Git Stash, Cherry-Picking, and Handling Conflicts – Advanced Git Techniques for DevOps
 Payal Saindane
Welcome to Day 11 of our DevOps journey, where we delve into the finer aspects of version control and collaboration using Git. In this blog, we'll uncover the art of stashing, cherry-picking, and gracefully handling conflicts – three powerful techniques that can save the day for any DevOps engineer.
Git Stash
Git stash is like a handy tool that lets you put aside your work temporarily. You can use it when you're not ready to commit your changes yet. This is super helpful when you want to switch to a different task or branch or just want to keep your work safe without officially saving it. It's like a "pause" button for your work in Git.
Here's how it works:
Stash Your Changes: You can use
git stashto stash your changes. This command takes a snapshot of your working directory, including any modified files and untracked files.Working Directory Clean: After stashing, your working directory becomes clean, meaning it's in the same state as your last commit.
Switch Branches: You can now easily switch to a different branch without worrying about carrying your uncommitted changes with you.
Apply or Pop Stash: When you return to the original branch or task, you can either apply the stashed changes or pop them from the stash.
git stash apply: This command applies the most recent stash and keeps it in the stash for later use.git stash pop: This command applies the most recent stash and removes it from the stash.
Multiple Stashes: You can stash changes multiple times, and Git keeps track of each stash as a separate entry. You can choose which stash to apply or pop.
Resolve Conflicts: If there are conflicts when applying a stash, Git will prompt you to resolve them just like in a regular merge.
List Stashes: You can use
git stash listto see a list of your stashes, and each stash is assigned a unique name or index.Clear Stashes: When you no longer need a stash, you can use
git stash dropfollowed by the stash name or index to remove it.
Git Cherry-pick
Cherry-picking in Git is like selecting specific commits from one branch and applying them to another branch. It's a way to choose individual changes and add them to a different branch. Here's how it works:
Identify Commits: First, you need to identify the specific commits you want to pick from one branch and add to another.
Cherry Pick: Using the "git cherry-pick" command, you can apply the changes from those selected commits to your current branch.
Apply One Commit: Each cherry-pick operation applies one commit at a time, allowing you to pick and choose which changes you want to move.
Resolving conflicts in Git
In Git, conflicts occur when there are conflicting changes in the same part of a file between different branches or commits. Here's how conflicts happen and how to deal with them:
Multiple Branches or Commits: Conflicts typically arise when two or more branches or commits modify the same lines of code within a file.
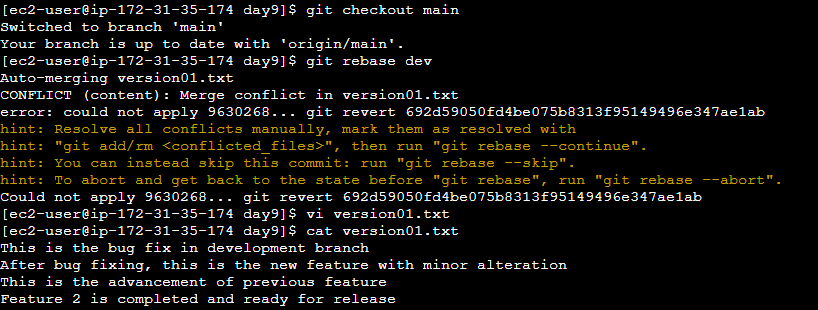
Merge or Rebase: Conflicts commonly happen during operations like merging or rebasing. These operations aim to combine changes from different branches into one, and conflicts occur when Git can't automatically determine which changes to keep.
Conflict Markers: When a conflict occurs, Git marks the conflicting lines in the affected file with special conflict markers. These markers indicate the areas of conflict and look like this:
<<<<<<< HEAD //
Your changes
=======
// Other changes
>>>>>>>The
<<<<<<< HEADmarker shows the changes in the current branch, while the>>>>>>>marker displays the changes in the other branch. The=======line separates the conflicting changes.Resolution: To resolve conflicts, you need to manually edit the file to choose which changes to keep, modify, or discard. After editing, you remove the conflict markers.
Committing: Once you've resolved all conflicts in the file, you need to commit the changes to complete the merge or rebase. The commit will have a message indicating the conflict resolution.
Testing: After resolving conflicts, it's essential to test your code thoroughly to ensure it functions as expected. Conflicts might introduce new issues, so testing is crucial.
Push or Continue: Depending on the situation, you may need to push the changes to the remote repository to share them with your team or you can continue the operation after resolving conflicts.
Let's learn the above techniques through some real-time examples.
Task 1:
Create a new branch and make some changes to it.

Use git stash to save the changes without committing them.
Switch to a different branch, make some changes and commit them.

Use git stash pop to bring the changes back and apply them on top of the new commits.

Task 2:
In
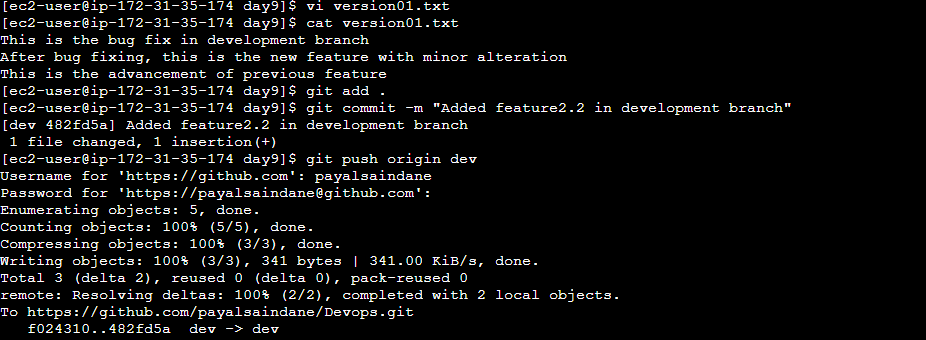
version01.txtof the development branch add the below lines after “This is the bug fix in development branch” that you added in Day10 and reverted to this commit.

Line2>> After bug fixing, this is the new feature with minor alteration”
Commit this with a message “ Added feature2.1 in development branch”

Line3>> This is the advancement of previous feature
Commit this with a message “ Added feature2.2 in development branch”

Line4>> Feature 2 is completed and ready for release
Commit this with a message “ Feature2 completed”

All these commit messages should be reflected in the Production branch too which will come out from the Master branch (Hint: try rebase).


Task 3:
In the Production branch Cherry pick Commit “Added feature2.2 in development branch” and added the below lines in it.
Line to be added after Line3>> This is the advancement of previous feature
Line4>>Added few more changes to make it more optimized.
Commit: Optimized the feature


Thank you!
Subscribe to my newsletter
Read articles from Payal Saindane directly inside your inbox. Subscribe to the newsletter, and don't miss out.
Written by

Payal Saindane
Payal Saindane
👨💻 Software Engineer on 🛠️ DevOps Journey | ☁️ AWS Cloud Explorer