Boosting Productivity: Connect React Forms to Google Sheets for Streamlined Data Handling
 Afolabi Abdullahi

Optimizing processes and data management is a primary goal in the ever-changing landscape of web development. Utilizing the capabilities of Google Sheets to speed form data handling can be a game changer for ReactJS developers. This post will walk you through the process of connecting your React forms to Google Sheets including insights to help you be more productive. Let's get started on supercharging your React projects!
Introduction
Forms are essential for web development, as they enable user interaction and data collection. They allow users and applications to exchange input, feedback, and communication. They are used for various purposes, such as signing up, giving feedback, or buying online.
As a React Developer, if you are the type that developed websites where none of the components required a server or database for just a few forms, you can try this method out to save your form inputs directly to Google Sheets.
Prerequisites
Before we go into the fascinating world of the React-Google Sheets connection, there are a few prerequisites you should be aware of. What you'll need is the following:
Basic Knowledge of React.
Google account.
Connecting React Form and Google Sheet
Create a simple React form
The foundation of our data management journey is your React project. If you have an existing React project that you'd like to enhance with Google Sheets integration, you can use that. Otherwise, follow these steps to set up a new React project:
import React from 'react'

const SimpleForm= () => {
  return (
     <form>
         <input name='Name' type='name' placeholder='Your Name' required />
         <input name='Email' type='email' placeholder='Email' required />
         <input name='Number' type='tel' placeholder='Phone Number' required />

         <input type='submit' value='submit' />
     </form>
  )
}

export default SimpleForm
Set up a Google Sheet
To get started, you need a Google Sheet, which you can create via sheet.new.
Step 1:
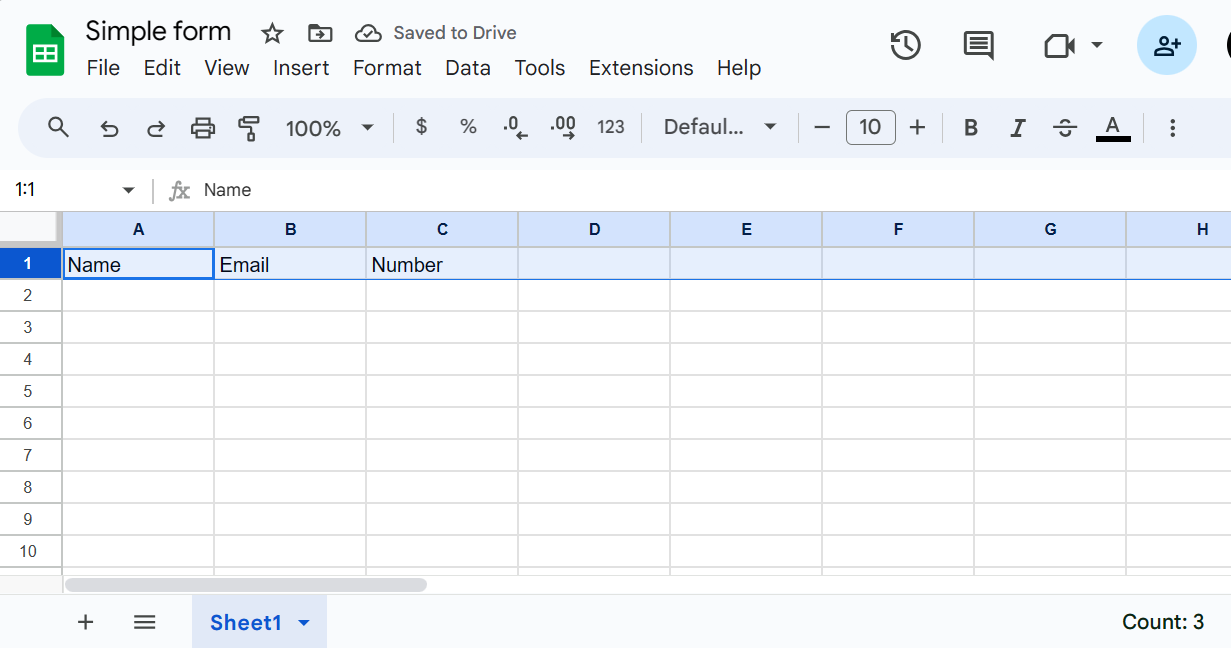
On your sheet, fill the first row according to your "name" tag for your form fields. In our form, we have three name tags: name, email, and number.
Step 2:
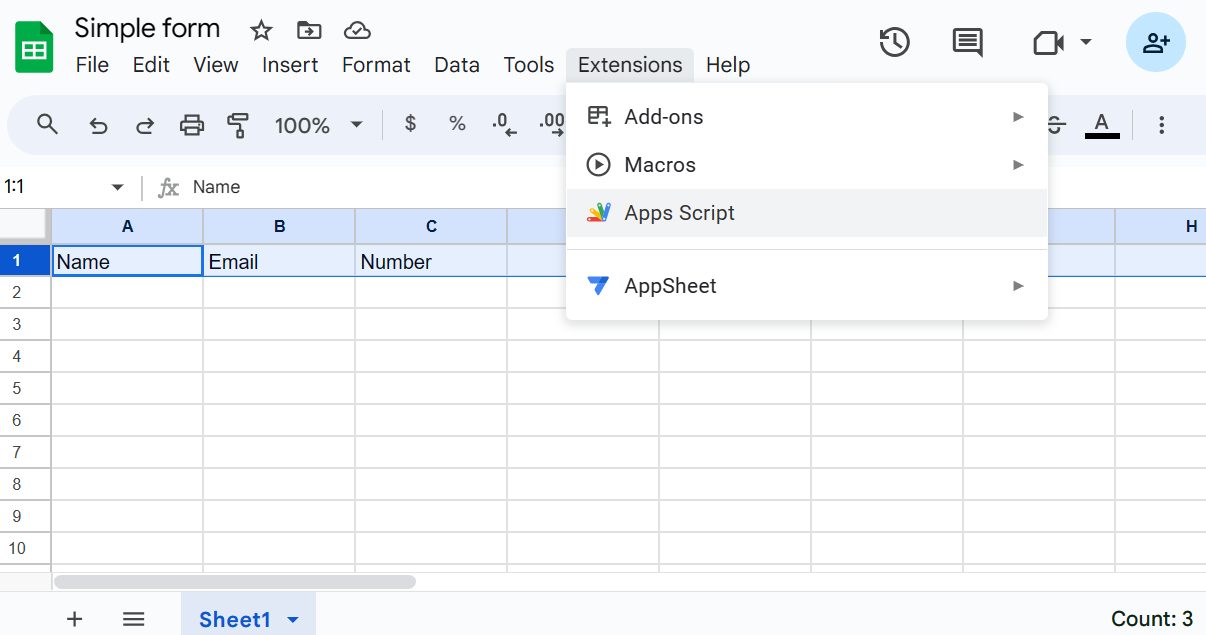
Hover over "Extensions" on the menu bar and click on Apps Script.
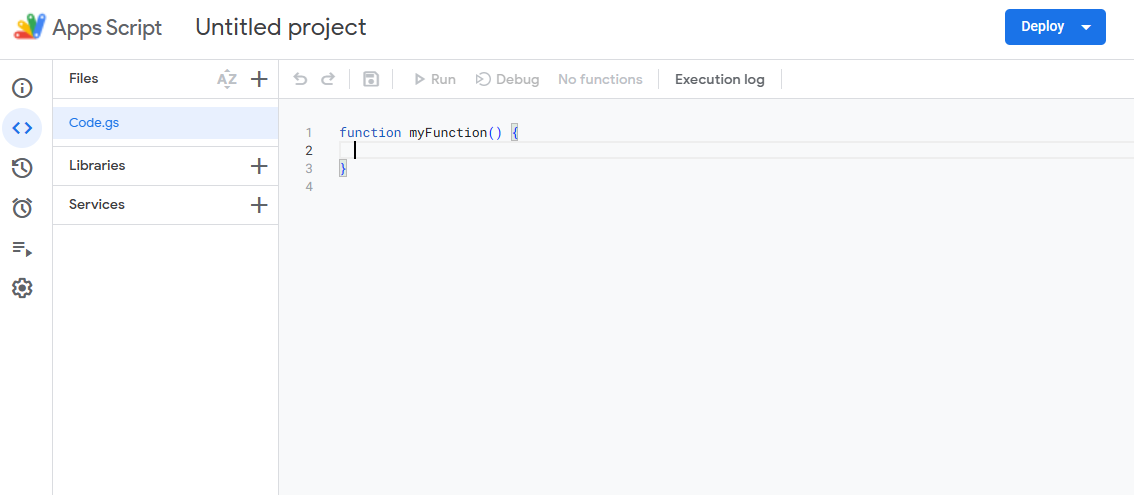
This will present you with the script page for your current Google Sheet.
Step 3:
On the Apps Script page, name the project and clear the default code. After that, paste the below code into your Code.gs
const sheets = SpreadsheetApp.openByUrl("google sheet link");
 //if you have changed your sheet name then replace the below Sheet1 with your sheet name
const sheet = sheets.getSheetByName("Sheet name");
function doPost(e){
  let data = e.parameter;
  sheet.appendRow([data.Name,data.Email,data.Number]);
  return ContentService.createTextOutput("your message");
}
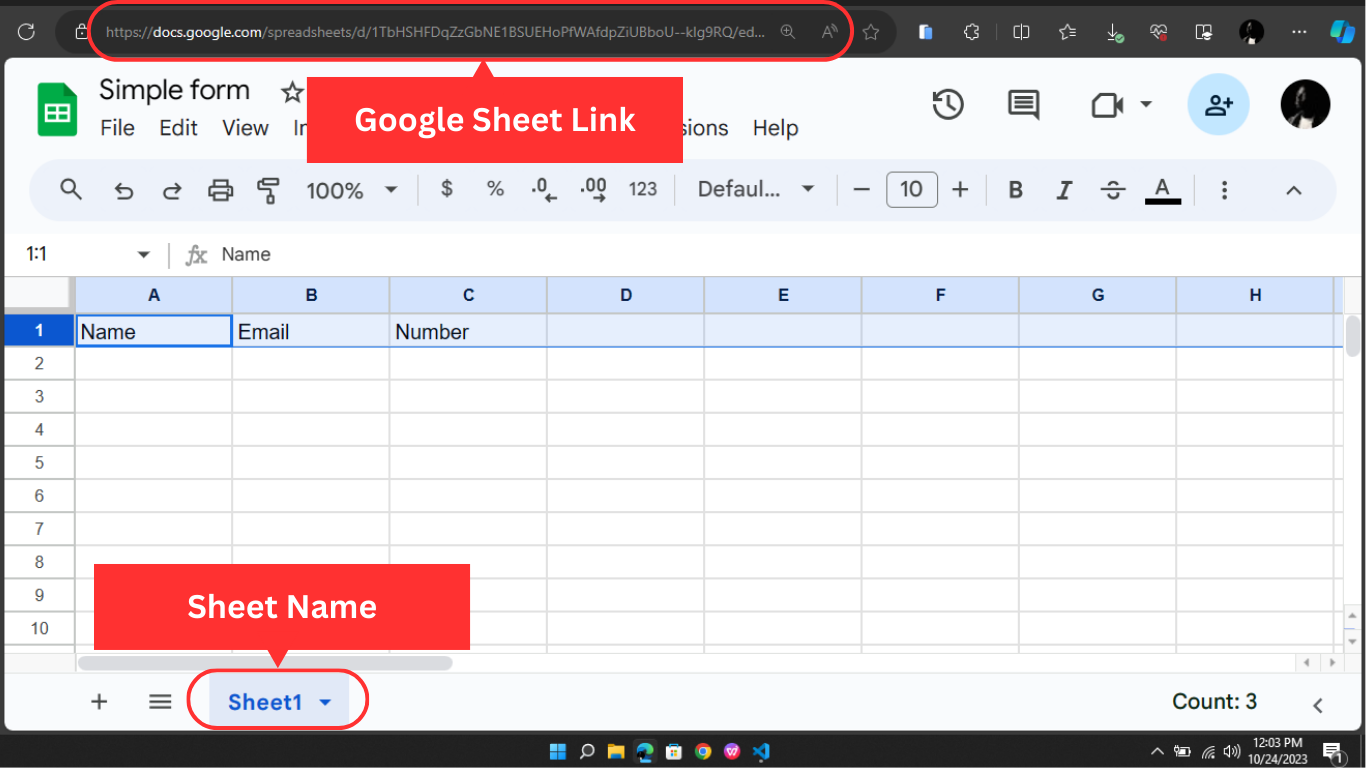
In the above code, you need to change some values, such as the Google Sheet link, the sheet name, and your message as explained below:
The Google Sheet link is the URL for your Google Sheet in the address bar.
Sheet Name is the name of the sheet you are using for the data.
Your message is the information you want the users to see after submitting the form.
The "sheet.appendRow([...])" will be edited also. Each data targets the name tag from our form. If there are more than three fields, new data will be added with the name of the field (data.Field) and also, and the name will be added to the Google Sheet
Step 4:
When everything in the previous step has been satisfied, now we need to deploy our script.
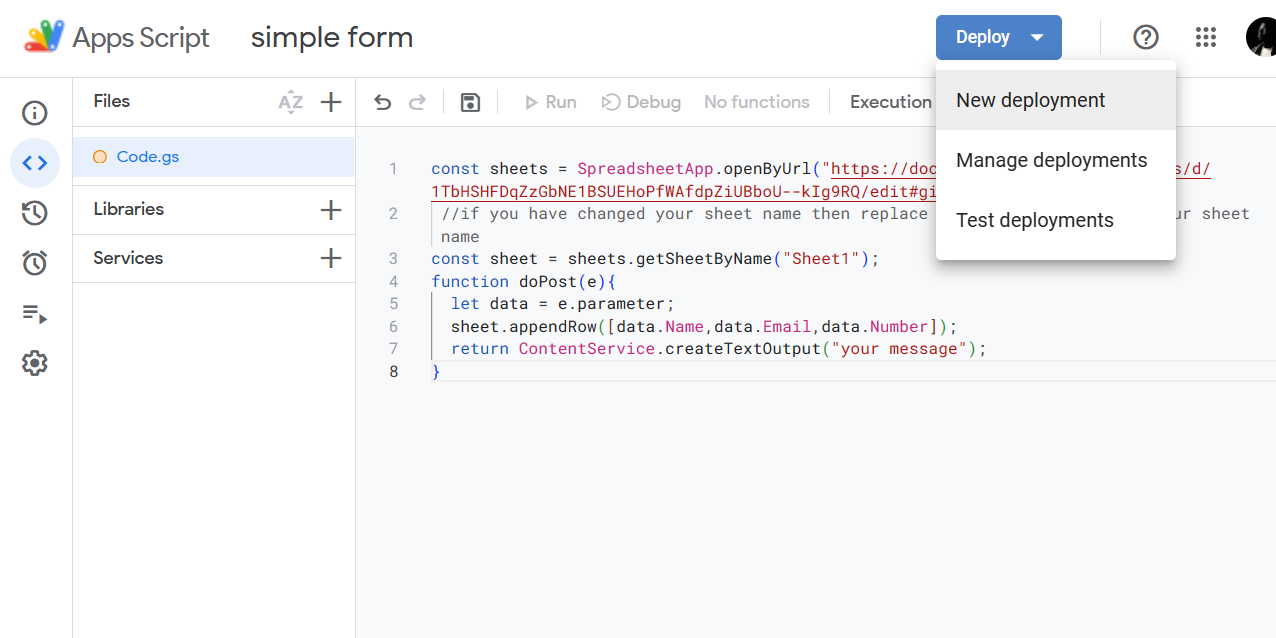
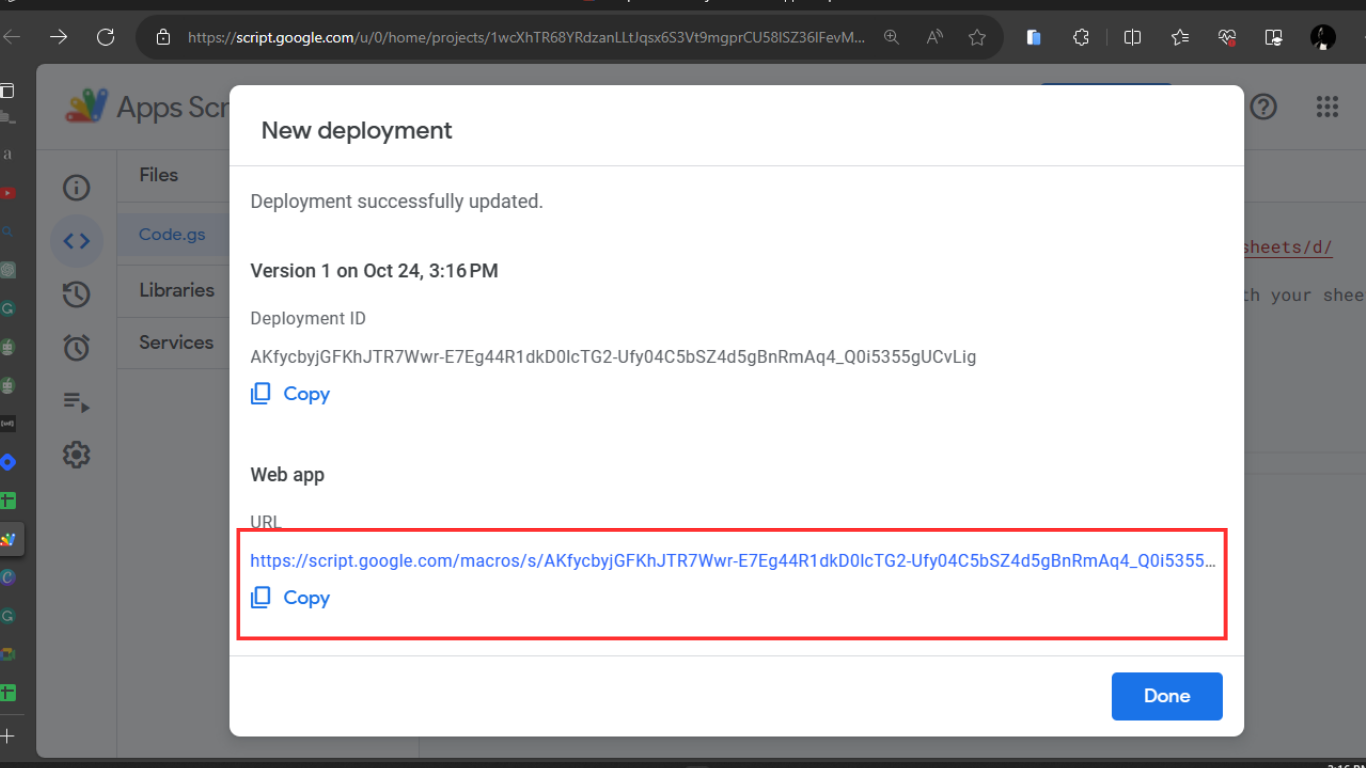
Click on the deploy button > New Deployment
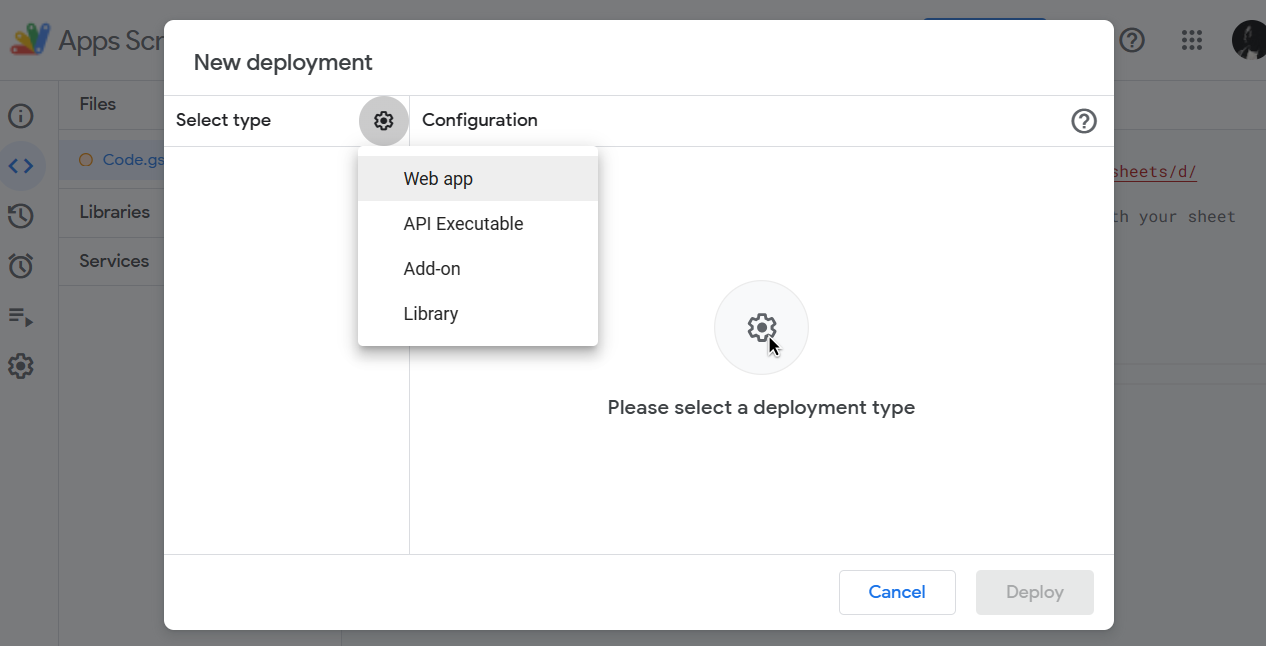
Click on select type > Web app
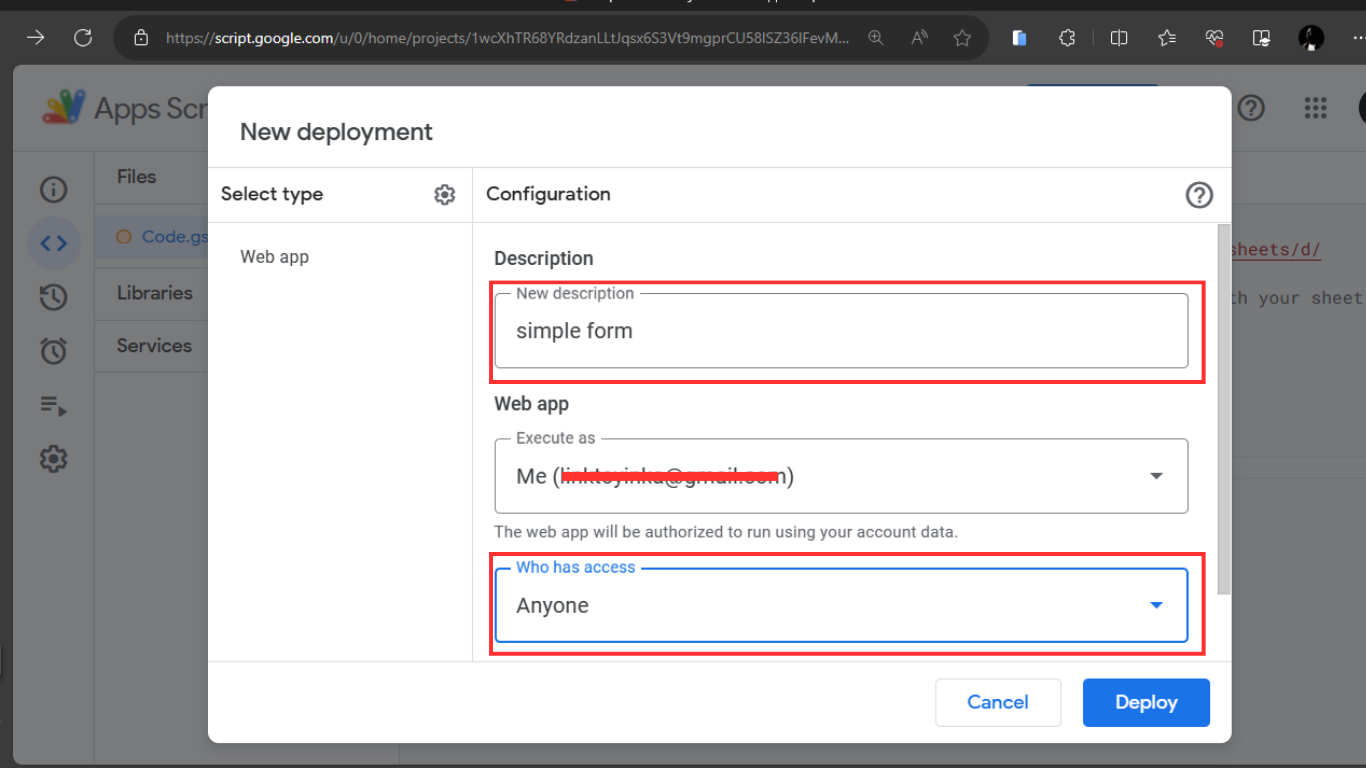
Add a description and set the access to anyone. Then, deploy
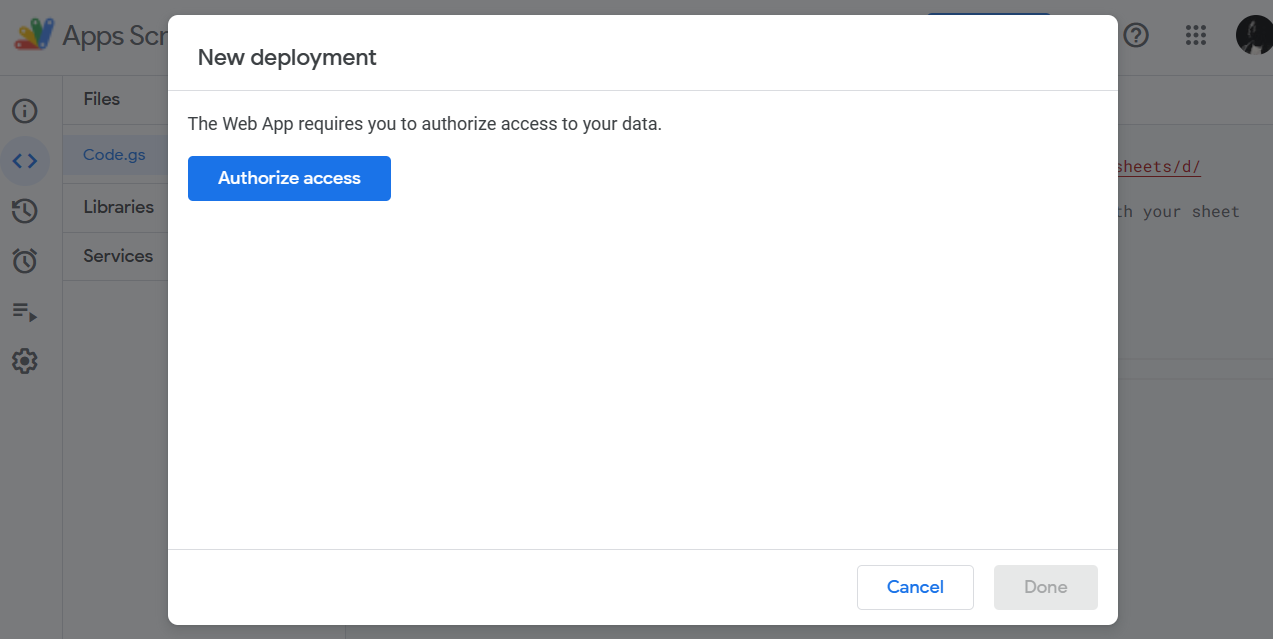
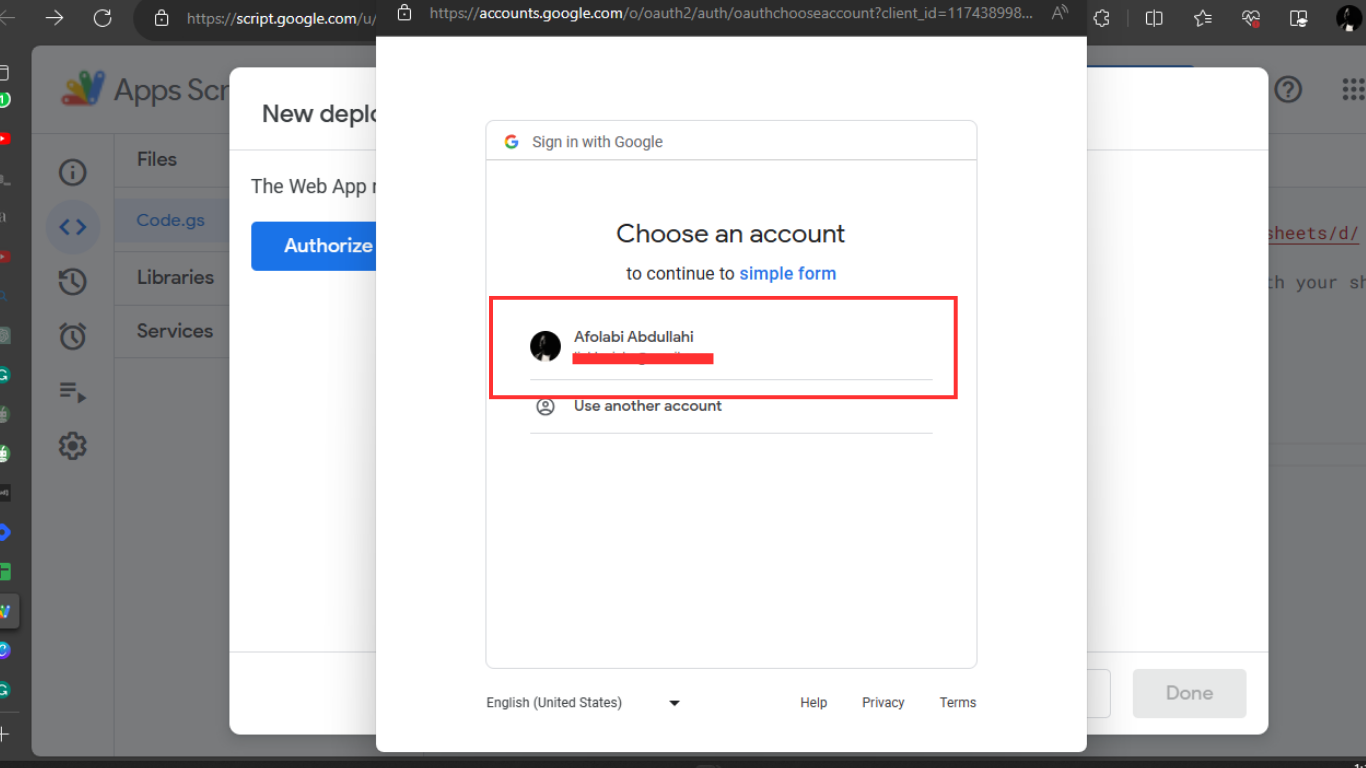
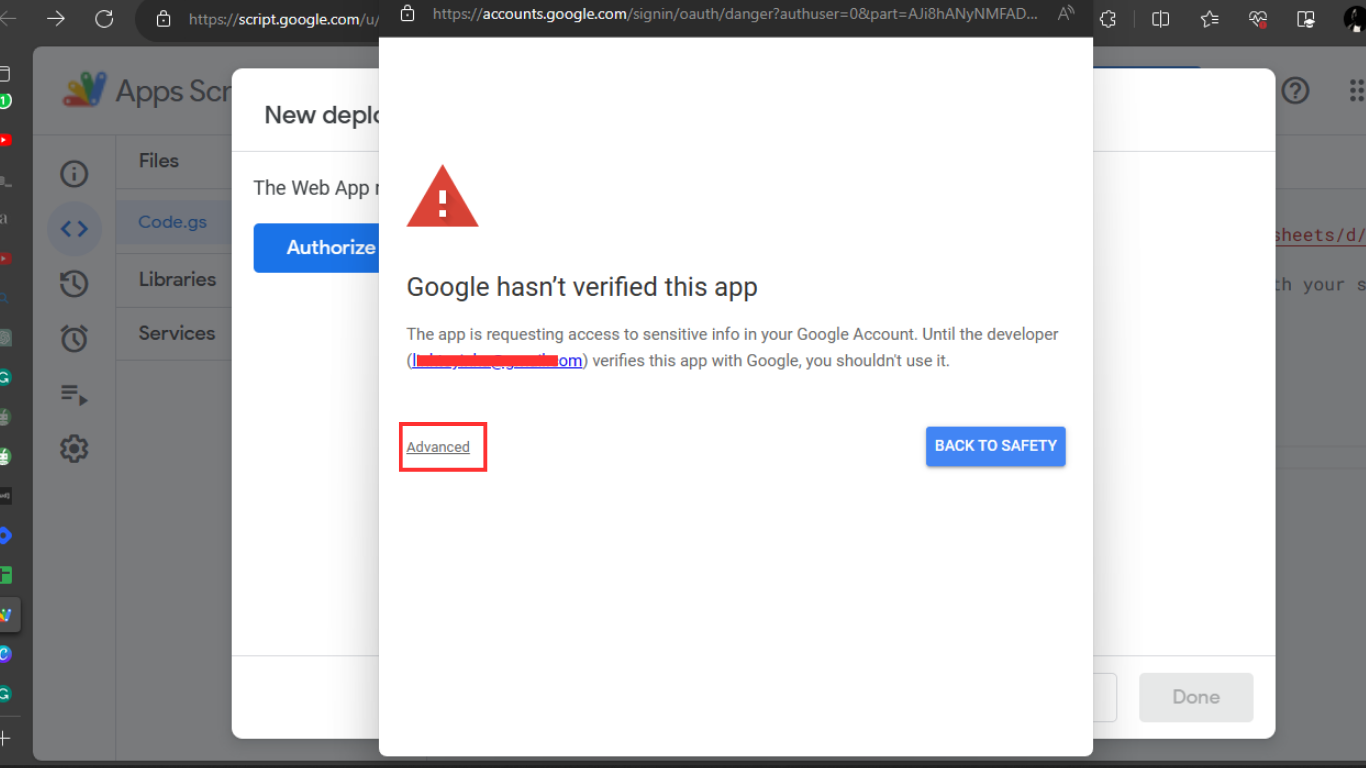
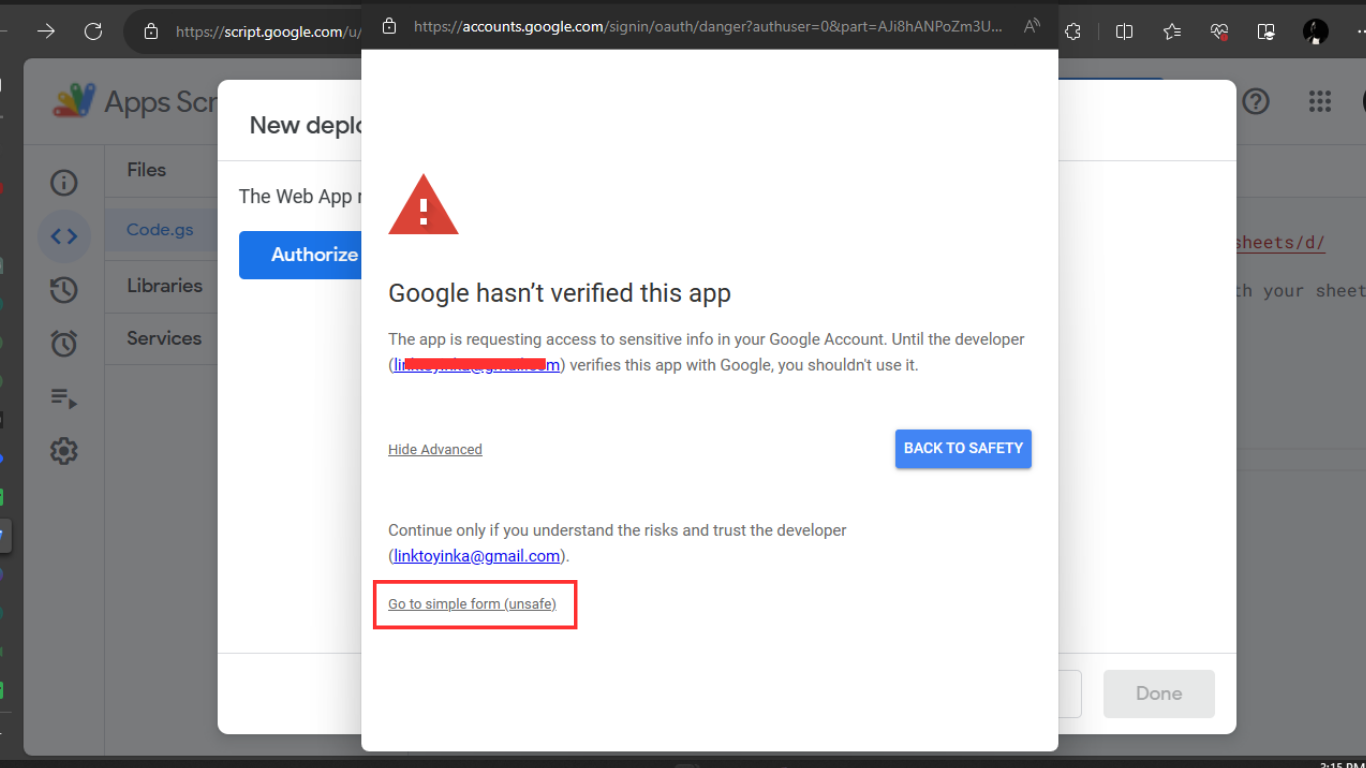
You will be prompted to authorize the application. Grant the authorization to the web app so it can work.
Select your account
Click on the "Advanced" to authorize the web app
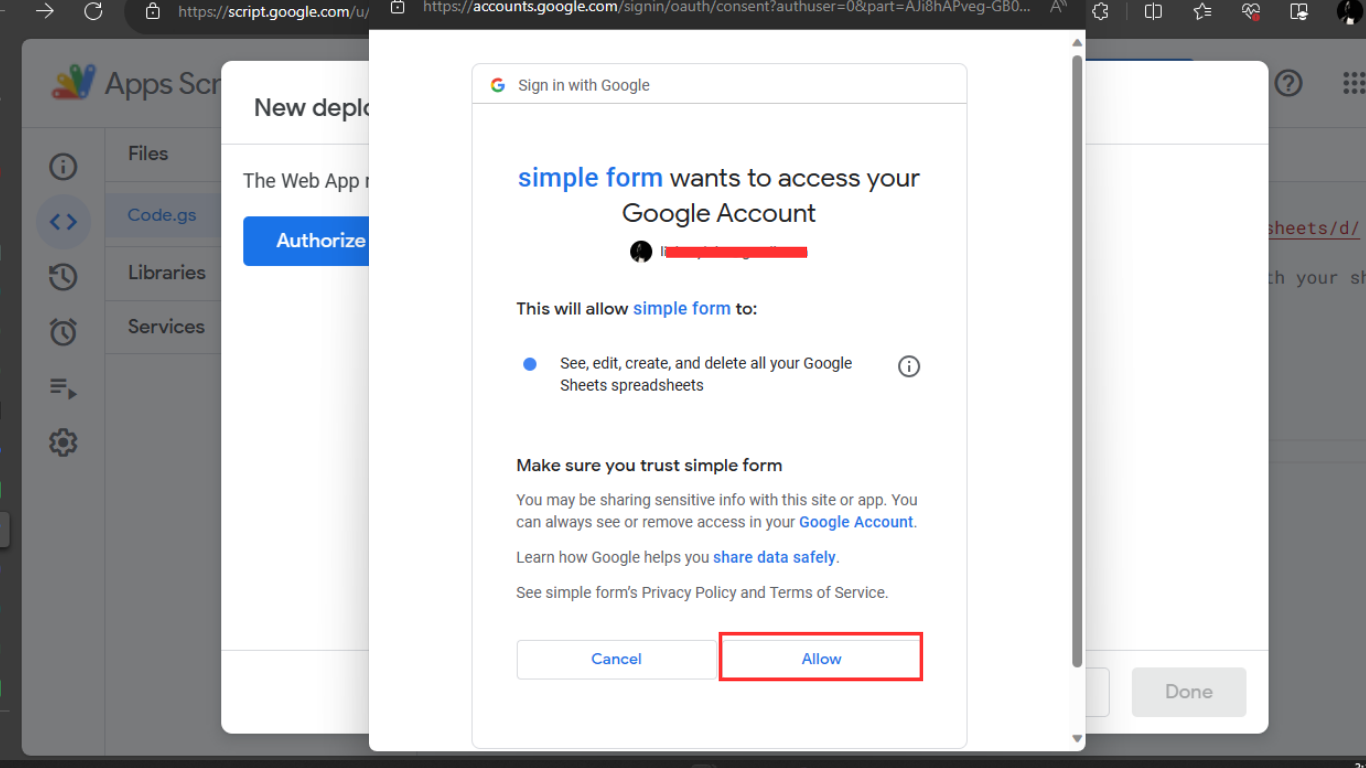
Copy and keep the web app URL safe
Step 5:
Go back to our React form, where we will be adding the code below.
Here, we will replace "your web app URL" with the URL we got from the Apps Script above.
function Submit(e) {
    e.preventDefault();
    const formEle = document.querySelector("form");
    const formDatab = new FormData(formEle);
    fetch(
      "your web app url",
      {
        method: "POST",
        body: formDatab
      }
    )
        // This is to get your message from the App script
        .then((response) => response.text())
        .then((data) => {
        // This is to alert your message from the App script to the user
        alert(data);
      })

      .catch((error) => {
        console.log(error);
      });

      // This is to reload the page when the form is submitted
      setTimeout(() => {
        window.location.reload();
      }, 4000);
  }
Our new react code for the simple form will be as below
import React from 'react'

const SimpleForm= () => {


function Submit(e) {
    e.preventDefault();
    const formEle = document.querySelector("form");
    const formDatab = new FormData(formEle);
    fetch(
      "https://script.google.com/macros/s/AKfycbyjGFKhJTR7Wwr-E7Eg44R1dkD0lcTG2-Ufy04C5bSZ4d5gBnRmAq4_Q0i5355gUCvLig/exec",
      {
        method: "POST",
        body: formDatab
      }
    )
        .then((response) => response.text())
        .then((data) => {
        alert(data);
      })

      .catch((error) => {
        console.log(error);
      });

      setTimeout(() => {
        window.location.reload();
      }, 4000);
  }


  return (
     <form className='form'>
         <input name='Name' type='name' placeholder='Your Name' required />
         <input name='Email' type='email' placeholder='Email' required />
         <input name='Number' type='tel' placeholder='Phone Number' required />

         <input type='submit' value='submit' />
     </form>
  )
}

export default SimpleForm
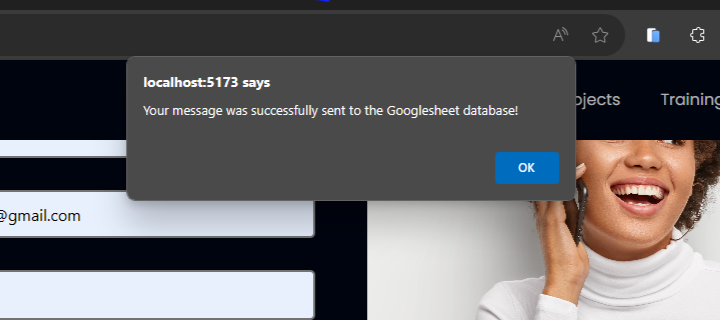
After the completion of step 5, your React project is ready. You can test the form on your localhost server.
When the form is submitted, your message will be alerted to the user, as shown below.
Conclusion
In our exploration of connecting React forms to Google Sheets, we've unveiled a powerful way to boost productivity and streamline data handling. This integration serves as a valuable asset for React developers, transforming Google Sheets from a traditional spreadsheet tool into a dynamic data repository.
By adopting this method, developers can not only collect and store data efficiently but also tap into the collaborative capabilities and accessibility offered by Google Sheets.
Reference
Subscribe to my newsletter
Read articles from Afolabi Abdullahi directly inside your inbox. Subscribe to the newsletter, and don't miss out.
Written by

Afolabi Abdullahi
Afolabi Abdullahi
I am a Frontend Developer who's more than just code. I bring technical prowess, clear communication through technical writing, and marketing finesse to every project. Fluent in HTML, CSS, and JavaScript, I turn design into seamless user experiences. I craft user-friendly documentation, compelling content, and persuasive marketing strategies. I thrive in collaborative, fast-paced environments and stay ahead of tech trends. Passionate about creating impactful digital experiences, I'm your go-to for innovation in front-end development.