Search Your AWS Glue Data Catalog Tables with Text
 Anish Machamasi
Table of contents
- Prerequisites:
- Workflow:
- Creating S3 bucket and AWS Glue Crawler
- Import Necessary packages and files
- AWS Configuration and Variable Initialization
- Setting up AWS Glue Client and Amazon Bedrock LangChain Clients
- VectorDB Selection and Glue Data Catalog Connection Status Display
- Retrieving AWS Glue Data Catalog Information: Databases and Tables
- Handling FAISS Vector Store: Load or Create
- User Input Form Rendering for Text-to-SQL Search
- Similarity Search and Result Display for Text-to-SQL Tables
- Generating SQL Queries from User Input and Displaying Results
- Executing SQL Query in AWS Athena and Displaying Results in Streamlit
- DEMO:

AWS Glue Data Catalog is a central metadata repository that provides a unified view of data across diverse data stores. It makes it easy to discover, understand, and manage data.
One of the challenges of working with large datasets is finding the right tables to query. With traditional methods, you need to have a good understanding of the data schema and table names. This can be time-consuming and error-prone, especially if you are working with a new dataset.
A text-based search capability for Glue Data Catalog tables can make it much easier to find the right tables to query. You can simply enter a keyword or phrase related to the data you are looking for, and the search engine will return a list of relevant tables.
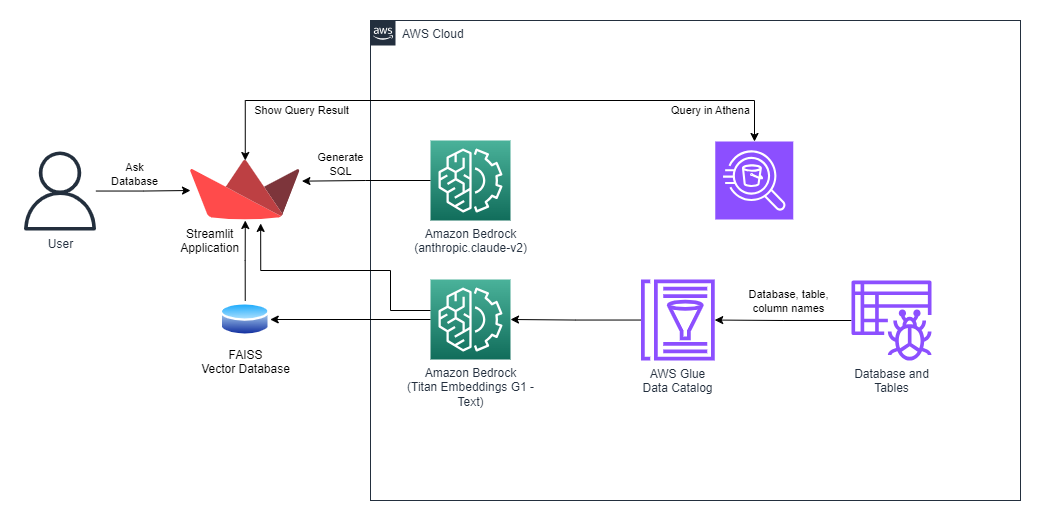
This blog post will describe a text-based search architecture for Glue Data Catalog tables that is built using AWS services. The architecture is shown in the following diagram:
The architecture works as follows:
The user initiates the application, triggering the indexing of crucial information such as database name, table name, and column name into the FAISS vector database.
Subsequently, the user inputs a textual query within a Streamlit app.
The query and the vector database are then dispatched to Bedrock LLM (Language Model).
Bedrock LLM processes the input and generates an SQL query as a response.
The SQL query is forwarded to Athena, which commences the execution of the query and subsequently transmits the necessary query results back to the user.
Finally, the query results are presented within the Streamlit app interface.
Note: In this project, we utilize a local vector database, FAISS. However, it's worth mentioning that AWS OpenSearch Service can also be employed to store this information.
Prerequisites:
AWS Account:
You need to have an AWS Account to run this code. If you have an AWS account, you should have AWS CLI configured in your system. In case you do not configure the CLI, you can manually set your Access Key and Secret Access Key in the code.
Region
This code should run in the region where
Your Glue Data Catalog is hosted.
Amazon Bedrock service is available.
Python Version
This code is tested on Anaconda Environment with Python 3.11.5.
Installation
Install required dependencies by following the command:
pip install -r requirements.txt
Usage
Run the Streamlit app using the following command:
streamlit run app.py
Workflow:
Creating S3 bucket and AWS Glue Crawler
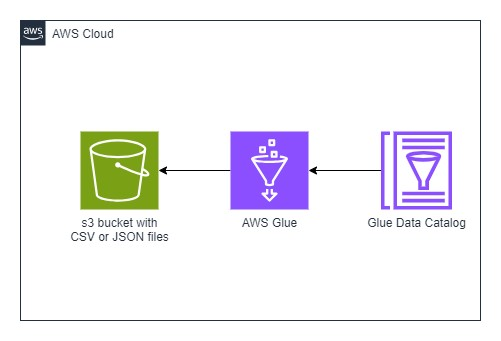
Before you begin, make sure you have an S3 bucket with CSV or JSON files in it. Then, create an AWS Glue Crawler to scan that S3 bucket for data. After the crawler does its work, you'll have one or more databases with tables inside them.

Import Necessary packages and files
import streamlit as st
import boto3
import time
import config
import langchain
from requests_aws4auth import AWS4Auth
from opensearchpy import OpenSearch, RequestsHttpConnection
from langchain.embeddings import BedrockEmbeddings
from langchain.llms.bedrock import Bedrock
from langchain.vectorstores import FAISS
from langchain.vectorstores import OpenSearchVectorSearch
from langchain.docstore.document import Document
from langchain.prompts import PromptTemplate
from langchain.chains import RetrievalQA

from utils.get_tables import get_tables
from utils.dict_to_multiline import dict_to_multiline_string
from utils.render_form import render_form
from utils.search_table import search_tables
from utils.generate_sql import generate_sql
from utils.get_athena_result import get_athena_result

import pandas as pd
AWS Configuration and Variable Initialization
if __name__ == "__main__":

    # Page configuration
    st.set_page_config(
        page_title='Text-to-SQL using AWS',
        page_icon=':space_invader:',
        initial_sidebar_state='collapsed')
    st.title(':violet[Text-to-SQL] using AWS :space_invader:')

    # Variables
    langchain.verbose = True
    session = boto3.session.Session()
    region = config._global['region']
    credentials = session.get_credentials()
    http_auth = AWS4Auth(
        credentials.access_key,
        credentials.secret_key,
        region,
        service,
        session_token=credentials.token)
The above code sets the appearance of the web page. It sets the page title, page icon etc. The script initializes an AWS session using the boto3 library. It extracts the AWS region from a configuration file. AWS credentials are retrieved using the session.get_credentials() method. An AWS4Auth object is created, which appears to be used for AWS authentication. It takes in the AWS access key, secret key, region, service, and session token.
Setting up AWS Glue Client and Amazon Bedrock LangChain Clients
    glue_client = boto3.client('glue', region_name=region)

    # Amazon Bedrock LangChain clients
    bedrock_llm = Bedrock(
        model_id="anthropic.claude-v2",
        model_kwargs={
            'max_tokens_to_sample': 3000})
    bedrock_embeddings = BedrockEmbeddings(model_id="amazon.titan-embed-text-v1")
This part of the code sets up an AWS Glue client, which is likely to be used for interacting with AWS Glue services, and initializes Amazon Bedrock LangChain clients, which are probably used for natural language processing tasks, including text generation and text embedding.
VectorDB Selection and Glue Data Catalog Connection Status Display
# VectorDB type

    vectorDB = st.selectbox(
        "VectorDB",
        ("FAISS (local)", "OpenSearch (Persistent)"),
        index=0
    )

    if vectorDB == "FAISS (local)":
        st.markdown("<br>", unsafe_allow_html=True)
        with st.status("Connecting to Glue Data Catalog :man_dancing:"):
This part of the code allows the user to choose a VectorDB type (either "FAISS (local)" or "OpenSearch (Persistent)" with the default set to "FAISS (local"). If "FAISS (local)" is chosen, it provides a visual separation and displays a status message indicating that the script is connecting to the AWS Glue Data Catalog.
Retrieving AWS Glue Data Catalog Information: Databases and Tables
catalog, num_db, num_tables = get_tables(glue_client)
# Function to get all tables from Glue Data Catalog
def get_tables(glue_client):
    # get all AWS Glue databases
    databases = glue_client.get_databases()

    tables = []

    num_db = len(databases['DatabaseList'])

    for db in databases['DatabaseList']:
        tables = tables + glue_client.get_tables(DatabaseName=db['Name'])["TableList"]

    num_tables = len(tables)

    return tables, num_db, num_tables
The code calls a function named get_tables with an AWS Glue client and assigns the returned values to variables. The get_tables function fetches data about databases and tables from the Glue Data Catalog, calculates the number of databases and tables, and returns this information in a structured manner.
Handling FAISS Vector Store: Load or Create
try:
                vectorstore_faiss = FAISS.load_local(
                    "faiss_index", bedrock_embeddings)
            except BaseException:
                docs = [
                    Document(
                        page_content=dict_to_multiline_string(x),
                        metadata={
                            "source": "local"}) for x in catalog]

                vectorstore_faiss = FAISS.from_documents(
                    docs,
                    bedrock_embeddings,
                )

                vectorstore_faiss.save_local("faiss_index")
This code tries to load a local FAISS vector store with a specific name ("faiss_index") associated with a model called "bedrock_embeddings." If loading fails (possibly because the vector store doesn't exist), it creates a new vector store using the "catalog" data, saves it locally with the same name, and stores it in the "vectorstore_faiss" variable.
User Input Form Rendering for Text-to-SQL Search
k, query = render_form(catalog, num_db, num_tables)
def render_form(catalog, num_db, num_tables):
    if (num_tables or num_db):
        st.markdown("<br>", unsafe_allow_html=True)
        st.write(
            "A total of ",
            num_tables,
            "tables and ",
            num_db,
            "databases were indexed")

    st.markdown("<br>", unsafe_allow_html=True)
    k = st.selectbox(
        'How many tables do you want to include in table search result?',
        (1, 2, 3, 4, 5, 6, 7, 8, 9, 10),
        index=2)

    st.markdown("<br>", unsafe_allow_html=True)
    query = st.text_area(
        'Prompt',
        "What is the total inventory per warehouse?")

    st.markdown("<br>", unsafe_allow_html=True)
    with st.sidebar:
        st.subheader(":violet[Data Catalog] :point_down:")
        st.write(catalog)

    return k, query
The render_form function is responsible for rendering a user input form in a Streamlit application. It allows the user to specify the number of tables to include in the search result, provide a query or prompt, and display information about the data catalog in the sidebar. The returned values k and query can be used in subsequent parts of the application to process the user's input.
Similarity Search and Result Display for Text-to-SQL Tables
        if st.button('Search relevant tables :dart:'):

            search_tables(vectorstore=vectorstore_faiss, k=k, query=query)
# Function to perform a similarity search
def search_tables(vectorstore, k, query):
    relevant_documents = vectorstore.similarity_search_with_score(query, k=k)
    for rel_doc in relevant_documents:
        st.write(rel_doc[0].page_content.split(" ")[0])
        st.write("Score: ", rel_doc[1])
        st.divider()
This code snippet sets up a search button that, when clicked, triggers a similarity search for relevant tables based on the user's query. The search_tables function performs the search and displays the results, including the initial word of the relevant documents and their similarity scores.
Generating SQL Queries from User Input and Displaying Results
sql_query = ""
        if st.button('Generate SQL :crystal_ball:'):
            sql_query = generate_sql(vectorstore=vectorstore_faiss, k=k, query=query, region=region)
def generate_sql(vectorstore, k, query, region):
    prompt_template = """
        \n\nHuman: Between <context></context> tags, you have a description of tables with their associated columns. Create a SQL query to answer the question between <question></question> tags only using the tables described between the <context></context> tags. If you cannot find the solution with the provided tables, say that you are unable to generate the SQL query.

    <context>
    {context}
    </context>

    Question: <question>{question}</question>

    # Rules
    1. Provide your answer using the following xml format: <result><sql>SQL query</sql><explanation>Explain clearly your approach, what the query does, and its syntax</explanation></result>
    Assistant:"""

    PROMPT = PromptTemplate(
        template=prompt_template, input_variables=["context", "question"]
    )

    qa = RetrievalQA.from_chain_type(
        llm=bedrock_llm,
        chain_type="stuff",
        retriever=vectorstore.as_retriever(),
        return_source_documents=True,
        chain_type_kwargs={"prompt": PROMPT},
        verbose=True
    )
    with st.status("Generating response :thinking_face:"):
        answer = qa({"query": query})

    # st.write(answer)

    with st.status("Searching tables :books:"):
        time.sleep(1)

    for i, rel_doc in enumerate(answer["source_documents"]):
        st.write(rel_doc.page_content.split(" ")[0])

    with st.status("Rendering response :fire:"):
        sql_query = answer["result"].split("<sql>")[1].split("</sql>")[0]
        explanation = answer["result"].split("<explanation>")[1].split("</explanation>")[0]

    st.code(sql_query, language='sql')
    st.link_button(
        "Athena console :sun_with_face:",
        "https://{0}.console.aws.amazon.com/athena/home?region={0}".format(region))

    st.write(explanation)

    return sql_query
This code allows the user to generate SQL queries based on their query or prompt. It uses a predefined template to structure the query and explains. The generated SQL query is then displayed along with an explanation, and the user is given a link to the Athena console for execution.
Executing SQL Query in AWS Athena and Displaying Results in Streamlit
if sql_query:
            print("Calling get_athena_result")
            print(sql_query)
            get_athena_result(sql_query)
def get_athena_result(sql_query):
    # Use regular expressions to extract the database name
    match = re.search(r'FROM\s+([\w_]+)\.\w+', sql_query)

    database_name=""
    if match:
        database_name = match.group(1)
        print(database_name)

        queryStart = athena_client.start_query_execution(
            QueryString = sql_query,
            QueryExecutionContext = {
                'Database': database_name
            },
            ResultConfiguration = { 'OutputLocation': 's3://layer-bucket-test-anish/'}
        )

        query_execution_id = queryStart['QueryExecutionId']

        time.sleep(7)

        # Streamlit app
        st.title("Athena Query Results")

        # Display a loading spinner
        with st.spinner("Running Athena Query..."):

            result = athena_client.get_query_results(QueryExecutionId=query_execution_id)

            column_names = [col['Label'] for col in result['ResultSet']['ResultSetMetadata']['ColumnInfo']]
            data_rows = [list(row['VarCharValue'] for row in row['Data']) for row in result['ResultSet']['Rows'][1:]]

            # Create a Pandas DataFrame for better formatting
            data = pd.DataFrame(data_rows, columns=column_names)

            # Display the table
            st.table(data)
This code snippet executes an SQL query in AWS Athena, retrieves the query results, and displays them within the Streamlit application. It also extracts the database name from the SQL query and uses it for Athena query execution. This enables users to see the results of their SQL query within the application, providing a user-friendly interface for interacting with the data stored in AWS Athena.
DEMO:
You can see the demo in the GitHub Repository: link
Subscribe to my newsletter
Read articles from Anish Machamasi directly inside your inbox. Subscribe to the newsletter, and don't miss out.
Written by
