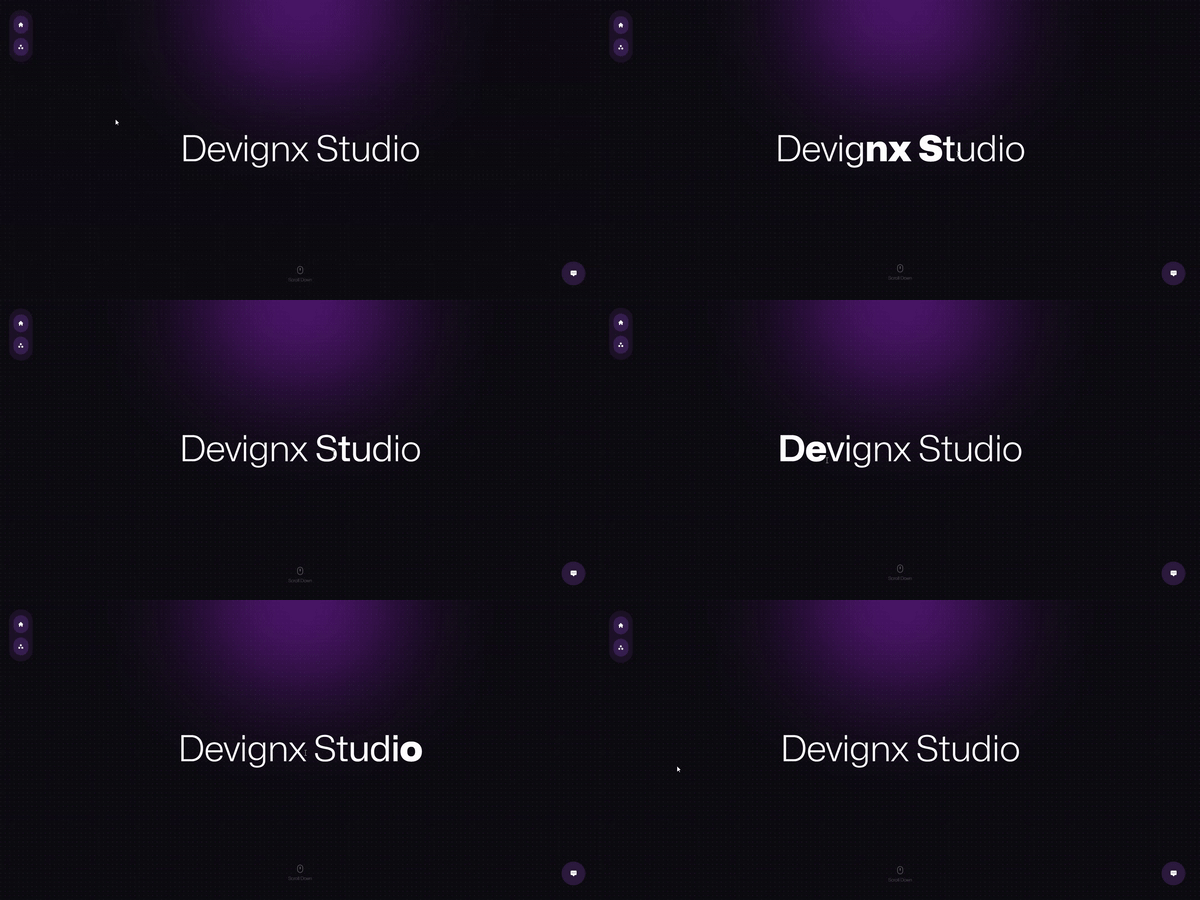
Creating a hover triggered text weight animation in Next Js / React - with source code
 Hari Prasad Designer
We will be creating a NextJs component that receives a string as a prop & animates it, Code below 👇
Note: Use Variable fonts to get seamless animation. Mona Sans is used for this example
As a bonus, We will be using Framer motion & Tailwind CSS to trigger a letter-by-letter slide-in animation
Animated Text Component Structure
Letters Reference: The
lettersRefis created using theuseRefhook to store references to the individual letter elements in the text.Mouse Interaction Effect: An
useEffecthook is used to set up a mouse movement interaction effect. It listens for mouse movements to change the font properties of each letter based on their proximity to the mouse cursor.The
handleMouseMovefunction calculates the proximity of each letter to the mouse and modifies font properties such asfontWeightandfontVariationSettingsaccordingly.The effect adds a
mousemoveevent listener to trigger the interaction and remove it when the component unmounts.
Rendering Animated Text: The component renders the animated text.
We split the input
textinto an array of individual letters and maps over them.Each letter is wrapped in a
motion.h1element, making use of Framer Motion for animation.The animation includes initial opacity and y-position, and a delay is applied to each letter for a staggered entrance effect.
The
exittransition is defined to control how the letters disappear while it gets unmounted
Export: The
AnimatedTextcomponent is exported for use in other parts of the application.
    "use client";  // NextJs will need this, React users feel free to  remove this

    import React, { useRef, useEffect } from "react";
    import { motion, AnimatePresence} from "framer-motion";

    const AnimatedText = ({ text }) => {
        const lettersRef = useRef([]);  // Create a reference for the letters

        useEffect(() => {
            // This effect sets up mouse movement interaction for the letters.
            const handleMouseMove = (e) => {
                // Handle mouse movement to change font properties based on proximity to the mouse.
                lettersRef.current.forEach((letter, index) => {
                    if (letter) {
                        const rect = letter.getBoundingClientRect();
                        const dx = e.clientX - (rect.left + rect.width / 2);
                        const dy = e.clientY - (rect.top + rect.height / 2);
                        const distance = Math.sqrt(dx * dx + dy * dy);
                        const maxDistance = 150;  // Maximum distance for interaction (feel free adjust this).
                        const proximity = Math.max(0, maxDistance - distance) / maxDistance;

                        // Modify the font properties based on proximity to the mouse.
                        letter.style.fontWeight = `${300 + proximity * 1000}`;
                        letter.style.fontVariationSettings = `"wdth" ${20 * proximity + 100}`;
                    }
                });
            };

            // Add a mousemove event listener to trigger the interaction.
            window.addEventListener("mousemove", handleMouseMove);

            // Clean up the event listener when the component unmounts.
            return () => {
                window.removeEventListener("mousemove", handleMouseMove);
            };
        }, []);

        return (
            <AnimatePresence mode='wait'>
                {text.split("").map((letter, index) => (
                    <motion.h1
                        key={index}
                        initial={{ opacity: 0, y: 30 }}
                        animate={{
                            opacity: 1,
                            y: 0,
                            transition: { duration: 0.8, delay: index * 0.1 }, {/*creating a staggered slide-in effect*/}
                        }}
                        exit={{ opacity: 0 }}
                        transition={{ duration: 0.3 }}
                        className="inline-block transition-all duration-100 delay-[-30ms] whitespace-nowrap"
                        ref={(el) => (lettersRef.current[index] = el)}
                    >
                        {letter}
                    </motion.h1>
                ))}
            </AnimatePresence>
        );
    };

    export default AnimatedText;
Usage
import AnimatedText from '../path-to-the-component'
const App = () => {
    return(
        <main>
            <AnimatedText text={'Devignx Studio'}/>
        </main>
    )
}
Thanks for visiting this blog, Feel free to reach me for creating Modern Interactive Web development projects, Visit my portfolio - Hariprasad and my Design agency
Subscribe to my newsletter
Read articles from Hari Prasad Designer directly inside your inbox. Subscribe to the newsletter, and don't miss out.
Written by

Hari Prasad Designer
Hari Prasad Designer
Artist, Designer & Developer