Use code first to connect database in .Net Core API
 Winson Yau
In the previous article, I have explained how to use VS Code to setup an ASP.NET Core development environment. Now, let's talking about how to build a database connection project! Here I have to say again that it is so comfortable to use VS CODE for development! :) OK, without further ado, let's do it!
1 Create the API project
1.1 Create Folder
Create a folder named Demo, then open it in VS Code (I usually drag the directory into VS Code) and create a folder named MyDemo.API . You can open MyDemo.API in VS Code, or drag it directly into VS CODE.
1.2 Create Solution
Click the vscode solution button on the left sidebar to open the solution panel, and then click Create New Solution to create a new solution called MyDemo.
1.3 Create Project
Right click on the solution file, select add new project, select asp.net core api, select c#, and then enter the project name, here we use MyDemo, and then you will be asked to enter the project folder name, as long as it is the same as the project The name is the same. After completion, a complete ASP.NET Core project will be created.
1.4 Run the Project
Click the Run and Debug button, it will auto create the related debug config files, click the Yes when you see the popup:
1.5 Startup the Swagger UI
By default, it will use the SSL url for startup the debug website, you need to use another Non SSL url and use the Swagger UI so that you can see the website page, for my below sample, it need to use
http://localhost:5171/Swagger
1.6 CORS Issue
After that, you may encounter the problem of CORS cross-site error as below
You can find more details{.blank} for CORS error. To fix this issue, we need to add the following code in the program.cs file.
//allow cross-origin access for the api
builder.Services.AddCors(o => o.AddPolicy("AllowCrosite", policy =>
{
    policy.AllowAnyHeader()
        .AllowAnyMethod()
        .SetIsOriginAllowed(origin => true) // allow any origin
        .AllowCredentials();
}));
and below code after create the app
app.UseCors("AllowCrosite");
1.7 Create other help Projects
Now that you have established a basic API website, the next step we need the data connection project for help to process ddata.
Here we first talk about the architecture of the API project. Because this example is intended to be clear and simple, so the project hierarchy will not be too complicated. We just need to create another project for CORE and UTILITY. Among them, the CORE project for the base data MODEL and related operation logic, while the UTILITY project is some general functional components. This structure is simple and clear, and it is also suitable for general small and medium-sized projects.
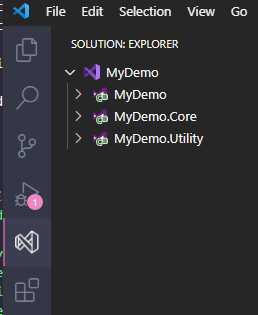
Since these two projects are only the class libraries, when using vscode solution to create, just select Class Library. At the same time, in order to maintain the overall project style and format, MyDemo is added before each project in the naming, so the two project names are MyDemo.Core and MyDemo.Utility respectively.
The folder structure will looks like below
2 The Entity Framework
We will use Entity Framework as the ORM framework for data manipulation
Here is a brief talk about the way that EF creates data operations. There are two main ways, one is DB First and the other is Code First.
2.1 introduce
2.1.1 DB First
DB First is a more traditional way, that is, first design the overall database structure, and then directly create each data table in the database, and then map it through EF, and automatically create the entity category corresponding to each table in the project; this kind of The general way needs to prepare the SQL statements for table creation. The advantage is that some more complex structures can also be done with SQL. Since all SQL has been designed at the beginning, it will be clear, but The disadvantage is that it is very inconvenient to support multiple databases at the same project. It is necessary to write various types of SQL statements, and it is also a troublesome thing to migrate to a new database.
2.1.2 Code First
Another way is Code First. As the name implies, it is to write the program code first, and then generate the data table to database. The advantage of this method is that you only need to concentrate on designing the code of each entity type without writing any SQL statements, so it is very convenient to support multiple databases, and the framework will automatically generate different databases SQL statements, and what is even more surprising is that you don’t even need to create a database file, just set up the corresponding database server connection, and the framework will automatically create the entire database and related tables. This is very helpful for the operation of migrating the database. You only need a complete set of code, and it doesn't matter where you put it to run!
In order to facilitate the migration of data, I don't want to write so many SQL statements, so this project will use the Code First.
3. Prepare Code First
3.1 Setup the references
The newly created CORE and Utility projects here serve the API, so add references to these two in the API project.(You can also use the DCE extension for do that)
3.1.2 Create Data folder
In the MyDemo.Core project, create a Data directory, which will store all entities and related code first codes.
3.1.3 Add the EF packages
To use EF, you need to install the following packages first. We can install them directly through NuGet Gallery extension, but it should be noted that the packages need to be installed in both MyDemo.Core and MyDemo.API projects.
Microsoft.EntityFrameworkCore
Microsoft.EntityFrameworkCore.Sqlite
Microsoft.EntityFrameworkCore.SqlServer
Microsoft.EntityFrameworkCore.Tools
Because I want to handle multiple database, so I will install Sqlite and SqlServer for the demo
3.1.4 Setup DB connection
The next step is to add the database connection string to the MyDemo.API\appsettings.json file. You can also put multiple database connections in here
 "ConnectionStrings": {
    "Mssql": "Server=.\\SQLEXPRESS;Database=MyDemo;User Id=sa;Password=password;Integrated Security=False;MultipleActiveResultSets=True;TrustServerCertificate=True",
    "Sqlite": "Data Source=DB\\MyDemo.db",
    "Mysql": "server=localhost;userid=root;password=yourpass;database=accountowner;"
  }
4. Startup the Code First
Now we add the code first support for entity class project:
4.1 Create an entity
Create an Entity directory under the Data directory, and then create an User.cs entity under this directory.
Tip: For now, we have already created the projects and solution, so don't need to use the DCE tool, we can go back to file explorer so that we can use C# Extensions to help to create other c# files, it will provide the nice file templates for do that. For example we create an User.cs as below:
After that, it will create a nice User class
using System;
using System.Collections.Generic;
using System.Linq;
using System.Threading.Tasks;

namespace MyDemo.Core.Data.Entity
{
    public class User
    {

    }
}
4.2 Table Structure:
4.2.1 Table design
Let me explain the design ideas about the tables:
Assuming that we want to create a simple user now, the attributes to be included user ID/name/password and email, which are enough for basic information, but in a normal project, there are some hidden information need to be processed, such sa user status, create and update date time, deactivation of the record, the administrator may temporarily deactivate it for some reason, for data security, we need a soft delete operation, that's mean the record is not actually deleted, but a mark is used to indicate that the status has been deleted. The reason for this is to prevent users from directly deleting very important data.
Therefore, when designing a table, the following fixed attributes should be included: whether it is enabled, deleted, creation time and modification time.
Since every table should have these common fields, so we can create a base class for this, the name can be called BaseEntity, and ID can also be put in it, because this base class is only for inherited by others and does not need to be implemented, so you can use an abstract class, and then inherit User from BaseEntity, so that you don't need to write these public fields every time.
using System.ComponentModel.DataAnnotations.Schema;

namespace MyDemo.Core.Data.Entity;

public abstract class BaseEntity
{
    [DatabaseGenerated(DatabaseGeneratedOption.Identity)]
    public long Id { get; set; }
    public bool IsActive { get; set;}
    public bool IsDeleted { get; set;}
    public DateTime CreatedAt { get; set; }
    public DateTime UpdatedAt { get; set; }
}
After establishing the attributes of the entity, you need to set the table name in the database, because sometimes the class name is not necessarily the same as the table name. To set the table name, you can use [Table("name" )], just add it to the class. At the same time, for better performance, it is better to add an index to the table. We can directly use the unique ID attribute as the index, and add [Index(nameof(Id))] to the class.
So the User.cs will be like below
[Table("User")]
[Index(nameof(Id))]
public class User : BaseEntity{
  public string Name { get; set; }
  public string Password { get; set; }
  public string Email { get; set; }
}
Finally, we also need to do some constraints for the fields, such as the ID can't be empty, the creation time is automatically based on the storage time of the current data, and the length of some fields, etc. These settings can be achieved through the IEntityTypeConfiguration interface.
public class UserEntityTypeConfiguration : IEntityTypeConfiguration<User>
{
    public void Configure(EntityTypeBuilder<User> builder)
    {
        builder.ToTable("User");
        builder.HasKey(x => x.Id);
        builder.Property(x => x.Id).IsRequired();
        builder.Property(x => x.CreatedAt).HasDefaultValue(DateTime.Now);
    }
}
And the completed codes should be as below
// MyDemo.Core/Data/Entity/User.cs
using System.ComponentModel.DataAnnotations;
using System.ComponentModel.DataAnnotations.Schema;
using Microsoft.EntityFrameworkCore;
using Microsoft.EntityFrameworkCore.Metadata.Builders;

namespace MyDemo.Core.Data.Entity;

[Table("User")]
[Index(nameof(Id))]
public class User : BaseEntity{
  public string Name { get; set; }
  public string Password { get; set; }
  public string Email { get; set; }
}


public class UserEntityTypeConfiguration : IEntityTypeConfiguration<User>
{
    public void Configure(EntityTypeBuilder<User> builder)
    {
        builder.ToTable("User");
        builder.HasKey(x => x.Id);
        builder.Property(x => x.Id).IsRequired();
        builder.Property(x => x.CreatedAt).HasDefaultValue(DateTime.Now);
    }
}
4.3 Create DbContext
- When the entity is completed, it is necessary to create a
DbContextfor database context to process the data. We name itApplicationDbContexthere, and this class is to be inherited fromDbContext
// MyDemo.Core/Data/ApplicationDbContext.cs
public class ApplicationDbContext : DbContext
{
    public ApplicationDbContext(DbContextOptions<ApplicationDbContext> options)
      :base(options)
    { }
}
- The
OnModelCreatingmethod should be override inApplicationDbContext, the purpose is to make theIEntityTypeConfigurationworking. The last thing is to link the User entity with the specific data table, add aDbSetobject, and then you can operate the tables in the database through this object. So the completed codes should be like below:
using System;
using System.Collections.Generic;
using System.Linq;
using System.Threading.Tasks;
using Microsoft.EntityFrameworkCore;

namespace MyDemo.Core.Data.Entity;

public class ApplicationDbContext : DbContext
{
    public ApplicationDbContext(DbContextOptions<ApplicationDbContext> options)
      :base(options)
    { }

    public DbSet<User> Users => Set<User>();

     protected override void OnModelCreating(ModelBuilder modelBuilder)
    {
        base.OnModelCreating(modelBuilder);

        // add the EntityTypeConfiguration classes
        modelBuilder.ApplyConfigurationsFromAssembly(
            typeof(ApplicationDbContext).Assembly
        );
    }
}
In the end, add the service that uses the database to the program.cs file of the API project. It should be noted that the added service code must be placed before creating the builder app!
// Add ApplicationDbContext and SQL Server support
builder.Services.AddDbContext<ApplicationDbContext>(options =>
    options.UseSqlServer(builder.Configuration.GetConnectionString("Mssql"))
);

var app = builder.Build();
4.4 Generate EF codes
Now you can start to generate related EF migration code. However, before executing the relevant commands, you need to open the terminal in VS CODE, and then enter the root directory of the solution, because the subsequent related EF commands need to be executed here. Of course, you can also execute them in other directories, but It is necessary to modify the path of the project in the command.
Execute the following commands to generate the relevant database code migration files.
dotnet ef migrations add InitialMigrations --project .\MyDemo.Core\MyDemo.Core.csproj --startup-project .\MyDemo\MyDemo.csproj
Then execute the command to update the code to the database.
dotnet ef database update --project .\MyDemo.Core\MyDemo.Core.csproj --startup-project .\MyDemo\MyDemo.csproj
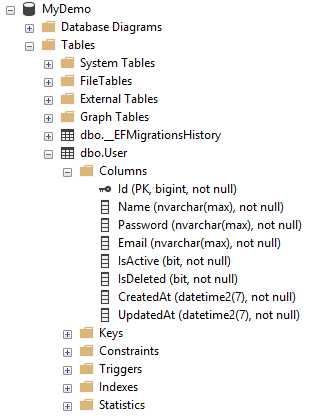
After that, you should find there is a new Migrations folder under the Data, and when you open the database, you should see there is a new DB MyDemo and the User table
Database
3 Summary
Now let's summarize what we have learned.
How to build a VS CODE development environment
How to create a project, and have successfully created an API project
Create the database and table with Code First
The next step is to create CRUD operation for the table (this is a data manipulation term in programming, which represents operations such as creating, deleting, modifying, etc., the full name is: Create, Read, Update, Delete), but before that, we need to understand a design pattern. A good design pattern can standardize the code and improve efficiency. So in the next, I will explain the Repository pattern and how to implement it :smiley:
Subscribe to my newsletter
Read articles from Winson Yau directly inside your inbox. Subscribe to the newsletter, and don't miss out.
Written by


