Day29-Jenkins Important Interview Questions/90days of DevOps Challenge
 Siri Chandana
Table of contents
- Questions:
- What’s the difference between continuous integration, continuous delivery, and deployment?
- Benefits of CI/CD
- What is meant by CI-CD?
- What is Jenkins Pipeline?
- How do you configure the job in Jenkins?
- Where do you find errors in Jenkins?
- In Jenkins how can you find log files?
- Jenkins workflow and write a script for this workflow?
- How to create a continuous deployment in Jenkins?
- How to build a job in Jenkins?
- Why do we use a pipeline in Jenkins?
- Is Only Jenkins enough for automation?
- How will you handle secrets?
- Explain different stages in CI-CD setup.
- Name some of the plugins in Jenkins.
Here are some Jenkins-specific questions related to Docker that one can use during a DevOps Engineer interview:
Jenkins is widely recognized as one of the best continuous integration and delivery solutions. Jenkins, the popular automation server, is available for no cost and with open-source code. Developers may have their code immediately built, integrated, and tested as soon as it is committed to the central repository. This allows for the earlier issue and mistake detection, allowing for faster deployments from the development team.
This blog will teach you everything you need to know to get started with Jenkins, including what CI/CD is, why we should use Jenkins, how to create pipelines, how to use different plugins, how to secure your Jenkins installation, and much more, all while providing you with hands-on practice along the way with demos at each step for better visualization of the concepts.
Questions:
What’s the difference between continuous integration, continuous delivery, and deployment?
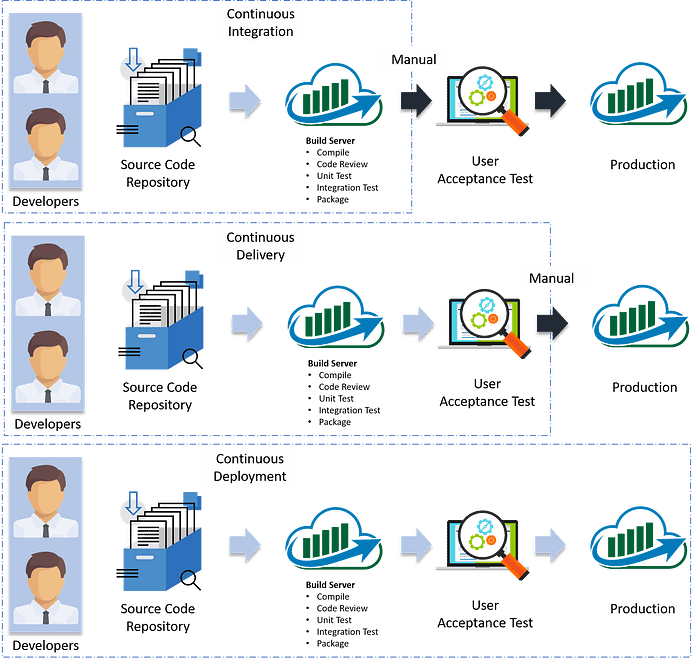
In Continuous Integration, every code commit is built and tested, but, is not in a condition to be released. I mean the build application is not automatically deployed on the test servers to validate it using different types of Blackbox testing like User Acceptance Testing (UAT).
In Continuous Delivery, the application is continuously deployed on the test servers for UAT. Or, you can say the application is ready to be released to production anytime. So, Continuous Integration is necessary for Continuous Delivery.
Continuous Deployment is the next step past Continuous Delivery, where you are not just creating a deployable package, but you are deploying it in an automated fashion.
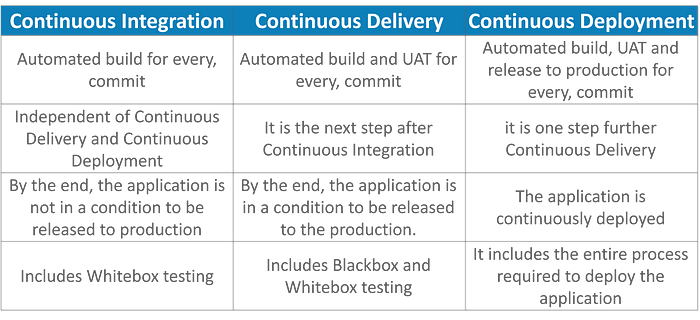
In simple terms, Continuous Integration is a part of both Continuous Delivery and Continuous Deployment. Continuous Deployment is like Continuous Delivery, except that releases happen automatically.
Benefits of CI/CD
Continuous Integration/Continuous Deployment (CI/CD) is a software development practice that combines continuous integration, continuous delivery, and continuous deployment. CI/CD brings numerous benefits to the software development and deployment process, including:
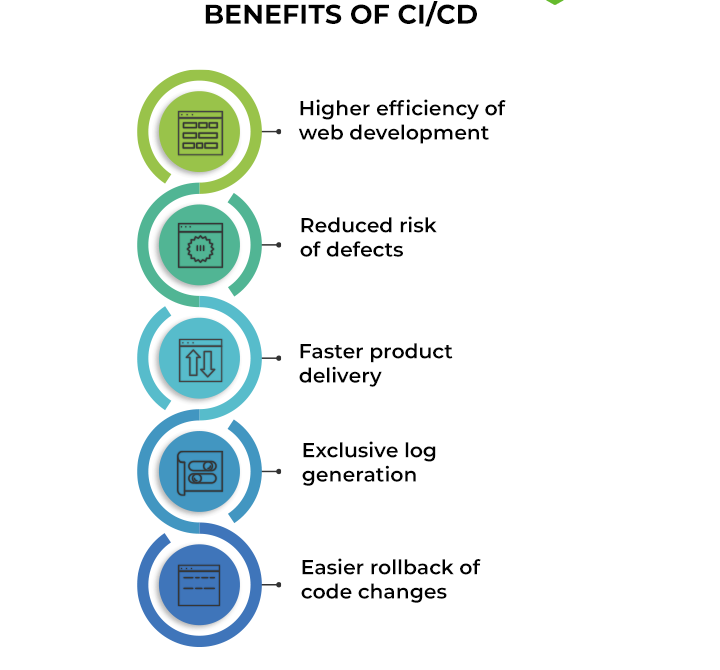
Faster Time-to-Market: CI/CD automates the build, test, and deployment processes, allowing for faster and more frequent releases. This enables organizations to deliver new features and bug fixes to users more quickly, gaining a competitive edge.
Early Detection of Bugs: With CI/CD, every code change triggers an automated build and testing process. This helps catch bugs and issues early in the development cycle, making it easier and less costly to fix them. This results in higher overall software quality.
Continuous Feedback Loop: CI/CD promotes a continuous feedback loop between developers and testers. Automated testing and deployment processes provide rapid feedback on the quality and stability of the code, enabling developers to address issues promptly and iterate faster.
Increased Collaboration: CI/CD encourages collaboration among team members. Developers can integrate their code changes regularly, minimizing conflicts and reducing the time spent on merging code. It also promotes better communication and knowledge sharing between team members.
Reliable and Repeatable Releases: CI/CD emphasizes automation, ensuring that the entire build, testing, and deployment processes are repeatable and consistent. This reduces the chances of human error and makes releases more reliable, leading to greater stability in production environments.
Risk Mitigation: By automating the build, test, and deployment processes, CI/CD reduces the risk associated with manual interventions and human error. The ability to roll back to a previously known working state quickly minimizes the impact of any issues that may arise during deployment.
Scalability: CI/CD provides a foundation for scalable software development and deployment. As the codebase and the number of developers grow, CI/CD ensures that the integration and deployment processes remain efficient and manageable.
DevOps Enablement: CI/CD is a key enabler of the DevOps culture and practices. It helps break down the silos between development and operations teams, promoting collaboration, shared responsibility, and faster feedback loops.
Overall, CI/CD facilitates faster development cycles, improves software quality, and enhances the efficiency of the development and deployment processes. It enables organizations to deliver software more reliably and frequently, leading to increased customer satisfaction and business value.
What is meant by CI-CD?
CI/CD stands for Continuous Integration/Continuous Deployment (or Continuous Delivery). It is a software development practice that aims to automate and streamline the processes of integrating code changes, building software, running tests, and deploying applications.
Continuous Integration (CI) involves regularly integrating code changes from multiple developers into a shared repository. Whenever a developer makes a code change, it is automatically merged with the main codebase. This practice ensures that the codebase is always up-to-date and that conflicts or integration issues are detected early.
Continuous Deployment (CD) refers to the process of automatically deploying software to production or staging environments after a successful build and testing. With CD, the entire deployment process, including configuration management and infrastructure provisioning, can be automated. This enables frequent and reliable releases of new features, bug fixes, and improvements.
Continuous Delivery is a related concept that focuses on continuously delivering software that is ready for deployment but may not be automatically deployed to production. In Continuous Delivery, the software is deployed manually or based on business decisions.

CI/CD relies on automation tools and practices to achieve its goals. It typically involves using version control systems (e.g., Git), build servers (e.g., Jenkins, Travis CI), automated testing frameworks, and infrastructure-as-code tools (e.g., Docker, Kubernetes) to automate the development, build, test, and deployment processes.
What is Jenkins Pipeline?
Jenkins Pipeline is a powerful and flexible plugin for the Jenkins automation server that allows you to define and manage your software delivery pipeline as code. It provides a way to define continuous integration and continuous delivery (CI/CD) pipelines using a domain-specific language (DSL) or by writing pipeline code directly in a Jenkinsfile.

The pipeline code defined in Jenkins can be version-controlled along with your project source code, providing visibility and traceability of your pipeline configuration. Jenkins Pipeline also integrates with various plugins and tools, allowing you to incorporate code analysis, code coverage, and other quality checks into your pipeline.
By using Jenkins Pipeline, you can achieve a fully automated and customizable CI/CD workflow. It enables you to define, manage, and visualize your pipeline as code, making it easier to maintain, version, and share across teams.
How do you configure the job in Jenkins?
To configure a job in Jenkins, you can follow these steps:
Log in to your Jenkins server and navigate to the Jenkins dashboard.
Click on the "New Item" link on the left-hand side menu. This will take you to the job creation page.
Enter a name for your job in the "Enter an item name" field. Choose the type of job you want to create, such as a Freestyle project or Pipeline, depending on your requirements. Click on the "OK" button to proceed.
Configure the general settings for your job. This may include specifying the source code repository, defining the build triggers (e.g., scheduled, SCM changes, or manual), and specifying any build parameters or environment variables required.
Set up the build steps. The build steps depend on the type of job you choose. For a Freestyle project, you can configure build steps such as executing shell commands, running batch scripts, invoking build tools, or running tests. For a Pipeline job, you define the steps in the Jenkinsfile or pipeline script.
Configure post-build actions. These actions are performed after the build is completed. They can include archiving artifacts, sending email notifications, publishing test results, generating reports, or triggering downstream jobs.
Optionally, you can configure additional settings specific to your job, such as build environment, build parameters, SCM configurations, or build triggers.
Once you have configured all the desired settings, click on the "Save" or "Apply" button to save the job configuration.
You will be redirected to the job's configuration page, where you can further manage and fine-tune the job settings, including configuring permissions, adding build agents, setting up SCM polling, configuring build triggers, or integrating with external tools.
To run the job, either manually trigger it or configure automated triggers based on your defined build triggers.
Where do you find errors in Jenkins?
In Jenkins, you can find errors and diagnostic information in several places:
Console Output: When a job is running, you can view the console output in real time or after the job completes. The console output provides detailed information about each step of the build process, including any errors, warnings, or stack traces. It is the primary location to look for errors during the build execution.
Build History: Jenkins maintains a build history for each job, allowing you to view the results of previous builds. If a build fails, you can click on the build number in the job's build history to access the build details. The build details page provides information about the build status, console output, and any associated errors or warnings.
Build Artifacts: If your job generates build artifacts such as logs, reports, or binaries, you can access them in the job's build artifacts section. Errors or relevant diagnostic information may be present in these artifacts, especially in log files or test result files.
Jenkins Log Files: Jenkins logs various messages and errors into log files, which can be helpful in troubleshooting issues. The location of the log files depends on your Jenkins installation. By default, Jenkins logs are stored in the Jenkins home directory under the "logs" subdirectory. The main log file is usually named "jenkins.log" or "jenkins.out".
Notifications and Emails: Jenkins can be configured to send email notifications when a build fails or encounters errors. You can check your email inbox for error notifications or alerts sent by Jenkins. The email notifications usually include a summary of the build status and any error messages encountered.
System Dashboard: Jenkins provides a system dashboard that shows an overview of the current state of all jobs and provides a summary of any failed or unstable builds. The dashboard may include error messages or notifications related to failed builds.
In Jenkins how can you find log files?
In Jenkins, you can find log files in the following locations:
Jenkins Home Directory: The log files are typically stored in the Jenkins home directory. By default, the Jenkins home directory is located at
$JENKINS_HOME, which can vary depending on your Jenkins installation. Common locations include/var/lib/jenkinson Linux orC:\Program Files (x86)\Jenkinson Windows.Logs Subdirectory: Within the Jenkins home directory, the log files are usually located in the
logssubdirectory. The main log file is commonly namedjenkins.logorjenkins.out. Other log files may also be present, such asaccess.logfor web access logs orerror.logfor error logs.Log Rotation: Jenkins may rotate log files to manage their size and retain a certain number of historical log files. In such cases, you may find the current log file with a timestamp appended to its name, indicating the rotation. For example,
jenkins.log.2023-11-3.
To access and view the log files:
Log in to the machine where Jenkins is installed.
Navigate to the Jenkins home directory. This may involve using the
cdcommand to change directories.Once in the Jenkins home directory, navigate to the
logssubdirectory.Use a text editor or command-line tools like
catorlessto view the contents of the log files. For example, you can runcat jenkins.logto display the contents of thejenkins.logfile in the terminal.
Jenkins workflow and write a script for this workflow?
Jenkins Workflow is a feature of Jenkins that allows you to define and manage complex build and deployment processes as code. It provides a way to create more advanced and customizable pipelines using a Groovy-based DSL (Domain-Specific Language). Here's an example of a simple Jenkins Workflow script:
pipeline {
    agent any

    stages {
        stage('Build') {
            steps {
                // Perform build steps here
                sh 'echo "Building..."'
            }
        }

        stage('Test') {
            steps {
                // Perform testing steps here
                sh 'echo "Testing..."'
            }
        }

        stage('Deploy') {
            steps {
                // Perform deployment steps here
                sh 'echo "Deploying..."'
            }
        }
    }
}
In this example, we define a pipeline with three stages: Build, Test, and Deploy. Each stage contains a set of steps to be executed. The agent any directive indicates that the pipeline can run on any available agent.
Within each stage's steps block, you can include various build and deployment commands or scripts. In this case, we use the sh step to execute a simple shell command that echoes a message to the console. You can replace these sh steps with your actual build, test, and deployment commands or scripts.
To use this script in Jenkins:
Log in to your Jenkins server and create a new Pipeline job.
In the job configuration, select the "Pipeline script" option.
Copy and paste the provided script into the script editor.
Save the job configuration.
Run the job to execute the pipeline.
Jenkins Workflow provides a wide range of features and functions for building complex pipelines, including parallel execution, input steps, environment variables, error handling, and integrations with external tools and services.
How to create a continuous deployment in Jenkins?
To create a continuous deployment in Jenkins, you can follow these general steps:
Use version control: Ensure that your code is stored in a version control system like Git.
Set up a Jenkins server: Install Jenkins on a server or use a Jenkins instance, either on-premises or in the cloud.
Install necessary plugins: Install the necessary Jenkins plugins for your deployment process, such as Git plugin, Pipeline plugin, etc.
Create a Jenkins pipeline: Use the Jenkins Pipeline feature to define your continuous deployment process as code[1]. You can create a Jenkinsfile, which is a text file that defines the steps of your build and deployment process.
Define the deployment stages: In your Jenkinsfile, define the stages of your deployment process. For example, you could have stages for building, testing, and deploying your application.
Configure the deployment steps: Within each stage, configure the specific steps needed to deploy your application. This can include pulling the latest code from your version control system, building the application, running tests, and deploying to your target environment.
Implement the necessary integrations: If your deployment requires integration with other tools, such as a cloud platform or a deployment tool, make sure to configure those integrations in your Jenkins pipeline.
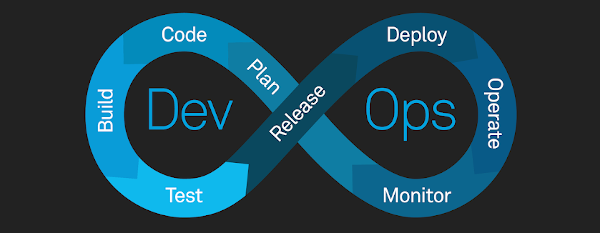
By following these steps, you can set up continuous deployment in Jenkins. Remember to regularly commit and push your code changes to trigger the Jenkins pipeline and initiate the deployment process.
How to build a job in Jenkins?
To build a job in Jenkins, you can follow these steps:
Log in to your Jenkins account and access the Jenkins dashboard.
Click on "New Item" to create a new job.
Enter a name for your job and select the type of job you want to create, such as a freestyle project.
Configure the job settings:
General settings: Set the job description, specify any parameters, and configure SCM (Source Control Management) settings if required.
Build triggers: Choose the triggers that will start the build, such as a manual trigger, a scheduled trigger, or a trigger based on SCM changes.
Build steps: Define the build steps that need to be executed as part of the job. This can include tasks like compiling the code, running tests, or packaging the application.
Post-build actions: Configure any actions that should be performed after the build is completed, such as archiving artifacts, sending notifications, or triggering downstream jobs.
Now, you can run the job manually by clicking on the "Build Now" button, or it can be triggered automatically based on the defined build triggers.
Why do we use a pipeline in Jenkins?
Pipeline is used in Jenkins to address various challenges in the Continuous Integration and Continuous Delivery (CI/CD) space. It offers a set of powerful automation tools that enhance Jenkins' capabilities and support a range of use cases, from simple continuous integration to comprehensive CD pipelines[1].
Here are some reasons why we use pipeline in Jenkins:
Centralized job management: With pipelines, you can define your entire CI/CD process as code, known as a Jenkinsfile. This provides a centralized and version-controlled way to manage your jobs, eliminating the need to configure and maintain jobs individually.
Improved visualization and flow control: Pipelines offer a visual approach to define, track, and monitor the stages and steps of your CI/CD process. You can easily view the progress, identify bottlenecks, and introduce manual approvals or conditional flows within the pipeline.
Flexibility and extensibility: The Jenkins Pipeline plugin provides a script-based CD workflow capability, allowing you to write your pipeline logic using Groovy. This flexible and extensible nature enables you to tailor the pipeline to your specific project needs.
Reusability: Pipelines can be defined as reusable components with shared libraries, allowing you to encapsulate common logic, steps, and best practices. This promotes code reuse, reduces duplication, and enhances maintainability.
Scalability and resilience: Pipelines in Jenkins are designed to be durable, surviving both planned and unplanned restarts of the Jenkins controller. They provide inherent scalability, allowing you to handle complex workflows and efficiently manage multiple projects.
By using pipelines in Jenkins, organizations can enhance their CI/CD processes, achieve better code quality, accelerate software delivery, and ensure reliability in their software deployments.
Is Only Jenkins enough for automation?
While Jenkins is a powerful automation tool, its scope is primarily focused on CI/CD and build automation. Depending on your automation needs, you may require additional tools for configuration management (e.g., Ansible or Puppet), container orchestration (e.g., Kubernetes), infrastructure provisioning (e.g., Terraform), and monitoring (e.g., Prometheus). The choice of tools depends on the specific requirements of your automation tasks.
How will you handle secrets?
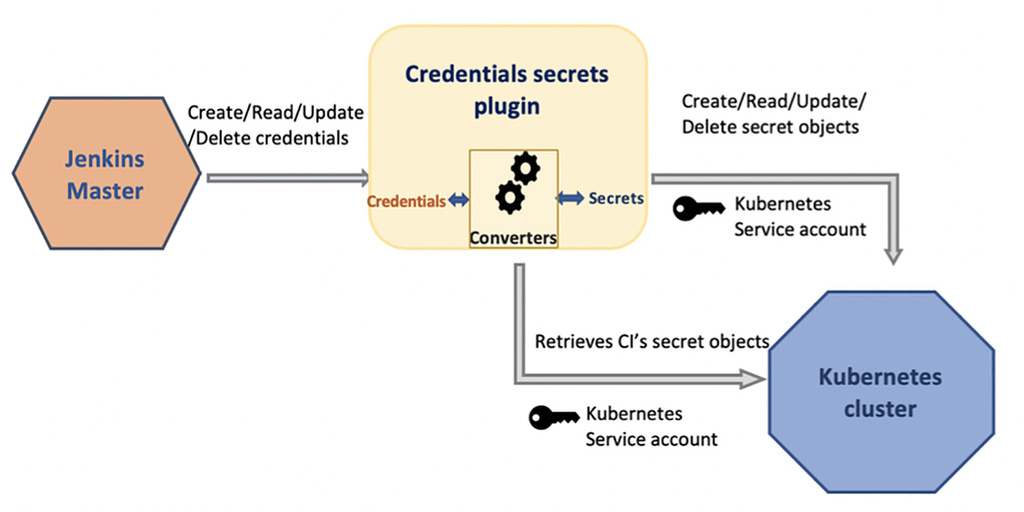
Handling secrets in Jenkins involves using plugins like "Credentials Binding" or "Secrets Management." These plugins provide secure storage and usage of sensitive information, such as API keys or passwords. Secrets are encrypted and can be accessed within your Jenkins jobs or pipelines securely.
Explain different stages in CI-CD setup.
In a CI/CD (Continuous Integration/Continuous Delivery) setup, the software development process is divided into different stages, each with a specific purpose. Here are the commonly used stages in a CI/CD setup:
Code Commit: This stage involves developers pushing their code changes to a version control system, such as Git. It serves as the starting point for the CI/CD pipeline.
Build: In this stage, the code is compiled, dependencies are resolved, and artifacts are generated. The build process ensures that the application can be successfully compiled and packaged.
Test: The test stage involves running automated tests to verify the correctness, functionality, and quality of the software. This includes unit tests, integration tests, and possibly other types of tests, such as performance or security tests.
Code Analysis: This stage involves static code analysis tools that scan the codebase for potential issues, such as bugs, code smells, or security vulnerabilities. It helps maintain code quality and adherence to coding standards.
Artifact Generation: After a successful build and passing tests, the artifacts, such as executable files or deployable packages, are generated. These artifacts are the output of the development process and will be used in the deployment stage.
Deployment: The deployment stage involves deploying the artifacts to various environments, such as development, staging, or production. This can include tasks like provisioning infrastructure, configuring servers, and deploying the application.
Post-Deployment Testing: Once the application is deployed, it is important to run additional tests to ensure it behaves correctly in the target environment. This may include tests like smoke tests or end-to-end tests to validate the functionality in a real-world context.
Release: In this stage, the application is released to end-users or customers. This can involve making the application available through app stores, deploying it to production servers, or any other steps required for the software to be accessible to users.
Monitoring: Continuous monitoring of the deployed application is an essential part of the CI/CD setup. Monitoring tools capture metrics, logs, and other information to identify performance issues, errors, or potential bottlenecks.
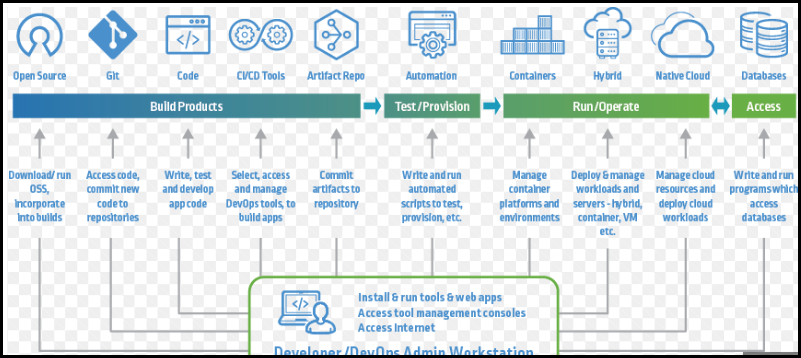
These stages can be automated using a CI/CD tool like Jenkins, where each stage is represented as a step or task in the pipeline. The pipeline defines the flow of the CI/CD process, ensuring that each stage is executed sequentially and automatically triggered based on events like code commits or time-based schedules
Name some of the plugins in Jenkins.
Jenkins has a vast ecosystem of plugins that extend its functionality and enable integration with various tools and services. Here are some popular plugins commonly used with Jenkins:
Git Plugin: Integrates Jenkins with Git, allowing you to clone Git repositories, manage branches, and trigger builds based on Git events.
GitHub Plugin: Provides integration with GitHub, enabling features like triggering builds on GitHub events, reporting build status to pull requests, and more.
Pipeline Plugin: Offers a powerful and flexible way to define and manage continuous delivery pipelines within Jenkins, allowing you to script your entire build, test, and deployment process.
Docker Plugin: Integrates Jenkins with Docker, enabling you to build, publish, and deploy Docker containers as part of your CI/CD pipelines.
SonarQube Plugin: Integrates Jenkins with SonarQube, a code quality and static analysis tool, allowing you to perform code quality checks and generate reports during the build process.
JUnit Plugin: Provides support for JUnit testing framework, allowing you to generate and view test reports, track test results, and visualize trends over time.
Artifactory Plugin: Integrates Jenkins with JFrog Artifactory, a binary repository manager, enabling you to publish and retrieve artifacts from Artifactory as part of your build process.
Slack Notification Plugin: Sends build notifications and status updates to Slack channels, allowing you to keep the team informed about build results and other important events.
Selenium Plugin: Integrates Jenkins with Selenium, a popular web testing framework, enabling you to run automated browser tests as part of your build process.
AWS Elastic Beanstalk Plugin: Allows you to deploy applications to AWS Elastic Beanstalk, an orchestration service for deploying and managing applications on AWS infrastructure.
These are just a few examples, and there are many more plugins available for Jenkins, covering a wide range of functionalities and integrations. The Jenkins Plugin Index (https://plugins.jenkins.io/) provides a comprehensive list of plugins along with their descriptions and documentation.
Happy Learning😊!!!!
Subscribe to my newsletter
Read articles from Siri Chandana directly inside your inbox. Subscribe to the newsletter, and don't miss out.
Written by
