Containerization with Docker
 Redaoui97
Virtualization
Is a technology that lets you create useful IT services using resources that are linked to hardware. It allows you to use the physical machine by distributing its capabilities.
Types of virtualization
Data Virtualization:
Consolidate data spread into a single source. Logical data management allows establishing single data access and real-time access to data stored across multiple heterogeneous data sources. Examples of data virtualization tools: Denodo platform SAP Hana
Desktop virtualization
Different from OS virtualization, Desktop virtualization allows a central administrator to deploy simulated desktop environments to hundreds of physical machines at once. Unlike traditional desktop environments that are physically installed and configured, desktop virtualization allows admins to perform mass configurations on all machines. Programs like Virtual box, Qemu or VMware... could fall under the Desktop virtualization category.
Server virtualization
Server virtualization is dividing physical servers into isolated virtual ones, allowing each virtual server to host its OS.
Operating system virtualization
OS virtualization happens at the Kernel. It's a way to run Linux and Windows environments side by side. The Kernel enables the existence of various isolated user-space instances.
Network functions virtualization.
Network functions virtualization separates the network's key functions (like directory services, file sharing, and IP configuration) so they can be distributed among environments.
How does Virtualization work?
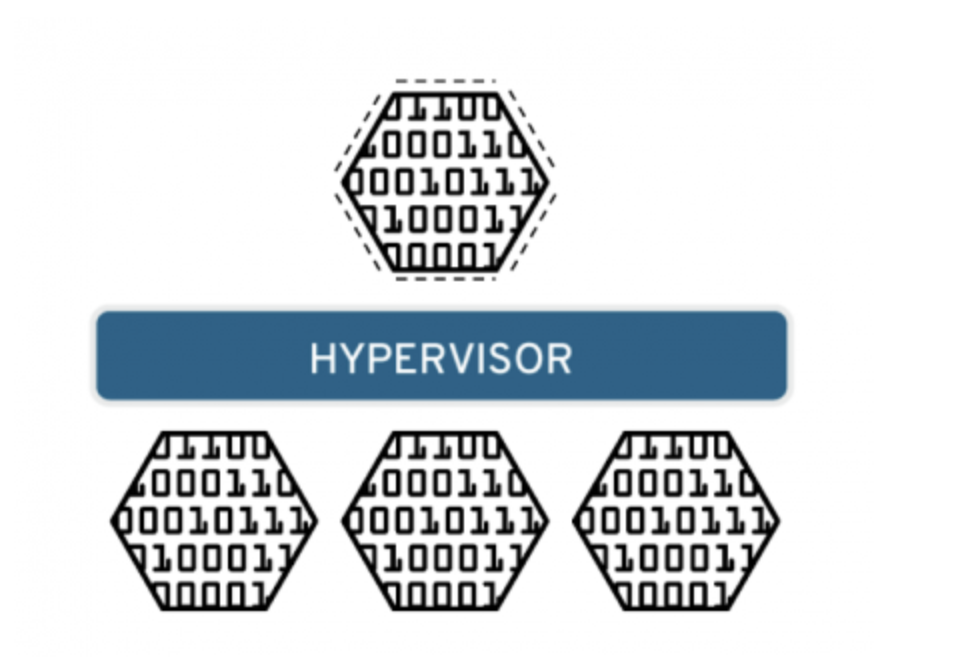
Software called Hypervisors separates the physical resources from the virtual environment.
Hypervisors
Introduction
A Hypervisor is a type of software, that creates and runs virtual machines. The Hypervisor presents the guest OS with a virtual operating platform and manages the execution of the guest operating systems.
Hypervisors types
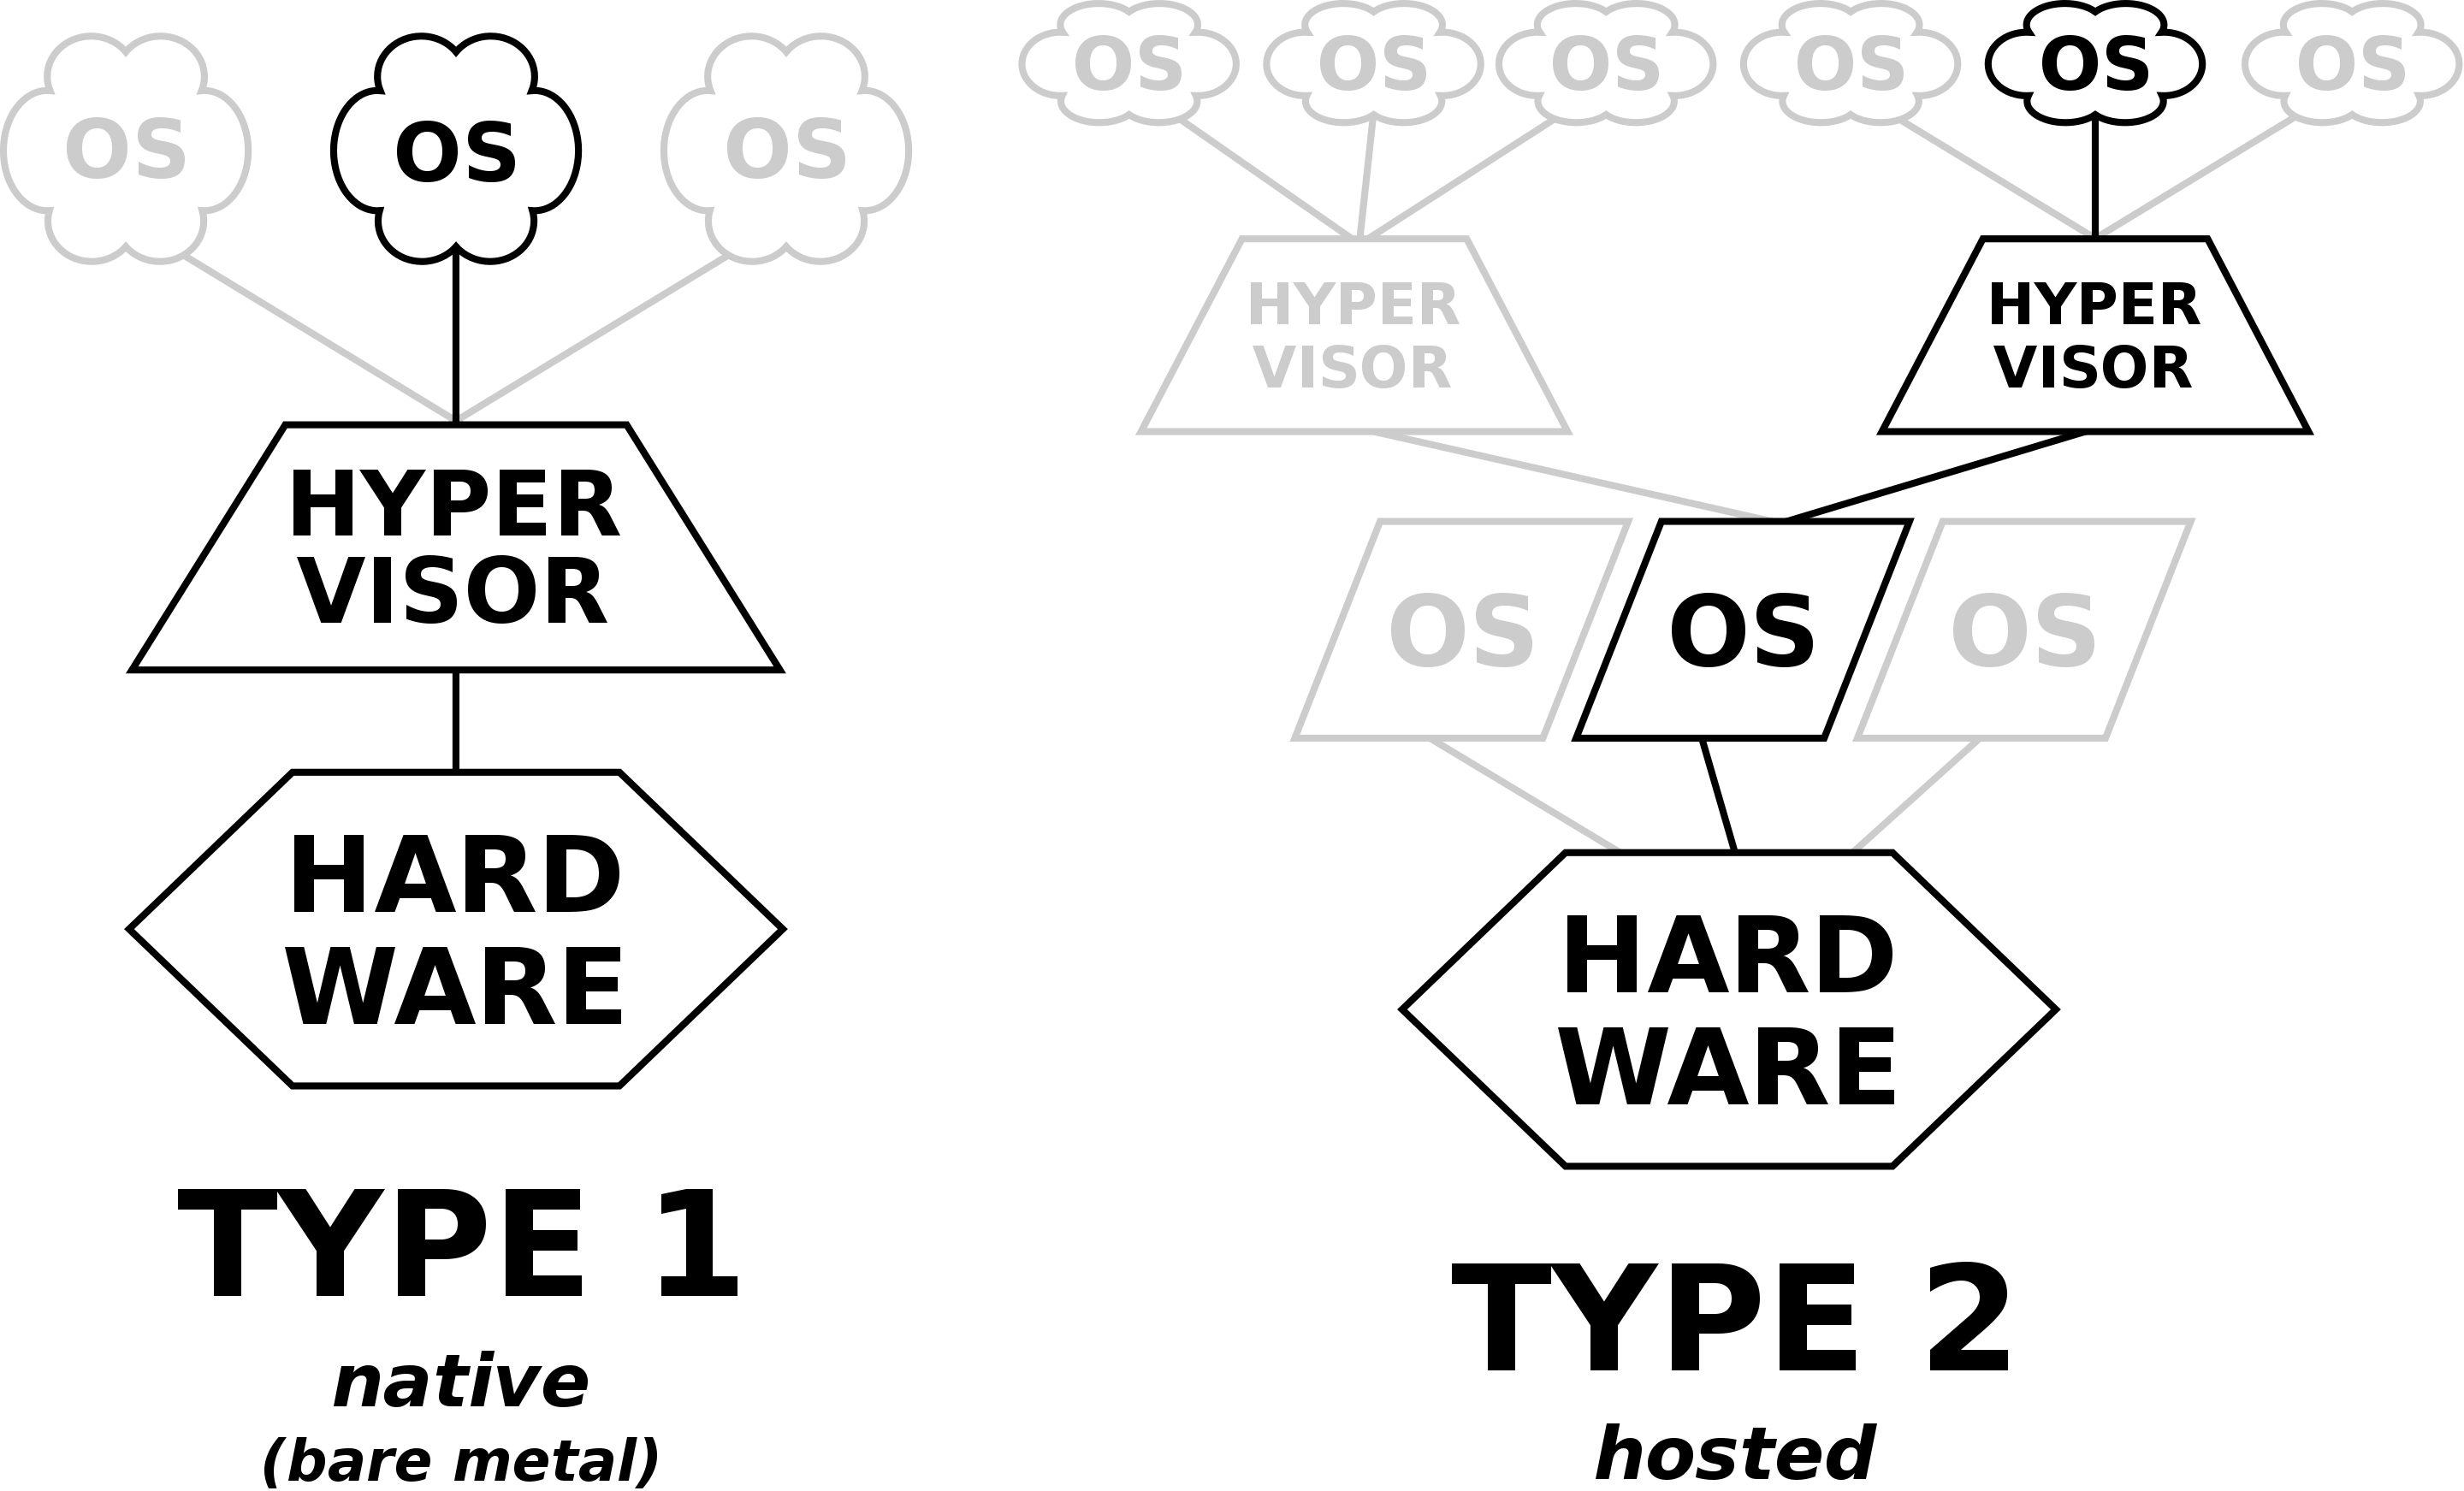
Type1: native/bare-metal hypervisor
This type of hypervisor runs directly on the physical hardware, without the need for a host OS. It interacts directly with the hardware and controls the allocation of physical resources to VMs.
Type2: Hosted Hypervisors
This type of hypervisor runs on a conventional OS just like other computer programs. It relies on the host OS to manage hardware resources and provides a virtualization layer on top of it. (Virtual box, VMware...)
KVM (Kernel-based Virtual machine)
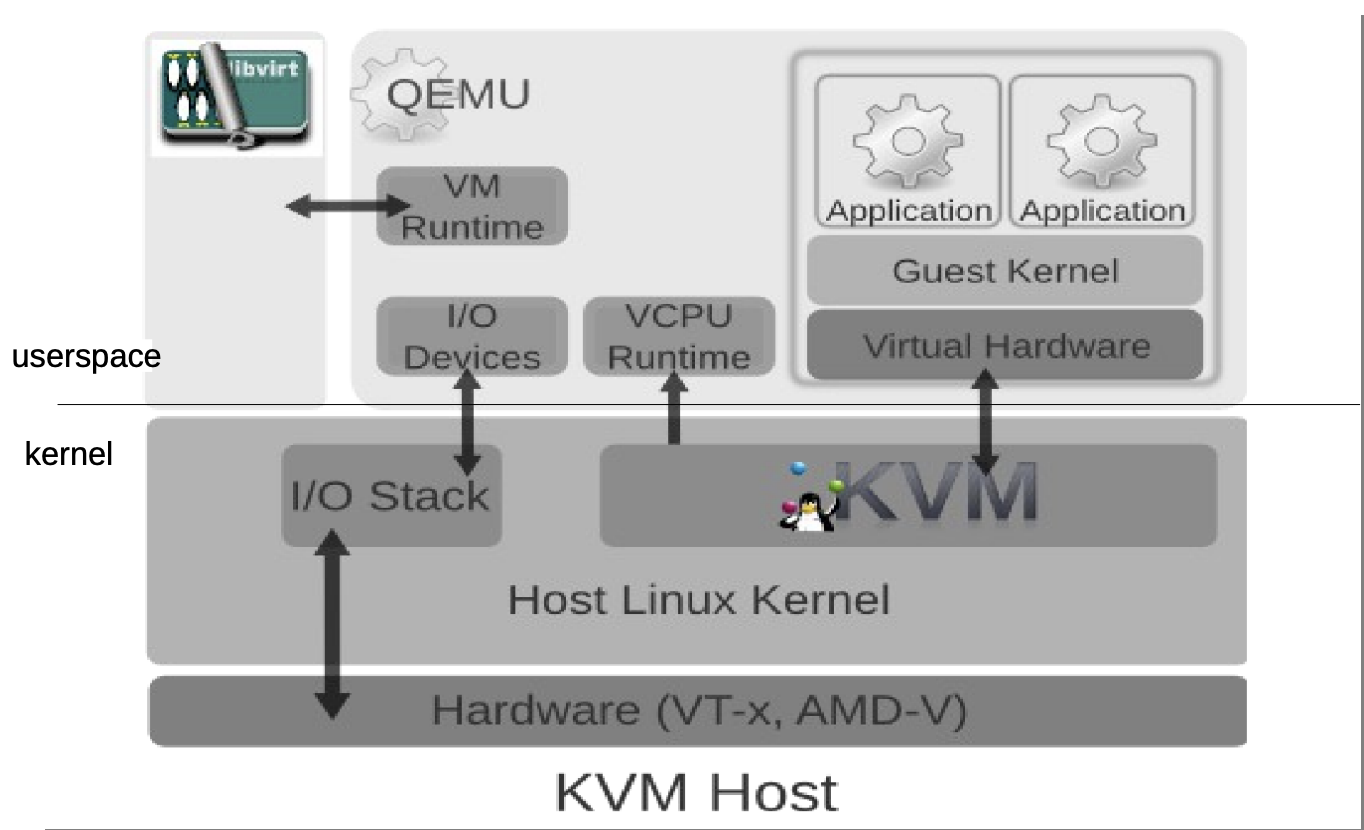
KVM is an open-source virtualization technology built into Linux. KVM lets you turn Linux into a hypervisor that allows a host machine to run multiple Virtual environments. KVM converts Linux into a type1 hypervisor. Since it's already built inside the Linux Kernel, it has by default all the Kernel modules and components it needs. There are other tools similar to KVM but irrelevant compared to KVM (Like MS Hyper-V, but who cares about Windows!?)
Containerization
Containerization is the packaging of software code with just the OS Libraries and dependencies required to run the code to create a single lightweight executable.
We know that virtualization relies on the hypervisor to run a virtual environment on another environment built on the physical environment. Containerization, on the other hand, operates on a higher level in the system stack and is based on the main system's kernel to operate.
Before jumping to containerization at runtime, we need to introduce 2 of the most important features in Linux systems on which containerization is based: Namespaces and Cgroups. These features allow process isolation:
Namespaces
Namespacing is a feature of the Linux Kernel, that provides process isolation, by creating different namespaces for various system resources.
Namespacing can easily done by running the unshare command, e.g:
$ sudo unshare --fork --pid --mount-proc sh
There are several types of namespaces that container runtime uses:
PID namespaces: processes inside a container have their process ID namespaces, meaning that the processes run inside the container, are isolated from other processes run in the system outside.
Network namespaces: Containers have their own Network interfaces, IP addresses and routing tables. Which allows networked applications to run independently.
Mount namespaces: This allows containers to mount their own isolated filesystems. Changes made to these filesystems will not affect the host system.
UTS namespaces: UTS(Unix Timesharing System) namespace is a form of namespacing that isolates the hostname and NIS(Network information service) domain name that is associated with a container.
If you want to know more about Hostname, NIS, and Namespacing.
CGroups
CGroups (Control Groups), are a Linux Kernel feature that allows the allocation and management of system resources. It's used to provide the necessary system resources. Because by default in the user-land, the kernel provides a certain amount of resources to processes run. Examples of resources: memory, CPU, block I/O, network(iptables/tc), huge pages(special way to allocate memory), RDMA(specific for InifiniBand / remote memory transfer)(Remote Direct Memory Access is a technology that enables two networked computers to exchange data in main memory without relying on the processor, cache or operating system of either computer.)
Example of a Cgroup that limits memory:
$ sudo cgcreate -a redaoui -g memory:cgExample
seccomp-bpf
In addition to Namespaces and CGroups, it's only fair to mention the seccomp-bpf feature that allows you to restrict system calls. Which adds another level of security to our "containers".
We also need to mention other security features like LSMs and capabilities.
more details
You can find more detailed information about the Containers' internals here.
Containers
From what we've read above, we understand that containers were just a small mixture of the Namespaces, CGroups and some filesystem magic. And secured using some features like capabilitiesm, seccomp, LSMs...
Why containers
There are many reasons why you should use containers, especially in some cases where it is vital for a task to be done virtually without the need for a Virtual Machine.

Portable: The diversity in Operating Systems nowadays makes it nearly impossible for developers to develop and maintain tools and applications on every system, thus making containerization a good choice to run stable applications in different environments.
Lightweight Containers are lightweight and share the host OS kernel, which makes them way faster and lighter than traditional Virtual Machines.
Fast deployment: Containers can easily and rapidly be deployed, making them ideal for CI/CD pipelines.
Security: Containers are fairly secure, as they provide a level of isolation from the host machines, making them a good choice for sandboxing and testing.
Docker
I won't go through the history of Containerization and how the first versions of Docker were released. So let's dive directly into Docker:
Docker was built on top of LXC(operating-system-level virtualization method for running multiple isolated Linux systems on a control host using a single Linux kernel).
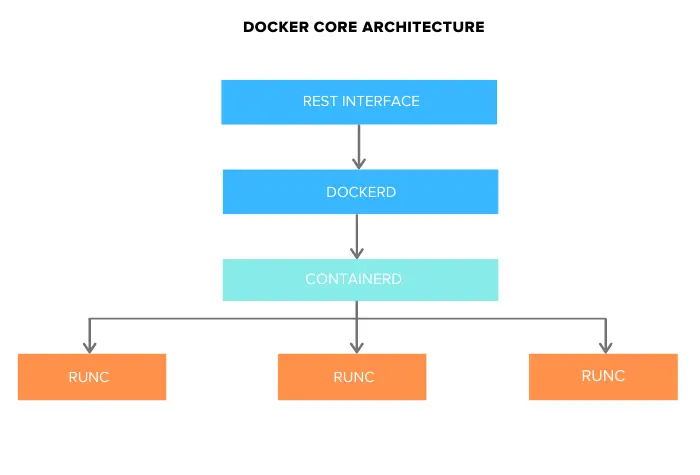
It has 3 main components:
Docker Engine (dockerd): comprises the following components in this image:
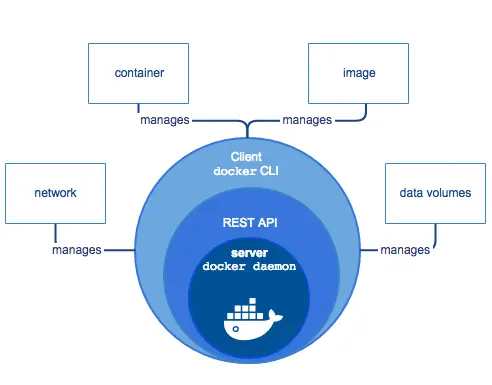
docker-containerd (containerd): another system daemon service that is responsible for downloading the docker images and running them as containers.
docker-runc (runc): is a container runtime responsible for creating the container components(namespaces, cgroups...)
Working environment
As we know, containerization, Docker containers specifically, is dependent of the host machine's Kernel. This means that you cannot run a Windows container directly in a Linux environment, or a Linux container directly in a Windows environment... You get the idea.
To solve this problem, you can use the Docker Desktop client that allows you to run containers that require a different Kernel than the host machine's (in Windows for example, Docker Desktop has the option to run Linux machines by providing a lightweight virtual machine based on HyperV to run a Linux Kernel, hence the ability to run Linux containers. So if you're on Windows you can do that, and then ask yourself why you're still using Windows).
Installing Docker
I'm currently using a MacOs machine, and since I don't have admin privileges in this machine, I hate using GUI clients that are installed on this machine. I'll be using a Kali Virtual machine where I'll set up my Docker environment (I'll mainly use it to run Linux containers)
If you're on Windows, MacOs or another Linux distribution, check the Docker docs and follow the steps to install on your host machine.
Tip: if you decide to do the same, make sure to constantly take snapshots to avoid the need to fresh install if you messed things up while testing.
Let's get started!
I have my Linux guest machine ready, and to avoid slow response when directly using the terminal inside the virtual machine, I'll be accessing it remotely through ssh.
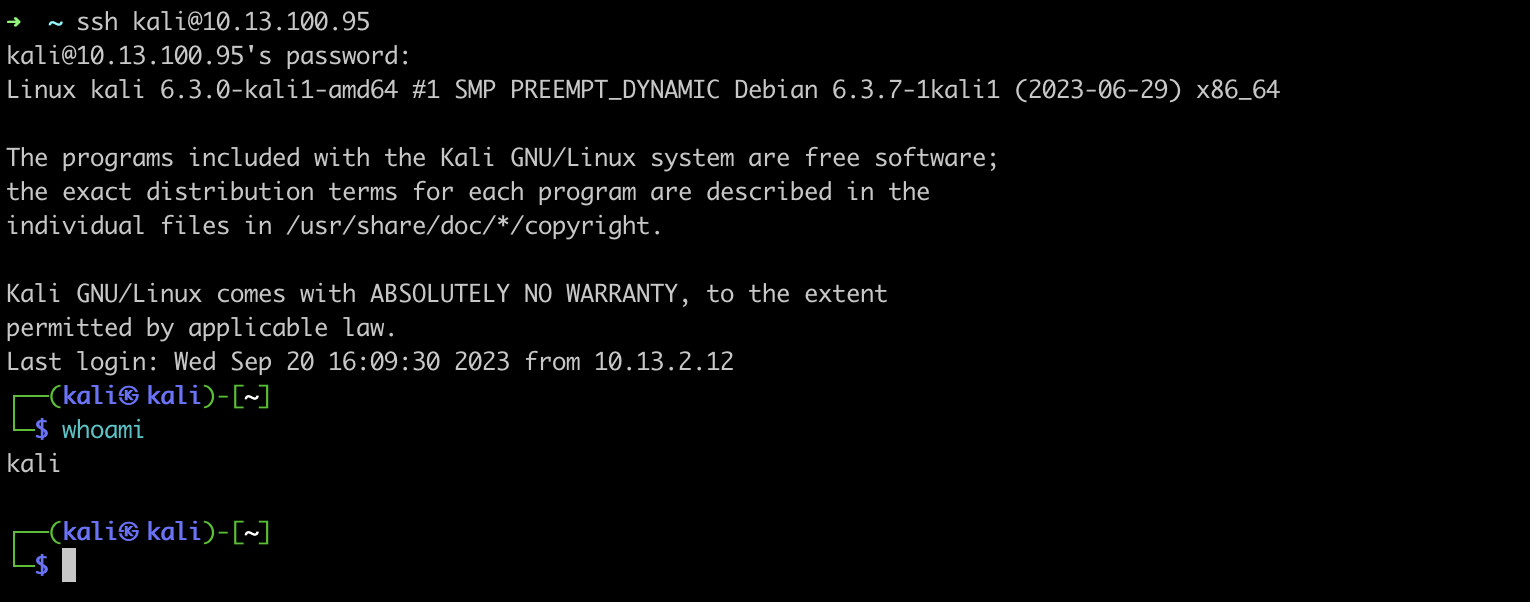
In many Linux distributions, there is already a package named docker, but the Docker we need is under another name (docker.io).
To install and run the Docker Daemon:
kali@kali:~$ sudo apt update
kali@kali:~$
kali@kali:~$ sudo apt install -y docker.io
kali@kali:~$
kali@kali:~$ sudo systemctl enable docker --now
kali@kali:~$
Hello world!
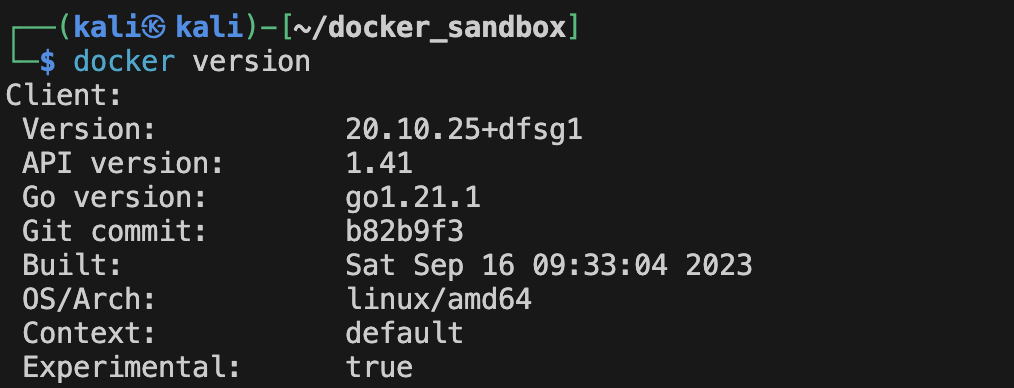
Let's start by testing a lightweight container called busybox and run a simple command in it. (busybox is a small container used in embedded systems)
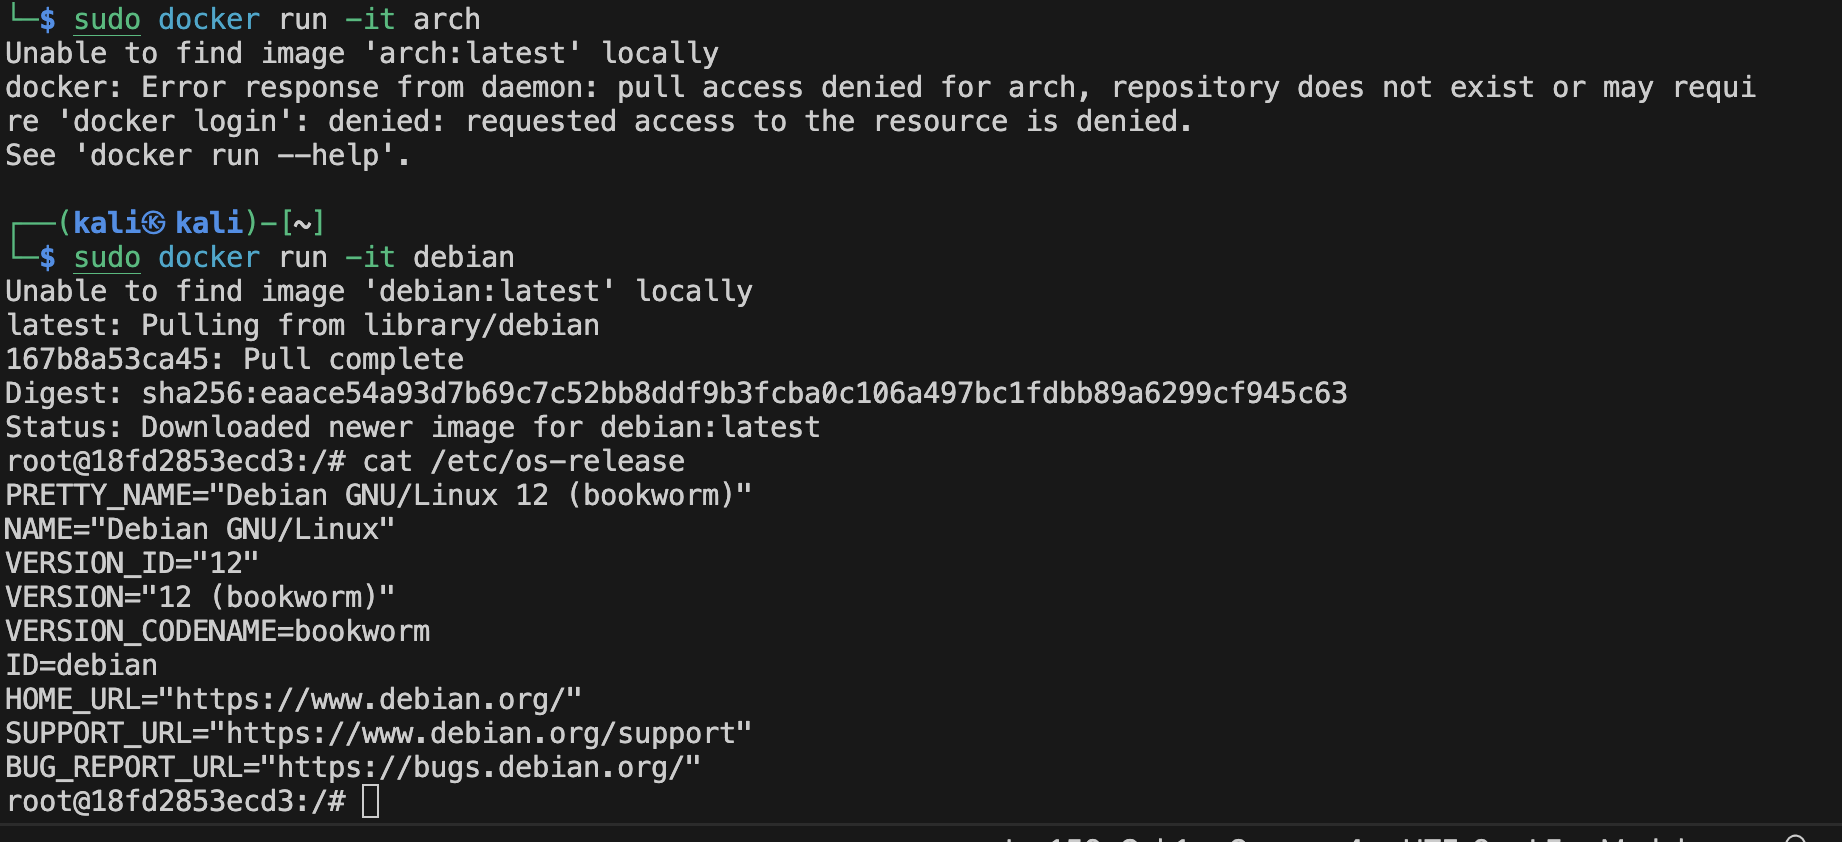
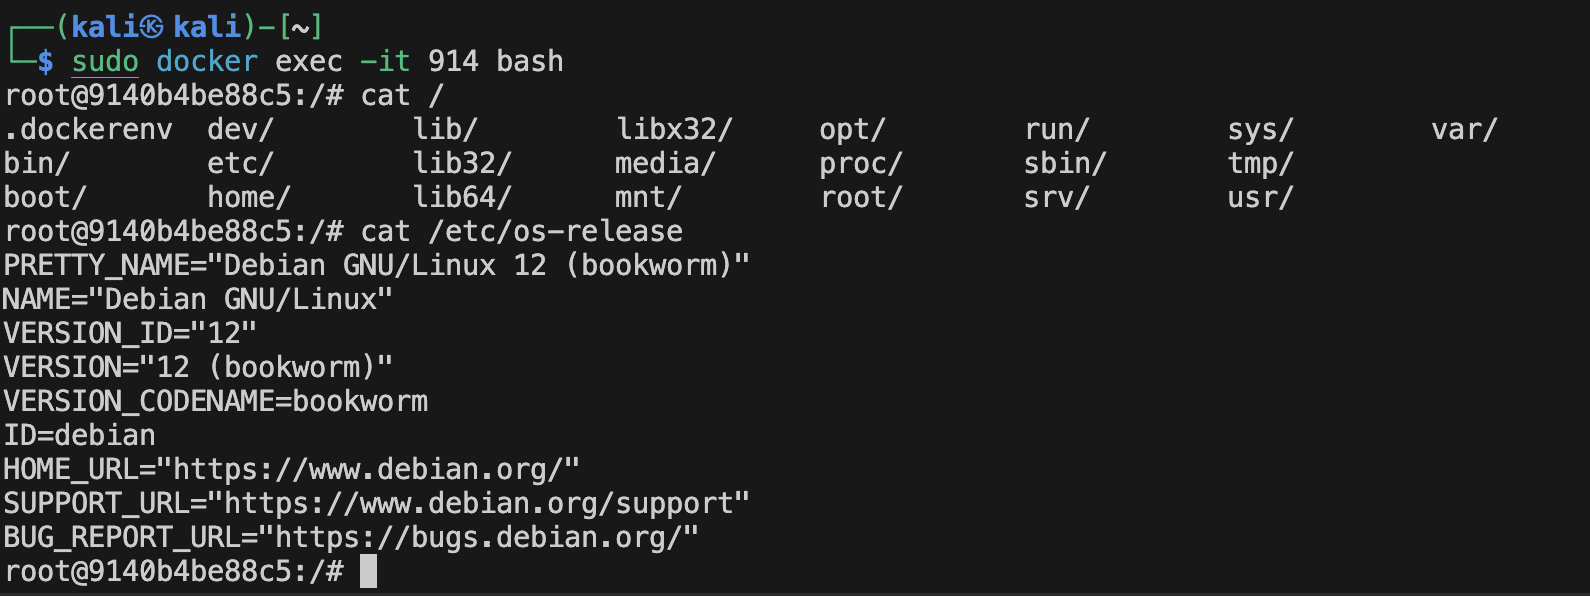
Let's run something heavier this time. Let's run an interactive pseudo-terminal of a Debian release:
sudo docker run -it debian
Detached mode
Using the "-d" flag enables detach mode, allowing the container to run in the background.
You can see the containers information of the containers running in the background using the command ps: (you can also see the containers that were stopped by adding the -a flag)
$ sudo docker ps

While running in the background, each container has a logs file that registers output from the stdout. The logs can be accessed using the command :
$ sudo docker logs CONTAINER_ID
Where CONTAINER_ID is the id of the container obviously (you can use the first distinct 2 or plus characters of the id).
Now that we have a bunch of containers in the background, it's time to put some of them down. There are two ways we can terminate our detached containers:
Stopping running containers
$ sudo docker kill CONTAINER_ID
$ sudo docker stop CONTAINER_ID
The difference between the two is the signal sent. kill sends the SIGKILL signal while stop sends the sigterm signal. Learn more about those 2 signals here.
You can run stopped containers again using Docker start command. It will then restart using the same options that you run it first with.

From detached to interactive and vice versa
Another interesting fact is the transitioning between interactive (when the container is run using the -it flags) and detached mode (when run using the -d flag):
You can go from interactive to detach by sending ^p^q signals or killing the Docker client. (note that this will not work in Windows PowerShell)
You can also detach it by defining detach-keys at docker run. e.g:
$ sudo docker run -it --detach-keys ctrl-h CONTAINER_IMAGE
Or you can go from detach to interactive mode by using the Docker exec command:
$ sudo docker exec -it CONTAINER_ID PATH_TO_SHELL_BINARY
Docker images
Image?
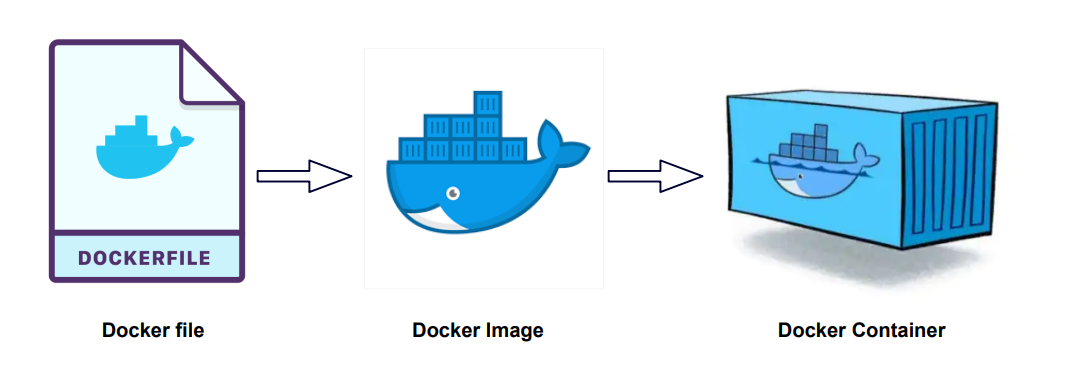
An image is a lightweight package (not to be confused with Linux packages) that contains everything needed to run a set of programs. It's a combo of files and metadata(image author, env variables, list of commands to run and build time...), forming layers stacked on top of each other.
Images are made of layers, where each layer can add, change and remove files.
An easy way to visualize images, layers and containers in OOP:
Images: classes
Containers: objects
Layers: inheritance
Manage images
You can find 3 namespaces for Docker images:
Docker official images: curated open-source images.
User/Orgs images: images from publishers verified by Docker Inc.
self-hosted images: images that are not hosted on Docker Hub, but on third-party registries.
$ sudo docker images
Or search for images from the Docker registry:
$ sudo docker search DOCKER_IMAGE_NAME
You can manage Docker images (pulling and pushing images) using the Docker client either by storing them in your Docker host or in a Docker registry.
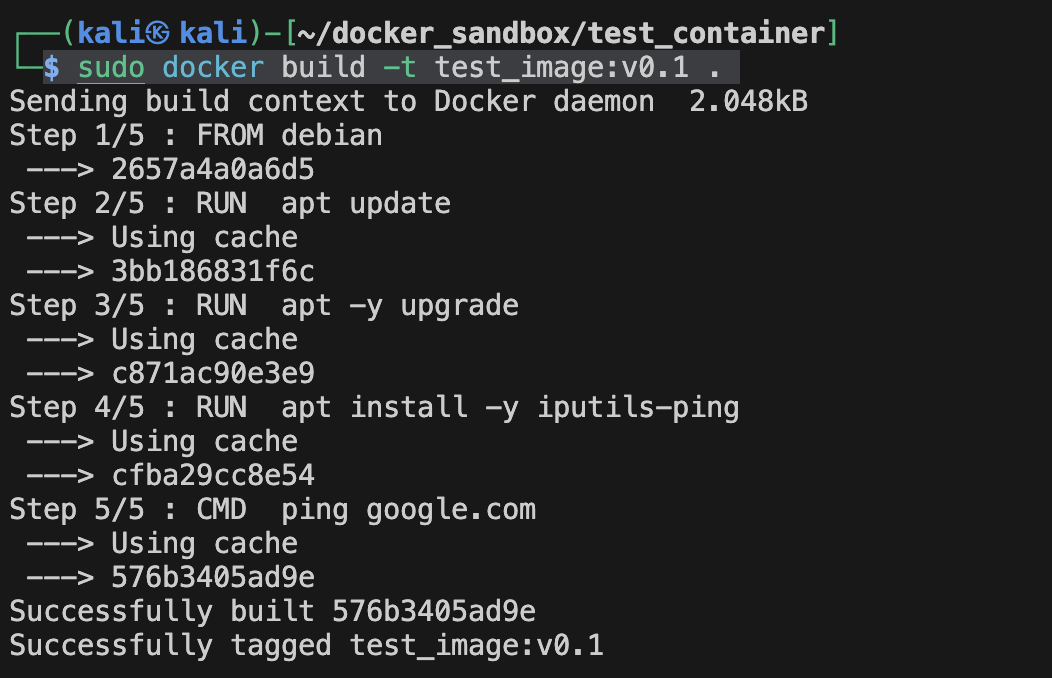
Docker has a built-in caching system that takes a snapshot after each build step, and before executing a step checks if the built step is cached for optimization purposes. (you can force a no-cache during the build using --no-cache)
Creating new images
You can create new Docker images by either:
docker commit: save all the changes made to a container into a new layer and create a new image. (not a very popular method) More information about docker commit here.
$ sudo docker commit --author AUTHOR_NAME CONTAINER_ID IMAGE_NAME
docker build: the best method to create docker images. It makes more maintainable and lightweight images...
Dockerfile
A Dockerfile is a blueprint, for a Docker image that is based on another image. (You can make an image from scratch, literally! Learn more here.)
We can build a container image automatically using a Dockerfile. It's a series of instructions telling Docker how an image is constructed. It's built using the docker build command.
Anatomy of a Dockerfile
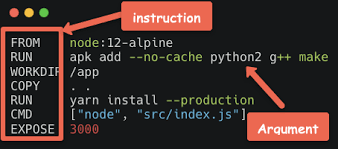
A Dockerfile is made of a set of instructions, each representing a layer of the image that we want to produce.
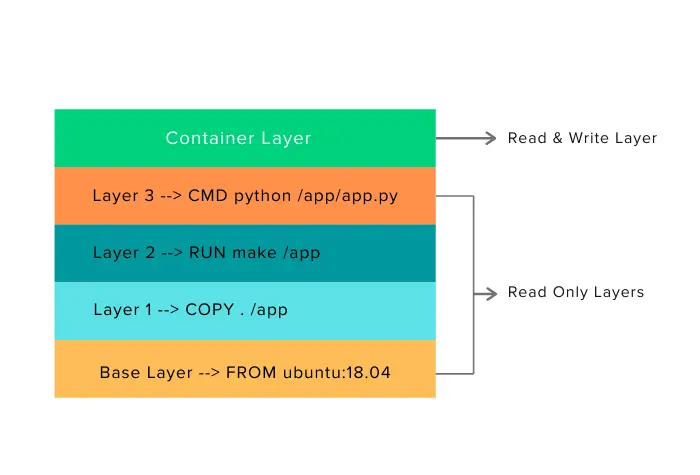
Here is an example of a Dockerfile:
Creating an image from a Dockerfile
To know more about Dockerfile, images and layers. Let's create our own simple Dockerfile:
This will generate a simple Docker image based on Debian and that just infinitely pings google.com:

Let's build it now (running a docker build is similar to making, you need to be in the directory where your target Dockerfile is. Or you can specify the Dockerfile using -f (--file) flag)
$ sudo docker build -t test_image:v0.1 .
And run it :

We can see the layers using :

Now let's see something interesting. Let's make a similar Dockerfile but instead of adding the command "ping google.com" inside of the Dockerfile, we execute it when we run the image:
$ sudo docker run --name second_test_container -d second_test_image:v0.1 ping google.com

We can see that the CMD instruction that runs "ping google.com" inside our Dockerfile runs our command using "/bin/sh -c".
As we know in the Unix system, a process can trigger the execution of another independent process using the exec family syscalls. The Docker builder is lazy (but more secure as BourneShell (sh) has been maintained for far longer than Docker, and is less susceptible to being vulnerable to input validation and other forms of attacks), he doesn't parse the commands taken but just forwards them to the shell to execute them. And that's why the shell syntax is used.
Another way to execute those commands is by using the JSON list also known as the exec syntax. The idea is to separate the arguments manually :
- RUN ["/usr/bin/ping", "google.com"]
tl. dr: separate arguments for the builder to execute your commands, otherwise he'll use the shell to execute them.
Docker PID 1
The very first process ran inside of a Docker container is assigned the process ID: PID 1. Thus has a very special role in the system. The PID1 process is responsible for the signal propagation to the other processes. When you send a SIGTERM or a SIGINT, the signals should be handled by that process otherwise the PID1 will just get killed after 10 seconds. A good way to properly handle signals and control the container during run-time is to use a supervisor. A supervisor is a tool through which we can run multiple processes while building our docker image. There are many supervisors. They're usually made for specific Os or distributions... Supervisord, systemd, runit, s6...
Configure a simple container supervised by supervisord
I made the following Dockerfile. it installs the packages for supervisor and ping command and sets up the configuration environment for supervisord, then executes supervisord that thus has PID1.

Then made the configuration file for supervisord. nodaemon=true tells him to run in the foreground instead of running as a daemon. The second part is the program behavior that we want: in a loop, every 60, ping google.com and concatenate the output given in a file called pings.txt located in the root directory.


Now when we run this in interactive mode we can see the following result

And when I send a SIGINT signal: (notice the SIGINT sent using ^C)

Build-time
We've been building a lot of images, but what is building? Building refers to the process of creating a Docker image from a set of instructions and resources defined in the Dockerfile. There are 2 tools that build our images:
Classic builder
BuildKit
The difference between those 2 tools is that BuildKit has improved performance, and parallelism and is just superior in many other aspects. Luckily, BuildKit is the default builder as of version 23.0. You can learn more here.
Dockerfile's CMD & ENTRYPOINT
We know that when a container is built and run it must have a process that takes PID1 and is the core of the container's lifecycle. That's where CMD and ENTRYPOINT come into play. Both CMD and ENTRYPOINT are responsible for the container's behavior, only one CMD and ENTRYPOINT is executed during run-time (the last one overrides the previous one; at the end, only 1 CMD and ENTRYPOINT is executed). But what if I use both of them? Well, then the commands get concatenated from both CMD and ENTRYPOINT. ENTRYPOINT is added to the result first before CMD. E.g :

Gives the following result when run:

Now the correct way:

That eventually gives:

See how both got concatenated. (p.s: it doesn't matter where ENTRYPOINT is in the file, it will always be executed before CMD) (p.s2: the command you pass when you run the image overrides the CMD) (p.s3: you can also override entrypoint by using --entrypoint when you run the image) But what is the difference between the 2? Basically, ENTRYPOINT is great for "containerized binaries", while CMD is great for images with multiple binaries.
Docker COPY
The COPY keyword allows us to copy files from the build context (the directory in the host that contains the Dockerfile) into the container that we are building. It's trivial to copy configuration files... You can copy directories (technically files in UNIX systems) and you can use .dockerignore to ignore files from the copy target.
Image size optimization
The more layers a Docker image has, the bigger our image gets. Therefore, many techniques are available to obtain a smaller image:
Collapsing layers:
Collapse layers into fewer layers. e.g.: "RUN apt-get update && apt-get install xxx && ... && apt-get remove xxx && ..." This is better than using RUN for each instruction. And they're all removed in the same layer. Though it's slower to build, that's where you want to see if you want to trade time and readability for space.adding binaries that are built outside of the Dockerfile:
Copy binaries from your current context and compile them inside the container. Could come in handy sometimes but usually brings back compatibilit issues.Squashing the final image:
Transform the final image into a single-layered image by either using "build --squash" or exporting the final image (after building)multi-stage builds:
You can use FROM statements to use a different base, each begins a new stage of the build. Learn more here.
Docker networking
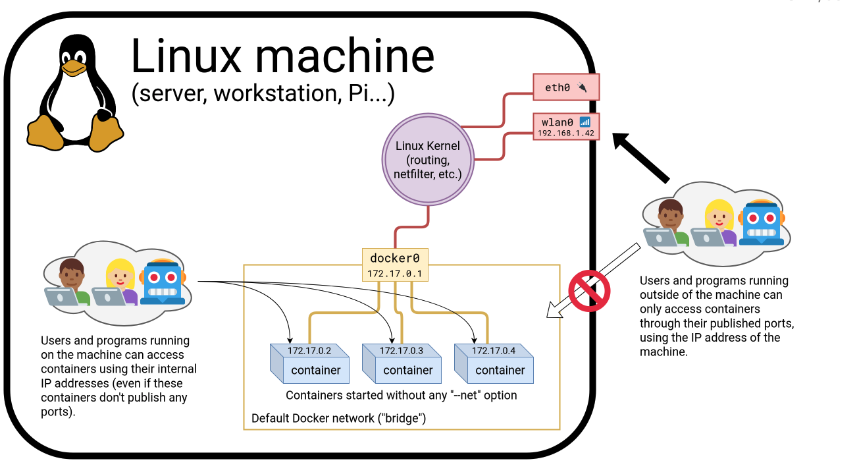
When you run a Docker container, it is isolated from the host system by default, since it has its own network namespace. To make a container accessible from the outside, it needs to expose/publish ports. What is exposing and publishing in this context?
Exposing is specifying which ports your container listens on. Though doesn't mean he can communicate with the outside.
EXPOSE 80
Publishing is mapping the specified container ports with the host's ports.
docker run -p 8080:80 NAME_Of_IMAGE
There are several ways to publish ports in Docker:
-P (--publish-all): it publishes all the exposed ports.
Note that this only publishes the exported ports and maps them to a random port on the host. If no ports are exposed, then obviously nothing is going to be published.
You'll notice that in some cases the images you're trying to run have already published ports. E.g.: Nginx.
To see what ports are exposed on a specific image use the following query:docker image inspect --format '{{.Config.ExposedPorts}}' image_name-p (--publish): This will publish the ports you specify and map them to the specified host ports. Unlike -P, ports in this case can be published without having to be exposed, though it affects readability.
Using a docker-compose.yml file: a cleaner way to publish ports, is to write a docker-compose file. It's useful especially when you have to set up 2+ interconnected containers. As it is an organized way. Example for an Nginx docker-compose file:
      #Nginx Service
        webserver:
          image: nginx:alpine
          container_name: webserver
          restart: unless-stopped
          tty: true
          ports:
            - "80:80"
            - "443:443"
          networks:
            - app-network
(the host can access containers using their internal ip address even if don't have any ports published)
Container network drivers
Network drivers are components that define how containers communicate with each other. There are several we count: bridge (the default), null, host, and container. A driver can be selected using --net
Container network model
The network model defines how the containers interact with the host and each other from a networking perspective. By default containers are isolated so by publishing ports and creating networks, we can interconnect stacks and apps. Networks are also isolated, but containers belonging to different networks at a time can connect networks...
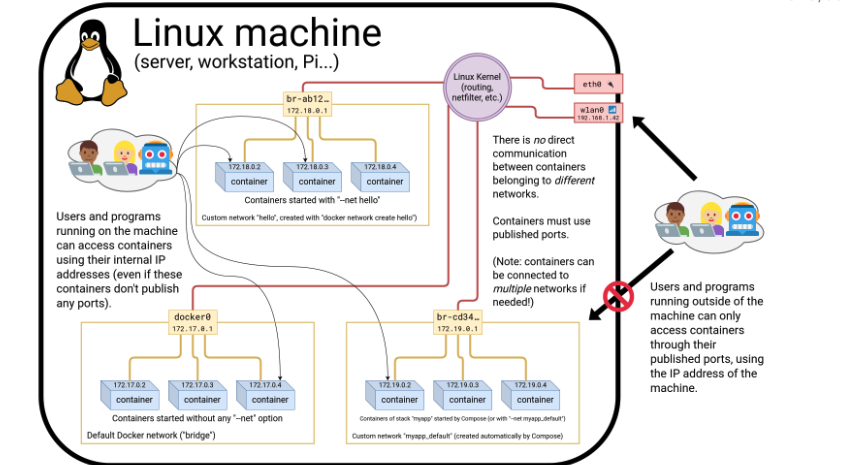
Let's run a simulation:
Let's create a network named test that englobes 2 containers
$ docker network create test
$ docker run -d --name test_container1 --net test debian sleep infinity
$ docker run -it --name test_container2 --net test debian bash
You can test if the container1 is accessible from outside the network, either by pinging its hostname from the host or another container. Containers on the same network have built-in DNS resolution for each other. Since Docker sets up DNS service within the network. You can connect and disconnect running containers from the network using
$ docker network connect NETWORK_NAME CONTAINER_ID
$ docker network disconnect NETWORK_NAME CONTAINER_ID
Ambassadors
Docker ambassadors refer to the containers and services that act as proxies for routing traffic (e.g: load balancing, service discovery, migration, failover, authentication...)
Docker compose & YAML
A little bit of YAML
YAML is a human-readable data serialization format. It's somehow similar to XML and JSON but it's more oriented towards data exchange between different programming languages. YAML is commonly used for Docker configuration (Docker compose, Kubernetes.) Example of YAML syntax:
#Comment: This is a supermarket list using YAML
#Note that - character represents the list
---
food:
  - vegetables: tomatoes #first list item
  - fruits: #second list item
      citrics: oranges
      tropical: bananas
      nuts: peanuts
      sweets: raisins
Docker Compose
Docker compose is a tool that lets you run multiple containers at once. You can interconnect those containers and configure them however you like in a single YAML file.
Conclusion
Great thanks to the guys who made this Docker training.
Another great resource.
For typos and mistakes, do not hesitate to open a pull request or contact me.
Subscribe to my newsletter
Read articles from Redaoui97 directly inside your inbox. Subscribe to the newsletter, and don't miss out.
Written by
