Configure mTLS with Nginx and EasyRSA
 Ibrahim Kabbash
The goal of this article is to explain the concept of Mutual Transport Layer Security (mTLS) protocol, how it works, the role of each component and all with an example as a proof of concept.
Prerequisites
Nginx knowledge
Secure Sockets Layer (SSL) / Transport Layer Security (TLS) and authentication knowledge
A virtual machine with Nginx and EasyRSA installed (preferably from the repo)
Linux knowledge
mTLS Anatomy
Before implementing the demo, let’s first have a good idea about mTLS and how does it compare to the usual SSL/TLS security protocols. SSL is primarily used to secure communication between a client (such as a web browser) and a server (such as a web server) which focuses on server authentication, where the client verifies the server's identity. Meanwhile mTLS on the other hand, is designed for mutual authentication. Both the client and the server are required to present their digital certificates to prove their identities, this ensures both parties can trust each other. The mTLS protocol can expand in case scenarios from VPNs to other case scenarios such as IoT for device authentication.
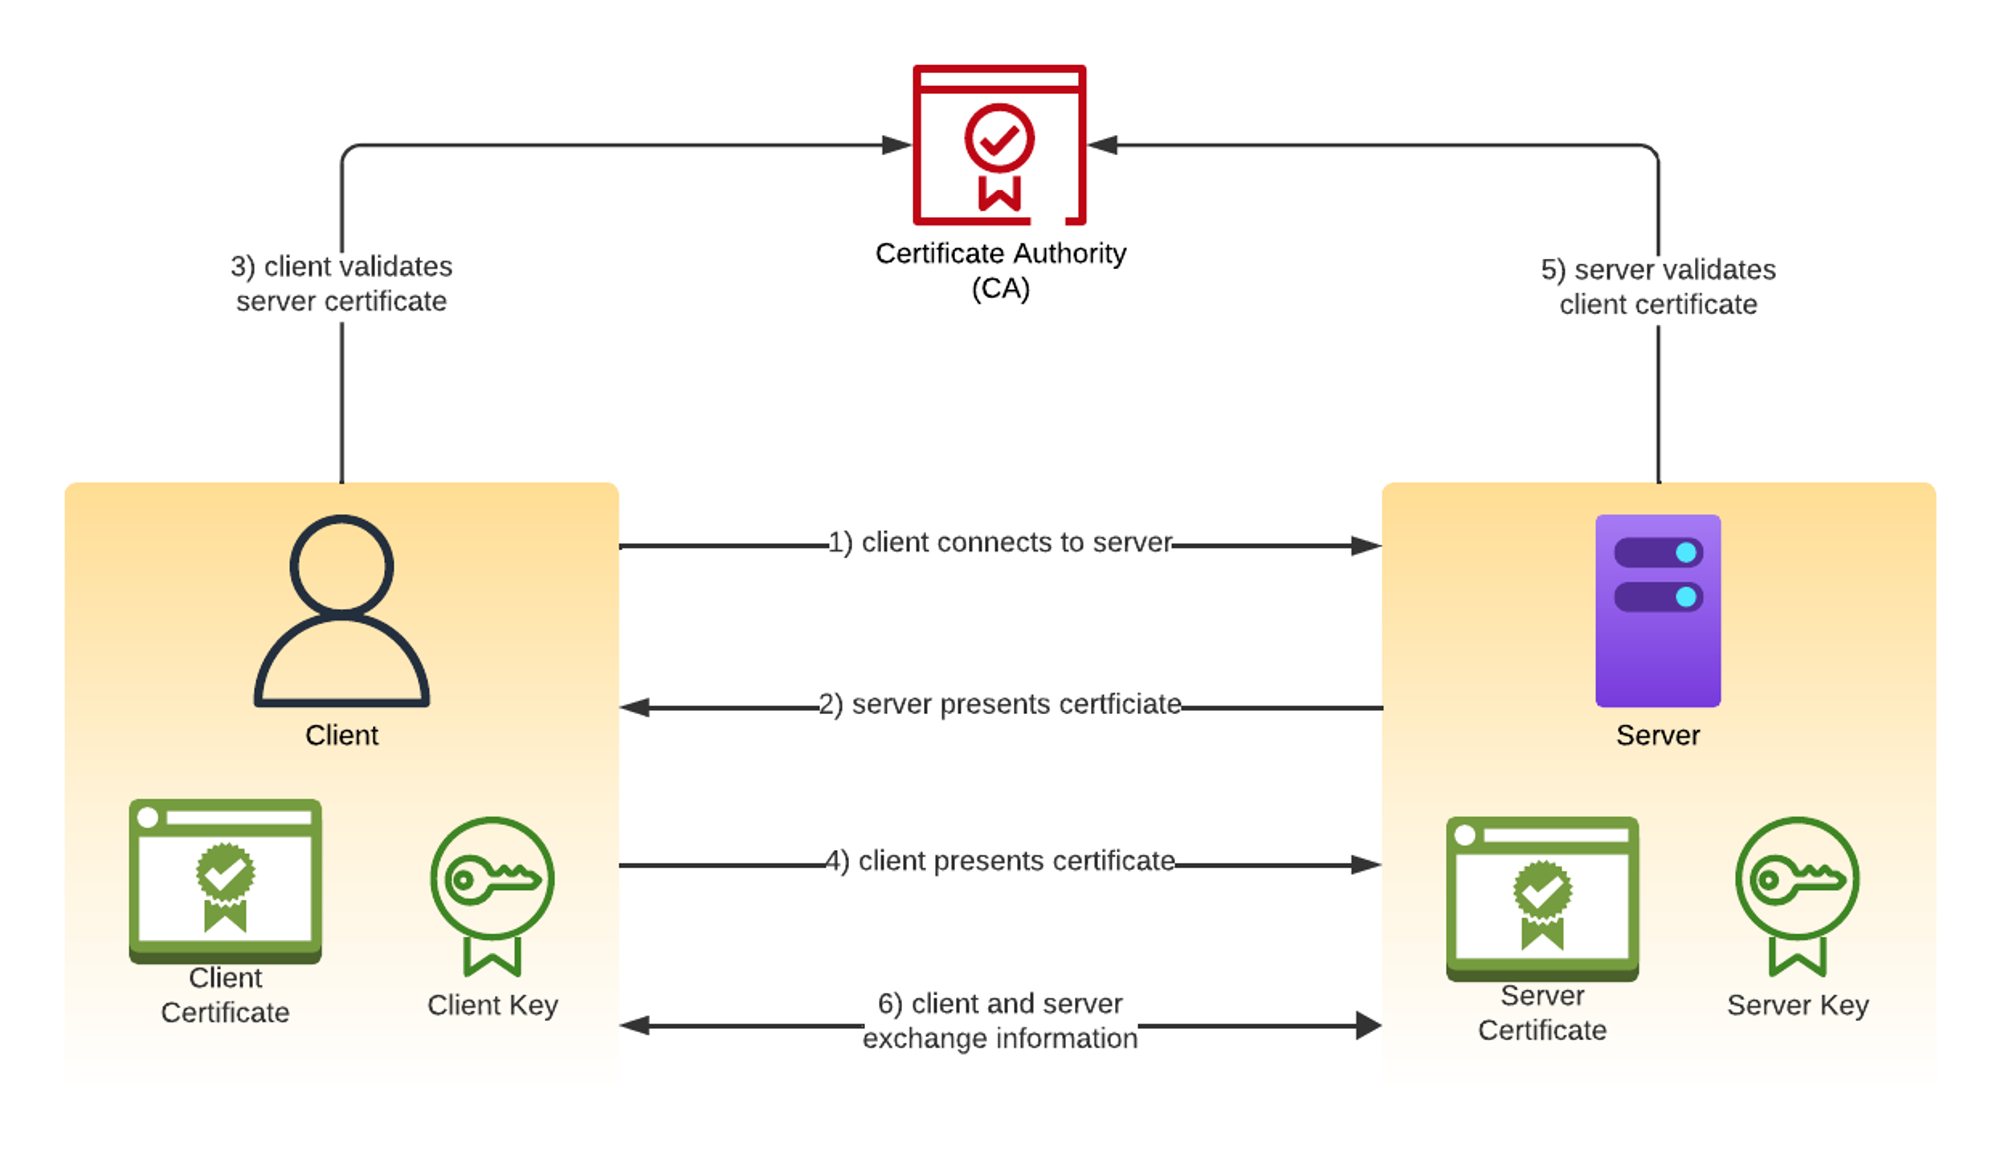
In mTLS, both the client and the server are verified and authenticated using digital certificates through a trusted Certificate Authority (CA). The following figure illustrates the request flow and how trust is established.

Demo
So we’re gonna need a server which has an Nginx running on and to generate a self-assigned certificate authority and using that certificate authority we’ll also need a client and server certificates and keys. All the certificates will be created using EasyRSA.
Generate certificates and keys
In your EasyRSA directory (where you installed it) create a public key infrastructure (PKI) in case you haven’t yet, if you did skip this step.
./easyrsa init-pki
After that, generate the CA certificate using the following command (if you want to add a pass phrase remove the nopass option)
./easyrsa build-ca nopass
You have created a self-assigned CA certificate, you can begin creating your own server and client certificates. We’ll create a server certificate for Nginx using the following command so it can host on SSL, then copy the server certificate and key to Nginx’s SSL directory
./easyrsa build-server-full server nopass
mkdir /etc/nginx/ssl
cp /path/to/easyrsa/pki/issued/server.crt /etc/nginx/ssl
cp /path/to/easyrsa/pki/private/server.key /etc/nginx/ssl
Server’s done, now you can create the client’s certificate and keys and they’ll be called client (or any other name you’d like). Be sure to copy them into your local machine for testing from the issued directory and private directory inside EasyRSA as well
./easyrsa build-client-full client nopass
Lastly generate a Certificate Revoke List (CRL), it’ll be explained further in the testing section why its needed
./easyrsa gen-crl
Setup Nginx
In order to use mTLS we’ll configure Nginx to require client authentication and ensure the client presents their own certificate that was made from our CA when they connect. Make sure to specify the location of your CA root certificate and the CRL below as they’re the crucial components for verification.
server {
        listen 80;
        server_name haha-example-server.com;
        location / {
                return 301 https://$host$request_uri;
        }
}

server {
  listen 443 ssl;
  server_name haha-example-server.com;

    # server's certificate
  ssl_certificate     /etc/nginx/ssl/server.crt;
  ssl_certificate_key /etc/nginx/ssl/server.key;

    # specify path to CA
  ssl_client_certificate /path/to/easyrsa/pki/ca.crt;
    # specify path to CRL
  ssl_crl /path/to/easyrsa/pki/crl.pem;
  ssl_verify_client  on;

    # optional in case you wanted to troubleshoot
  access_log /var/log/nginx/mtls.access.log;
  error_log /var/log/nginx/mtls.error.log;

  location / {
      return 200 OK;
      }
}
The ssl_client_certificate used to verify client certificates presented during mTLS, while ssl_crl helps Nginx check if client certificates have been revoked by the CA before accepting them for mTLS. Finally, ssl_verify_client determines whether the server verifies client certificates during mTLS handshake or not. Can also be set to either off or optional.
Testing
We’ll be making an authenticated request with the curl command using the client’s certificate and private key. Make sure to add the host in your hosts file with the IP of the machine that you configured the web server with.
curl -Lks --cert /path/to/client.crt --key /path/to/client.key <https://haha-example-server.com>
The curl command’s options explained:
Lredo the request on the new redirectionkexplicitly allows "insecure" SSL connectionsssilent mode to not show progress bar
If all is well, you should be getting an OK response hence the mTLS verification succeeded! Otherwise you’ll be getting the following response if the client is revoked, if the certificate is from a different CA, or if the certificate has been expired.
<html>
<head><title>400 The SSL certificate error</title></head>
<body>
<center><h1>400 Bad Request</h1></center>
<center>The SSL certificate error</center>
<hr><center>nginx/1.24.0</center>
</body>
</html>
What if you don’t want that client to be able to authenticate anymore? Simply go back to your web server’s EasyRSA directory and execute the following.
md5sum /path/to/easyrsa/pki/crl.pem
./easyrsa revoke client
./easyrsa gen-crl
nginx -s reload
md5sum /path/to/easyrsa/pki/crl.pem
To explain the role of the CRL file further, if you ran the md5sum before revoking and after you’ll notice the hash value of the file is different, and that’s because it was changed. The CRL file contains a list of revoked certificates, allowing Nginx to check the revocation status of certificates during the request initiation. If you tried to use the curl command on the same certificate again it should give you a status code 400.
If you would like to create a certificate that’ll expire tomorrow using EasyRSA, open the vars file using your favorite text editor and uncomment the following line adding 1 so it’ll expire tomorrow.
set_var EASYRSA_CERT_EXPIRE 1
Conclusion
The mTLS can be implemented in many other ways and for many other use cases, it could be used as a license checker, an identity verification, or even to secure cross-service communication between microservices. You can test using an API instead of Curl command if you would like. Just be sure to manage your certificates properly and you’re good to go!
Subscribe to my newsletter
Read articles from Ibrahim Kabbash directly inside your inbox. Subscribe to the newsletter, and don't miss out.
Written by
