Day 10 Advance Git & GitHub for DevOps Engineers.
 Apurv Samadder
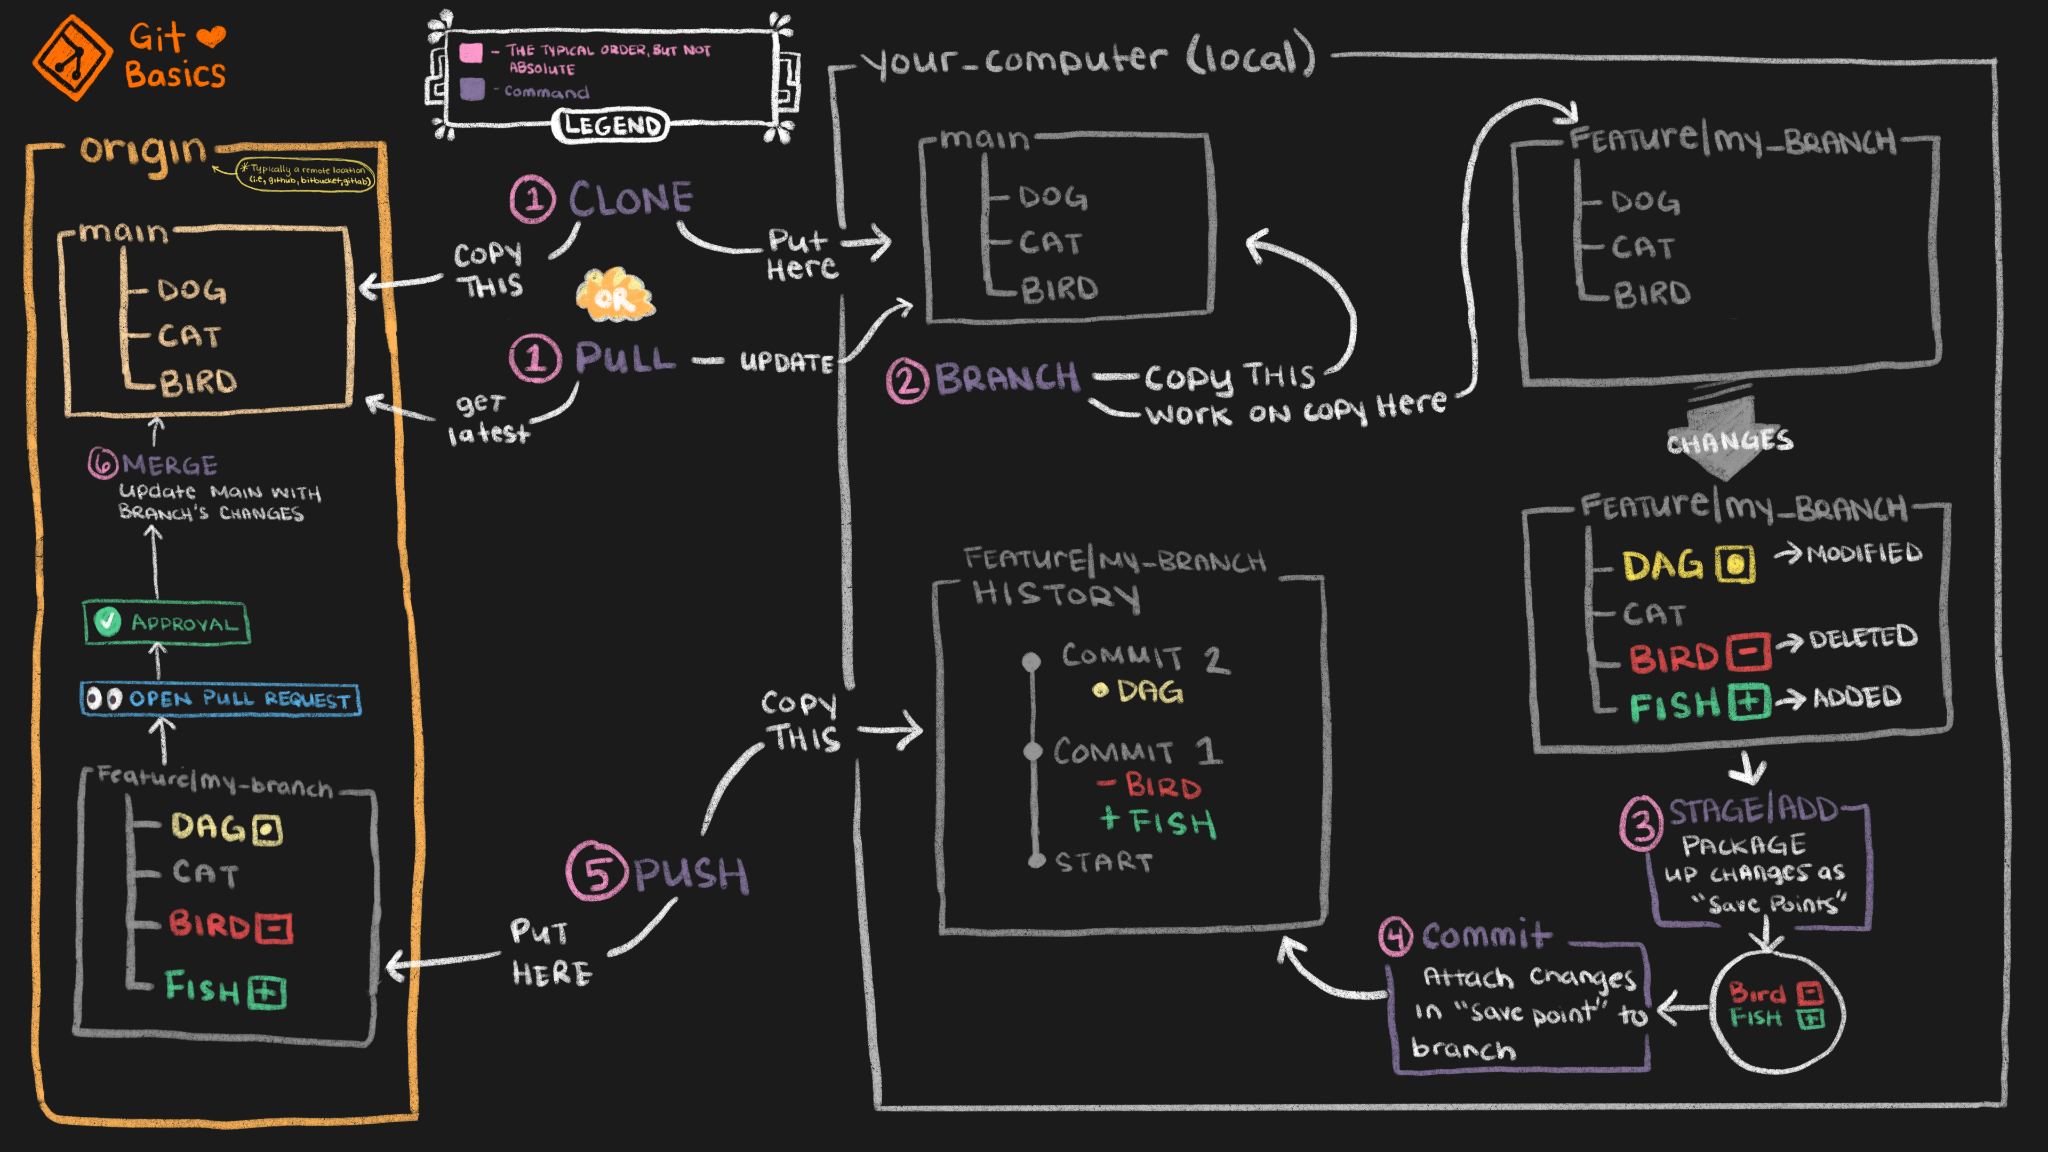
What is Git Branching? 🌿
Git branching provides flexibility, enabling teams to work on different parts of a project simultaneously while maintaining a stable main branch. It's a key feature for collaborative and agile development

Branching Strategy 🌿
There are many ways or strategies of branching, below is the image that is bit old technique of doing branching where, we initially have 3 Branches, Master, Staging and the Developer
📍 Developer Branch is the branch where we have actual code that is working and running in the production environment and, new feature is created. developed in this branch. Develope branch can also have multiple branches depending on what feature is being developed and who is working on it.
Note: Not all developed will work directly on develope branch as this will create a mess if everyone will work on the same branch, So everyone will create a branch from Develope branch i.e some feature branch and then add it to actual develop branch
📍 Staging Branch is the branch where New features are tested that were developed in Develope branch, anything before going to production/Master, will get tested on this branch
📍 Master Branch is the actual branch where actually live/ running / working code of your app resides. And no one works on it. as it is the approved working piece of code of the App.
There Could be one Branch in Master/ production, and it's not necessary, this will be there, it depends on the organization, that Branch is a Hotfix branch, this is a patch/ or temporary solution for anything that is creating issues in production and need to be fixed right away. The feature of this Hotfix branch will be integrated into the Develop branch as well so that developers are aware of the Fix that is being done.

However in today's Scenario, we have different ways of doing things and there is no specific Branching strategy, it depends on teams or company size. Still, there is a Jira tool, that is called project management tool used to project tracking
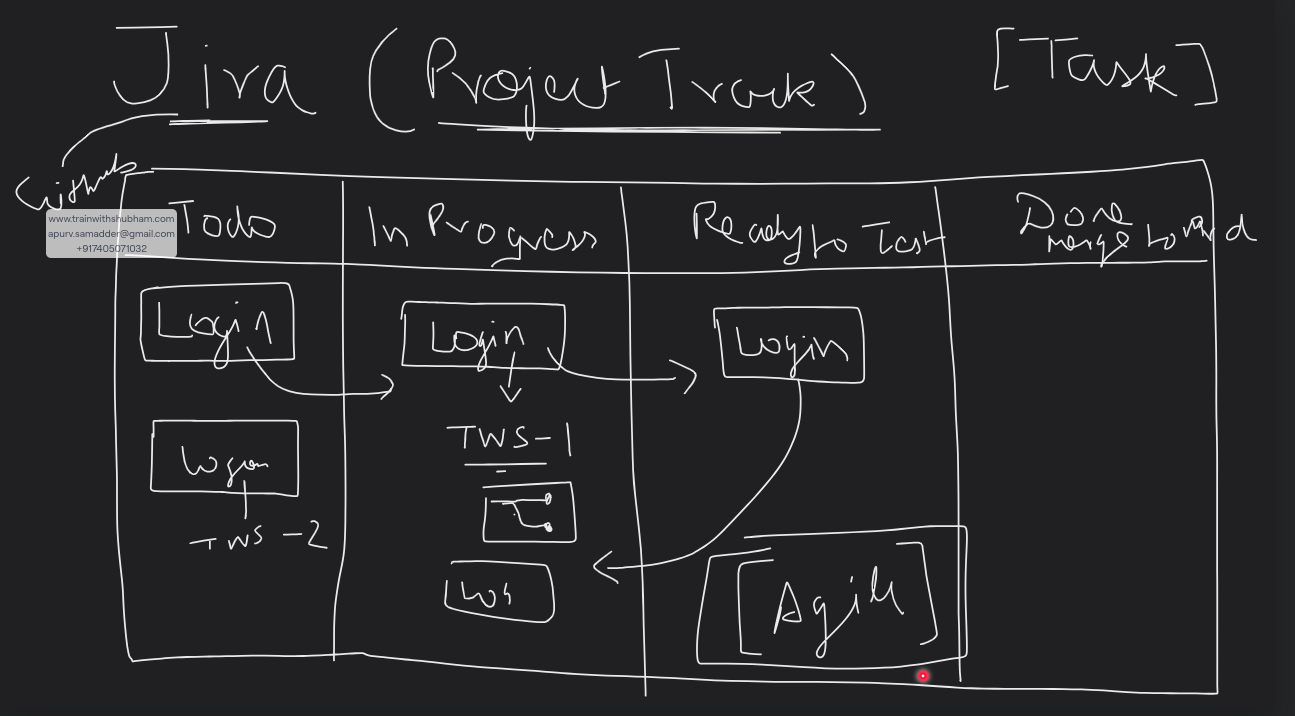
📍 Whenever a New Toda ( Task/ Feature ) is to be developed it gets first in Jira with a Number and when someone starts working on it, it goes to the In-Progress state. Many a time Jira and Github are connected and once the Ticket goes in In-progress status, we see a New branch is created in the Development branch and everyone can see the code that is being written for that feature. Further it moves to Ready to test (UAT/ Staging) for get tested and once Done, project release is done, it means it goes into Production
Let actually now see how this branching is done
Below is the screenshot that shows the Current status of the branch of our Repository. And how can we create a new branch and move to a new Branch and back again to the Master branch?
📍 Git Status:
git status

📍 Git Checkout: Creating new file in Dev branch and checking the status also Git adding and committing new changes in dev.
git checkout -b dev
git status
git add newdev.txt
git add newdev.txt
git commit -m "Dev 1 commit"
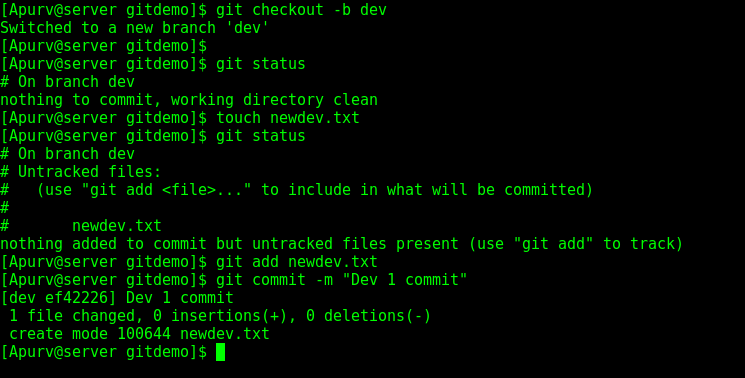
While we have added the newfeature in the Dev branch, we will see the files only on Dev branch not in the Dev Branch.
Check by doing ls in the dev and master branch
git status
git ls
git checkout master
git status

📍 Git merging the Dev to master Branch
git merge dev

After the dev (new feature) branch is merged with the main branch, the HEAD will now point to the Main branch as shown below. This is mostly visible in Ubuntu system not in centos 7
Taking the correct screenshot from the Ec2 machine
git log --oneline

Diagrammatically, the merge will appear as below now;

Adding the latest updates in the git hub
git push origin master

Another and better way of doing is to first set URL, instead of giving the token as a password in the command
git remote set-url https://<token>@github.com/<repo_name>

It will never as for any password moving ahead
📍 Git Pull & Git Fetch
Git pull will only pull the changes or updates from the master branch to local repository. However, Git Fetch will pull/bring down all the updates from the Remote repository to the Local repository
git pull origin master
git fetch

📍 Git Rebase and Git Merge
Git Merge is the command that allows the developer to merge the changes from the dev branch to master branch. The logs are modified once the action is completed, but there is one shortcoming with Merge the commits from the develope / feature branch get removed and only the last commit will be visible in the master branch, where the merge happened. along with all the previous commits in the Master branch.

Git rebase, is a similar command to merge but it keeps the commits that happened in the Develope /feature branch intact or we can say it keeps it in a Linear manner so that all of the Logs are visible on the Master branch well
Below is the sample
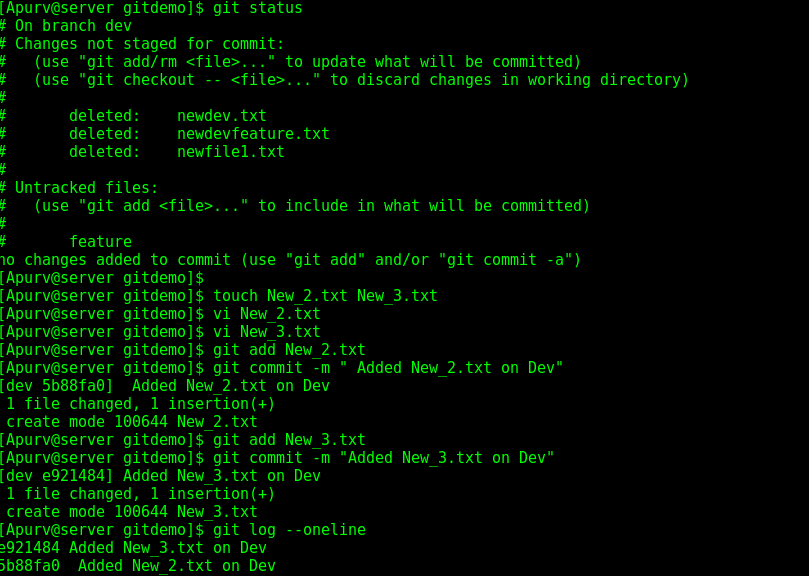

Now if we do rebase, the Head will point to the branch that we rebased And will show all the commits in the Develope/Feature branch, that we did.

Commands that were used
git merge <branch name>
git rebase <branch name>
git checkout <branch name>
📍 Git Revert & Git Reset :
Git Revert is used to revert the changes that were done by mistake. While we do git revert, the wrong work, will be reverted but the commit message will remain there.
For Eg. We have added some content in the Dev branch in the New_3.txt file, and also commited it in the repo with the commit Message "Friday Party"


But later on, revert it
git revert <hash code of the commit>

After reverting the lines that were added got removed however the commit message will be there
Git Reset
Git reset is used to move the current branch head to a specific commit, effectively “resetting” the branch to that commit. It is often used to undo changes or unstaged files.
There are three types of git reset:
- $ git reset — soft HEAD~1*— This form of reset is the least destructive. It moves the HEAD pointer to a different commit while leaving your working directory and staging area unchanged
- $ **git reset — hard HEAD~1** — changes are permanently discarded.
- $ **git reset — mixed** — default behavior if no option is specified.*
Below is an example where we see a demo of a soft reset.


Above are screenshots before doing a Soft Reset.
Below we will see screenshots after doing a soft reset

After doing a reset, we see the files have been removed from tracking and now its unstaged, which is evident from the git status
Another Screenshot that will display what if we do git reset --hard <hashcode>
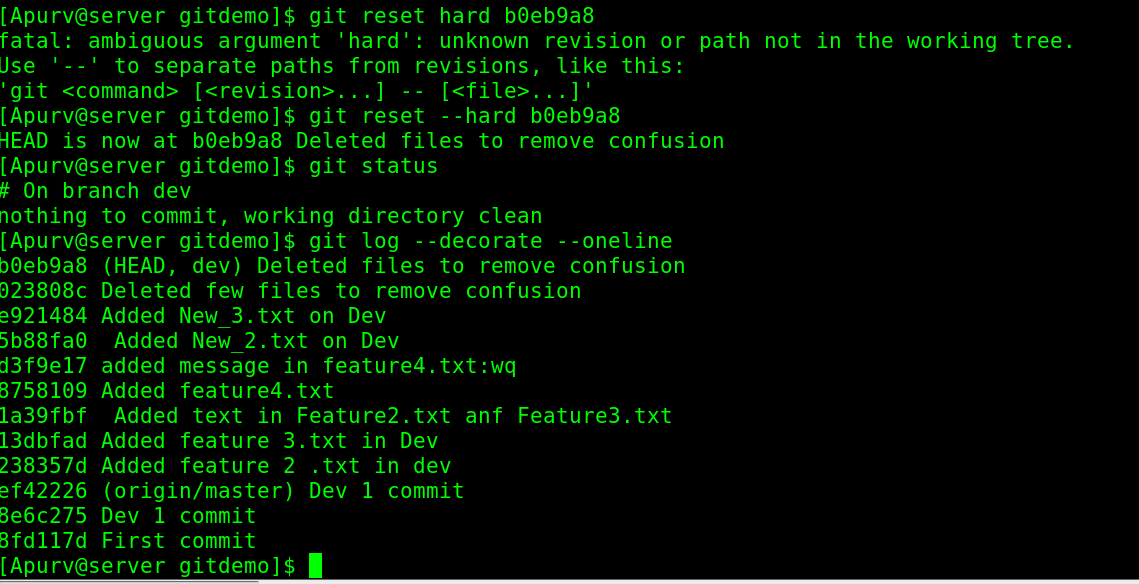
The difference between both of them is in the case of a Soft reset it is still visible in an untracked file in the staging area, that needed to be staged and committed, it's still available in the local repo. However, when we do a Hard reset, it is removed and cannot be recovered. It's Dangerous to do a Hard reset
Subscribe to my newsletter
Read articles from Apurv Samadder directly inside your inbox. Subscribe to the newsletter, and don't miss out.
Written by
