Automating AWS Resource Deployment with Terraform via CloudFormation
 Asma Akram
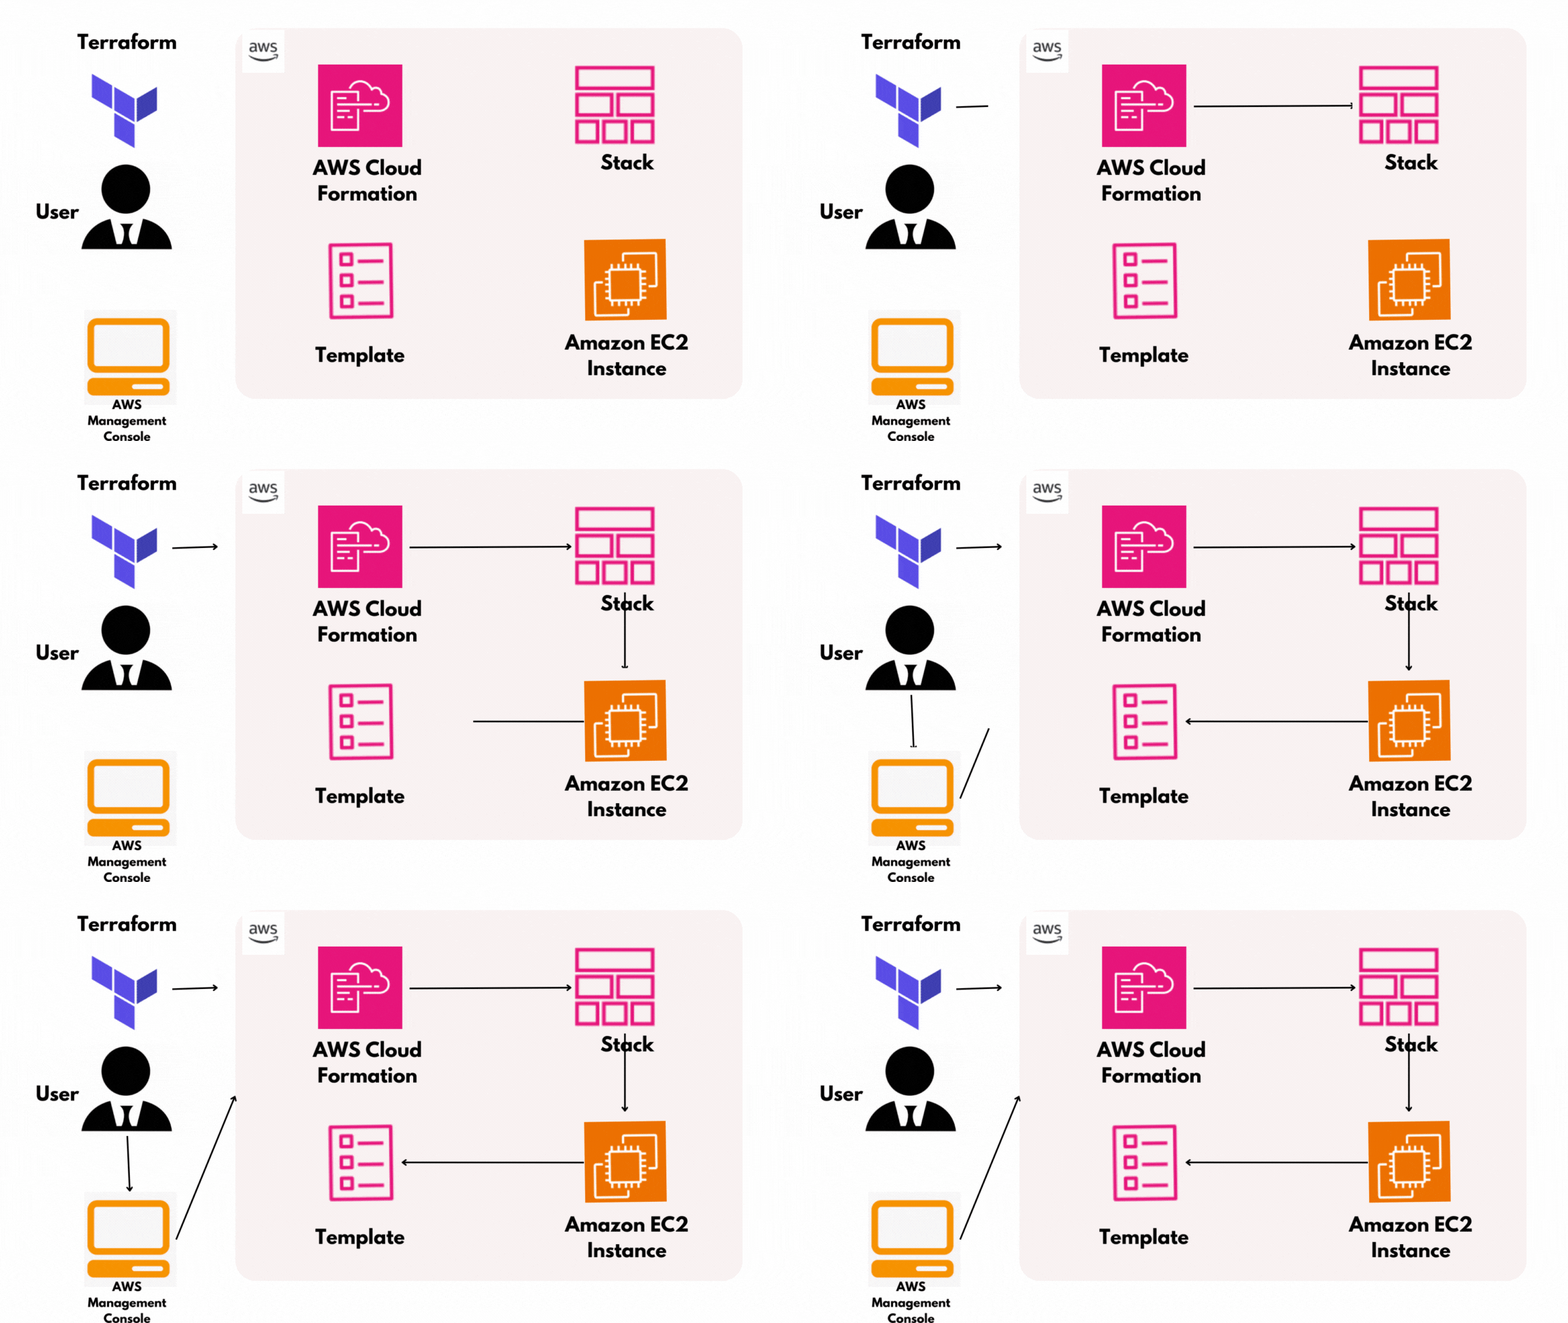
What is Terraform?
Terraform is an infrastructure as code tool that lets you build, change, and version cloud and on-prem resources safely and efficiently.
It lets you define both cloud and on-premises resources in human-readable configuration files that you can version, reuse, and share. You can then use a consistent workflow to provision and manage all of your infrastructure throughout its lifecycle. Terraform can manage low-level components like compute, storage, and networking resources, as well as high-level components like DNS entries and SaaS features.
Terraform creates and manages resources on cloud platforms and other services through their application programming interfaces (APIs). Providers enable Terraform to work with virtually any platform or service with an accessible API.
AWS CloudFormation
CloudFormation allows you to create and provision AWS infrastructure deployment predictably and repeatedly. You can create services like Amazon Elastic Compute Cloud(EC2), S3 buckets, Elastic Block Store, Elastic Load Balancing, Auto Scaling to build robust, cost effective, highly reliable applications in cloud. CloudFormation enables you to use a template file to create and delete collection of resources as a single unit or block.
When you use CloudFormation you work with Template and Stacks. You create a template to describe you resources and their properties. When you create a stack, you provision the resources that are described in your template.
Templates
A CloudFormation template is a JSON or YAML formatted text file. You can save these files with any extension, such as .json, .yaml, .template, or .txt. CloudFormation uses these templates as blueprints for building your AWS resources. For eg. A Yaml code to create S3 bucket.
{
    "Resources": {
        "HelloBucket": {
            "Type": "AWS::S3::Bucket"
        }
    }
}
AWSTemplateFormatVersion: '2010-09-09'
Description: 'Create an S3 Bucket'

Resources:
  MyS3Bucket:
    Type: 'AWS::S3::Bucket'
    Properties:
      BucketName: 'your-unique-bucket-name'
Stacks
When you use CloudFormation you manage related resources in a single unit called as a Stack. Suppose you created a template that includes an Auto Scaling group, Elastic Load Balancing load balancer, and an Amazon Relational Database Service (Amazon RDS) database instance. To create those resources, you create a stack by submitting the template that you created, and CloudFormation provisions all those resources for you. You can work with stacks by using the CloudFormation console, API, or AWS CLI
Prerequisites
Install Terraform on your local machine using this official guide by Hashicorp.
To install Terraform using CLI, use this guide https://learn.hashicorp.com/tutorials/terraform/install-cli
To install Terraform by downloading, use this guide https://www.terraform.io/downloads.html
Download and Install Visual Studio code editor using this guide https://code.visualstudio.com/download
Note: I have used PyCharm as IDE for this project you can use any IDE available to you.
Task Details
Task 1. Setup Visual Studio Code
Open the Visual Studio code.
If you have already installed and using Visual Studio code, open a new window.
A new window will open a new file and release notes page (only if you have installed or updated Visual Studio Code recently). Close the Release Notes tab.
Open Terminal by selecting View from the Menu bar and choose Terminal.
It may take up to 2 minutes to open the terminal window.
Create a new folder for your project and open the project in VS Code
Task 2. Create a variables file
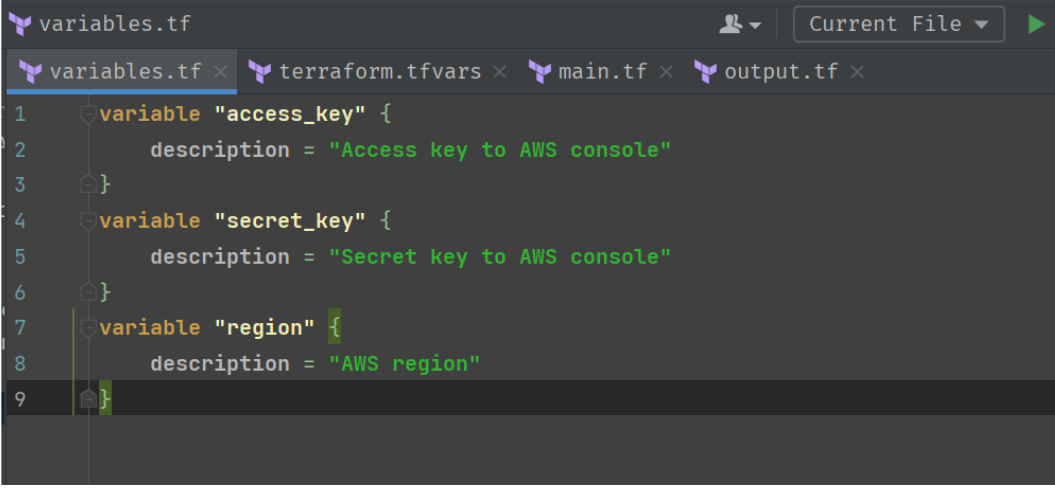
- Create a new file in projects folder and name as variables.tf
Paste the below contents in the variables.tf file and save the file.
variable "access_key" {
    description = "Access key to AWS console"
}
variable "secret_key" {
    description = "Secret key to AWS console"
}
variable "region" {
    description = "AWS region"
}
Here you are declaring a variable called, access_key, secret_key, and region with a short description of all three variables.
Create a new file as terraform.tfvars and paste the below content in and press Enter to save it.
region = "us-east-1"access_key = "<YOUR_ACCESS_KEY>"secret_key = "<YOUR_SECRET_KEY>"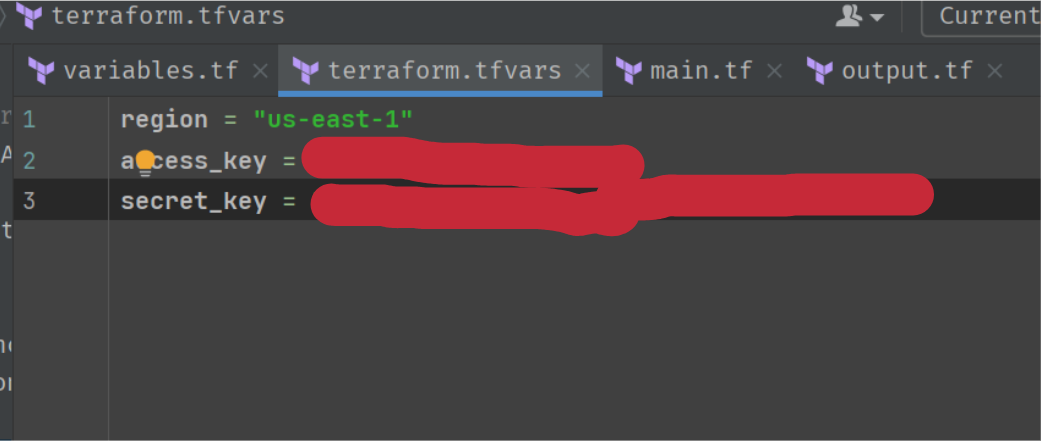
Follow these steps to get the access key and secret_key
Open the AWS Console
Click on your username near the top right and select Security Credentials
Click on Users in the sidebar
Click on your username
Click on the Security Credentials tab
Click Create Access Key
Click Show User Security Credentials
Task 3. Create a key pair for the EC2 Instance in the main.tf file
Create a new file in projects folder and name as main.tf
Paste the below content in the file and save it.
provider "aws" {
  region     = var.region
  access_key = var.access_key
  secret_key = var.secret_key
}
Note: In the above code, you are defining the provider as AWS*.*
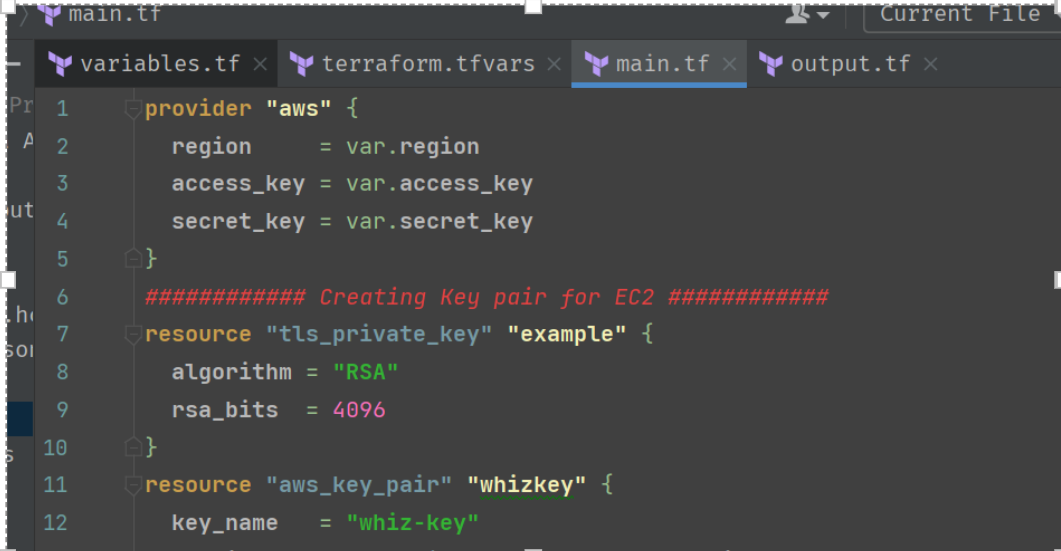
Next, we want to tell Terraform to create a key pair for the EC2 Instance. The following code will generate an RSA private key, derives its corresponding OpenSSH-formatted public key, and then uses that public key to create an AWS key pair named "whiz-key". This key pair will be associated with EC2 instances to allow secure SSH access.
Paste the following code into the main.tf file.
  ############ Creating Key pair for EC2 ############
  resource "tls_private_key" "example" {
    algorithm = "RSA"
    rsa_bits  = 4096
  }
  resource "aws_key_pair" "whizkey" {
    key_name   = "whiz-key"
    public_key = tls_private_key.example.public_key_openssh
  }
- Save the file
Task 4. Create a CloudFormation Stack in main.tf file
In this task we are going to create a cloudformation stack in the main.tf file.
- Create a file LAMP_template.json This template contains the creation of LAMP server.
{
  "AWSTemplateFormatVersion" : "2010-09-09",

  "Description" : "AWS CloudFormation Sample Template LAMP_Single_Instance: Create a LAMP stack using a single EC2 instance and a local MySQL database for storage. This template demonstrates using the AWS CloudFormation bootstrap scripts to install the packages and files necessary to deploy the Apache web server, PHP and MySQL at instance launch time. **WARNING** This template creates an Amazon EC2 instance. You will be billed for the AWS resources used if you create a stack from this template.",

  "Parameters" : {

    "KeyName": {
      "Description" : "Name of an existing EC2 KeyPair to enable SSH access to the instance",
      "Type": "AWS::EC2::KeyPair::KeyName",
      "Default": "whiz-key",
      "ConstraintDescription" : "must be the name of an existing EC2 KeyPair."
    },

    "DBName": {
      "Default": "MyDatabase",
      "Description" : "MySQL database name",
      "Type": "String",
      "MinLength": "1",
      "MaxLength": "64",
      "AllowedPattern" : "[a-zA-Z][a-zA-Z0-9]*",
      "ConstraintDescription" : "must begin with a letter and contain only alphanumeric characters."
    },

    "DBUser": {
      "NoEcho": "true",
      "Description" : "Username for MySQL database access",
      "Type": "String",
      "MinLength": "1",
      "MaxLength": "16",
      "AllowedPattern" : "[a-zA-Z][a-zA-Z0-9]*",
      "ConstraintDescription" : "must begin with a letter and contain only alphanumeric characters."
    },

    "DBPassword": {
      "NoEcho": "true",
      "Description" : "Password for MySQL database access",
      "Type": "String",
      "MinLength": "1",
      "MaxLength": "41",
      "AllowedPattern" : "[a-zA-Z0-9]*",
      "ConstraintDescription" : "must contain only alphanumeric characters."
    },

    "DBRootPassword": {
      "NoEcho": "true",
      "Description" : "Root password for MySQL",
      "Type": "String",
      "MinLength": "1",
      "MaxLength": "41",
      "AllowedPattern" : "[a-zA-Z0-9]*",
      "ConstraintDescription" : "must contain only alphanumeric characters."
    },

    "InstanceType" : {
      "Description" : "WebServer EC2 instance type",
      "Type" : "String",
      "Default" : "t2.micro",
      "AllowedValues" : ["t2.micro"]
,
      "ConstraintDescription" : "must be a valid EC2 instance type."
    },

    "SSHLocation" : {
      "Description" : " The IP address range that can be used to SSH to the EC2 instances",
      "Type": "String",
      "MinLength": "9",
      "MaxLength": "18",
      "Default": "0.0.0.0/0",
      "AllowedPattern": "(\\d{1,3})\\.(\\d{1,3})\\.(\\d{1,3})\\.(\\d{1,3})/(\\d{1,2})",
      "ConstraintDescription": "must be a valid IP CIDR range of the form x.x.x.x/x."
    }
  },

  "Mappings" : {
    "AWSInstanceType2Arch" : {
      "t2.micro"    : { "Arch" : "HVM64"  }
    },

    "AWSInstanceType2NATArch" : {
      "t2.micro"    : { "Arch" : "NATHVM64"  }
    }
,
     "AWSRegionArch2AMI" : {
      "us-east-1"      : { "HVM64" : "ami-0080e4c5bc078760e" }
    }

  },

  "Resources" : {

    "WebServerInstance": {
      "Type": "AWS::EC2::Instance",
      "Metadata" : {
        "AWS::CloudFormation::Init" : {
          "configSets" : {
            "InstallAndRun" : [ "Install", "Configure" ]
          },

          "Install" : {
            "packages" : {
              "yum" : {
                "mysql"        : [],
                "mysql-server" : [],
                "mysql-libs"   : [],
                "httpd"        : [],
                "php"          : [],
                "php-mysql"    : []
              }
            },

            "files" : {
              "/var/www/html/index.php" : {
                "content" : { "Fn::Join" : [ "", [
                  "<html>\n",
                  "  <head>\n",
                  "    <title>AWS CloudFormation PHP Sample</title>\n",
                  "    <meta http-equiv=\"Content-Type\" content=\"text/html; charset=ISO-8859-1\">\n",
                  "  </head>\n",
                  "  <body>\n",
                  "    <h1>Welcome to the AWS CloudFormation PHP Sample</h1>\n",
                  "    <p/>\n",
                  "    <?php\n",
                  "      // Print out the current data and time\n",
                  "      print \"The Current Date and Time is: <br/>\";\n",
                  "      print date(\"g:i A l, F j Y.\");\n",
                  "    ?>\n",
                  "    <p/>\n",
                  "    <?php\n",
                  "      // Setup a handle for CURL\n",
                  "      $curl_handle=curl_init();\n",
                  "      curl_setopt($curl_handle,CURLOPT_CONNECTTIMEOUT,2);\n",
                  "      curl_setopt($curl_handle,CURLOPT_RETURNTRANSFER,1);\n",
                  "      // Get the hostname of the intance from the instance metadata\n",
                  "      curl_setopt($curl_handle,CURLOPT_URL,'http://169.254.169.254/latest/meta-data/public-hostname');\n",
                  "      $hostname = curl_exec($curl_handle);\n",
                  "      if (empty($hostname))\n",
                  "      {\n",
                  "        print \"Sorry, for some reason, we got no hostname back <br />\";\n",
                  "      }\n",
                  "      else\n",
                  "      {\n",
                  "        print \"Server = \" . $hostname . \"<br />\";\n",
                  "      }\n",
                  "      // Get the instance-id of the intance from the instance metadata\n",
                  "      curl_setopt($curl_handle,CURLOPT_URL,'http://169.254.169.254/latest/meta-data/instance-id');\n",
                  "      $instanceid = curl_exec($curl_handle);\n",
                  "      if (empty($instanceid))\n",
                  "      {\n",
                  "        print \"Sorry, for some reason, we got no instance id back <br />\";\n",
                  "      }\n",
                  "      else\n",
                  "      {\n",
                  "        print \"EC2 instance-id = \" . $instanceid . \"<br />\";\n",
                  "      }\n",
                  "      $Database   = \"localhost\";\n",
                  "      $DBUser     = \"", {"Ref" : "DBUser"}, "\";\n",
                  "      $DBPassword = \"", {"Ref" : "DBPassword"}, "\";\n",
                  "      print \"Database = \" . $Database . \"<br />\";\n",
                  "      $dbconnection = mysql_connect($Database, $DBUser, $DBPassword)\n",
                  "                      or die(\"Could not connect: \" . mysql_error());\n",
                  "      print (\"Connected to $Database successfully\");\n",
                  "      mysql_close($dbconnection);\n",
                  "    ?>\n",
                  "    <h2>PHP Information</h2>\n",
                  "    <p/>\n",
                  "    <?php\n",
                  "      phpinfo();\n",
                  "    ?>\n",
                  "  </body>\n",
                  "</html>\n"
                ]]},
                "mode"  : "000600",
                "owner" : "apache",
                "group" : "apache"
              },

              "/tmp/setup.mysql" : {
                "content" : { "Fn::Join" : ["", [
                  "CREATE DATABASE ", { "Ref" : "DBName" }, ";\n",
                  "GRANT ALL ON ", { "Ref" : "DBName" }, ".* TO '", { "Ref" : "DBUser" }, "'@localhost IDENTIFIED BY '", { "Ref" : "DBPassword" }, "';\n"
                  ]]},
                "mode"  : "000400",
                "owner" : "root",
                "group" : "root"
              },
              "/etc/cfn/cfn-hup.conf" : {
                "content" : { "Fn::Join" : ["", [
                  "[main]\n",
                  "stack=", { "Ref" : "AWS::StackId" }, "\n",
                  "region=", { "Ref" : "AWS::Region" }, "\n"
                ]]},
                "mode"    : "000400",
                "owner"   : "root",
                "group"   : "root"
              },

              "/etc/cfn/hooks.d/cfn-auto-reloader.conf" : {
                "content": { "Fn::Join" : ["", [
                  "[cfn-auto-reloader-hook]\n",
                  "triggers=post.update\n",
                  "path=Resources.WebServerInstance.Metadata.AWS::CloudFormation::Init\n",
                  "action=/opt/aws/bin/cfn-init -v ",
                  "         --stack ", { "Ref" : "AWS::StackName" },
                  "         --resource WebServerInstance ",
                  "         --configsets InstallAndRun ",
                  "         --region ", { "Ref" : "AWS::Region" }, "\n",
                  "runas=root\n"
                ]]},
                "mode"    : "000400",
                "owner"   : "root",
                "group"   : "root"
              }
            },

            "services" : {
              "sysvinit" : {
                "mysqld"  : { "enabled" : "true", "ensureRunning" : "true" },
                "httpd"   : { "enabled" : "true", "ensureRunning" : "true" },
                "cfn-hup" : { "enabled" : "true", "ensureRunning" : "true",
                              "files" : ["/etc/cfn/cfn-hup.conf", "/etc/cfn/hooks.d/cfn-auto-reloader.conf"]}
              }
            }
          },

          "Configure" : {
            "commands" : {
              "01_set_mysql_root_password" : {
                "command" : { "Fn::Join" : ["", ["mysqladmin -u root password '", { "Ref" : "DBRootPassword" }, "'"]]},
                "test" : { "Fn::Join" : ["", ["$(mysql ", { "Ref" : "DBName" }, " -u root --password='", { "Ref" : "DBRootPassword" }, "' >/dev/null 2>&1 </dev/null); (( $? != 0 ))"]]}
              },
              "02_create_database" : {
                "command" : { "Fn::Join" : ["", ["mysql -u root --password='", { "Ref" : "DBRootPassword" }, "' < /tmp/setup.mysql"]]},
                "test" : { "Fn::Join" : ["", ["$(mysql ", { "Ref" : "DBName" }, " -u root --password='", { "Ref" : "DBRootPassword" }, "' >/dev/null 2>&1 </dev/null); (( $? != 0 ))"]]}
              }
            }
          }
        }
      },
      "Properties": {
        "ImageId" : { "Fn::FindInMap" : [ "AWSRegionArch2AMI", { "Ref" : "AWS::Region" },
                          { "Fn::FindInMap" : [ "AWSInstanceType2Arch", { "Ref" : "InstanceType" }, "Arch" ] } ] },
        "InstanceType"   : { "Ref" : "InstanceType" },
        "SecurityGroups" : [ {"Ref" : "WebServerSecurityGroup"} ],
        "KeyName"        : { "Ref" : "KeyName" },
        "UserData"       : { "Fn::Base64" : { "Fn::Join" : ["", [
             "#!/bin/bash -xe\n",
             "yum update -y aws-cfn-bootstrap\n",

             "# Install the files and packages from the metadata\n",
             "/opt/aws/bin/cfn-init -v ",
             "         --stack ", { "Ref" : "AWS::StackName" },
             "         --resource WebServerInstance ",
             "         --configsets InstallAndRun ",
             "         --region ", { "Ref" : "AWS::Region" }, "\n",

             "# Signal the status from cfn-init\n",
             "/opt/aws/bin/cfn-signal -e $? ",
             "         --stack ", { "Ref" : "AWS::StackName" },
             "         --resource WebServerInstance ",
             "         --region ", { "Ref" : "AWS::Region" }, "\n"
        ]]}}
      },
      "CreationPolicy" : {
        "ResourceSignal" : {
          "Timeout" : "PT10M"
        }
      }
    },

    "WebServerSecurityGroup" : {
      "Type" : "AWS::EC2::SecurityGroup",
      "Properties" : {
        "GroupDescription" : "Enable HTTP access via port 80",
        "SecurityGroupIngress" : [
          {"IpProtocol" : "tcp", "FromPort" : "80", "ToPort" : "80", "CidrIp" : "0.0.0.0/0"},
          {"IpProtocol" : "tcp", "FromPort" : "22", "ToPort" : "22", "CidrIp" : { "Ref" : "SSHLocation"}}
        ]
      }
    }
  },

  "Outputs" : {
    "WebsiteURL" : {
      "Description" : "URL for newly created LAMP stack",
      "Value" : { "Fn::Join" : ["", ["http://", { "Fn::GetAtt" : [ "WebServerInstance", "PublicDnsName" ]}]] }
    }
  }
}
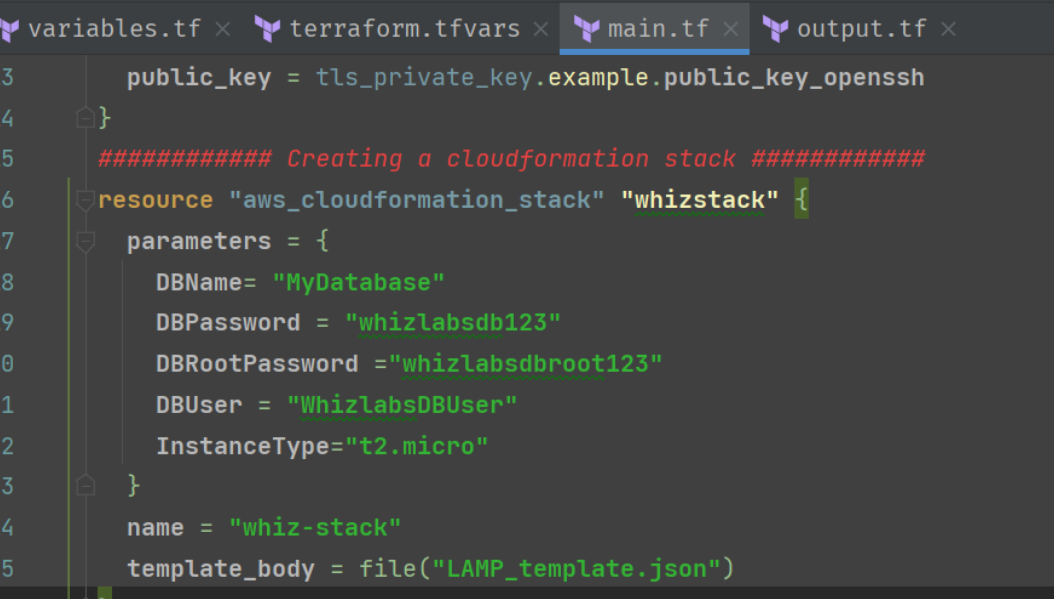
To create a Cloudformation stack, paste the following contents in the main.tf file:
############ Creating a cloudformation stack ############
resource "aws_cloudformation_stack" "whizstack" {
  parameters = {
    DBName= "MyDatabase"
    DBPassword = "whizlabsdb123"
    DBRootPassword ="whizlabsdbroot123"
    DBUser = "WhizlabsDBUser"
    InstanceType="t2.micro"
  }
  name = "whiz-stack"
  template_body = file("LAMP_template.json")
}
Save the file.
Note: In the above code, the parameters for the webserver and database are defined that will be required for the creation of LAMP server. Also the name and template body is defined as well.
Task 5. Create an output file
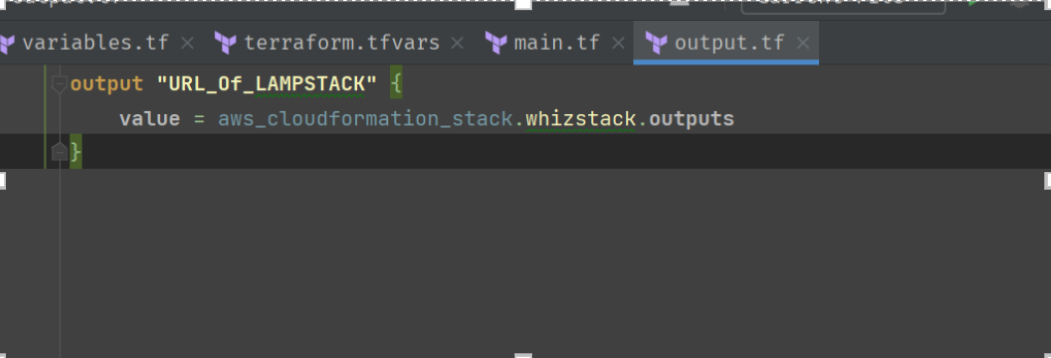
Create a new file as output.tf and paste the below content into the file and press Enter to save it.
  output "URL_Of_LAMPSTACK" {

      value = aws_cloudformation_stack.whizstack.outputs

  }
In the above code, we will extract the LAMP server URL.
Task 6. Confirm the installation of Terraform by checking the version.
In the terminal paste the below code to check the version of Terraform
terraform --version
Task 7. Apply terraform configurations
Initialize Terraform by running the below command:
terraform initNote: terraform init will check for all the plugin dependencies and download them if required, this will be used for creating a deployment plan

To generate the action plans run the below command
terraform plan
To create all the resources declared in main.tf configuration file, run the below command
terraform apply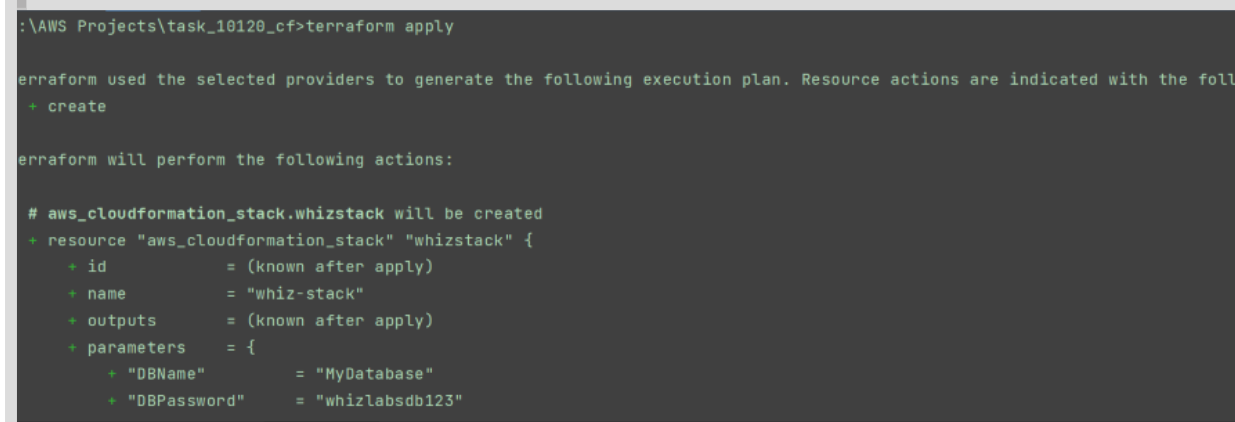
Approve the creation of all the resources by entering yes.
Note: This process will take around 5-10 minutes.
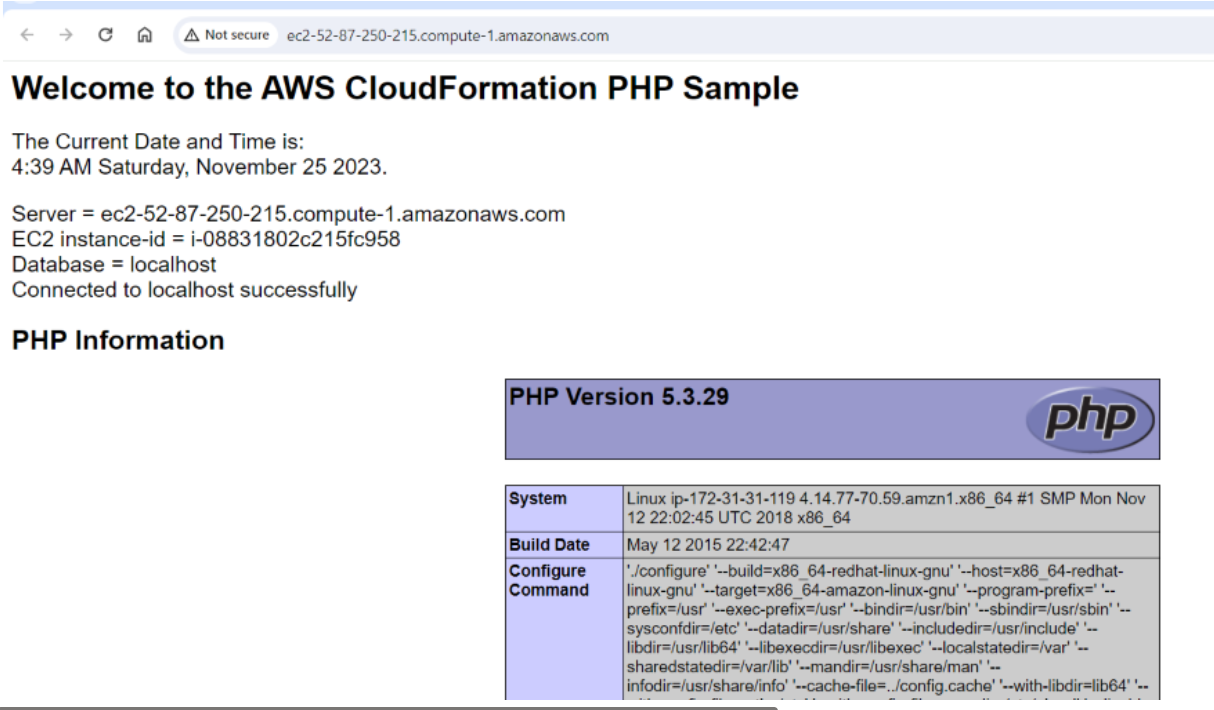
URL of the Lamp stack created by terraform will be visible there.

- Copy the URL and paste it in the browser to see if the lamp server is deployed successfully. If you see the PHP info and your database connection, it means you have completed a LAMP server setup with AWS CloudFormation. Sample screenshot provided below:
Task 8. Check the resources in AWS Console
Make sure you are in the US East (N. Virginia) us-east-1 Region.
Navigate to CloudFormation by clicking on Services on the top, then click on CloudFormation in the Management and Governance section.
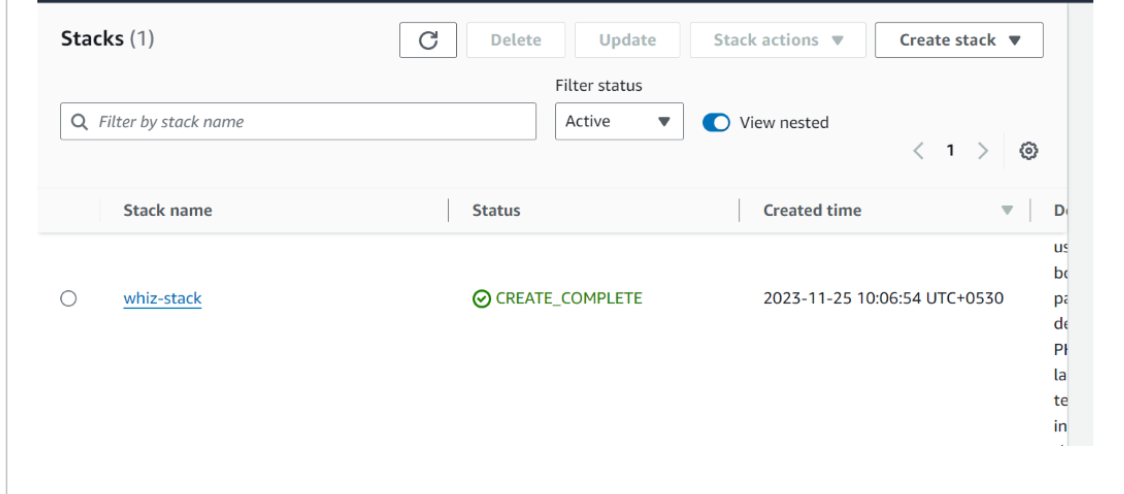
Click on Stacks in left navigation menu. You can see that the stack is created successfully.
Task 9. Delete AWS Resources
To delete the resources, open Terminal again.
Run the below command to delete all the resources. Enter yes to confirm the deletion.
terraform destroy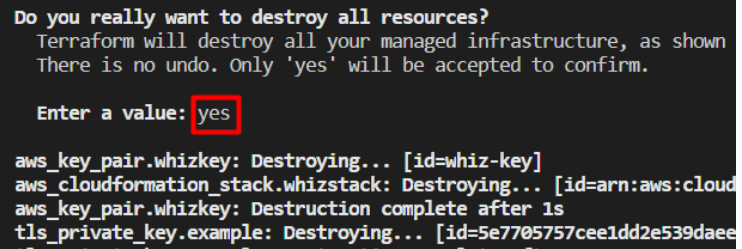
Dear Readers,
In this journey of Automating AWS Resource Deployment with Terraform via CloudFormation , we've integrated Terraform with Cloudformation stack to create AWS resources and completed LAMP server setup . Shedding light on the intricacies of Terraform, AWS CloudFormation.
As we conclude this exploration, remember that technology is a dynamic landscape, always evolving and presenting new challenges and opportunities.
Stay inquisitive, continue your exploration, and adapt to the dynamic landscape of the AWS Cloud.
Subscribe to my newsletter
Read articles from Asma Akram directly inside your inbox. Subscribe to the newsletter, and don't miss out.
Written by
