Mastering Docker: Deploying Web Servers and Testing with Ease - How to Build, Push, Pull, and Verify Docker Images for Web Server Deployment?.
 Rakesh Kumar Jangid
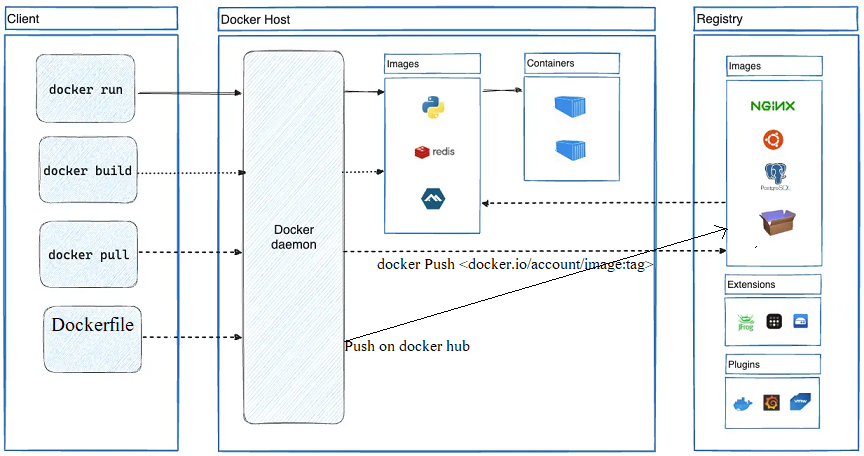
Question :
How can I create a Dockerfile with a base image of Linux, such as Rocky Linux or CentOS, to deploy a web server (specifically httpd) on port 80? Additionally, I'd like to include the installation of prerequisite programs using
yum install, such as httpd, vim, net-tools, and bind-utils. After creating the Dockerfile, I want to push it to Docker Hub, pull the newly pushed Docker image, run and execute a container with the updated image, and finally, verify and test it on a web browser. Could you provide the steps or a guide on how to accomplish this?
Answer:
Step-1 ( Install Docker on your machine)
I am using a Virtual Machine here, and my OS is centos-9 stream. So make sure you have enough pre-requisite work done like repository setup, host entry, and default firewall ports open. so let's install the docker-engine on virtual-machine. Follow this official docker engine setup link : https://docs.docker.com/engine/install/centos/
# yum remove docker \
                  docker-client \
                  docker-client-latest \
                  docker-common \
                  docker-latest \
                  docker-latest-logrotate \
                  docker-logrotate \
                  docker-engine

# yum install -y yum-utils
sudo yum-config-manager --add-repo https://download.docker.com/linux/centos/docker-ce.repo

# yum install docker-ce docker-ce-cli containerd.io docker-buildx-plugin docker-compose-plugin

# sudo systemctl start docker
# sudo systemctl enable docker
Congratulation. Your docker setup is launched successfully on your VM Linux centos-9 stream server. So let's create Dockerfile as per our question mentioned earlier.
# mkdir ~/Docker
# vi ~/Docker/Dockerfile

FROM rockylinux:9
MAINTAINER "Rakesh|rakeshkumarjangid.hashnode.dev"
RUN yum update -y
RUN yum install -y bind-utils vim  wget nmap net-tools httpd unzip
WORKDIR /var/www/html
EXPOSE 80
CMD ["/usr/sbin/httpd","-D","FOREGROUND"]
Step-2 ( build the docker image from dockerfile )
[root@localhost Docker]# docker build -t rockyweb:v1 .

[+] Building 90.8s (8/8) FINISHED                                                                                                                    docker:default
 => [internal] load .dockerignore                                                                                                                              0.0s
 => => transferring context: 2B                                                                                                                                0.0s
 => [internal] load build definition from Dockerfile                                                                                                           0.0s
 => => transferring dockerfile: 336B                                                                                                                           0.0s
 => [internal] load metadata for docker.io/library/rockylinux:9                                                                                                0.0s
 => CACHED [1/4] FROM docker.io/library/rockylinux:9                                                                                                           0.0s
 => [2/4] RUN yum update -y                                                                                                                                   55.5s
 => [3/4] RUN yum install -y bind-utils vim  wget nmap net-tools httpd unzip                                                                                  33.3s
 => [4/4] WORKDIR /var/www/html                                                                                                                                0.1s
 => exporting to image                                                                                                                                         1.8s
 => => exporting layers                                                                                                                                        1.8s
 => => writing image sha256:b0dc71435fb5fc1eee603d9158c48703b890f6cd5d0ad8ff1bcd8adbd8e0c993                                                                   0.0s
 => => naming to docker.io/library/rockyweb:v1
[root@localhost Docker]# docker images REPOSITORY TAG IMAGE ID CREATED SIZE rockyweb v1 b0dc71435fb5 6 minutes ago 292MB
Step-3 ( Tag image and push on docker registry )
Let's Tag with the new version and push this docker image on the docker hub for publically access.
[root@localhost Docker]# docker tag rockyweb:v1 rockyhttpd:v1
[root@localhost Docker]# docker images
REPOSITORY   TAG       IMAGE ID       CREATED          SIZE
rockyhttpd   v1        b0dc71435fb5   15 minutes ago   292MB
rockyweb     v1        b0dc71435fb5   15 minutes ago   292MB
Note: From the running container create an image and tag it with a new name.
[root@localhost Docker]# docker ps -a
CONTAINER ID   IMAGE          COMMAND       CREATED          STATUS          PORTS                                     NAMES
91b1c0e0490a   rockylinux:9   "/bin/bash"   38 minutes ago   Up 38 minutes   0.0.0.0:32768->80/tcp, :::32768->80/tcp   c1

[root@localhost Docker]# docker commit 91b1c0e0490a jangidrakesh71/c1:v1
sha256:2daeefc25257eb0beaec5161d3784d9de896d6a56eac9346ff2d323ccaa2184b
Before pushing image on the docker hub, you have to log in on the docker hub first. Follow this official docker hub link for more : https://docs.docker.com/docker-hub/repos/create/
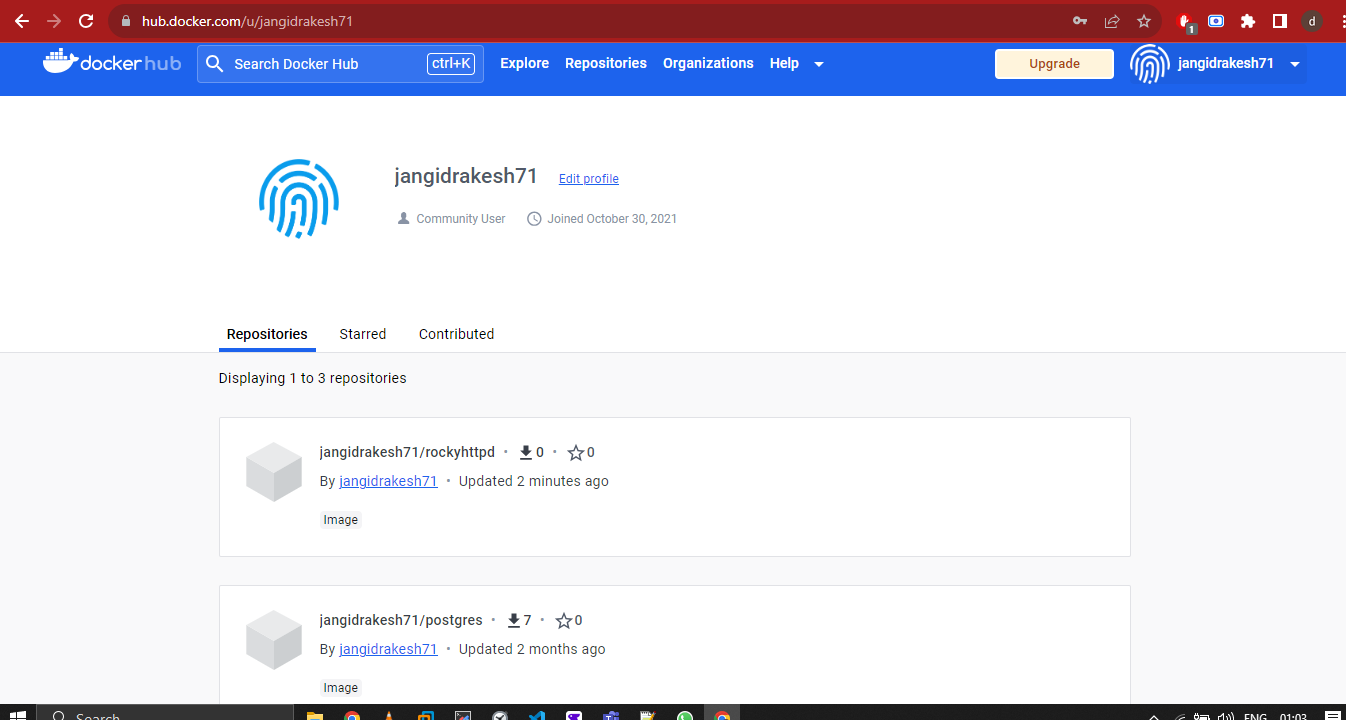
[root@localhost Docker]# docker login
--Log in with your Docker ID or email address to push and pull images from Docker Hub. If you don't have a Docker ID, head over to https://hub.docker.com/ to create one.
You can log in with your password or a Personal Access Token (PAT). Using a limited-scope PAT grants better security and is required for organizations using SSO. Learn more at https://docs.docker.com/go/access-tokens/

Username: jangidrakesh71@gmail.com
Password:
WARNING! Your password will be stored unencrypted in /root/.docker/config.json.
Configure a credential helper to remove this warning. See
https://docs.docker.com/engine/reference/commandline/login/#credentials-store

Login Succeeded
[root@localhost Docker]#
[root@localhost Docker]# docker push jangidrakesh71/rockyhttpd:v1 The push refers to repository [docker.io/jangidrakesh71/rockyhttpd] 5f70bf18a086: Pushed 9d71ef5fb785: Pushed 5de793c738a4: Pushed c4bc4a1387e8: Mounted from library/rockylinux v1: digest: sha256:96cf71b21c9fe222eeac8ecdbc946f18f427c4c413ff9904843adbcbf9f4ea70 size: 1159Let's Check the DockerHub account and check whether image pushed successfully or not. Go to this link: https://hub.docker.com/u/jangidrakesh71
Step-4 (Pull a custom image and run a container )
[root@localhost Docker]# docker pull jangidrakesh71/rockyhttpd:v1
v1: Pulling from jangidrakesh71/rockyhttpd
489e1be6ce56: Already exists
2dd56c91439e: Already exists
7d91ded6796d: Already exists
4f4fb700ef54: Already exists
Digest: sha256:96cf71b21c9fe222eeac8ecdbc946f18f427c4c413ff9904843adbcbf9f4ea70
Status: Downloaded newer image for jangidrakesh71/rockyhttpd:v1
docker.io/jangidrakesh71/rockyhttpd:v1
[root@localhost Docker]# docker run -itd --name=c1 -v c1:/var/www/html -p 80:80 jangidrakesh71/rockyhttpd:v1 91bc91ee0e2020df903915d637b61e73c6f928d5b0d8bc2f51a33439537788c9 [root@localhost Docker]# docker ps -a CONTAINER ID IMAGE COMMAND CREATED STATUS PORTS NAMES 91bc91ee0e20 jangidrakesh71/rockyhttpd:v1 "/usr/sbin/httpd -D …" 4 seconds ago Up 2 seconds 0.0.0.0:80->80/tcp, :::80->80/tcp c1[root@localhost Docker]# cd /var/lib/docker/volumes/c1/_data/ [root@localhost _data]# ls index.html [root@localhost _data]# cat index.html This is docker container c1[root@localhost _data]# docker inspect c1 [root@localhost _data]# curl 172.17.0.2 This is docker container c1Congratulation you have deployed your web application successfully.
Lets download a static website template and paste there code contents on container "c1" volume location. That is actually mounted on containers /var/www/html internally. So lets download static website content from link : https://www.free-css.com/assets/files/free-css-templates/download/page296/healet.zip
Download website content using
wget[root@localhost Docker]# pwd /root/Docker [root@localhost Docker]# wget https://www.free-css.com/assets/files/free-css-templates/download/page296/healet.zip --2023-12-01 13:48:50-- https://www.free-css.com/assets/files/free-css-templates/download/page296/healet.zip Resolving www.free-css.com (www.free-css.com)... 217.160.0.242, 2001:8d8:100f:f000::28f Connecting to www.free-css.com (www.free-css.com)|217.160.0.242|:443... connected. HTTP request sent, awaiting response... 200 OK Length: 2040237 (1.9M) [application/zip] Saving to: ‘healet.zip’ healet.zip 100%[==================================================================================>] 1.95M 1.43MB/s in 1.4s 2023-12-01 13:48:52 (1.43 MB/s) - ‘healet.zip’ saved [2040237/2040237]Don't forgot to remove previous index.html content :
[root@localhost Docker]# rm -rf /var/lib/docker/volumes/c1/_data/index.htmland now unzip website.zip content on location
/var/lib/docker/volumes/c1/_data/[root@localhost Docker]# unzip healet.zip Archive: healet.zip creating: healet-html/ inflating: healet-html/about.html inflating: healet-html/blog.html creating: healet-html/css/ inflating: healet-html/css/bootstrap.css inflating: healet-html/css/font-awesome.min.css inflating: healet-html/css/responsive.css inflating: healet-html/css/style.css inflating: healet-html/css/style.css.map inflating: healet-html/css/style.scss creating: healet-html/fonts/ inflating: healet-html/fonts/fontawesome-webfont.ttf inflating: healet-html/fonts/fontawesome-webfont.woff inflating: healet-html/fonts/fontawesome-webfont.woff2 inflating: healet-html/fonts/octin_sports_rg.ttf creating: healet-html/images/ inflating: healet-html/images/about-img.jpg inflating: healet-html/images/b1.jpg inflating: healet-html/images/b2.jpg inflating: healet-html/images/client.jpg inflating: healet-html/images/favicon.png inflating: healet-html/images/o1.jpg inflating: healet-html/images/o2.jpg inflating: healet-html/images/o3.jpg inflating: healet-html/images/p1.png inflating: healet-html/images/p2.png inflating: healet-html/images/p3.png inflating: healet-html/images/p4.png inflating: healet-html/images/p5.png inflating: healet-html/images/p6.png inflating: healet-html/images/p7.png inflating: healet-html/images/p8.png inflating: healet-html/images/slider-bg.jpg inflating: healet-html/index.html creating: healet-html/js/ inflating: healet-html/js/bootstrap.js inflating: healet-html/js/custom.js inflating: healet-html/js/jquery-3.4.1.min.js inflating: healet-html/shop.htmland move all content on
/var/lib/docker/volumes/c1/_data/[root@localhost Docker]# mv ./healet-html/* /var/lib/docker/volumes/c1/_data/And now do entry n /etc/hosts file and then open browse the website content with your FQDN.
[root@localhost Docker]# vi /etc/hosts
127.0.0.1   localhost localhost.localdomain localhost4 localhost4.localdomain4
::1         localhost localhost.localdomain localhost6 localhost6.localdomain6

192.168.199.133         rakamodify.com

:wq!
References:
Web-site content : https://www.free-css.com/free-css-templates/page296/healet
How to install docker engine on centos: https://docs.docker.com/engine/install/centos/
How to push image on docker registry server: https://docs.docker.com/docker-hub/repos/create/

Subscribe to my newsletter
Read articles from Rakesh Kumar Jangid directly inside your inbox. Subscribe to the newsletter, and don't miss out.
Written by
Rakesh Kumar Jangid
Rakesh Kumar Jangid
Let's learn together and serve the society, Make India Proud.