Unveiling the Power of Docker: Building Seamless WordPress and MySQL Containers on RockyLinux
 Rakesh Kumar Jangid
Table of contents
- Introduction:
- Step-1 ( Install Docker on Centos-9 VM BaseOS)
- Step-2 ( Pull and run MySQL container)
- Step-3 (Pull and run RockyLinux BaseOS image)
- Step-4 ( Install EPEL & REMI repository )
- Step-4 ( Install Required Packages in the container )
- Step-5 ( Configuration for WordPress in RockyLinux )
- Step-5 ( Start Apache and php services )
- Step-6 ( Browse WordPress )
- References:
Introduction:
In this article, we'll guide you through the creation of an impressive Docker project involving the containerization of MySQL and WordPress. Throughout this project, we'll meticulously deploy WordPress entirely from scratch on a RockyLinux environment.
In this Docker project, we're utilizing a Virtual Machine as our base Linux OS. Initially, we'll install the Docker engine on this base OS and subsequently proceed to run WordPress and MySQL containers.
Configuration:
- Virtual Machine: 4GB RAM, 2 Core CPU
So let's start. Follow this official docker engine Installation link :
Step-1 ( Install Docker on Centos-9 VM BaseOS)
sudo yum remove docker \
                  docker-client \
                  docker-client-latest \
                  docker-common \
                  docker-latest \
                  docker-latest-logrotate \
                  docker-logrotate \
                  docker-engine
# sudo yum install -y yum-utils
# sudo yum-config-manager --add-repo https://download.docker.com/linux/centos/docker-ce.repo
# sudo yum install docker-ce docker-ce-cli containerd.io docker-buildx-plugin docker-compose-plugin
# sudo systemctl start docker
# docker info
Congratulations your docker setup is completed.
Step-2 ( Pull and run MySQL container)
This MySQL container requires some pre-environment variable to run perfectly. Without these environment variables, this MySql container will cause an error. we set the environment variables when we run the docker container using the option -e and some other options:
-e MYSQL_ROOT_PASSWORD=
-e MYSQL_DATABASE=
-p 3606:3606 (Should be open this port on BaseOS machine firewall)
For some advanced and easy docker access, we should use volume using option -v and -p to link 3606:3606 port from the base machine to the container port. But make sure you have open 3606/tcp port on BaseOS machine firewall.
Open port 3606 on firewall
# firewall-cmd --add-port=3606/tcp --permanent
# firewall-cmd --reload

# firewall-cmd --list-all
public (active)
  target: default
  icmp-block-inversion: no
  interfaces: ens160
  sources:
  services: cockpit dhcpv6-client ssh
  ports: 3606/tcp
  protocols:
  forward: yes
  masquerade: no
  forward-ports:
  source-ports:
  icmp-blocks:
  rich rules:
# docker info
# docker --version

# docker pull mysql:latest
# docker images
# docker run -d --name=mysql -e MYSQL_ROOT_PASSWORD=password -e MYSQL_DATABASE=wordpress -p 3606:3606 -v mysql_vol:/var/lib/mysql mysql
# docker ps -a
# docker inspect mysql
# docker images
REPOSITORY   TAG       IMAGE ID       CREATED       SIZE
mysql        latest    a3b6608898d6   5 weeks ago   596MB
CONTAINER ID   IMAGE          COMMAND                  CREATED         STATUS                        PORTS                                                            NAMES
530c527e7976   mysql          "docker-entrypoint.s…"   5 seconds ago   Up 3 seconds                  3306/tcp, 33060/tcp, 0.0.0.0:3606->3606/tcp, :::3606->3606/tcp   mysql
Check MySQL container working and database has been created or not, so come into MySQL container using option docker exec -it mysql bash and check mysql databases.
root@wordpress:~# docker exec -it mysql bash
bash-4.4# mysql -u root -p
Enter password:
Welcome to the MySQL monitor.  Commands end with ; or \g.
Your MySQL connection id is 37
Server version: 8.2.0 MySQL Community Server - GPL

Copyright (c) 2000, 2023, Oracle and/or its affiliates.

Oracle is a registered trademark of Oracle Corporation and/or its
affiliates. Other names may be trademarks of their respective
owners.

Type 'help;' or '\h' for help. Type '\c' to clear the current input statement.

mysql> show databases;
+--------------------+
| Database           |
+--------------------+
| information_schema |
| mysql              |
| performance_schema |
| sys                |
| wordpress          |
+--------------------+
5 rows in set (0.00 sec)
We'll create a new user named 'rakesh' and grant comprehensive access permissions to the entire 'wordpress' database, which is specifically utilized in this Docker project.
So let's create a new user "rakesh".
mysql> CREATE USER 'rakesh'@'%' IDENTIFIED WITH mysql_native_password BY 'password';
Query OK, 0 rows affected (0.01 sec)
mysql> GRANT ALL PRIVILEGES ON wordpress.* TO 'rakesh'@'%' WITH GRANT OPTION;
Query OK, 0 rows affected (0.01 sec)
mysql> use mysql;
Reading table information for completion of table and column names
You can turn off this feature to get a quicker startup with -A

[Database changed]

mysql> select User, Host from user;
+------------------+-----------+
| User             | Host      |
+------------------+-----------+
| rakesh           | %         |
| root             | %         |
| mysql.infoschema | localhost |
| mysql.session    | localhost |
| mysql.sys        | localhost |
| root             | localhost |
+------------------+-----------+
6 rows in set (0.00 sec)
update the database with new database entry changes.
bash-4.4# FLUSH PRIVILEGES;
Try to login with user rakesh to check it working or not.
bash-4.4# mysql -u rakesh -p
Enter password:
Welcome to the MySQL monitor.  Commands end with ; or \g.
Your MySQL connection id is 10
Server version: 8.2.0 MySQL Community Server - GPL

Copyright (c) 2000, 2023, Oracle and/or its affiliates.

Oracle is a registered trademark of Oracle Corporation and/or its
affiliates. Other names may be trademarks of their respective
owners.

Type 'help;' or '\h' for help. Type '\c' to clear the current input statement.

mysql> show databases;
+--------------------+
| Database           |
+--------------------+
| information_schema |
| performance_schema |
| wordpress          |
+--------------------+
3 rows in set (0.01 sec)
Oh. Great it working.
Now check the mysql container ip address. docker container mysql ip is 172.17.0.2 as we can see in below output result of command # docker inspect mysql .
# docker inspect mysql

...
            "Networks": {
                "bridge": {
                    "IPAMConfig": null,
                    "Links": null,
                    "Aliases": null,
                    "NetworkID": "e8b3896c40abfd8a5cd2ce9878bc0b06b2632fba106b0fcfb225f111a3599b75",
                    "EndpointID": "9837933b050993fee609a601112ae9bc02415cc58ec2af67098704a634bb88ca",
                    "Gateway": "172.17.0.1",
                    "IPAddress": "172.17.0.2",
...
                }
            }
        }
    }
]
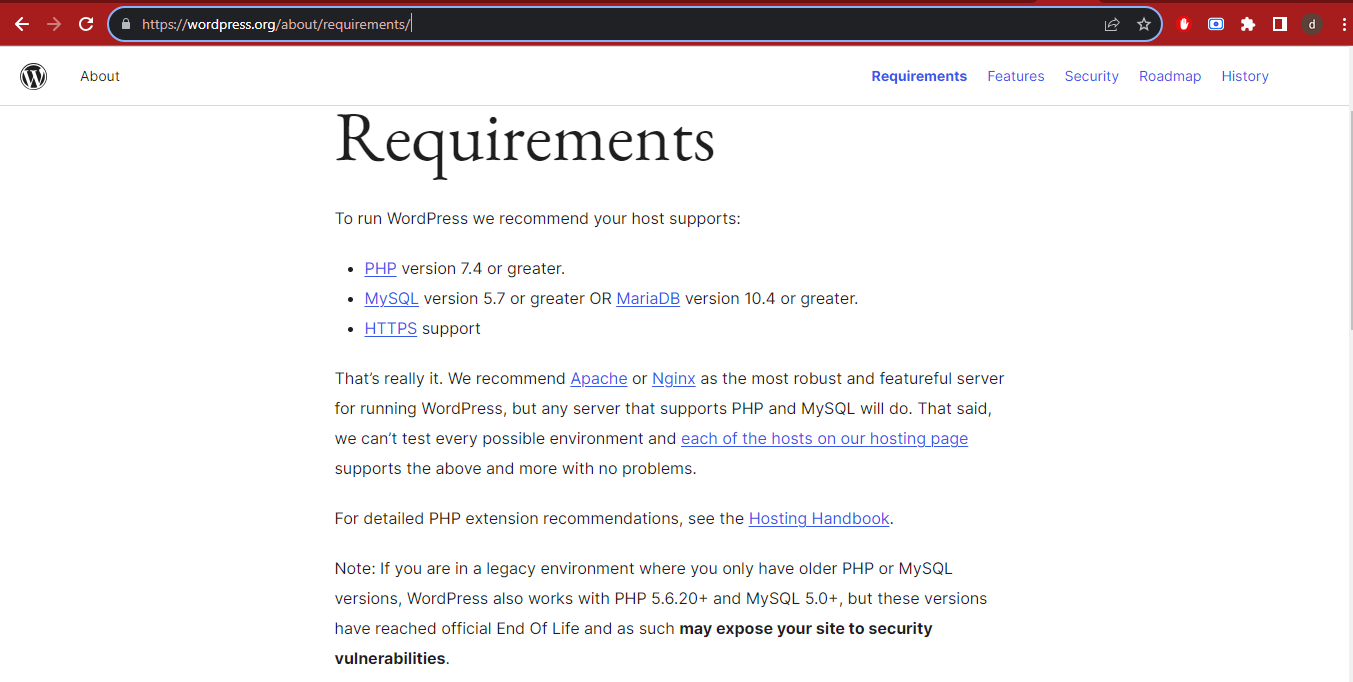
Now it's turn to run complicated WordPress containers and configurations on the top of RockyLinux, but here we have to confirm about compatible versions for both containers. we can check this information with official documentation on wordpress.org.
So now we are clear about the required version for both containers.
Step-3 (Pull and run RockyLinux BaseOS image)
Pull the rockylinux baseos image from the docker registry server with version tag 9.
check rockylinux all versions here : https://hub.docker.com/_/rockylinux
# docker pull rockylinux:9
[root@localhost ~]# docker images
REPOSITORY                             TAG       IMAGE ID       CREATED        SIZE
rockylinux                             9         b72d2d915008   2 days ago     176MB
mysql                                  latest    a3b6608898d6   5 weeks ago    596MB
Run this docker container with some important options.
-v wordpress_vol:/var/www/html
-p 80:80 (Should be open this port on BaseOS machine firewall)
--link=mysql_container_name
-e WORDPRESS_DB_HOST=mysql_container_ip:3606
Let's Open 80/tcp port on BaseOS firewall.
# firewall-cmd --permanent --add-port=80/tcp
# firewall-cmd --reload
# firewall-cmd --list-all
public (active)
  target: default
  icmp-block-inversion: no
  interfaces: ens160
  sources:
  services: cockpit dhcpv6-client ssh
  ports: 80/tcp 3606/tcp
  protocols:
  forward: yes
  masquerade: no
  forward-ports:
  source-ports:
  icmp-blocks:
  rich rules:
Run rockylinux:9 docker container form the image, but just before we create parental "wordpress_vol/_data" volume directory in /var/lib/docker/volumes/
[root@localhost ~]# cd /var/lib/docker/volumes/
[root@localhost volumes]# mkdir -p wordpress_vol/_data/
[root@localhost volumes]# cd wordpress_vol/_data
[root@localhost _data]# pwd
/var/lib/docker/volumes/wordpress_vol/_data
and here download the wordpress.org complete package and unzip. link: https://wordpress.org/download/
[root@localhost _data]# wget https://wordpress.org/latest.zip
[root@localhost _data]# unzip latest.zip
Remove latest.zip folder
[root@localhost _data]# rm -rf latest.tar.gz
Now run the docker rockylinux container.
docker run -itd --name=wordpress -v wordpress_vol:/var/www/html -p 80:80 --link=mysql -e WORDPRESS_DB_HOST=172.17.0.2:3606 rockylinux:9
Check the docker container status.
[root@localhost _data]# docker ps -a
CONTAINER ID   IMAGE          COMMAND                  CREATED          STATUS          PORTS                                                            NAMES
0f39c926429e   rockylinux:9   "/bin/bash"              13 minutes ago   Up 13 minutes   0.0.0.0:80->80/tcp, :::80->80/tcp                                wordpress
0813fe5820d8   mysql          "docker-entrypoint.s…"   51 minutes ago   Up 51 minutes   3606/tcp, 36060/tcp, 0.0.0.0:3606->3606/tcp, :::3606->3606/tcp   mysql
Yeh.. It works without causing any errors. Congratulation...
So let's come inside the rockylinux:9 container, which is known as wordpress here.
rest of the work will performed here.
Step-4 ( Install EPEL & REMI repository )
Setup compatible EPEL repository and REMI repository. Find your compatible repository
EPEL (Fedora): https://dl.fedoraproject.org/pub/epel/
REMI (PHP): https://rpms.remirepo.net/enterprise/
Check your compatible EPEL repository, so check your OS version by /etc/os-release .
[root@0f39c926429e /]# [root@0f39c926429e /]# cat /etc/os-release
NAME="Rocky Linux"
VERSION="9.3 (Blue Onyx)"
ID="rocky"
ID_LIKE="rhel centos fedora"
VERSION_ID="9.3"        ----------------> Check this
My RockyLinux:9 version is : VERSION_ID="9.3" , So lets install compatible EPEL repository.
[root@0f39c926429e /]# dnf install https://dl.fedoraproject.org/pub/epel/epel-next-release-latest-9.noarch.rpm
But in RockyLinux you can latest EPEL-compatible repository with a simple command.
[root@0f39c926429e /]# yum update -y
[root@0f39c926429e /]# dnf install epel-release -y
And install the REMI repository as well.
[root@0f39c926429e /]# dnf install https://rpms.remirepo.net/enterprise/remi-release-9.rpm -y
To view available packages specifically from the "remi" and "remi-safe" repositories while temporarily disabling other repositories during the package listing operations.
[root@0f39c926429e /]# dnf --disablerepo="*" --enablerepo="remi" list available -y && \
    dnf --disablerepo="*" --enablerepo="remi-safe" list available -y
Lists the available modules related to PHP. The -y flag automatically confirms any prompts or questions during the listing process. and Installs a specific php version (in this case, version 7.4 from the "remi" repository) of the PHP module.
[root@0f39c926429e /]# dnf module list php -y && \
    dnf module install php:remi-7.4 -y
Step-4 ( Install Required Packages in the container )
# yum whatprovides <Command_Name>In the container, we will install some command packages to work smoothly on the docker container. I know this will increase the size of the docker container, but these are default requirements for a DevOps Engineer
procps-ng:A package that provides various system and process monitoring utilities, such asps,top,free, and others, to display system information and manage processes.
vim:A highly configurable text editor, often considered an enhanced version of the traditionalvieditor, with additional functionalities and customization options.
bind-utils:Includes utilities for querying DNS servers and troubleshooting DNS-related issues, containing tools likedigfor DNS lookups andnslookupfor querying name servers.
wget:A command-line utility used for downloading files from the web via HTTP, HTTPS, and FTP protocols.
nmap:A network exploration and security auditing tool, utilized for discovering hosts and services on a network, along with assessing their security.
net-tools:Contains a set of basic networking tools likeifconfig,netstat,arp, and others for managing and troubleshooting network configurations.
httpd:The Apache HTTP Server, a widely used web server software for hosting websites and serving web content.
iputils:Provides various networking tools for basic network troubleshooting, includingping,ping6,arping,tracepath, andclockdiff.
[root@localhost _data]# docker exec -it wordpress bash
[root@0f39c926429e /]# yum install iproute procps-ng vim bind-utils wget nmap net-tools httpd iputils
# docker exec -it wordpress bash
[root@0f39c926429e /]#
And as well, we will have to download lots of configuration packages and do configuration manually. These packages are is:
php-cli:PHP Command Line Interface - allows executing PHP scripts via the command line.
php-pear:PHP Extension and Application Repository - a framework and distribution system for reusable PHP components.
php-pdo:PHP Data Objects - provides a consistent interface for accessing databases in PHP.
php-mysqlnd:PHP MySQL Native Driver - allows PHP to communicate with MySQL databases using a native protocol.
php-gd:PHP GD Library - enables PHP to create and manipulate images.
php-mbstring:PHP Multibyte String - provides multibyte-specific string functions.
php-mcrypt:PHP Mcrypt Extension - allows PHP to encrypt and decrypt data.
php-xml:PHP XML Extension - supports XML parsing and manipulation in PHP.
httpd:Apache HTTP Server - the web server software used to serve web content.
php:PHP itself - the scripting language used for web development.
php-common:Common files for PHP - contains files shared among different PHP packages.
[root@0f39c926429e /]# yum install php-cli php-pear php-pdo php-mysqlnd php-gd php-mbstring php-mcrypt php-xml
Thats good!
Step-5 ( Configuration for WordPress in RockyLinux )
- Change the ownership of the directory
/var/www/html/wordpressto the userapache, and adjust the permissions to755, including all contents within that directory.
[root@0f39c926429e /]# cd /var/www/html/
[root@0f39c926429e html]# ls
wordpress
[root@0f39c926429e html]#  chown -R apache.apache wordpress
[root@0f39c926429e html]# chmod -R 755 wordpress
[root@0f39c926429e html]# ls -lZ
total 4
drwxr-xr-x. 5 apache apache unconfined_u:object_r:container_file_t:s0 4096 Nov  9 00:45 wordpress

[root@0f39c926429e html]# ls -lZ wordpress/
total 228
-rwxr-xr-x.  1 apache apache unconfined_u:object_r:container_file_t:s0   405 Feb  6  2020 index.php
-rwxr-xr-x.  1 apache apache unconfined_u:object_r:container_file_t:s0 19915 Jan  1  2023 license.txt
-rwxr-xr-x.  1 apache apache unconfined_u:object_r:container_file_t:s0  7399 Jul  5 17:41 readme.html
-rwxr-xr-x.  1 apache apache unconfined_u:object_r:container_file_t:s0  7211 May 12  2023 wp-activate.php
drwxr-xr-x.  9 apache apache unconfined_u:object_r:container_file_t:s0  4096 Nov  9 00:45 wp-admin
-rwxr-xr-x.  1 apache apache unconfined_u:object_r:container_file_t:s0   351 Feb  6  2020 wp-blog-header.php
-rwxr-xr-x.  1 apache apache unconfined_u:object_r:container_file_t:s0  2323 Jun 14 14:11 wp-comments-post.php
-rwxr-xr-x.  1 apache apache unconfined_u:object_r:container_file_t:s0  3013 Feb 23  2023 wp-config-sample.php
drwxr-xr-x.  4 apache apache unconfined_u:object_r:container_file_t:s0    52 Nov  9 00:45 wp-content
-rwxr-xr-x.  1 apache apache unconfined_u:object_r:container_file_t:s0  5638 May 30  2023 wp-cron.php
drwxr-xr-x. 27 apache apache unconfined_u:object_r:container_file_t:s0 12288 Nov  9 00:45 wp-includes
-rwxr-xr-x.  1 apache apache unconfined_u:object_r:container_file_t:s0  2502 Nov 26  2022 wp-links-opml.php
-rwxr-xr-x.  1 apache apache unconfined_u:object_r:container_file_t:s0  3927 Jul 16 12:16 wp-load.php
-rwxr-xr-x.  1 apache apache unconfined_u:object_r:container_file_t:s0 50924 Sep 29 22:01 wp-login.php
-rwxr-xr-x.  1 apache apache unconfined_u:object_r:container_file_t:s0  8525 Sep 16 06:50 wp-mail.php
-rwxr-xr-x.  1 apache apache unconfined_u:object_r:container_file_t:s0 26409 Oct 10 14:05 wp-settings.php
-rwxr-xr-x.  1 apache apache unconfined_u:object_r:container_file_t:s0 34385 Jun 19 18:27 wp-signup.php
-rwxr-xr-x.  1 apache apache unconfined_u:object_r:container_file_t:s0  4885 Jun 22 14:36 wp-trackback.php
-rwxr-xr-x.  1 apache apache unconfined_u:object_r:container_file_t:s0  3154 Sep 30 07:39 xmlrpc.php
- Customize apache VirtualHost configuration in
/etc/httpd/conf/httpd.conf
[root@0f39c926429e /]# vim /etc/httpd/conf/httpd.conf

<VirtualHost *:80> ---------->  Apache HTTP server should listen on all available IP addresses (*) on port 80
    ServerAdmin  jangidrakesh71@gmail.com -----> valid email address where the server administrator or website maintainer can be reached
    DocumentRoot /var/www/html/wordpress  ------> where the web files for a particular website or web application are stored
    ServerName grras.com --------> Do entry in /etc/hosts with this domainname
    <Directory "/var/www/html/wordpress"> ---------> where the web files for a particular website or web application are stored
         Allowoverride All ------> An Apache configuration allows the use of .htaccess files to override server settings for the specific directory and its subdirectories.
     </Directory>
    ErrorLog logs/wordpress-error_log    ----> The file where Apache will write its error logs related to the wordpress virtual host or directory. check /var/log
    CustomLog logs/wordpress-access_log combined  -------> The file where Apache will write its access logs related to the wordpress virtual host or directory. check /var/log
</VirtualHost>
- Edit this wordpress configuration file
"wp-config-sample.php".
define( 'DB_NAME', 'wordpress' );----> Database namedefine( 'DB_USER', 'rakesh' );-----> Database authorized user to access DBdefine( 'DB_PASSWORD', 'password' );----> Database password you setdefine( 'DB_HOST', '172.17.0.2' );-----> Ip (Where your database is running on)
[root@0f39c926429e /]# vim /var/www/html/wordpress/wp-config-sample.php

<?php
/**
 * The base configuration for WordPress
 *
 * The wp-config.php creation script uses this file during the installation.
 * You don't have to use the web site, you can copy this file to "wp-config.php"
 * and fill in the values.
 *
 * This file contains the following configurations:
 *
 * * Database settings
 * * Secret keys
 * * Database table prefix
 * * ABSPATH
 *
 * @link https://wordpress.org/documentation/article/editing-wp-config-php/
 *
 * @package WordPress
 */

// ** Database settings - You can get this info from your web host ** //
/** The name of the database for WordPress */
define( 'DB_NAME', 'wordpress' );

/** Database username */
define( 'DB_USER', 'rakesh' );

/** Database password */
define( 'DB_PASSWORD', 'password' );

/** Database hostname */
define( 'DB_HOST', '172.17.0.2' );

/** Database charset to use in creating database tables. */
define( 'DB_CHARSET', 'utf8' );

/** The database collate type. Don't change this if in doubt. */
define( 'DB_COLLATE', '' );

/**#@+
 * Authentication unique keys and salts.
 *
 * Change these to different unique phrases! You can generate these using
 * the {@link https://api.wordpress.org/secret-key/1.1/salt/ WordPress.org secret-key service}.
 *
 * You can change these at any point in time to invalidate all existing cookies.
 * This will force all users to have to log in again.
 *
 * @since 2.6.0
 */
define( 'AUTH_KEY',         'put your unique phrase here' );
define( 'SECURE_AUTH_KEY',  'put your unique phrase here' );
define( 'LOGGED_IN_KEY',    'put your unique phrase here' );
define( 'NONCE_KEY',        'put your unique phrase here' );
define( 'AUTH_SALT',        'put your unique phrase here' );
define( 'SECURE_AUTH_SALT', 'put your unique phrase here' );
define( 'LOGGED_IN_SALT',   'put your unique phrase here' );
define( 'NONCE_SALT',       'put your unique phrase here' );

/**#@-*/

/**
 * WordPress database table prefix.
 *
 * You can have multiple installations in one database if you give each
 * a unique prefix. Only numbers, letters, and underscores please!
 */
$table_prefix = 'wp_';

/**
 * For developers: WordPress debugging mode.
 *
 * Change this to true to enable the display of notices during development.
 * It is strongly recommended that plugin and theme developers use WP_DEBUG
 * in their development environments.
 *
 * For information on other constants that can be used for debugging,
 * visit the documentation.
 *
 * @link https://wordpress.org/documentation/article/debugging-in-wordpress/
 */
define( 'WP_DEBUG', false );

/* Add any custom values between this line and the "stop editing" line. */


/* That's all, stop editing! Happy publishing. */

/** Absolute path to the WordPress directory. */
if ( ! defined( 'ABSPATH' ) ) {
        define( 'ABSPATH', __DIR__ . '/' );
}

/** Sets up WordPress vars and included files. */
require_once ABSPATH . 'wp-settings.php';
- Try to Ping mysql container from RockyLinux Container to check connection availability.
[root@0f39c926429e html]# ping 172.17.0.2
PING 172.17.0.2 (172.17.0.2) 56(84) bytes of data.
64 bytes from 172.17.0.2: icmp_seq=1 ttl=64 time=0.471 ms
64 bytes from 172.17.0.2: icmp_seq=2 ttl=64 time=0.109 ms
- Do entry in rockylinux container
/etc/hostsfile, (Because you mentionedServerName grras.comin apache configuration file).172.17.0.3is the RockyLinux container Ip address.
[root@0f39c926429e /]# vim /etc/hosts
172.17.0.3      0f39c926429e    grras.com
Step-5 ( Start Apache and php services )
Now we are in the final stage of using MySQL + WordPress.
Run httpd & php-fpm socket manually by their file location. You can find these file locations using the command: # which httpd
[root@0f39c926429e html]# which httpd
/usr/sbin/httpd
[root@0f39c926429e html]# which php-fpm
/usr/sbin/php-fpm
- First, we will Run php-fpm socket Not Apache service. Because if any error occurs from
php-fpmwe will edit and correct them and then Apache will read all edited configurations correctly.
[root@0f39c926429e html]# /usr/sbin/php-fpm
[03-Dec-2023 05:07:34] ERROR: unable to bind listening socket for address '/run/php-fpm/www.sock': No such file or directory (2)
[03-Dec-2023 05:07:34] ERROR: FPM initialization failed
ERROR: As we assume, This php-fpm socket showing an error, that you have not created /run/php-fpm/www.sock file respectively./run/php-fpm/www.sock file not created automatically through package installation. So we need to create such a file on the respective location.Create /run/php-fpm/www.sock file manually .
[root@0f39c926429e html]# mkdir -p /run/php-fpm/
[root@0f39c926429e html]# touch /run/php-fpm/www.sock
And run again php-fpm service.
[root@0f39c926429e html]# /usr/sbin/php-fpm
Check services using ps -ef
[root@0f39c926429e html]# ps -ef
UID          PID    PPID  C STIME TTY          TIME CMD
root           1       0  0 02:09 pts/0    00:00:00 /bin/bash
root          18       0  0 02:26 pts/1    00:00:00 bash
root          95       0  0 03:00 pts/2    00:00:00 bash
root         342       1  0 03:17 ?        00:00:00 gpg-agent --homedir /var/cache/dnf/remi-603f3219454e8792/pubring --use-standard-socket --daemon
root         344     342  0 03:17 ?        00:00:00 scdaemon --multi-server --homedir /var/cache/dnf/remi-603f3219454e8792/pubring
root         396       1  0 03:17 ?        00:00:00 gpg-agent --homedir /var/cache/dnf/remi-safe-0e8c787d52d39c50/pubring --use-standard-socket --daemon
root         398     396  0 03:17 ?        00:00:00 scdaemon --multi-server --homedir /var/cache/dnf/remi-safe-0e8c787d52d39c50/pubring
root         472       1  0 03:23 ?        00:00:00 gpg-agent --homedir /var/cache/dnf/remi-modular-c5d7aed76c0e3693/pubring --use-standard-socket --daemon
root         474     472  0 03:23 ?        00:00:00 scdaemon --multi-server --homedir /var/cache/dnf/remi-modular-c5d7aed76c0e3693/pubring
root         756       0  0 03:53 pts/3    00:00:00 bash
root        1684       1  0 05:25 ?        00:00:00 php-fpm: master process (/etc/php-fpm.conf)
apache      1685    1684  0 05:25 ?        00:00:00 php-fpm: pool www
apache      1686    1684  0 05:25 ?        00:00:00 php-fpm: pool www
apache      1687    1684  0 05:25 ?        00:00:00 php-fpm: pool www
apache      1688    1684  0 05:25 ?        00:00:00 php-fpm: pool www
apache      1689    1684  0 05:25 ?        00:00:00 php-fpm: pool www
root        1698     756  0 05:26 pts/3    00:00:00 ps -ef
- And now we can run the Apache service.
[root@0f39c926429e html]# /usr/sbin/httpd
AH00558: httpd: Could not reliably determine the server's fully qualified domain name, using 172.17.0.3. Set the 'ServerName' directive globally to suppress this message
check whether it starts or not.
[root@0f39c926429e html]# ps -ef

UID          PID    PPID  C STIME TTY          TIME CMD
root           1       0  0 05:29 pts/0    00:00:00 /bin/bash
root          20       0  0 05:32 pts/1    00:00:00 bash
root          42       1  0 05:33 ?        00:00:00 php-fpm: master process (/etc/php-fpm.conf)
apache        43      42  0 05:33 ?        00:00:00 php-fpm: pool www
apache        44      42  0 05:33 ?        00:00:00 php-fpm: pool www
apache        45      42  0 05:33 ?        00:00:00 php-fpm: pool www
apache        46      42  0 05:33 ?        00:00:00 php-fpm: pool www
apache        47      42  0 05:33 ?        00:00:00 php-fpm: pool www
root          49       1  0 05:33 ?        00:00:00 httpd
apache        50      49  0 05:33 ?        00:00:00 httpd
apache        51      49  0 05:33 ?        00:00:00 httpd
apache        52      49  0 05:33 ?        00:00:00 httpd
apache        53      49  0 05:33 ?        00:00:00 httpd
root         269      20  0 05:33 pts/1    00:00:00 ps -ef
Well Done. Both Apache and php-fpm service run smoothly without any errors.
If you facing any problems yet, we will stop and start wordpress container once and run httpd & php-fpm socket again. and check this log file:
[root@0f39c926429e /]# cd /var/log/httpd/
[root@0f39c926429e httpd]# ls
access_log  error_log  wordpress-access_log  wordpress-error_log
Step-6 ( Browse WordPress )
- If you wish to access the WordPress site using a local domain name, add an entry to the hosts file in the Virtual Machine BaseOS (where the Docker engine is running) with the format <www.domain_name>.com. For instance, if my website's domain name is
"www.rakamodify.com"in this example.
Note: The VM BaseOS Machine can ping each Docker container, regardless of the network they are connected to.[root@localhost ~]# vim /etc/hosts
192.168.199.133 www.rakamodify.com -----> This is your VM BaseOS IP
172.17.0.2 84c764f910d2 grras.com
:wq!
Now Open Your virtual machine web browser Mozilla Firefox and type this address:
http://rakamodify.com
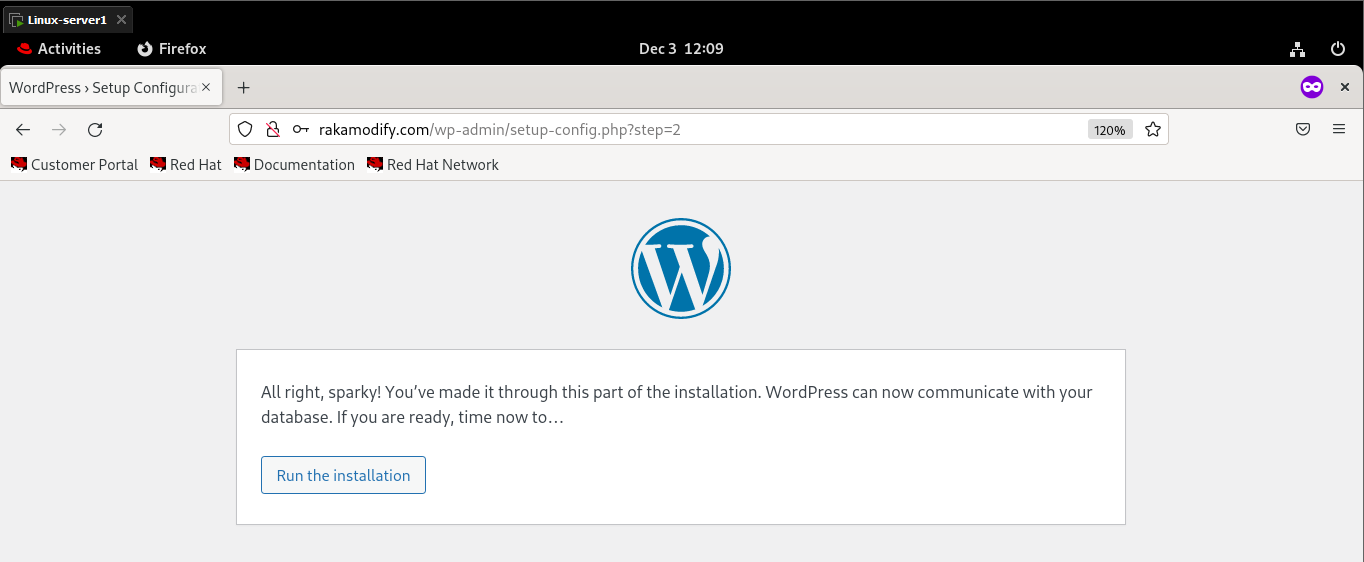
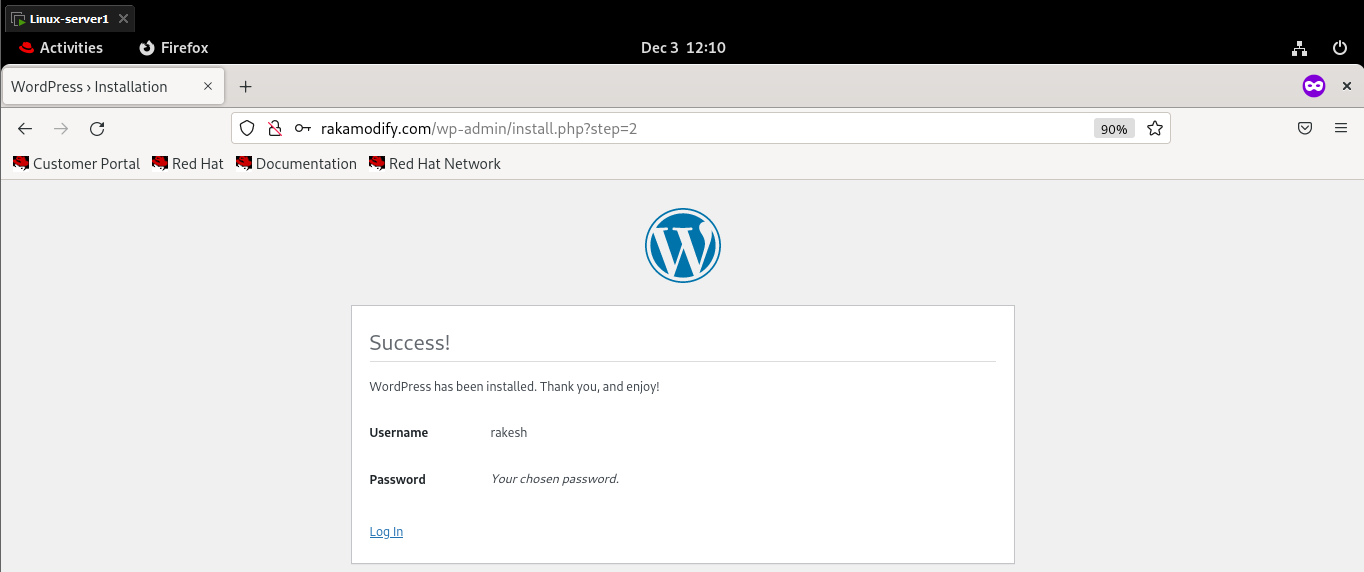
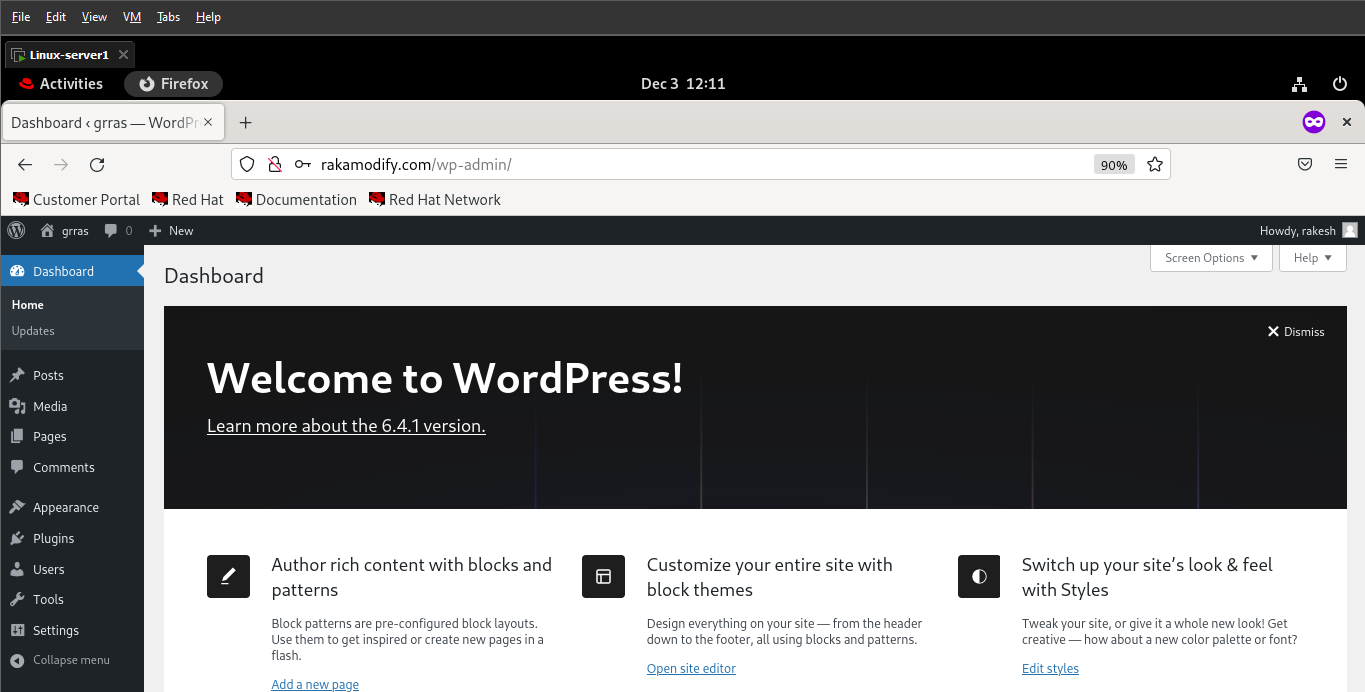
Congratulations to all........ It works
References:
Docker engine installation:https://docs.docker.com/engine/reference/commandline/push/MySQL container launch:https://rakeshkumarjangid.hashnode.dev/docker-containerization-mysql-wordpress-web-installation-on-cloud-awswordpress in centos :https://tecadmin.net/install-wordpress-using-lamp-centos-rhel-fedora/WordPress.org:https://wordpress.org/download/Database user creation:
Wordpress Requirement: https://wordpress.org/about/requirements/
Subscribe to my newsletter
Read articles from Rakesh Kumar Jangid directly inside your inbox. Subscribe to the newsletter, and don't miss out.
Written by

Rakesh Kumar Jangid
Rakesh Kumar Jangid
Let's learn together and serve the society, Make India Proud.
