React + Lib: How to include a local React UI library component into a React app. Part 1 of 2
 Emzar Panikashvili
Cover picture by: Image by wirestock on Freepik
For one of my projects, which I will probably describe in one of my next posts, I needed to create a react web application. Since I'm not good at styling, design and CSS are not my cup of tea, to say the least, I have decided to use an existing theme, already developed for React.
My choice was to use Creative Tim's React template called Material Kit React (Material Kit 2 React: Free MUI & ReactJS Kit @ Creative Tim (creative-tim.com)). This template is available for download either as a zip archive or as GitHub forking, and an older version of this theme exists also as a published NPM package.
I've been using the version of React that has not been supported by the NPM package. When I checked the GitHub repo, it turned out that the team had already updated the source code to the latest version of React, but they haven't published it yet as a publicly available NPM module. So I downloaded the latest code source from the repo and verified that it runs correctly against the version of React I've been using.
My goal presumably was to keep this theme as an external component to my project, like NPM dependency, or a local library component, so that the code of the project wouldn't get bloated with the large UI-related chunks.
Looking ahead, if I only had known how difficult this simple at-first-sight task would turn out to be, I would have opted for something else, like bloated chunks of UI code in my source tree!
The desired result
Here is the directory structure that would be our goal
└── react-app-plus-local-lib-workspace
    ├── my-react-app-abc
    │   ├── src
    │   │   └── index.js
    │   └── package.json
    └── react-ui-component-xyz
        ├── src
        │   └── index.js
        └── package.json
Nothing special so far, a single folder for a React App - my-react-app-abc, and a separate folder for a React component - react-ui-component-xyz - which in our case is the Creative Tim's React template.
It's probably worth mentioning that my-react-app-abc is created using the create-react-app framework, and the Creative Tim's React template is also supplied as a React app, which can be launched. So the app itself and the UI component are both React app's, created with create-react-app framework.
Our goal would be to achieve a situation when all the UI components, provided by the react-ui-component-xyz, will be available in my-react-app-abc, so that when we launch the latter, the page, using these UI components, is correctly displayed.
Including adjacent folder into a NodeJs project as a dependency
It turns out that, starting from NPM 2.0.0, it's not actually that difficult to include the component into a NodeJS project, even if it's not a fully-fledged NPM dependency, but a folder adjacent to the app's folder.
According to this explanation, we can simply type:
npm install --save ../react-ui-component-xyz
This would modify the package.json of the React app to mark the component dependency as follows:
- "react-ui-component-xyz": "file:../react-ui-component-xyz"
{
  "name": "my-react-app-abc",
  "version": "1.0.0",
  "private": true,
  "dependencies": {
    ...
    "react-ui-component-xyz": "file:../react-ui-component-xyz",
    ...
  },
  "scripts": {
    ...
  },
  "devDependencies": {
    ...
  },
  "babel": {
    "presets": [
      "react-app"
    ]
  }
}
As has been mentioned above, the Creative Tim's React Kit theme can be either downloaded or forked via Git Hub. So let's fork the git repository and link the main app to it:
cd my-react-app-abc
npm install
npm install --save ..\material-kit-react
After these commands the my-react-app-abc/node_modules will have the following symlink:
<JUNCTION> material-kit-2-react [<fullpath>\react-app-plus-local-lib-workspace\material-kit-react]
So we can conclude that the required NPM link has been created.
Now, let's try to use the linked module as follows:
import App from "material-kit-2-react";
import React from "react";
import * as ReactDOMClient from "react-dom/client";
import { BrowserRouter } from "react-router-dom";
import App from "material-kit-2-react";

const container = document.getElementById("root");

const root = ReactDOMClient.createRoot(container);

root.render(
  <BrowserRouter>
    <App />
  </BrowserRouter>
);
As one can see, the import is as straightforward as it gets, we are simply including directly the component App from the material-kit-react module, and we expect it to work.
However, this is the error we get:
ERROR in ./src/index.js 8:0-39
Module not found: Error: Can't resolve 'material-kit-2-react' in '<fullpath>\react-app-plus-local-lib-workspace\my-react-app-abc\src'

webpack compiled with 1 error
To find out what could be the problem, let's have a look at the libraries, located in node_modules. We can notice that the package.json of those modules has the following attribute: main. According to this explanation, the main entry in the package.json designates the single entry point of the module, which is being imported, when used as such: import xxx from "yyy".
In our case, the material-kit-react module doesn't contain this attribute, apparently because this project has not been intended to be used as a library. So let's add "main" as follows:
- "main": "src/index.js"
and see what happens. Here is the snippet of the resulting material-kit-react/package.json file:
{
  "name": "material-kit-2-react",
  "version": "2.1.0",
  "private": true,
  "main": "src/index.js",
    ...
  "dependencies": {
    ...
  },
  "scripts": {
    "start": "react-scripts start",
    ...
  },
    ...
  "devDependencies": {
    ...
  }
}
Now we are having a different error:
ERROR in ../material-kit-react/src/index.js
Module build failed (from ./node_modules/babel-loader/lib/index.js):
SyntaxError: <fullpath>\react-app-plus-local-lib-workspace\material-kit-react\src\index.js: Support for the experimental syntax 'jsx' isn't currently enabled (27:3):

  25 |
  26 | root.render(
> 27 |   <BrowserRouter>
     |   ^
  28 |     <App />
  29 |   </BrowserRouter>
  30 | );
Hmmm.... Support for the experimental syntax 'jsx' isn't currently enabled...
Really? Everything is enabled, as both projects work just fine, as long as one is not included in the other... Hence, the problem is not related to the Babel transpiler config, nor has it something to do with any other project configuration options.
So in this case, what can it be?
The answer might be related to the fact that when a dependency is included in the project, it is supposed to be fully compiled, transpiled and ready to use as a plain Javascript file.
This explanation sheds a little bit of light on this mystery. According to it, indeed, any code of the module, that is included in the node_modules, should be pre-compiled and transpiled with Babel.
We have tried the naive, most straightforward approach, and so far no luck. We'll need to come up with something more sophisticated to solve the issue.
Creating a Webpack bundle out of the component
Ok, we have figured out that for our local dependency to work, we'll need to create a pre-compiled bundle, so that it can be included in the project.
This article
already mentioned earlier, has two precious links in it, which could help us with this non-easy task - Webpack configuration to create the bundle:
How to Create and Publish a React Component Library - DEV Community
How to package your React Component for distribution via NPM | by Suprada Urval | ITNEXT
The message to take home from this reading is the following:
use babel-loader with react presets to transpile the JSX code
never (really never!) include React and ReactDOM modules in the final bundle, as it will clash with those libraries on the main React app project
put these dependencies as peerDependencies and devDependencies
exclude these dependencies from bundling in the Webpack config
So, considering these points, first I have moved the react and react-dom modules to devDependencies and peerDependencies, as has been suggested:

I have also created the following Webpack config file to create the bundle - build-module.config.js.
const path = require('path');

module.exports = {
    mode: "development",
    target: ['web'],
    devtool: "source-map",
    entry: {
        'main': './src/index.js',
    },
    output: {
        path: path.resolve(__dirname, 'dist'),
        filename: 'material-kit-2-react.lib.js',
        library: 'material-kit-2-react',
        libraryTarget: 'umd',
        publicPath: '/dist/',
        umdNamedDefine: true
    },
    resolve: {
        alias: {
            'assets': path.resolve(__dirname, 'src/assets'),
            'components': path.resolve(__dirname, 'src/components'),
            'examples': path.resolve(__dirname, 'src/examples'),
            'layouts': path.resolve(__dirname, 'src/layouts'),
            'pages': path.resolve(__dirname, 'src/pages'),
            'app': path.resolve(__dirname, 'src/app'),
        },
    },
    externals: {
        react: {
            commonjs: "react",
            commonjs2: "react",
            amd: "React",
            root: "React"
        },
        "react-dom": {
            commonjs: "react-dom",
            commonjs2: "react-dom",
            amd: "ReactDOM",
            root: "ReactDOM"
        }
    },
    module: {
        rules: [
            { test: /\.txt$/, use: 'raw-loader' },
            {
                test: /\.(jpe?g|png|gif|svg)$/i,
                loader: 'file-loader',
            },
            {
                test: /(\.js|\.jsx)$/,
                exclude: /node_modules/,
                loader: 'babel-loader',
                options: {
                    presets: [
                        '@babel/preset-env',
                        '@babel/preset-typescript',
                        '@babel/preset-react',
                        'react-app'
                    ]
                }
            }
        ],
    },
};
We build the bundle calling Webpack as follows:
webpack --config build-module.config.js
To access this command easily, let's add it to the scripts section of the package.json as follows:
  "scripts": {
    ...
    "build-module": "webpack --config build-module.config.js",
  },
Then we can run the bundle building from npm as follows:
npm run build-module
We need also to setup the environment variable NODE_ENV, otherwise we will be getting the following error: Using babel-preset-react-app requires that you specify NODE_ENV or BABEL_ENV environment variables.
set NODE_ENV=development
But if we run the build, finally we will receive something similar to this:
ERROR in ./src/index.js 20:0-22
Module not found: Error: Can't resolve 'App' in '<full path>\material-kit-react\src'
Did you mean './App'?
Aie aie aie... such a deception... we were almost there... ((
Webpack bundle config
To crawl deeper down this rabbit hole, let's have a closer look at the Webpack config, that has been presented earlier.
The root section
module.exports = {
    mode: "development",
    target: ['web'],
    devtool: "source-map",
    entry: {
        'main': './src/index.js',
    },
    ...
};
mode: "development" - we are creating a bundle that will be used for development (not production)
devtool: "source-map" - we would like to include the source map within the bundle so that the debugging will be easier
entry: { 'main': './src/index.js' } - we instruct Webpack that the entry point for our bundle will be index.js file
The "output" section
module.exports = {
    ...
    output: {
        path: path.resolve(__dirname, 'dist'),
        filename: 'material-kit-2-react.lib.js',
        library: 'material-kit-2-react',
        libraryTarget: 'umd',
        publicPath: '/dist/',
        umdNamedDefine: true
    },
    ...
}
path: path.resolve(__dirname, 'dist') - the final bundle should be located in the dist subfolder
filename: 'material-kit-2-react.lib.js' - the file name to use for the generated bundle
libraryTarget: 'umd' - apparently, this is how we specify the bundle format, which should be compatible both with NodeJS imports, as well as with old style "require" imports
library: 'material-kit-2-react', publicPath: '/dist/', umdNamedDefine: true - frankly speaking, no idea what this means, probably can be omitted, to be tested ...
The "resolve" section
module.exports = {
    ...
    resolve: {
        alias: {
            'assets': path.resolve(__dirname, 'src/assets'),
            'components': path.resolve(__dirname, 'src/components'),
            'examples': path.resolve(__dirname, 'src/examples'),
            'layouts': path.resolve(__dirname, 'src/layouts'),
            'pages': path.resolve(__dirname, 'src/pages'),
            'app': path.resolve(__dirname, 'src/app'),
        },
    },
    ...
}
The "resolve" section deserves probably special attention.
The source tree of the Material Kit React library is organized such that there is one entry point - index.js, and all the components are located in subfolders, such as "assets", "components", etc. The "resolve" section allows to tell Webpack where to look for imports, once it encounters something like this:
import MKBox from "components/MKBox";
Without the "resolve" section Webpack wouldn't be able to locate the required module unless we modify the code to have imports as relative paths (which is of course not an option):
import MKBox from "../MKBox";
Note, that we don't need this when we run the Material Kit React as a React App, since the entry point of this React App - index.js - is located already in the location, from which all the other imports could be resolved.
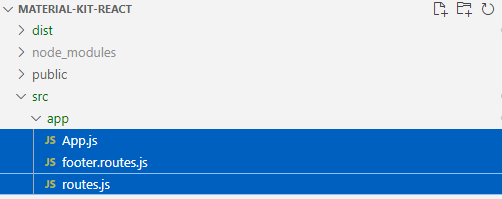
- 'app': path.resolve(__dirname, 'src/app') - we have added this additional resolve entry to account for 3 files, that are located in the /src folder: App.js, footer.router.js and router.js. We are going to create an additional subfolder in the source tree - app - and move there the three files so that the same resolution mechanism can be applied. Like this:

Of course, once we do that, we'll need to adapt the relevant imports accordingly:
import App from "App";
becomes
import App from "app/App";
The "externals" section
module.exports = {
    ...
    externals: {
        react: {
            commonjs: "react",
            commonjs2: "react",
            amd: "React",
            root: "React"
        },
        "react-dom": {
            commonjs: "react-dom",
            commonjs2: "react-dom",
            amd: "ReactDOM",
            root: "ReactDOM"
        }
    },
    ...
}
This section instructs Webpack not to include in the final bundle the common libraries that should be already present in the host project, in our case the main application my-react-app-abc.
This part is extremely important, as otherwise, the presence of two React libraries in the same project will cause the dreaded error "Invalid Hook Call Warning". This error will chase you every time you try to use hooks, like "useEffect", and the only way to remedy it would be to carefully clean up your dependencies from every presence of React library. So, we exclude these libraries, as we know that our hosting project would already include React.
I must confess, so far the syntax of this "externals" section remains quite cryptic to me, as I don't understand what this means, except for the fact that thanks to some magic that would do the trick and exclude the React libraries from the bundle.
The "module" section
module.exports = {
    ...
    module: {
        rules: [
            { test: /\.txt$/, use: 'raw-loader' },
            {
                test: /\.(jpe?g|png|gif|svg)$/i,
                loader: 'file-loader',
            },
            {
                test: /(\.js|\.jsx)$/,
                exclude: /node_modules/,
                loader: 'babel-loader',
                options: {
                    presets: [
                        '@babel/preset-env',
                        '@babel/preset-typescript',
                        '@babel/preset-react',
                        'react-app'
                    ]
                }
            }
        ],
    },
    ...
}
This section is more or less common in every React project. It contains the required Babel presets to correctly transpile the JSX code, as well as other file loader directives.
The created bundle
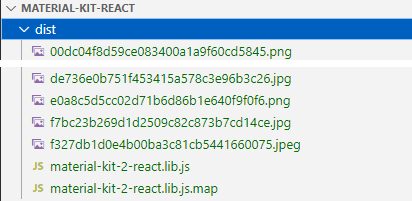
With the config presented above, Webpack has created the following in the "dist" folder:

Behold! This is our long-awaited bundle, which (hopefully!) includes the full Material Kit React component, ready to be included in the React app.
Including the bundle in the main app
Finally, after all these efforts, the bundle is created, and we can try to include it in our React application. Recall, that our main application is already having a relative dependency on Material Kit React:
{
  "name": "my-react-app-abc",
  "version": "1.0.0",
  "private": true,
  "dependencies": {
    ...
    "material-kit-2-react": "file:../material-kit-react",
    ...
  },
}
But wait a sec... Now we somehow need to tell NPM and NodeJS that material-kit-react should be loaded from the file /dist/material-kit-2-react.lib.js! Fortunately, this is quite easily accomplished using the "exports" term in the package.json:
Here is the material-kit-react\package.json:
{
    "name": "material-kit-2-react",
    "version": "2.1.0",
    "exports": {
        ".": "./dist/material-kit-2-react.lib.js"
    },
    ...
}
With this line in place, we can hope that NPM will correctly understand the entry point for our component.
Ok, the time has come to test it!
cd my-react-app-abc
npm install
npm start
Here is what we get in the browser:
Uncaught ReferenceError: React is not defined
Wow... so much has been said about NOT including React in the bundle, since it is already in the main app, and here we go again...
Conclusion
Well, not always the things go smoothly...
Still, the good news is that we've got some understanding of how Webpack compiles the bundle, and how this bundle is then included in the main application.
We haven't reached our declared goal - the application still cannot include the UI components from the external local library, and that is a downside.
We'll continue our quest in the second part of this article, which you can find here:
Subscribe to my newsletter
Read articles from Emzar Panikashvili directly inside your inbox. Subscribe to the newsletter, and don't miss out.
Written by
