How to Build a YouTube Channel Scraper in JS
 Crawlbase
This blog is originally posted to crawlbase blog.
The use of a YouTube channel scraper has become increasingly important in a world where platforms like YouTube have made a significant impact. Such tools are vital for businesses looking to gain insights and remain competitive. YouTube began as a modest venture in 2005 and has grown into a global phenomenon, altering the landscape of content consumption and creation.
In the next few years, YouTube grew a lot and added more types of content. By 2018, it became a big part of the culture, featuring viral challenges, music stars, and educational videos. As of 2023, YouTube has more than 2.7 billion monthly users, making it a significant hub for worldwide entertainment, education, and information.
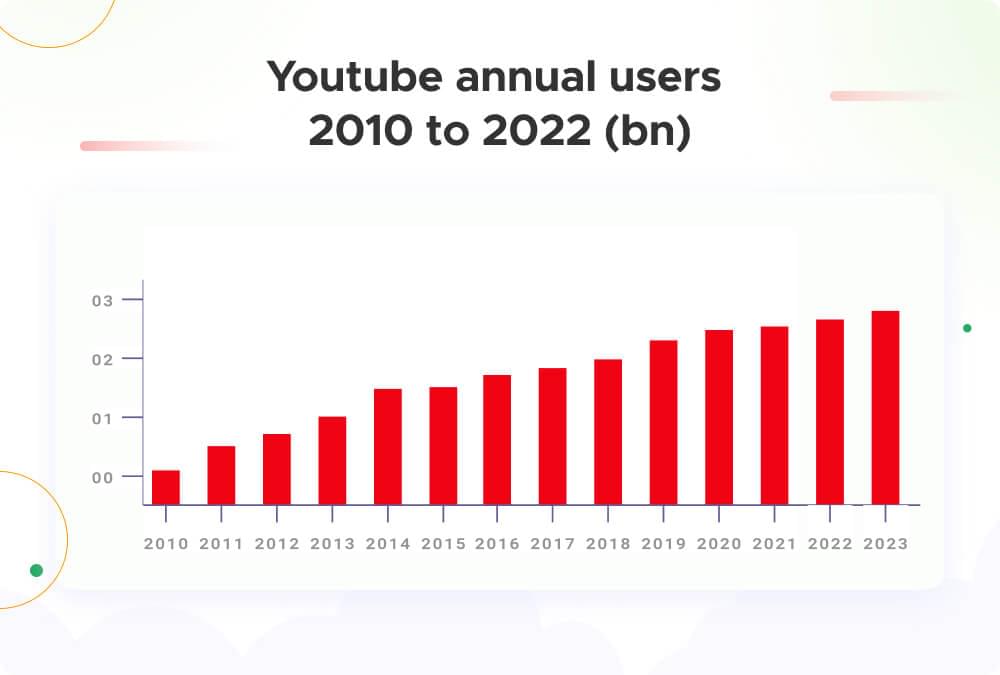
With these massive numbers in mind, we know for a fact that YouTube serves as a gold mine of invaluable data. However, extracting this data is complex, especially if you need the right tool.
This blog will walk you through a step-by-step guide on leveraging Crawlbase’s Crawling API to optimize your data extraction process. Discover how to build a custom scraper with JavaScript, making tasks such as Competitive Analysis and Content Strategy Enhancement feasible and remarkably efficient. Let’s dive into the details of maximizing the potential of Crawlbase for your data extraction needs.
Table of Contents
I. YouTube API vs YouTube Scraper with Crawlbase
II. Why use Crawlbase to Scrape YouTube Channels?
III. Project Scope and Prerequisites
Prerequisites
Setting Up Crawlbase API
IV. Setting up the Environment
Installing Dependencies
Creating an Endpoint
V. Crafting the Web Scraping Logic
Step 1. Fetching HTML using Crawling API
Step 2. Writing a Custom Scraper using Cheerio
Step 3. Compiling the Web Scraping Code
Step 4. Testing the Web Scraping API Using Postman
VII. Frequently Asked Questions
I. YouTube API vs YouTube Scraper with Crawlbase
The choice between using the YouTube API and a third-party service like Crawlbase for scraping YouTube data depends on the specific requirements of your project, the scale of data needed, and your technical capabilities.
The YouTube API provides official access to Youtube data but has major limitations as it only allows scraping of basic information such as video details, rankings, recommendations, and ads. It also requires user login and mandates quota restrictions. In contrast, a YouTube scraper with Crawlbase employs web scraping techniques, extracting information directly from HTML content, offering flexibility and simplicity at the cost of being an unofficial and potentially more subject to website changes and policies.
Here are some pros and cons to provide a clearer picture:
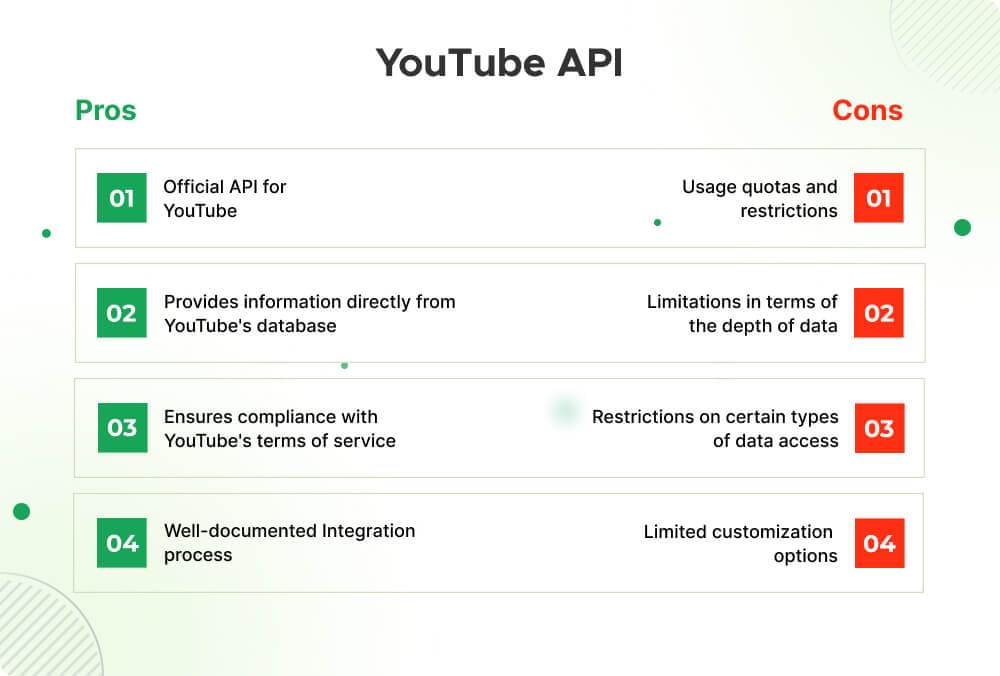
YouTube API:
- Official Access:
Pros: The YouTube API is the official and sanctioned method for accessing YouTube data. It provides a structured and supported way to retrieve information directly from YouTube.
Cons: The API has usage quotas and restrictions, and certain features may be limited based on your API key and access level.
- Data Accuracy:
Pros: The API provides accurate and up-to-date information directly from YouTube’s database.
Cons: The API may have some limitations in terms of the depth of data it provides, and certain metrics might be aggregated or anonymized.
- Compliance and Legal Considerations:
Pros: Using the YouTube API ensures compliance with YouTube’s terms of service and legal requirements.
Cons: The API might have restrictions on certain types of data access, and scraping activities outside the API may violate terms of service.
- Development Overhead:
Pros: Integrating with the YouTube API is well-documented and can be done by developers with programming experience.
Cons: Customization options may be limited, and accessing specific types of data may require multiple API requests.
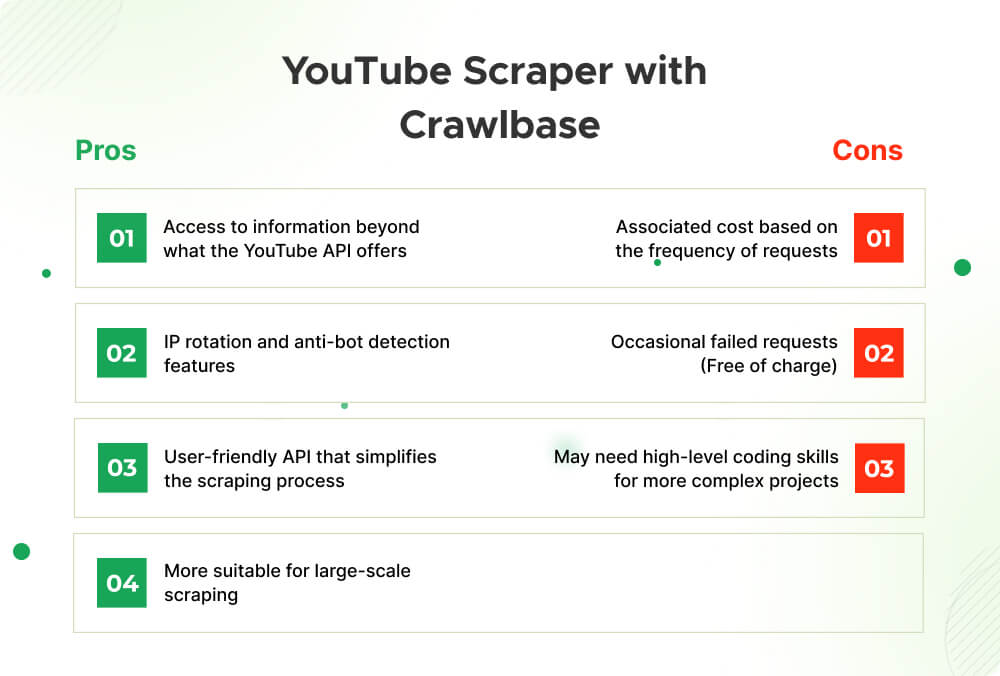
Youtube Scraper:
- Comprehensive Data Access:
Pros: Youtube Scraper allows for more extensive and flexible data scraping, potentially providing access to information beyond what the YouTube API offers.
Cons: Depending on the scale of data needed, there may be associated costs with using a third-party service.
- IP Rotation and Anonymity:
Pros: Crawlbase often employs IP rotation and anti-bot detection features, reducing the risk of being blocked by YouTube for scraping activities.
Cons: While these features significantly enhance stealth, the success rate may not be 100% all the time.
- Ease of Use:
Pros: Youtube Scraper like Crawlbase offers a user-friendly API that simplifies the scraping process, making it accessible to users with varying technical expertise.
Cons: The level of skill required to fully take advantage of the API increases depending on the complexity of the project.
- Scalability:
Pros: Crawlbase is more suitable for large-scale scraping projects where extensive data is needed.
Cons: Additional cost depending on the frequency of requests and concurrent connections.
Considerations for Decision-making:
Data Volume and Customization: If you require a high level of customization and access to extensive data and you are willing to manage potential risks, a third-party service like Crawlbase might be more suitable.
Technical Expertise: The YouTube API might be more suitable for developers with the expertise to navigate and implement API integrations. On the other hand, Crawlbase may offer a simpler solution for users with less technical experience.
Cost Considerations: Evaluate the cost implications of using the YouTube API versus a third-party service, considering factors such as API usage fees, potential overage costs, and any subscription fees associated with third-party services.
Ultimately, the choice between the YouTube API and Crawlbase depends on your project’s specific needs and constraints, balancing factors such as data accuracy, compliance, customization, and ease of use.
II. Why use Crawlbase to Scrape YouTube Channels?
When it comes to scraping data from YouTube channels, various hurdles need to be addressed to ensure the process is efficient, effective, and avoids disruptions. The Crawling API from Crawlbase provides solutions to overcome these challenges.
Hurdles in YouTube Scraping
- Bypassing the Blockade: Staying Clear of Bans:
Challenge: YouTube employs measures to prevent scraping activities, and repeated attempts can lead to IP bans.
Issue: Traditional scraping methods may trigger YouTube’s security mechanisms, resulting in IP blocking and hindering data collection efforts.
- Outsmarting Captchas: Simplifying the Digital Puzzle:
Challenge: Captchas are commonly used to distinguish between human and automated bot activities.
Issue: Constantly solving captchas during scraping processes is time-consuming and disrupts the automation flow, making it challenging to extract data seamlessly.
- Sneaking Past Bot Detection: Flying Under the Radar:
Challenge: YouTube is equipped with sophisticated bot detection mechanisms to identify and block automated scraping bots.
Issue: Traditional scraping tools may fail to emulate human behavior, leading to bot detection and subsequent blocking.
Crawlbase’s Solutions: The Crawling API
- IP Rotation:
Solution: Crawlbase employs rotating IP addresses to avoid bans and distribute requests across multiple IP addresses.
Benefits: By rotating IPs in each request, Crawlbase ensures that scraping activities appear more like regular user interactions, minimizing the risk of IP bans and allowing for continuous, uninterrupted data collection.
- AI-powered that acts like a human browsing the target website:
Solution: Crawlbase’s AI-powered scraping technology simulates human-like interactions with the target website.
Benefits: By replicating natural browsing patterns, Crawlbase’s AI-powered solution helps bypass bot detection mechanisms, reducing the likelihood of being flagged as a scraping bot.
- Anti-Bot Detection Features:
Solution: Crawlbase incorporates anti-bot detection features to counteract measures employed by websites like YouTube.
Benefits: These features include randomized user agents, headers, and other techniques that make scraping activities less conspicuous, ensuring a higher level of stealth during the data extraction process.
- Faster Development Time Means Lower Project Cost:
Solution: Crawlbase’s user-friendly API reduces the development time required for implementing YouTube scraping functionalities.
Benefits: A quicker development process translates to lower project costs, making Crawlbase a cost-effective solution for businesses and developers seeking efficient YouTube scraping capabilities.
In short, Crawlbase’s Crawling API offers a comprehensive solution to the challenges associated with scraping YouTube channels by employing IP rotation, AI-powered emulation of human browsing, anti-bot detection features, and a faster development cycle. Collectively, these features contribute to a more seamless and efficient data extraction process while minimizing the risk of disruptions and bans.
III. Project Scope and Prerequisites
Our project, the YouTube Channel scraper, is designed to provide developers and businesses with the capability to extract comprehensive data efficiently from YouTube channels with the help of Crawlbase’s Crawling API. The project encompasses the following key aspects:
Data Extraction from YouTube Channels
The primary objective of the API is to extract detailed information from YouTube channels. This includes essential metadata such as the channel title, description, subscriber count, channel image, videos count, and the channel handle. Additionally, the API retrieves information about individual videos within the channel, including video title, views, and thumbnail images.Dynamic Data Parsing
The API employs dynamic HTML parsing techniques, using the Cheerio library, to extract relevant data from the HTML structure of the YouTube channel page. The data parsing mechanism ensures adaptability to changes in the YouTube website structure, allowing for consistent and reliable data extraction.Crawlbase’s Crawling API Integration
The project integrates seamlessly with Crawlbase’s Crawling API, a powerful tool that facilitates efficient and discreet web scraping. The API handles the complexities of web scraping, such as IP rotation, anti-bot detection, and page wait times, ensuring the reliability and continuity of data extraction from YouTube channels.Scalability and Efficiency
Designed with scalability in mind, the API can be used to scrape data from a single channel or multiple channels concurrently. This scalability is crucial for projects requiring extensive data extraction from a diverse range of YouTube channels.Integration with Existing Applications
Developers can seamlessly integrate the YouTube Channel Scraper API into their existing applications, workflows, or analytical tools. The API’s simplicity and adherence to RESTful principles make it versatile and compatible with various development environments.
Prerequisites
Before we begin writing the code, make sure you have the following prerequisites in place:
Basic Knowledge of JavaScript and Node.js:
- A fundamental understanding of JavaScript programming language and Node.js is essential. This knowledge will help you comprehend the code structure and make any necessary customization.
Node.js Installed on Your Development Machine:
- Ensure that Node.js is installed on your development machine. You can download and install the latest version of Node.js from the official Node.js website.
Familiarity with Express.js for Creating an Endpoint:
- The project utilizes Express.js to create a simple endpoint for handling API requests. Familiarize yourself with Express.js, as it will enable you to customize the API behavior based on your project requirements.
Active Crawlbase Account with API Credentials:
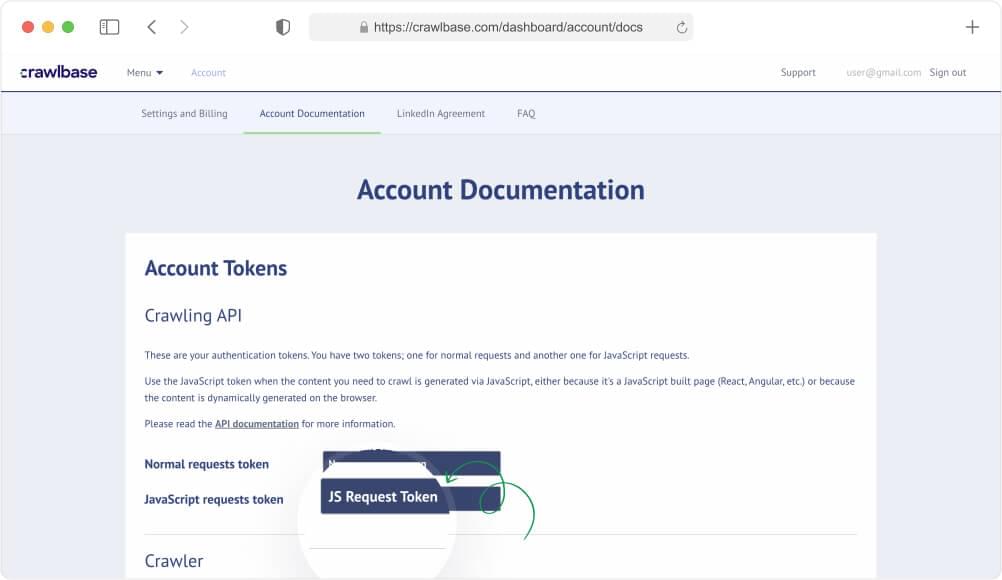
Sign up for a Crawlbase account if you don’t have one. Obtain your API credentials, including the normal request token, from the account documentation provided by Crawlbase. This token is crucial for making requests to the Crawlbase API in the context of this project.
Steps to Obtain Crawlbase API Credentials:
Sign up for a Crawlbase account.
Access the account documentation to obtain your API credentials.
Retrieve the normal request token from your Crawlbase account, as it will be used to authenticate and make requests to the Crawlbase Crawling API.
By satisfying these prerequisites, you’ll be well-prepared to follow our guide in building your own YouTube Channel Scraper.
IV. Setting up the Environment
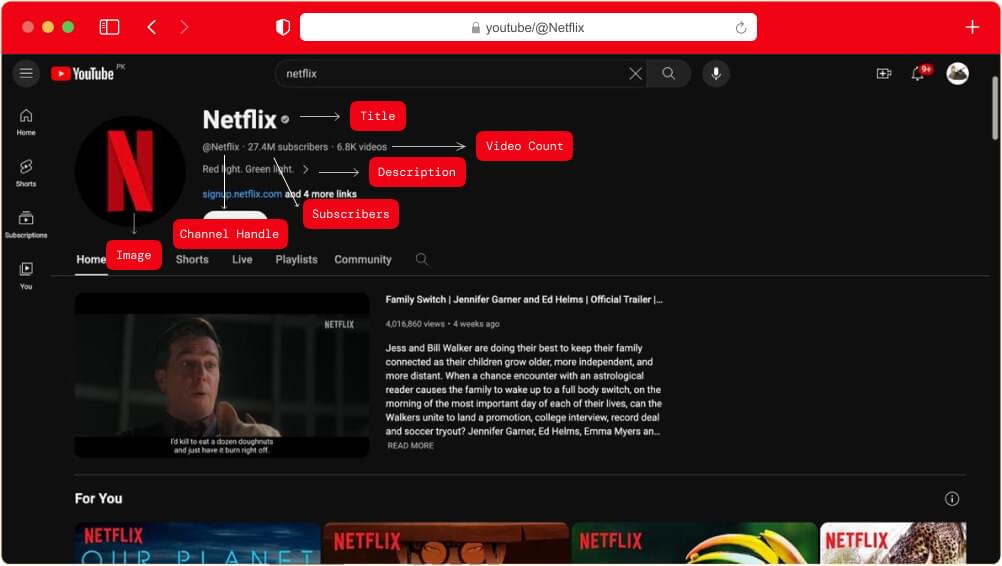
Before setting up your coding environment and writing the scripts, it’s highly advisable to plan your scraping targets first. For the sake of this guide, we’ll be scraping the following information from this YouTube channel page:
Title
Description
Subscribers
Image
Videos Count
Channel Handle
Videos list
Installing Dependencies
In your Node.js project, installing the essential dependencies required to set up your web scraping environment is crucial. These packages include:
Cheerio: Cheerio is a powerful library for parsing HTML, enabling you to extract specific data from web pages efficiently.
Express (Optional): If you plan to create an endpoint for receiving scraped data, you can use the Express.js framework to set up your server.
Crawlbase (Optional): The crawlbase package facilitates interaction with the Crawlbase Crawling API, allowing you to integrate API requests to your Node.js easily.
To begin, open your console or terminal and use the following command:
npm i express cheerio crawlbase |
This command will download and install the necessary packages for your project, ensuring that you have the tools to set up your YouTube Channel Scraper.
Creating an Endpoint
Now, let’s establish an Express.js server and define a GET route at /scrape. This route acts as the starting point for initiating the web scraping process. When a client sends a GET request to this route, the server will trigger the scraping operation, retrieve data, and deliver a response.
This endpoint becomes valuable when you aim to provide an API for users or systems to request real-time scraped data. It grants you control over the timing and manner in which data is fetched, enhancing the flexibility and accessibility of your web scraping solution.
You can copy the code below and save it as index.js (or whatever filename you prefer) in your project directory to create a basic Express.js GET route for /scrape
const express = require('express'); |
You can run this code to start the server by executing the command below.
node index.js |
Output:

With this task completed, we are ready to advance to the next stage of our guide. In the upcoming step, we will write the core code for the Scraper, seamlessly integrating it with the Crawling API. Let’s proceed.
V. Crafting the Web Scraping Logic
Step 1. Fetching HTML using Crawling API
Now that you’ve established your API credentials and a server endpoint with the necessary dependencies, the next step involves leveraging the Crawlbase API to retrieve HTML content from a YouTube channel page.
In this section, you will gain insights into making requests to the Crawlbase API, passing your API credentials, and acquiring HTML content for subsequent processing. The HTML content obtained will serve as the foundation for data extraction and analysis, employing Cheerio and custom scraping logic.
Copy the code below and save it in the same index.js file.
const express = require('express'); |
Let’s break down the provided code:
Importing Dependencies:
- The first two lines imports the necessary Node.js modules.
expressis used for creating a web server, and{ CrawlingAPI }is a destructuring assignment to import theCrawlingAPIclass from the “crawlbase” package.
Crawlbase API Initialization:
- Here, a new instance of the
CrawlingAPIclass is created with the provided Crawlbase API token. Make sure to replace"YOUR_CRAWLBASE_TOKEN"with your actual Crawlbase API token.
Express Server Setup:
- An Express application (
app) is initialized, and the server is configured to listen on the specified port (either the one defined in the environment variablePORTor defaulting to 3000).
Handling the “/scrape” Endpoint:
This part defines a route for handling GET requests at the “/scrape” endpoint. When a client makes a GET request to this endpoint, it triggers a call to the Crawlbase API using the
api.get()method, passing the URL as a query parameter (req.query.url).If the API call is successful, the raw HTML response is logged to the console (
console.log(response.body)). If an error occurs, it is caught, logged, and a 500 Internal Server Error response is sent to the client.
Starting the Server:
- The Express server is started and configured to listen on the specified port. A log message is displayed in the console indicating that the server is running.
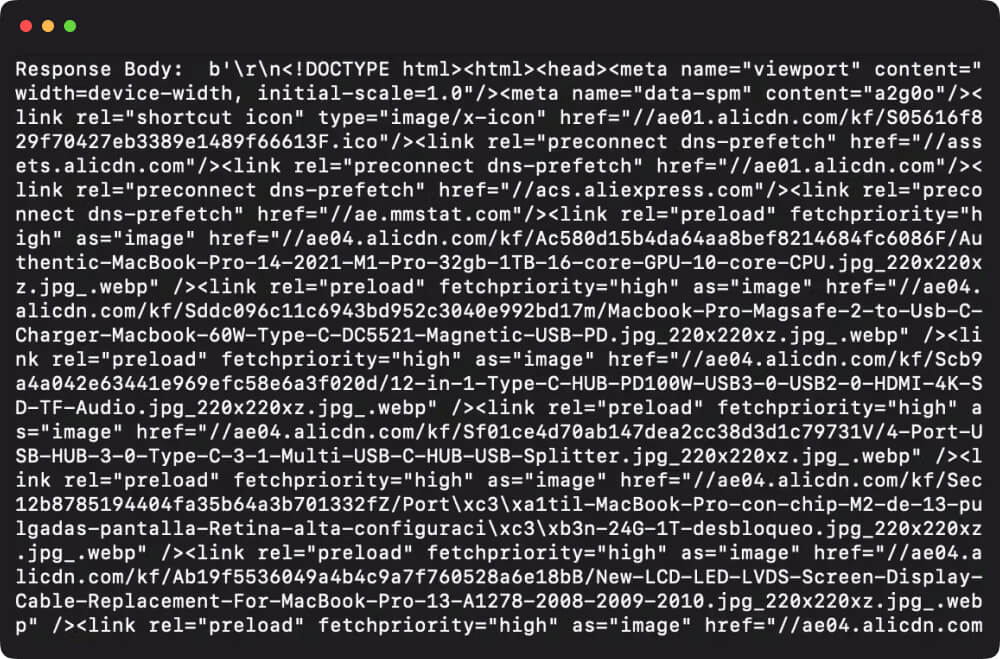
Execute the code to get an HTML response as shown below:
Step 2. Writing a Custom Scraper using Cheerio
In this step, we’ll delve into the core of web scraping, focusing on extracting valuable product information from a YouTube channel URL using Cheerio. The objective is to create a custom scraper for precise control over the data extraction process.
You’ll pinpoint product details such as titles, prices, and ratings by developing a tailored scraper. This hands-on approach allows you to adapt your scraping logic to the unique structure of the YouTube channel, ensuring accurate and efficient data retrieval.
Review the code snippets below and its explanation:
Initializing Cheerio and Data Structure
const $ = cheerio.load(html), |
- The code initializes Cheerio with the HTML content (
html) and creates achannelobject to store the extracted data. The object has properties such astitle,description,subscribers, etc., and an arrayvideosto store information about individual videos.
Extracting Channel Information:
channel['title'] = $('#inner-header-container .ytd-channel-name .ytd-channel-name:first').text().trim(); |
- The code uses Cheerio selectors to target specific elements in YouTube’s HTML structure and extract relevant information. For example, it extracts the channel title, description, subscriber count, channel image URL, videos count, and channel handle.
Looping Through Videos:
$('#content #scroll-container #items #dismissible').each((_, element) => { |
- This part of the code utilizes Cheerio’s
.each()method to iterate over each video element on the page. It extracts information such as video title, views, and image URL for each video and appends this data to thevideosarray within thechannelobject.
Step 3. Compiling the Web Scraping Code
Now that we’ve developed the key components for our web scraping project, it’s time to compile the code and bring everything together. This involves consolidating the functions, routes, and configurations into a cohesive unit that can be executed as a complete application.
Copy the complete code below, overwrite the existing code in your index.js file, and save it.
const express = require('express'); |
Step 4. Testing the Web Scraping API Using Postman
After compiling our web scraping code, it’s time to test it using Postman. Follow these steps to ensure that your API is functioning correctly:
1. Start the Server Locally
Ensure that your Express server is running locally on localhost:3000. If it’s not already running, navigate to your project directory in the terminal and execute:
node index.js |
2. Open Postman
Open the Postman application on your computer. If you don’t have Postman installed, you can download it here.
3. Create a New Request
Click “Workspaces” in the top left corner of Postman and configure your new workspace.
Create an “untitled request” by clicking the plus sign button at the top.
4. Configure the Request
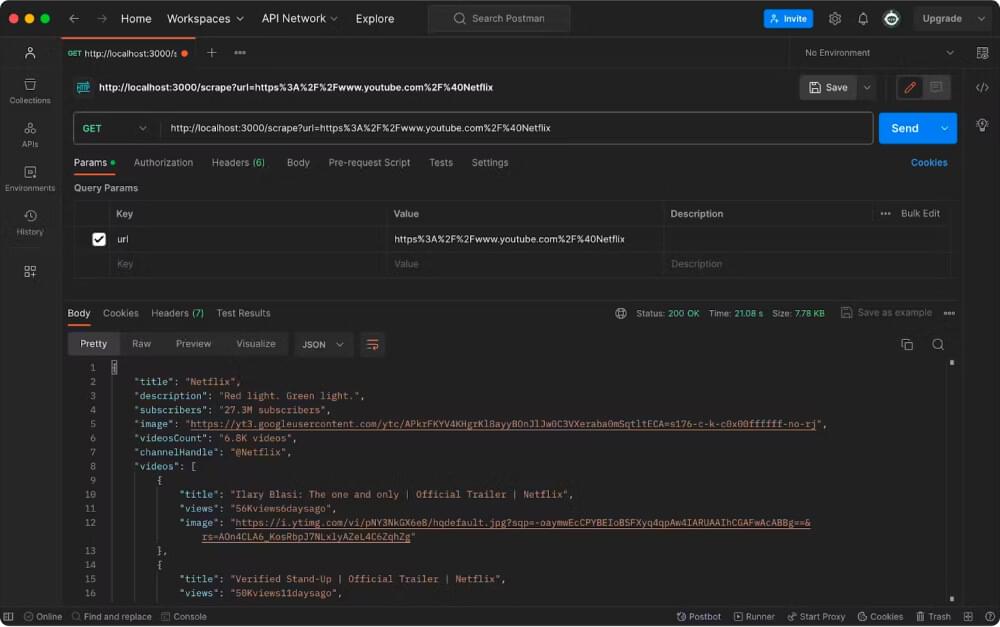
Choose the request type as “GET.”
Enter the target URL (encoded) in the address bar:
http://localhost:3000/scrape?url=https%3A%2F%2Fwww.youtube.com%2F%40Netflix.
5. Send the Request
- Click on the “Send” button to initiate the request.
6. Review the Response and Validate Data
- Postman will display the response from your API. Verify that the response includes the expected data extracted from the specified YouTube channel.
Example response:
{ |
7. Validate Data
- Check the extracted data, including channel title, description, subscriber count, videos count, and video details. Ensure that the information aligns with the content of the provided YouTube channel URL.
8. Check for Errors
- If there are any errors in the response, review the error messages provided by your server. Check the Postman console for detailed information.
VI. Conclusion
Congratulations on successfully creating your YouTube Channel Scraper using the Crawling API and Cheerio! This blog has walked you through the steps of building a powerful web scraping solution.
Now that you’ve experienced the Crawling API’s flexibility, we encourage you to explore further. Experiment with other websites, customize your scraping logic, and unlock the full potential of the Crawling API for diverse data collection needs.
If you are interested in other scraping projects using JavaScript, we recommend the tutorials below:
Amazon SERP Scraping with Next.js
AliExpress Search Page Scraping using JavaScript
Scraping Twitter Profiles for Influence Analysis
Also, if you’re interested in scraping other social media platforms, check out our guides on scraping Facebook, Linkedin, Twitter, Reddit, Instagram.
For additional features and customization options, refer to the Crawling API documentation. Whether you’re conducting research, competitive analysis, or tracking market trends, the Crawling API provides a streamlined way to extract valuable data from the web.
If you have questions or feedback, connect with the Crawlbase support channel. Thank you for choosing the Crawling API, and best of luck in your web scraping ventures!
Subscribe to my newsletter
Read articles from Crawlbase directly inside your inbox. Subscribe to the newsletter, and don't miss out.
Written by
