Two-Tier Application Deployment Using Kubeadm
 Aman Awasthi
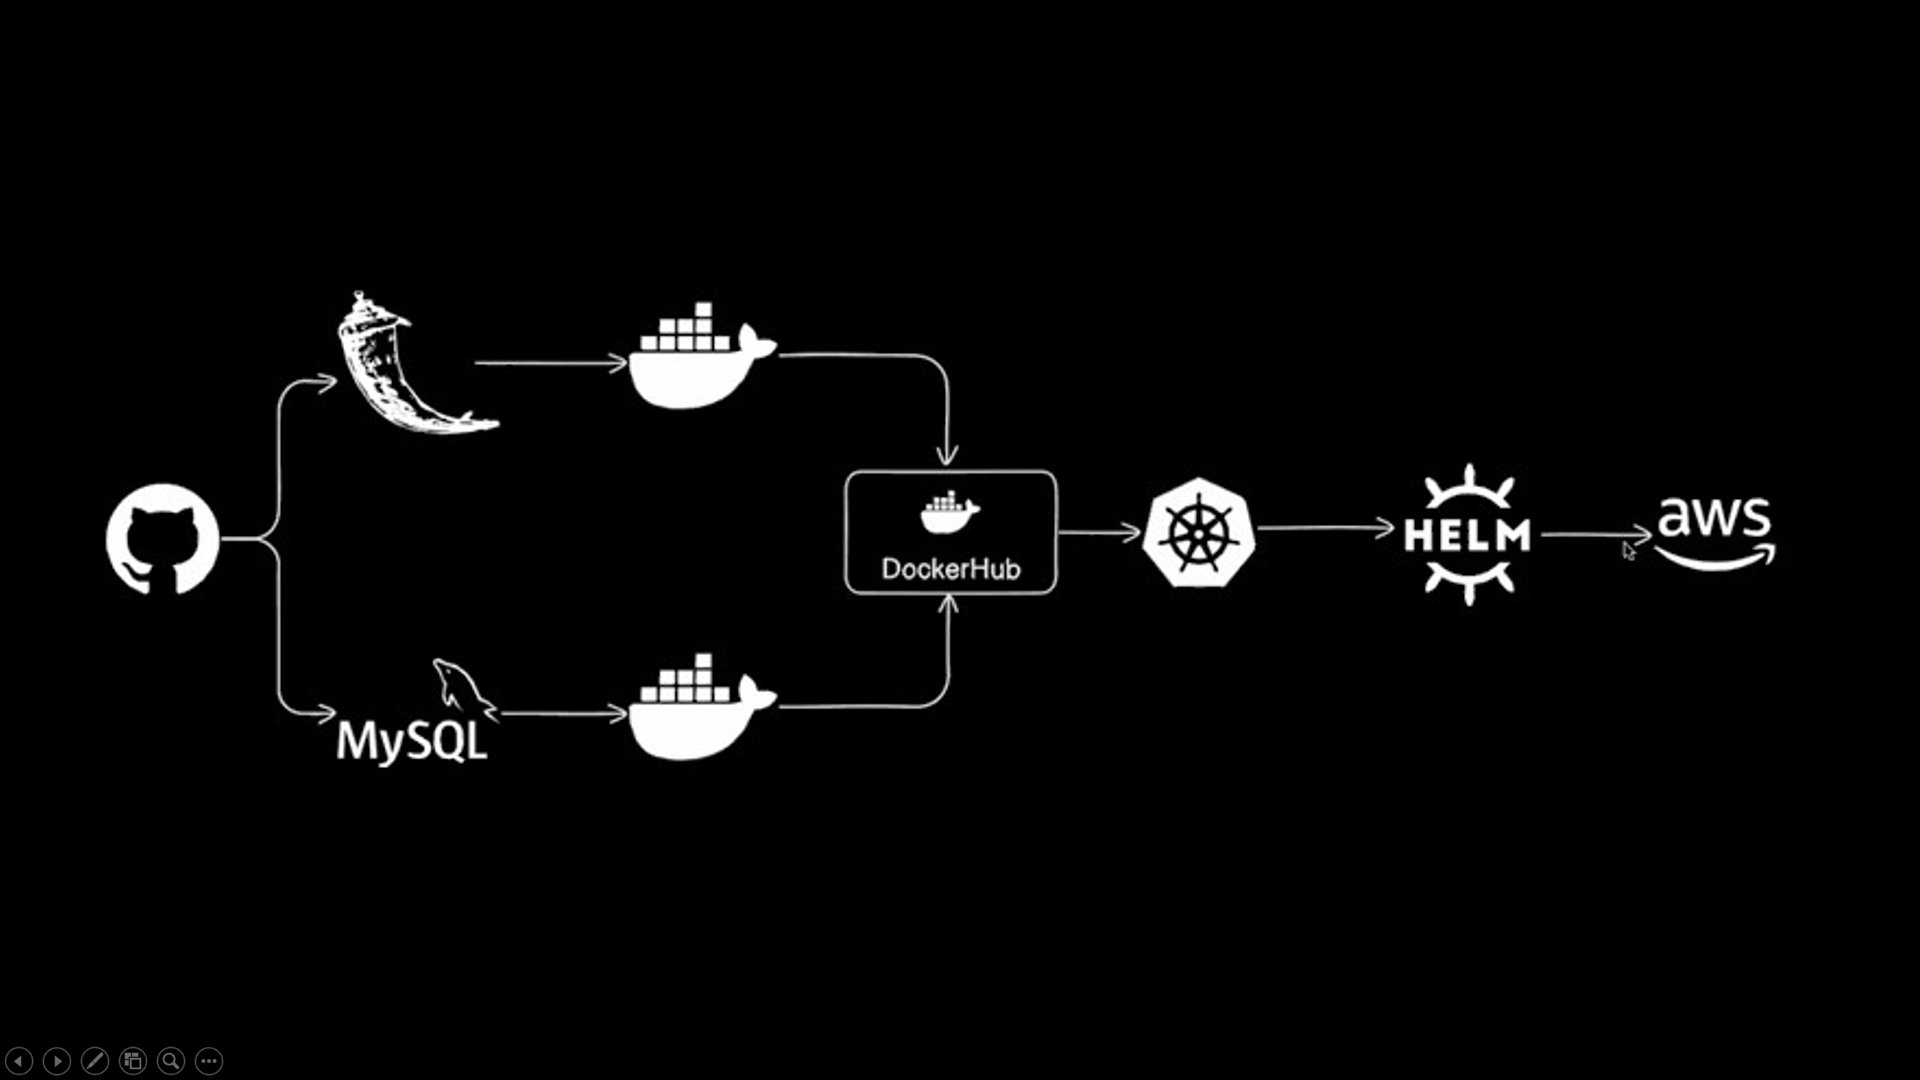
This exciting project consists of 8 episodes, exploring the fascinating tech stack involving Flask for the application and MySQL for the database, with a keen focus on utilizing Docker, DockerHub, Kubernetes, Helm, and AWS for infrastructure management.
YouTube link: 2-Tier Application Deployment Series
GitHub Repo - https://github.com/Aman-Awasthi/two-tier-flask-app
📅 Here's a glimpse of what's in the bucket:
Ep. 01: Introduction to the 2-Tier Application
Ep. 02: Dockerizing the Application
Ep. 03: Kubernetes Architecture Explanation and Cluster Setup
Ep. 04: Kubernetes Deployment of 2-Tier Application
Ep. 05: HELM and Packaging of 2-Tier Application on AWS
Ep. 06: EKS Deployment
Ep. 07: Adding the Project to your Resume/LinkedIn/GitHub
Ep. 08: Finale and Gift Hampers for the ones who Complete the series
Ep. 01: Introduction to the 2-Tier Application
Project Overview: Building a 2-Tier Application with Flask and MySQL
In this project, we will embark on a hands-on journey to create a 2-Tier Application using Flask as the front end and MySQL as the backend. A 2-Tier Application is a classic software architecture that consists of two main tiers or layers: the front-end or client-side, and the back-end or server-side. These two tiers work together to provide a functional and interactive application for users.
Key Components and Activities:
Front-End with Flask: The front end of our 2-Tier Application will be built using Flask, a lightweight and powerful web framework for Python. Flask allows us to create web pages, handle user requests, and render dynamic content. In this project, we'll design the user interface, create routes, and implement views that interact with the back-end database.
Back-End with MySQL: The back-end of our application will utilize MySQL, a popular relational database management system. We will design the database schema, set up tables, and write SQL queries to manage and retrieve data. This back-end will store and serve data to the front-end, enabling user interactions and data persistence.
Dockerization: We will containerize both the front end (Flask) and the back end (MySQL) using Docker. Containerization allows us to package our applications with all their dependencies, ensuring consistency and portability across different environments.
Kubernetes Deployment: To achieve scalability and orchestration, we'll deploy our containerized application on a Kubernetes cluster. Kubernetes will help manage container lifecycles, scaling, and load balancing, ensuring our application runs smoothly in a production environment.
Helm Packaging: We'll explore Helm, a Kubernetes package manager, to create packages for our application and simplify the deployment process. Helm allows us to define, install, and upgrade even complex Kubernetes applications with ease.
AWS Deployment: Our 2-Tier Application will be deployed on Amazon Web Services (AWS) using Amazon Elastic Kubernetes Service (EKS). This cloud-based infrastructure will provide scalability, reliability, and easy management of our Kubernetes cluster.
Professional Development: Towards the end of the series, we will guide you on how to showcase this project on your resume, LinkedIn, and GitHub, enhancing your professional profile. You'll also learn about version control, documentation, and best practices in software development.
Benefits and Learning Outcomes:
By completing this project, you will:
Gain a comprehensive understanding of 2-Tier Application architecture.
Learn how to develop a dynamic web application using Flask.
Acquire database design and management skills with MySQL.
Become proficient in containerization with Docker.
Master Kubernetes for application orchestration and scaling.
Understand the Helm package manager for Kubernetes.
Deploy your application on AWS EKS, a popular cloud platform.
Enhance your professional profile by showcasing a real-world project on your resume, LinkedIn, and GitHub.
This project is designed to help you transition from theoretical knowledge to practical implementation, making you a well-rounded developer with experience in modern application development and deployment practices. Throughout the series, you'll progress from the fundamentals to advanced concepts, enabling you to take on real-world projects with confidence.
Ep. 02: Dockerizing the Application
Step 1: Launch a New Ubuntu EC2 Instance
Launch a new Ubuntu EC2 instance on AWS.
SSH into the instance using your private key.
Step 2: Upgrade the Server
Update the package list with
sudo apt update.Upgrade installed packages with
sudo apt upgrade.
Step 3: Install Docker
Install Docker with
sudo apt install docker.io -y.Give the Ubuntu user permission to run Docker commands with
sudo usermod -aG docker $USER.
Step 4: Clone the Git Repository
- Fork and clone the Git repository with
git clonehttps://github.com/LondheShubham153/two-tier-flask-app.

Step 5: Create a Dockerfile
- Create a Dockerfile to build the application and connect the application container to the MySQL container.
FROM python:3.9-slim

WORKDIR /app
RUN apt-get update -y \
    && apt-get upgrade -y \
    && apt-get install -y gcc default-libmysqlclient-dev pkg-config \
    && rm -rf /var/lib/apt/lists

COPY requirements.txt .

RUN pip install mysqlclient
RUN pip install --no-cache-dir -r requirements.txt

COPY . .

CMD ["python", "app.py"]
Step 6: Create a Docker Network
- Create a Docker network to connect the Flask application container with the MySQL container:
docker network create flaskappnetwork
docker build . -t flaskapp

Step 7: Run Docker Containers
- Run the Flask application container and the MySQL container with environment variables:
docker run -d -p 5000:5000 --network=flaskappnetwork -e MYSQL_HOST=mysql -e MYSQL_USER=admin -e MYSQL_PASSWORD=admin -e MYSQL_DB=mydb --name=flaskapp flaskapp:latest
docker run -d -p 3306:3306 --network=flaskappnetwork -e MYSQL_DATABASE=mydb -e MYSQL_USER=admin -e MYSQL_PASSWORD=admin -e MYSQL_ROOT_PASSWORD=admin --name=mysql mysql:5.7
Step 8: Validate Containers
Validate the running containers with
docker ps.Verify that both containers are on the same network with
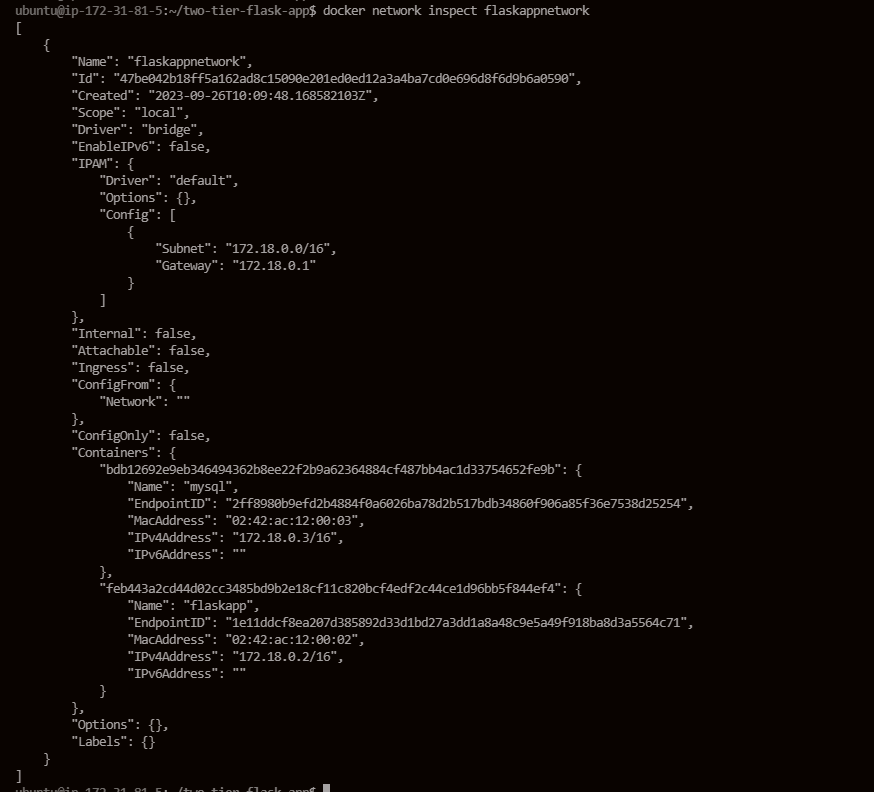
docker network inspect flaskappnetwork.

Step 9: Configure Security Groups
Add inbound rules to the EC2 instance's security group to allow traffic on ports 5000 and 3306.
Try accessing the application using public Ip followed by port(5000)

Here, we got one error because the tables are not created in the MySQL container.
Step 10: Create Database Table
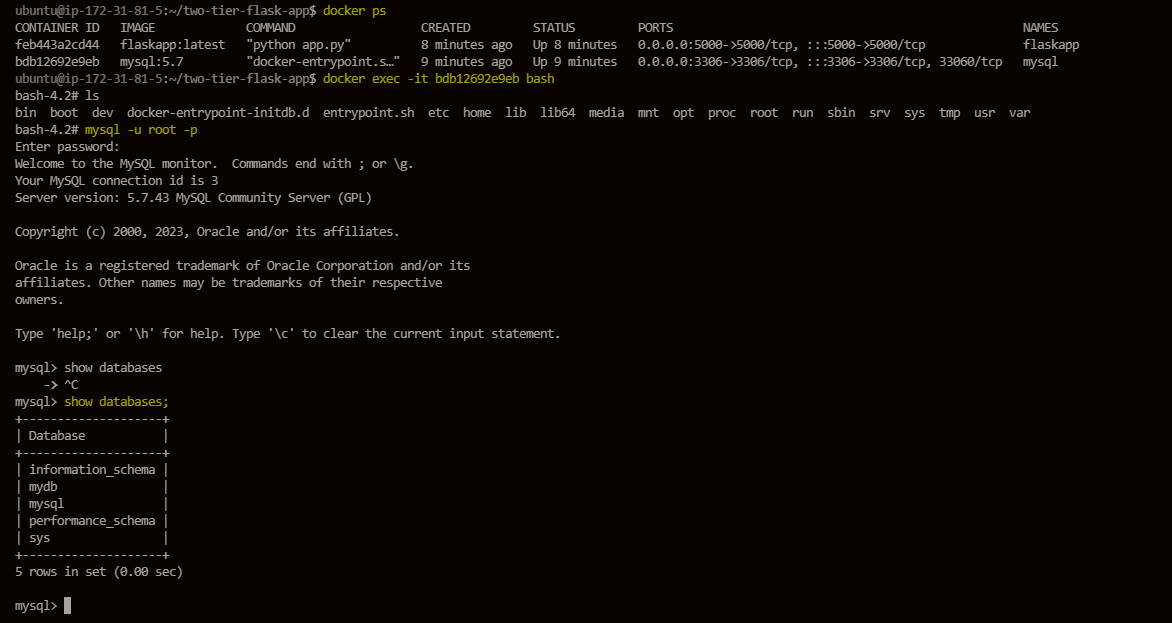
SSH into the MySQL container with
docker exec -it <container> bash.Change the database to
mydband create a table:
CREATE TABLE messages (
    id INT AUTO_INCREMENT PRIMARY KEY,
    message TEXT
);

Step 11: Validate Application
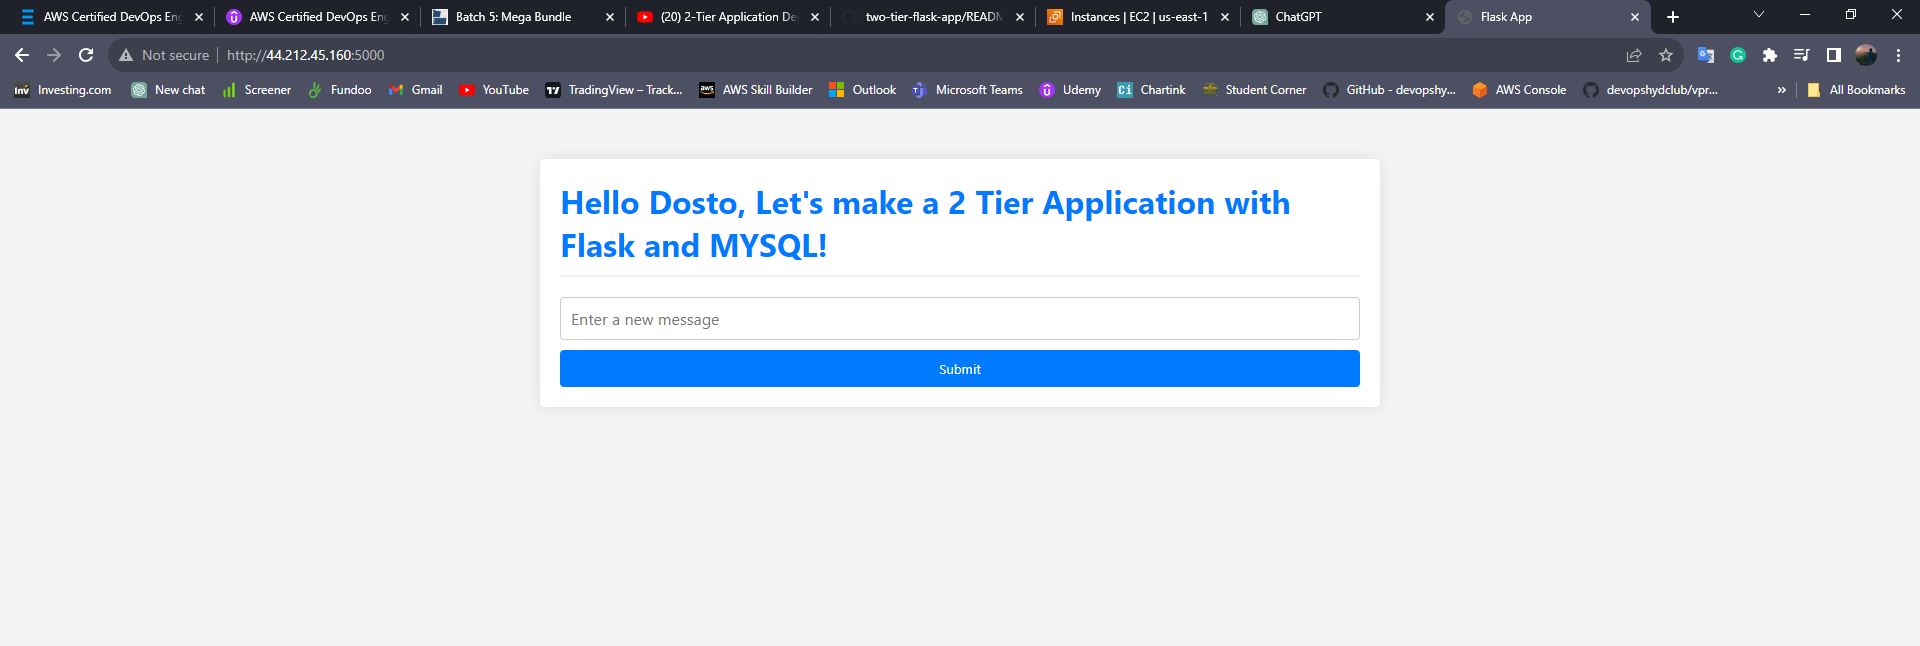
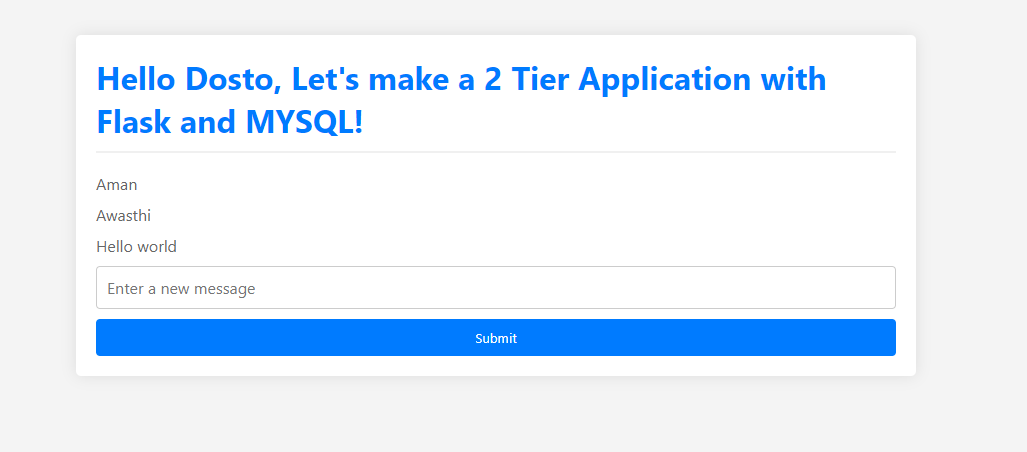
Access the application using the public IP of the container.
Verify that the application is accessible and the backend is connected to the frontend.
Step 12: Test the Application
Add some sample messages through the application's GUI.
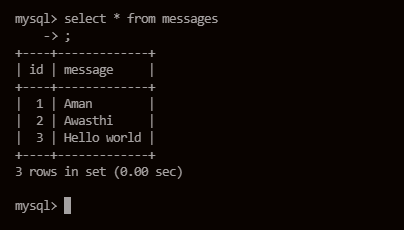
SSH into the MySQL container.
Run the command
select * from messagesto validate if the data entered from the GUI is present in the database.
Step 13: Push the Image to Docker Hub
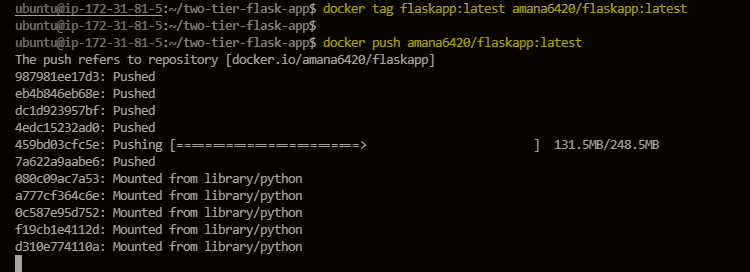
- Push the Docker image to Docker Hub. First, log in to your Docker Hub account:

- Tag the image and push it to Docker Hub:
docker tag flaskapp:latest amana6420/flaskapp:latest
docker push amana6420/flaskapp:latest
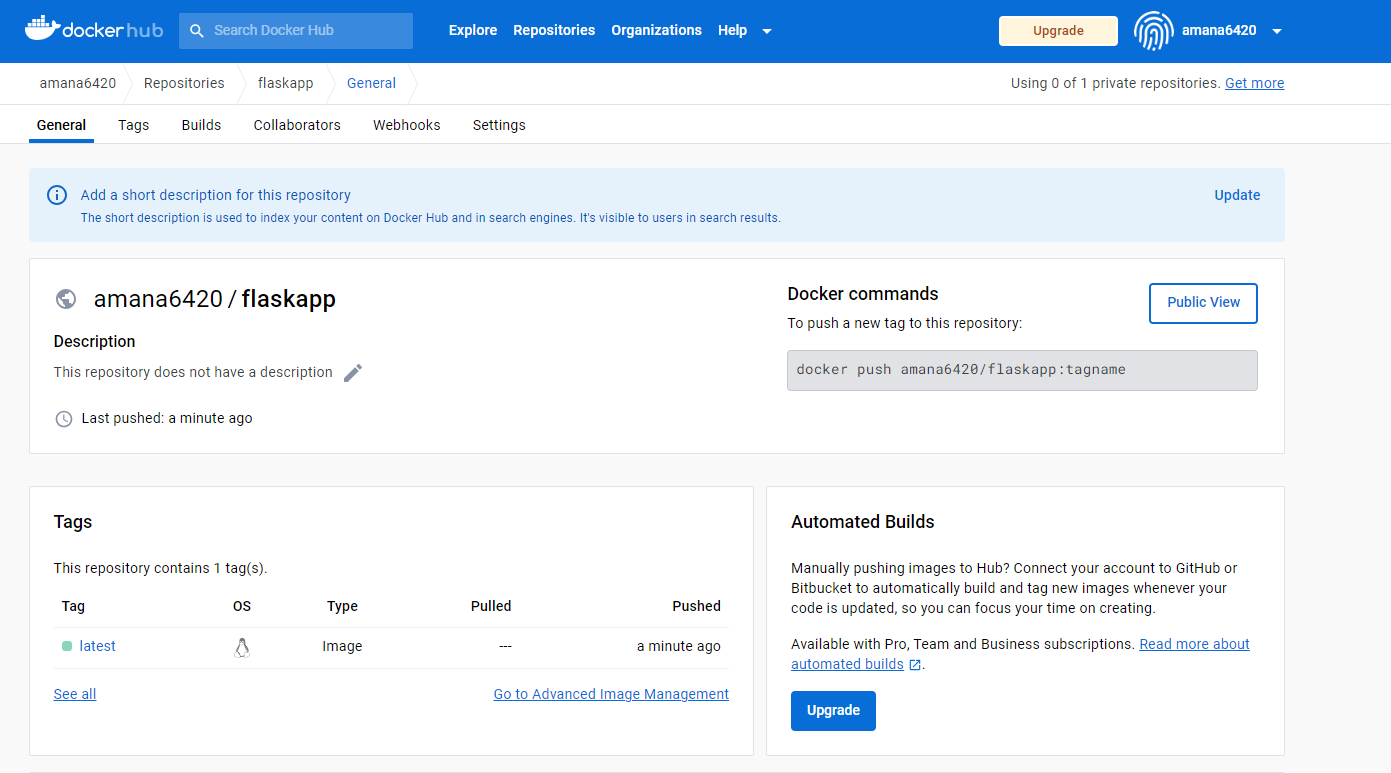
- Validate that the image is uploaded to your Docker Hub account by logging in to Docker Hub.
Step 14: Create a Docker Compose File
- To simplify the deployment process, create a Docker Compose file. Install Docker Compose if not already installed:
sudo apt install docker-compose
- Create a
docker-compose.ymlfile to define the services for the application and database:
version: '3'
services:
  backend:
    image: amana6420/flaskapp:latest
    ports:
      - "5000:5000"
    environment:
      MYSQL_HOST: "mysql"
      MYSQL_PASSWORD: "admin"
      MYSQL_USER: "admin"
      MYSQL_DB: "mydb"

  mysql:
    image: mysql:5.7
    ports:
      - "3306:3306"
    environment:
      MYSQL_DATABASE: "mydb"
      MYSQL_USER: "admin"
      MYSQL_PASSWORD: "admin"
      MYSQL_ROOT_PASSWORD: "admin"

    volumes:
      - ./message.sql:/docker-entrypoint-initdb.d/message.sql
      - mysql-data:/var/lib/mysql
volumes:
  mysql-data:
- Create a
message.sqlfile to define the table structure for the database:
CREATE TABLE messages (
    id INT AUTO_INCREMENT PRIMARY KEY,
    message TEXT
);
The
mysqlservice using a volumemysql-datato persistently store the MySQL database data.The
./message.sqlfile is mapped to the MySQL container at/docker-entrypoint-initdb.d/message.sqlto initialize the database when the container starts. This script creates amessagestable in themydbdatabase.
Step 15: Run Docker Compose
- Now, run the following command to start both containers automatically within the same network:
docker-compose up -d

- Validate that the containers are running successfully and accessible by accessing the application.

Ep. 03: Kubernetes Architecture Explanation and Cluster Setup
I have already covered the Kubernetes Architecture as part of the 90DaysOfDevOps Challenge - Kubernetes Architecture - 90DaysOfDevOps
Cluster Setup - Preparing Master and Worker Nodes:
Before setting up your Kubernetes cluster using kubeadm, you'll need to prepare both the master and worker nodes. Follow these steps to ensure your nodes are ready for cluster initialization.
Step 1: Node Preparation
- On both the master and worker nodes, update the package list and install the necessary dependencies:
sudo apt update -y
sudo apt-get install -y apt-transport-https ca-certificates curl
sudo apt install docker.io -y
- Enable and start the Docker service in one command:
sudo systemctl enable --now docker
Step 2: Add GPG Keys and Repository
- Add the GPG keys for the Kubernetes packages:
curl -fsSL "https://packages.cloud.google.com/apt/doc/apt-key.gpg" | sudo gpg --dearmor -o /etc/apt/trusted.gpg.d/kubernetes-archive-keyring.gpg
- Add the Kubernetes repository to the source list:
echo 'deb https://packages.cloud.google.com/apt kubernetes-xenial main' | sudo tee /etc/apt/sources.list.d/kubernetes.list
- Update the package list again:
sudo apt update
Step 3: Install Kubernetes Components
- Install specific versions of kubeadm, kubectl, and kubelet:
sudo apt install kubeadm=1.20.0-00 kubectl=1.20.0-00 kubelet=1.20.0-00 -y
Master Node Configuration:
Step 4: Initialize the Kubernetes Master Node
- Initialize the Kubernetes master node using Kubeadm:
sudo kubeadm init

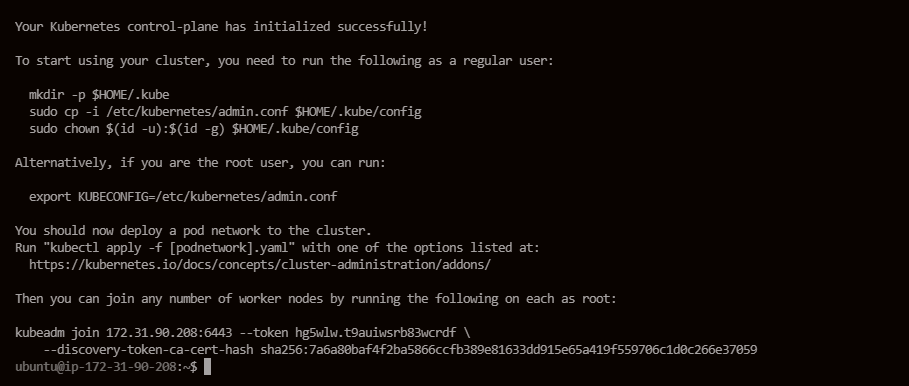
Step 5: Set Up Local kubeconfig
- Create the necessary directories and copy the kubeconfig file:
mkdir -p $HOME/.kube
sudo cp -i /etc/kubernetes/admin.conf $HOME/.kube/config
sudo chown $(id -u):$(id -g) $HOME/.kube/config

Step 6: Apply Weave Network
- Apply the Weave network to enable network communication between nodes:
kubectl apply -f https://github.com/weaveworks/weave/releases/download/v2.8.1/weave-daemonset-k8s.yaml

Step 7: Generate Token for Worker Nodes
- Generate a token that worker nodes can use to join the cluster:
sudo kubeadm token create --print-join-command

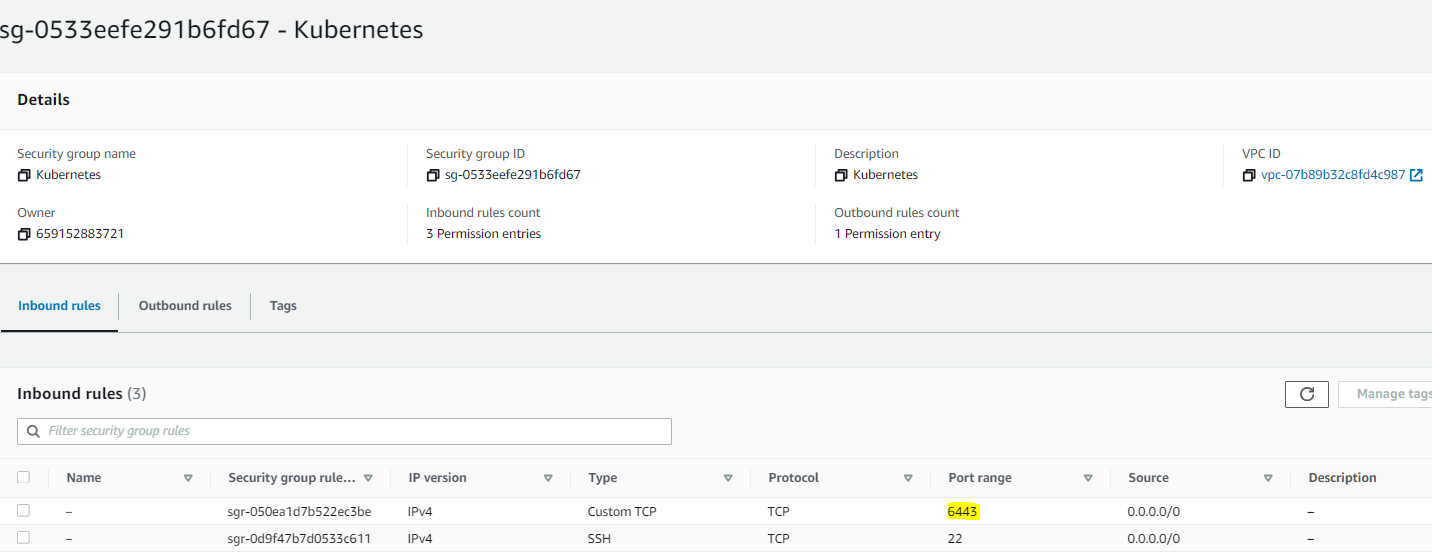
Step 8: Expose Port 6443
- Ensure that port 6443 is exposed in the security group of the master node to allow worker nodes to connect.
Worker Node Configuration:
Step 9: Worker Node Initialization
- On the worker node, run the following command to reset pre-flight checks and join the cluster using the join command provided by the master node. Append
--v=5to get verbose output. Make sure you are working as a sudo user or use sudo before the command:
sudo kubeadm reset pre-flight checks
<insert the join command from the master node here> --v=5


Step 10: Verify Cluster Connection
- On the master node, check if the worker node has successfully joined the cluster:
kubectl get nodes
Step 11: Node Labeling
- If you want to label worker nodes for specific roles (e.g., labeling a worker node as a worker), you can use the following command:
kubectl label node <node-name> node-role.kubernetes.io/worker=worker

Ep. 04: Kubernetes Deployment of 2-Tier Application
We will start with creating pods --> deployments --> services
Pod:
- Explanation: Think of a pod as a single office room where a specific job task is done. Inside the room, you have everything needed to perform that task—computers, documents, and tools. Each room (pod) is self-contained and serves a specific purpose.
Deployment:
- Explanation: Now, imagine the office building as your entire application. The deployment is like the building blueprint or plan. It defines how many rooms (pods) should be there, what tasks they perform, and how to update or scale the workforce (pods) when needed.
Service:
- Explanation: The building's lobby is like a service. It's the main entrance or access point to the entire building. You don't need to know which specific room (pod) is doing what; you just go through the lobby (service) to access the building (application).
Persistent Volume (PV) and Persistent Volume Claim (PVC):
- Explanation: Imagine you have a storage room in the basement for long-term items. The storage room (PV) is like a dedicated space, and when someone needs storage, they submit a request (PVC) for a specific amount of space in that room. The PV and PVC together ensure that items (data) are stored persistently, even if you move offices (delete and recreate pods).
We need to create below files -
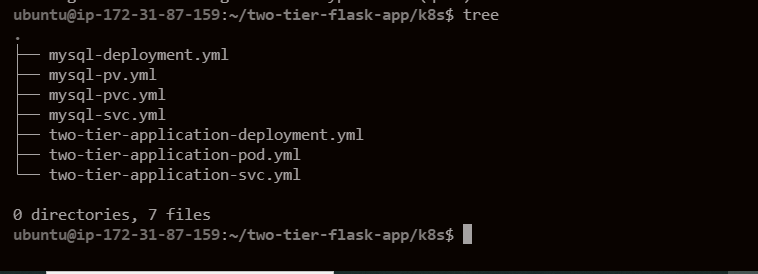
two-tier-application-pod.yml -
apiVersion: v1
kind: Pod
metadata:
  name: two-tier-app-pod
spec:
  containers:
  - name: two-tier-app-pod
    image: amana6420/flaskapp:latest
    env:
      - name: MYSQL_HOST
        value: "mysql"
      - name: MYSQL_PASSWORD
        value: "admin"
      - name: MYSQL_USER
        value: "root"
      - name: MYSQL_DB
        value: "mydb"
    ports:
      - containerPort: 5000
    imagePullPolicy: Always
Once the file is created, run the command - kubectl apply -f file-name to configure the yml file and to run the pod.

Go to the worker node and check if the container is running

two-tier-application-deployment.yml -
apiVersion: apps/v1
kind: Deployment
metadata:
  name: two-tier-app
  labels:
    app: two-tier-app
spec:
  replicas: 1
  selector:
    matchLabels:
      app: two-tier-app
  template:
    metadata:
      labels:
        app: two-tier-app
    spec:
      containers:
        - name: two-tier-app
          image: amana6420/flaskapp:latest
          env:
            - name: MYSQL_HOST
              value: "10.111.92.203" #Get mysql IP after creating mysql service
            - name: MYSQL_PASSWORD
              value: "admin"
            - name: MYSQL_USER
              value: "root"
            - name: MYSQL_DB
              value: "mydb"
          ports:
            - containerPort: 5000
          imagePullPolicy: Always
Apply the deployment configuration file and we should have two-tier application containers running in worker node -


Command to scale the deployment pods -
kubectl scale deployment two-tier-app-deployment --replicas=3

Now, we need to create a service to access the pods from outside network -
two-tier-application-svc.yml -
apiVersion: v1
kind: Service
metadata:
  name: two-tier-app-service
spec:
  selector:
    app: two-tier-app

  ports:
    - protocol: TCP
      port: 80
      targetPort: 5000
      nodePort: 30008
  type: NodePort
Here, the pod will be able to communicate with the outer world on port 30008, and check the running services using the command - kubectl get service

We should have port 30008 opened in inbound rules(AWS) -
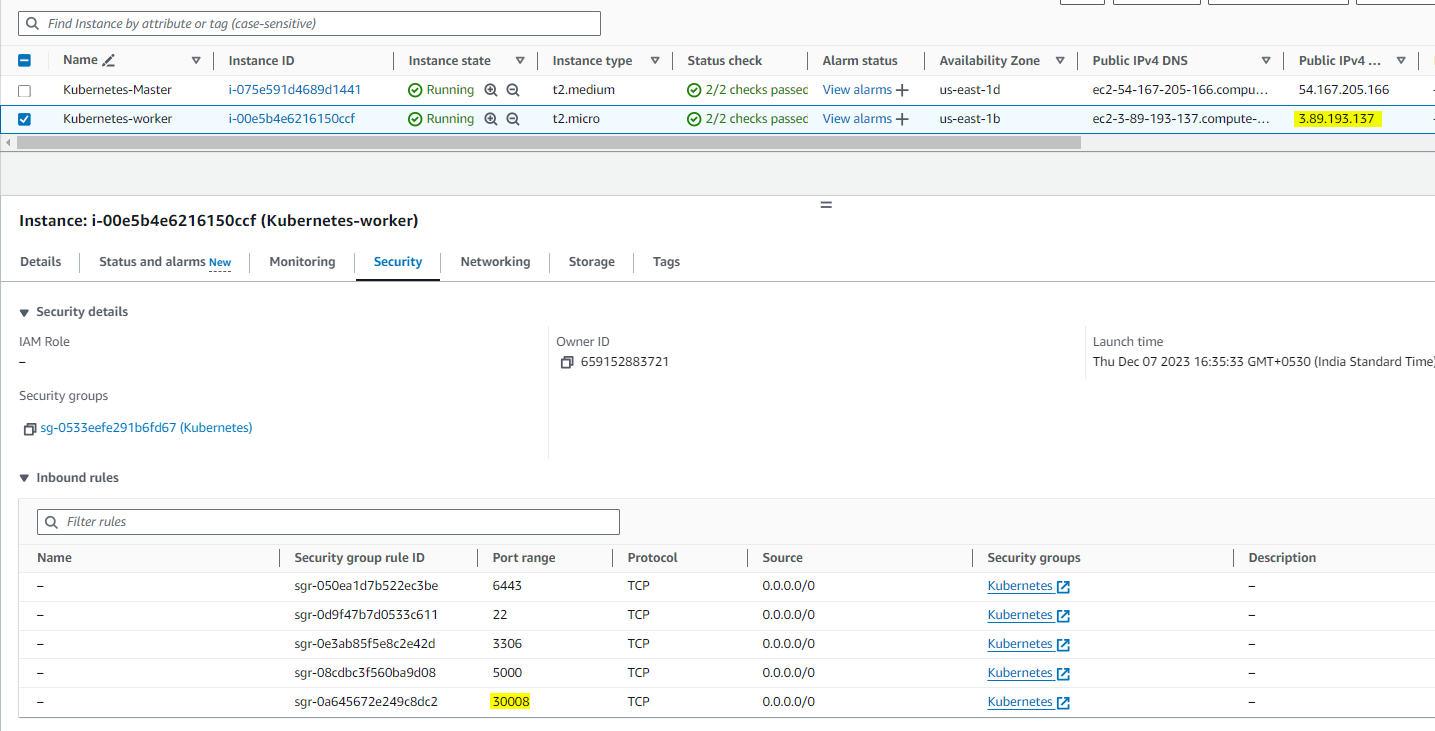
Use the public IP of worker node on port 30008 to connect to the container -
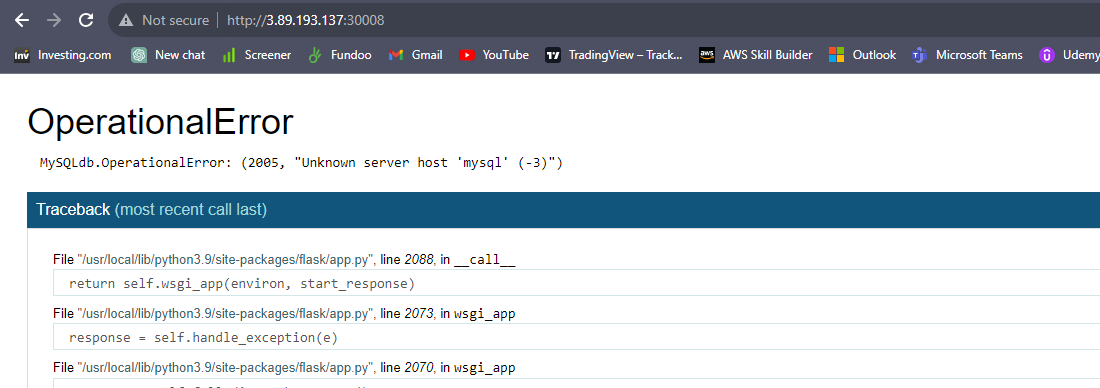
The pod is running but we are getting errors for the database as the database containers are yet to be created. Now we need to create configuration files for MySQL database -
mysql-pv.yml -
apiVersion: v1
kind: PersistentVolume
metadata:
  name: mysql-pv
spec:
  capacity:
    storage: 256Mi
  volumeMode: Filesystem
  accessModes:
    - ReadWriteOnce
  persistentVolumeReclaimPolicy: Retain
  hostPath:
    path: /home/ubuntu/two-tier-flask-app/mysqldata
mysql-pvc.yml -
apiVersion: v1
kind: PersistentVolumeClaim
metadata:
  name: mysql-pvc
spec:
  accessModes:
    - ReadWriteOnce
  resources:
    requests:
      storage: 256Mi
mysql-deplyment.yml -
apiVersion: apps/v1
kind: Deployment
metadata:
  name: mysql
  labels:
    app: mysql
spec:
  replicas: 1
  selector:
    matchLabels:
      app: mysql
  template:
    metadata:
      labels:
        app: mysql
    spec:
      containers:
        - name: mysql
          image: mysql:latest
          env:
            - name: MYSQL_ROOT_PASSWORD
              value: "admin"
            - name: MYSQL_DATABASE
              value: "mydb"
            - name: MYSQL_USER
              value: "admin"
            - name: MYSQL_PASSWORD
              value: "admin"
          ports:
            - containerPort: 3306
          volumeMounts:
            - name: mysqldata
              mountPath: /var/lib/mysql
      volumes:
        - name: mysqldata
          persistentVolumeClaim:
            claimName: mysql-pvc
Once the files are created, run the command kubectl apply as below to create the persistent volume, persistent volume claim, and deployment configurations.
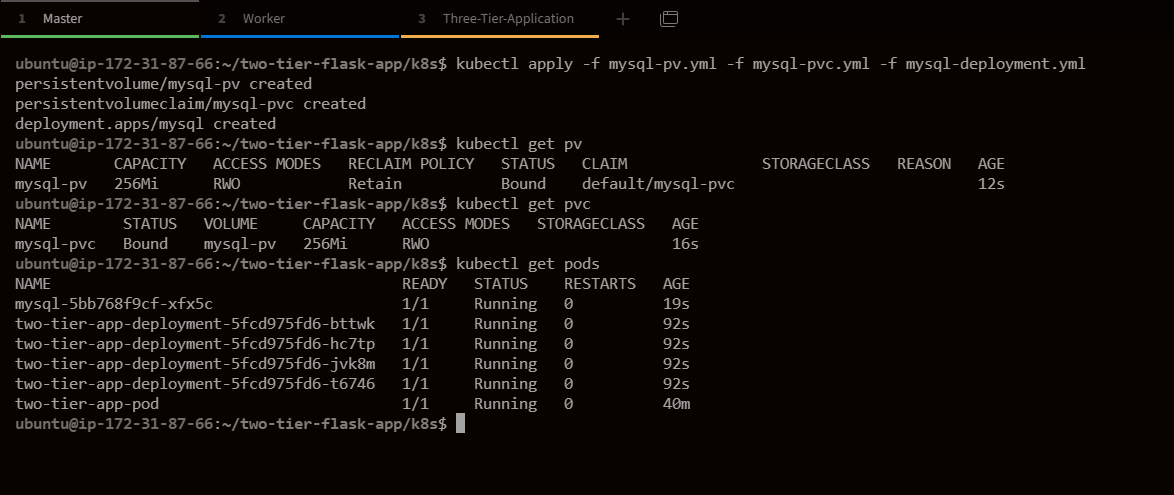
As a last step, we need to create a service to connect the database with outer network -
apiVersion: v1
kind: Service
metadata:
  name: mysql
spec:
  selector:
    app: mysql
  ports:
    - port: 3306
Use the cluster IP and use it in the two-tier application deployment file for Host IP

two-tier-application-deployment.yml -
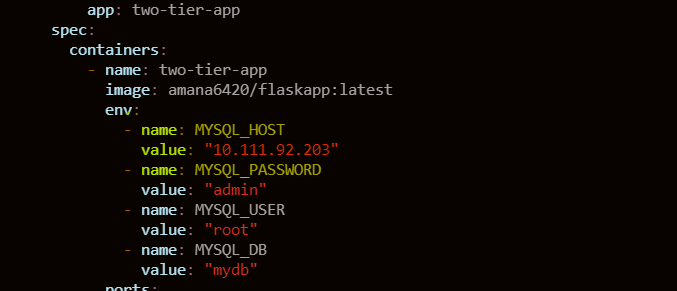
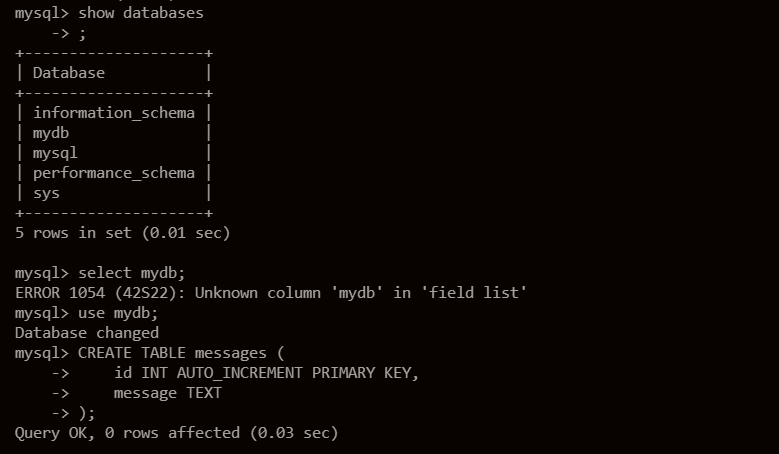
Still, we will be getting the database error: MySQLdb.ProgrammingError: (1146, "Table 'mydb.messages' doesn't exist") as the messages table is not created yet.
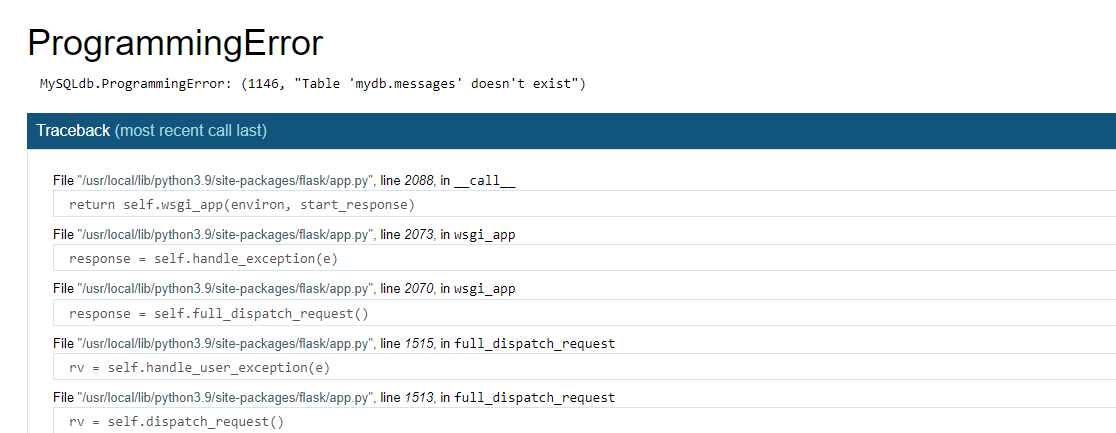
Create the table as we created earlier -
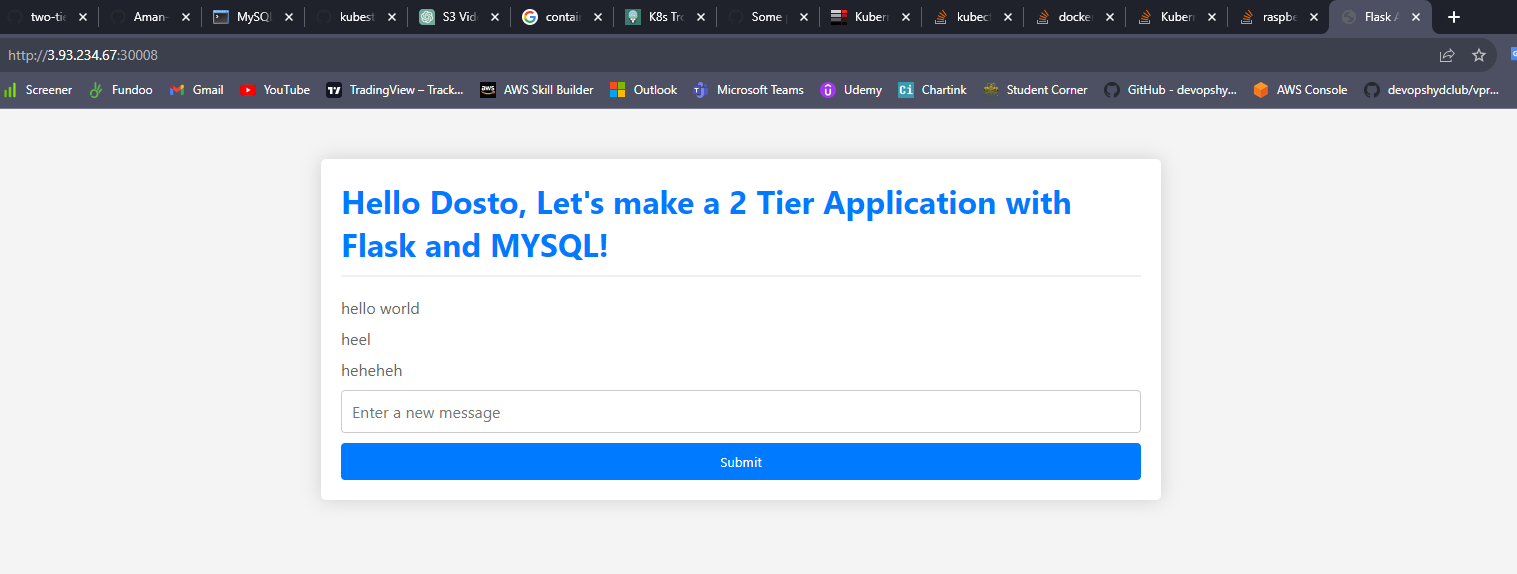
Now, the application should be running with database connectivity -
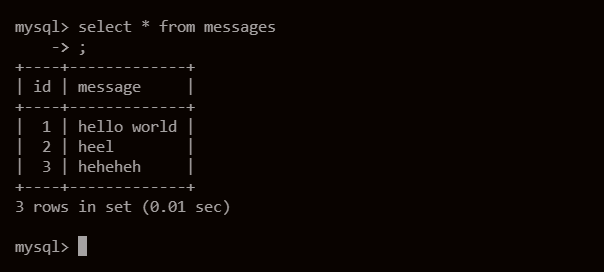
Validate if the information is getting saved in tables by running the command in MySQL container -
Now, our application is robust and can be scaled-in or scaled-out as per the requirement -

Ep. 05: HELM and Packaging of 2-Tier Application on AWS
Helm is a package manager for Kubernetes, which is an open-source container orchestration platform. Helm simplifies the deployment and management of applications on Kubernetes by allowing users to define, install, and upgrade even complex Kubernetes applications using charts. A Helm chart is a collection of pre-configured Kubernetes resources that can be easily shared and reused, making it a powerful tool for managing the lifecycle of applications in a Kubernetes environment.
- To set up Helm on our master server, use the following commands:
curl https://baltocdn.com/helm/signing.asc | sudo apt-key add -
sudo apt-get install apt-transport-https --yes
echo "deb https://baltocdn.com/helm/stable/debian/ all main" | sudo tee /etc/apt/sources.list.d/helm-stable-debian.list
sudo apt-get update
sudo apt-get install helm
Create a MySQL chart:
helm create mysql-chart

Once the chart is created, we can see all required yml files like deployment.yml, and services.yml. We have a values.yml which will be used to change the values without making changes to actual configuration files.
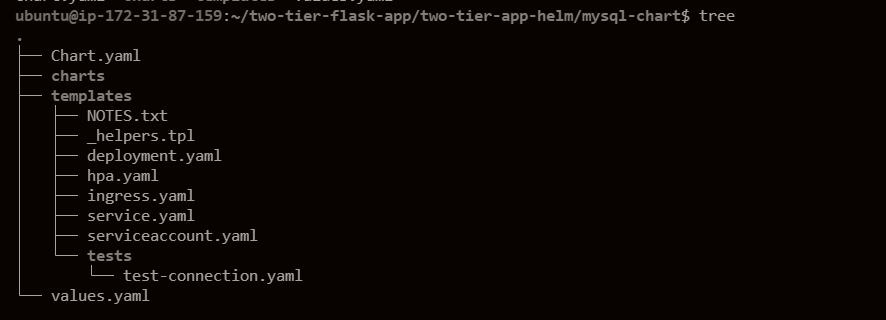
Edit values.yaml for MySQL chart:
Set image name and tag.
Configure MySQL port 3306.
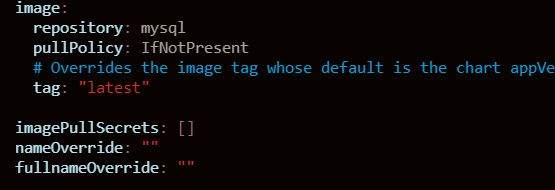

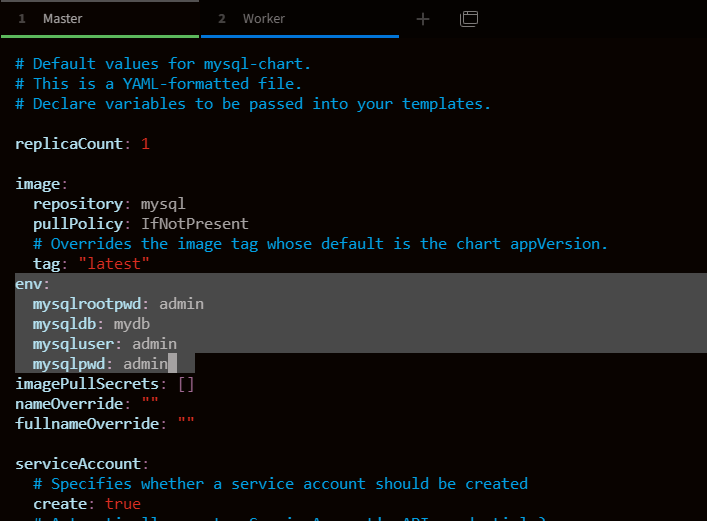
Create a variable env and give values to the env variables for root password, database, MySQL user, and MySQL password.
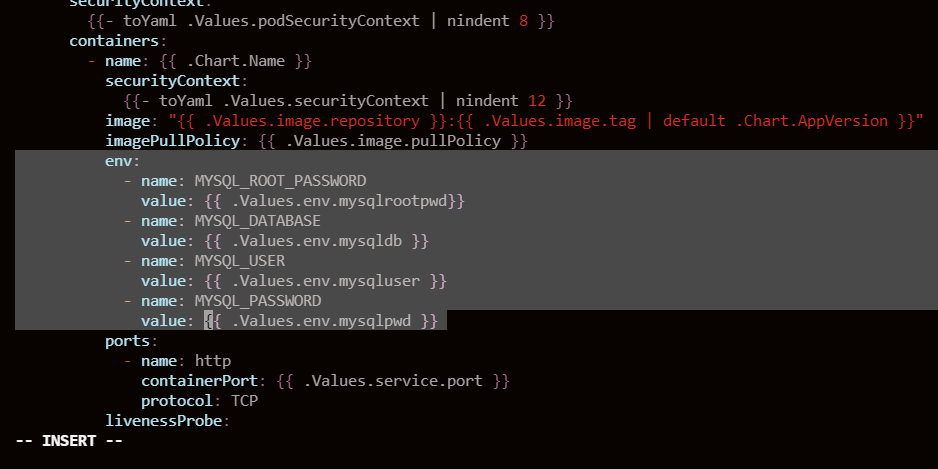
Create an environment variable (env) in deployment.yml with values from values.yaml.
Package the chart:
helm package mysql-chart

Install MySQL chart:
helm install mysql-chart ./mysql-chart
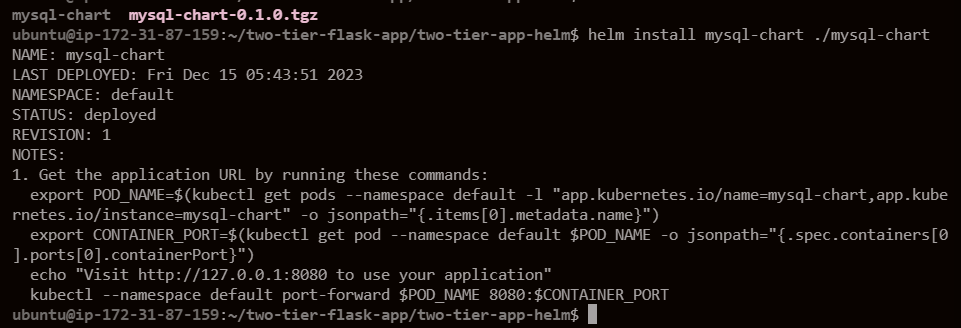
Verify deployment:
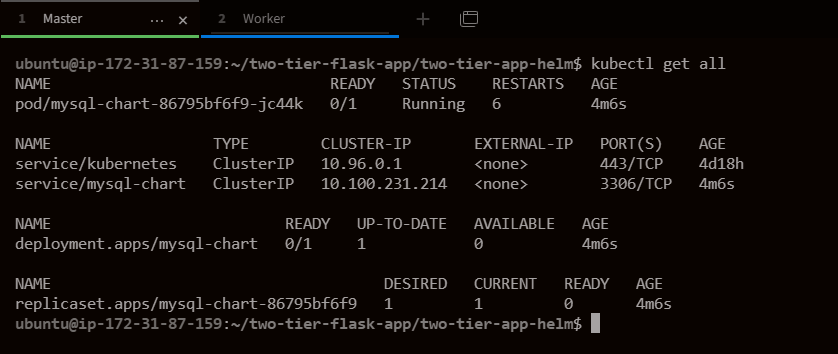
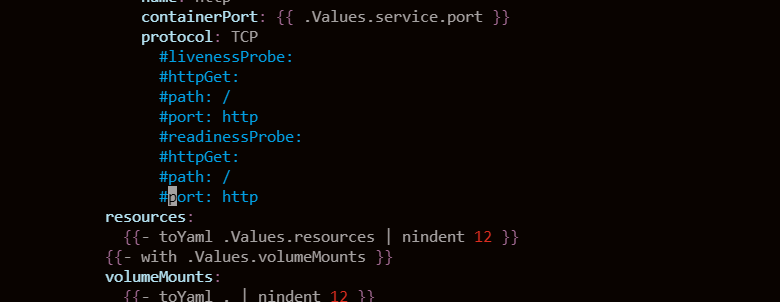
Resolve MySQL container restart issue:
- Edit the deployment file and comment out/delete
livenessProbeandreadinessProbe.
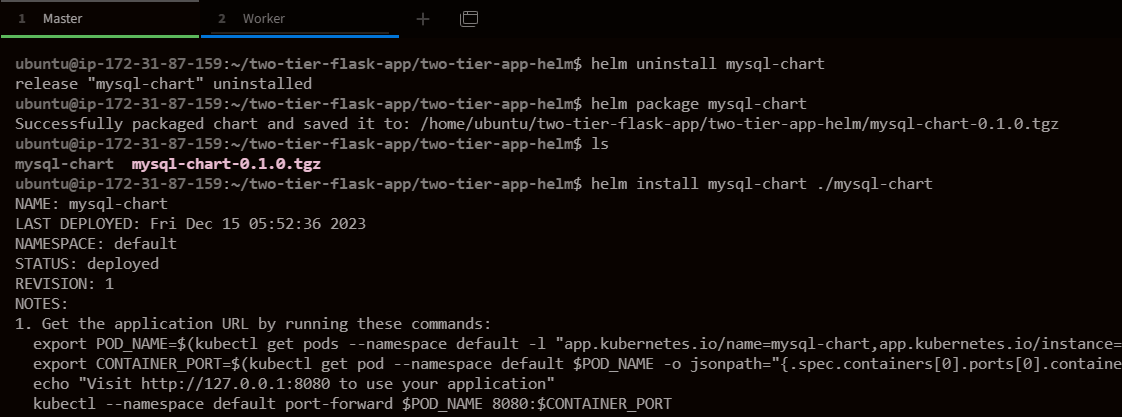
To apply new changes - uninstall, package, and reinstall the updated chart.
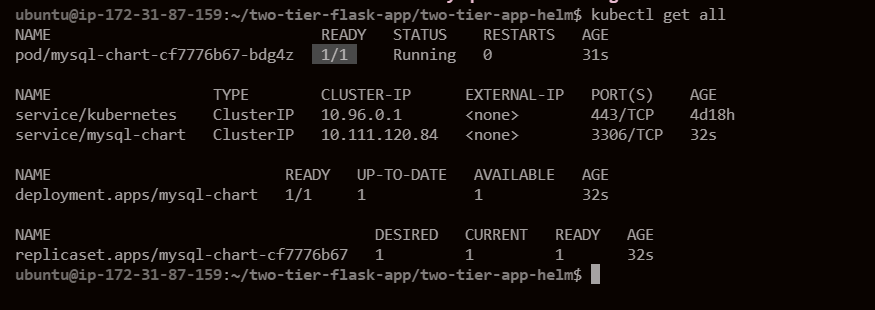
Now, we should see the container running without any issues.
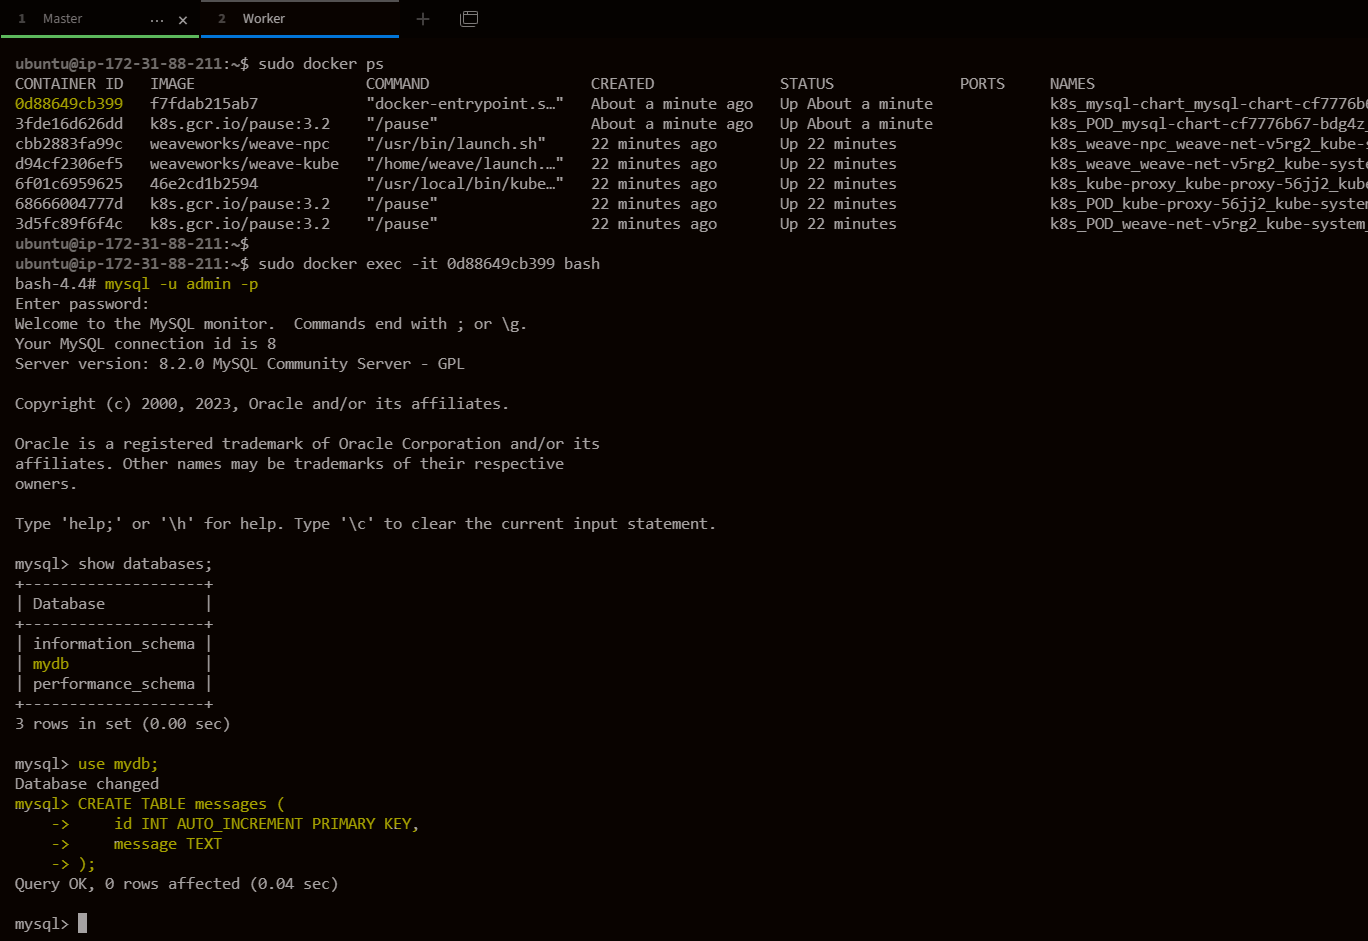
Go to the worker node and create the messages table which will give an error at the end as we saw in earlier episodes.
Create a Flask application chart:
helm create flask-app-chart

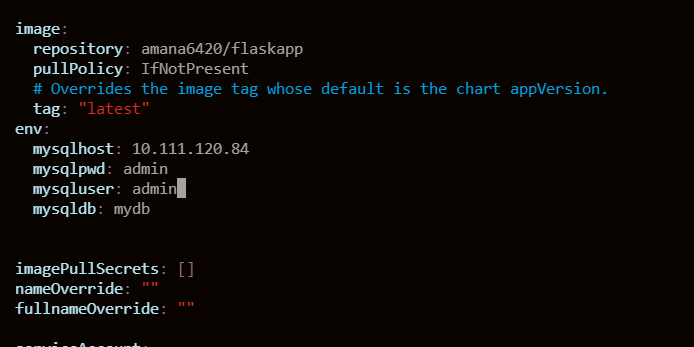
Edit values.yaml for Flask chart:
Set the container name.
Create
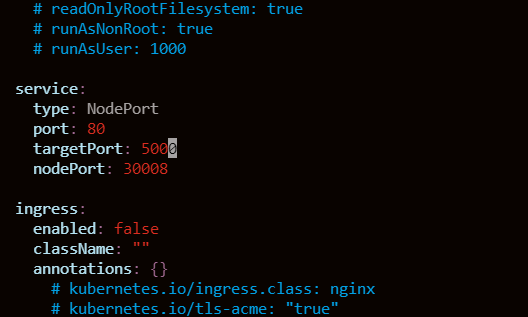
envvariable for MySQL host, password, user, and database.Update
targetPortandnodePortin the service section.
Edit deployment file for Flask chart:
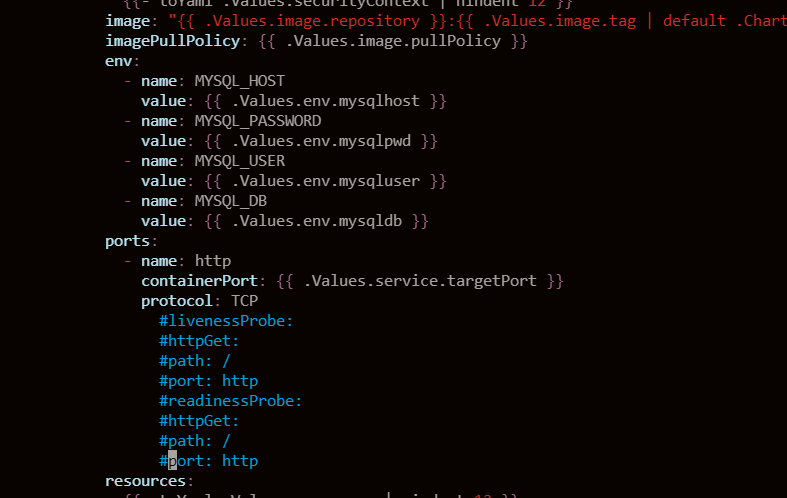
Reference
envvalues fromvalues.yaml.Comment out
livenessProbeandreadinessProbe.
Update service.yaml to reference port values from values.yaml.
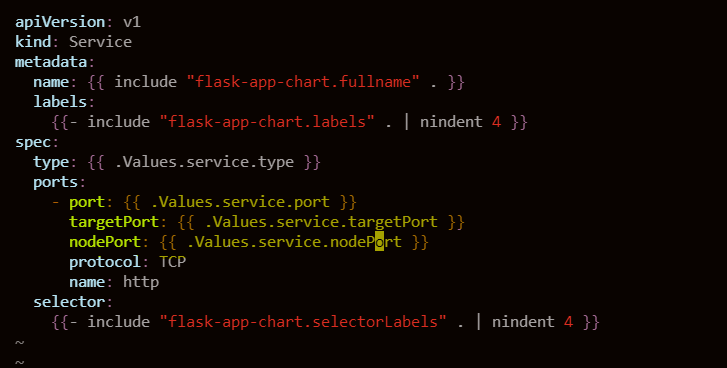
Package and install Flask chart:
helm install flask-app-chart ./flask-app-chart
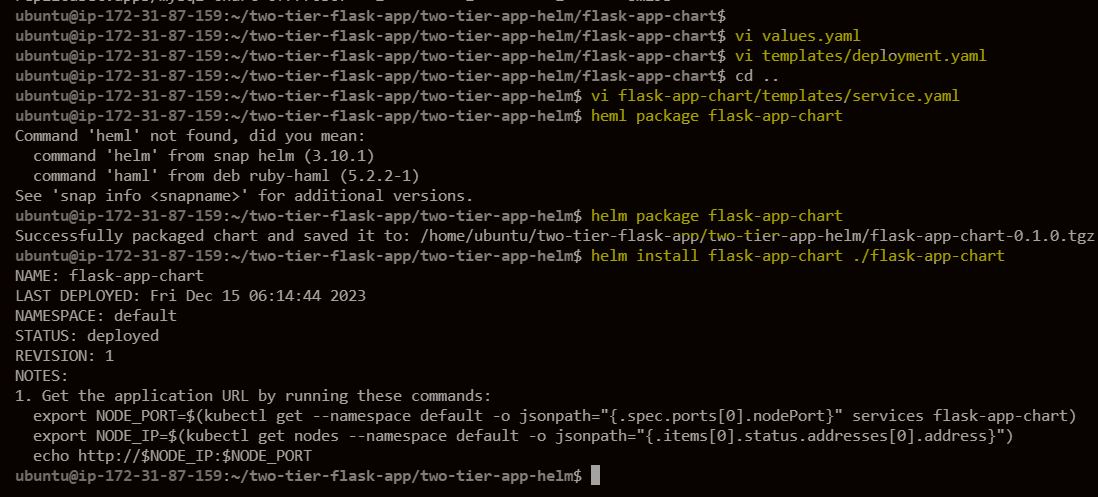
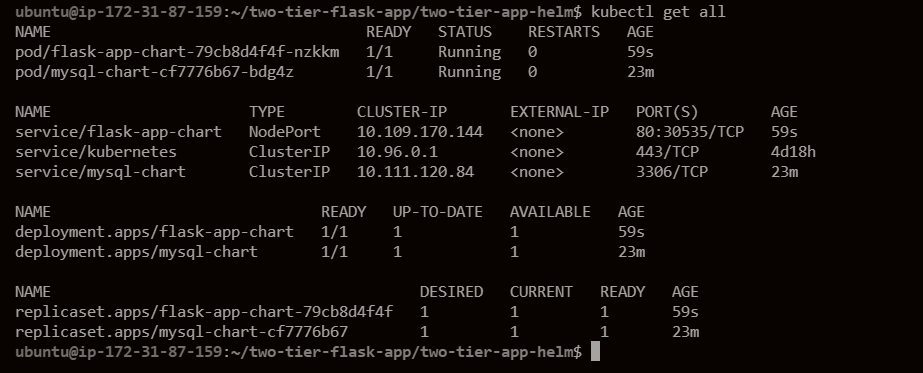
Validate deployment:
kubectl get all
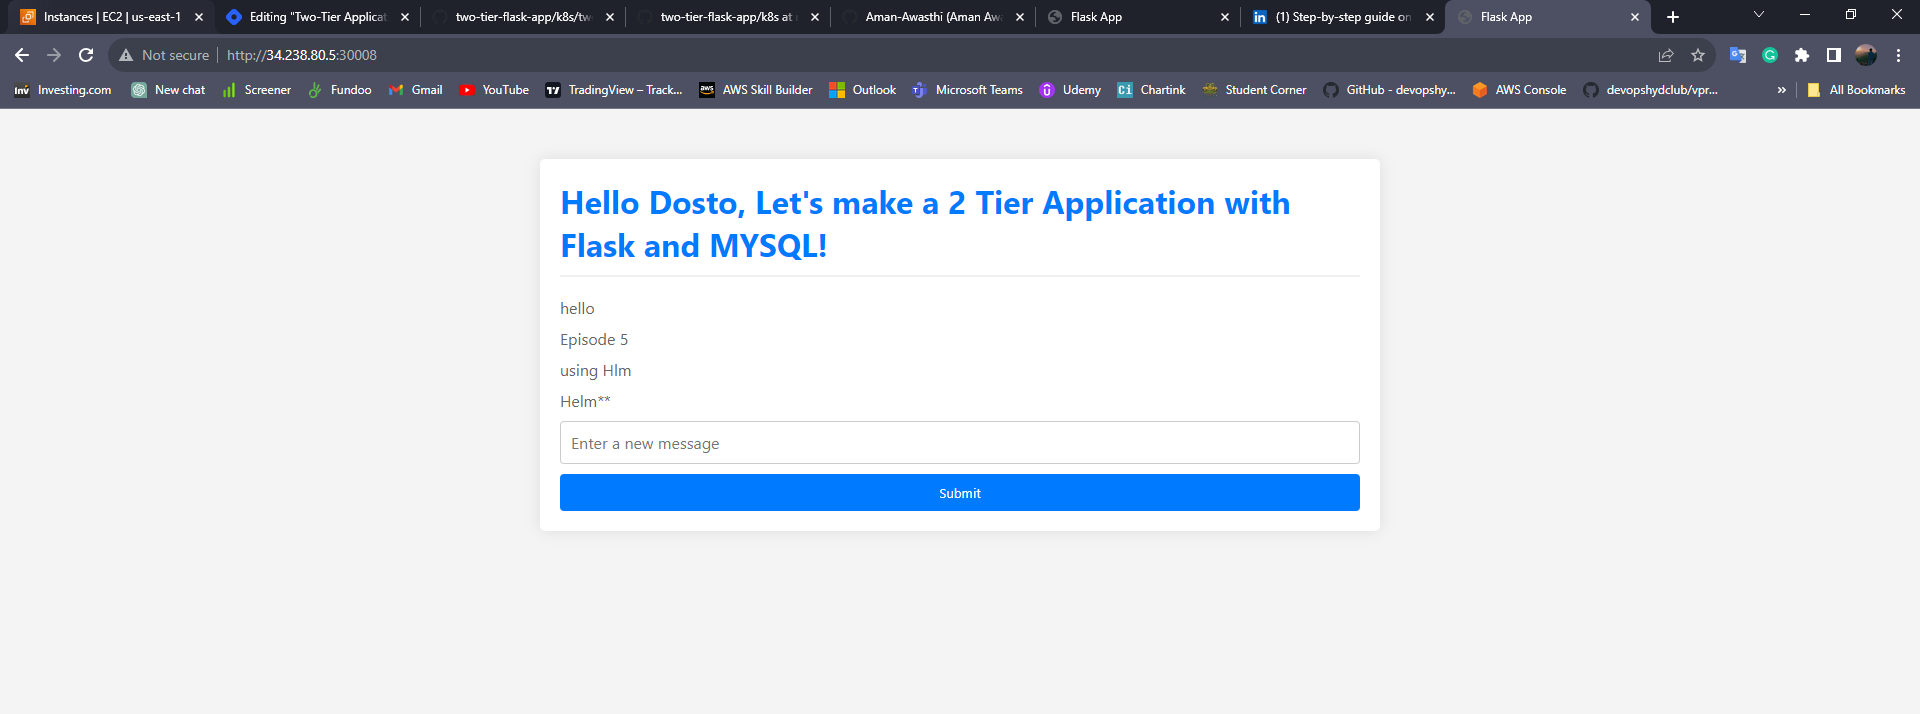
Access the application using publicip:30008. The application should be up and running.
Ep. 06: EKS Deployment
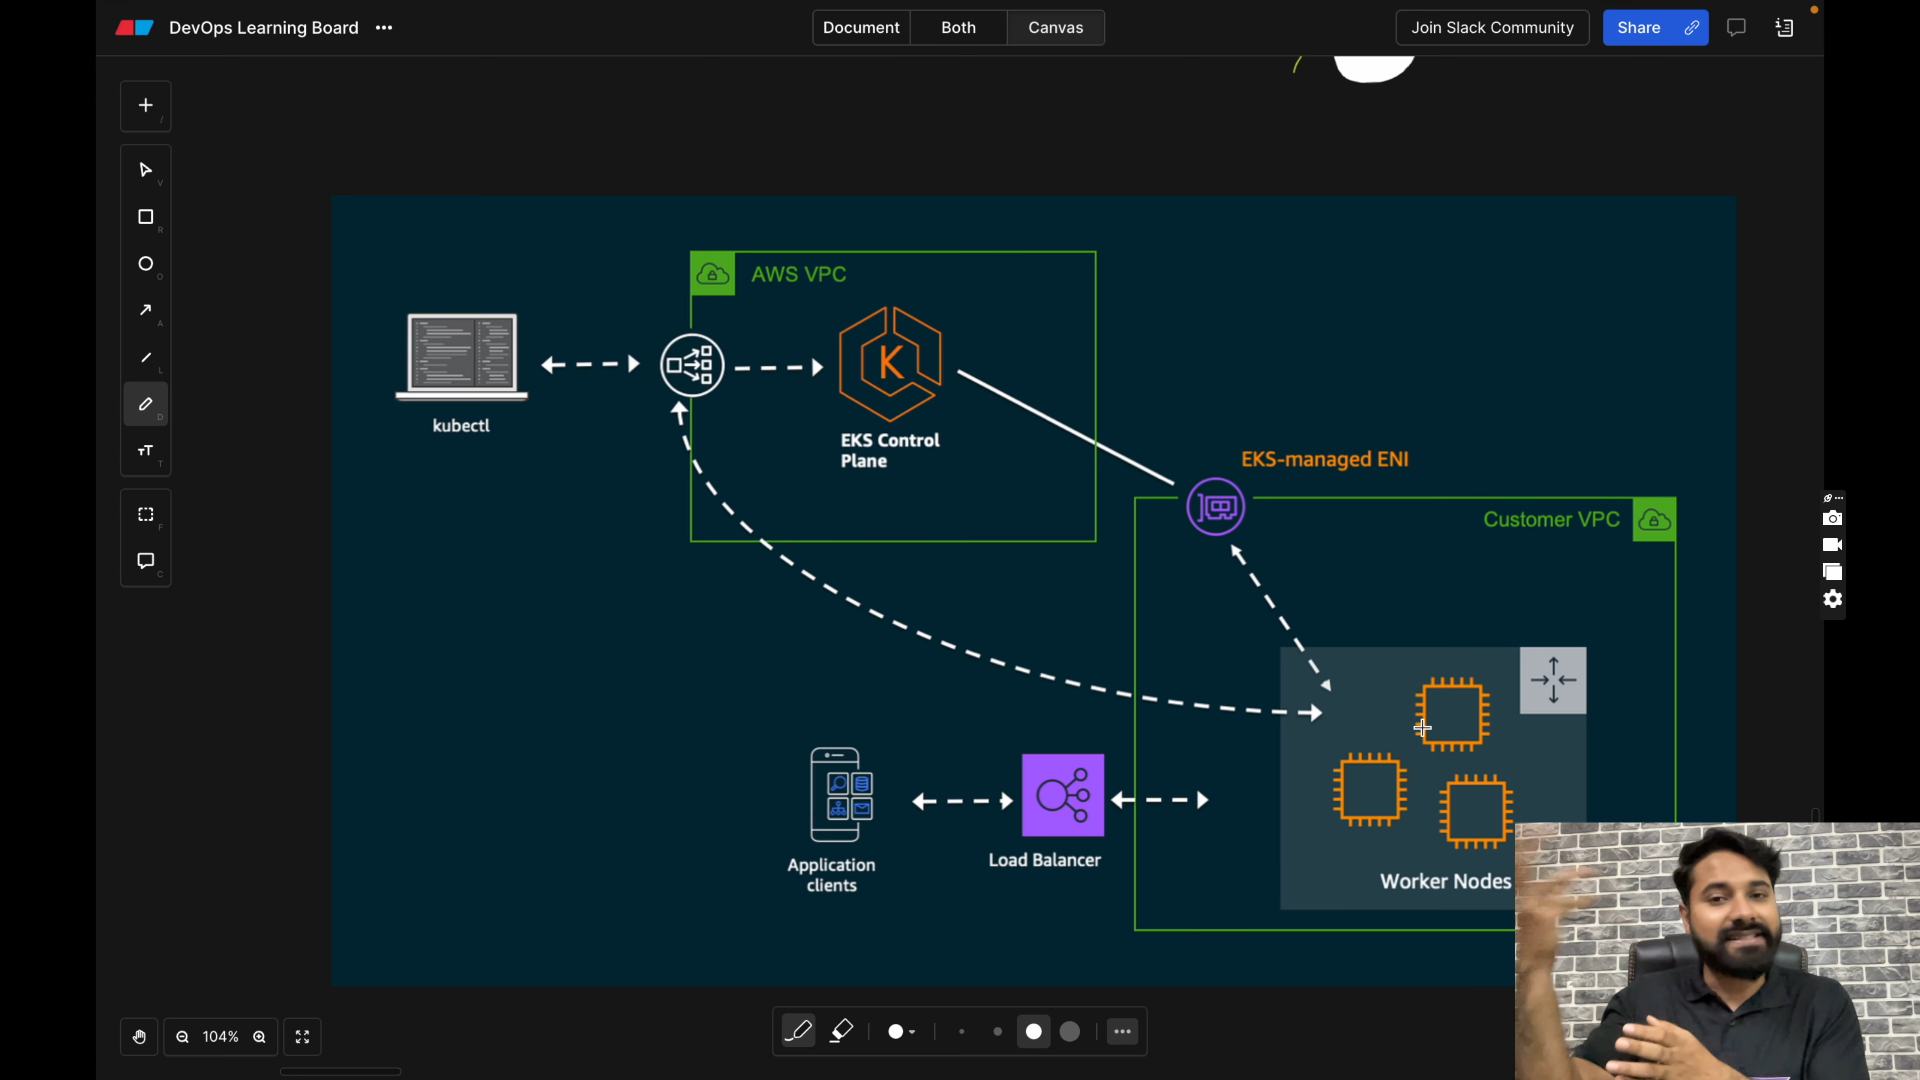
Before setting up an Amazon EKS (Elastic Kubernetes Service) cluster, ensure you have the following prerequisites:
IAM (Identity and Access Management):
Create an IAM user named "eks-admin" with AdministratorAccess permissions.
Generate Security Credentials (Access Key and Secret Access Key) for the IAM user.
EC2 Instance:
Create an Ubuntu EC2 instance in the us-east-1 region.
Install AWS CLI v2:
curl "https://awscli.amazonaws.com/awscli-exe-linux-x86_64.zip" -o "awscliv2.zip"
sudo apt install unzip
unzip awscliv2.zip
sudo ./aws/install -i /usr/local/aws-cli -b /usr/local/bin --update
Configure AWS CLI, use the credentials created from the created IAM user:
aws configure

Kubectl:
Install kubectl:
curl -o kubectl https://amazon-eks.s3.us-west-2.amazonaws.com/1.19.6/2021-01-05/bin/linux/amd64/kubectl
chmod +x ./kubectl
sudo mv ./kubectl /usr/local/bin
kubectl version --short --client
eksctl:
Install eksctl:
curl --silent --location "https://github.com/weaveworks/eksctl/releases/latest/download/eksctl_$(uname -s)_amd64.tar.gz" | tar xz -C /tmp
sudo mv /tmp/eksctl /usr/local/bin
eksctl version
Setup EKS Cluster:
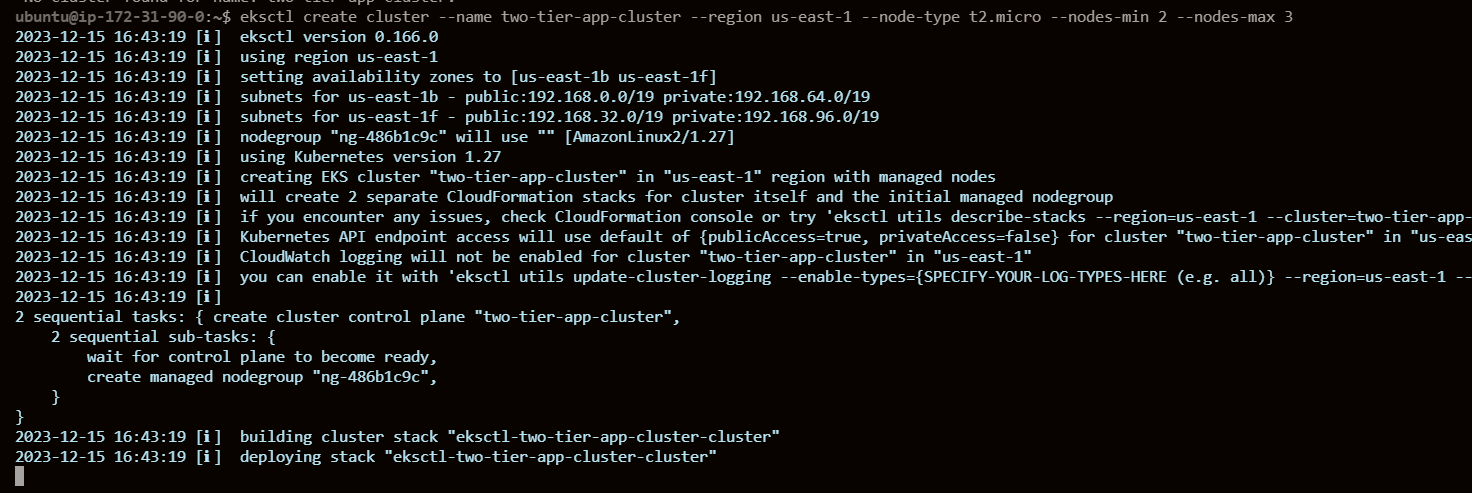
Create EKS Cluster, creation will take 15-20 min:
eksctl create cluster --name two-tier-app-cluster --region us-east-1 --node-type t2.micro --nodes-min 2 --nodes-max 3
Verify nodes:
kubectl get nodes

We can see the new EC2 instances are created -

Here, we are going to use two new concepts - ConfigMaps and Secrets
In Kubernetes:
ConfigMaps:
Purpose: Store non-sensitive configuration data.
Usage: Environment variables or mounted files in pods.
Example: Database connection strings, API URLs.
Secrets:
Purpose: Store sensitive information securely.
Usage: Environment variables or mounted files in pods.
Examples: Passwords, API tokens, TLS certificates.
Both provide a way to decouple configuration details from application code, facilitating easier management and updates. ConfigMaps for non-sensitive data, and Secrets for confidential information.
In our setup, we will be using ConfigMaps to create the table in the database with the initialization and secrets for the MySQL root password.
mysql-configmaps.yml -
apiVersion: v1
kind: ConfigMap
metadata:
  name: mysql-initdb-config
data:
  init.sql: |
    CREATE DATABASE IF NOT EXISTS mydb;
    USE mydb;
    CREATE TABLE messages (id INT AUTO_INCREMENT PRIMARY KEY, message TEXT);
secrets.yml -
apiVersion: v1
kind: Secret
metadata:
  name: mysql-secret
type: Opaque
data:
  MYSQL_ROOT_PASSWORD: YWRtaW4=
mysql-deployment.yml -
apiVersion: apps/v1
kind: Deployment
metadata:
  name: mysql
  labels:
    app: mysql
spec:
  replicas: 1
  selector:
    matchLabels:
      app: mysql
  template:
    metadata:
      labels:
        app: mysql
    spec:
      containers:
        - name: mysql
          image: mysql:latest
          env:
            - name: MYSQL_ROOT_PASSWORD
              valueFrom:
                secretKeyRef:
                  name: mysql-secret
                  key: MYSQL_ROOT_PASSWORD
            - name: MYSQL_DATABASE
              value: "mydb"
            - name: MYSQL_USER
              value: "admin"
            - name: MYSQL_PASSWORD
              value: "admin"
          ports:
            - containerPort: 3306
          volumeMounts:
            - name: mysql-initdb
              mountPath: docker-entrypoint-initdb.d
      volumes:
        - name: mysql-initdb
          configMap:
            name: mysql-initdb-config
mysql-svc.yml -
apiVersion: v1
kind: Service
metadata:
  name: mysql
spec:
  selector:
    app: mysql
  ports:
    - port: 3306
      targetPort: 3306
two-tier-app-deployment -
apiVersion: apps/v1
kind: Deployment
metadata:
  name: two-tier-app
  labels:
    app: two-tier-app
spec:
  replicas: 1
  selector:
    matchLabels:
      app: two-tier-app
  template:
    metadata:
      labels:
        app: two-tier-app
    spec:
      containers:
        - name: two-tier-app
          image: amana6420/flaskapp:latest
          env:
            - name: MYSQL_HOST
              value: 10.100.181.4
            - name: MYSQL_PASSWORD
              value: "admin"
            - name: MYSQL_USER
              value: "root"
            - name: MYSQL_DB
              value: "mydb"
          ports:
            - containerPort: 5000
          imagePullPolicy: Always
two-tier-app-svc.yml -
apiVersion: v1
kind: Service
metadata:
  name: two-tier-app-service
spec:
  selector:
    app: two-tier-app
  type: LoadBalancer
  ports:
    - protocol: TCP
      port: 80
      targetPort: 5000
Run Manifests:
Apply manifests files:
kubectl apply -f mysql-configmap.yml -f mysql-secrets.yml -f mysql-deployment.yml  -f mysql-svc.yml
kubectl apply -f two-tier-app-deployment.yml  -f two-tier-app-svc.yml
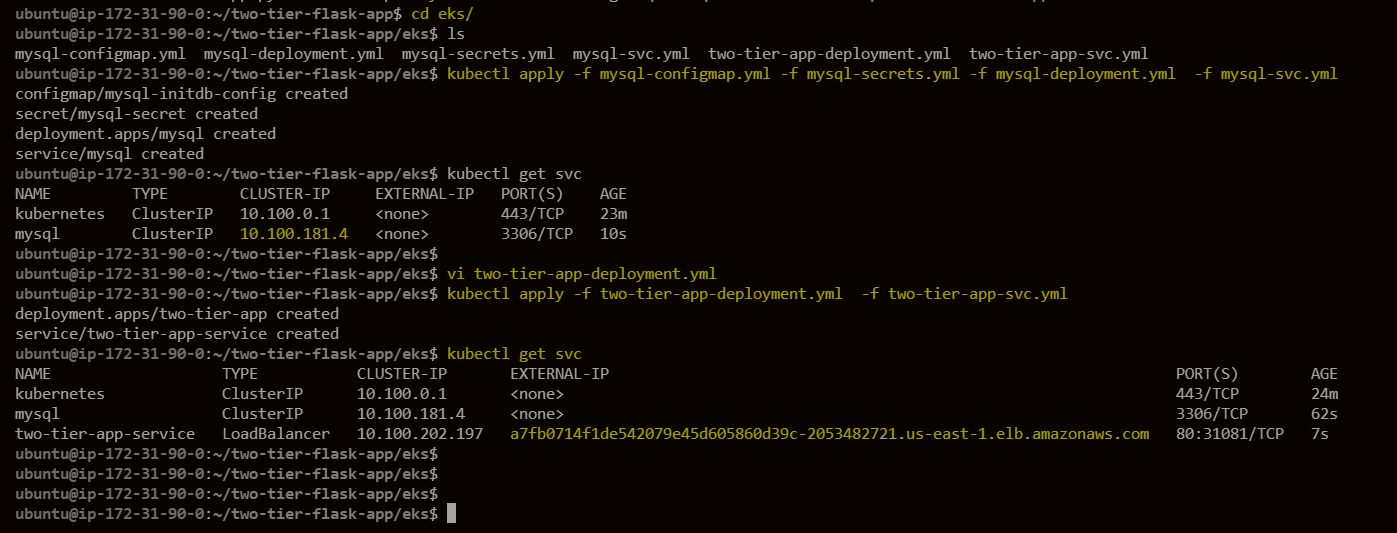
Make sure to update the MySQL host IP in the two-tier deployment file.
Run the command to get the Loadbalancer target address using which we can access our application - a7fb0714f1de542079e45d605860d39c-2053482721.us-east-1.elb.amazonaws.com
ubuntu@ip-172-31-90-0:~/two-tier-flask-app/eks$ kubectl get svc
NAME                   TYPE           CLUSTER-IP       EXTERNAL-IP                                                               PORT(S)        AGE
kubernetes             ClusterIP      10.100.0.1       <none>                                                                    443/TCP        24m
mysql                  ClusterIP      10.100.181.4     <none>                                                                    3306/TCP       62s
two-tier-app-service   LoadBalancer   10.100.202.197   a7fb0714f1de542079e45d605860d39c-2053482721.us-east-1.elb.amazonaws.com   80:31081/TCP   7s
Our application is accessible -

Once we are done with the project, we can delete the eks cluster using the below command -
eksctl delete cluster --name two-tier-app-cluster --region us-east-1
Thank you for joining the series :)
Subscribe to my newsletter
Read articles from Aman Awasthi directly inside your inbox. Subscribe to the newsletter, and don't miss out.
Written by
