Automating AWS 3 Tier Architecture deploying with Terraform and Jenkins
 SIVAPRAKASH S
Table of contents
- Introduction
- Diagram
- GitHub
- Prerequisites for Automating Infrastructure with Terraform and Jenkins
- Creating our services:
- 1. VPC
- 2. Subnets
- 3. IGW
- 4. Security Groups
- 5. Route Tables
- 6. NACL
- 7. Variables
- 8. Elastic IP
- 9. EC2 Instances
- 10. DB Instance
- 11. NAT Gateways
- 12. Application Load Balancer
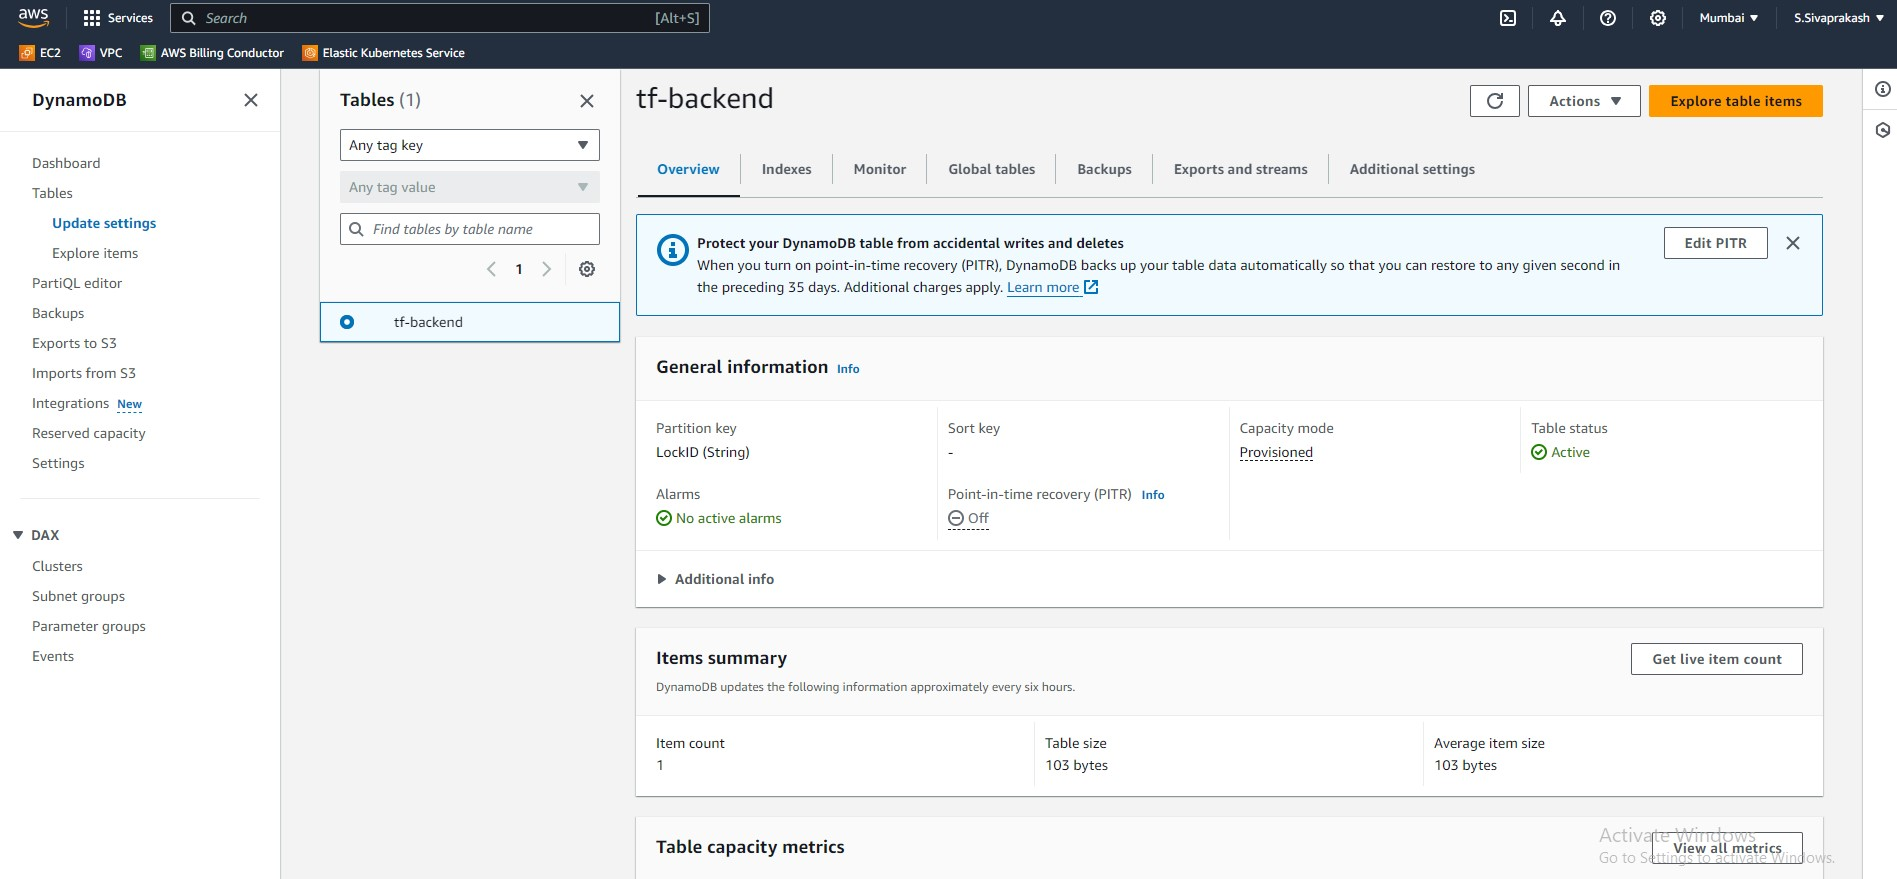
- 13 . Managing Terraform State with S3 and DynamoDB: A Secure and Scalable Approach
- Why S3 and DynamoDB?
- Implementing S3 and DynamoDB Backend
- 14. Routing Traffic with Ease: Creating Route 53 Records
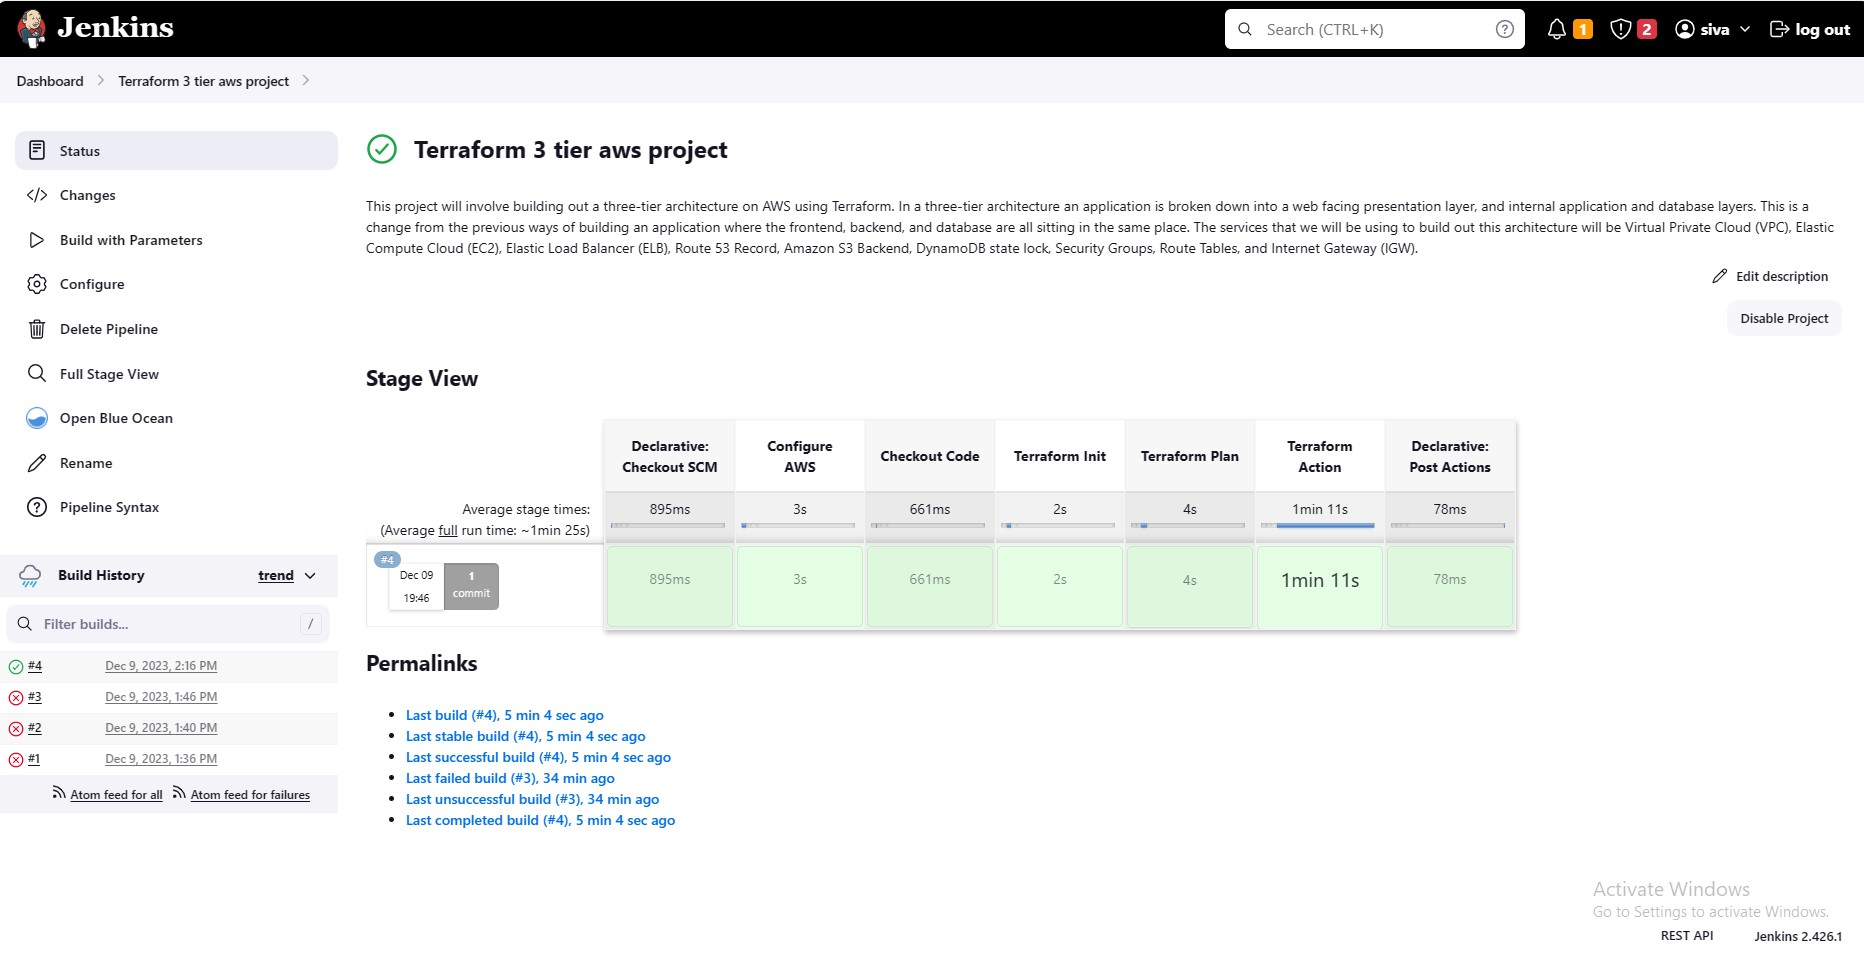
- 15. Jenkins File
- 16. Testing
- 17. Clean Up
- Final Thoughts
- Output Screenshots
Introduction
Infrastructure as code or IaC allows an architect to deploy services using code rather than logging into the console and deploying using the GUI. The benefits of this over deploying through the console are that it allows for a more consistent environment and also the code can be reused and edited as needed which saves time. The IaC tool that I will be using in this project is Terraform which is compatible with most major cloud providers.
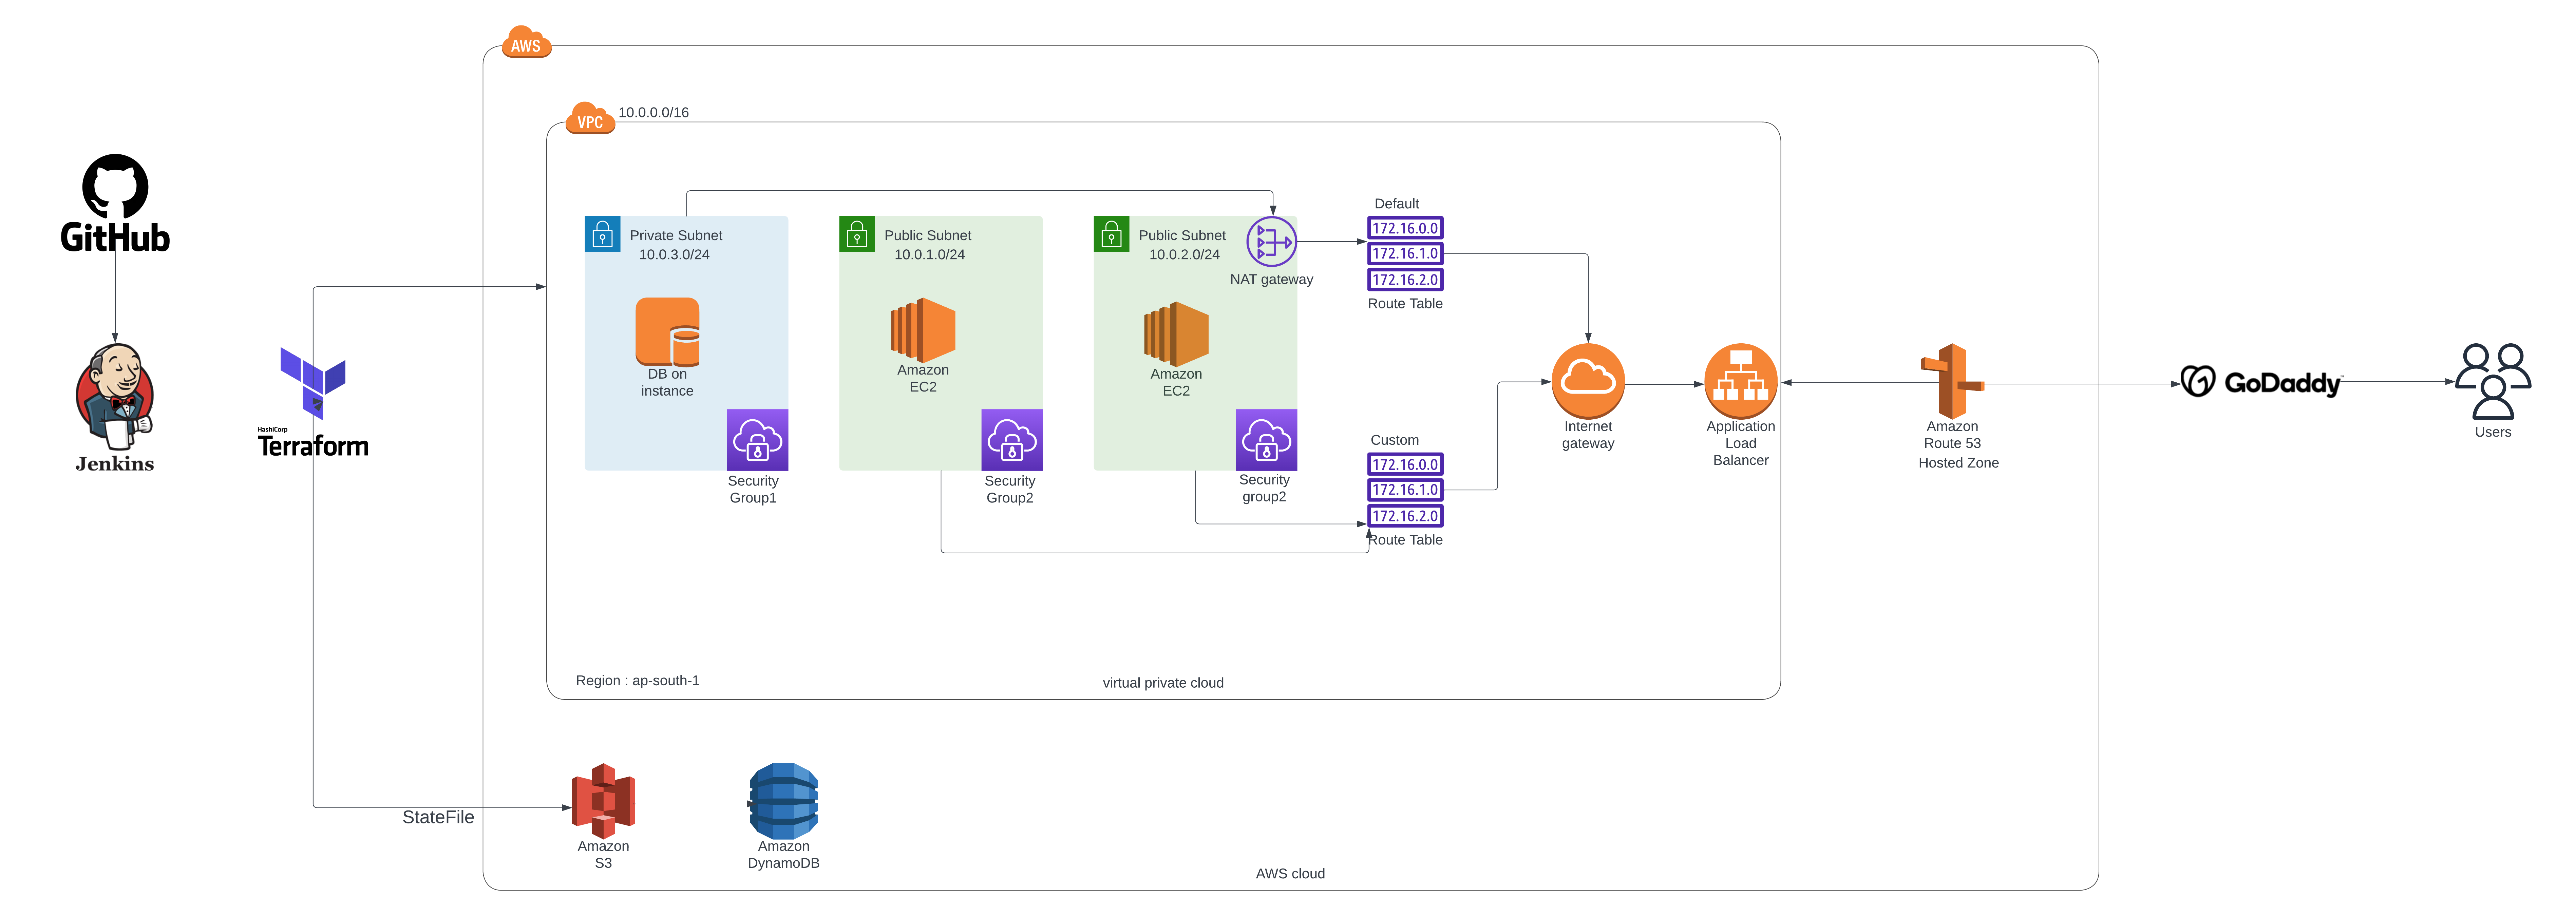
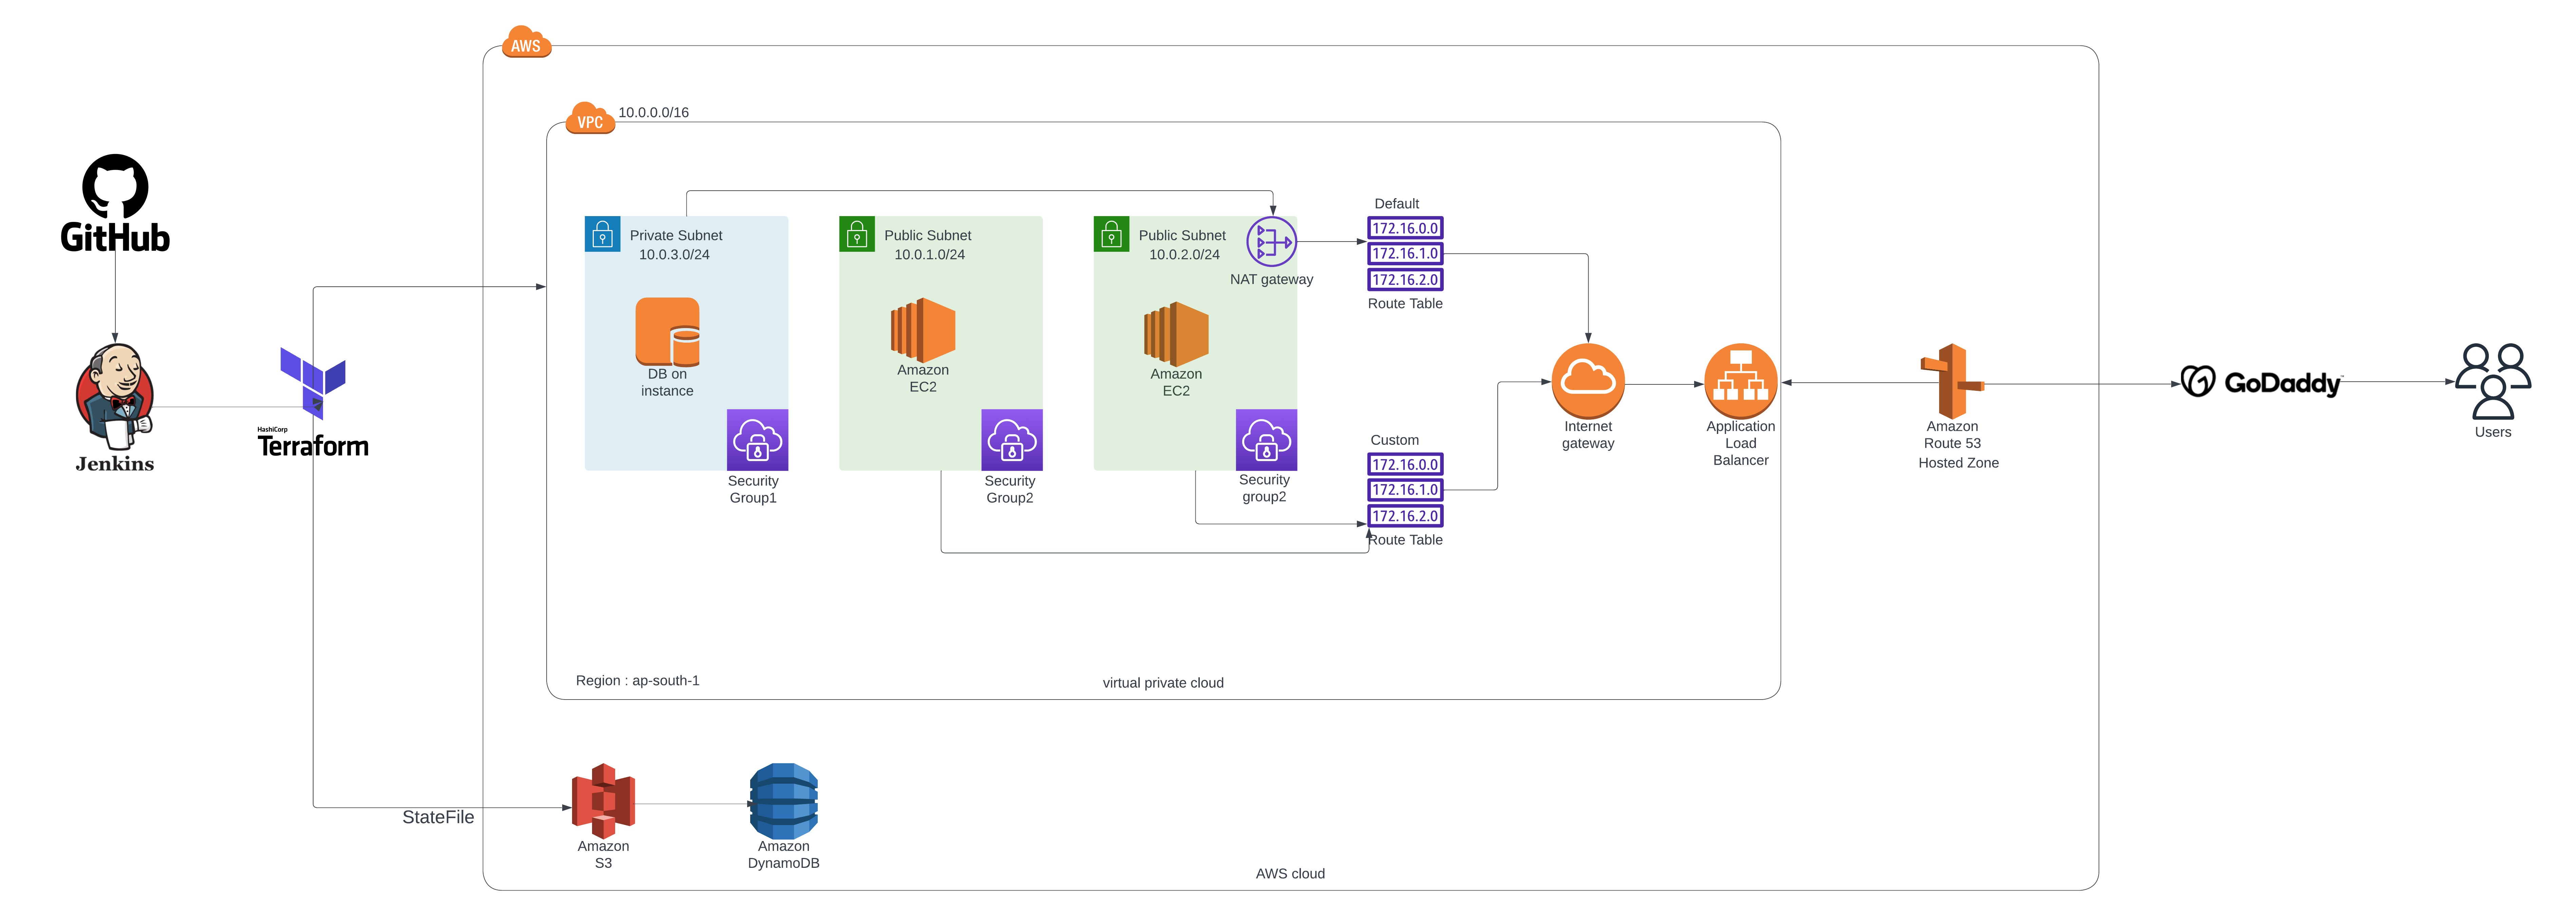
This project will involve building out a three-tier architecture on AWS using Terraform. In a three-tier architecture, an application is broken down into a web-facing presentation layer, and internal application and database layers. This is a change from the previous ways of building an application where the frontend, backend, and database are all sitting in the same place. The services that we will be using to build out this architecture will be Virtual Private Cloud (VPC), Elastic Compute Cloud (EC2), Elastic Load Balancer (ELB), Route 53 Record, Amazon S3 Backend, DynamoDB state lock, Security Groups, Route Tables, and Internet Gateway (IGW).
Diagram
GitHub
Why Should We Architect This Way?
1. Modularity: One benefit of building our architecture out this way is that each layer can be managed separately. This can be beneficial to keep a secure environment where users can only log in and manage the specific servers and services that they need to be working on ie. The DB developer works on the DB, front-end developer works on the front end. Another benefit of this is more efficient troubleshooting and if one layer were to go down we can focus on that specifically without needing to take down the entire application.
2. High Availability: Another thing we will be focusing on is high availability which we will address by building in two separate AWS availability zones. In case one availability zone were to go down for whatever reason our application would still be running in the other. This is a huge benefit of the cloud compared to the traditional on-site server where if power were to go out or the internet connection was lost the application would be completely down.
3. Security: We will be building the front end on a public subnet which will be accessed through a load balancer. Our application and database layers will be on private subnets which can only be accessed using SSH from specified security groups, or IP addresses. The security groups will allow us to set the criteria for ingress and egress traffic and specify which protocols can be used from what CIDR blocks.
4. Consistency: An important part of rolling out these projects is maintaining consistency. When we make any changes to this project, we will be doing so using Terraform and not the AWS console. The reason for this is that if we need to find out any kind of information on the configuration, we can look through our Terraform files which will let us know exactly how things are set up. Another benefit of this is we can reuse the code again, for example, if we need to add a server or if we are working on another similar project, we can use the code for this project to deploy the architecture which saves us time.
Prerequisites for Automating Infrastructure with Terraform and Jenkins
1. AWS Account:
First and foremost, you'll need an AWS account to access the vast array of cloud services offered by Amazon Web Services. This account will serve as your playground for creating and managing infrastructure resources like EC2 instances, S3 buckets, and much more.
2. Jenkins Server:
As your automation hub, Jenkins plays a crucial role in managing your infrastructure deployments. This open-source continuous integration and continuous delivery (CI/CD) server will automate your Terraform code execution, ensuring consistent and reliable deployments across environments.
3. Terraform and AWS CLI Installation:
To interact with AWS resources and automate their creation, we need two essential tools:
Terraform: This Infrastructure as Code (IaC) tool allows you to define your infrastructure in code, enabling repeatable and consistent deployments.
AWS CLI: The AWS Command Line Interface provides a command-line interface for interacting with AWS services. It allows you to manage resources directly and integrate with Terraform scripts for automated deployments.
4. S3 Bucket for State Storage:
Terraform requires a secure location to store its state file, which contains information about your infrastructure resources. An S3 bucket on your AWS account offers a perfect solution for storing the state file and ensuring its durability and accessibility.
5. Github Account for Code Repository:
Version control is essential for managing your Terraform code and tracking changes. A GitHub repository provides a centralized platform to store your code, collaborate with team members, and maintain different versions of your infrastructure configurations.
Benefits of Setting Up Your Environment:
Automation: Achieve consistent and repeatable deployments through automation with Terraform and Jenkins.
Scalability: Easily scale your infrastructure as your needs grow.
Reliability: Reduce the risk of manual errors and ensure consistent configurations.
Collaboration: Facilitate collaborative development and management of infrastructure code.
Security: Leverage the power of AWS and secure your infrastructure with S3 and IAM policies.
Creating our services:
1. VPC
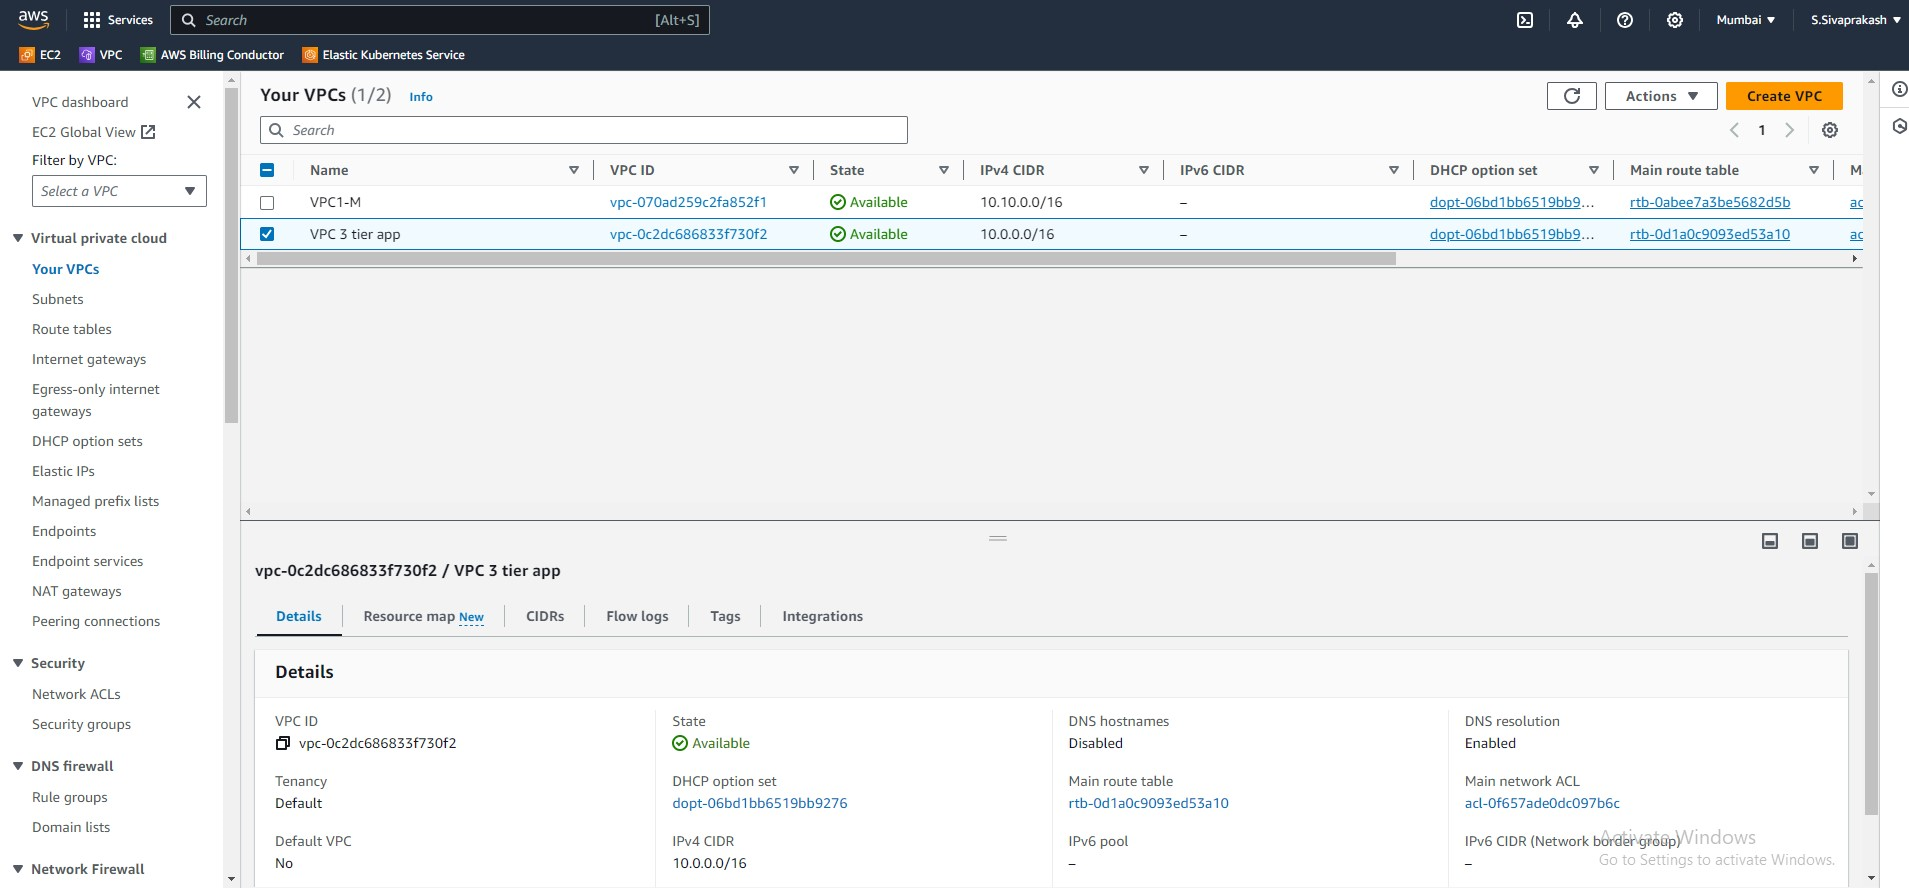
Our first step will be to create a Virtual Private Cloud (VPC). This is a virtual network where we will be deploying our services. When creating a VPC we will give it a name and CIDR range, one thing to keep in mind here is that the CIDR range cannot be changed later.
resource "aws_vpc" "main" {
  cidr_block = "10.0.0.0/16"

  tags = {
    Name = "CustomVPC"
  }
}
2. Subnets
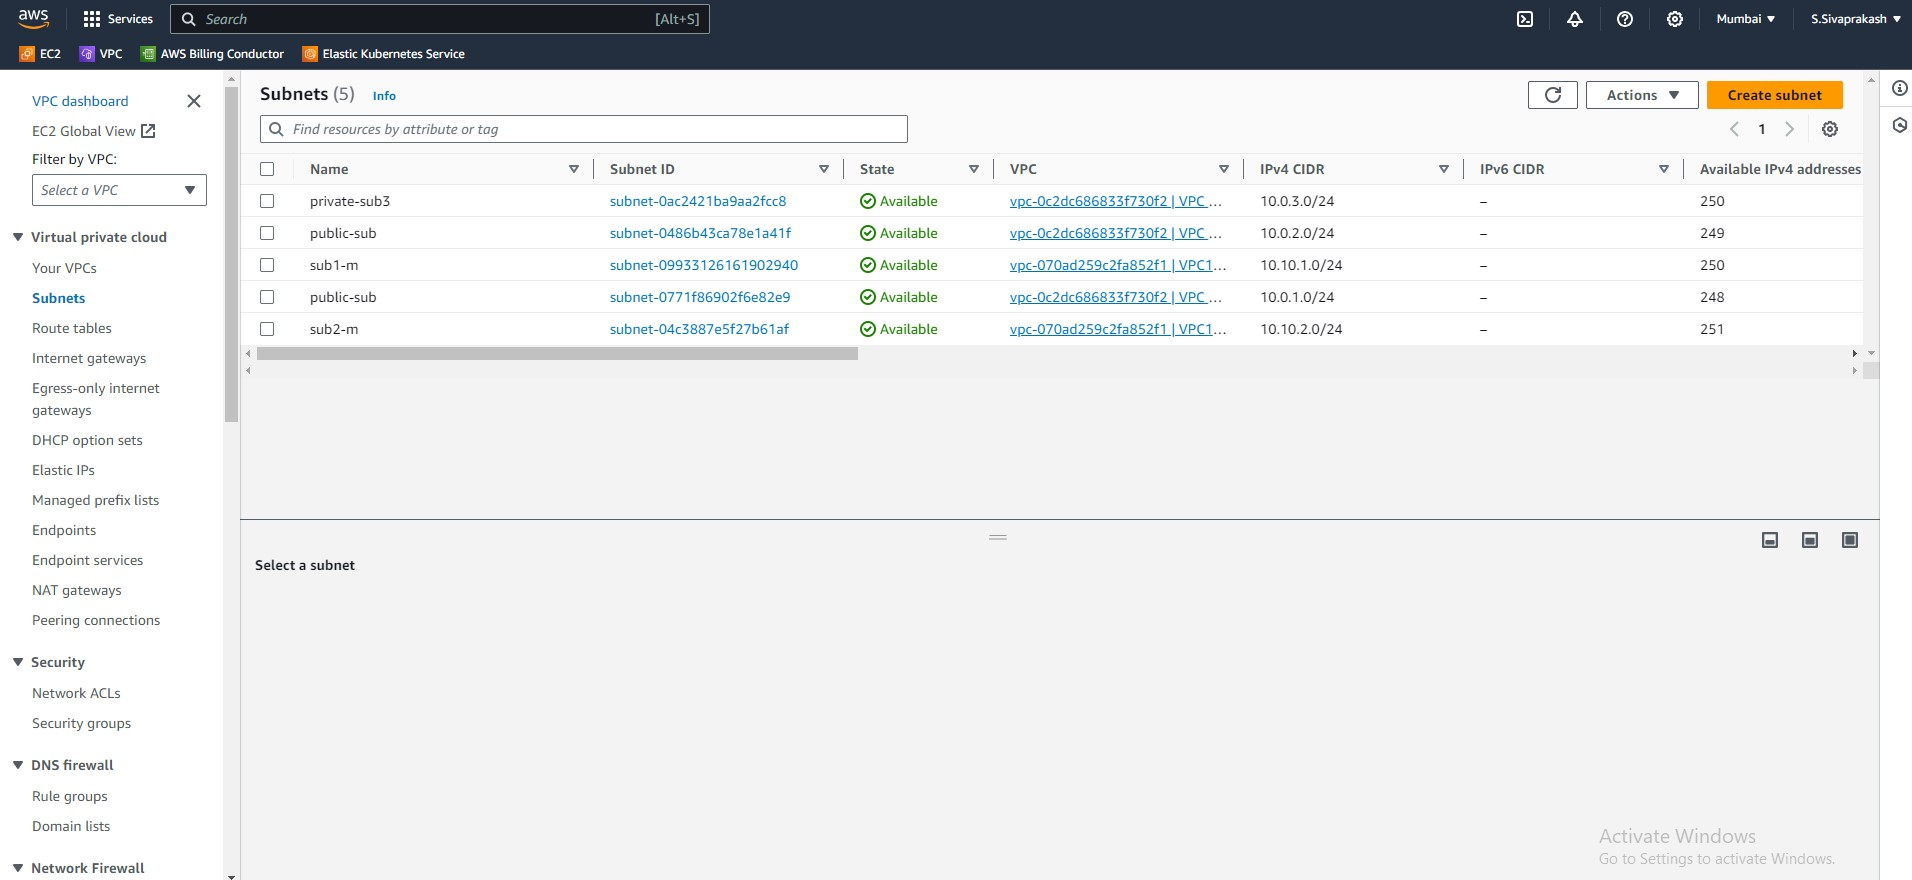
Now that our VPC has been created we can move on to creating the subnets. For this project, we will have six subnets, 2 public subnets for the presentation layer, 1 private subnet for the database layer. The instances in the public subnet will have public IPs and will be able to access the internet, while the private subnets will have private IPs and only send traffic internally.
resource "aws_subnet" "public" {
  vpc_id     = aws_vpc.main.id
  cidr_block = var.cidr[count.index]
  availability_zone = var.az[count.index]
  count = 2

  tags = {
    Name = "public-sub"
  }
}

resource "aws_subnet" "private" {
  vpc_id     = aws_vpc.main.id
  cidr_block = "10.0.3.0/24"
  availability_zone = "ap-south-1b"

  tags = {
    Name = "private-sub3"
  }
}

data "aws_subnets" "sid" {
  filter {
    name   = "vpc-id"
    values = [aws_vpc.main.id]
  }

  tags = {
    Tier = "Public"
  }
}
3. IGW
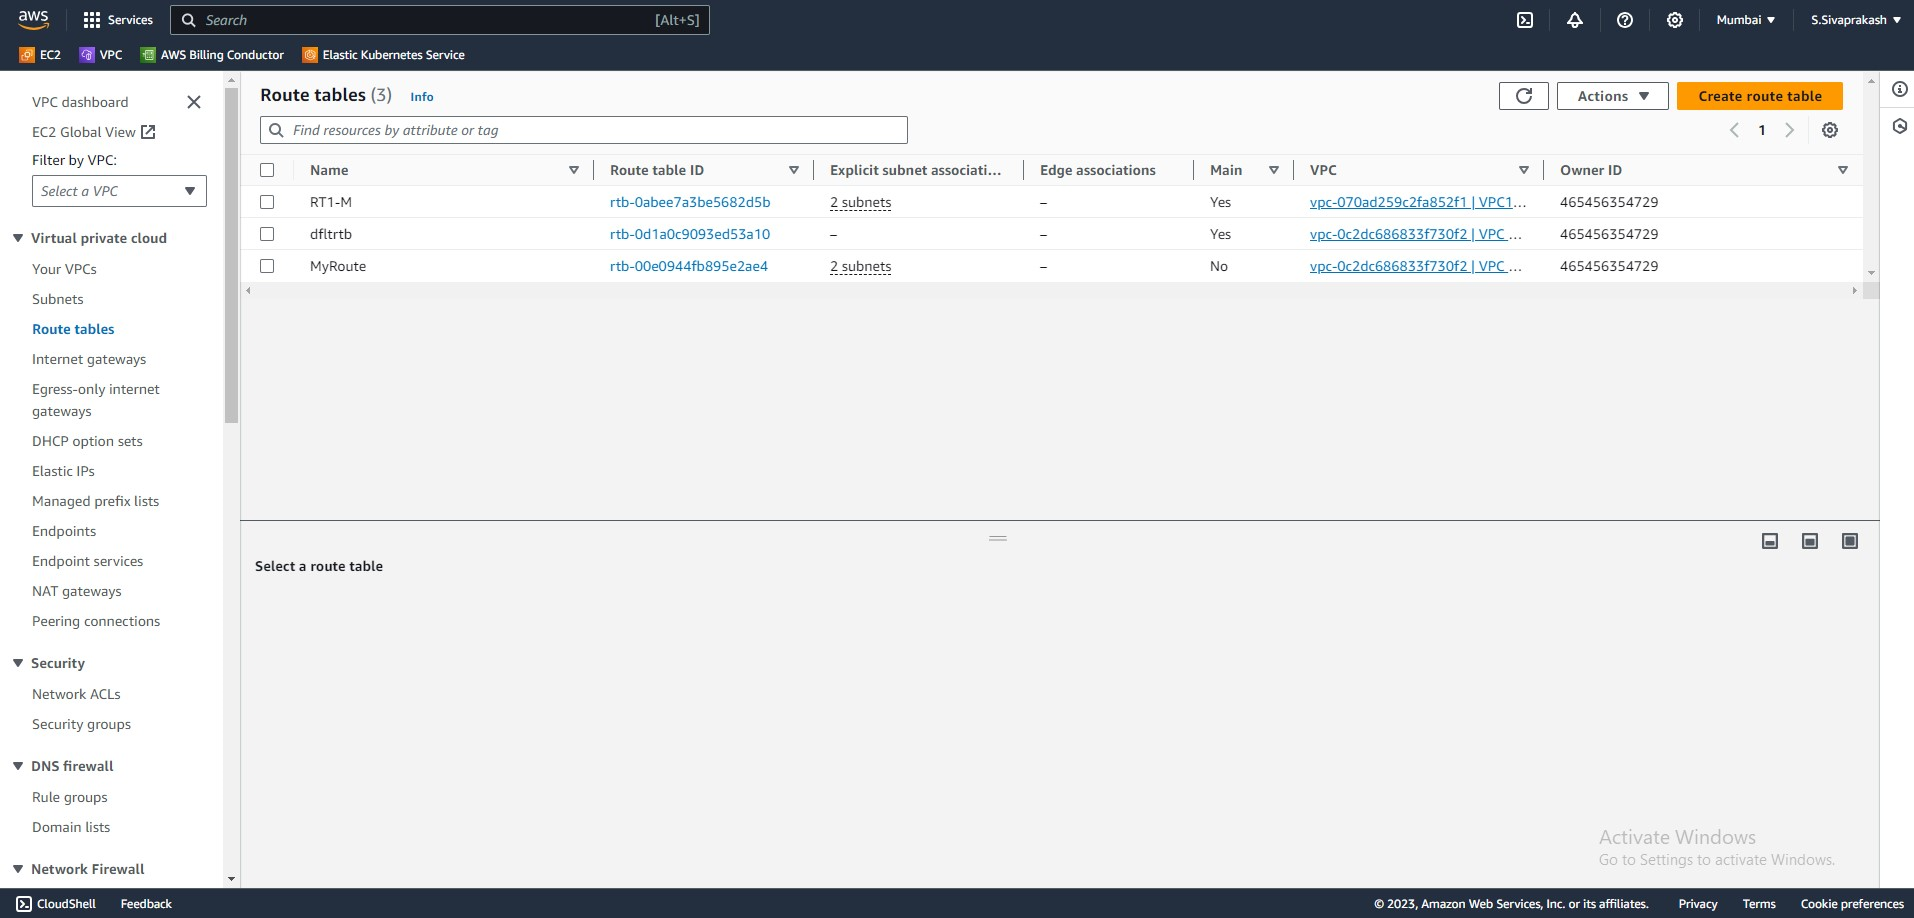
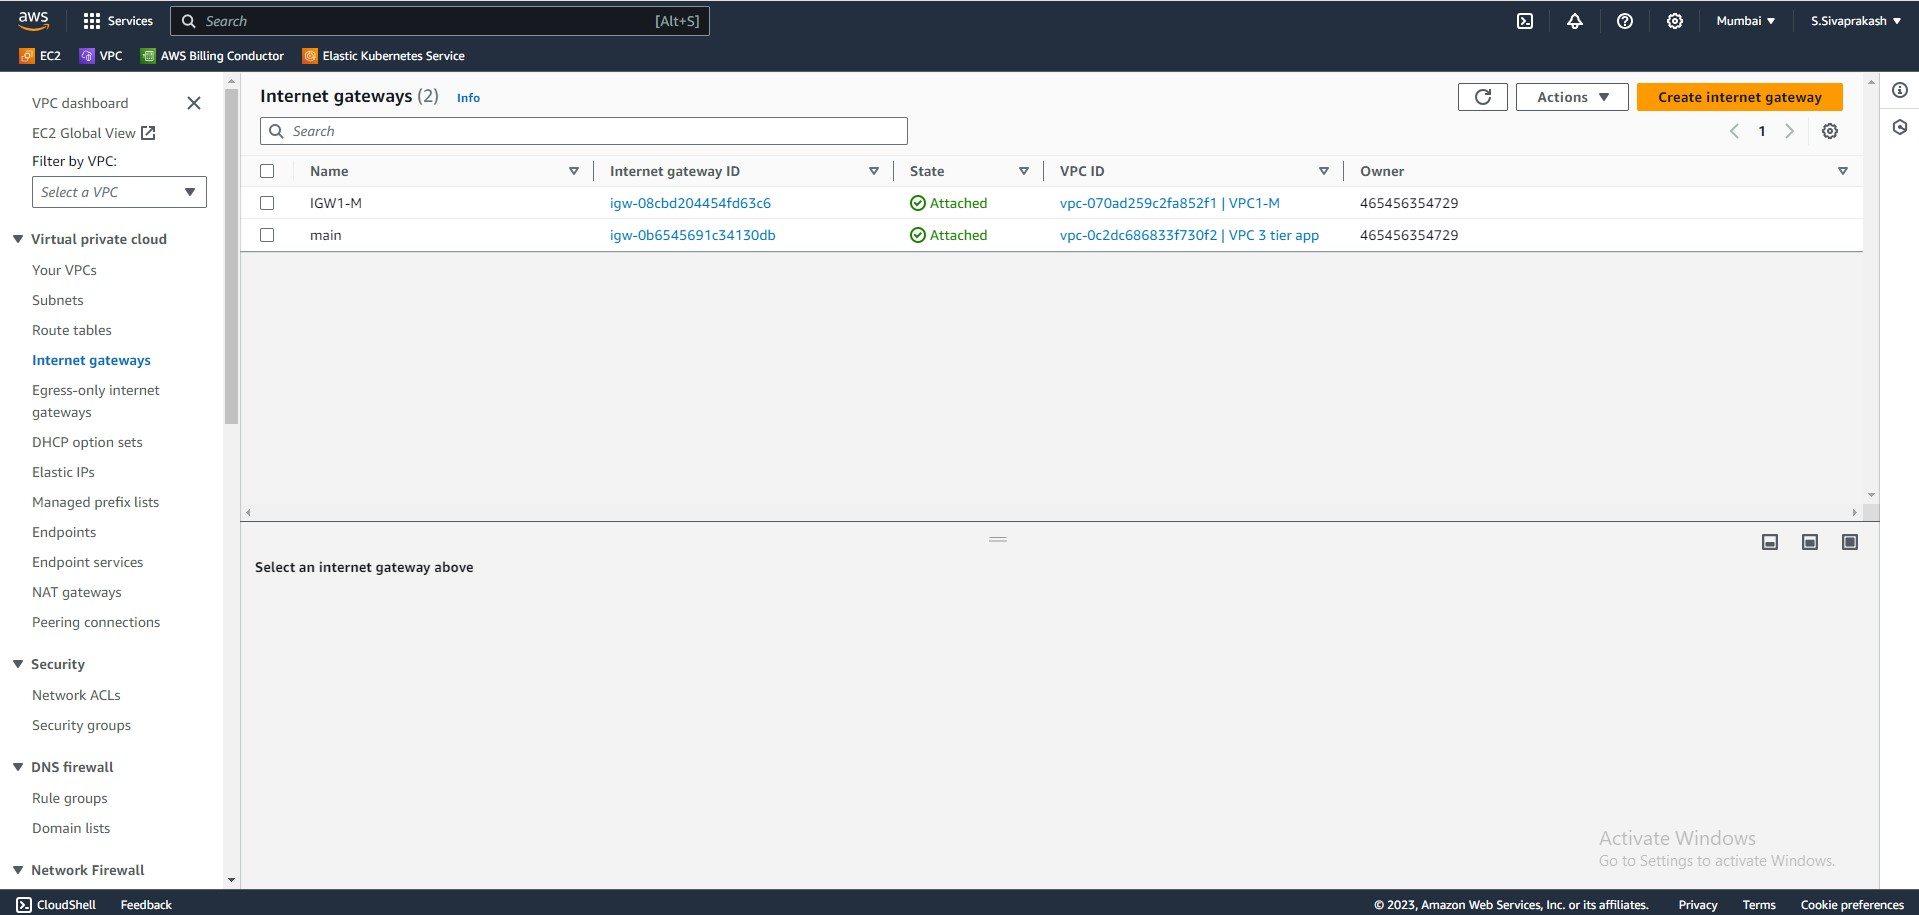
Next will be the Internet Gateway or IGW, this will allow the EC2 instances in our public subnet to access the public internet. Also in this step, I've created a route table that will add the route to the public internet through our IGW, as well as a route table association that will attach the route table to the desired subnets.
resource "aws_internet_gateway" "gw" {
  vpc_id = aws_vpc.main.id

  tags = {
    Name = "main"
  }
}
4. Security Groups
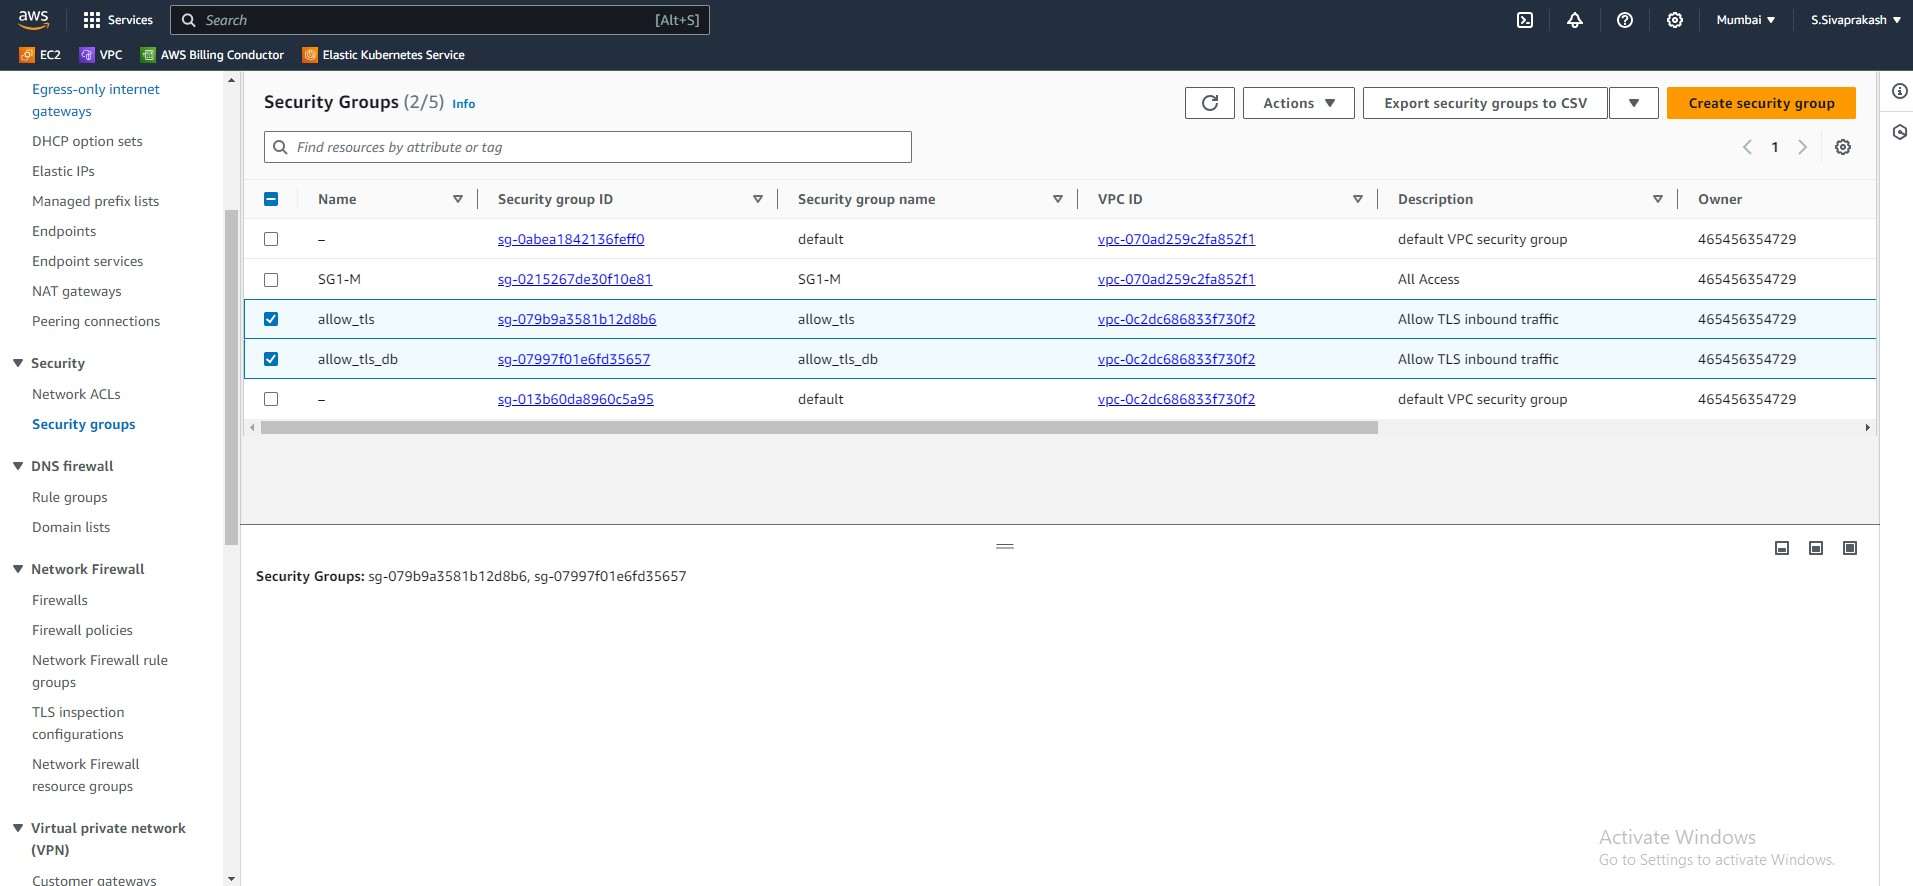
The next step is to create security groups. Security groups allow traffic from specified ports and it also lets you set where you want to allow that traffic from, whether it be a CIDR range or another AWS security group. We will create 2 security groups one for the web server, and one for the database layer.
The load balancer will allow HTTP and HTTPS traffic from anywhere, the web server will allow HTTP traffic from the load balancer, and the database layer will allow traffic on port 3306 from the web application layer which would be for MySQL.
resource "aws_security_group" "allow_tls" {
  name        = "allow_tls"
  description = "Allow TLS inbound traffic"
  vpc_id      = aws_vpc.main.id

  ingress {
    description      = "TLS from VPC"
    from_port        = 22
    to_port          = 22
    protocol         = "tcp"
    cidr_blocks      = ["0.0.0.0/0"]
  }

  ingress {
    description      = "TLS from VPC"
    from_port        = 80
    to_port          = 80
    protocol         = "tcp"
    cidr_blocks      = ["0.0.0.0/0"]
  }

  egress {
    from_port        = 0
    to_port          = 0
    protocol         = "-1"
    cidr_blocks      = ["0.0.0.0/0"]
  }

  tags = {
    Name = "allow_tls"
  }
}

resource "aws_security_group" "allow_tls_db" {
  name        = "allow_tls_db"
  description = "Allow TLS inbound traffic"
  vpc_id      = aws_vpc.main.id

  ingress {
    description      = "TLS from VPC"
    from_port        = 22
    to_port          = 22
    protocol         = "tcp"
    cidr_blocks      = ["0.0.0.0/0"]
  }

  ingress {
    description      = "TLS from VPC"
    from_port        = 3306
    to_port          = 3306
    protocol         = "tcp"
    cidr_blocks      = ["0.0.0.0/0"]
  }

  egress {
    from_port        = 0
    to_port          = 0
    protocol         = "-1"
    cidr_blocks      = ["0.0.0.0/0"]
  }

  tags = {
    Name = "allow_tls_db"
  }
}
5. Route Tables
Route tables are essentially maps that tell your network where to send traffic. They contain a set of rules that specify how packets are forwarded based on their destination IP address. Each subnet within your VPC can have its route table, allowing for granular control over traffic flow.
resource "aws_route_table" "rtb" {
  vpc_id = aws_vpc.main.id

  route {
    cidr_block = "0.0.0.0/0"
    gateway_id = aws_internet_gateway.gw.id
  }

  tags = {
    Name = "MyRoute"
  }
}

resource "aws_route_table_association" "a" {
  subnet_id      = aws_subnet.public[count.index].id
  route_table_id = aws_route_table.rtb.id
  count = 2
}
/*
resource "aws_route_table_association" "b" {
  subnet_id      = aws_subnet.public2.id
  route_table_id = aws_route_table.rtb.id
}
*/
//Adding NAT Gateway into the default main route table
resource "aws_default_route_table" "dfltrtb" {
  default_route_table_id = aws_vpc.main.default_route_table_id

  route {
    cidr_block = "0.0.0.0/0"
    gateway_id = aws_nat_gateway.natgw.id
  }

  tags = {
    Name = "dfltrtb"
  }
}
6. NACL
Think of NACLs as digital bouncers for your network. They define the inbound and outbound traffic rules for subnets within your VPC. These rules specify which traffic is allowed to enter and leave the subnet, based on source and destination IP addresses, ports, and protocols. This granular control allows you to secure your network by restricting access to specific resources and services.
resource "aws_network_acl" "main" {
  vpc_id = aws_vpc.main.id

  ingress {
    protocol   = "tcp"
    rule_no    = 100
    action     = "allow"
    cidr_block = "0.0.0.0/0"
    from_port  = 80
    to_port    = 80
  }

  ingress {
    protocol   = "tcp"
    rule_no    = 200
    action     = "allow"
    cidr_block = "0.0.0.0/0"
    from_port  = 443
    to_port    = 443
  }
  ingress {
    protocol   = "tcp"
    rule_no    = 300
    action     = "allow"
    cidr_block = "0.0.0.0/0"
    from_port  = 22
    to_port    = 22
  }

  egress {
    protocol   = "tcp"
    rule_no    = 100
    action     = "allow"
    cidr_block = "0.0.0.0/0"
    from_port  = 80
    to_port    = 80
  }
  egress {
    protocol   = "tcp"
    rule_no    = 200
    action     = "allow"
    cidr_block = "0.0.0.0/0"
    from_port  = 443
    to_port    = 443
  }
  egress {  //Ephemeral Port
    protocol   = "tcp"
    rule_no    = 300
    action     = "allow"
    cidr_block = "0.0.0.0/0"
    from_port  = 1024
    to_port    = 65535
  }

  tags = {
    Name = "main"
  }
}

resource "aws_network_acl_association" "main" {
  network_acl_id = aws_network_acl.main.id
  subnet_id      = aws_subnet.public.id
}
7. Variables
Terraform variables act as placeholders for values that can be dynamically set during runtime. This means you don't need to hardcode values directly into your code, making it flexible and adaptable.
By mastering Terraform variables, you can unlock a world of possibilities in your infrastructure management. You can build dynamic and reusable configurations, adapt to various environments, and simplify collaboration. So, embrace the power of variables and watch your infrastructure soar!
variable "cidr" {
  type = list
  default = ["10.0.1.0/24","10.0.2.0/24"]
}

variable "az" {
  type = list
  default = ["ap-south-1a","ap-south-1b"]
}
8. Elastic IP
Elastic IP addresses are like dedicated phone lines for your cloud resources. They provide a static public IP address that remains consistent even as your underlying instances are stopped or terminated. This allows you to connect to your resources remotely, even if their internal IP addresses change. Additionally, Elastic IP addresses can be easily reassigned to different resources, offering flexibility and scalability.
resource "aws_eip" "myeip" {
  //instance = aws_instance.web.id
  vpc      = true
}
9. EC2 Instances
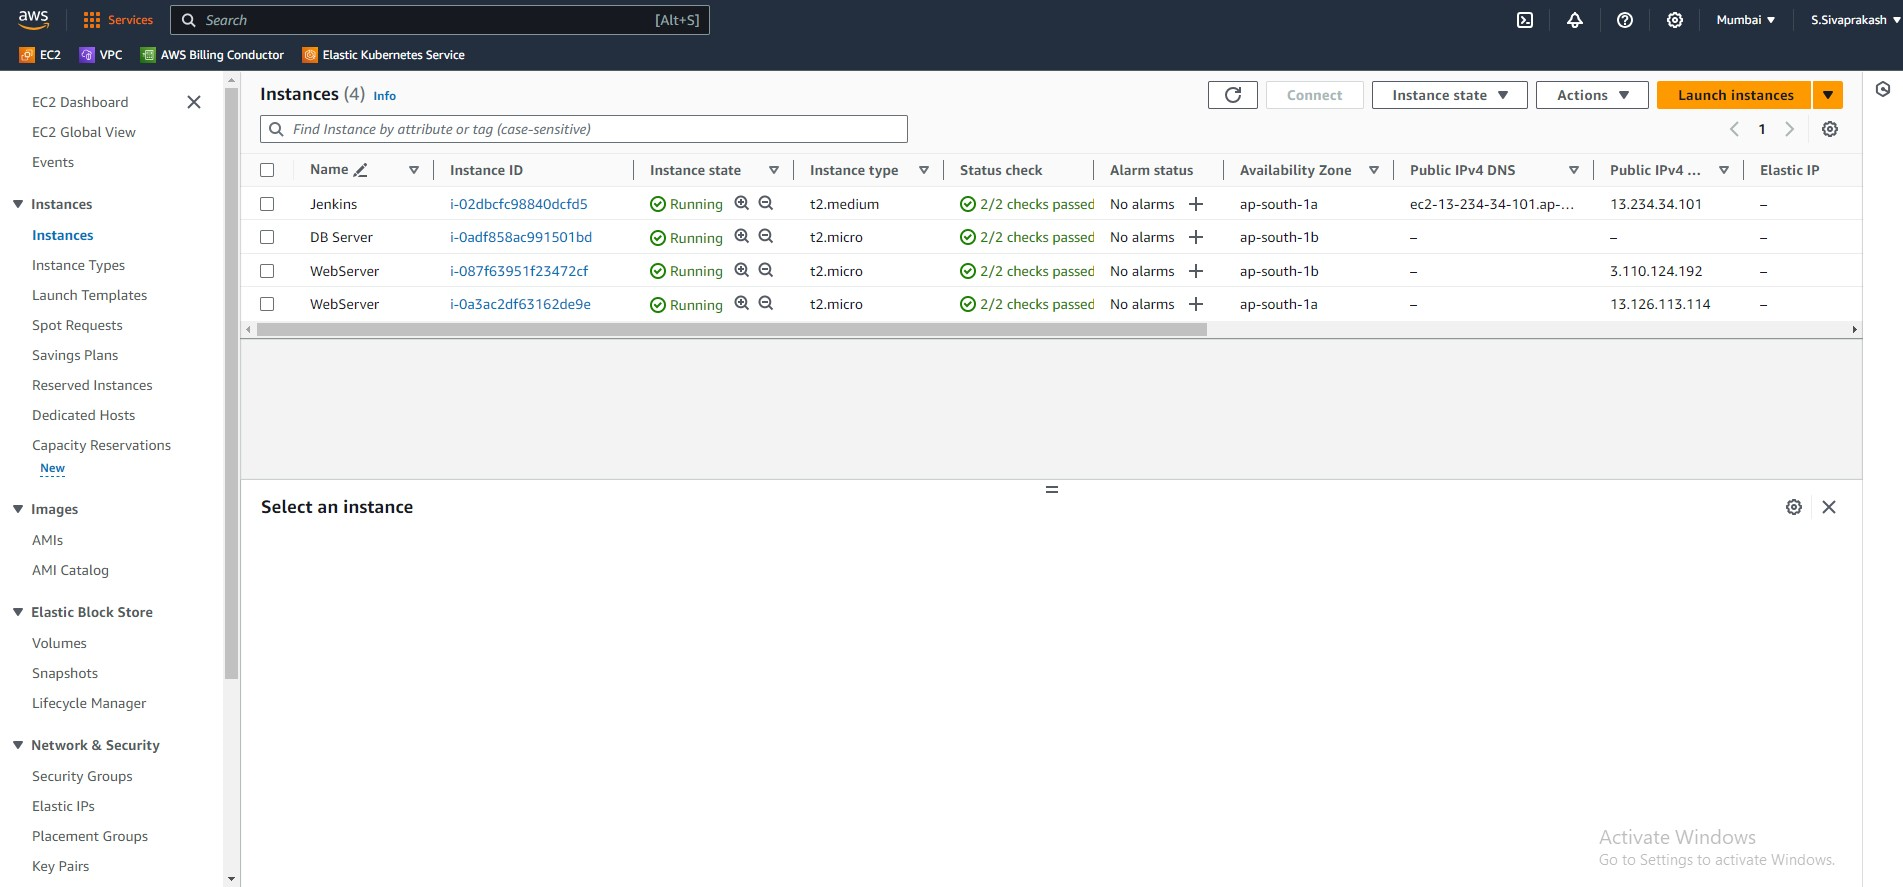
Now that the networking side of things has been completed, we can start working on EC2 instances. In this section, we will be creating the instances for the web-facing and application layers. We will be spinning up 2 Web instances.
resource "aws_instance" "web" {
  ami           = "ami-0287a05f0ef0e9d9a"
  instance_type = "t2.micro"
  key_name = "KP1-M"
  subnet_id = aws_subnet.public[count.index].id
  vpc_security_group_ids = [aws_security_group.allow_tls.id]
  associate_public_ip_address = true
  count = 2
  user_data     = <<-EOF
                  #!/bin/bash
                  sudo apt update -y
                  sudo apt install docker.io -y
                  sudo systemctl start docker
                  sudo usermod -aG docker ubuntu
                  sudo chmod 777 /var/run/docker.sock
                  sudo docker run -dit -p 80:80 --name webapp1 sivaprakash1998/web-app-nginx-test-server1:v1
                  EOF

  tags = {
    Name = "WebServer"
  }
}
10. DB Instance
Next, we'll move to creating the DB instance which will be our backend database. Along with the instance itself, we will a subnet_group for our db instances. This is a subnet we specify for all of our database instances.
resource "aws_instance" "db" {
  ami           = "ami-08df646e18b182346"
  instance_type = "t2.micro"
  key_name = "KP1-M"
  subnet_id = aws_subnet.private.id
  vpc_security_group_ids = [aws_security_group.allow_tls_db.id]

  tags = {
    Name = "DB Server"
  }
}
11. NAT Gateways
NAT gateways act as a shield for your private network. They translate the private IP addresses of your instances to a public IP address when they communicate with the outside world. This masks the identity of your internal resources, enhancing security and preventing malicious actors from directly accessing them.
resource "aws_nat_gateway" "natgw" {
  allocation_id = aws_eip.myeip.id
  subnet_id     = aws_subnet.public[0].id

  tags = {
    Name = "gw NAT"
  }

  # To ensure proper ordering, it is recommended to add an explicit dependency
  # on the Internet Gateway for the VPC.
  depends_on = [aws_internet_gateway.gw]
}
12. Application Load Balancer
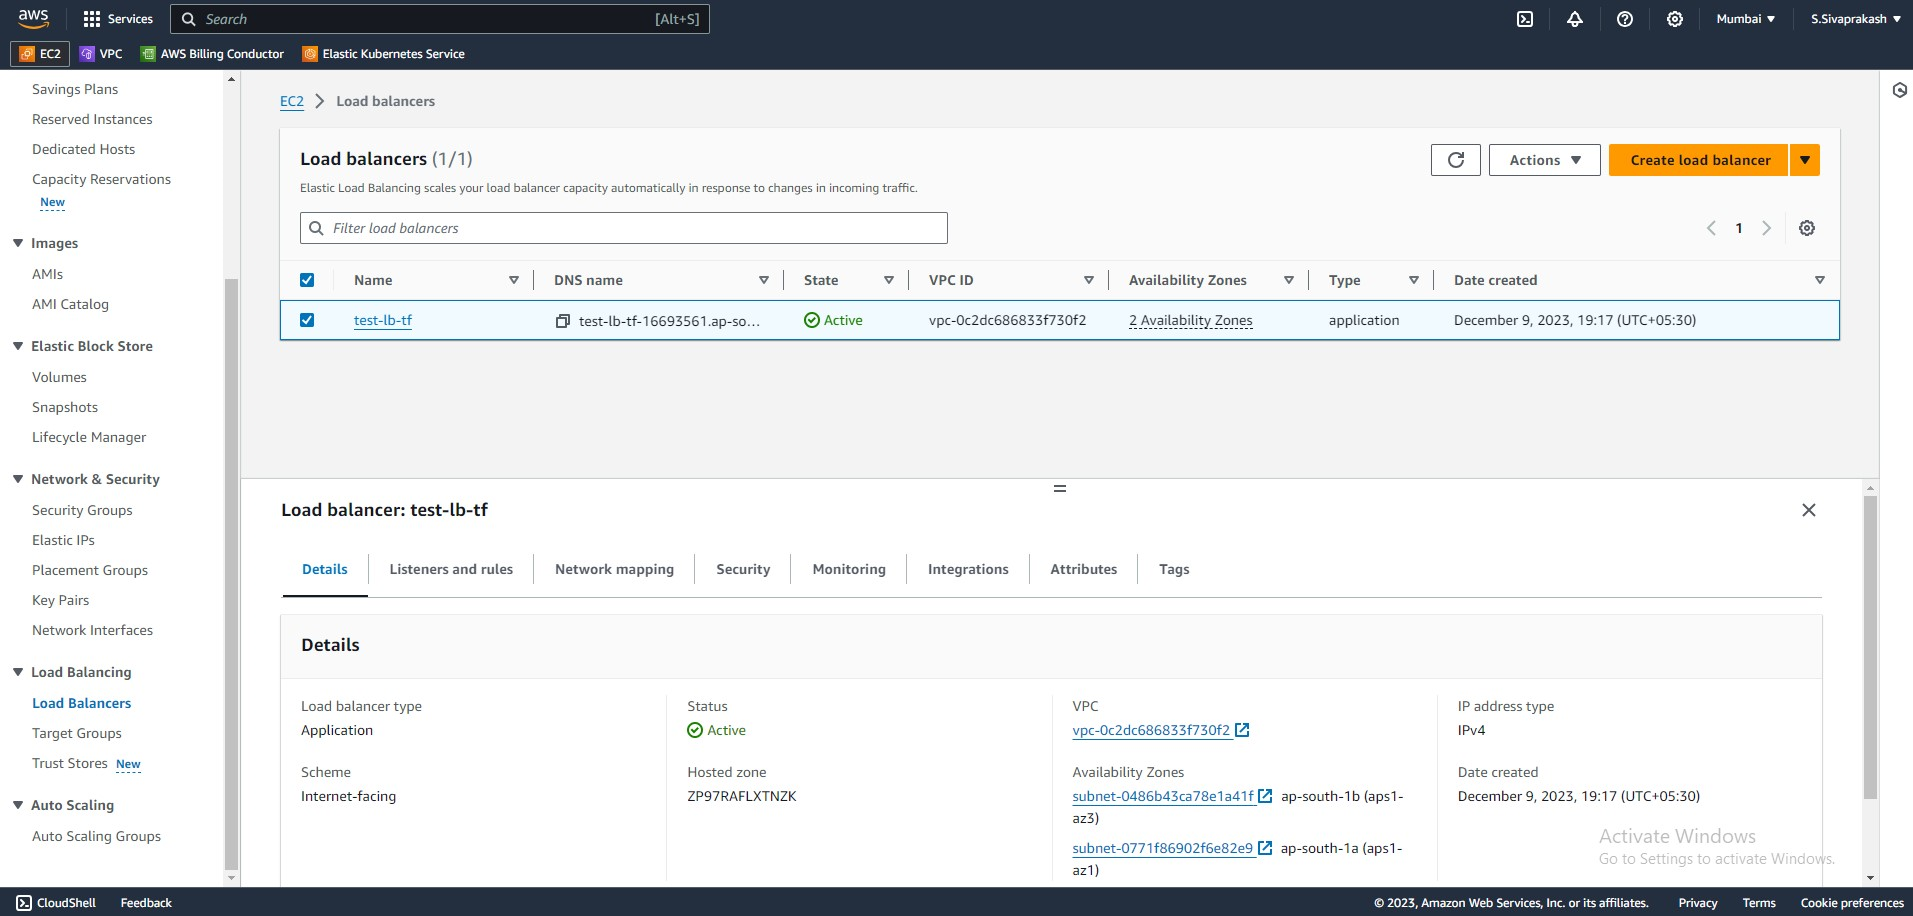
We will be provisioning a load balancer to distribute traffic between our instances in the different availability zones. When accessing our application, the users will hit IP address of the load balancer which will then direct the traffic to our EC2 instances.
Along with the load balancer itself, we also have:
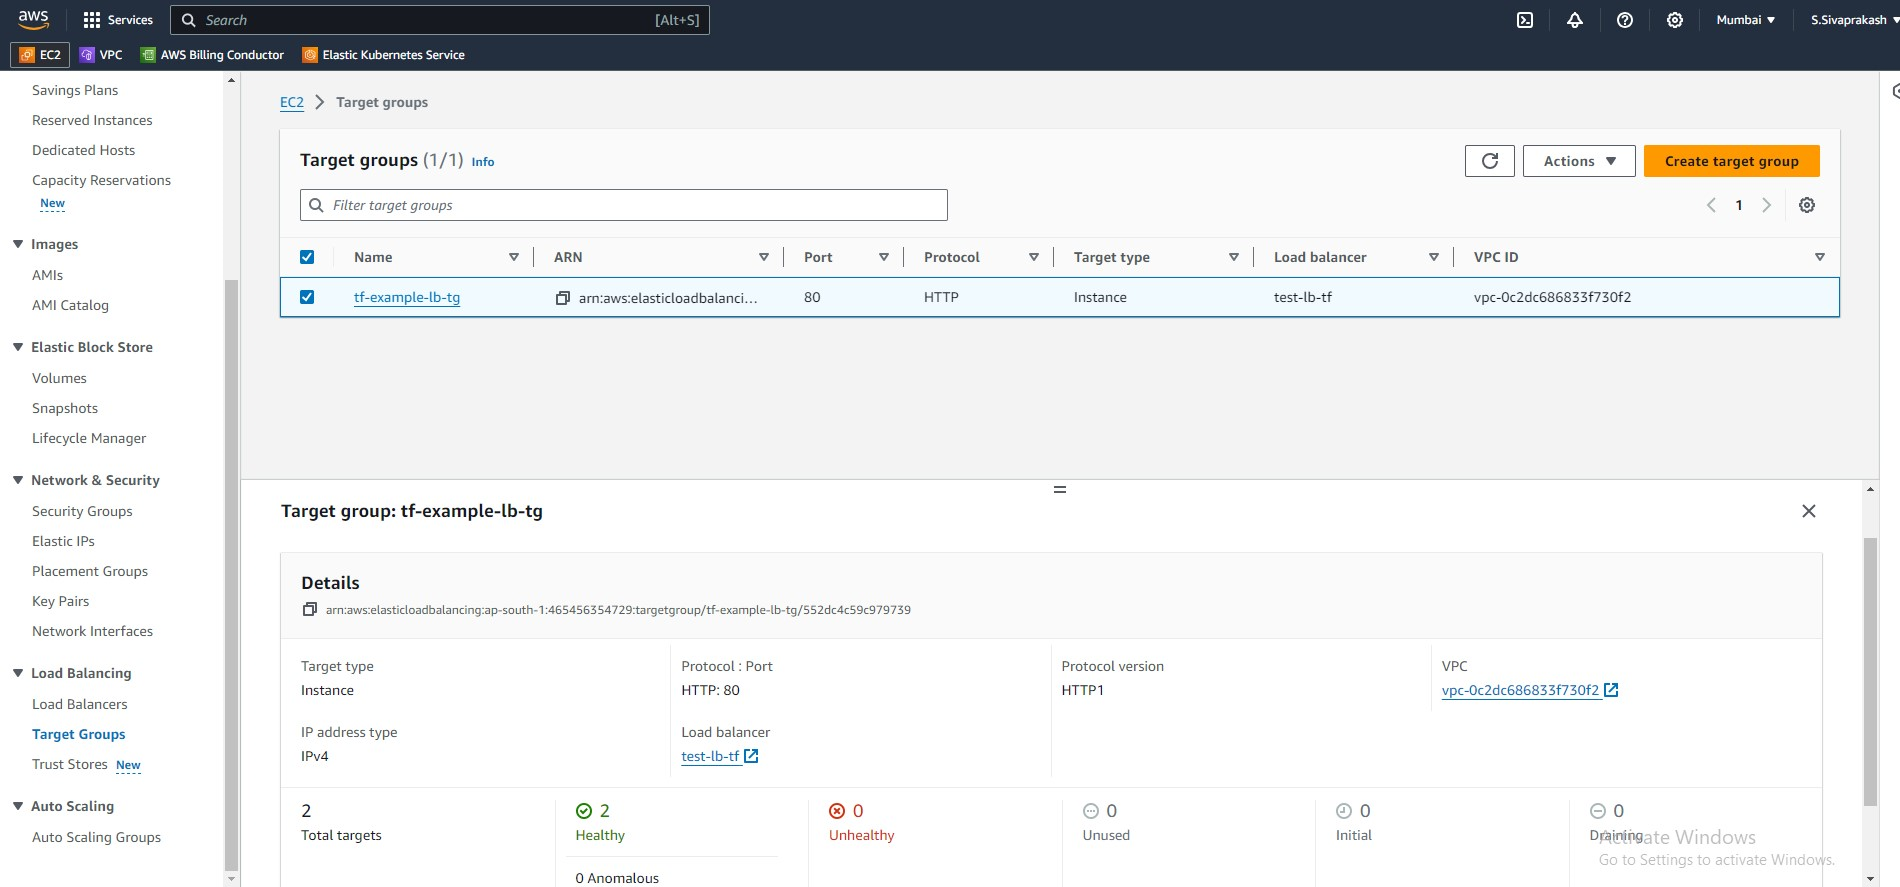
A target group, which we use to route requests to a registered target
A target group attachment which lets us attach our instances to the load balancer
A listener that checks for connection requests from the port and protocol that we specify
resource "aws_lb" "alb" {
  name               = "test-lb-tf"
  internal           = false
  load_balancer_type = "application"
  security_groups    = [aws_security_group.allow_tls.id]
  subnets            = [for subnet in aws_subnet.public : subnet.id]

  enable_deletion_protection = false

  tags = {
    Environment = "test"
  }
}

//Target Group
resource "aws_lb_target_group" "albtg" {
  name     = "tf-example-lb-tg"
  port     = 80
  protocol = "HTTP"
  target_type = "instance"
  vpc_id   = aws_vpc.main.id

  health_check {
    healthy_threshold   = 3
    unhealthy_threshold = 10
    timeout             = 5
    interval            = 10
    path                = "/"
    port                = 80
  }
}

resource "aws_lb_target_group_attachment" "front_end" {
  target_group_arn = aws_lb_target_group.albtg.arn
  target_id        = aws_instance.web[count.index].id
  port             = 80
  count = 2
}

//Listener
resource "aws_lb_listener" "albl" {
  load_balancer_arn = aws_lb.alb.arn
  port              = "80"
  protocol          = "HTTP"

  default_action {
    type             = "forward"
    target_group_arn = aws_lb_target_group.albtg.arn
  }
}
13 . Managing Terraform State with S3 and DynamoDB: A Secure and Scalable Approach
Storing your Terraform state file is crucial for managing your infrastructure effectively. While the default local storage option is convenient, it lacks scalability and security for collaborative environments. This is where the power of Amazon S3 and DynamoDB comes into play.
Why S3 and DynamoDB?
S3:
Durable storage: S3 offers high durability and redundancy, ensuring your state files are always available and protected against accidental deletion or hardware failures.
Versioning: S3 enables versioning of your state files, allowing you to roll back to previous states if needed.
Scalability: S3 scales seamlessly to accommodate any amount of state data you throw at it.
DynamoDB:
Locking mechanism: DynamoDB's atomic operations provide a robust locking mechanism, preventing concurrent modifications to your state file and avoiding conflicts during collaboration.
High availability: DynamoDB offers high availability across multiple regions, ensuring your state files are accessible even during outages.
Fast performance: DynamoDB delivers fast read and write speeds, optimizing your Terraform workflow.
Implementing S3 and DynamoDB Backend
Here's a breakdown of implementing the S3 and DynamoDB backend:
1. Create an S3 bucket:
Configure the bucket with appropriate access permissions.
Enable versioning for additional security and rollback capabilities.
2. Create a DynamoDB table:
Define a primary key for locking purposes (e.g., terraform_state).
Set the appropriate access permissions for Terraform to access the table.
3. Configure Terraform backend:
In your Terraform configuration, specify the backend block.
Provide the S3 bucket name and DynamoDB table name.
Define workspace configuration (optional).
terraform {
  required_providers {
    aws = {
      source = "hashicorp/aws"
      version = "4.20.1"
    }
  }
  backend "s3" {
    bucket = "terraform-statefile-management-bucket01"
    key = "backend.tfstate"
    region = "ap-south-1"
    encrypt = true
    dynamodb_table = "tf-backend"
  }
}
14. Routing Traffic with Ease: Creating Route 53 Records
In the vast landscape of cloud computing, Domain Name System (DNS) plays a crucial role in directing traffic to your web applications and services. AWS Route 53, a highly scalable and reliable DNS service, simplifies this process by offering robust features and intuitive management tools.
However, manually configuring DNS records can be cumbersome and error-prone, especially as your infrastructure grows. This is where the power of Infrastructure as Code (IaC) comes into play. By using Terraform, an open-source IaC tool, you can automate the creation and management of your Route 53 records, ensuring consistency and reducing the risk of errors.
resource "aws_route53_record" "cname_record" {
  zone_id = "Z048191423B1RB1MAJP3Z"
  name    = "web-app"  # Replace with your desired subdomain
  type    = "CNAME"
  ttl     = "120"
  records = [aws_lb.alb.dns_name]
}
15. Jenkins File
pipeline {
    agent any

    environment {
        AWS_ACCESS_KEY_ID     = credentials('aws_access_key_id')
        AWS_SECRET_ACCESS_KEY = credentials('aws_secret_access_key')
        AWS_DEFAULT_REGION    = 'ap-south-1'
        AWS_DEFAULT_OUTPUT    = 'json'
    }


    stages {
        stage('Configure AWS') {
            steps {
                // Use the environment variables to configure AWS
                sh "aws configure set aws_access_key_id ${AWS_ACCESS_KEY_ID}"
                sh "aws configure set aws_secret_access_key ${AWS_SECRET_ACCESS_KEY}"
                sh "aws configure set default.region ${AWS_DEFAULT_REGION}"
                sh "aws configure set default.output ${AWS_DEFAULT_OUTPUT}"
            }
        }

        stage('Checkout Code') {
            steps {
                // Checkout your Terraform configuration files from version control
                git branch: 'main', url: 'https://github.com/Sivaprakash-pk/AWS-3-Tier-Architecture-and-Web-application-Deploying-via-Terraform.git'
            }
        }

        stage('Terraform Init') {
            steps {
                // Initialize the Terraform working directory
                sh 'terraform init'
            }
        }


        stage('Terraform Plan') {
            steps {
                // Generate and show an execution plan
                sh 'terraform plan'
            }
        }

        stage('Terraform Action') {
            steps {
                script {
                    // Apply or destroy based on user choice
                    if (params.ACTION == 'apply') {
                        sh 'terraform apply -auto-approve'
                    } else if (params.ACTION == 'destroy') {
                        sh 'terraform destroy -auto-approve'
                    }
                }
            }
        }
    }

    post {
        success {
            // This block will run if the pipeline is successful
            echo 'Pipeline succeeded!'
        }
        failure {
            // This block will run if the pipeline fails
            echo 'Pipeline failed!'
        }
    }
}
16. Testing
Once the services have been created, take the DNS name of our Route 53 record. We will copy and paste this into our browser to make sure that we can access the site.
17. Clean Up
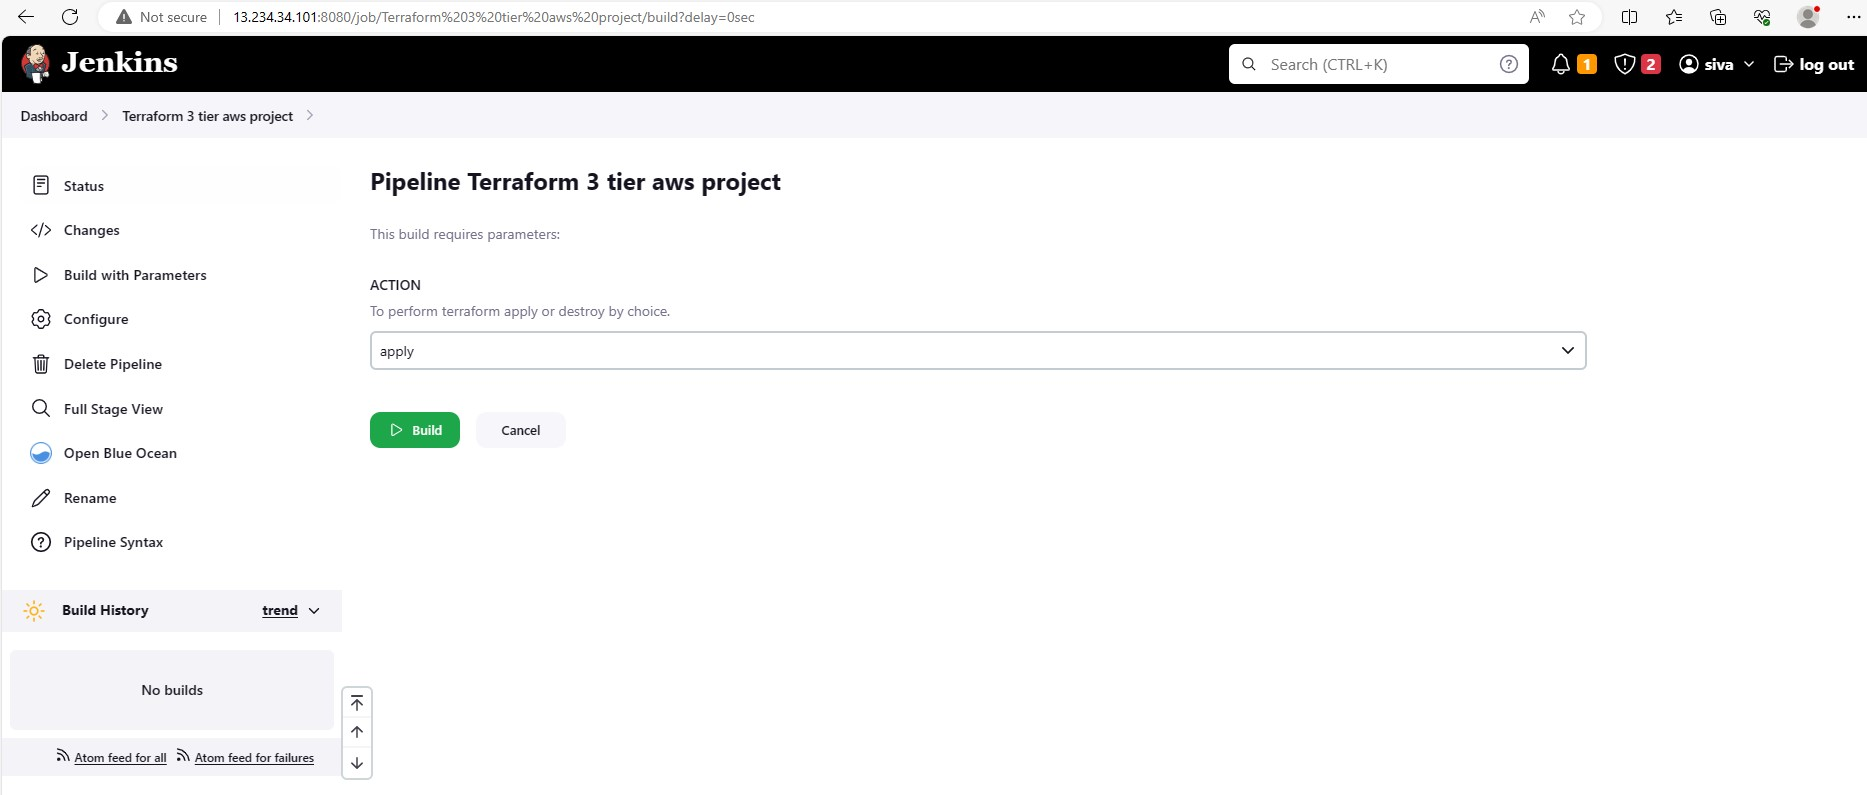
Whenever we are finished with this project it is important to delete our infrastructure so that we don't continue to get charged. To do so we issue the Terraform destroy command which will delete everything we have created via running the Jenkins pipeline job by choosing ‘destroy’ in the choice parameter.
Final Thoughts
When I first started using AWS I wondered why people would use the CLI or an IaC tool when creating their architecture instead of the GUI. For a beginner, the GUI just seems so much easier to use, but after playing around with Terraform I can see why this is the preferred way.
It is much easier and quicker to create services this way, and as an added benefit you have the code that you can reuse for other projects which saves a lot of time, and while Terraform code may look daunting for someone new to the tool, it is easy to understand. Also, the documentation on the Terraform website is amazing and makes using the tool so much easier.
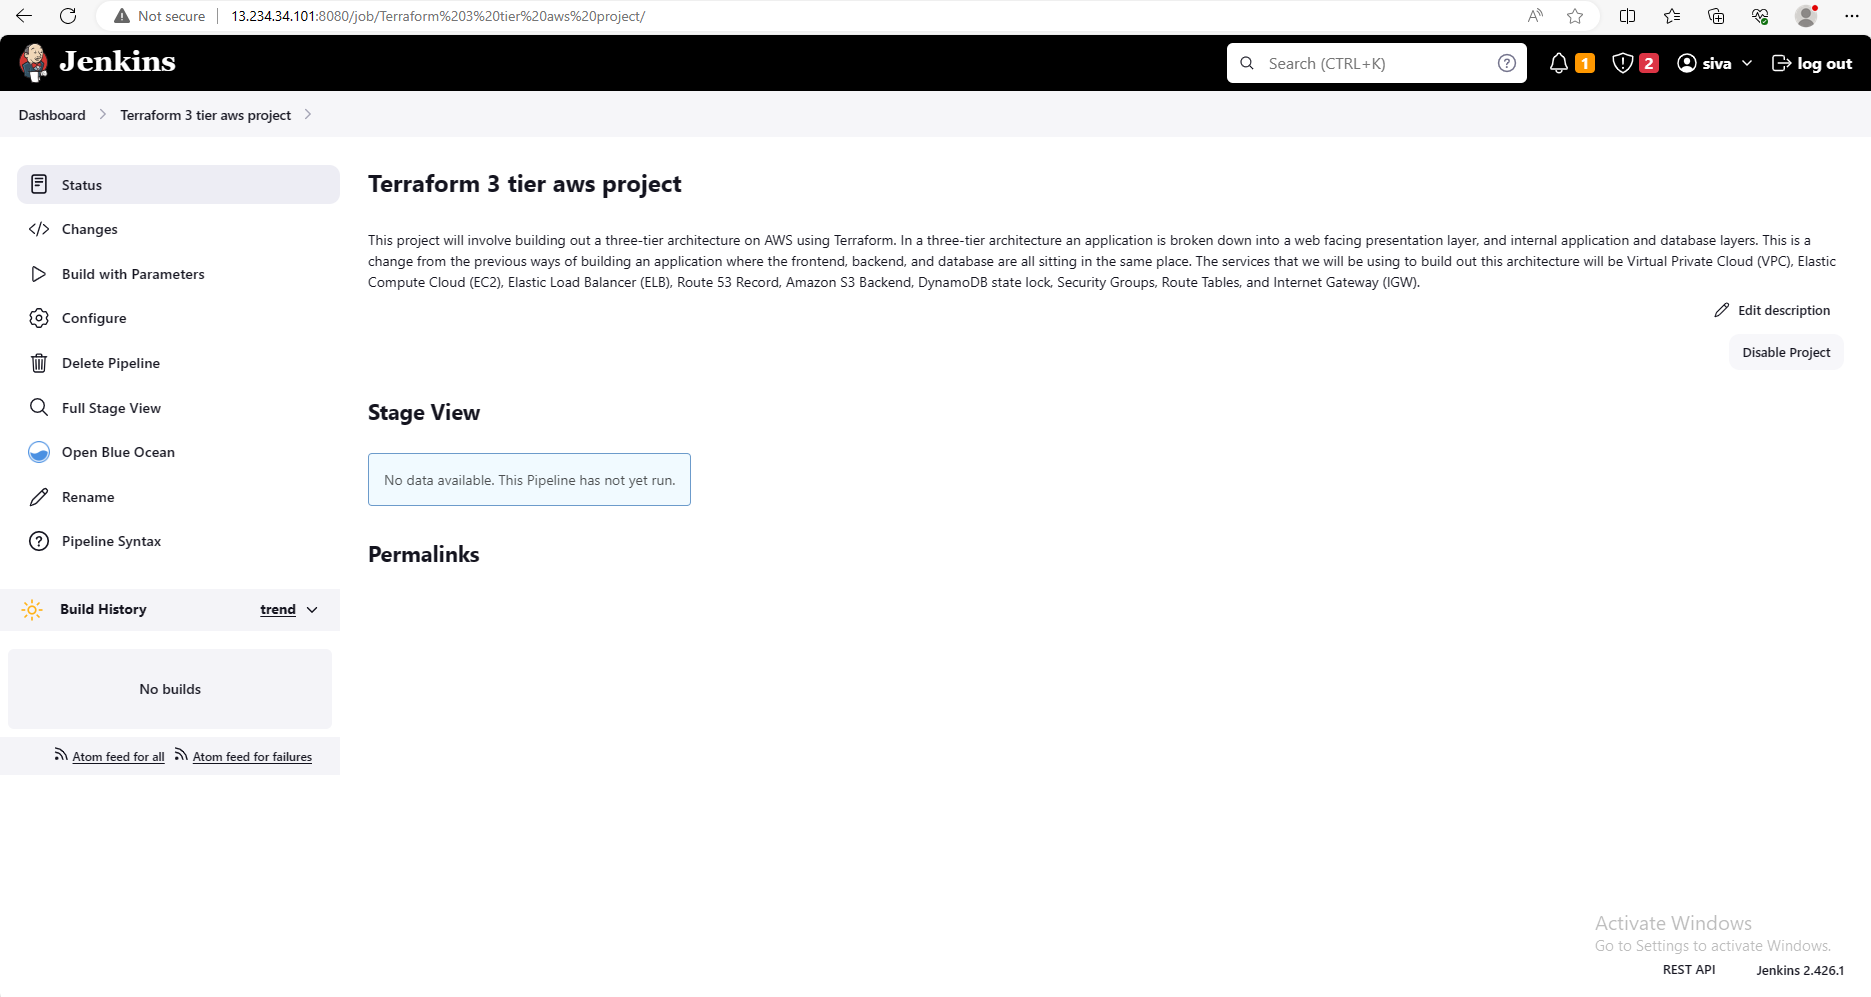
Output Screenshots
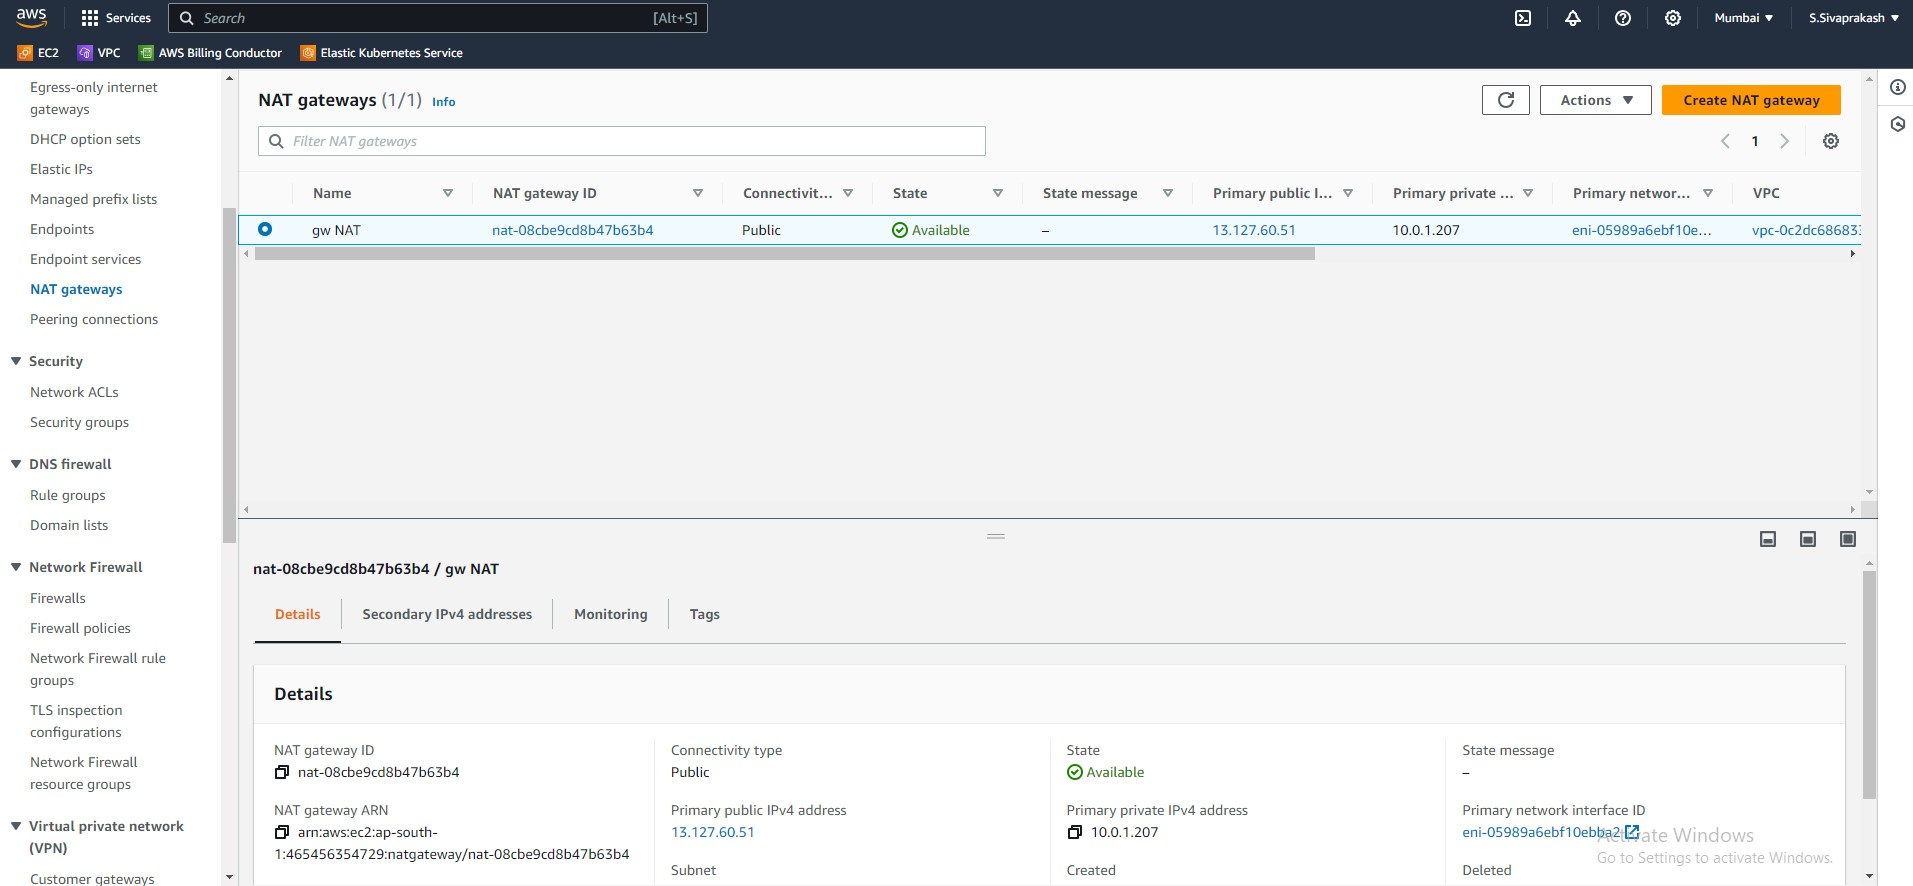
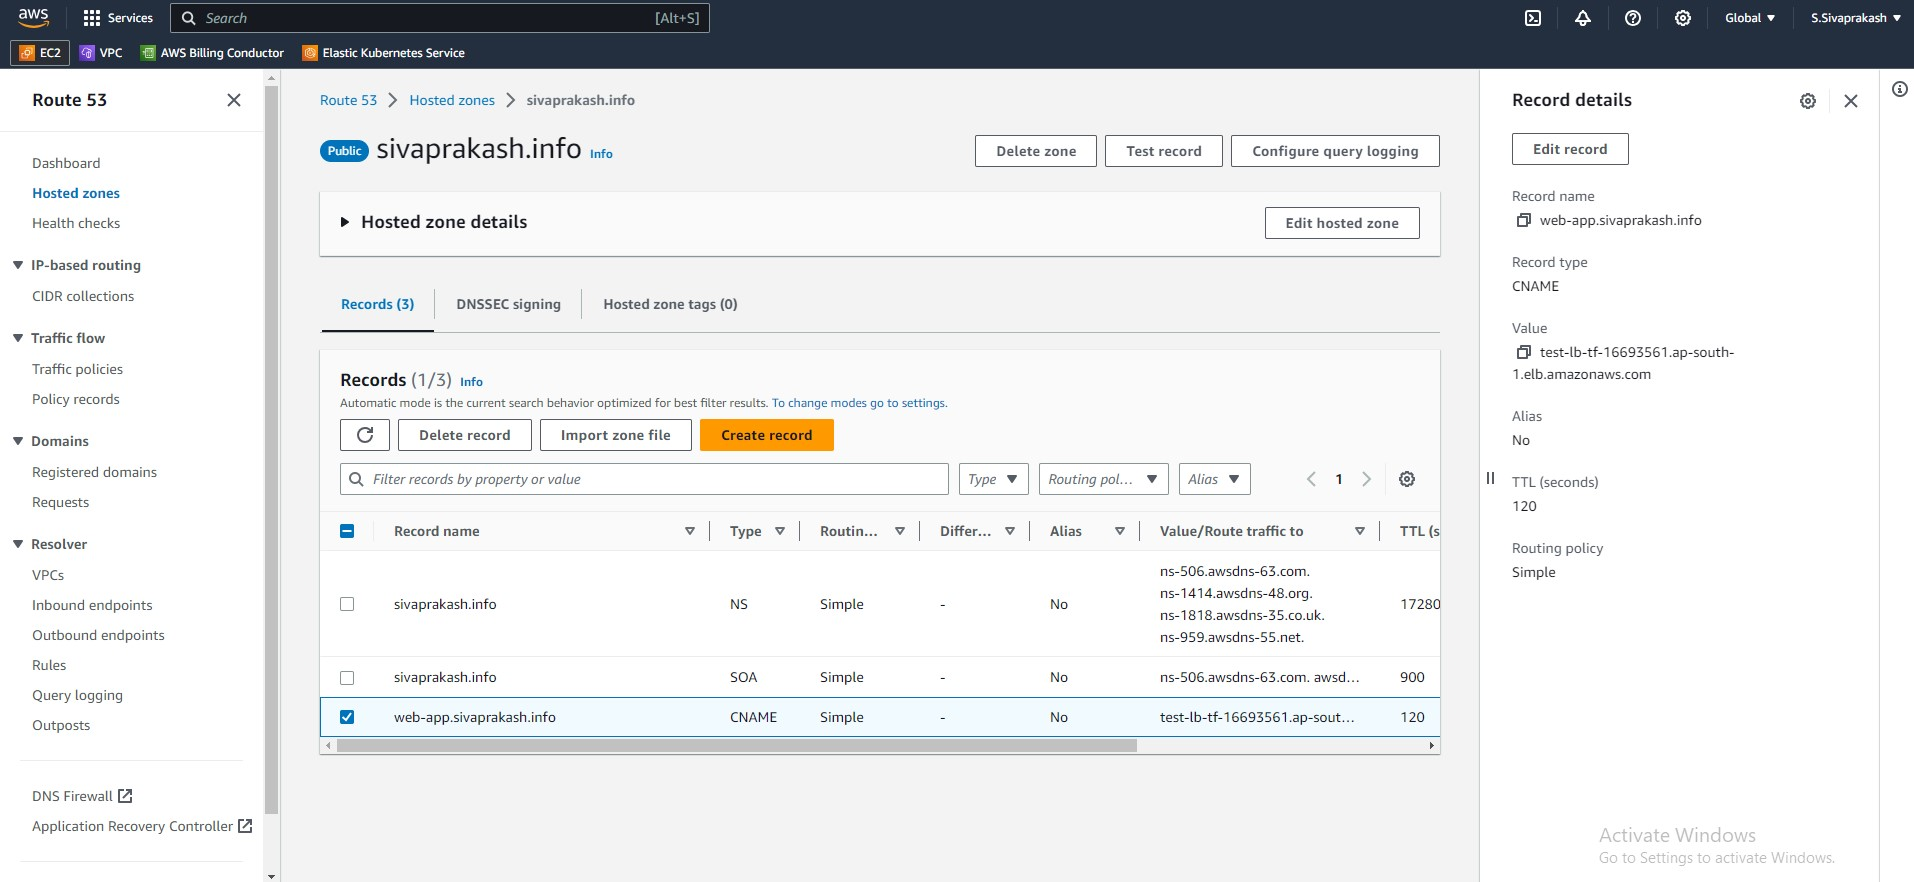
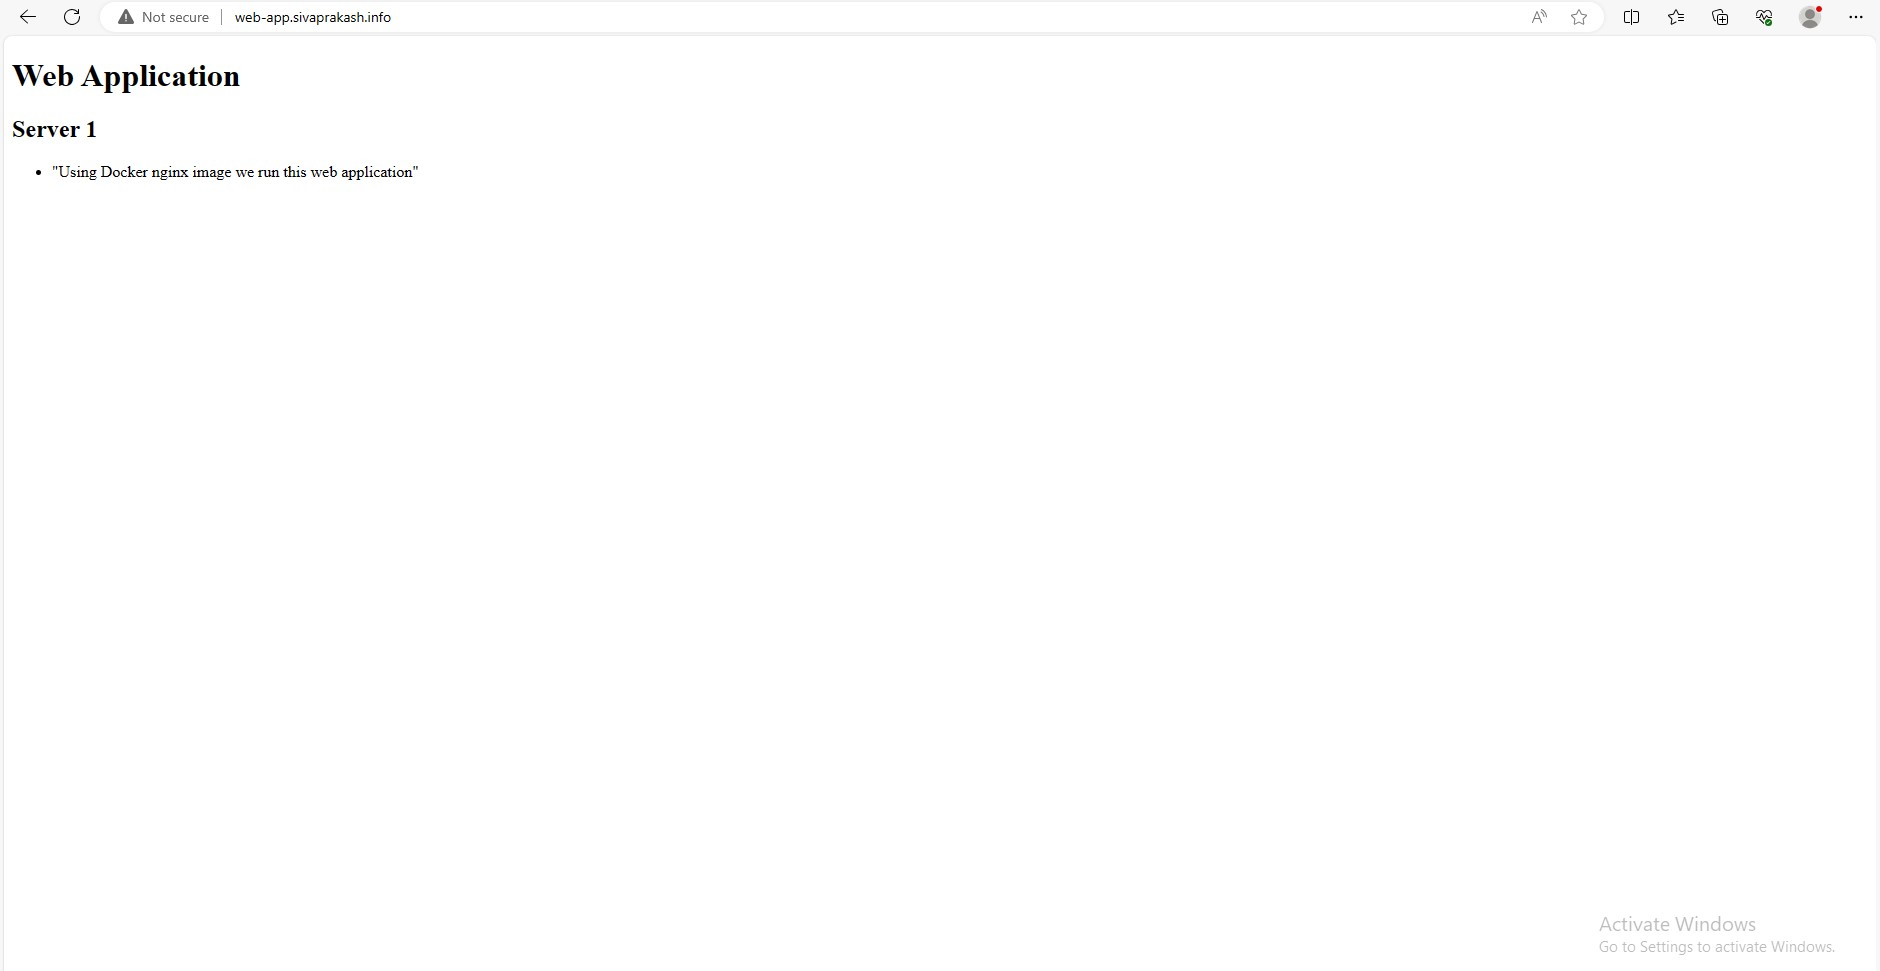
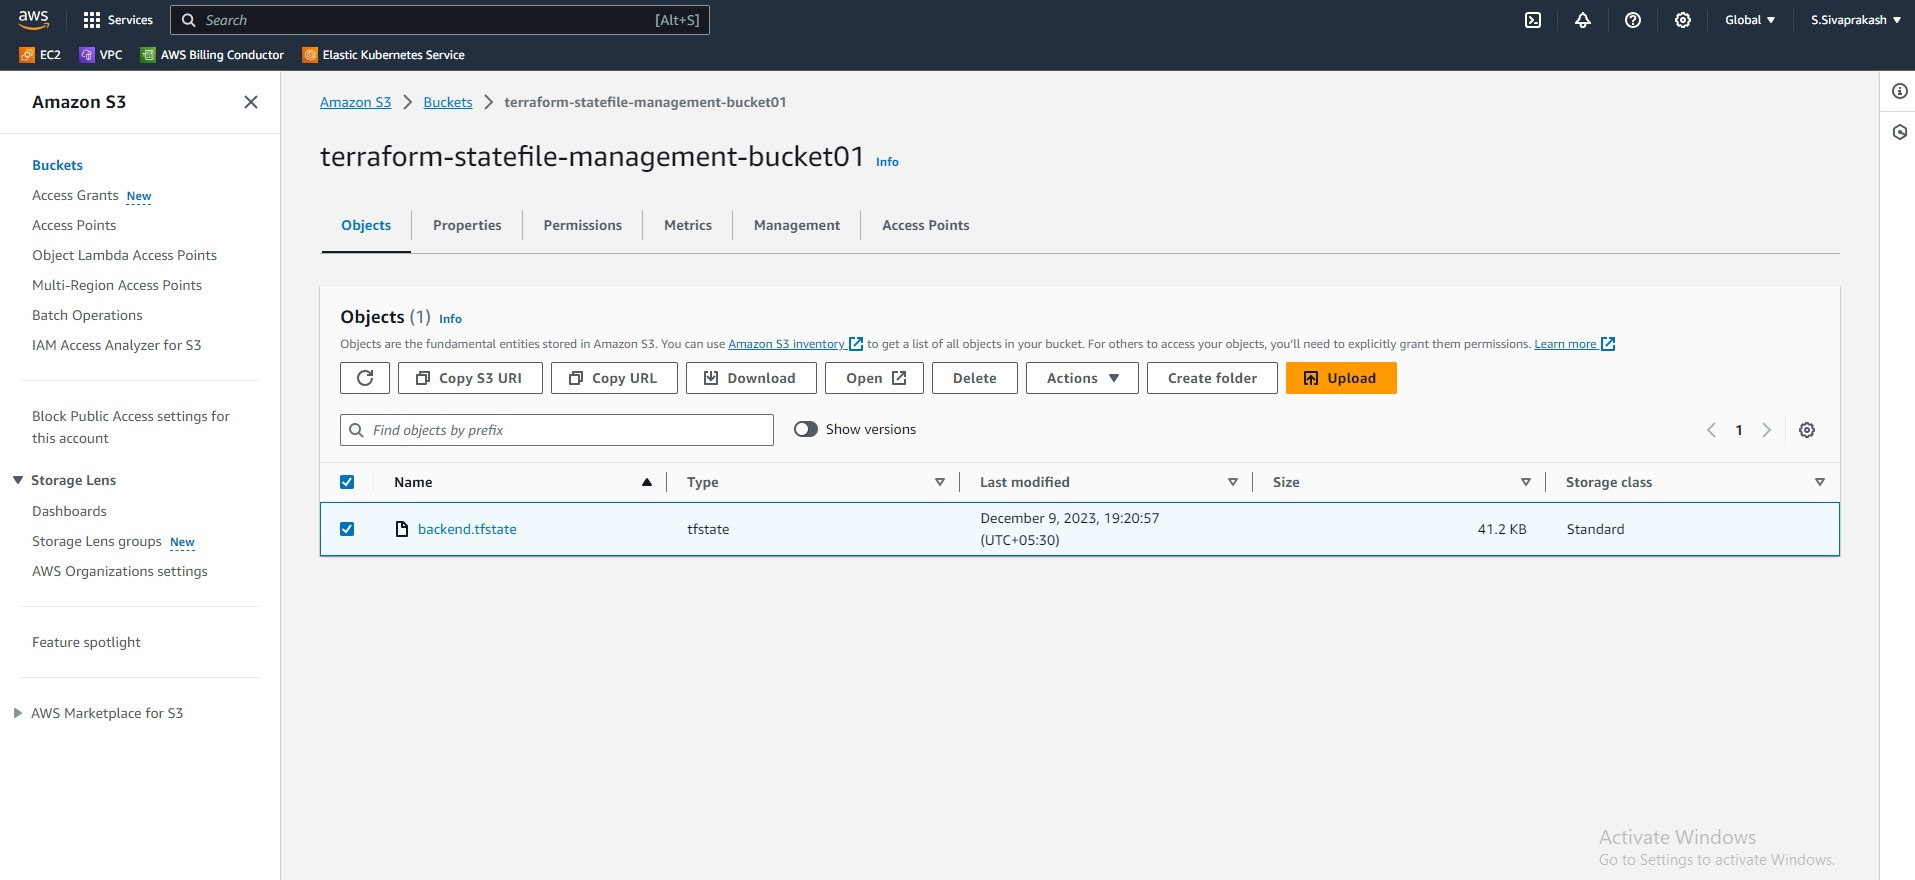
Subscribe to my newsletter
Read articles from SIVAPRAKASH S directly inside your inbox. Subscribe to the newsletter, and don't miss out.
Written by

SIVAPRAKASH S
SIVAPRAKASH S
Highly motivated and talented aspiring DevOps Engineer with a strong educational background and 4 years of experience in technical and infrastructure support. Skilled in troubleshooting complex technical issues and providing efficient solutions to enhance system performance and user satisfaction. With a passion for continuous improvement, I'm dedicated to implementing DevOps best practices to optimize scalability, stability, and security in software systems. Seeking an opportunity to leverage my knowledge, experience, and problem-solving skills to drive innovation in the field of DevOps engineering.