🚀🔧 Building a 10-Tier Application Deployment Framework on EKS! 🌟
 Mudit Mathur
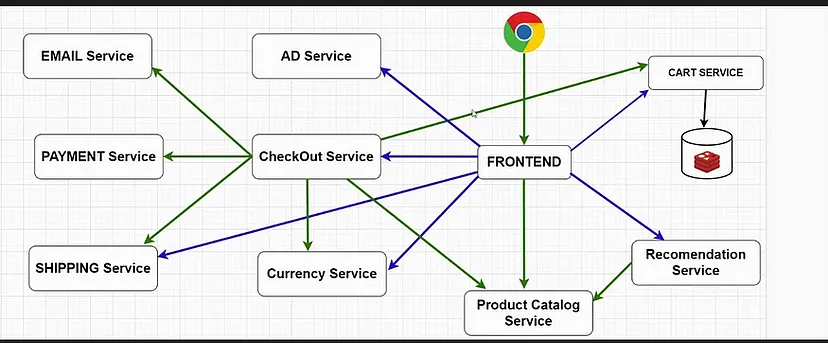
In the realm of cloud computing, successfully deploying a complex application stands as a paramount challenge. Amazon Web Services (AWS) presents Elastic Kubernetes Service (EKS), a fully managed Kubernetes platform simplifying the deployment, management, and scaling of containerized applications. In this comprehensive guide, we embark on a detailed exploration into orchestrating a sophisticated 10-tier application on AWS EKS.
This breakdown delves into each tier’s intricacies, highlighting the precise role and integration of AWS services within the architecture. From the frontend presentation to the core infrastructure management, we dissect the functionalities, optimal strategies, and the specific AWS tools employed at each tier.
Designing and deploying such an intricate architecture demands meticulous planning and utilization of appropriate services. Our exploration aims to provide clarity and guidance for navigating the complexities of deploying a multi-tiered application efficiently on AWS EKS.
Designing the 10-Tier Application on AWS EKS
1. Presentation Tier 🖥️
Function: Host the frontend application.
AWS Service: Utilize AWS Elastic Load Balancer (ELB) for efficient traffic distribution.
2. Web Server Tier 🌐
Function: Deploy web servers using Kubernetes-managed containers.
Implementation: Leverage Kubernetes Services for load balancing within the web server tier.
3. Application Tier 🚀
Function: Execute application logic within containers using Kubernetes Deployments.
Optimization: Implement auto-scaling to ensure optimal performance based on demand.
4. API Gateway Tier 🚪
Function: Create, publish, and manage APIs securely.
AWS Service: Use Amazon API Gateway with authentication and throttling controls.
5. Business Logic Tier 💼
Function: Containerize business logic components.
Strategy: Deploy using Kubernetes; consider AWS Lambda for specific serverless functions.
6. Message Queue Tier 📬
Function: Enable asynchronous communication between components.
Service: Implement message queues like Amazon SQS for reliability and scalability.
7. Data Access Tier 📊
Function: Manage data storage and retrieval.
Options: Use Amazon RDS or DynamoDB; implement read replicas for scalability and fault tolerance.
8. Caching Tier 🚀
Function: Enhance application performance via in-memory caching.
Service: Leverage Amazon ElastiCache; configure caching strategies as per application needs.
9. Storage Tier 🗄️
Function: Store objects securely and efficiently.
Service: Utilize Amazon S3 with data lifecycle policies for effective data management.
10. Infrastructure Tier 🌐
Function: Efficiently manage and orchestrate containers.
Tools: Leverage Amazon EKS for container orchestration; ensure secure access control using AWS IAM.
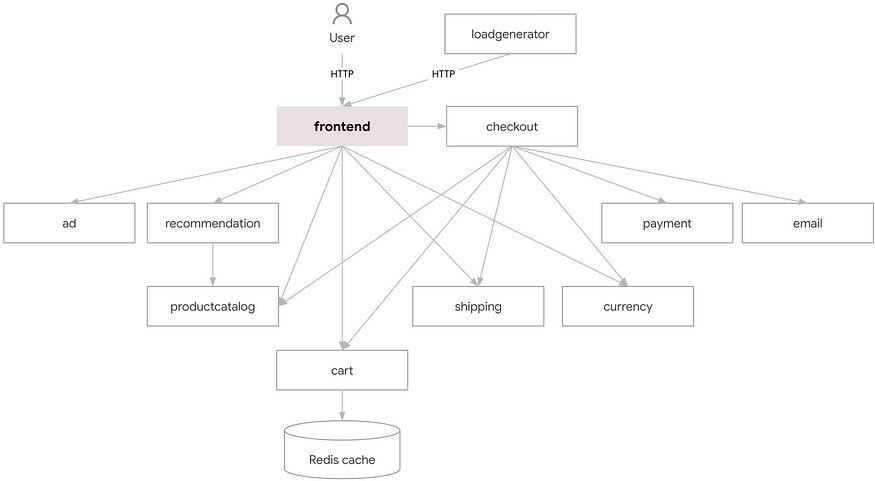
Step-by-Step Implementation :-
- Create an AWS EC2 instance

2. Create a user and give the following permissions :-
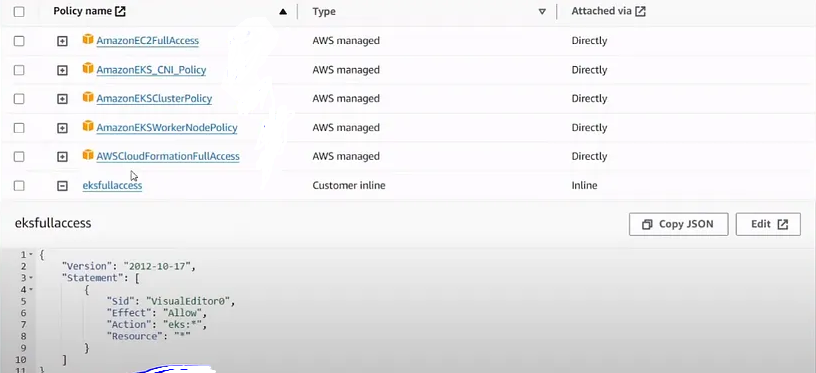
Connect with the EC2 instance you can use ssh or Putty or mobaXterm.
3. After connect install aws ctl on your server to give your credentials
https://docs.aws.amazon.com/cli/latest/userguide/getting-started-install.html
4. After connecting install Jenkins on your server
https://www.jenkins.io/doc/book/installing/linux/#debianubuntu
5. Now install kubctl on the linux
https://kubernetes.io/docs/tasks/tools/install-kubectl-linux/#install-kubectl-binary-with-curl-on-linux
6. Install eksctl
https://docs.aws.amazon.com/emr/latest/EMR-on-EKS-DevelopmentGuide/setting-up-eksctl.html
7. Install docker and give permission
sudo apt-get install docker.io
sudo usermod -aG docker ubuntu
sudo newgrp docker
8. Install sonarqube from docker image
docker run -d -p 9000:9000 sonarqube:lts-community
9. Install EKS
eksctl create cluster --name=my-eks2 \
        --region=ap-south-1 \
        --zones=ap-south-1a,ap-south-1b \
        --without-nodegroup
// after the above setup complete run this
eksctl utils associate-iam-oidc-provider \
 --region ap-south-1 \
 --cluster my-eks2 \
 --approve
eksctl create nodegroup --cluster=my-eks2 \
   --region=ap-south-1 \
   --name=node2 \
   --node-type=t3.medium \
   --nodes=3 \
   --nodes-min=2 \
   --nodes-max=3 \
   --node-volume-size=20 \
   --ssh-public-key=10-tier-key \
   --managed \
   --asg-access \
   --external-dns-access \
   --full-ecr-access \
   --appmesh-access \
   --alb-ingress-access
Installing some pugins in Jenkins as,
sonarqube scanner
docker
docker pipeline
docker common
cloud base docker build and publish
kubernetes
kubernetes cli
Configure Sonar Server in Manage Jenkins
Grab the Public IP Address of your EC2 Instance, Sonarqube works on Port 9000 , sp <Public IP>:9000. Goto your Sonarqube Server. Click on Administration → Security → Users → Click on Tokens and Update Token → Give it a name → and click on Generate Token
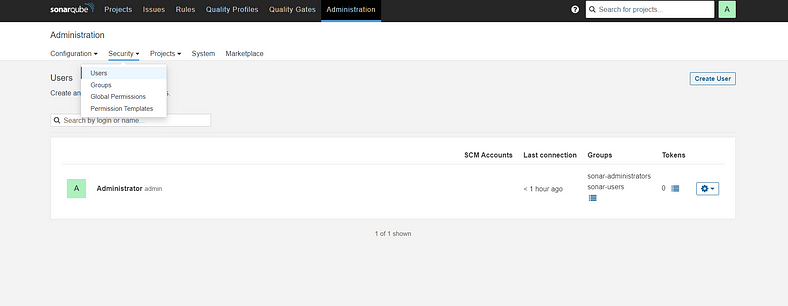
Click on Update Token
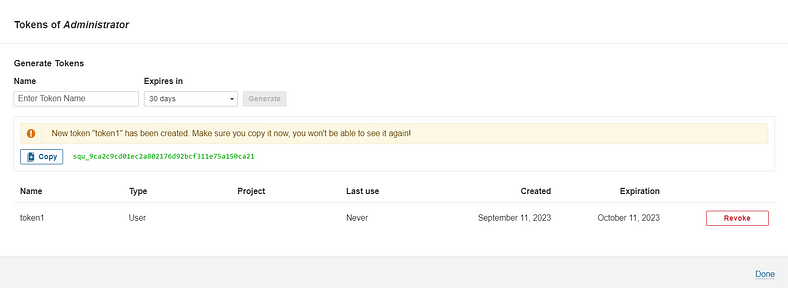
Copy this Token
Goto Dashboard → Manage Jenkins → Credentials → Add Secret Text. It should look like this

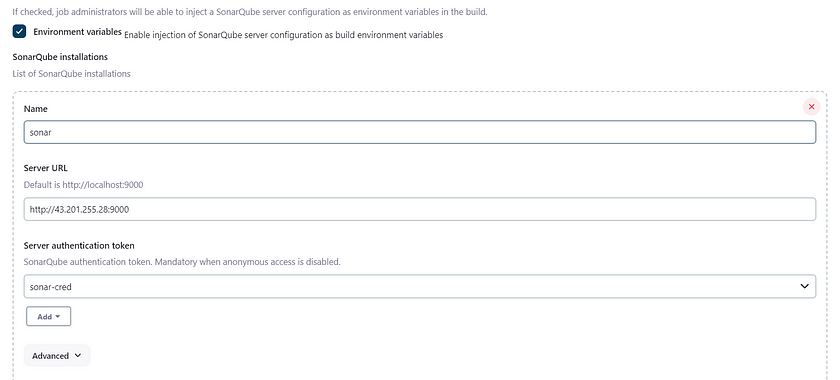
Now, goto Dashboard → Manage Jenkins → Configure System
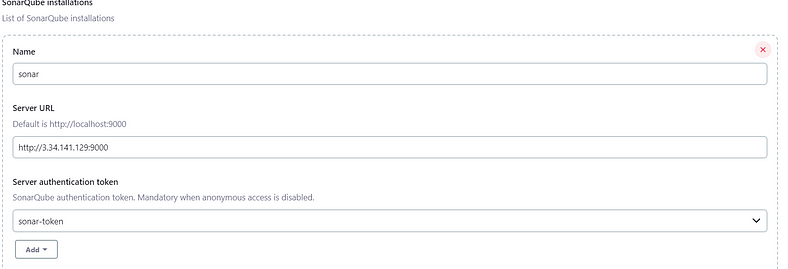
Click on Apply and Save
Configure System option is used in Jenkins to configure different server
Global Tool Configuration is used to configure different tools that we install using Plugins
We will install sonar-scanner in tools.
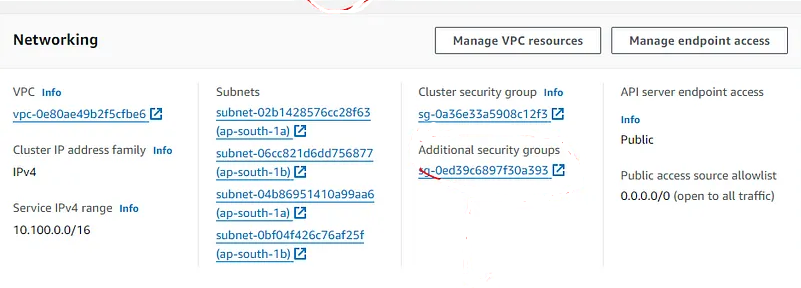
11. Go to EKS service and add all traffic to its SG
12. Create a Service Account and role and Assign that role create a secret service account, and generate a token
Creating Service Account
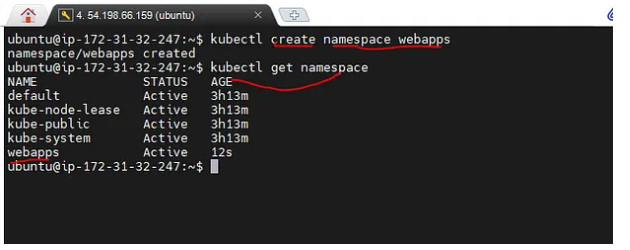
1 create namespace:-
2. Create sa.yml file and add the follow code
apiVersion: v1
kind: ServiceAccount
metadata:
  name: jenkins
  namespace: webapps
kubectl apply -f sa.yaml
3. Now we need to create role
---
apiVersion: rbac.authorization.k8s.io/v1
kind: Role
metadata:
 name: app-role
 namespace: webapps
rules:
 - apiGroups:
 - ""
 - apps
 - autoscaling
 - batch
 - extensions
 - policy
 - rbac.authorization.k8s.io
 resources:
 - pods
 - configmaps
 - deployments
 - daemonsets
 - componentstatuses
 - events
 - endpoints
 - horizontalpodautoscalers
 - ingress
 - jobs
 - limitranges
 - namespaces
 - nodes
 - pods
 - persistentvolumes
 - persistentvolumeclaims
 - resourcequotas
 - replicasets
 - replicationcontrollers
 - serviceaccounts
 - services
 verbs:
 - get
 - list
 - watch
 - create
 - update
 - patch
 - delete
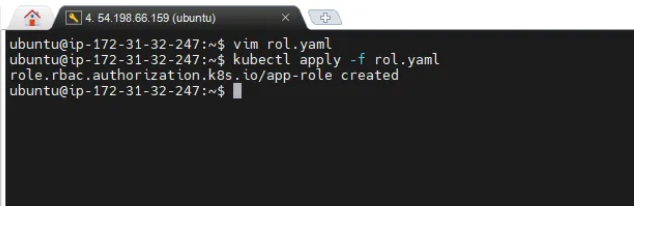
4. now assigning the role to the service account
apiVersion: rbac.authorization.k8s.io/v1
kind: RoleBinding
metadata:
  name: app-rolebinding
  namespace: webapps
roleRef:
  apiGroup: rbac.authorization.k8s.io
  kind: Role
  name: app-role
subjects:
  - namespace: webapps
    kind: ServiceAccount
    name: jenkins

5. now creating a token for service account
apiVersion: v1
kind: Secret
type: kubernetes.io/service-account-token
metadata:
  name: mysecretname
  annotations:
    kubernetes.io/service-account.name: jenkins

Go to Jenkins and add a pipeline
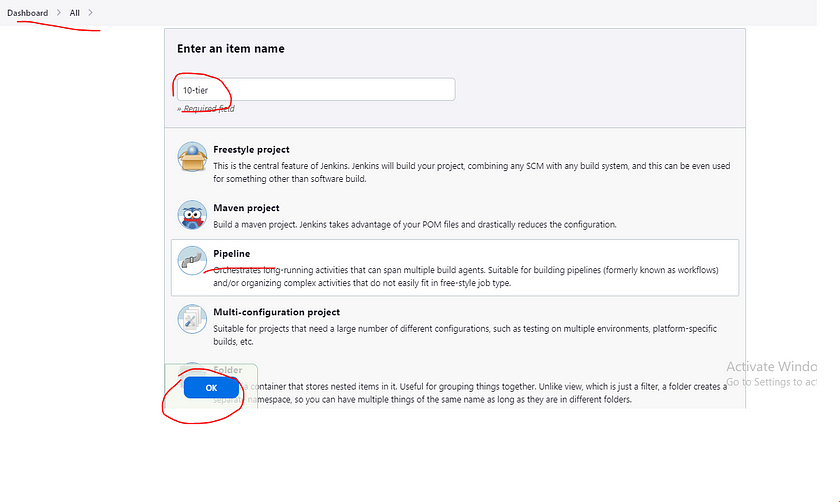
Lets goto our Pipeline and add below Script.
pipeline {
    agent any
    environment {
        SCANNER_HOME = tool 'sonar-scanner'
    }
    stages {
        stage('git checkout') {
            steps {
                git branch: 'latest', url: 'https://github.com/mudit097/10-Tier-MicroService-Appliction.git'
            }
        }
        stage('SonarQube') {
            steps {
                withSonarQubeEnv('sonar') {
                    sh '''$SCANNER_HOME/bin/sonar-scanner -Dsonar.projectKey=10-Tier -Dsonar.ProjectName=10-Tier -Dsonar.java.binaries=.'''
                }
            }
        }

        def buildAndPush = { serviceName ->
            script {
                withDockerRegistry(credentialsId: 'docker-cred', toolName: 'docker') {
                    dir("/var/lib/jenkins/workspace/10-Tier/src/${serviceName}") {
                        sh "docker build -t mudit097/${serviceName}:latest ."
                        sh "docker push mudit097/${serviceName}:latest"
                        sh "docker rmi mudit097/${serviceName}:latest"
                    }
                }
            }
        }

        stage('adservice') { buildAndPush('adservice') }
        stage('cartservice') { buildAndPush('cartservice/src/') }
        stage('checkoutservice') { buildAndPush('checkoutservice') }
        stage('currencyservice') { buildAndPush('currencyservice') }
        stage('emailservice') { buildAndPush('emailservice') }
        stage('frontend') { buildAndPush('frontend') }
        stage('loadgenerator') { buildAndPush('loadgenerator') }
        stage('paymentservice') { buildAndPush('paymentservice') }
        stage('productcatalogservice') { buildAndPush('productcatalogservice') }
        stage('recommendationservice') { buildAndPush('recommendationservice') }
        stage('shippingservice') { buildAndPush('shippingservice') }

        stage('K8-Deploy') {
            steps {
                withKubeConfig(caCertificate: '', clusterName: 'my-eks2', contextName: '',
                        credentialsId: 'k8-token', namespace: 'webapps', restrictKubeConfigAccess: false,
                        serverUrl: 'https://EBCE08CF45C3AA5A574E126370E5D4FC.gr7.ap-south-1.eks.amazonaws.com') {
                    sh 'kubectl apply -f deployment-service.yml'
                    sh 'kubectl get pods'
                    sh 'kubectl get svc'
                }
            }
        }
    }
}
How to get the key
kubectl -n examplens describe secret mysecretname
Now run the pipeline
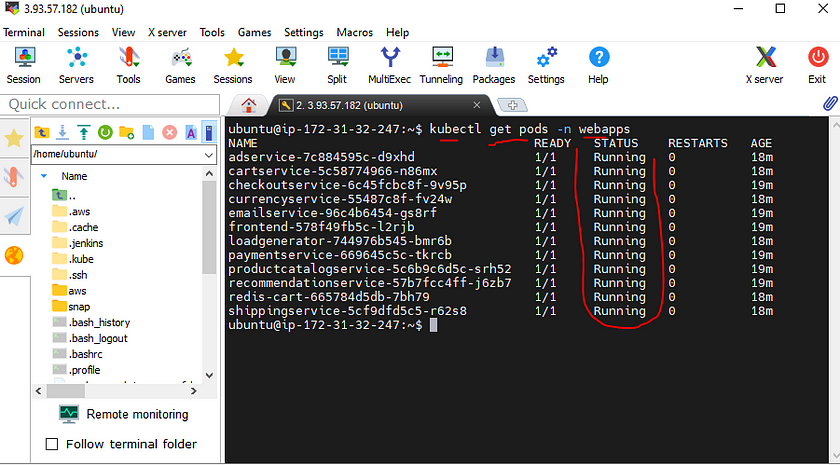
After that we run that command
kubectl get pods -n webapps


Terminate the AWS EC2 Instance
Lastly, do not forget to terminate the AWS EC2 Instance.
If this post was helpful, please do follow and click the like 👍 button below to show your support.
Follow me on Linked-in and Github for further updates-
Subscribe to my newsletter
Read articles from Mudit Mathur directly inside your inbox. Subscribe to the newsletter, and don't miss out.
Written by

Mudit Mathur
Mudit Mathur
Mudit Mathur is an experienced DevOps Engineer with expertise in AWS, CI/CD, and automation. He delivers tangible results by streamlining processes and fostering collaboration. Reach out to him at linkedin.com/in/mudit-mathur-535786146 or muditmathur121@gmail.com for efficient DevOps solutions.