Mastering ConfigMaps and Secrets in Kubernetes🔒🔑🛡️
 Unnati Gupta
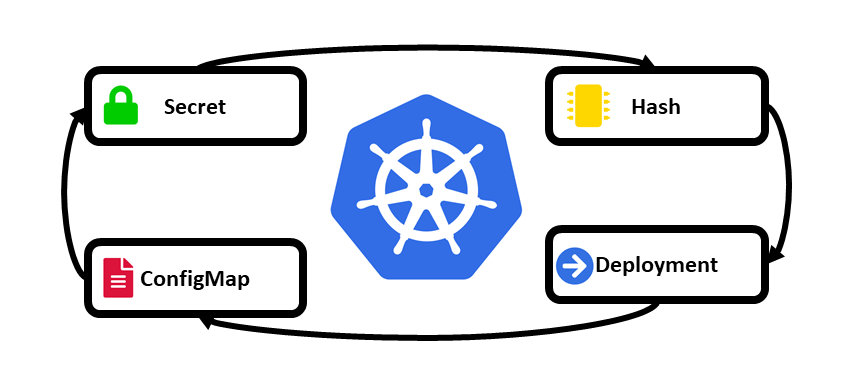
ConfigMaps in Kubernetes:
In Kubernetes, Configmaps stores the configuration file, and non-secret or non-sensitive data required to deploy or run our application.
Why we use Configmap in Kubernetes:
When deploying our application into different environments. Some of the configuration is changed according to the environment like dev, QA, stage, and production environment if we hardcoded that configuration with our code. so according to the environment required to change and create a new image and then deploy our application. It is a lengthy process. Instead of that what if we make a configuration file according to the environment and decouple it with the application when the application is successful in deploying on the environment like Dev, QA, Stage & Production?
This is the scenario where configmap comes into the picture in Kubernetes.
Note: In configmap, can't store large chunks of data. The data stored in configmap is more than 1MiB. if you need to store more than this limit, you can mount as volume or use a separate database or file service.
Define Configmap in Deployment or Pods:
In Deployment configmap is defined in two ways:
a) By using the env variable
b) By using the volume mount
In the case of the env variable, It goes inside the configuration file and reads the data from it.
In the case of volume mount, it copies the whole file inside the pod instead of reading data from the file.
Note: In other objects of Kubernetes, when using the yaml file "spec" section is present but in the case of configmap data( UTF-8 strings) and binary data (base64-encoded strings), the option is present.
Commands for Configmap in Kubernetes:
a) List Configmap:
kubectl get configmap
kubectl get cm
b) Create Configmap from the file:
kubectl create configmap <configmap-name> --from-file=<path-to-file>
c) Create Configmap from literals:
kubectl create configmap <configmap-name> --from-literals=<key1=value1,key2=value2>
d) Create Configmap from the directory:
kubectl create configmap <configmap-name> --from-file=<path-to-dirctory>
e) Edit Configmap:
kubectl edit configamp <configmap-name>
f) View the data stored in Configmap:
kubectl get configmap <configmap-name> -o yaml
g) Delete a Configmap:
kubectl delete configmap <configmap-name>
❄Tasks:
Task 1:
Create a ConfigMap for your Deployment. Create a ConfigMap for your Deployment using a file or the command line. Update the deployment.yml file to include the ConfigMap. Apply the updated deployment using the command: kubectl apply -f deployment.yml -n <namespace-name>.Verify that the ConfigMap has been created by checking the status of the ConfigMaps in your Namespace.
Perform this task by using two ways:
a) By using the Volume Mount Concept:
Step 1: Create a config.yaml and put some configuration. By using the configuration file create one configmap.

Step 2: Verify that the configmap was created successfully.

Step 3: Create deployment.yaml file and also use that configmap by using volume mount.
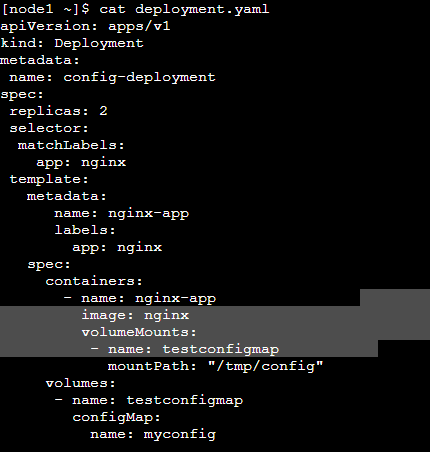
Step 4: Apply deployment.yaml and Verify deployments created successfully.

Step 5: Now go inside one of the pod and check config file is present in the defined location or not.
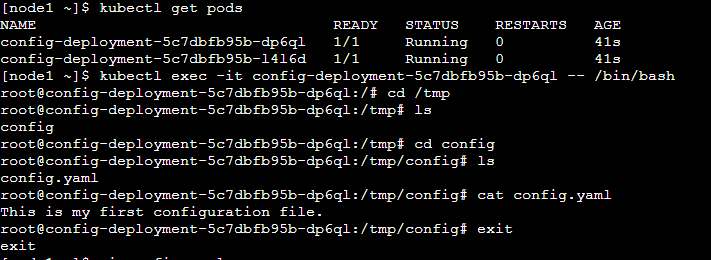
b) By using the env variable in the deployment file:
Step 1: Create deployment.yaml file with env variable.
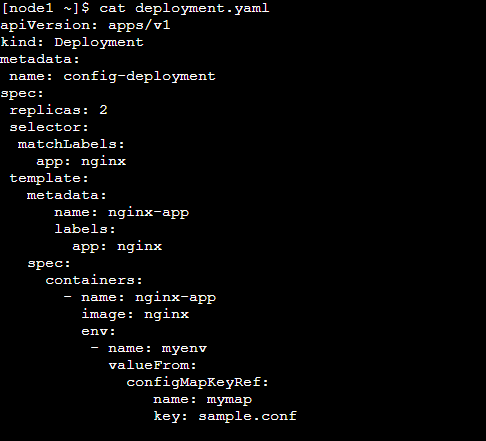
Step 2: Apply Deployment .yaml and Verify whether it's deployed successfully or not.

Step 3: Now go inside the pod and Verify the env variable value.
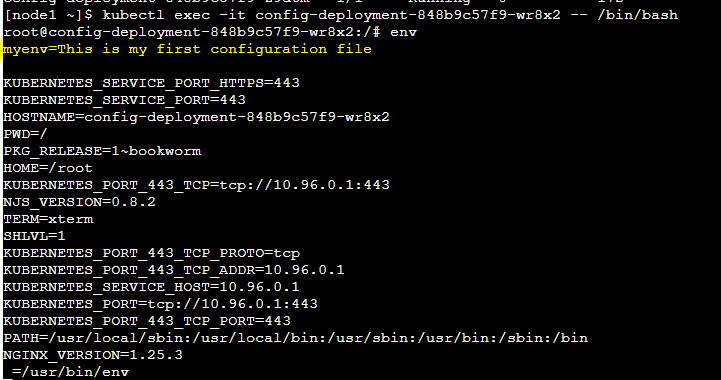
Congratulations!! Successfully Created configmap and deploy application.
Secrets in Kubernetes:
In Kubernetes, Secrets is the same as Configmap. The main difference is it stores secret and sensitive data which is required for deploying or running the application.
In Secrets, you can store 1MB of data. Secrete is always stored in tmpfs volume. An API server stored secret as plaintext format in etcd.
Types of Kubernetes Secret:
| Built-in Type | Usage |
Opaque | arbitrary user-defined data |
kubernetes.io/service-account-token | Service Account token |
kubernetes.io/dockercfg | serialized ~/.dockercfg file |
kubernetes.io/dockerconfigjson | serialized ~/.docker/config.json file |
kubernetes.io/basic-auth | credentials for basic authentication |
kubernetes.io/ssh-auth | credentials for SSH authentication |
kubernetes.io/tls | data for a TLS client or server |
bootstrap.kubernetes.io/token | bootstrap token data |
Commands for Kubernetes Secrets:
a) List Secrets:
kubectl get secrets
a) Create a Secret from literal values:
kubectl create secret generic <secret-name> --from-literal=key1=value1 --from-literal=key2=value2
b) Create a Secret from files:
kubectl create secret generic <secret-name> --from-file=path/to/file
c) Create a Secret from an envirnoment files:
kubectl create secret generic <secret-name> --from-env-file=path/to/env/file
d) Create a generic Secret and interactively enter key-value pairs:
kubectl create secret generic <secret-name> --dry-run=client -o yaml | kubectl apply -f -
e) View details of a Secret:
kubectl describe secret <secret-name>
f) Decode and view the content of a specific key in a Secret:
kubectl get secret <secret-name> -o jsonpath='{.data.key}' | base64 --decode
g) Delete a Secret:
kubectl delete secret <secret-name>
g) Edit a Secret:
kubectl edit secret <secret-name>
Task 2:
Create a Secret for your Deployment. Create a Secret for your Deployment using a file or the command line. Update the deployment.yml file to include the Secret. Apply the updated deployment using the command: kubectl apply -f deployment.yml -n <namespace-name>.Verify that the Secret has been created by checking the status of the Secrets in your Namespace.
a) By using env Variable:
Step 1: Create a secret and Verify the secret was created successfully then use that secret in deployment. yaml.

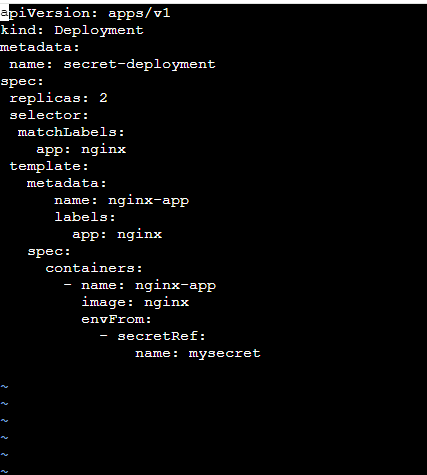
Step 2: Now Apply the deployment.yaml and Verify whether Secret is working or not.

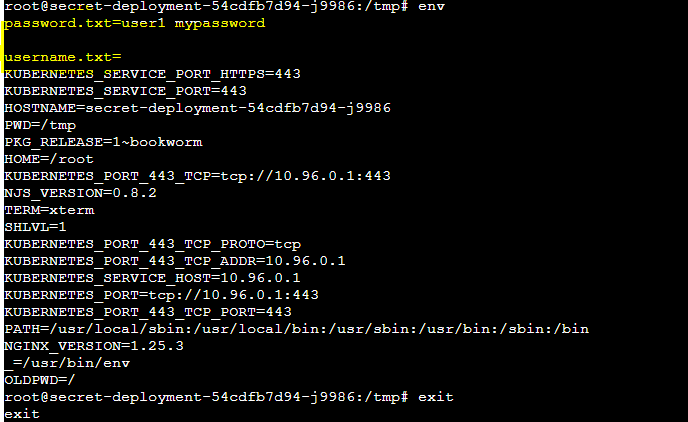
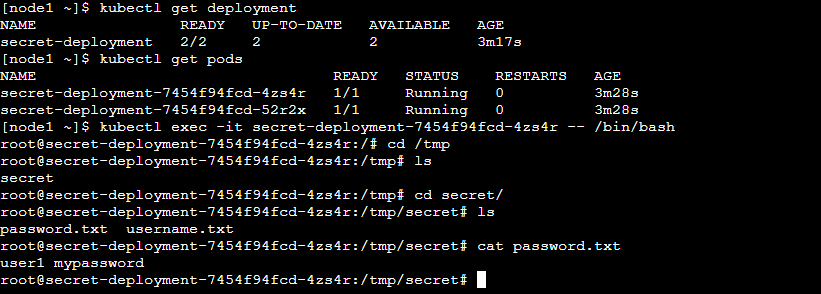
b) By using Volume Mount:
Step 1: Perform some changes in deployment. yaml and apply secret as volume mount.
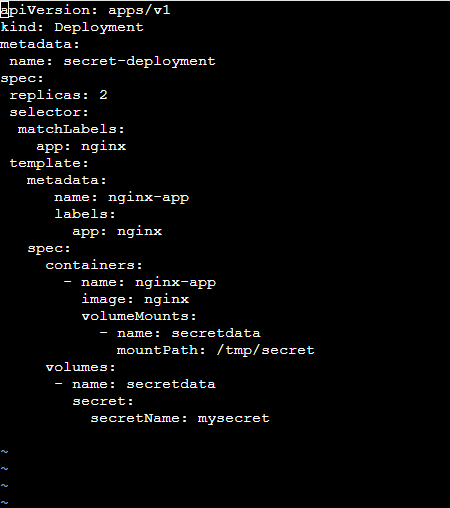
Step 2: Now apply the deployment. yaml and go inside the pod. Verify secret exists or not.
In the Next Article, we will go deep down in K8S Persistent Volume.......
Thank you for giving your precious time to read this blog/article and if any suggestions or improvements are required on my blogs feel free to connect on LinkedIn Unnati Gupta. Happy Learning 💥🙌***!!!***
Subscribe to my newsletter
Read articles from Unnati Gupta directly inside your inbox. Subscribe to the newsletter, and don't miss out.
Written by

Unnati Gupta
Unnati Gupta
👨💻 DevOps Architect @ Hippo Technik, LLC Passionate about bridging the gap between development and operations, I'm a dedicated DevOps Engineer at 6D Technology. With a strong belief in the power of automation, continuous integration, and continuous delivery, I thrive in optimizing software development pipelines for efficiency and reliability. 🚀 Exploring the DevOps Universe In my articles, I delve into the fascinating world of DevOps, where I share insights, best practices, and real-world experiences. From containerization and orchestration to CI/CD pipelines and infrastructure as code, I'm here to demystify the complex and empower fellow developers and ops enthusiasts. 📝 Blogging for Knowledge Sharing As a tech enthusiast and a lifelong learner, I'm committed to sharing knowledge. My articles aim to simplify complex concepts and provide practical tips that help teams and individuals streamline their software delivery processes. 🌐 Connect with Me Let's connect and explore the ever-evolving landscape of DevOps together. Feel free to reach out, comment, or share your thoughts on my articles. Together, we can foster a culture of collaboration and innovation in the DevOps community. 🔗 Social Links LinkedIn: https://www.linkedin.com/in/unnati-gupta-%F0%9F%87%AE%F0%9F%87%B3-a62563183/ GitHub: https://github.com/DevUnnati 📩 Contact Have questions or looking to collaborate? You can reach me at unnatigupta527@gmail.com Happy Learning!!