JavaScript DOM (Document Object Model): Simply Explained
 SHAIK IRFAN
Introduction
Hello everyone. Welcome to my blog. In today's tutorial, we'll be learning and understanding the concept of the Document Object Model in JavaScript. It is one of the most important and fundamental concepts of JavaScript which sets the base for JS developers. So, if you're aspiring to become a good JS developer, then this concept is very important. Let's get started.
The Document Object Model (DOM) is a programming interface for web documents. It represents the page so that programs can change the document structure, style, and content. With the DOM, JavaScript can perform tasks such as adding, removing, and modifying HTML elements and attributes on a webpage.
In this article, we will discuss the basics of JavaScript DOM, including its structure, key concepts, and practical examples.
What is a DOM?
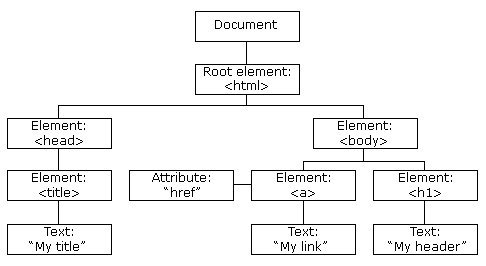
The DOM is a hierarchical tree-like structure that represents the elements and content of an HTML page. It allows JavaScript to access and manipulate the elements of a webpage dynamically.
Each HTML element is represented by a DOM node, which can have child nodes and attributes. The structure of the DOM tree reflects the structure of the HTML document.
For example, consider the following HTML code:
<!DOCTYPE html>
<html>
<head>
    <title>JavaScript DOM Example</title>
</head>
<body>
    <h1>Welcome to my website</h1>
    <p>Here's some content.</p>
    <ul>
        <li>List item 1</li>
        <li>List item 2</li>
        <li>List item 3</li>
    </ul>
</body>
</html>
This code defines an HTML document with a title, header, body, and list.

The root of the tree is the document object, which represents the entire HTML document. The document object has a number of child nodes, including the html, head, and body elements.
Key Concepts
Before we dive into practical examples of using the DOM, let's review some key concepts:
Nodes: As mentioned earlier, each HTML element is represented by a DOM node. There are several types of nodes, including element nodes, text nodes, and attribute nodes.
Parent and Child Nodes: Nodes can have parent and child nodes. For example, the
bodyelement is the parent node of theh1,p, andulelements in the example above. Thelielements are child nodes of theulelement.Attributes: HTML elements can have attributes, such as
class,id,src, etc. These attributes can be accessed and modified using the DOM.
Methods: The DOM provides a number of methods for interacting with elements, such as getElementById, querySelector, appendChild, removeChild, etc.
Practical Examples
1.Accessing Elements
To access an element using the DOM, we can use the getElementById method. This method returns a reference to the element with the specified ID.
<!DOCTYPE html>
<html>
<head>
    <title>JavaScript DOM Example</title>
</head>
<body>
    <h1 id="title">Welcome to my website</h1>
    <p>Here's some content.</p>
    <ul>
        <li>List item 1</li>
        <li>List item 2</li>
        <li>List item 3</li>
    </ul>

    <script>
        // Get the h1 element
        var title = document.getElementById("title");
        // Change the text of the h1 element
        title.innerHTML = "Hello World!";
    </script>
</body>
</html>
In this example, we use getElementById to get a reference to the h1 element with the ID title. We then use the innerHTML property to change the text of the element to "Hello World!".
2.Modifying Elements
We can also use the DOM to modify elements on a webpage. For example, we can use the setAttribute method to change the value of an attribute:
<!DOCTYPE html>
<html>
<head>
    <title>JavaScript DOM Example</title>
</head>
<body>
    <img id="myImage" src="image.jpg">

    <script>
        // Get the image element
        var img = document.getElementById("myImage");
        // Change the source of the image
        img.setAttribute("src", "new-image.jpg");
    </script>
</body>
</html>
In this example, we use getElementById to get a reference to the img element with the ID myImage. We then use the setAttribute method to change the value of the src attribute to "new-image.jpg".
3.Adding and Removing Elements
We can also use the DOM to add and remove elements from a webpage. For example, we can use the createElement and appendChild methods to add a new element to the page:
<!DOCTYPE html>
<html>
<head>
    <title>JavaScript DOM Example</title>
</head>
<body>
    <ul id="myList">
        <li>List item 1</li>
        <li>List item 2</li>
        <li>List item 3</li>
    </ul>

    <button onclick="addItem()">Add Item</button>

    <script>
        function addItem() {
            // Create a new list item element
            var li = document.createElement("li");
            li.innerHTML = "New List Item";
            // Add the new element to the list
            document.getElementById("myList").appendChild(li);
        }
    </script>
</body>
</html>
In this example, we create a new list item element using the createElement method. We then set the innerHTML property of the element to "New List Item". Finally, we use the appendChild method to add the new element to the ul element with the ID myList.
We can also use the removeChild method to remove an element from the page:
<!DOCTYPE html>
<html>
<head>
    <title>JavaScript DOM Example</title>
</head>
<body>
    <ul id="myList">
        <li>List item 1</li>
        <li>List item 2</li>
        <li>List item 3</li>
    </ul>

    <button onclick="removeItem()">Remove Item</button>

    <script>
        function removeItem() {
            // Get the first list item element
            var li = document.getElementById("myList").firstChild;
            // Remove the element from the list
            document.getElementById("myList").removeChild(li);
        }
    </script>
</body>
</html>
In this example, we use the getElementById method to get a reference to the ul element with the ID myList. We then use the firstChild property to get a reference to the first list item element. Finally, we use the removeChild method to remove the element from the list.
Conclusion
The Document Object Model (DOM) is a powerful tool for manipulating webpages dynamically. In this article, we discussed the structure of the DOM, key concepts, and practical examples of using the DOM with JavaScript. By understanding the basics of the DOM, you can create dynamic and interactive web pages that respond to user input and other events.
That's a wrap. Thanks for reading.
If you enjoyed reading this, then please like and share this article with others.
Subscribe to my newsletter
Read articles from SHAIK IRFAN directly inside your inbox. Subscribe to the newsletter, and don't miss out.
Written by

SHAIK IRFAN
SHAIK IRFAN
"Full Stack Web Developer | Bridging Front-End Elegance with Back-End Power | Crafting Dynamic and User-Centric Digital Solutions"