Part 4 - ACM(AWS Certificate Manager) set-up with CloudFront and Route 53
 Rahul Patel
Overview
What is ACM and Why do we need it?
Create a Certificate using AWS SAM
Map Certificate with CloudFront
Objective
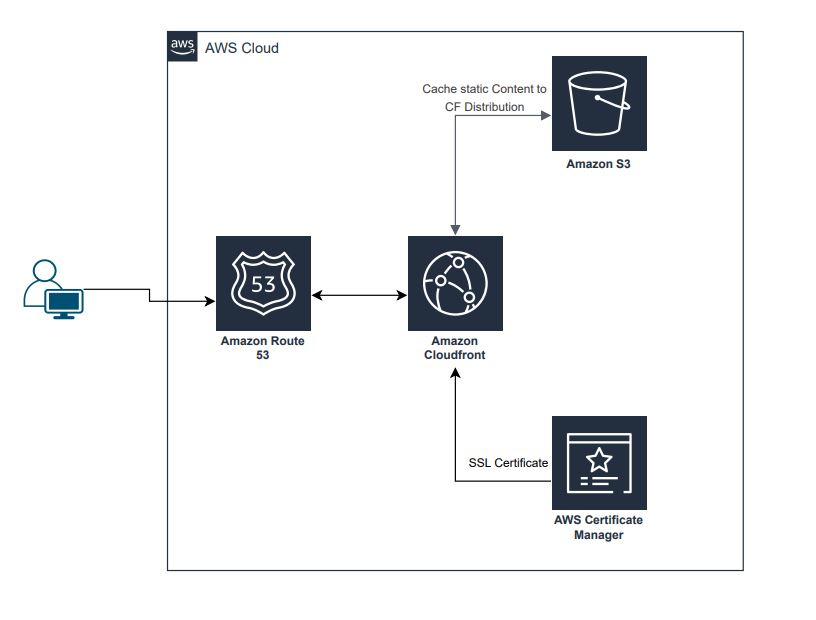
Our objective for this blog is to clear the 403 error we got in the previous blog by creating the certificate in the ACM and mapping it to the CloudFront distribution.
Pre-requisites
Part 3 — Configure Custom Domain with CloudFront Using Route 53
- Follow the above link to set up Route 53 with CloudFront.

What is ACM and Why do we need it?
ACM in AWS stands for AWS Certificate Manager. It is a service that lets you easily provision, manage, and deploy SSL/TLS (Secure Sockets Layer/Transport Layer Security) certificates for use with AWS services and your internal connected resources.
Here's why ACM is useful:
Security: SSL/TLS certificates are crucial for securing data in transit over the internet. ACM helps you manage and deploy these certificates to ensure secure communication between clients and your AWS resources.
Ease of Use: ACM automates many of the manual processes involved in procuring, uploading, and managing SSL/TLS certificates. It integrates seamlessly with other AWS services like Elastic Load Balancer (ELB), CloudFront, API Gateway, and more.
Auto-Renewal: ACM provides automatic renewal for SSL/TLS certificates, reducing the operational burden of keeping certificates up-to-date and avoiding expiration-related issues.
When you add a certificate to AWS Certificate Manager (ACM) and associate it with your CloudFront distribution, you enable secure communication between end-users and your content through HTTPS. Here's a breakdown of why adding a certificate resolved the issue:
SSL/TLS Encryption: By adding an SSL/TLS certificate to ACM and associating it with your CloudFront distribution, you're enabling secure communication between users and CloudFront. The certificate ensures that the data transferred between the user's browser and CloudFront is encrypted, providing confidentiality and integrity.
HTTPS Configuration: When you access a website using HTTPS, your browser expects a secure connection, and this is achieved through the SSL/TLS certificate. If your CloudFront distribution is configured to use HTTPS, but there's no valid SSL/TLS certificate associated with it, browsers will raise security-related errors, such as the 403 error you encountered.
Access Control: The 403 error is an HTTP status code indicating that the server understood the request but refuses to authorize it. In the context of CloudFront, this could be related to the security settings, and the lack of a valid SSL/TLS certificate may have contributed to the refusal of the request.
Create a Certificate using AWS SAM
  MyCertificate:
      Type: AWS::CertificateManager::Certificate
      Properties:
        DomainName: your domain name(example.com)
        ValidationMethod: DNS
        SubjectAlternativeNames:
          - Alternative name(api.example.com)
        Tags:
          - Key: Name
            Value: MyCertificate
Note: The above code will take time to complete.
So, this template creates an ACM certificate for your domain with DNS validation and includes additional SANs. After deploying this SAM template, go to the ACM console, and you should see the certificate in a "Pending validation" state. It might take some time for the DNS changes to propagate.
AWS ACM will periodically check the DNS records to validate your ownership of the domain. Once the validation is successful, the certificate status will change to "Issued."
Create Record in Route 53: The "Create the Record in Route 53" button in ACM, in this context, is a manual action. After deploying your AWS SAM template and initiating the certificate request, you click this button to create the required DNS records in Route 53. This typically involves navigating to the Route 53 console, finding the hosted zone for your domain, and adding the specified CNAME records.
Map Certificate with CloudFront
    Properties:
      DistributionConfig:
        ViewerCertificate:
          AcmCertificateArn: !Ref MyCertificate
          SslSupportMethod: sni-only
        Aliases:
          - domain of 'A' Record we created in Part 3
Add the above code under the Properties of CloudFront Distribution.
Viewer Certificate Configuration:
ViewerCertificateis a sub-property that configures the SSL/TLS settings for the distribution.AcmCertificateArn: !Ref MyCertificate: Specifies the ACM certificate to use for securing the distribution. The!Ref MyCertificatereferences the ACM certificate resource were created elsewhere in the template.SslSupportMethod: sni-only: Specifies that only Server Name Indication (SNI) SSL/TLS connections are supported. This means that multiple SSL/TLS certificates can be hosted on the same IP address, which is common for modern web hosting.
Domain Aliases (CNAMEs):
Aliasesis a property that allows you to specify domain aliases (CNAMEs) for the CloudFront distribution. Requests to these domain aliases will be handled by the CloudFront distribution.
In summary, this code configures the CloudFront distribution to use SSL/TLS with an ACM certificate (MyCertificate) and supports SNI. Additionally, it specifies an alias for the distribution, allowing it to respond to requests for that domain. This is useful for serving content over HTTPS with a custom domain through CloudFront.
Check the Custom URL and it should be up and running without any Error.

Conclusion:
In this blog post, we addressed and resolved a 403 error encountered in a previous installment by leveraging AWS Certificate Manager (ACM) and AWS SAM. We explored the importance of ACM in managing SSL/TLS certificates for secure communication over the Internet.
If this post was helpful, please follow and click on the like button
Subscribe to my newsletter
Read articles from Rahul Patel directly inside your inbox. Subscribe to the newsletter, and don't miss out.
Written by

Rahul Patel
Rahul Patel
AWS Developer @TCS | 2 x AWS Certified | AWS | DevOps | Python | Agile | Azure Devops | TCS-Digital | AWS Certified Solutions Architect - Associate with expertise in EC2, S3, Lambda, API Gateway, DynamoDB, AWS DevOps