Client-side form validation
 SHAIK IRFAN
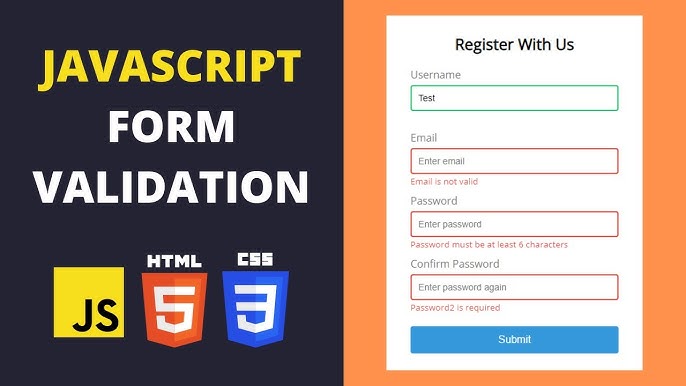
Introduction
Hello Developer's ! Welcome to the IRFAN's Blog. In this blog article , we learn how to create a form validation using HTML CSS and JavaScript. We validate passwords and confirm passwords, and email addresses using JavaScript.
Go onto any website or e-commerce store, and you’ll notice that almost everyone uses website forms. Whether it’s a checkout form, a booking form, a registration form, or a contact form, businesses are using web forms to streamline their user’s online experiences.
Before submitting data to the server, it is important to ensure all required form controls are filled out, in the correct format. This is called client-side form validation, and helps ensure data submitted matches the requirements set forth in the various form controls. This article leads you through basic concepts and examples of client-side form validation.
What is a form Validation?
Form validation is the process of checking that the data is correctly entered inside the form using a set of rules. In this process, developers use JavaScript to add some rules inside the form, and as the user enters some text inside the form, the set of rules inside the application will check whether the entered text follows the defined rule or not.
Why Form Validation is Important
It’s critical to website security:
There are lots of ways that malicious users can abuse forms. Unprotected forms are vulnerable to SQL injection attacks, cross-site scripting, and much more. Form validation enhances web security and consumer safety by applying strict constraints on valid inputs.
It prevents human error:
Form validation mitigates the risk of users inputting the wrong data (such as the wrong zip code or phone number). Wrongly-inputted data can result in order delays, poor customer service, etc., which is why form validation is crucial for delivering positive customer experiences.
It protects your users’ data:
Form validation for passwords verifies that users are only inputting highly-secure passwords. This protects their account information from data breaches and malicious attacks.
It enforces data consistency:
Freeform data can cause chaos in your database and, at worse, even crash your applications. Form validation is a critical step in creating a foundation for database consistency. And, because you can integrate your forms with your other tools for e-commerce (such as your CRMs and email marketing platforms), you can extend your data consistency even further.
What are the types of Form Validation?
So, now you know what form validation is, let’s explore it more deeply. There are two types of form validation: server-side validation and client-side validation. While this article will focus on client-side form validation, it helps to have a basic understanding of what server-side form validation is, too.
Form validation is of two types:
Client-side Validation:
Client-side validation is an initial check and an important feature of good user experience; by catching invalid data on the client-side, the user can fix it straight away. If it gets to the server and is then rejected, a noticeable delay is caused by a round trip to the server and then back to the client-side to tell the user to fix their data.
Client-side form validation occurs on your site’s front end before the browser submits the data to the server. Instead, the browser itself will complete the validation process first, checking the inputted data and providing the user with an immediate response.
You can think of client-side form validation as your first line of defense. It protects the integrity of your back end from badly formatted data. And, by providing users with immediate, easy-to-understand custom error messages, you can deliver a better user experience.
There are two different ways that you can implement client-side form validation: built-in form validation and JavaScript validation.
Server-side Validation:
As opposed to client-side validation (which is completed in the browser), server-side validation takes place on the server.
Once a user submits data into a form, the browser sends this data to the server. The server will then validate the data against the constraints and requirements set by the application.
If the data is valid, it will be saved to the database. If it’s invalid, it will be sent back to the browser along with an error message explaining what went wrong.
The problem with server-side validation is that it takes time to process. Also, it can only be completed after the user completes the whole form. This means that users must wait until they’ve submitted the entire form to be notified of any errors.
If your user has a poor network connection, this can make for a frustrating, tedious experience.So, while server-side form validation is absolutely necessary for protecting your online store from cyber attacks, it doesn’t exactly provide a good experience for your users.
Different types of client-side validation
There are two different ways that you can implement client-side form validation: built-in form validation and JavaScript validation.
JavaScript Validation
JavaScript validation is coded using JavaScript and is more customizable than built-in form validation. It gives you more control over the design, feel, and microcopy of your validation messages, allowing you to create forms that express your brand’s identity.
However, as you can probably guess, validating forms using JavaScript requires pretty extensive coding knowledge and stricter continuous testing processes in response to code changes.
For this reason, many developers are turning to built-in form validation instead. Built-in form validation creates better internal workflows and provides simpler, to-the-point forms. In turn, businesses can provide more optimal user experiences.
Built-in Form Validation
Built-in form validation uses HTML5 to perform data validation instead of the more traditionally-used JavaScript. It’s well-supported by popular modern browsers (Safari, Firefox, etc.) which makes it a fantastic modern form control for those who aren’t a fan of writing JavaScript code.

Its ability to independently validate user data is made possible through the use of validation attributes of the form elements. For example:
“Type”: Defines the specific type of data that should be inputted (email address, URL, phone number, etc,).
“Required”: Marks the form field as mandatory, meaning it must be filled in before submission.
“Minlength” and “maxlength”: Specifies and enforces control over the minimum and maximum character length.
“Pattern”: Dictates regular expression (pattern) rules that the inputted data needs to abide by for validation.
Built-in form validation offers users visual aids to guide them to successful form completion. They are presented using CSS pseudo-classes, which let you define special states of elements.
For example:
:invalid and :valid tell users which elements abide by validation rules and which ones require revision.
:required and :optional inform the user of the mandatory state of the field.
:inrange and :out-of-range inform users that their inputted data value is either within or outside the allowed limit.
Let’s go over some of the different way to validate forms with HTML.
Required Fields
If a field is mandatory you just need to add the required attribute:
<input id="name" type="text" required>
Email validation
Email addresses can be validated using a type="email" input field. This checks that the inputed text contains both @ and . symbols with no spaces between the characters.
<input id="email" type="email" name="email" required>
Username validation
Username requirements vary so we need to use the pattern attribute. This attribute allows us to use regular expressions to test for more explicit requirements.
In this example the pattern only allows letters, numbers, and be between 3 & 15 characters in length:
<input id="username" type="text" name="username" required pattern="^[a-z0-9]{3,15}$" title="Password may only contain letters and numbers">
Also note the inclusion of the title attribute. This will appear in a tooltip to help users understand the field requirements if the text entered isn’t valid.

Password validation
Just like with usernames the requirements for passwords vary so we’ll once again use a pattern to define the validation rules. This pattern will accept between 8 & 25 characters and include a uppercase letter, lowercase letter, and a number:
<input id="password" type="password" name="password" required pattern="^(?=.*[a-z])(?=.*[A-Z])(?=.*\d)[a-zA-Z\d]{8,25}$">
URL validation
URLs can be validated using the type="url" input field. An optional pattern is used to ensure URLs start with http(s) otherwise [file://](file://) would be accepted a valid URL:
<input id="url" type="url" name="url" required pattern="https?://.+">
Age validation
If you need to validate an age or any number that falls between two values the type="number" input is used. As number fields only allow numeric characters we just need to specify a min and max values:
<input id="age" type="number" name="age" required min="18" max="36">
Styling valid/invalid input using CSS
Using the following CSS we can style fields based on whether they contain valid or invalid data:
input {
  border: 2px solid #eee;
  border-radius: 4px;
}
input:valid,
input:in-range {
  border-color: green;
}
input:invalid,
input:out-of-range {
  border-color: red;
}
If a field contains a valid input it will have a “green” border otherwise the border is “red”.

JavaScript validation
JavaScript is used widely for HTML form validation as it provides more ways to customize and set the validation rules; also, some of the tags provided in HTML5 are not supported in the older versions of Internet Explorer. JavaScript is being used for a long time for form validation.
In JavaScript form validation, basically, we define functions to validate the data before submitting it to the server. We can implement any logic required for achieving the validation rules. JavaScript is more flexible in this way because there is no restriction on defining rules.
Let’s see the example of form validation using JavaScript.
we will create a simple signup form with four input fields: username, email, password, and confirm password.
When you click the sign up without filling anything or filling incorrect data format, the form will show error messages:

You’ll validate the following:
Username cannot be blank and has at least 3 characters and cannot be longer than 25 characters.
Email is mandatory and valid.
Password has eight characters or longer. And it must contain 1 lowercase character, 1 uppercase character, 1 number, and at least one special character in this set (
!@#$%^&*).The confirm password must be the same as the password.
Create the project structure
First, create the form-validation folder that stores all the source code files of the project.
Second, create the js and CSS folders inside the form-validation folder.
Third, create the style.css in the CSS folder, the app.js in the js folder, and index.html directly in the form-validation folder.
The final project structure will look like this:

Build the HTML form
First, open the index.html file and enter the following code:
 <!DOCTYPE html>
<html>
<head>
    <title>JavaScript Form Validation Demo</title>
    <link rel="stylesheet" href="css/style.css">
</head>
<body>
    <div class="container">
        <form id="signup" class="form">
            <h1>Sign Up</h1>
            <div class="form-field">
                <label for="username">Username:</label>
                <input type="text" name="username" id="username" autocomplete="off">
                <small></small>
            </div>

            <div class="form-field">
                <label for="email">Email:</label>
                <input type="text" name="email" id="email" autocomplete="off">
                <small></small>
            </div>

            <div class="form-field">
                <label for="password">Password:</label>
                <input type="password" name="password" id="password" autocomplete="off">
                <small></small>
            </div>


            <div class="form-field">
                <label for="confirm-password">Confirm Password:</label>
                <input type="password" name="confirm-password" id="confirm-password" autocomplete="off">
                <small></small>
            </div>

            <div class="form-field">
                <input type="submit" value="Sign Up">
            </div>
        </form>
    </div>

    <script src="js/app.js"></script>
</body>
</html>
In this HTML file, we place the style.css file in the head section and app.js file in the body section before the closing </body> tag.
The notable thing about the signup form is that each field is wrapped in a div with the class form-field.
Each form field has three elements:
A label
An input field
A
<small>element
You’ll use the <small> tag to show the error message to the users.
If an input field isn’t valid, we’ll make its border color red by adding the error class to the form-field element. It’ll look like this:
<div class="form-field error">
   <label for="username">Username:</label>
   <input type="text" name="username" id="username" autocomplete="off">
   <small></small>
</div>
If the value of an input field is valid, then we’ll make its border color green by adding the success class to the form-field element as follows:
<div class="form-field success">
   <label for="username">Username:</label>
   <input type="text" name="username" id="username" autocomplete="off">
   <small></small>
</div>
Select the form fields and add the submit event listener
In the app.js file, you’ll first use the document.querySelector() method to select the input fields and the form:
const usernameEl = document.querySelector('#username');
const emailEl = document.querySelector('#email');
const passwordEl = document.querySelector('#password');
const confirmPasswordEl = document.querySelector('#confirm-password');

const form = document.querySelector('#signup');
And then you attach the submit event listener to the form by using the addEventListener() method:
form.addEventListener('submit', function (e) {
    // prevent the form from submitting
    e.preventDefault();

});
In the event listener, you need to call the e.preventDefault(). to prevent the form from submitting once the submit button is clicked.
Develop utility functions
Before validating the form, you can develop some reusable utility functions to check if:
A field is required.
The length of a field is between min and max.
The email is in a valid format.
The password is strong.
The following isRequired() function returns true if the input argument is empty:
const isRequired = value => value === '' ? false : true;
The following isBetween() function returns false if the length argument is not between the min and max argument:
const isBetween = (length, min, max) => length < min || length > max ? false : true;
To check the email is valid, you’ll use a regular expression:
const isEmailValid = (email) => {
    const re = /^(([^<>()\[\]\\.,;:\s@"]+(\.[^<>()\[\]\\.,;:\s@"]+)*)|(".+"))@((\[[0-9]{1,3}\.[0-9]{1,3}\.[0-9]{1,3}\.[0-9]{1,3}\])|(([a-zA-Z\-0-9]+\.)+[a-zA-Z]{2,}))$/;
    return re.test(email);
};
To check if a password is strong, which match a specified pattern, you’ll also use a regular expression:
const isPasswordSecure = (password) => {
    const re = new RegExp("^(?=.*[a-z])(?=.*[A-Z])(?=.*[0-9])(?=.*[!@#\$%\^&\*])(?=.{8,})");
    return re.test(password);
};
Develop functions that show the error / success
The following showError() function highlights the border of the input field and displays an error message if the input field is invalid:
const showError = (input, message) => {
    // get the form-field element
    const formField = input.parentElement;
    // add the error class
    formField.classList.remove('success');
    formField.classList.add('error');

    // show the error message
    const error = formField.querySelector('small');
    error.textContent = message;
};
How it works.
First, get the parent element of the input field, which is the <div> element that contains the form-field class:
const formField = input.parentElement;
Second, remove the success class and add the error class to the form-field element:
formField.classList.remove('success');
formField.classList.add('error');
Third, select the <small> element inside the form-field element:
const error = formField.querySelector('small');
Notice that you use the formField.querySelector() instead of the document.querySelector().
Finally, set the error message to its textContent property of the <small> element:
error.textContent = message;
The function that shows the success indicator is similar to the showError() function:
const showSuccess = (input) => {
    // get the form-field element
    const formField = input.parentElement;

    // remove the error class
    formField.classList.remove('error');
    formField.classList.add('success');

    // hide the error message
    const error = formField.querySelector('small');
    error.textContent = '';
}
Unlike the showError() function, the showSuccess() function removes the error class, adds the success class, and set the error message to blank.
Now, you can use the utility function above to check for each field.
Develop input field validating functions
You’ll develop four functions for validating values of the form fields:
1) Validate the username field
The following checkUsername() function uses:
The
isRequired()function to check if the username is provided.The
isBetween()function to check if the length of the username is between 3 and 25 characters.The
showError()andshowSuccess()functions to show the error and success indicator.
The function returns true if the field passes the checks.
const checkUsername = () => {

    let valid = false;
    const min = 3,
        max = 25;
    const username = usernameEl.value.trim();

    if (!isRequired(username)) {
        showError(usernameEl, 'Username cannot be blank.');
    } else if (!isBetween(username.length, min, max)) {
        showError(usernameEl, `Username must be between ${min} and ${max} characters.`)
    } else {
        showSuccess(usernameEl);
        valid = true;
    }
    return valid;
}
2) Validate the email field
The checkEmail() function returns true if the email is provided and valid.
It uses the isRequired() and isEmailValid() functions for checking. And it uses the showError() and showSuccess() functions to provide feedback in case of error and success.
const checkEmail = () => {
    let valid = false;
    const email = emailEl.value.trim();
    if (!isRequired(email)) {
        showError(emailEl, 'Email cannot be blank.');
    } else if (!isEmailValid(email)) {
        showError(emailEl, 'Email is not valid.')
    } else {
        showSuccess(emailEl);
        valid = true;
    }
    return valid;
}
3) Validate the password field
The following checkPassword() function checks the password field if it is provided and match the required format:
const checkPassword = () => {

    let valid = false;

    const password = passwordEl.value.trim();

    if (!isRequired(password)) {
        showError(passwordEl, 'Password cannot be blank.');
    } else if (!isPasswordSecure(password)) {
        showError(passwordEl, 'Password must has at least 8 characters that include at least 1 lowercase character, 1 uppercase characters, 1 number, and 1 special character in (!@#$%^&*)');
    } else {
        showSuccess(passwordEl);
        valid = true;
    }

    return valid;
};
4) Validate the confirm password field
The checkConfirmPassword() function checks if the confirm password is the same as the password.
const checkConfirmPassword = () => {
    let valid = false;
    // check confirm password
    const confirmPassword = confirmPasswordEl.value.trim();
    const password = passwordEl.value.trim();

    if (!isRequired(confirmPassword)) {
        showError(confirmPasswordEl, 'Please enter the password again');
    } else if (password !== confirmPassword) {
        showError(confirmPasswordEl, 'Confirm password does not match');
    } else {
        showSuccess(confirmPasswordEl);
        valid = true;
    }

    return valid;
};
Modifying the submit event handler
Now, you can use the functions that validate the input fields in the submit event handler:
form.addEventListener('submit', function (e) {
    // prevent the form from submitting
    e.preventDefault();

    // validate forms
    let isUsernameValid = checkUsername(),
        isEmailValid = checkEmail(),
        isPasswordValid = checkPassword(),
        isConfirmPasswordValid = checkConfirmPassword();

    let isFormValid = isUsernameValid &&
        isEmailValid &&
        isPasswordValid &&
        isConfirmPasswordValid;

    // submit to the server if the form is valid
    if (isFormValid) {

    }
});
How it works:
First, call each individual function to validate username, email, password, and confirm password fields.
Second, use the
&&operator to determine if the form is valid. The form is valid only if all fields are valid.
The following shows the complete app.js file:
const usernameEl = document.querySelector('#username');
const emailEl = document.querySelector('#email');
const passwordEl = document.querySelector('#password');
const confirmPasswordEl = document.querySelector('#confirm-password');

const form = document.querySelector('#signup');


const checkUsername = () => {

    let valid = false;

    const min = 3,
        max = 25;

    const username = usernameEl.value.trim();

    if (!isRequired(username)) {
        showError(usernameEl, 'Username cannot be blank.');
    } else if (!isBetween(username.length, min, max)) {
        showError(usernameEl, `Username must be between ${min} and ${max} characters.`)
    } else {
        showSuccess(usernameEl);
        valid = true;
    }
    return valid;
};


const checkEmail = () => {
    let valid = false;
    const email = emailEl.value.trim();
    if (!isRequired(email)) {
        showError(emailEl, 'Email cannot be blank.');
    } else if (!isEmailValid(email)) {
        showError(emailEl, 'Email is not valid.')
    } else {
        showSuccess(emailEl);
        valid = true;
    }
    return valid;
};

const checkPassword = () => {
    let valid = false;


    const password = passwordEl.value.trim();

    if (!isRequired(password)) {
        showError(passwordEl, 'Password cannot be blank.');
    } else if (!isPasswordSecure(password)) {
        showError(passwordEl, 'Password must has at least 8 characters that include at least 1 lowercase character, 1 uppercase characters, 1 number, and 1 special character in (!@#$%^&*)');
    } else {
        showSuccess(passwordEl);
        valid = true;
    }

    return valid;
};

const checkConfirmPassword = () => {
    let valid = false;
    // check confirm password
    const confirmPassword = confirmPasswordEl.value.trim();
    const password = passwordEl.value.trim();

    if (!isRequired(confirmPassword)) {
        showError(confirmPasswordEl, 'Please enter the password again');
    } else if (password !== confirmPassword) {
        showError(confirmPasswordEl, 'The password does not match');
    } else {
        showSuccess(confirmPasswordEl);
        valid = true;
    }

    return valid;
};

const isEmailValid = (email) => {
    const re = /^(([^<>()\[\]\\.,;:\s@"]+(\.[^<>()\[\]\\.,;:\s@"]+)*)|(".+"))@((\[[0-9]{1,3}\.[0-9]{1,3}\.[0-9]{1,3}\.[0-9]{1,3}\])|(([a-zA-Z\-0-9]+\.)+[a-zA-Z]{2,}))$/;
    return re.test(email);
};

const isPasswordSecure = (password) => {
    const re = new RegExp("^(?=.*[a-z])(?=.*[A-Z])(?=.*[0-9])(?=.*[!@#\$%\^&\*])(?=.{8,})");
    return re.test(password);
};

const isRequired = value => value === '' ? false : true;
const isBetween = (length, min, max) => length < min || length > max ? false : true;


const showError = (input, message) => {
    // get the form-field element
    const formField = input.parentElement;
    // add the error class
    formField.classList.remove('success');
    formField.classList.add('error');

    // show the error message
    const error = formField.querySelector('small');
    error.textContent = message;
};

const showSuccess = (input) => {
    // get the form-field element
    const formField = input.parentElement;

    // remove the error class
    formField.classList.remove('error');
    formField.classList.add('success');

    // hide the error message
    const error = formField.querySelector('small');
    error.textContent = '';
}


form.addEventListener('submit', function (e) {
    // prevent the form from submitting
    e.preventDefault();

    // validate fields
    let isUsernameValid = checkUsername(),
        isEmailValid = checkEmail(),
        isPasswordValid = checkPassword(),
        isConfirmPasswordValid = checkConfirmPassword();

    let isFormValid = isUsernameValid &&
        isEmailValid &&
        isPasswordValid &&
        isConfirmPasswordValid;

    // submit to the server if the form is valid
    if (isFormValid) {

    }
});


const debounce = (fn, delay = 500) => {
    let timeoutId;
    return (...args) => {
        // cancel the previous timer
        if (timeoutId) {
            clearTimeout(timeoutId);
        }
        // setup a new timer
        timeoutId = setTimeout(() => {
            fn.apply(null, args)
        }, delay);
    };
};

form.addEventListener('input', debounce(function (e) {
    switch (e.target.id) {
        case 'username':
            checkUsername();
            break;
        case 'email':
            checkEmail();
            break;
        case 'password':
            checkPassword();
            break;
        case 'confirm-password':
            checkConfirmPassword();
            break;
    }
}));
That's a wrap. Thanks for reading.
Hope this article was helpful to you.
If you enjoyed reading this, then please like and share this article with others.
Have fun coding!
Subscribe to my newsletter
Read articles from SHAIK IRFAN directly inside your inbox. Subscribe to the newsletter, and don't miss out.
Written by
SHAIK IRFAN
SHAIK IRFAN
"Full Stack Web Developer | Bridging Front-End Elegance with Back-End Power | Crafting Dynamic and User-Centric Digital Solutions"