How To Create a Windows 11 Virtual Machine
 Samuel Mac Hassan
HOW TO CREATE WINDOWS 11 VIRTUAL MACHINE
Windows 11 is a virtual machine that provides convenience, flexibility and the ability to perform tests on the latest version of Windows without any permanent changes to your primary hardware or system.
Using Windows 11 virtual machine allows you to create an environment that meets your required needs.
To create your own Windows 11 virtual machine, below is the procedure to follow.
SIGN IN TO THE AZURE PORTAL
To be able to create Windows on a virtual machine Azure subscription must be in place. You must first go on the Microsoft website and search for the Azure portal to subscribe.
After your account is created on Microsoft, you will then use your email and password to sign in to start creating.
- CREATE YOUR VIRTUAL MACHINE
First, go to the search bar, and type "Virtual Machine" or click on the left-hand side plus sign.
You will see search results, then select "Virtual Machine" from the list.
Click on the "Create" button
Select the highlighted virtual machine.
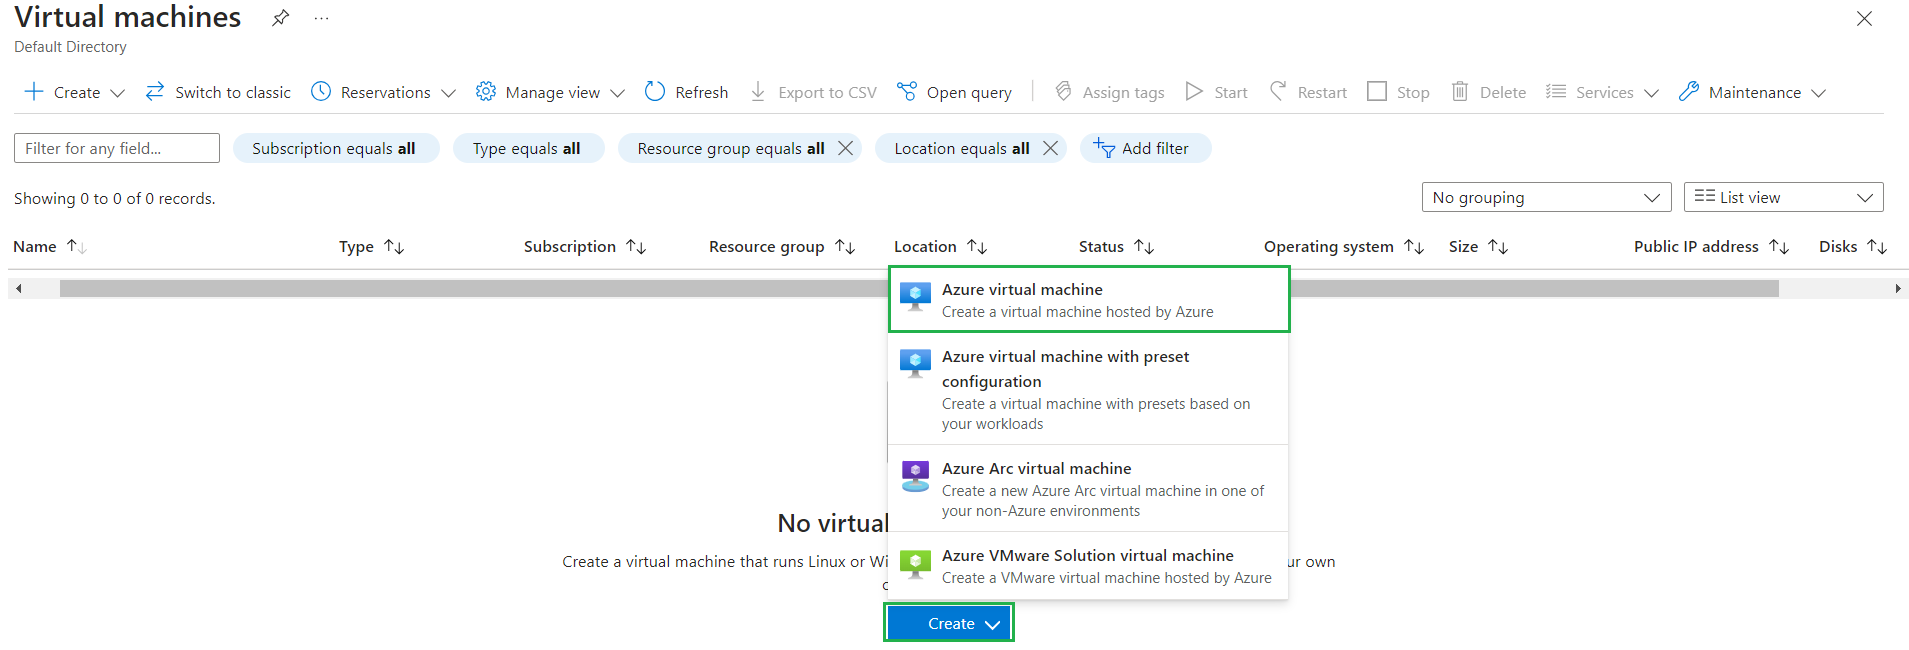
After clicking on the virtual machine, you will be directed to the next page, where you will see Project Details.
Project Details
There are two categories in project details, subscription and resource group.
- subscription
When we talk about Azure subscriptions, we are talking about membership or access to be able to create or work on the Azure platform. The good news is that you could make use of the Azure platform to create or work on a free trial to explore and experiment before going into a full subscription.
- Resource Group
About resource group, is like a container or folder that helps arrange and manage various resources such as virtual machines in the Azure cloud.
Let us consider living in a room disorganised with so much stuff lying all over the floor, In this summary the room represents the Azure cloud environment, and the untidy stuff represents the resources. In other to clean up the room, all stuff needs to be arranged together in an organised manner which would make it easier for the stuff to be located when needed.
Instance Details
In the first box, you will give your virtual machine a name
In the second box in the region section, you will select the location you want your virtual machine to be located.
What is region? The region is categorised as a geographical location with data centres that comprise infrastructure and services. Region operates independently with one or more availability zones in each region.
- In the third box, click on the drop-down to select the availability Zone where you want your data centre to be located.
There are three availability zones located in the Azure region, they are made up of zone 1, zone 2, and zone 3 which could be miles apart.
These data centres are physically linked together using fibre optic technology to ensure high-speed data transmission over long distances while maintaining low downtime and high transmission capabilities.
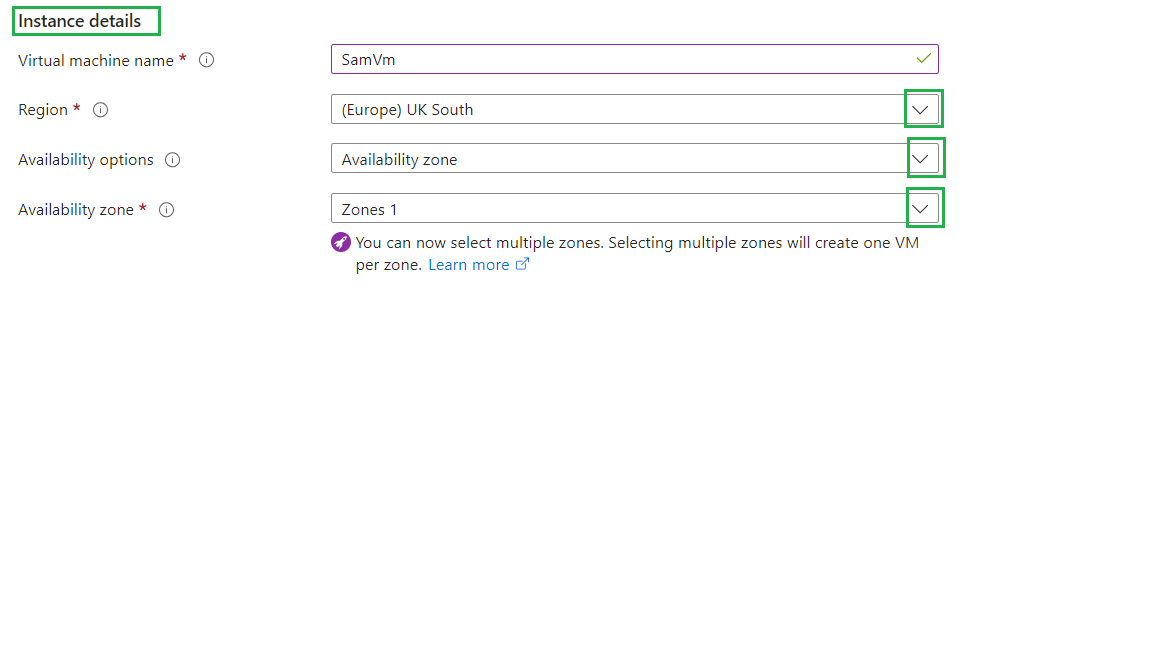
It is also equipped with independent networking, power, and cooling infrastructure to enable the minimization of failures and disruption.
- Now, click on the drop-down and select your security type
- Click on the image section drop-down and select Windows 11 Pro.
- Click on the drop-down to see the list of the sizes of your virtual machine, then select the one that best fits your build, and leave the rest of the default information.
Administrator Account
- Create your username and password and make sure it is correct and easy to remember because you will need it later for confirmation.
Inbound Port Rules
- On the section of inbound rules, you must select "Allow selected ports" and make sure you select RDP (3389).
This port enables you to have remote access to your physical work desktop computer, Make sure you check the box to confirm that you have an eligible Windows 11 licence.
Then click on Next: Disks> to move to the next page.
Disk
- Click on the dropdown of the disk page, then click on the OS disk type and select Standard SSD or the one you needed for the build, then leave the rest of the boxes as default, meaning no change on them at all.
Tag
- Create your tag name
Creating tags allows you to arrange your resources the way you want them in cloud computing environments.
- Next, click on Review+create
- Review the summary of your virtual machine configuration and click on the "Create" button to begin the deployment process.
- After the completion of the deployment, click on "Go to resource".
Connect to Your Windows Virtual Machine.
- In other to connect to your Windows virtual machine, you must create a remote desktop connection to the virtual machine.
To connect to your Windows 11 operating system, check the connect button on the overview page and click on it.
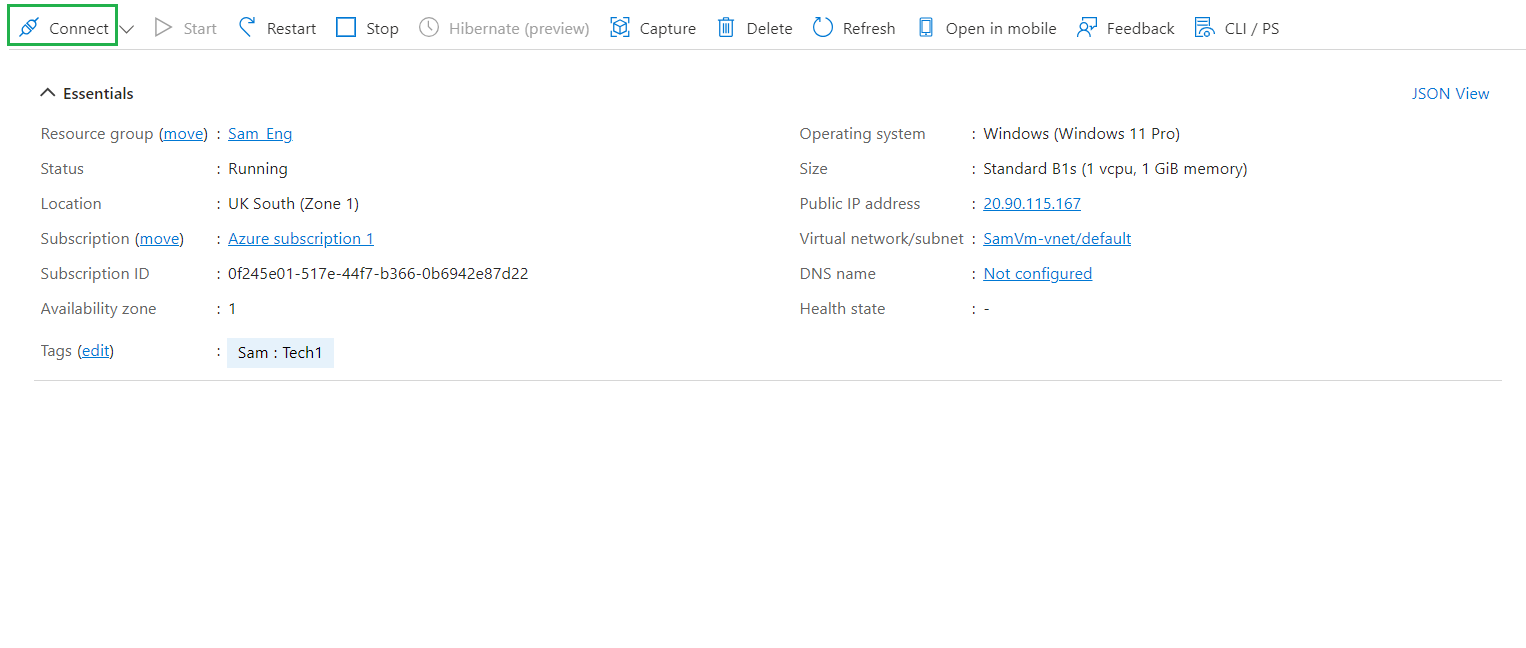
- After connecting with RDP, make no change to the settings, and click the download RDP file to your file
- Open the downloaded RDP file and click "connect"
- Insert your username and password.
- Click yes to activate
- Welcome to Windows 11 Pro, you are now connected
How To Disassociate IP Address
Sometimes you might want to create your virtual machine cost-effectively to save money. What you need to do is to disassociate your IP address in your virtual machine.
Click on the IP address
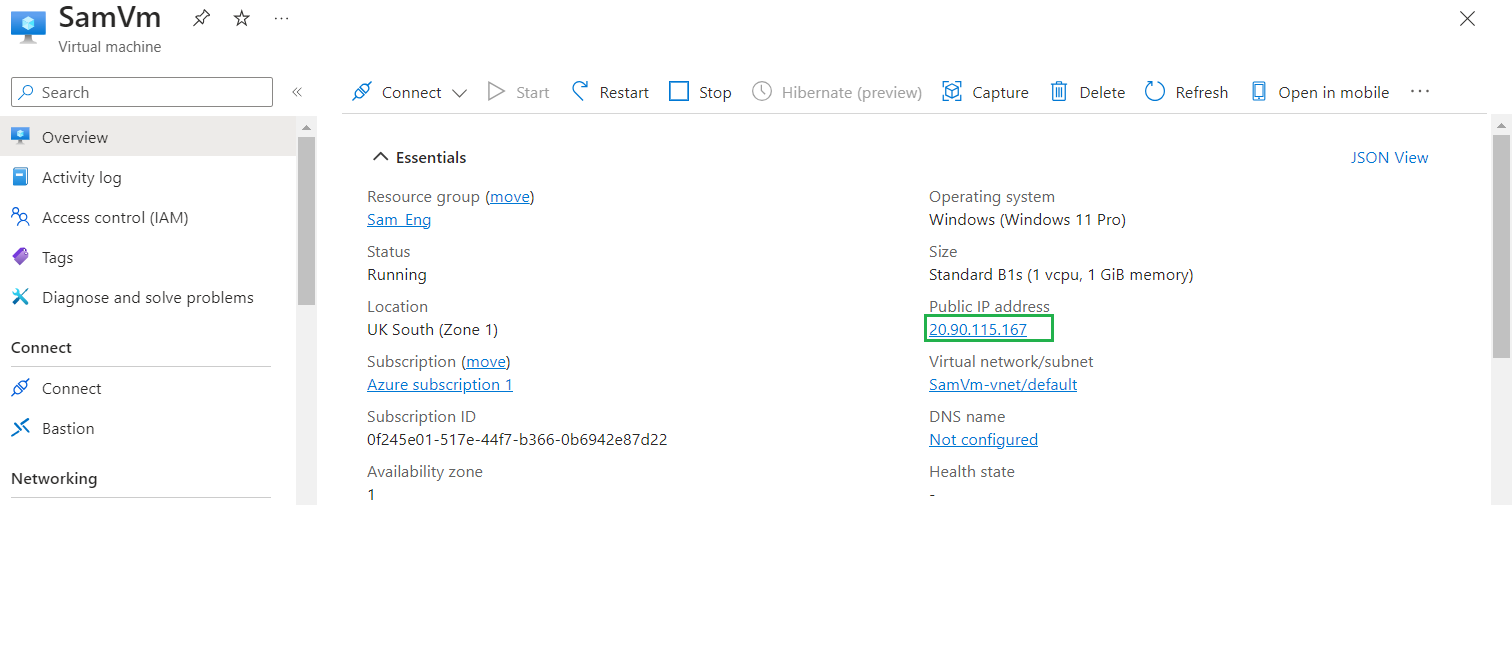
Then click on the overview, On that overview page you will find disassociate button, then click on it.
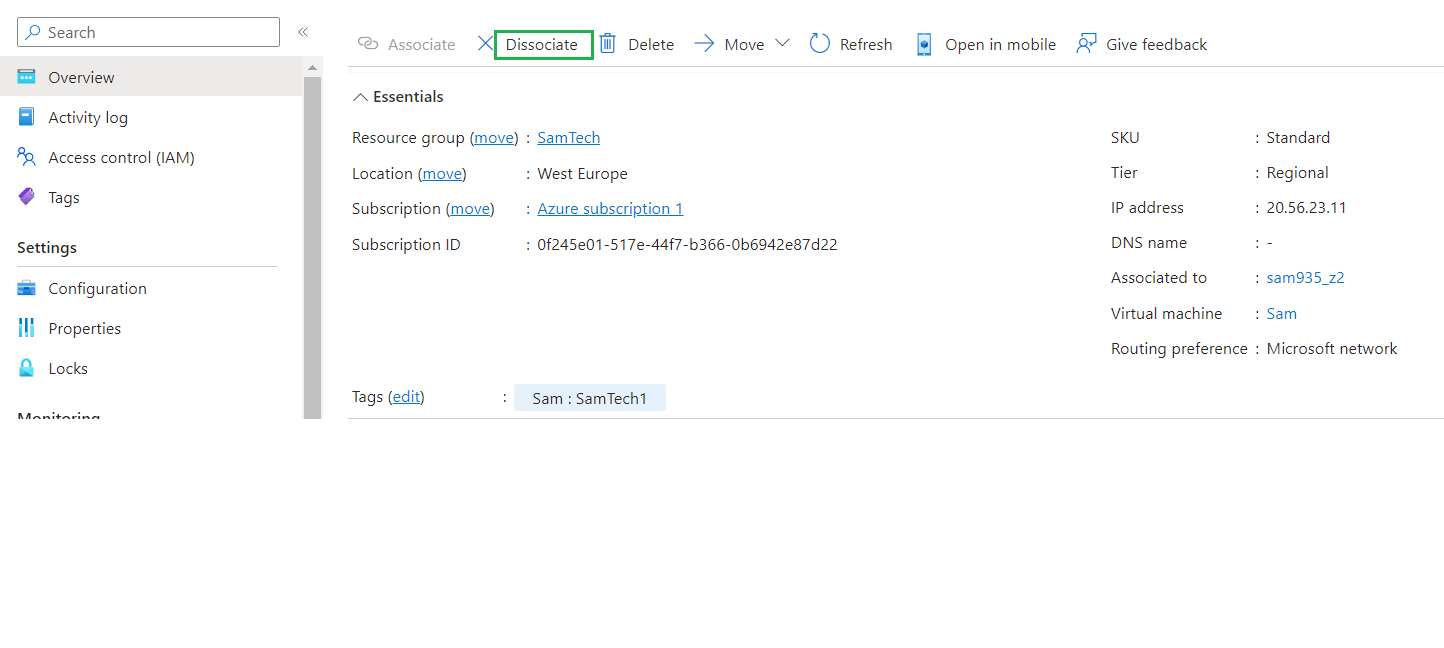
The system will request dissociation confirmation, all you need to do is to confirm by clicking on the yes button.

I believe this tutorial gives you a bit of understanding of how to create and disassociate a Windows 11 virtual machine.
Thank you
Subscribe to my newsletter
Read articles from Samuel Mac Hassan directly inside your inbox. Subscribe to the newsletter, and don't miss out.
Written by
