Achieving Zero Downtime: Building a High Availability Static Website on AWS with Auto Scaling and ALB
 Yash Gupta
Introduction
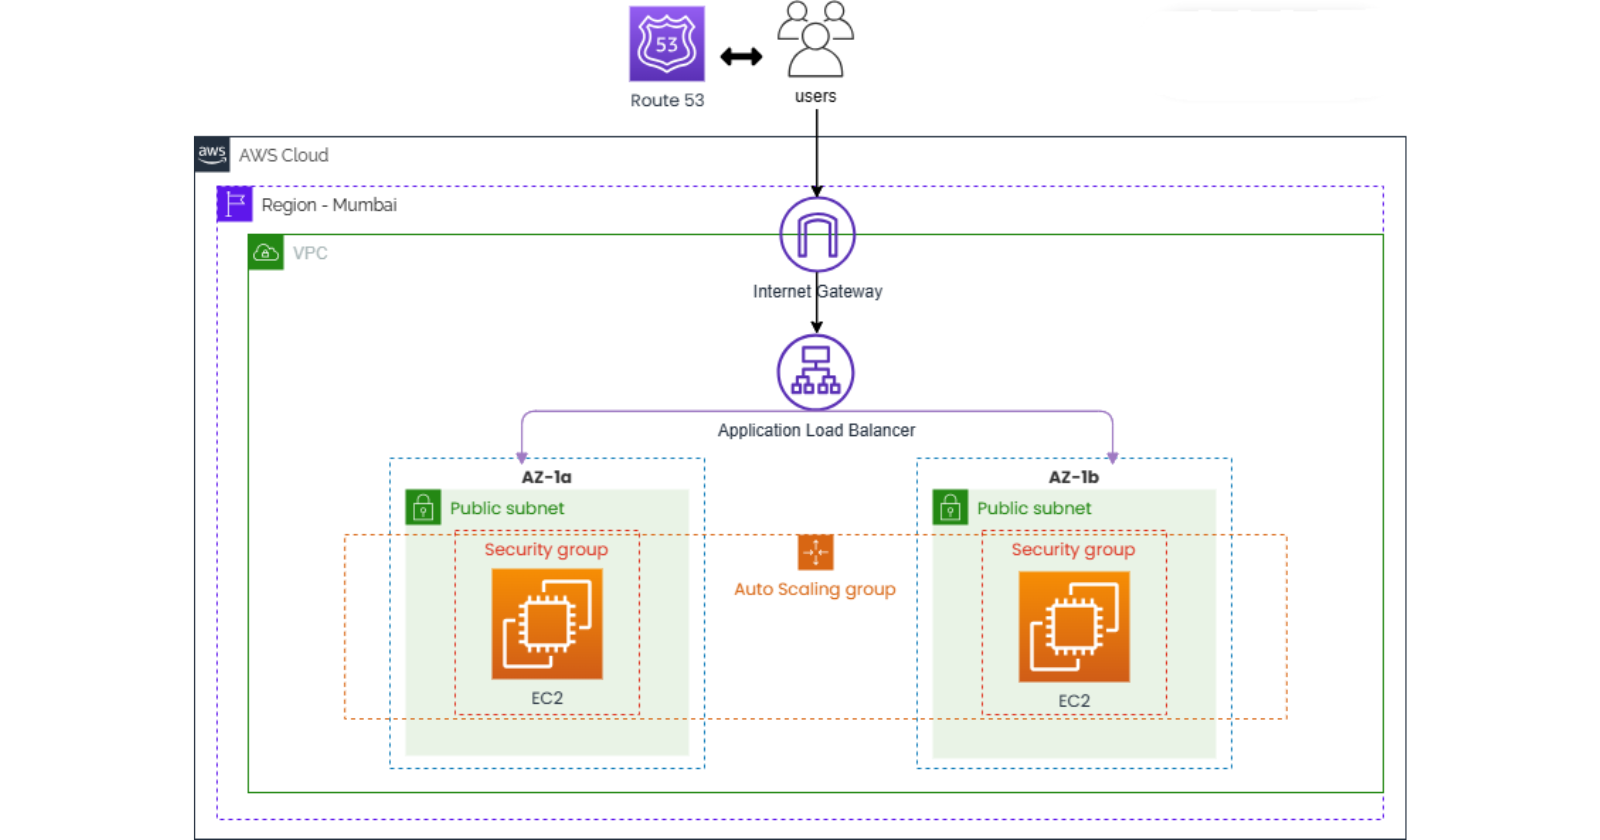
Greetings, fellow learners and enthusiasts! As part of our academic journey, we are thrilled to present a project that encapsulates the essence of modern web infrastructure – "Achieving Zero Downtime: Building a High Availability Static Website on AWS with Auto Scaling and ALB." This project emerges from our collective curiosity to explore and understand the intricacies of deploying web applications that stand resilient against the challenges of an ever-evolving digital landscape.
AWS Services Requirement
EC2 for scalable computing
AMI for rapid instance provisioning.
VPC for secure networking
Security Groups for Robust Protection
Route 53 for reliable DNS
ACM for HTTPS security
Auto Scaling Group for dynamic resource management
ALB for high availability
SNS for timely notifications
What we’ll be doing
Network Environment Setup:
Establish Virtual Private Cloud (VPC)
Define subnets for strategic segmentation
Integrate an Internet Gateway
Configure route tables for efficient traffic management
Create security Groups
Website Deployment and Auto Scaling Template:
Deploy website on Amazon EC2 instance
Create Amazon Machine Image (AMI) for Auto Scaling template
Application Load Balancer (ALB) and Auto-Scaling Group:
Implement ALB for intelligent traffic routing
Distribute traffic across multiple subnets for enhanced fault tolerance
Domain Resolution with Route 53:
Utilize Route 53 for DNS resolution
Translate hostnames to IP addresses for seamless accessibility
HTTPS Security with ACM:
Integrate AWS Certificate Manager (ACM) for HTTPS
Strengthen website security and instill user trust.
Step 1: Create our environment
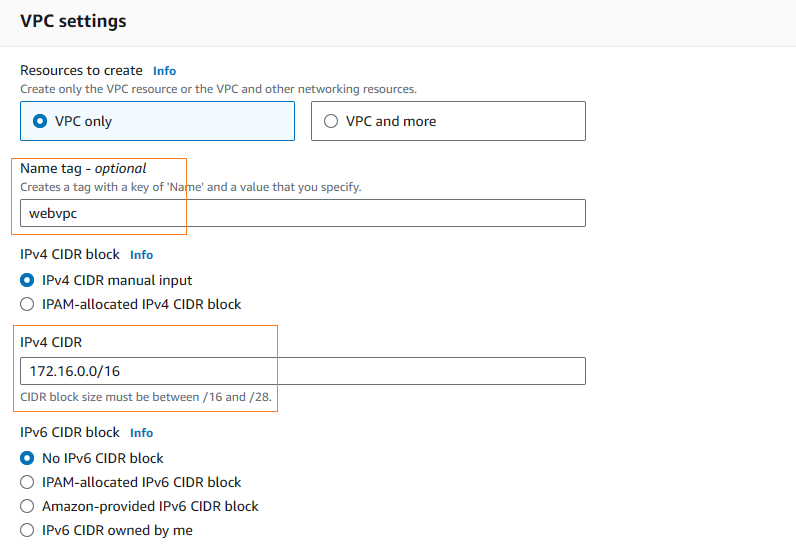
Create a VPC:
- Build the main networking space called a Virtual Private Cloud (VPC).
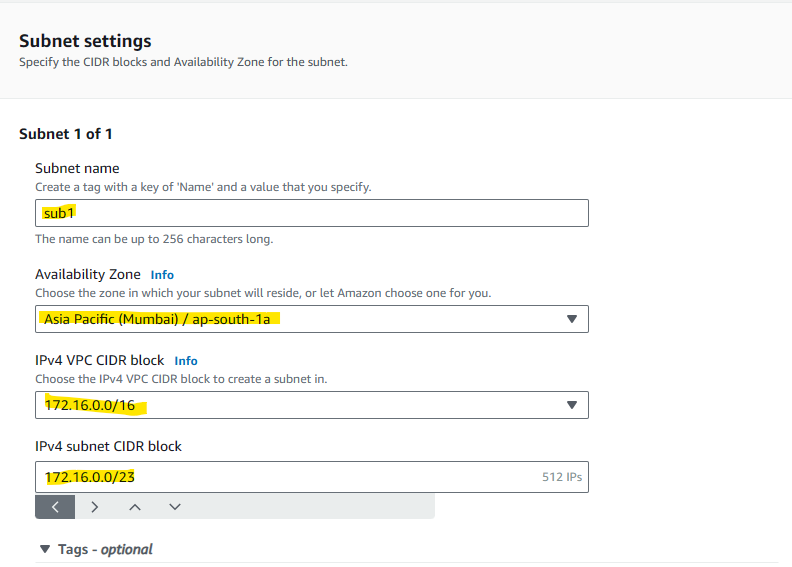
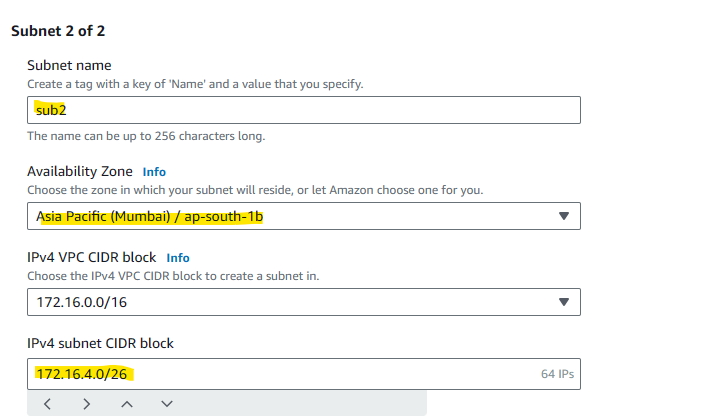
Set Up Public Subnets:
Make two (2) public sub-areas where our EC2 instances will be kept.
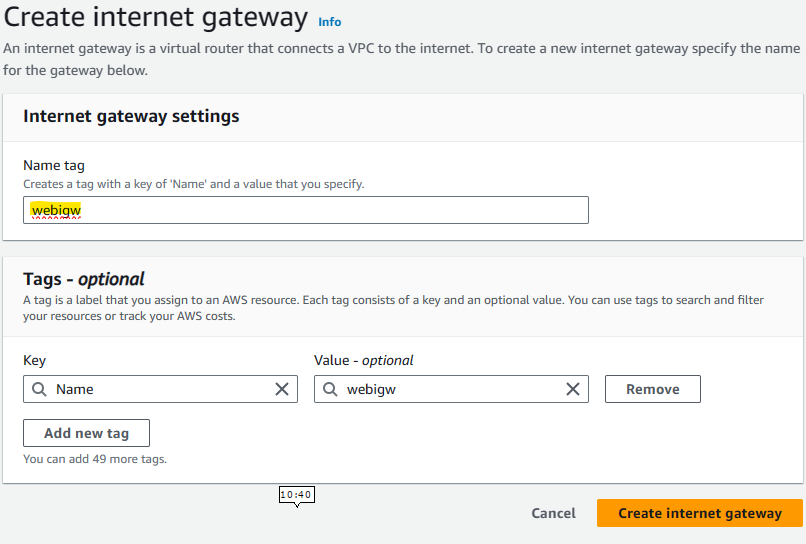
Add an Internet Gateway:
Include a gateway to connect our sub-areas to the internet.

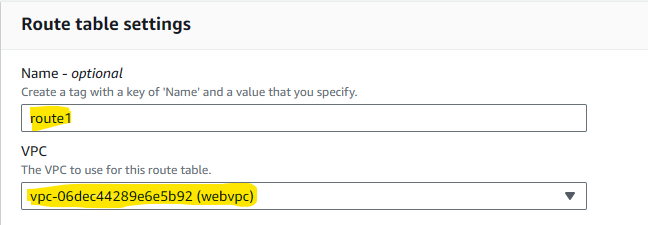
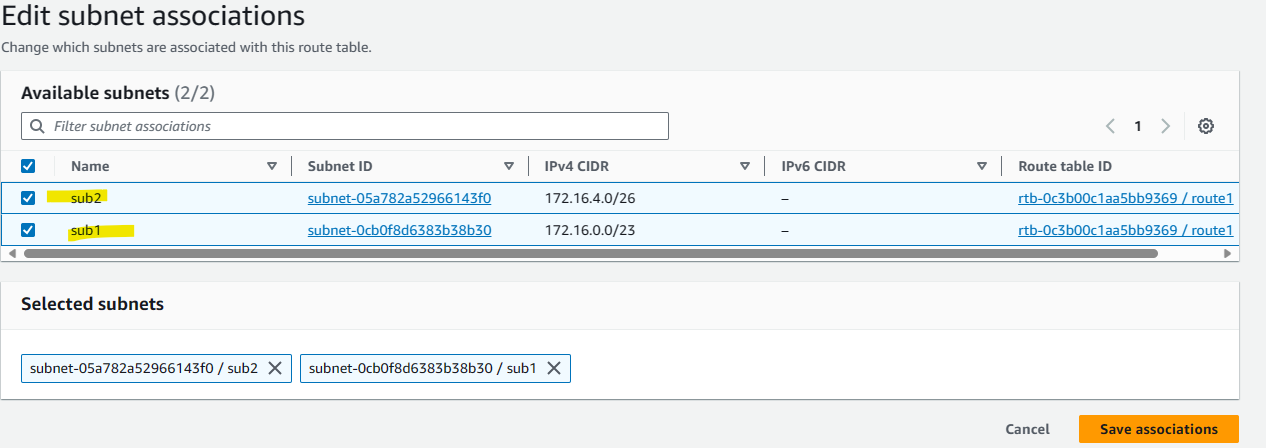
Direct Traffic with Route Table:
Organize the route table to guide traffic from the sub-areas to the internet gateway.


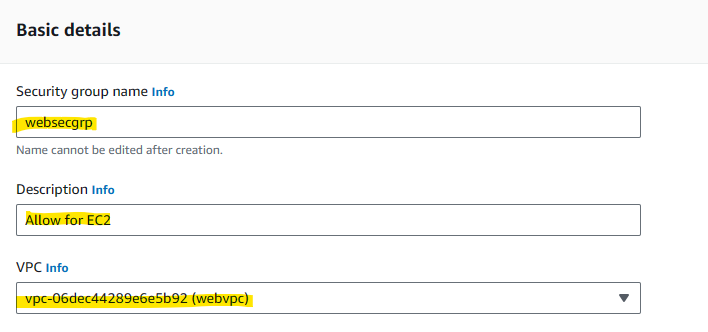
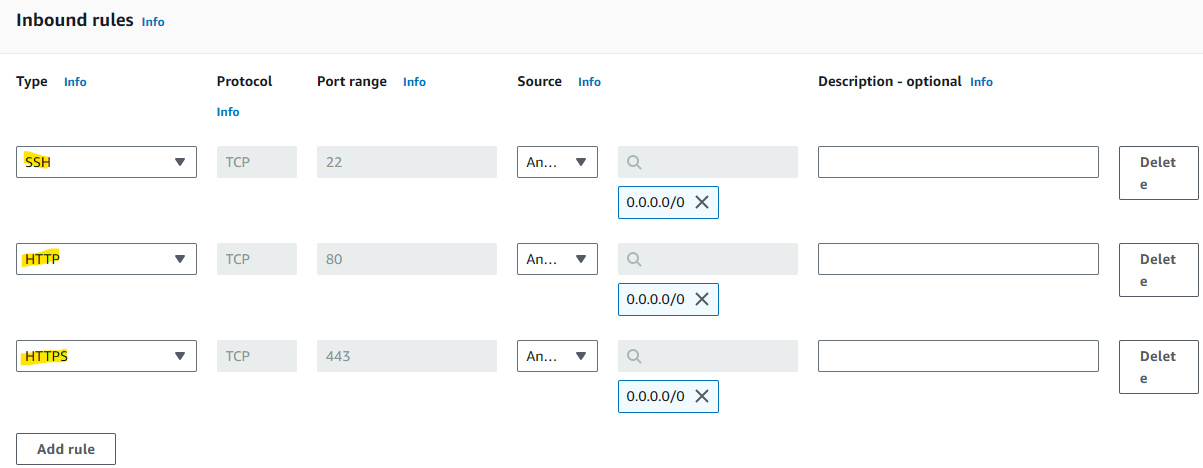
Create Security Groups
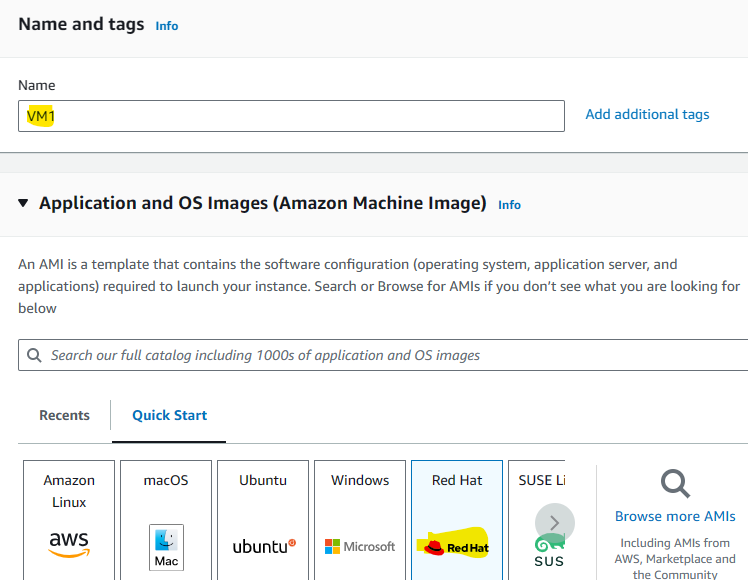
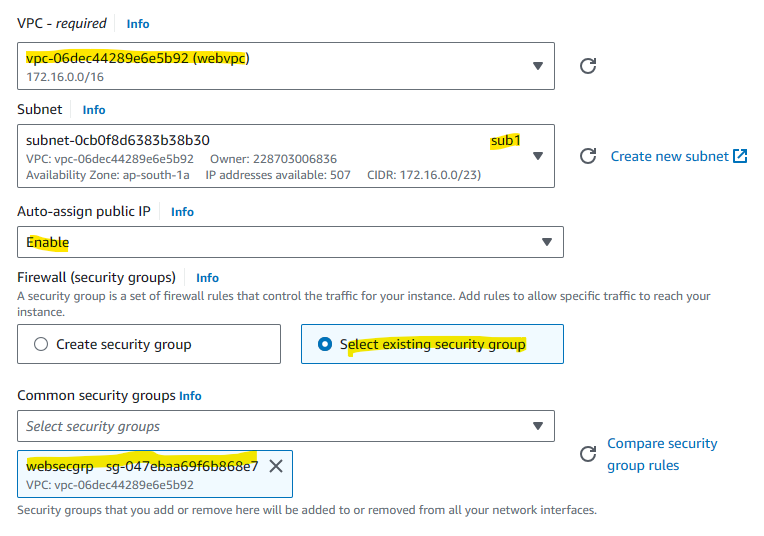
Step 2: Deploy EC2 and create AMI

#!/bin/bash
sudo su -
yum install httpd -y
systemctl enable --now httpd
cd /var/www/html
echo '<!DOCTYPE html>
<html lang="en">
<head>
<meta charset="UTF-8">
<meta name="viewport" content="width=device-width, initial-scale=1.0">
<title>Cloud Engineer Portfolio</title>
<style>
body {
font-family: 'Segoe UI', Tahoma, Geneva, Verdana, sans-serif;
margin: 0;
padding: 0;
background-color: #f5f5f5;
color: #333;
line-height: 1.6;
}
header {
background-color: #3498db;
color: #ecf0f1;
padding: 30px 0;
text-align: center;
}
nav {
background-color: #2c3e50;
padding: 15px;
text-align: center;
}
nav a {
color: #ecf0f1;
text-decoration: none;
padding: 15px;
margin: 0 15px;
font-weight: bold;
transition: color 0.3s;
}
nav a:hover {
color: #3498db;
}
section {
background-color: #fff;
border-radius: 8px;
box-shadow: 0 4px 8px rgba(0, 0, 0, 0.1);
padding: 30px;
margin: 20px auto;
max-width: 800px;
}
section h2 {
color: #3498db;
}
section p {
margin-bottom: 15px;
}
section ul {
list-style-type: none;
padding: 0;
margin: 0;
}
section li {
margin-bottom: 10px;
}
footer {
background-color: #3498db;
color: #ecf0f1;
padding: 20px 0;
text-align: center;
}
footer p {
margin: 0;
}
</style>
</head>
<body>
<header>
<h1 style="margin-bottom: 0; font-size: 2em;">Portfolio-Cloud-Skills</h1>
</header>
<nav>
<a href="#">Home</a>
<a href="#">About</a>
<a href="#">Skills</a>
<a href="#">Projects</a>
<a href="#">Contact</a>
</nav>
<section>
<h2>About Me</h2>
<p>Welcome to my personal portfolio! I am a passionate and skilled Cloud Engineer with a strong background in designing, implementing, and managing cloud infrastructure.</p>
<p>With a keen interest in cloud technologies and a commitment to staying updated with the latest advancements, I bring a blend of technical expertise and problem-solving skills to the table.</p>
</section>
<section>
<h2>Skills</h2>
<p>Here are some of my key skills as a Cloud Engineer:</p>
<ul>
<li><strong>Infrastructure as Code (IaC)</strong> using Terraform</li>
<li><strong>Cloud Platforms:Cloud Platforms:</strong> AWS, Azure, Google Cloud</li>
<li><strong>Containerization</strong> with Docker and Kubernetes</li>
<li><strong>Continuous Integration/Continuous Deployment (CI/CD)</strong></li>
<li><strong>Scripting Languages:</strong> Python, Bash</li>
<li><strong>Monitoring and Logging:</strong> Prometheus, Grafana, ELK Stack</li>
</ul>
</section>
<section>
<h2>Projects</h2>
<p>Explore some of the projects I've worked on:</p>
<ul>
<li><strong>Project 1:</strong> Implemented an automated deployment pipeline for a microservices architecture using Jenkins and Kubernetes.</li>
<li><strong>Project 2:</strong> Designed and managed a highly available infrastructure on AWS for a web application with auto-scaling and load balancing.</li>
<li><strong>Project 3:</strong> Created Terraform scripts for provisioning and managing infrastructure resources, improving efficiency and scalability.</li>
<!-- Additional dummy projects -->
<li><strong>Project 4:</strong> Implemented a serverless architecture for real-time data processing using AWS Lambda and Kinesis.</li>
<li><strong>Project 5:</strong> Deployed a multi-region Kubernetes cluster for a global e-commerce platform to ensure high availability and low latency.</li>
</ul>
</section>
<section>
<h2>Contact Me</h2>
<p>Feel free to reach out if you have any questions or if you would like to collaborate:</p>
<ul>
<li><strong>Email:</strong> cloudengineer@example.com</li>
<li><strong>LinkedIn:</strong> linkedin.com/in/cloudengineer</li>
</ul>
<p>Alternatively, you can use the form below to send me a message:</p>
<!-- Add a contact form here if desired -->
</section>
<footer>
<p>© 2023 Your Name - Cloud Engineer. All rights reserved.</p>
</footer>
</body>
</html>
' > index.html

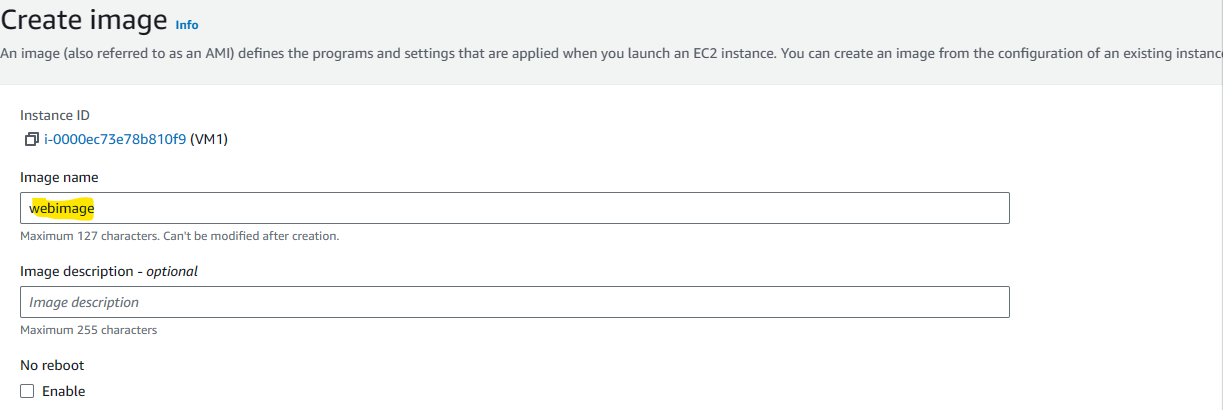
Now Launch two EC2 instances using the Same AMI (webimage) one in sub1 and second in sub2
Step 3: Setup ALB and Auto-Scaling Group
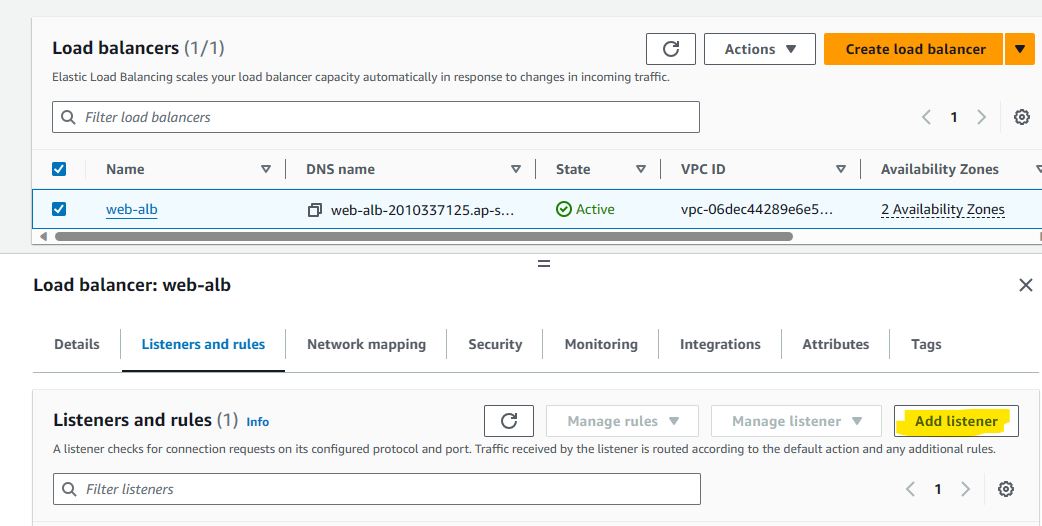
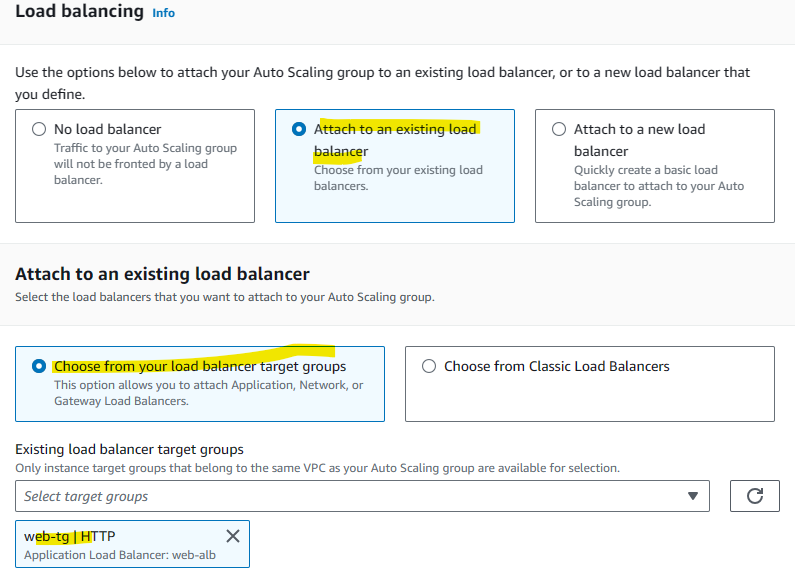
Choose Application Load balancer
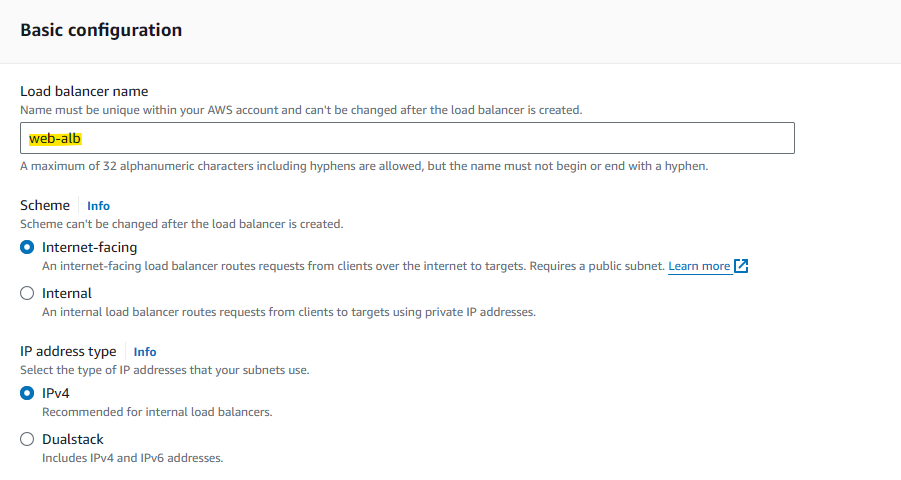
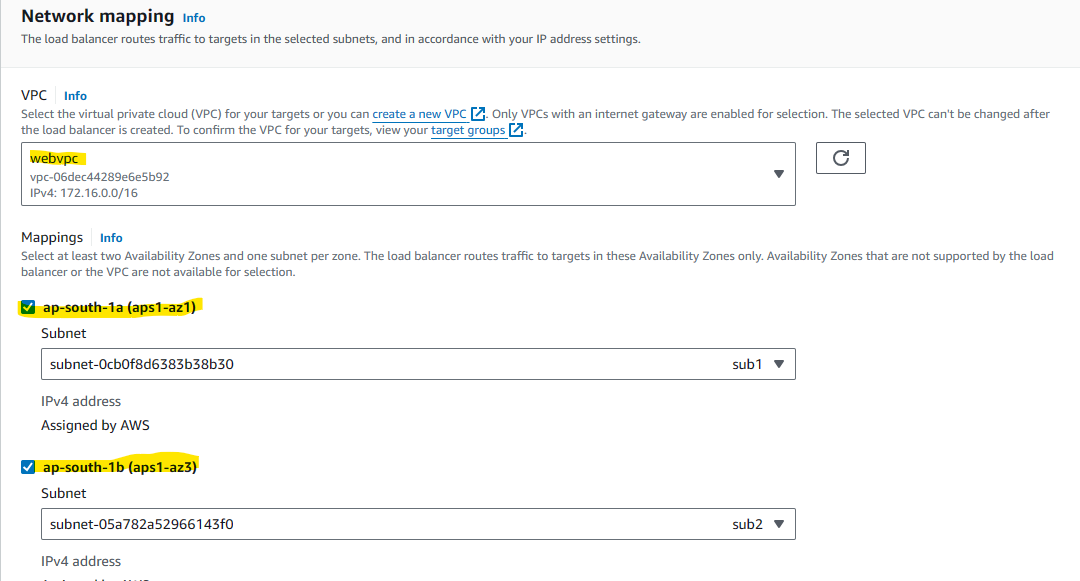
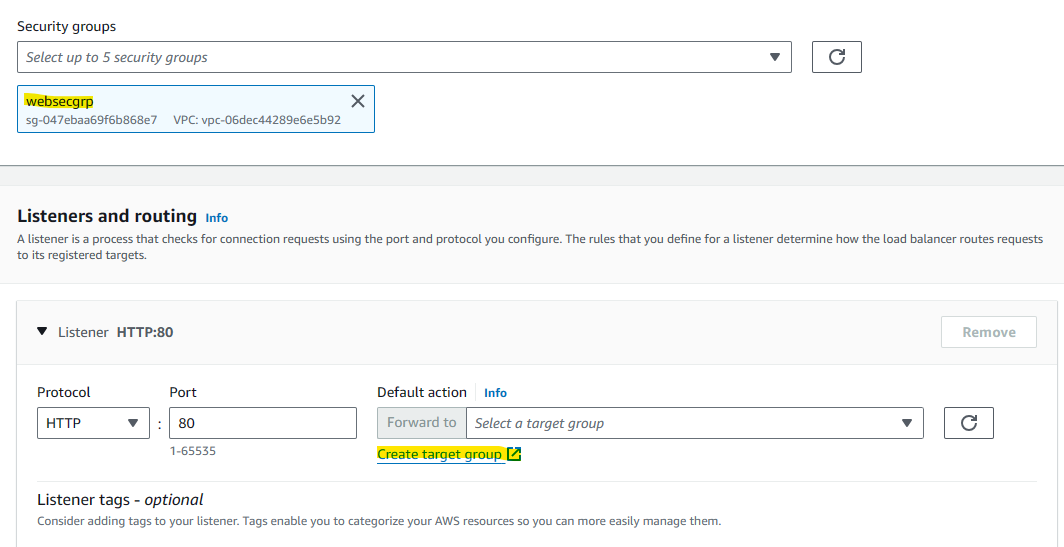


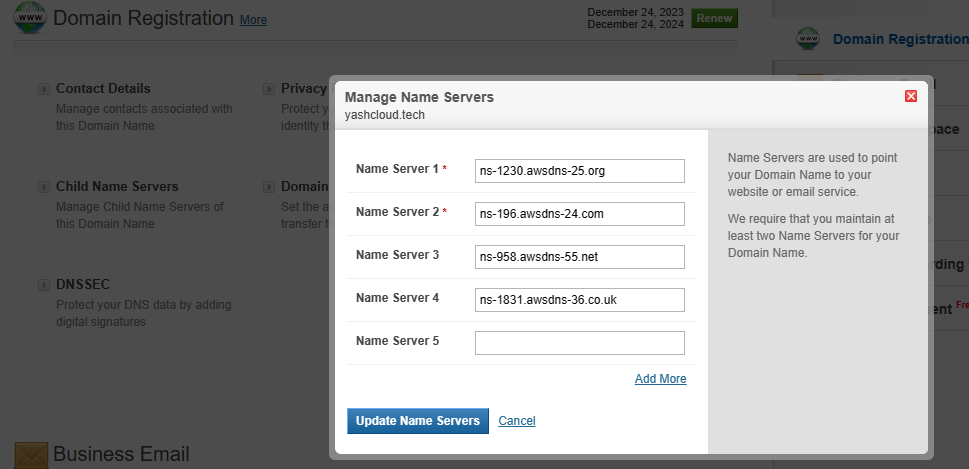
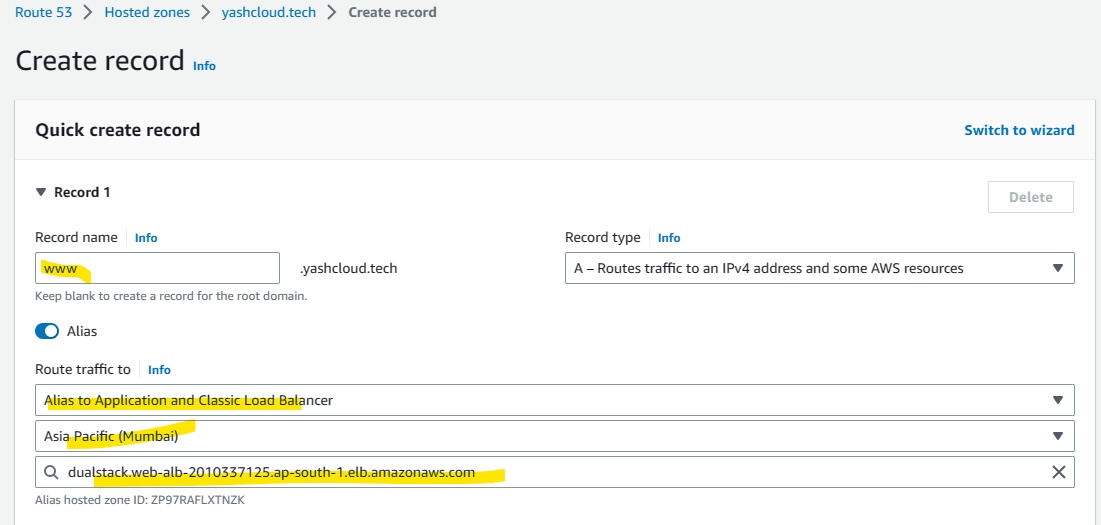
Step 4: Setting Route 53

type yashcloud.tech and left same setting.
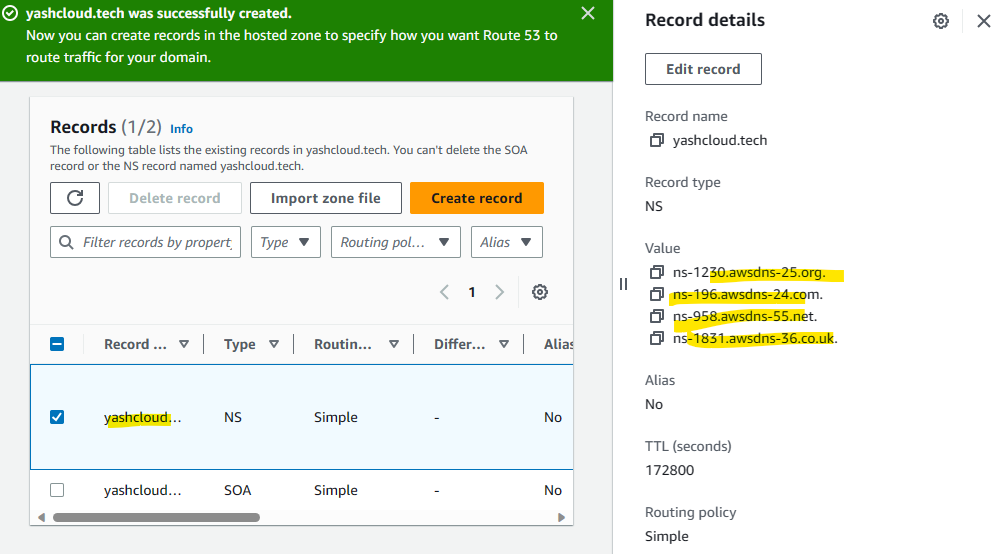
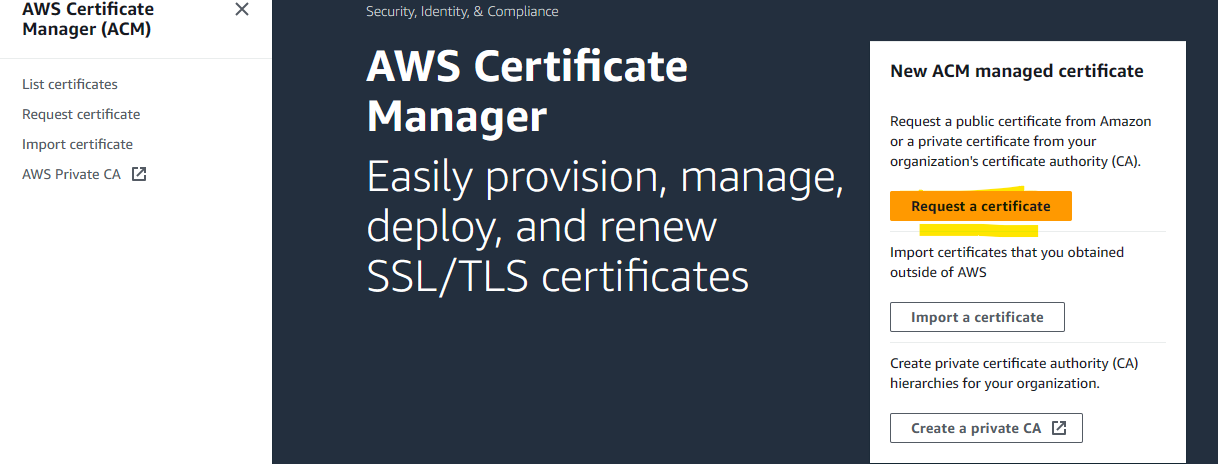
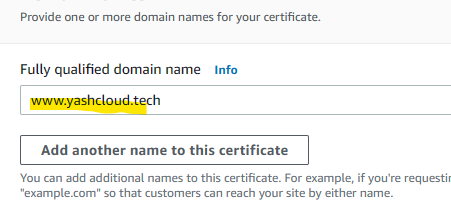
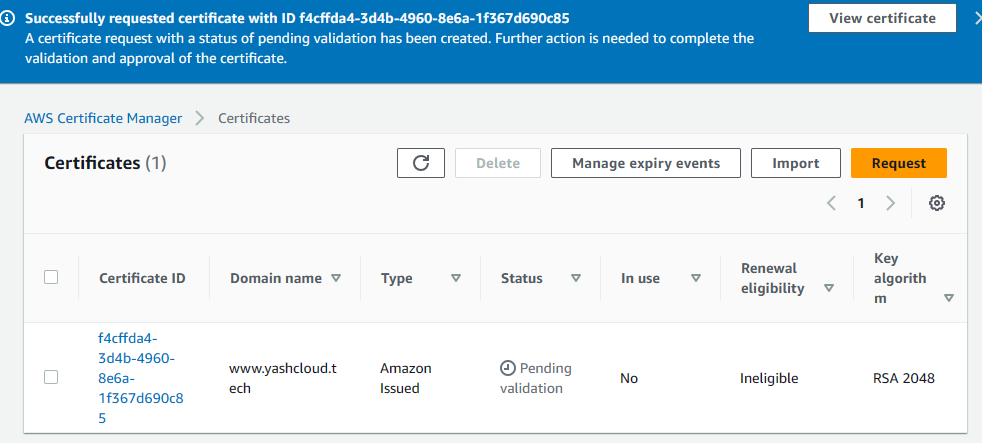
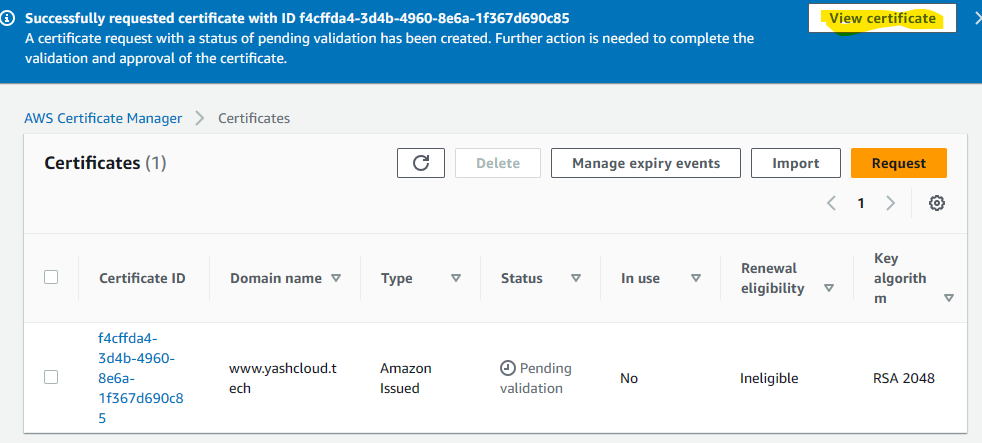
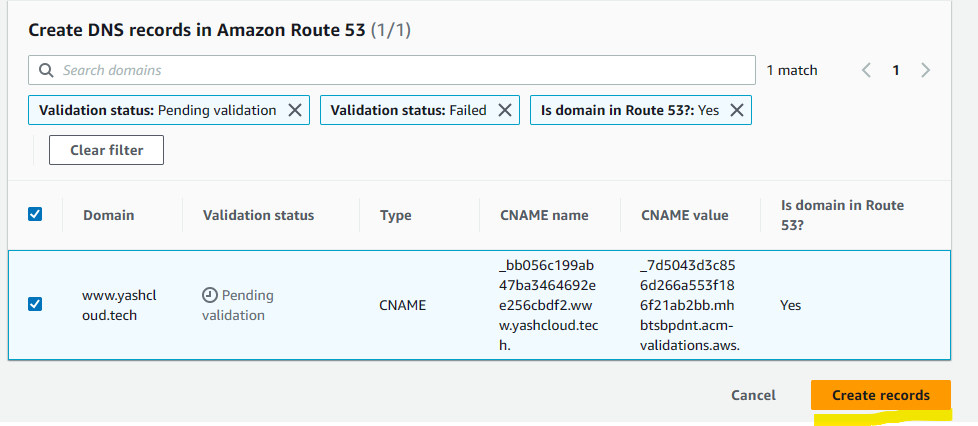
now make it secure using https - ACM

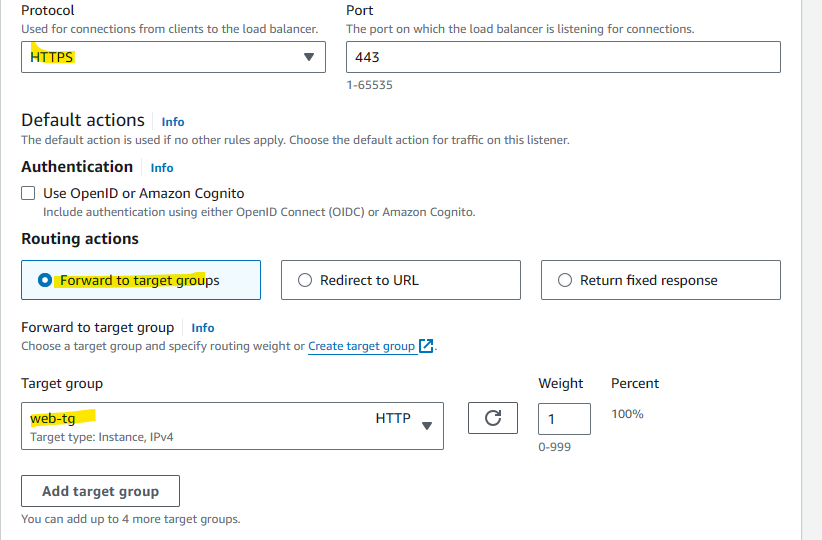
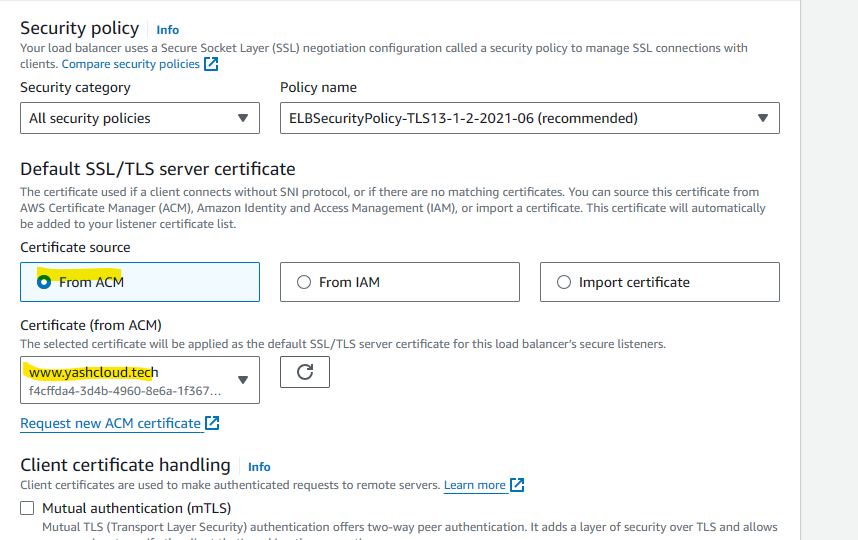

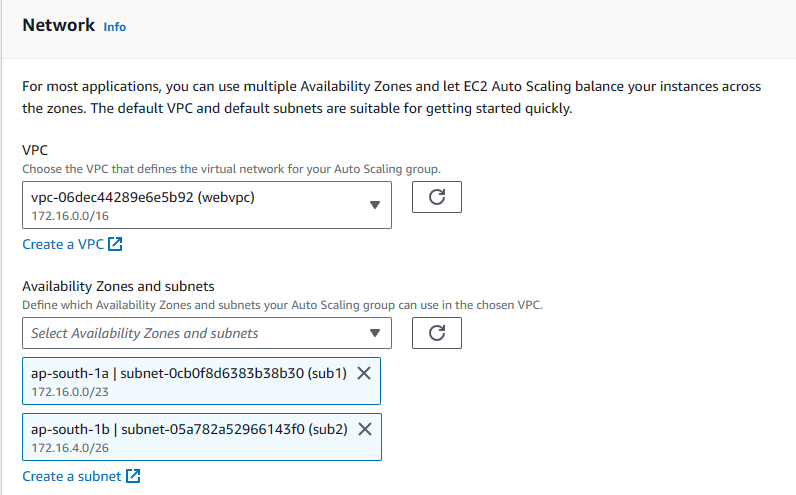
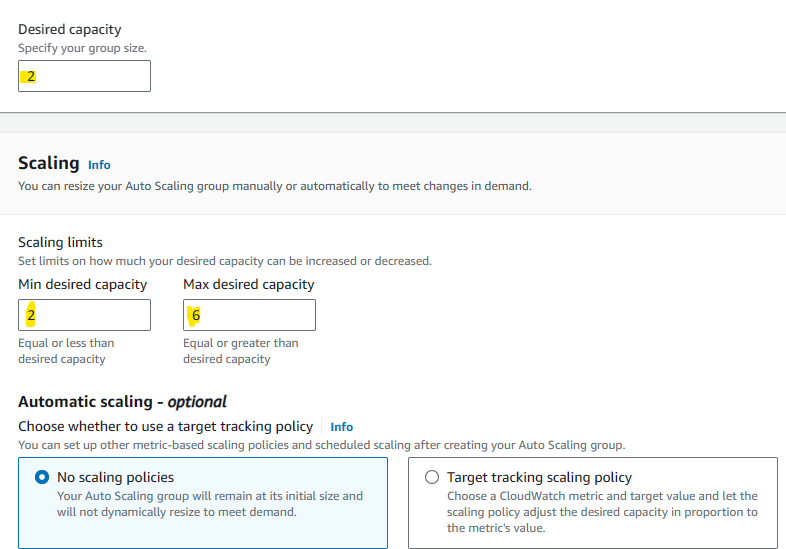
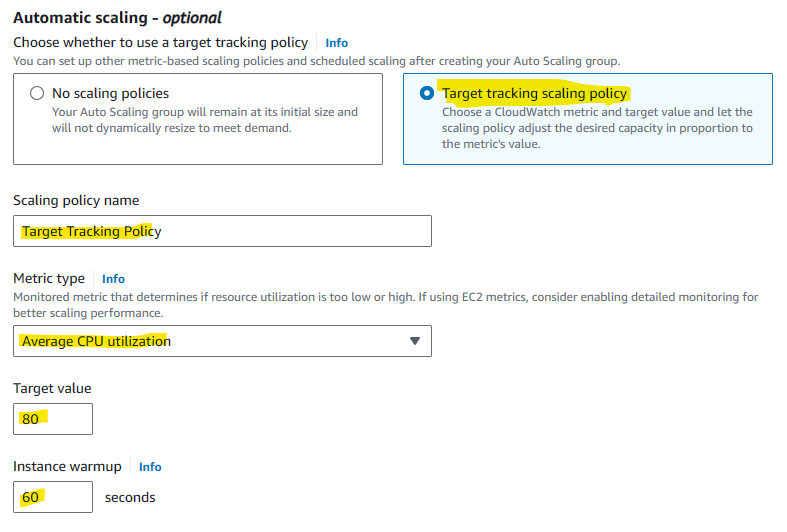
Step 5: Add Auto-Scaling Group
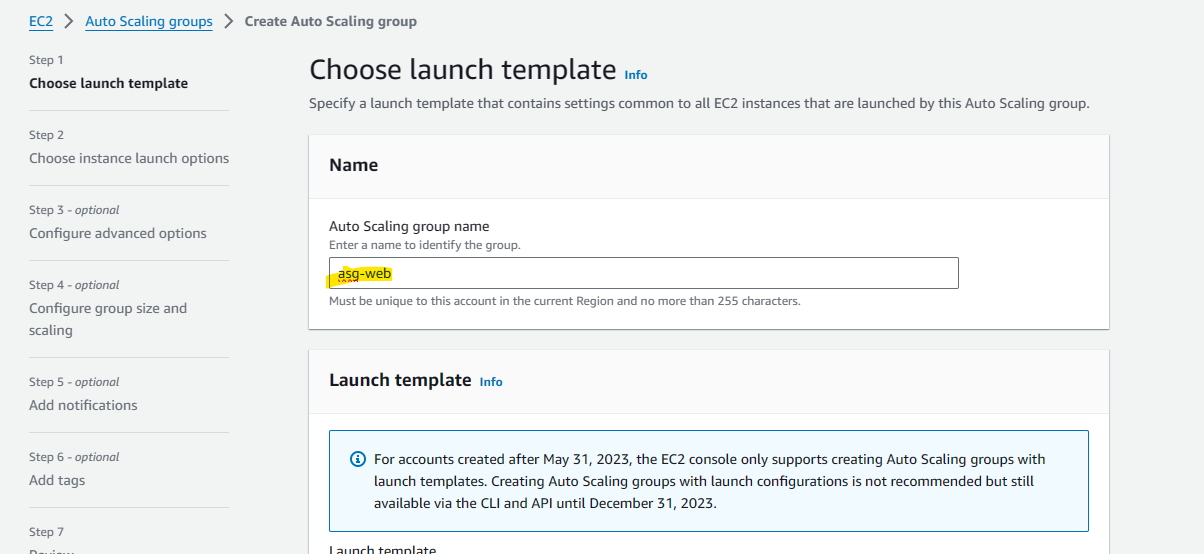
then below click on Create Launch Template, give the name of the template choose AMI, and don't change the network configuration next and create.
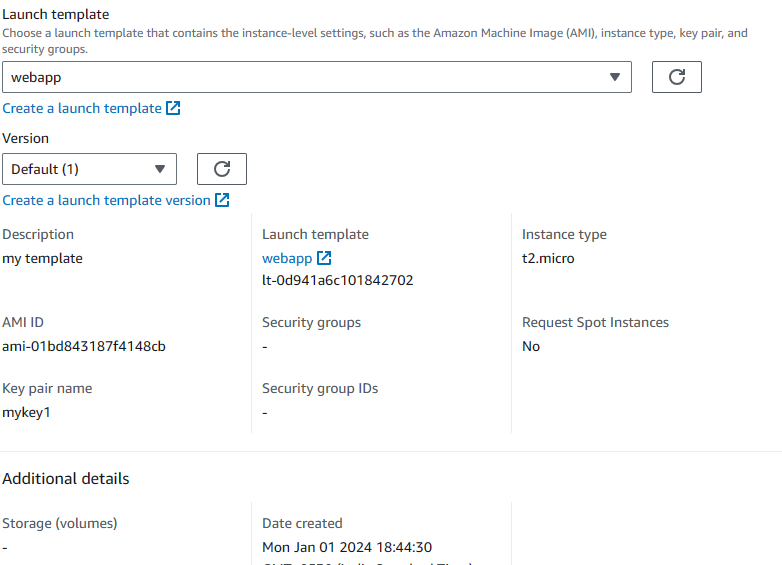
DONE
Subscribe to my newsletter
Read articles from Yash Gupta directly inside your inbox. Subscribe to the newsletter, and don't miss out.
Written by
