Creating 3 Tier Application using on AWS VPC with ASG, ELB along Backup Plan
 Surya Velmurugesan
Table of contents
- Three -tier Architecture
- Presentation Tier
- Application Tier
- Data Tier
- Virtual Private Cloud (VPC)
- VPC Creation
- Subnets
- Subnets Creation
- Internet gateway
- Internet Gateway Creation
- NAT Gateways
- NAT Gateways Creation
- Route Tables
- Route Tables creation
- Associating subnets, IGW, NAT Gateway with respective route tables
- Elastic Load Balancing
- Application Load Balancer Creation (webtier)
- Application Load Balancer Creation (apptier)
- AWS Auto Scaling
- Launch Templates for webtier
- Auto Scaling Group Creation(webtier)
- Launch Templates for apptier
- Auto Scaling Group Creation(apptier)
- Creating Database and Connecting EC2 and taking Backup
- AWS WAF
- WAF Creation
- AWS Backup
- Backup Setup

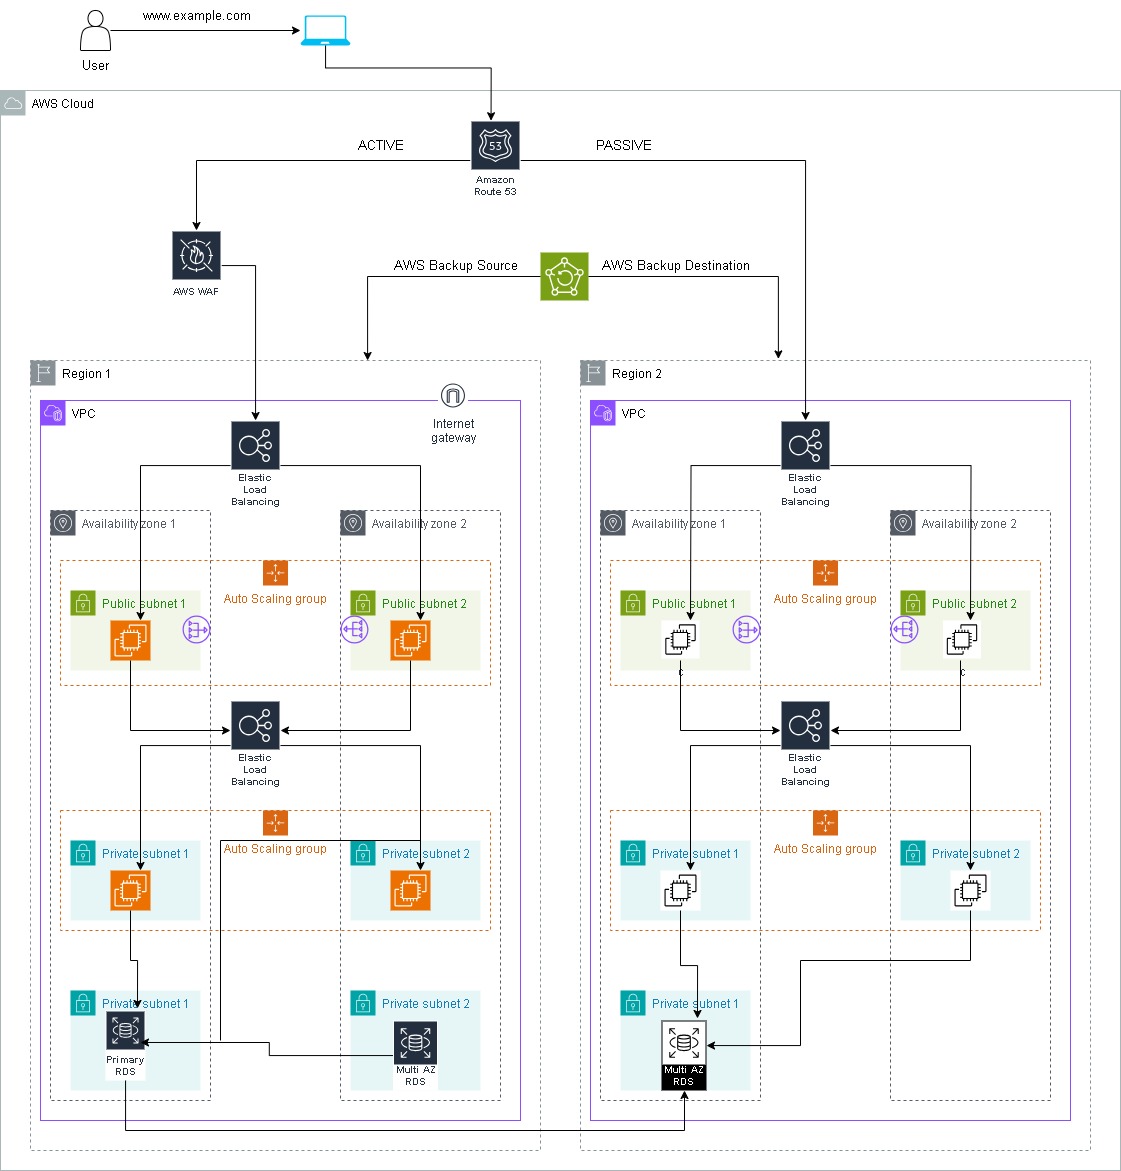
Three -tier Architecture
A three-tier application in the context of cloud computing refers to a software architecture that divides an application into three logical and distinct components, each running on a separate tier or layer. These tiers are typically referred to as the presentation tier, application tier, and data tier. The use of a three-tier architecture provides modularity, scalability, and maintainability for applications.
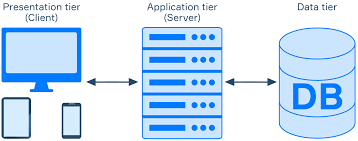
Presentation Tier
This is the top layer that interacts directly with users.
It handles user interface and presentation logic.
In a cloud context, the presentation tier could consist of web browsers or mobile devices accessing the application through the internet.
Application Tier
This tier contains the application logic and business rules.
It processes user requests, performs computations, and manages communication between the presentation tier and the data tier.
In a cloud environment, this tier often involves deploying application servers or serverless functions that run the core application logic.
Data Tier
This is the bottom layer that stores and retrieves data.
It manages the data persistence and storage aspects of the application.
In a cloud-based three-tier architecture, the data tier may involve using cloud-based databases or storage services.
Virtual Private Cloud (VPC)
Amazon Virtual Private Cloud (Amazon VPC) is a service provided by Amazon Web Services (AWS) that allows you to create a logically isolated section of the AWS Cloud where you can launch resources in a virtual network that you define. In simpler terms, it allows you to create your own private piece of the AWS cloud where you can control aspects like IP address ranges, subnets, routing tables, and network gateways.
VPC Creation
Login to the AWS Management Console and navigate to VPC → Create VPC
In VPC Settings → Resources to create → VPC only
And Enter a name for the VPC, IPV4 CIDR block →
172.32.0.0/16→ Create VPC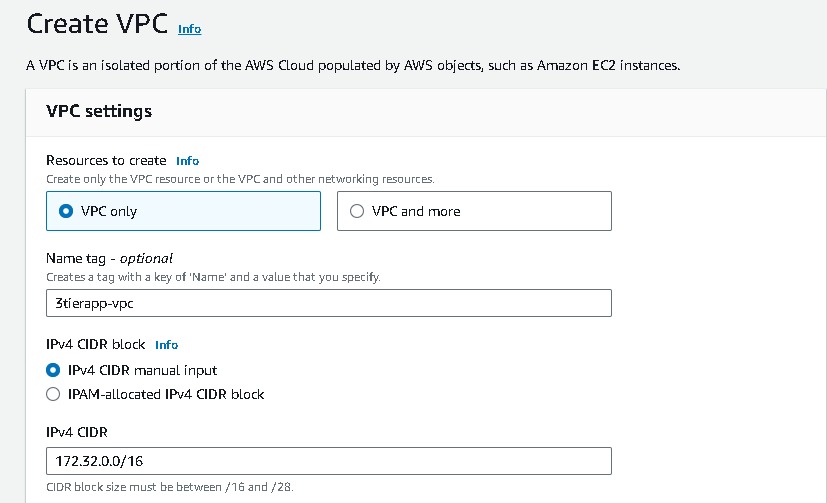
Subnets
In the context of Amazon Virtual Private Cloud (Amazon VPC) on AWS, a Subnet is a range of IP addresses in your VPC where you can place resources. Subnets are essential for organizing and isolating resources within your VPC.
Subnets Creation
Now navigate to subnets and follow Subnets → Create subnet → VPC → VPC ID → select the VPC created that you have created.
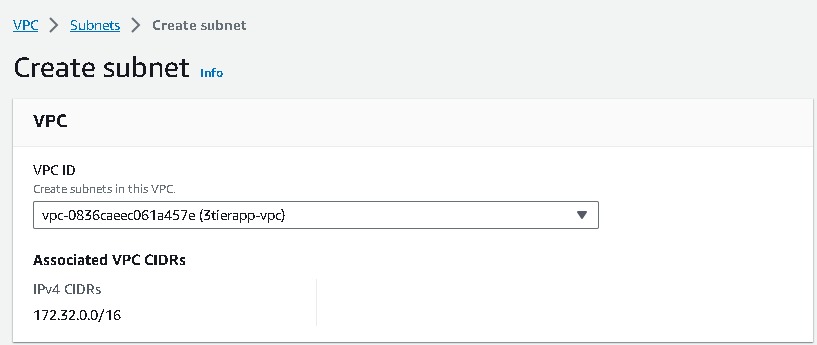
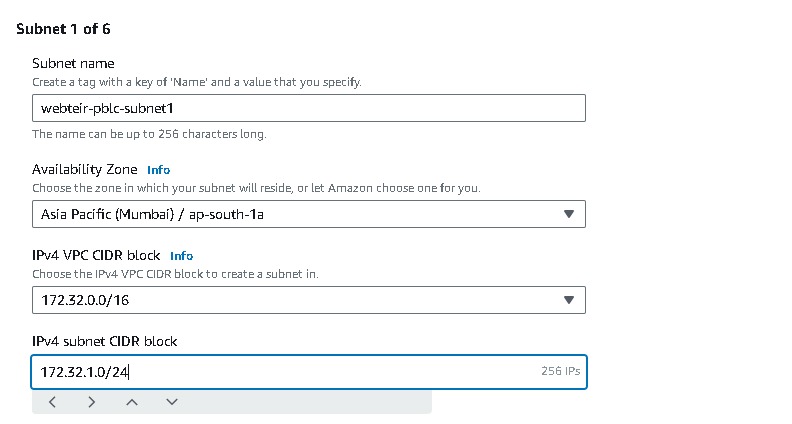
Similarly, now you have to create another 5 subnets one by one, two for webtier, two for apptier, & two for dbtier. And for each sets it should be created in two Availability Zones(AZ), like these i mentioned in this table
| SUBNETS | AVAILABILITY ZONES | CIDR |
| webtier-pblc-subnet1 | AZ1 | 172.32.1.0/24 |
| webtier-pblc-subnet2 | AZ2 | 172.32.2.0/24 |
| apptier-prvt-subnet1 | AZ1 | 172.32.3.0/24 |
| apptier-prvt-subnet2 | AZ2 | 172.32.4.0/24 |
| dbtier-prvt-subnet1 | AZ1 | 172.32.5.0/24 |
| dbtier-prvt-subnet2 | AZ2 | 172.32.6.0/24 |
Name each subnet( i.e webtier-pblc-subnet1) and provide a CIDR for each.
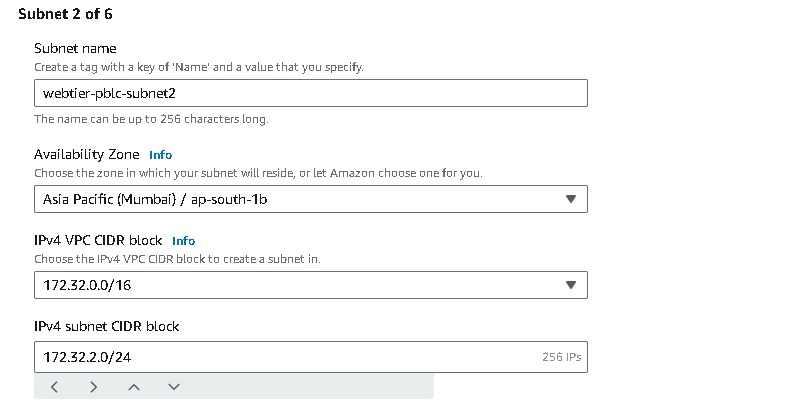
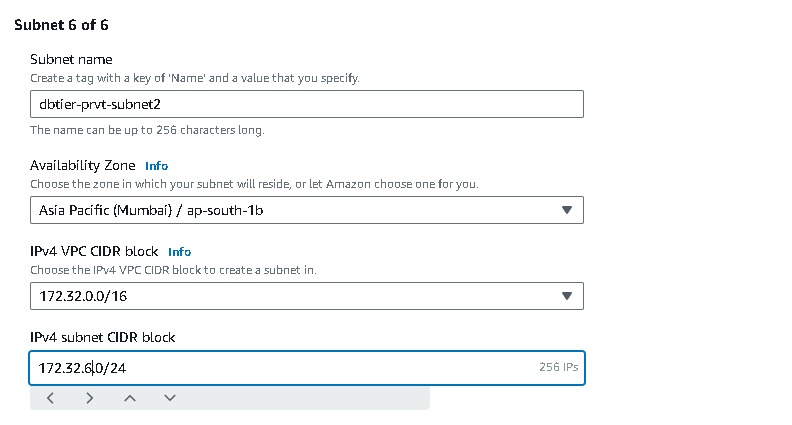
After all the subnets are created it will look like these,

Internet gateway
An Internet Gateway (IGW) is a key component in Amazon Virtual Private Cloud (Amazon VPC) that allows communication between instances in your VPC and the internet and allows internet traffic to reach resources in your VPC. It supports IPv4 and IPv6. It essentially serves as a gateway for outbound and inbound traffic between your VPC and the internet.
Internet Gateway Creation
Navigate to Internet gateways → Create Internet gateway → Name tag, give the name of your gateway. After IGW is created it needs to be attached to the vpc you created (i.e. 3tierapp-vpc). So Select your IGW → Actions → Attach to VPC → then select your vpc

NAT Gateways
A Network Address Translation (NAT) Gateway is a managed service provided by Amazon Web Services (AWS) that allows instances in a private subnet of a Virtual Private Cloud (VPC) to initiate outbound traffic to the internet while preventing unsolicited inbound traffic from reaching those instances and tasks such as downloading software updates, accessing external APIs, or fetching data without exposing them directly to the internet.
NAT Gateways Creation
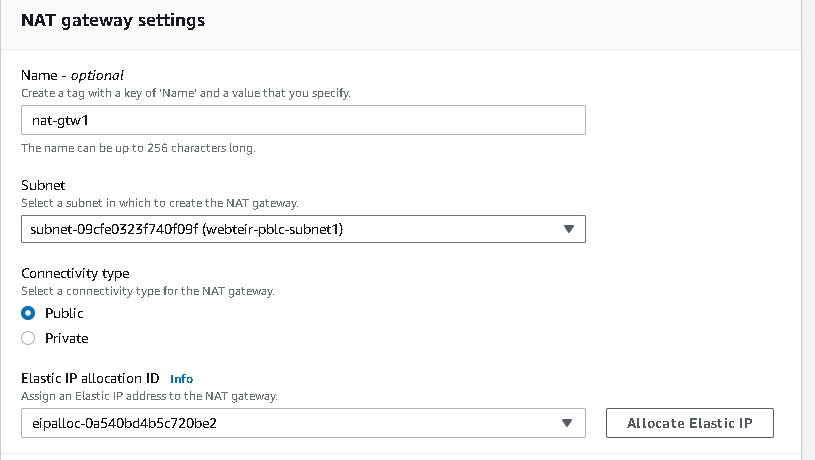
Navigate to NAT gateway → create NAT gateway →enter the name →subnet (select the public subnet ) →Connectivity type(public)→ Allocate Elastic IP →Create Nat Gateway.
Route Tables
In Amazon Virtual Private Cloud (Amazon VPC), a Route table is a set of rules, called routes, that are used to determine where network traffic is directed. Each subnet in your VPC must be associated with a route table; the table controls the routing for the subnet.To enable internet access for instances in a subnet, you add a route with a destination of 0.0.0.0/0 (all IPv4 addresses) and a target pointing to an Internet Gateway. For instances in private subnets that need outbound internet access, you add a route with a destination of 0.0.0.0/0 and a target pointing to a NAT Gateway.
Route Tables creation
Navigate to route tables →create route table → name your route table →select your vpc →create.
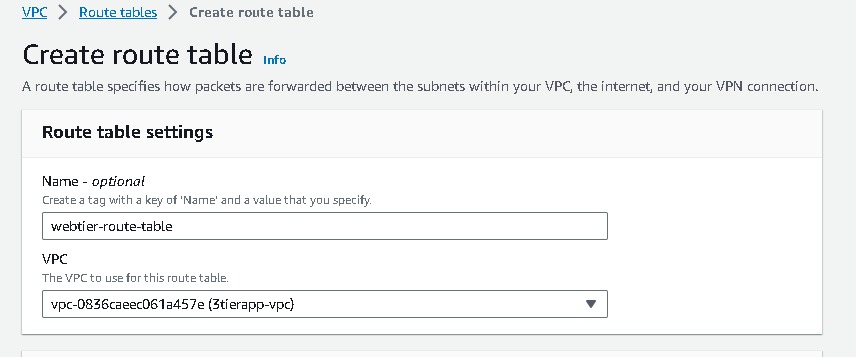
Like webtier route table, We will be creating 2 more route tables one for the app tier and one for the dbtier. So after the creation of the route table, it will look like this.


Associating subnets, IGW, NAT Gateway with respective route tables
After route tables are created, it is necessary to associate your subnets with the route table. Also as our webtier will be facing the internet so in the route section we will provide internet gateway. similarly, for the app tier and db tier, we don't want to expose public facing internet directly so we will attach NAT gateway in their routes section. You can see the below table for the respective route and subnet association.
| Route table | Route | Subnets Association |
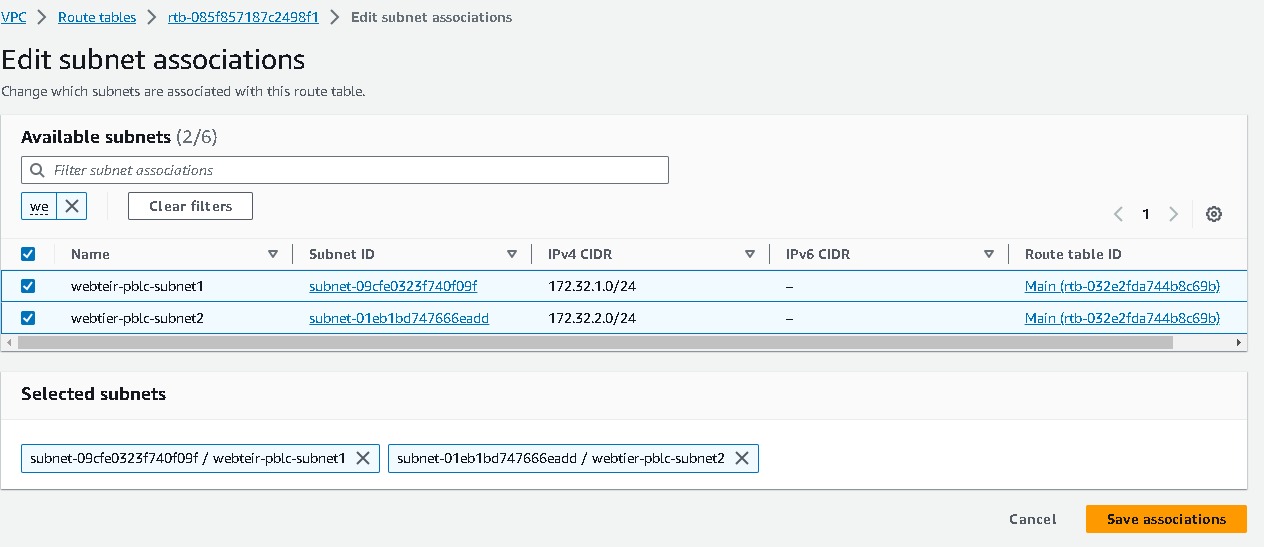
| webtier-route-table | IGW | webtier-pblc-subnet1 ; webtier-pblc-subnet2 |
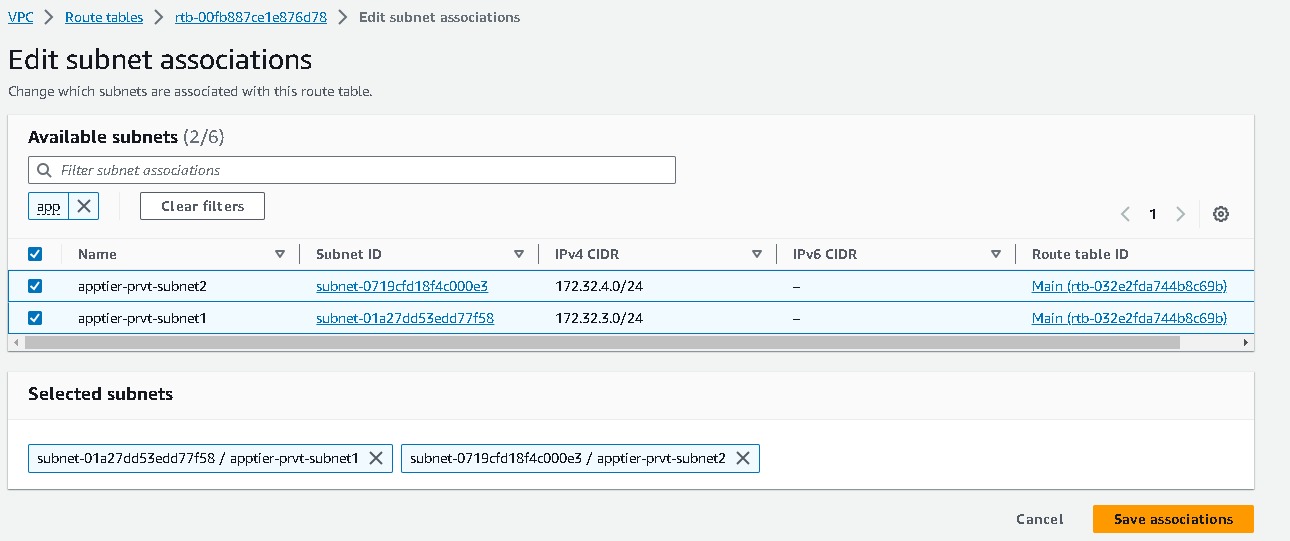
| apptier-route-table | NAT Gateway | apptier-prvt-subnet1 ; apptier-pblc-subnet2 |
| dbtier-route-table | NAT Gateway | dbtier-prvt-subnet1 ; dbtier-pblc-subnet2 |
- Select your route table →Routes →Edit routes → add route → Destination(
0.0.0.0/0) → internet gateway(you created) → save changes.

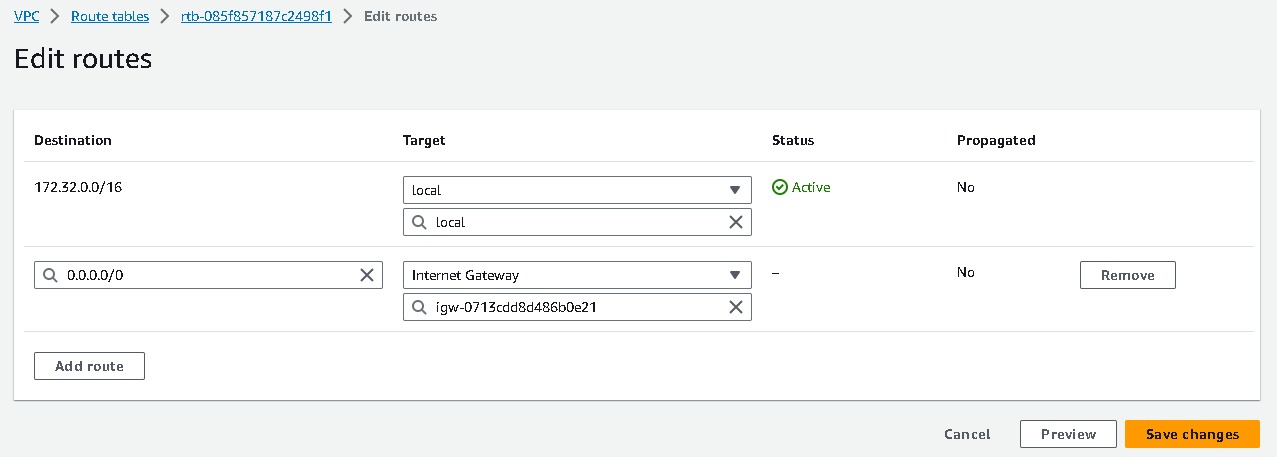
- Now we will associate subnets in route tables go to → subnet associations → edit subnet association →select your subnets → save changes.
Similarly like webtier, we will be attaching NAT gateway to apptier and dbtier route tables.

And their subnets association are like these,
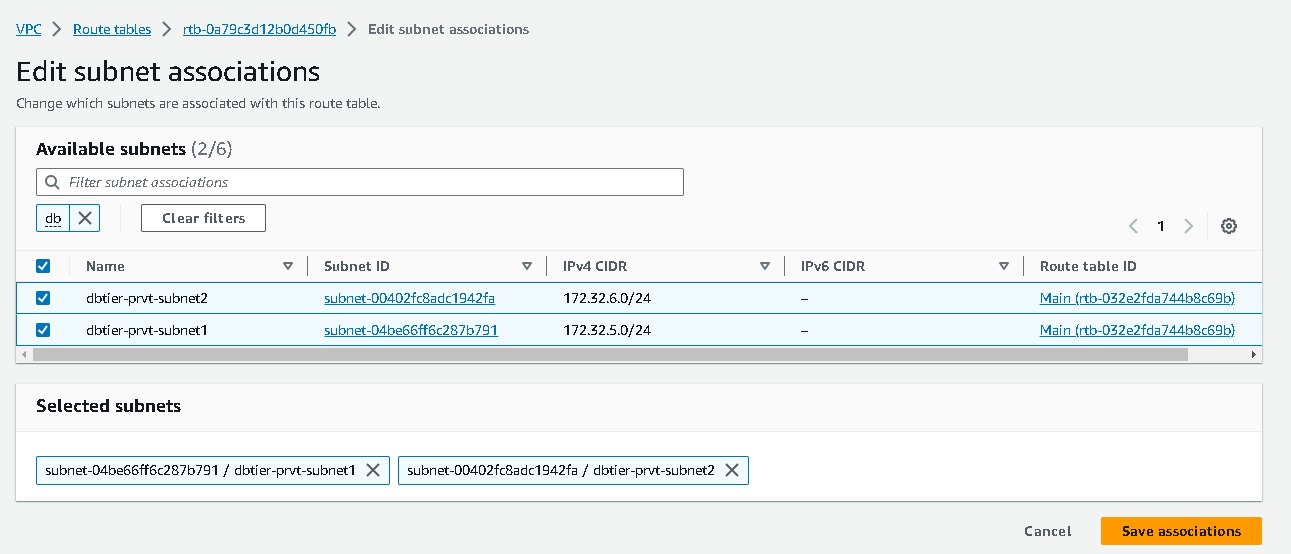
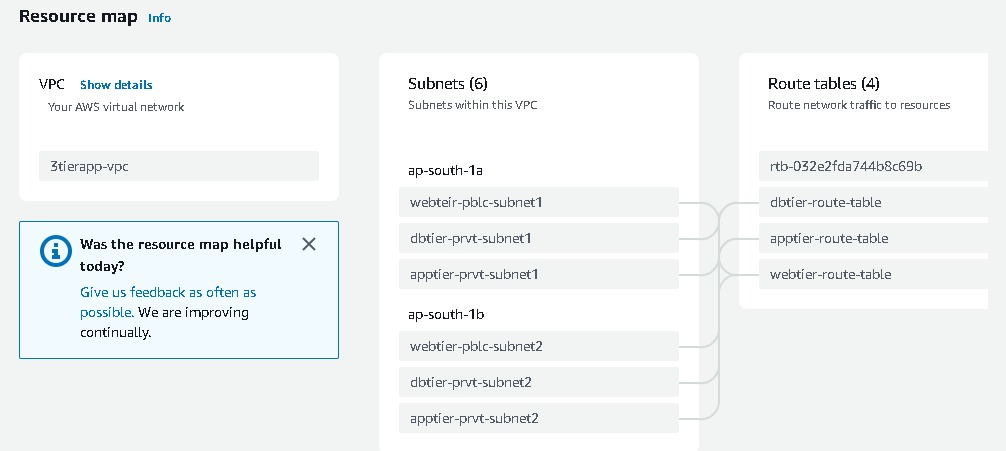
After all the subnets are associated with route tables you can view your mapping. Go to VPC → select your vpc → resources maps
Elastic Load Balancing
Elastic Load Balancing (ELB) is an AWS service that automatically distributes incoming application traffic across multiple targets, such as Amazon EC2 instances, containers, and IP addresses, in one or more Availability Zones. ELB serves to enhance the availability and fault tolerance of your applications. Elastic Load Balancing is a fundamental component of scalable and fault-tolerant architectures on AWS. By distributing incoming traffic across multiple targets, ELB helps ensure high availability and reliability for your applications. Types:
Application Load Balancer (ALB): Best suited for routing HTTP/HTTPS traffic and provides advanced routing features. Works at the application layer (Layer 7) of the OSI model.
Network Load Balancer (NLB): Ideal for handling TCP/UDP traffic and is designed for high performance and low latency. Operates at the transport layer (Layer 4).
Classic Load Balancer: The older version, now considered a legacy option. Supports both HTTP/HTTPS and TCP/UDP traffic but lacks some of the advanced features found in ALB and NLB.
Application Load Balancer Creation (webtier)
Now navigate to EC2 in the AWS Management Console. Select Load Balancing → Load Balancers → Create Load Balancer
Select Application load balancer → Basic Configuration → Load balancer name (webtier-alb) , Scheme →select “Internet-facing”, IP address type → select IPV4
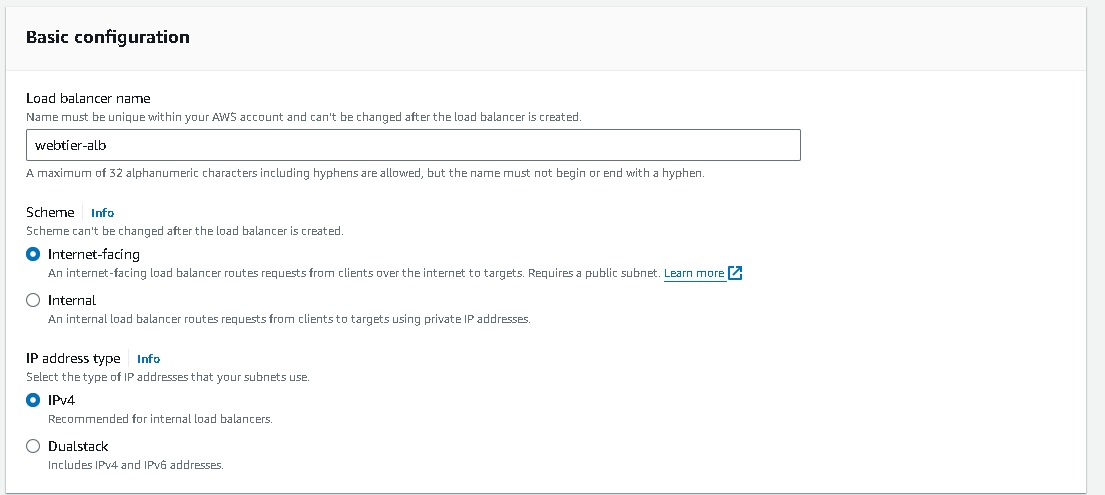
Network mapping → VPC (select the one created say 3tier-vpc), Mappings → select each AZ and the public subnets associated with each)
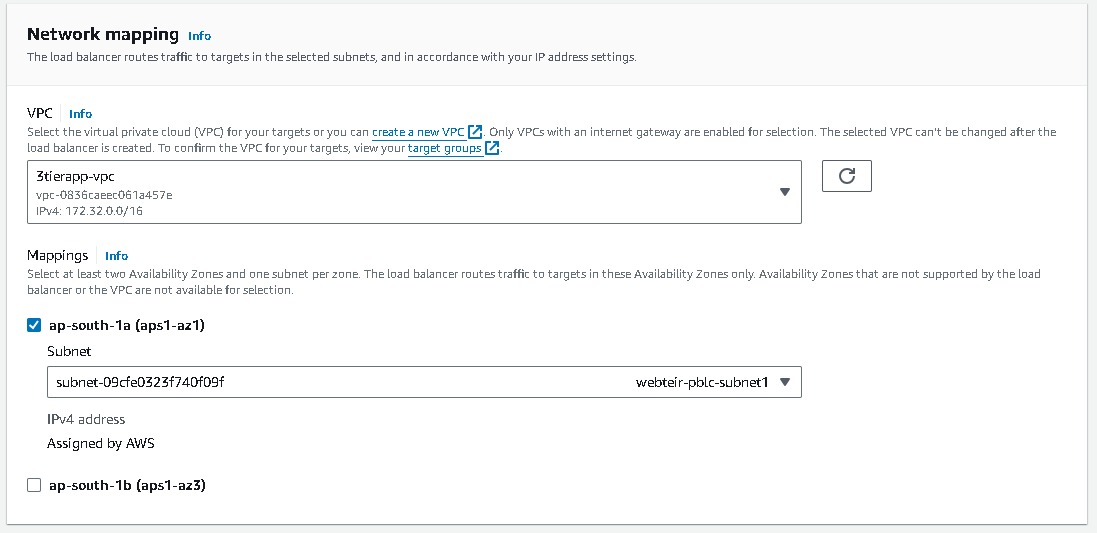
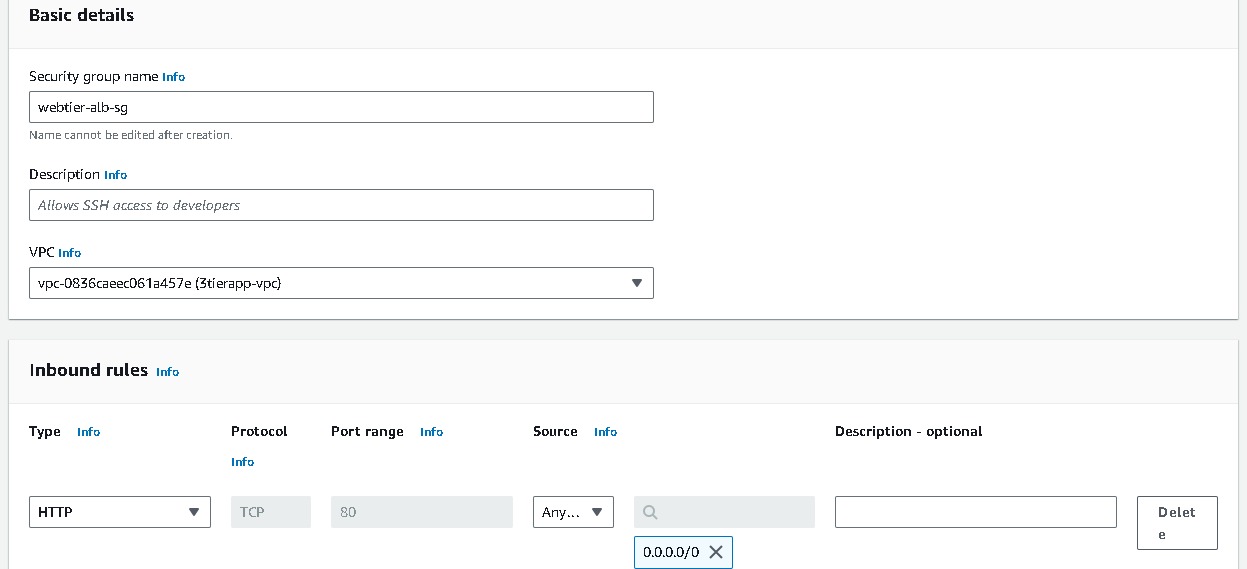
Security groups → Create a new security group (this will open a new tab)→ Basic details → Create a Security group name (webtier-alb-sg), and select the VPC (3tier-vpc) created earlier. Inbound rules must be configured to allow any IPV4 traffic through ports 80 (HTTP) → Create security group. Once you have created select that security group in the Security Groups field.

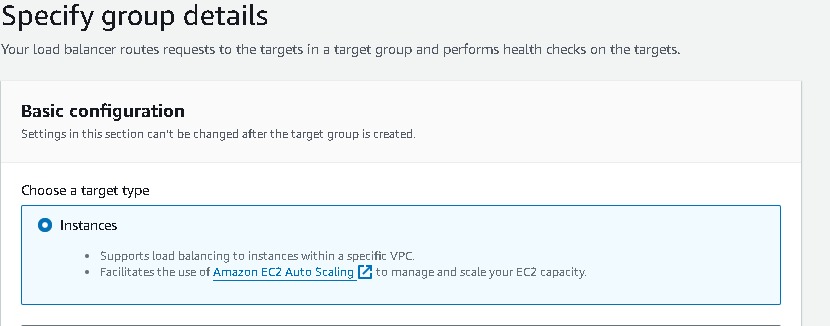
- Listeners and routing → Listener should use the HTTP protocol on Port 80 [# I have already created a target group make sure to create a new one.]→ Create target group (this will open a new tab) → Choose a target type → Select Instances → create a Target group name (webtier-target-group) → accept all other defaults and click Next. Since we have not created the EC2 instances at this stage, we will skip Registering targets for now and Create target group. Now return to the Load Balancer page, select the new target group and Create load balancer.



Application Load Balancer Creation (apptier)
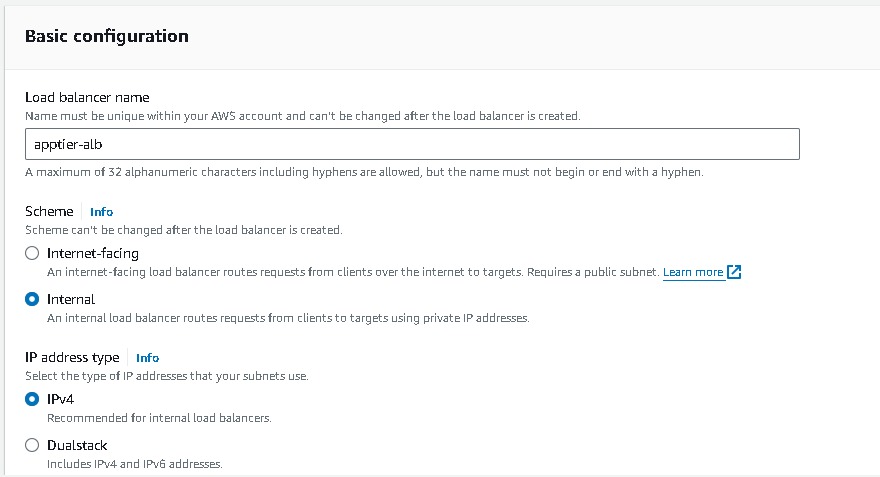
Follow the same steps as webtier like, Select Application load balancer → Basic Configuration → Load balancer name (apptier-alb) , Scheme →select “Internal”, IP address type → select IPV4
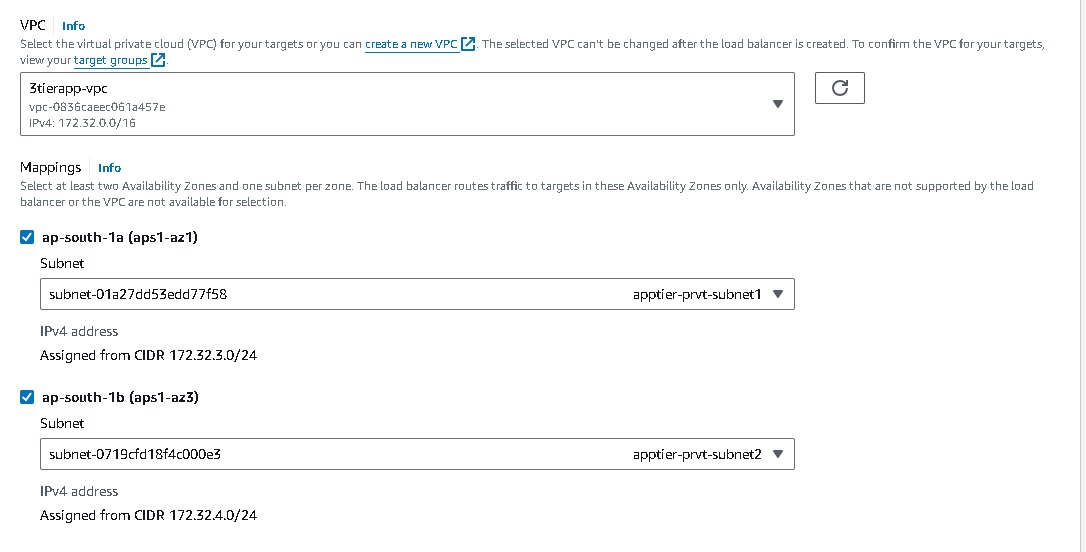
Network mapping → VPC (select the one created say 3tier-vpc), Mappings → select each AZ and the private subnets associated with each)
Security groups → Create a new security group (this will open a new tab)→ Basic details → Create a Security group name (apptier-alb-sg), and select the VPC (3tier-vpc) created earlier. Inbound rules must be configured to allow traffic from webtier-alb load balancer so select the security group of your alb(webtier-alb-sg) → Create security group. Once you have created select that security group in the Security Groups field.


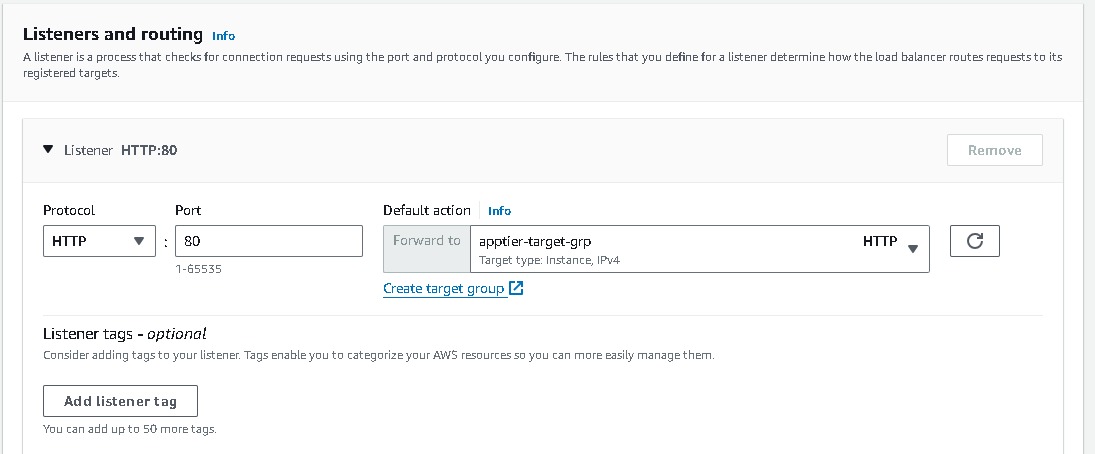
Listeners and routing → Listener should use the HTTP protocol on Port 80 [# I have already created a target group make sure to create a new one.]→ Create target group (this will open a new tab) → Choose a target type → Select Instances → create a Target group name (apptier-target-group) → accept all other defaults and click Next. Since we have not created the EC2 instances at this stage, we will skip Registering targets for now and Create target group. Now return to the Load Balancer page, select the new target group and Create load balancer.
AWS Auto Scaling
Amazon EC2 Auto Scaling that enables you to automatically adjust the number of Amazon EC2 instances in your Auto Scaling group (ASG) based on conditions you define. The goal of Auto Scaling is to maintain application availability and performance even as demand for your application changes. When you create an Auto Scaling group, you specify the minimum, maximum, and desired number of instances, and Auto Scaling ensures that your group has the correct number of instances by adjusting the size of the group.Adjusts the number of instances to maintain a specified target metric, such as CPU utilization or request count per target.Auto Scaling provides elasticity for your applications, allowing them to automatically scale in or out based on demand. This helps ensure that you have the right amount of compute capacity to handle varying workloads efficiently.
Launch Templates for webtier

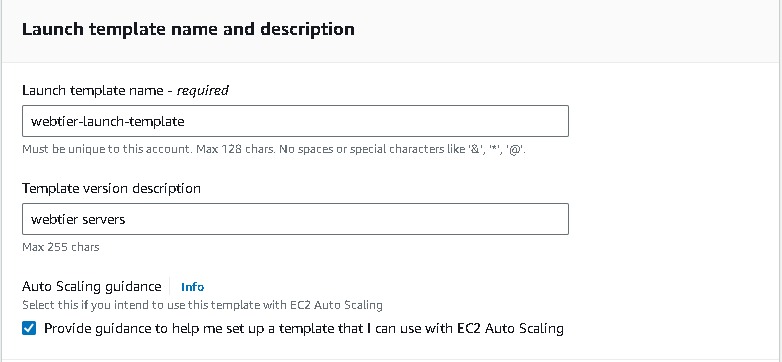
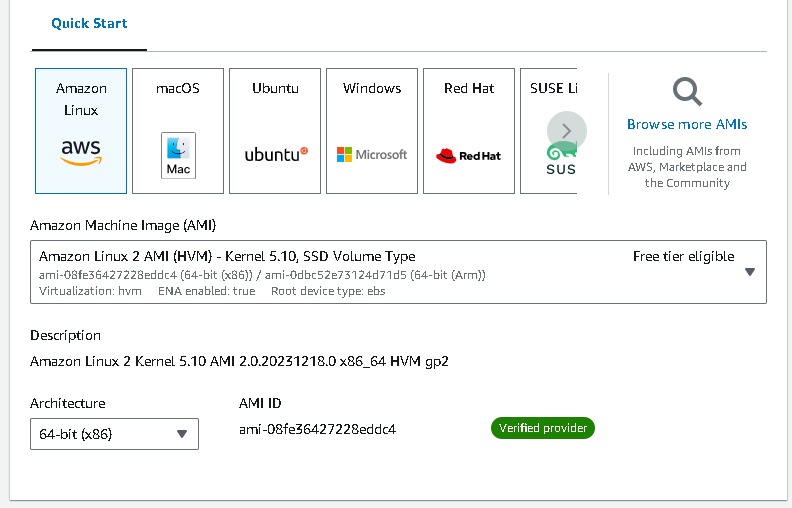
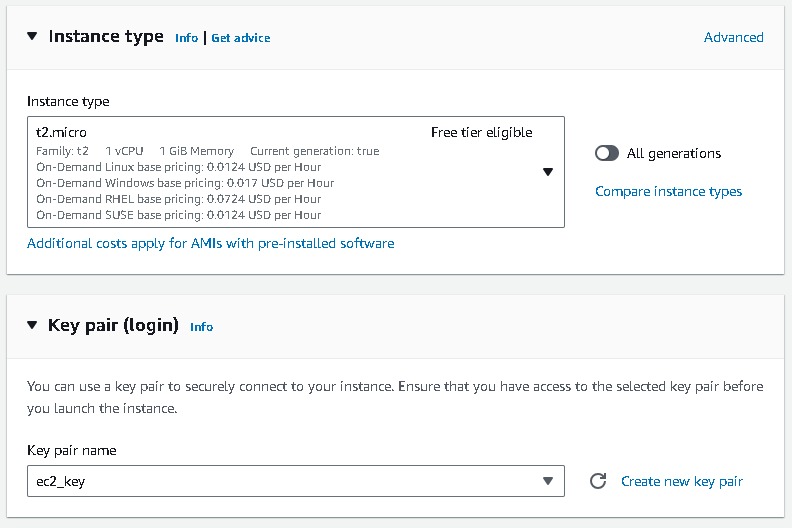
Navigate to EC2 → Instances → Launch Templates → Create launch template → create a Launch template name (webtier-launch-template), Template version description (app tier), select the box under Auto Scaling guidance. AMI → Amazon Linux 2 Kernel 5.10 with a t2.micro Instance type Create new key pair or select an existing key pair.
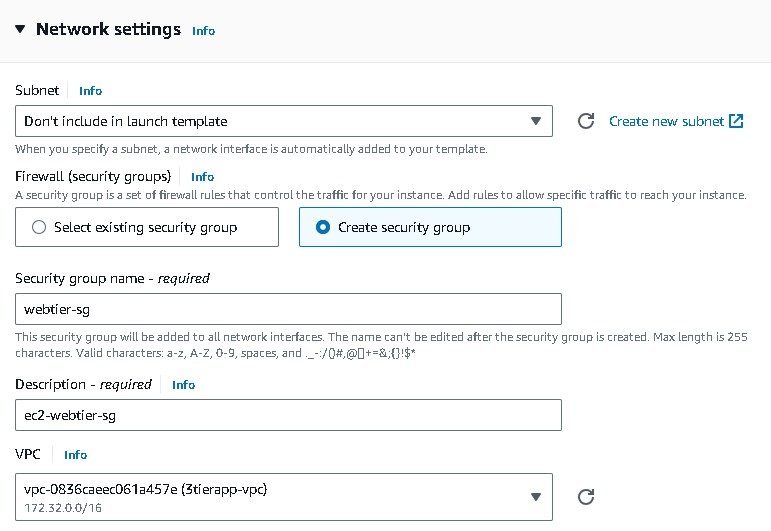
Network Settings → do not specify a subnet in this template. Security groups → Create security group → Create a Security group name (webtier-sg),provide some Description, VPC (3tier-vpc) with rules to allow traffic through ports 80 (HTTP) and 22 (SSH).

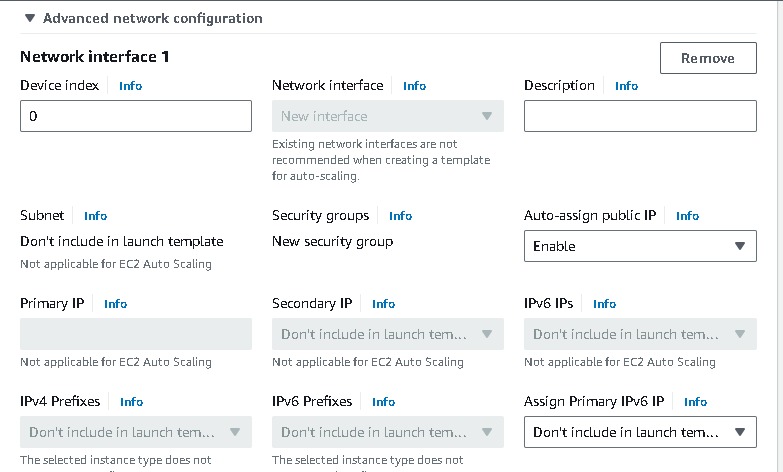
Go to advance network configuration →add network interference →enable auto assign public ip. Under “User data” under “Advanced details” i have installed Apache web server → “Create launch template”.
- I attached code here, so you can copy it
#!/bin/bash
# install httpd (Linux 2 version)
yum update -y
yum install -y httpd
systemctl start httpd
systemctl enable httpd
Auto Scaling Group Creation(webtier)

Navigate to EC2 → Auto Scaling groups → Create Autoscaling group (webtier-auto-scaling) using the “Launch template” created for the web tier (webtier-launch-template). Choose your VPC →attach to an existing load balancer → choose your target groups → desired capacity (2) → minimum capacity (2) →maximum capacity(3). And for Automation Scaling set the default as No Scaling Policies.
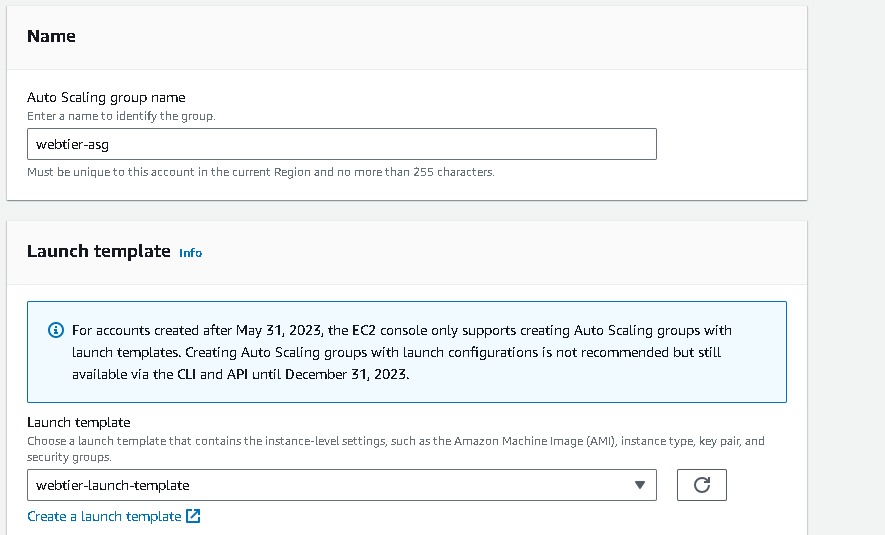
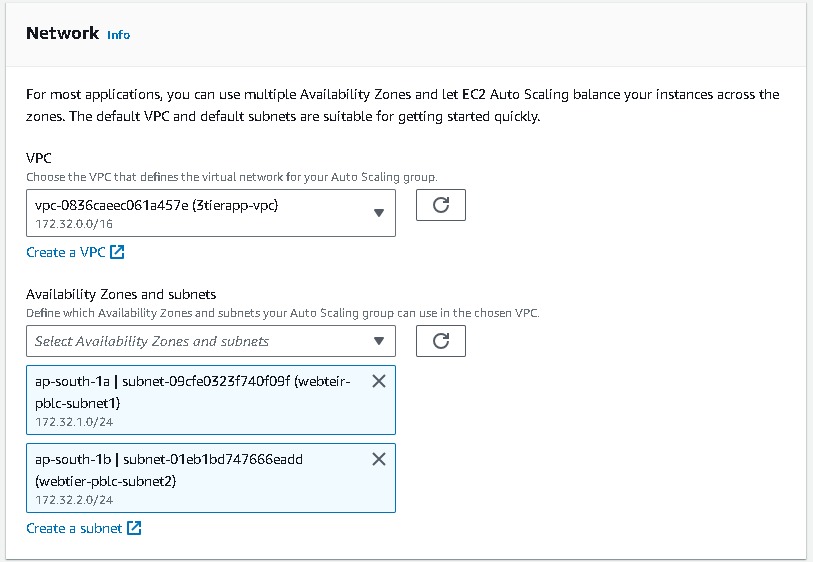
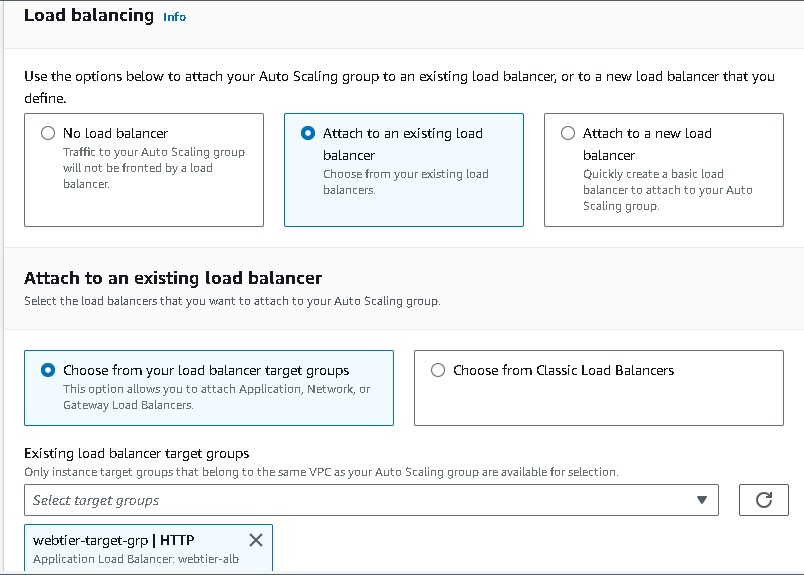
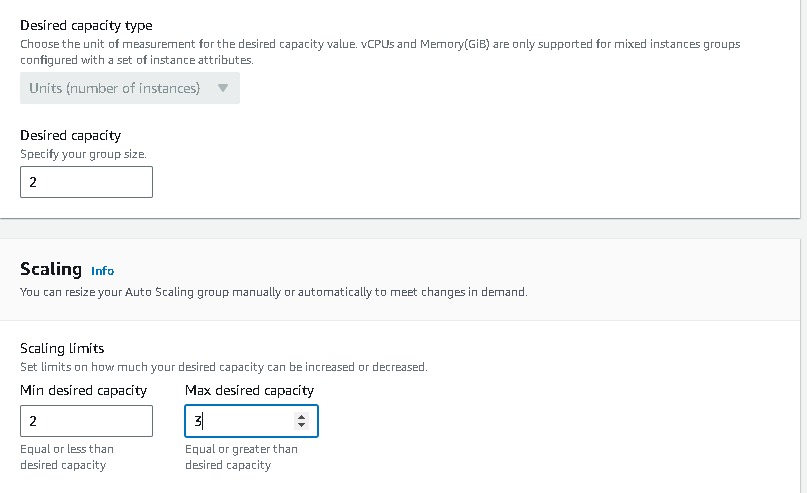

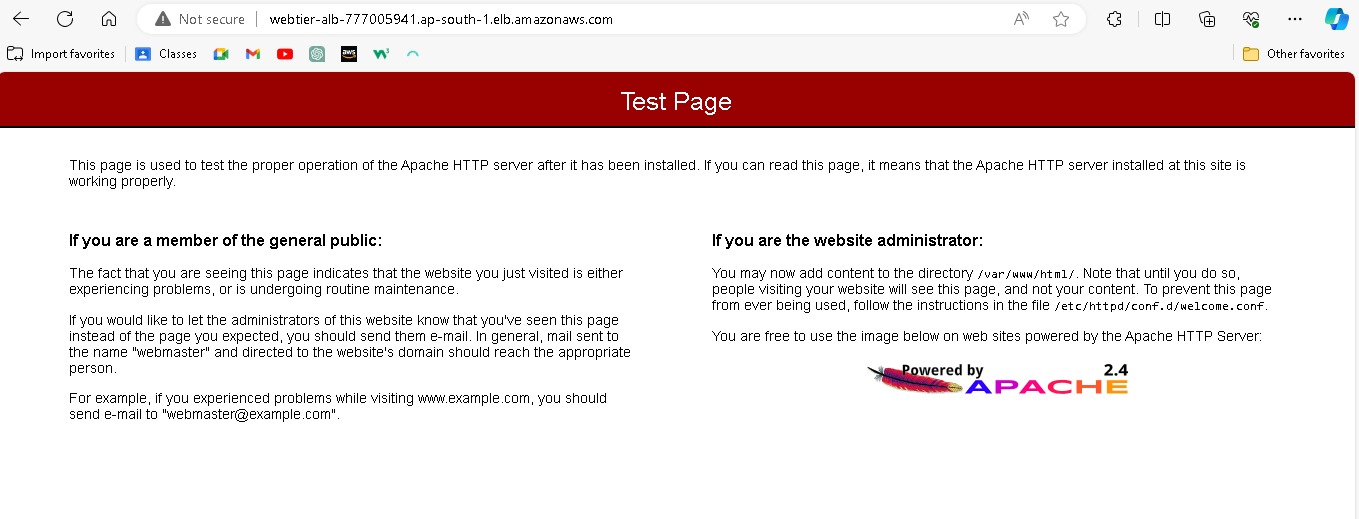
Keep all this as default and create auto-scaling groups. After that, you can observe the instances created on the EC2 console. Also, Select the load balancer of webtier and copy the load balancer URL and paste it into your browser.
Launch Templates for apptier

- Repeat the same steps as webtier but configure the apptier security group by only allowing the traffic from web tier security group access and also Go to advance network configuration →add network interference →disable auto assign public ip.
Auto Scaling Group Creation(apptier)
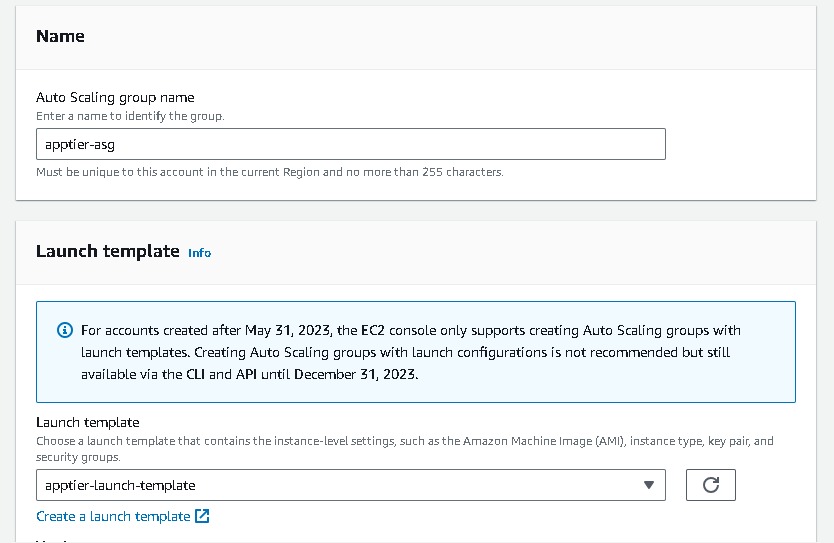
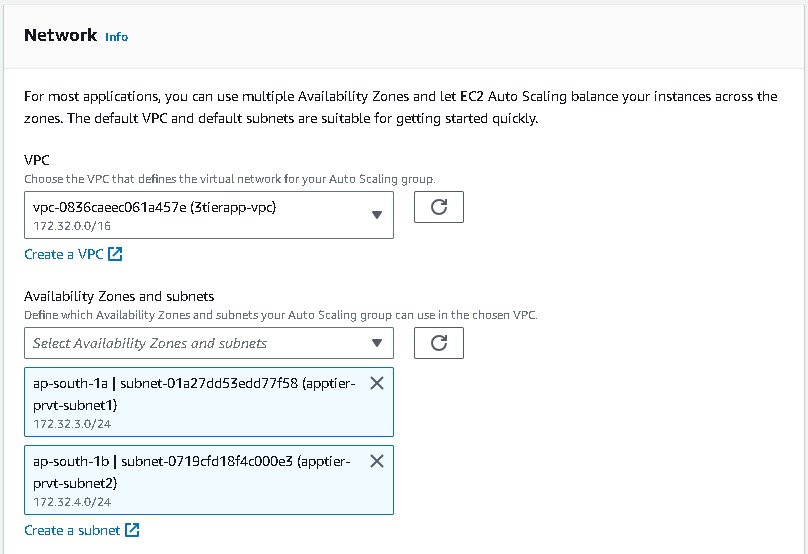
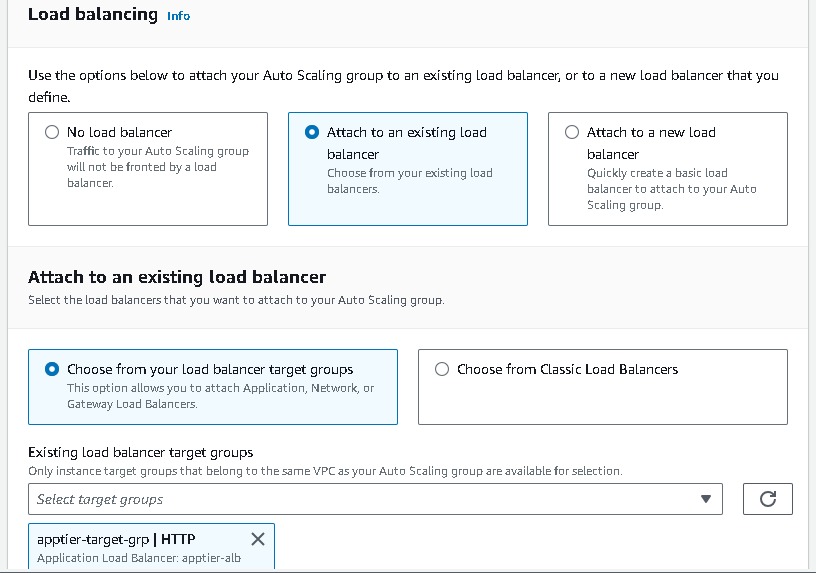
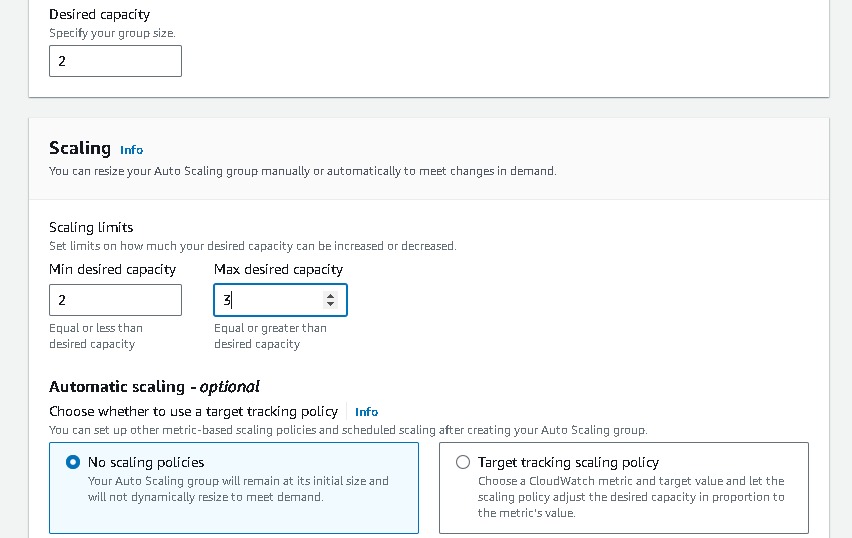
- Navigate to EC2 → Auto Scaling groups → Create Autoscaling group (apptier-auto-scaling) using the “Launch template” created for the web tier (apptier-launch-template). Choose your VPC →attach to an existing load balancer → choose your target groups → desired capacity (2) → minimum capacity (2) →maximum capacity(3). And for Automation Scaling set the default as No Scaling Policies.
Creating Database and Connecting EC2 and taking Backup
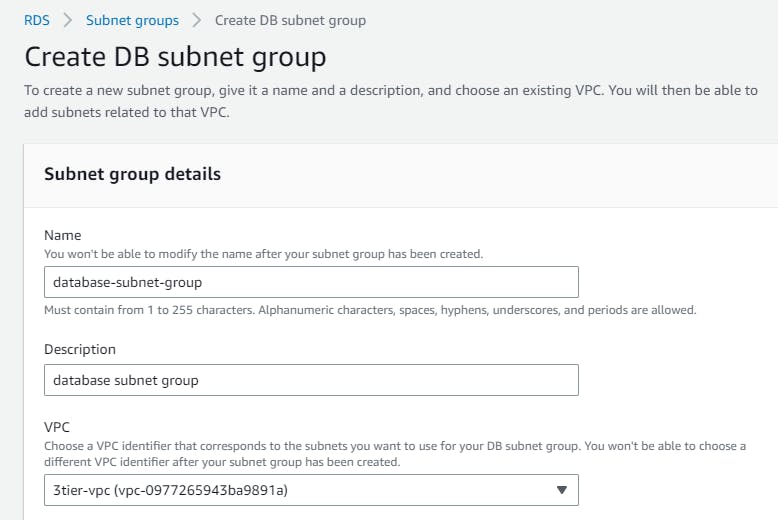
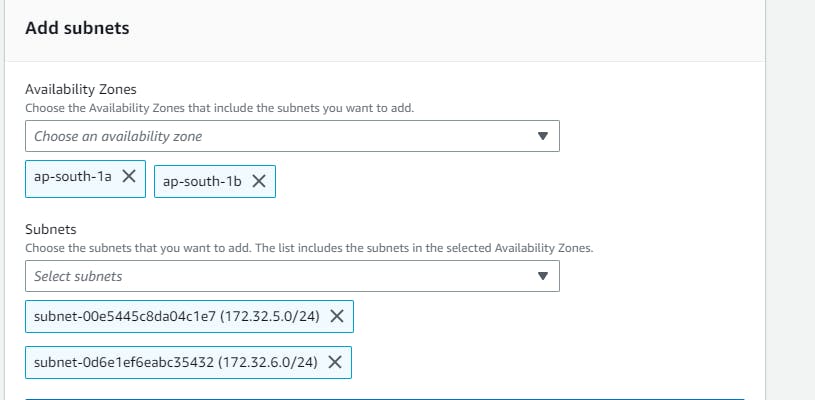
Let's first create a subnet group that we created earlier in vpc . Navigate to “RDS” in the “AWS Management Console” →Create Subnet groups → name your subnet group(database-subnet-group)→ select the vpc → add the subnets → and Create
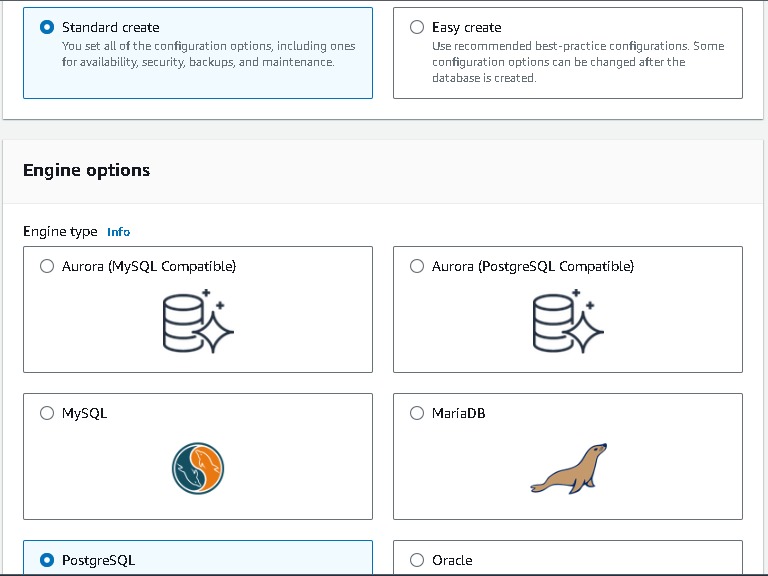
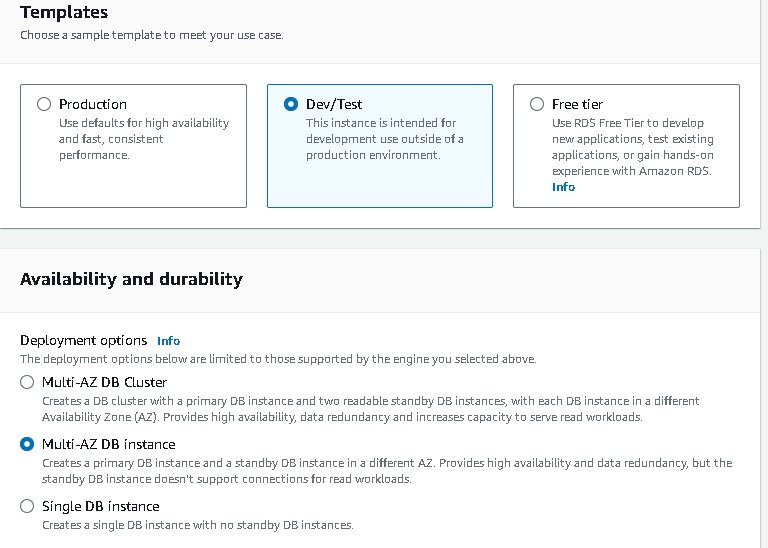
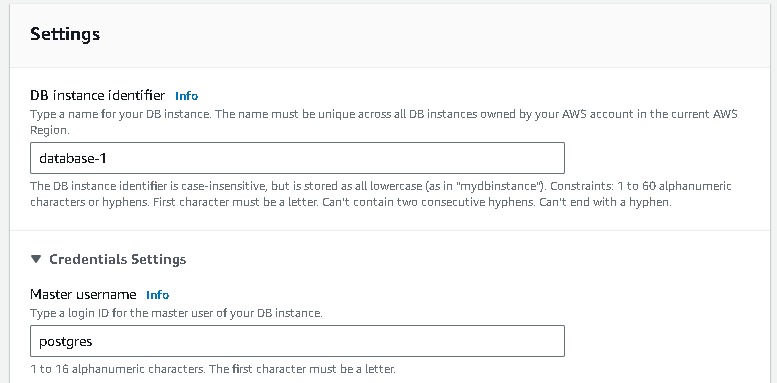
Now navigate to Databases → “Create database” → Select “Standard create” and select the following options to configure the database tier: postgres → template(dev/test) note you can you free tier →Availability and durability (say multi az db instance) → DB cluster identifier (database-1) → Master username → Master password → Instance configuration as per your choice.
In the connectivity section →connect to an EC2 computer resource →select your instance → choose the subnet db group → No to public access
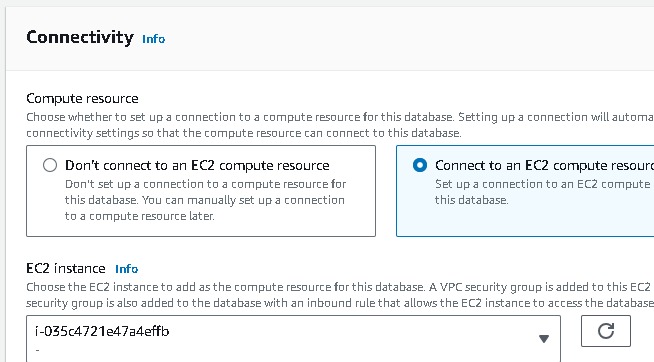
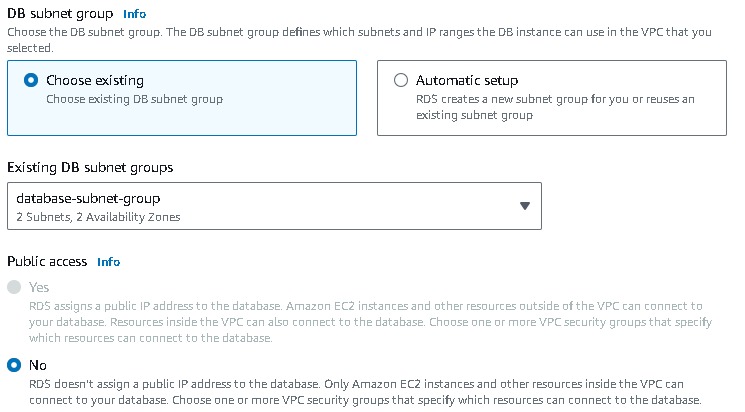
create a new VPC security group(database-security-group) and note that the 5432 port is added.


Note: later the VPC security group needs to be modified by deleting the default rule and selecting the database port 5432 and identifying the app tier’s security group as a source → Create rule.
For the backup, we can add the setting → advanced configuration→ backup (retention period say 1). You can also enable backup replication in another region (if you do not opt free tier). → create database.
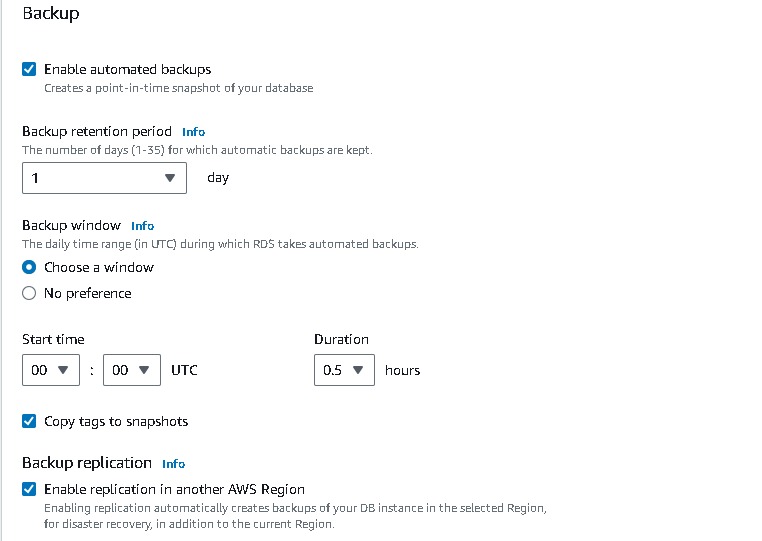
Once the database is set and running, you can verify the connectivity by checking from the apptier instances.
AWS WAF
AWS Web Application Firewall (WAF) is a web application firewall service that helps protect your web applications from common web exploits that could affect application availability, compromise security, or consume excessive resources. AWS WAF gives you control over the traffic that reaches your web applications by enabling you to create rules that allow, block, or monitor (count) web requests based on custom criteria. It helps protect your web applications against a wide range of security threats and gives you fine-grained control over your web traffic. It's commonly used to mitigate common web application vulnerabilities and safeguard against malicious traffic.
WAF Creation
Here I will be blocking my ip to access the webtier application
navigate to WAF → ip sets → give the name → region →give the ranges the ip addresses which you want to block (for demo i am choosing my ip address)
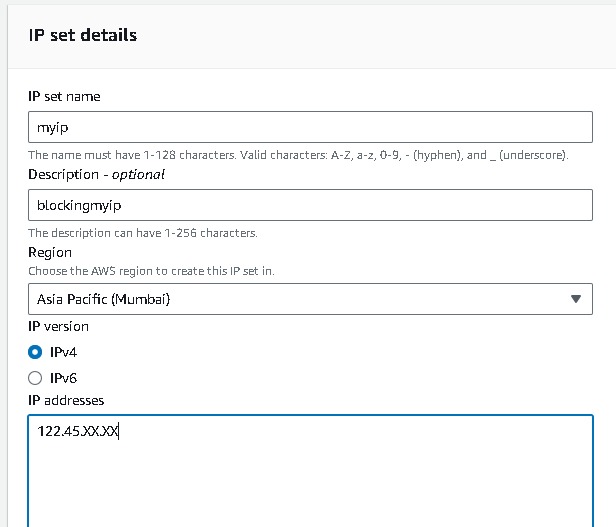
Now navigate to Web ACLS → Create web acl → resource type(application load balancer) → region → add aws resources (application load balancer) select your resource name → add rule and rules groups (add my own rule) → select the ip sets which you created → add block rule → create.
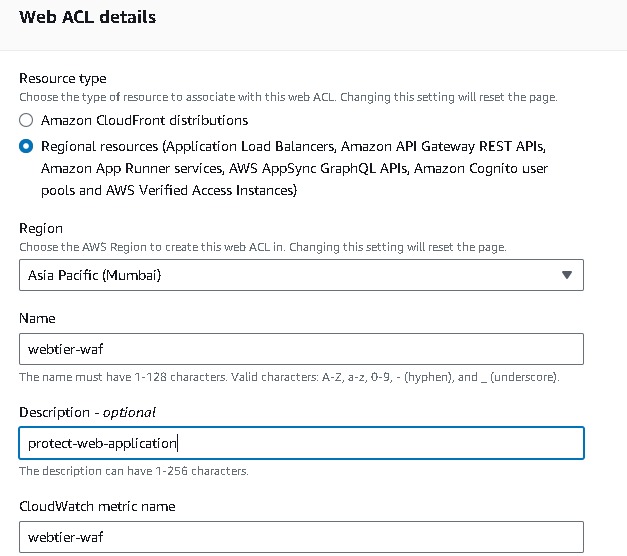
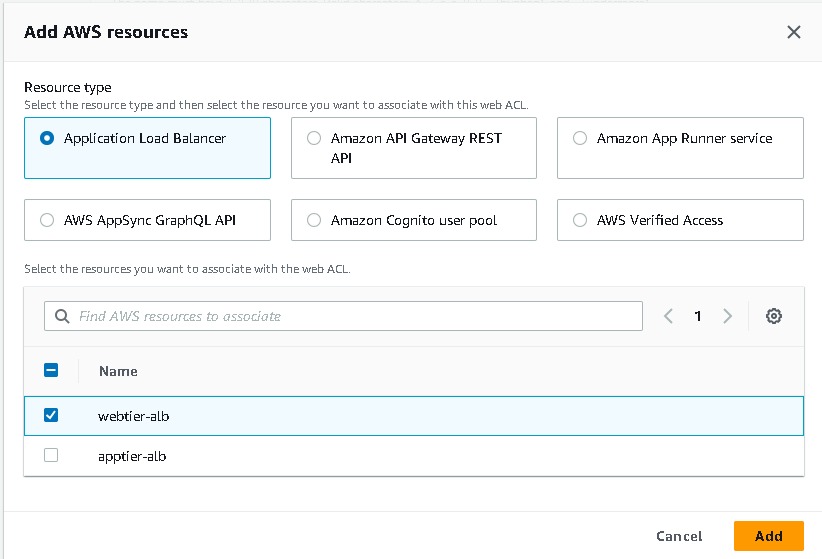
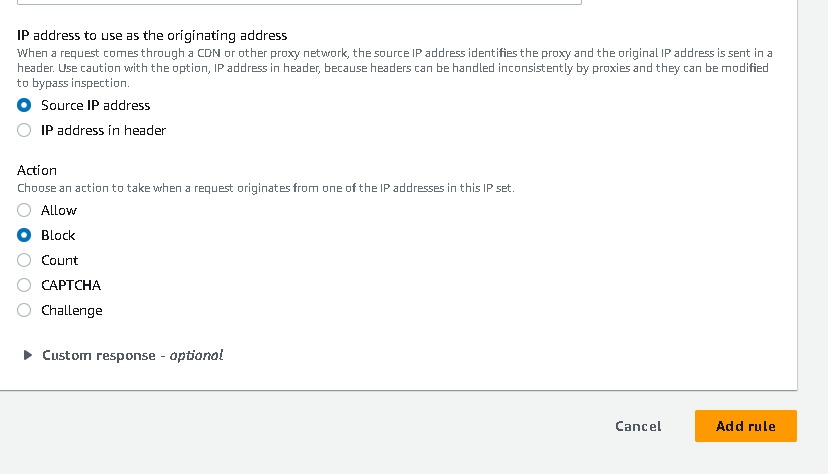
After it has been created check the alb URL from your ip which show a 403 forbidden error.

AWS Backup
AWS Backup is a fully managed backup service provided by Amazon Web Services (AWS). It simplifies the process of protecting your data, applications, and workloads by centralizing and automating the backup process. AWS Backup supports a variety of AWS resources and allows you to create and manage backup plans to meet your specific backup and retention requirements. A backup plan is a set of rules that define when and how AWS Backup performs backups. It includes settings such as the schedule, backup window, and retention policies. You create backup plans to organize and manage your backups.
Backup Setup
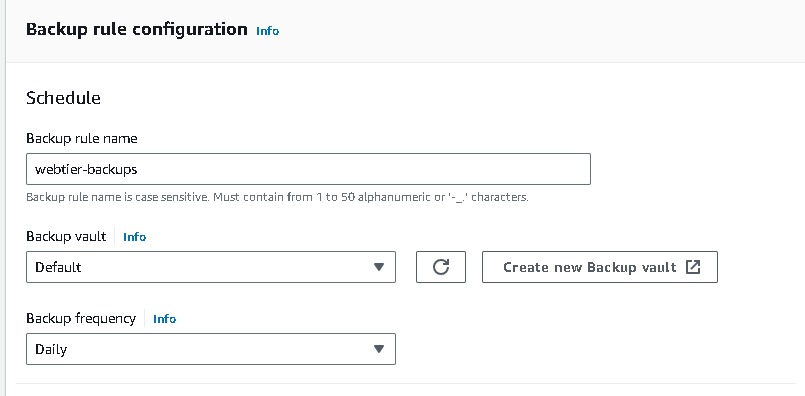
Navigate to AWS backup from the management console → create backup plan → build new plan →name → backup rule configuration (select you backup frequency) → you can use your customize backup window also.
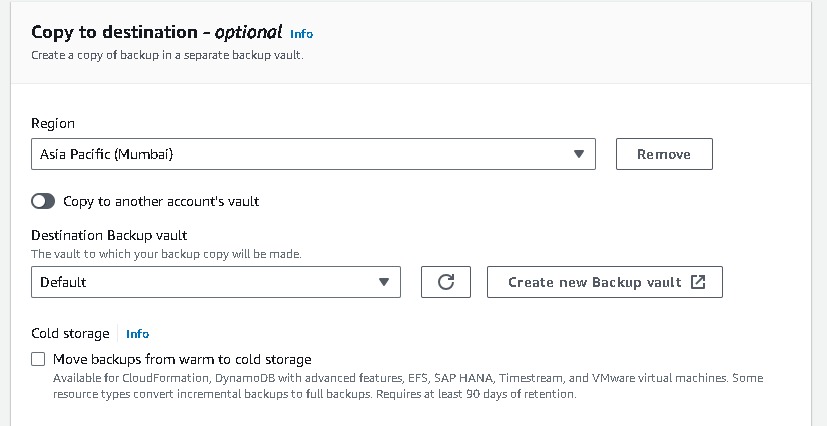
→ choose your destination.
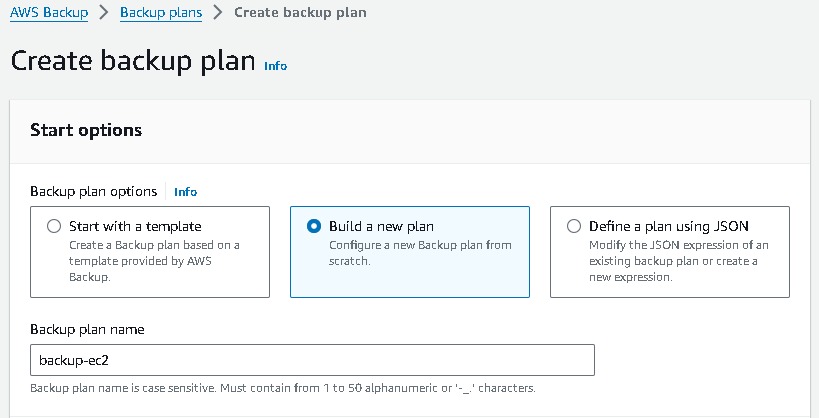

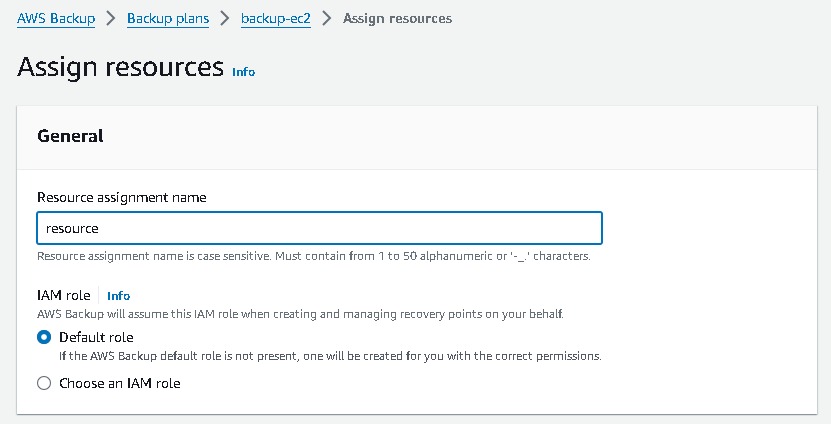
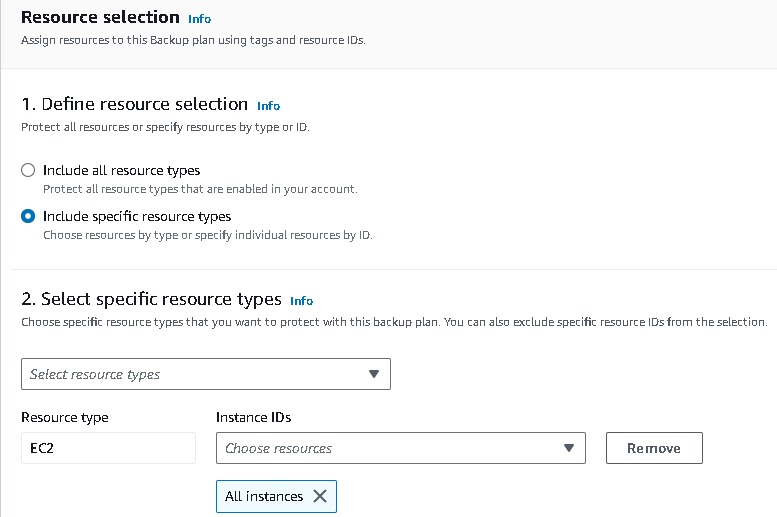
Assign resource → name → choose your resource and which back you want here i have selected all the instances which back you want→ create.
This is how we can have a Backup Plan for your resources in case of any disaster occurs.
After you have done make sure to delete all the resources that you have created otherwise it will costs by each services. You can check your bills in the Billing & Cost Management from your AWS Management Console.
Thank you for reading my blog :) ~Surya Velmurugesan
#10weeksofCloudOps #EC2 #VPC #ELB #ASG #RDS #WAF #AWSBackup #AWSCloud #CloudComputing
Subscribe to my newsletter
Read articles from Surya Velmurugesan directly inside your inbox. Subscribe to the newsletter, and don't miss out.
Written by

Surya Velmurugesan
Surya Velmurugesan
Recent graduate with a degree in CSE and a passion for cloud computing seeking an entry level position as a Cloud Engineer. Eager to apply academic knowledge, hands-on experience from coursework, and internship exposure to contribute to cloud infrastructure projects and gain practical skills in a professional setting with Solid Computer technologies.
