DOM Manipulation (Part-2) ( Traversing elements and attribute methods in DOM ) JavaScript in-depth
 Muhammad Bilal
Traversing elements in DOM
Traversing elements in the DOM involves navigating through the structure of an HTML or XML document to access, manipulate, or interact with different elements. The DOM represents the document as a tree-like structure where each element is a node in the tree.
Here are some common properties used for traversing elements in the DOM using JavaScript:
parentNode
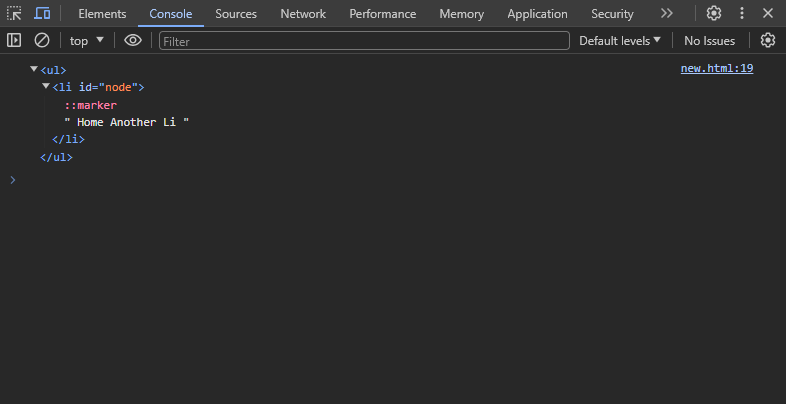
In the Document Object Model (DOM), theparentNode property is used to access the parent node of a specified node. Every node in the DOM tree, except the root node, has a parent node. The root node is typically the <html> element in an HTML document.
For example:
<!DOCTYPE html>
<html lang="en">
<head>
    <meta charset="UTF-8">
    <meta name="viewport" content="width=device-width, initial-scale=1.0">
    <title>Understanding DOM</title>
</head>
<body>
    <div>
       <ul> // Parent Node of li
            <li id="node"> // Child Node of ul
                Home Another Li
            </li>
       </ul>
    </div>
</body>
</html>
If you have this structure, then in a script tag (<script>) or in a JavaScript file that is linked to the HTML, you will write
let selectNode = document.querySelector("#node").parentNode;
console.log(selectNode); // print the parent node
Output:
childNodes
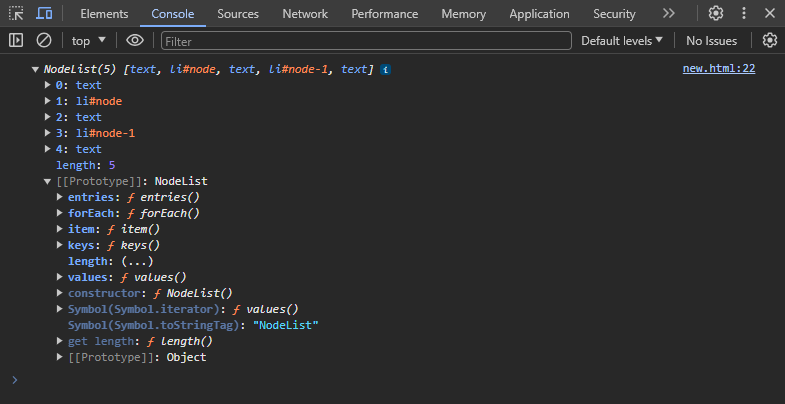
In the Document Object Model (DOM), thechildNodes property is used to access a NodeList representing the child nodes of a given element. ThechildNodes property returns all child nodes, including elements, text nodes, and comments, as a live collection.
For example:
<!DOCTYPE html>
<html lang="en">
<head>
    <meta charset="UTF-8">
    <meta name="viewport" content="width=device-width, initial-scale=1.0">
    <title>Understanding DOM</title>
</head>
<body>
    <div>
       <ul> // Parent Node of li
            <li id="node"> // both li are child nodes of ul
                Home Another Li
            </li>
            <li id="node-1">
                About Another Li
            </li>
       </ul>
    </div>
</body>
</html>
If you have this structure, then in a script tag (<script>) or in a JavaScript file that is linked to the HTML, you will write
let selectNode = document.querySelector("ul").childNodes;
console.log(selectNode); // Print all clid node of ul
Output:
firstChild
In the DOM, thefirstChild property is used to access the first child node of a specified node.
For example:
<!DOCTYPE html>
<html lang="en">
<head>
    <meta charset="UTF-8">
    <meta name="viewport" content="width=device-width, initial-scale=1.0">
    <title>Understanding DOM</title>
</head>
<body>
    <div>
       <ul>
            <li id="node"> Home Another Li  </li>
            <li id="node-1"> About Another Li </li>
            <li id="node-2"> About Another Li </li>
       </ul>
    </div>
</body>
</html>
If you have this structure, then in a script tag (<script>) or in a JavaScript file that is linked to the HTML, you will write
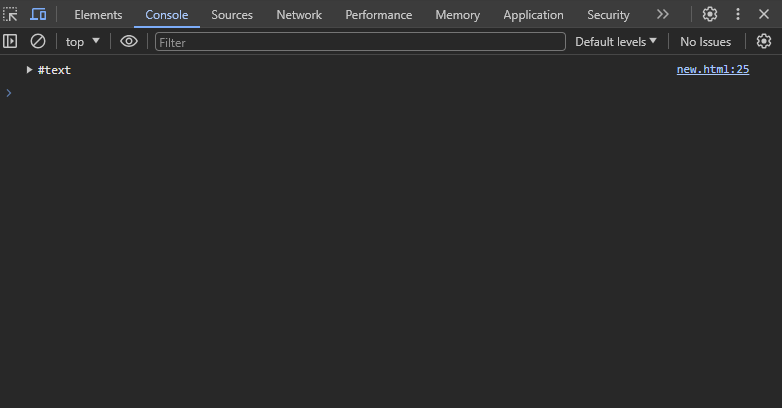
let selectNode = document.querySelector("ul").firstChild;
console.log(selectNode);
Output: Here it returns the text node because the spaces or the gap between ul and li tag is considered the text node.
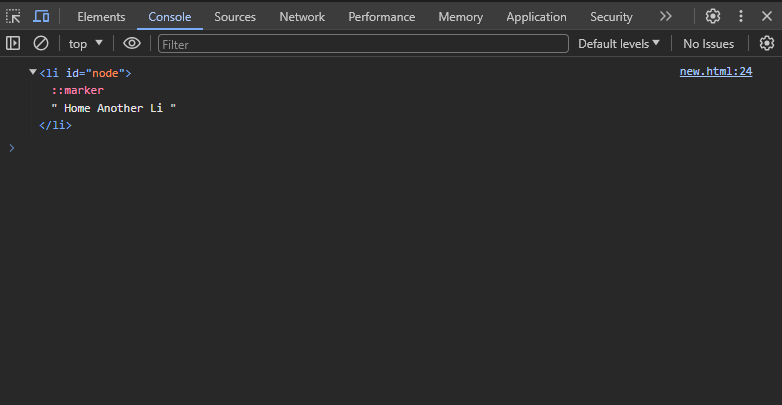
If you write like this without any space, then it selects the firstli.
<body>
    <div>
       <ul><li id="node"> Home Another Li  </li>
            <li id="node-1"> About Another Li </li>
            <li id="node-2"> About Another Li </li>
       </ul>
    </div>
</body>
let selectNode = document.querySelector("ul").firstChild;
console.log(selectNode);
Output:
firstElementChild
The firstElementChild property in the DOM element represents the first child element of the current element. It returnsnull if the element has no child elements.
For example:
<!DOCTYPE html>
<html lang="en">
<head>
    <meta charset="UTF-8">
    <meta name="viewport" content="width=device-width, initial-scale=1.0">
    <title>Understanding DOM</title>
</head>
<body>
    <div>
       <ul>
            <li id="node"> Home Another Li  </li>
            <li id="node-1"> About Another Li </li>
            <li id="node-2"> About Another Li </li>
       </ul>
    </div>
</body>
</html>
If you have this structure, then in a script tag (<script>) or in a JavaScript file that is linked to the HTML, you will write
let selectNode = document.querySelector("ul").firstElementChild;
console.log(selectNode);
Output: li#node
Keep in mind that firstElementChild only considers elements, not text nodes or other types of nodes.
lastChild
In the DOM, the lastChild property is used to access the last child node of a given parent node.
For example:
<!DOCTYPE html>
<html lang="en">
<head>
    <meta charset="UTF-8">
    <meta name="viewport" content="width=device-width, initial-scale=1.0">
    <title>Understanding DOM</title>
</head>
<body>
    <div>
       <ul>
            <li id="node"> Home Another Li  </li>
            <li id="node-1"> About Another Li </li>
            <li id="node-2"> About Another Li </li>
       </ul>
    </div>
</body>
</html>
If you have this structure, then in a script tag (<script>) or in a JavaScript file that is linked to the HTML, you will write
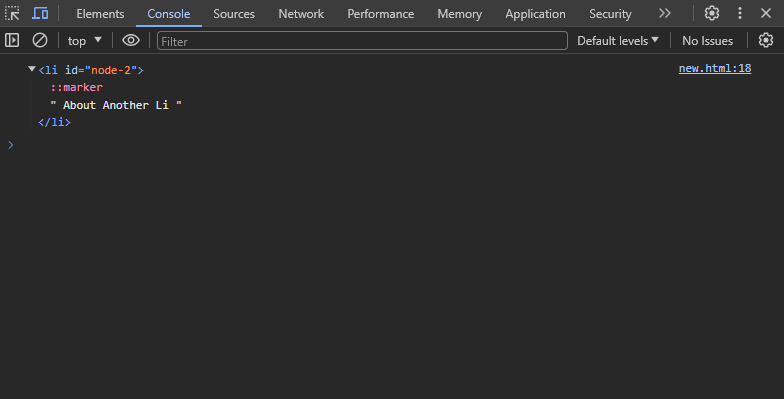
let selectNode = document.querySelector("ul").lastChild;
console.log(selectNode);
Output: Here it returns the text node because the spaces or the gap between ul and li tag is considered the text node.

If you write like this without any space, then it selects the lastli.
<body>
    <div>
       <ul>
            <li id="node"> Home Another Li  </li>
            <li id="node-1"> About Another Li </li>
            <li id="node-2"> About Another Li </li></ul>
    </div>
</body>
let selectNode = document.querySelector("ul").lastChild;
console.log(selectNode);
Output:
lastElementChild
In the DOM, thelastElementChild property is a property that returns the last child element of the specified element.
For example:
<!DOCTYPE html>
<html lang="en">
<head>
    <meta charset="UTF-8">
    <meta name="viewport" content="width=device-width, initial-scale=1.0">
    <title>Understanding DOM</title>
</head>
<body>
    <div>
       <ul>
            <li id="node"> Home Another Li  </li>
            <li id="node-1"> About Another Li </li>
            <li id="node-2"> About Another Li </li>
       </ul>
    </div>
</body>
</html>
If you have this structure, then in a script tag (<script>) or in a JavaScript file that is linked to the HTML, you will write
let selectNode = document.querySelector("ul").lastElementChild;
console.log(selectNode);
Output: li#node-2
Keep in mind that lastElementChild only considers elements, not text nodes or other types of nodes.
parentElement
In the DOM, the parentElement property is used to get the parent element of a specified element. It returns the parent element node of the specified element.
For example:
<!DOCTYPE html>
<html lang="en">
<head>
    <meta charset="UTF-8">
    <meta name="viewport" content="width=device-width, initial-scale=1.0">
    <title>Understanding DOM</title>
</head>
<body>
    <div>
       <ul>
            <li id="node"> Home Another Li  </li>
            <li id="node-1"> About Another Li </li>
            <li id="node-2"> About Another Li </li>
       </ul>
    </div>
</body>
</html>
If you have this structure, then in a script tag (<script>) or in a JavaScript file that is linked to the HTML, you will write
let selectNode = document.querySelector("#node-1").parentElement;
console.log(selectNode);
Output:
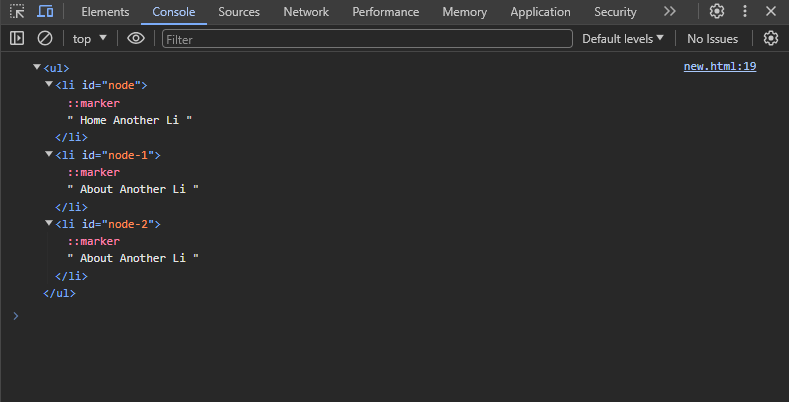
Keep in mind that the parentElementproperty is similar to theparentNode property, but it only returns elements (nodes of type element_node), whileparentNode can return any type of node.
nextSibling
In the DOM, nextSibling is a property that allows you to access the next sibling node of a particular DOM element. Siblings are nodes that share the same parent in the DOM tree. ThenextSibling property provides a way to navigate to the next sibling node.
For example:
<!DOCTYPE html>
<html lang="en">
<head>
    <meta charset="UTF-8">
    <meta name="viewport" content="width=device-width, initial-scale=1.0">
    <title>Understanding DOM</title>
</head>
<body>
    <div>
       <ul>
            <li id="node"> Home Another Li  </li>
            <li id="node-1"> About Another Li </li>
            <li id="node-2"> About Another Li </li>
       </ul>
    </div>
</body>
</html>
If you have this structure, then in a script tag (<script>) or in a JavaScript file that is linked to the HTML, you will write
let selectNode = document.querySelector("#node-1").nextSibling;
console.log(selectNode);
Output: #text
Output: Here it returns the text node because the spaces or the gap between li and li tag is considered the text node.
nextElementSibling
In the DOM, the nextElementSibling property is a property of a DOM element that returns the next sibling element node in the DOM tree.
For example:
<!DOCTYPE html>
<html lang="en">
<head>
    <meta charset="UTF-8">
    <meta name="viewport" content="width=device-width, initial-scale=1.0">
    <title>Understanding DOM</title>
</head>
<body>
    <div>
       <ul>
            <li id="node"> Home Another Li  </li>
            <li id="node-1"> About Another Li </li>
            <li id="node-2"> About Another Li </li>
       </ul>
    </div>
</body>
</html>
If you have this structure, then in a script tag (<script>) or in a JavaScript file that is linked to the HTML, you will write
let selectNode = document.querySelector("#node-1").nextElementSibling;
console.log(selectNode);
Output: li#node-2
Keep in mind that nextElementSibling only considers elements, not text nodes or other types of nodes.
previousSibling
In the DOM, previousSibling is a property that allows you to access the previous sibling node of a given node.
For example:
<!DOCTYPE html>
<html lang="en">
<head>
    <meta charset="UTF-8">
    <meta name="viewport" content="width=device-width, initial-scale=1.0">
    <title>Understanding DOM</title>
</head>
<body>
    <div>
       <ul>
            <li id="node"> Home Another Li  </li>
            <li id="node-1"> About Another Li </li>
            <li id="node-2"> About Another Li </li>
       </ul>
    </div>
</body>
</html>
If you have this structure, then in a script tag (<script>) or in a JavaScript file that is linked to the HTML, you will write
let selectNode = document.querySelector("#node-1").previousSibling;
console.log(selectNode);
Output: #text
Output: Here it returns the text node because the spaces or the gap between li and li tag is considered the text node.
previousElementSibling
In the DOM, the previousElementSibling property is used to get the previous sibling element node in the DOM tree. A sibling element is an element that has the same parent as the specified element. ThepreviousElementSibling property returnsnull if there is no previous sibling element.
For example:
<!DOCTYPE html>
<html lang="en">
<head>
    <meta charset="UTF-8">
    <meta name="viewport" content="width=device-width, initial-scale=1.0">
    <title>Understanding DOM</title>
</head>
<body>
    <div>
       <ul>
            <li id="node"> Home Another Li  </li>
            <li id="node-1"> About Another Li </li>
            <li id="node-2"> About Another Li </li>
       </ul>
    </div>
</body>
</html>
If you have this structure, then in a script tag (<script>) or in a JavaScript file that is linked to the HTML, you will write
let selectNode = document.querySelector("#node-1").previousElementSibling;
console.log(selectNode);
Output: li#node
Keep in mind that previousElementSibling only considers elements, not text nodes or other types of nodes.
children
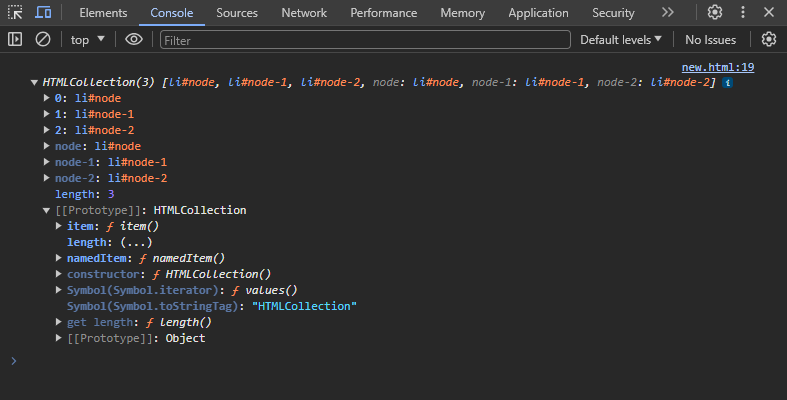
The children property returns an HTML collection of an element's child elements, ignoring the text and comment nodes.
In the DOM, thechildren property is used to access a collection of child elements of a particular node. Thechildren property returns a live HTMLCollection, which is a list of child nodes as elements, excluding non-element nodes like text nodes and comments.
For example:
<!DOCTYPE html>
<html lang="en">
<head>
    <meta charset="UTF-8">
    <meta name="viewport" content="width=device-width, initial-scale=1.0">
    <title>Understanding DOM</title>
</head>
<body>
    <div>
       <ul>
            <li id="node"> Home Another Li  </li>
            <li id="node-1"> About Another Li </li>
            <li id="node-2"> About Another Li </li>
       </ul>
    </div>
</body>
</html>
If you have this structure, then in a script tag (<script>) or in a JavaScript file that is linked to the HTML, you will write
let selectNode = document.querySelector("ul").children;
console.log(selectNode);
Output:
Let's talk about attribute and its methods in DOM in JavaScript
Attribute
In the context of the DOM, attribute methods refer to how you can manipulate and interact with attributes of HTML or XML elements using programming languages such as JavaScript. Attributes are key-value pairs associated with HTML or XML elements and are used to provide additional information about the elements and to control various aspects of their behavior, appearance, and functionality.
For example, in the HTML code
<input type="text" id="premium" placeholder="username">
<img src="example.jpg" alt="There was an Image">
type, id, and placeholder attributes provide additional information about the <input>element.
src and alt attributes provide additional information about the <img>element.
Here are some attribute methods:
getAttribute()
In JavaScript, the getAttribute() method is used to retrieve the value of a specified attribute of a DOM element. It's important to note that the getAttribute() method returns null if the specified attribute does not exist on the element.
For example:
<!DOCTYPE html>
<html lang="en">
<head>
    <meta charset="UTF-8">
    <meta name="viewport" content="width=device-width, initial-scale=1.0">
    <title>Understanding DOM</title>
</head>
<body>
    <div>
        <input type="text" id="premium" placeholder="username">
        <img src="example.jpg" alt="There was an Image">
    </div>
</body>
</html>
If you have this structure, then in a script tag (<script>) or in a JavaScript file that is linked to the HTML, you will write
// Js for input tag
let getAtMethod = document.querySelector("input");
console.log(getAtMethod.getAttribute("id"));
Output: premium
// Js for img tag
let getAtMethod = document.querySelector("img");
console.log(getAtMethod.getAttribute("src"));
Output: example.jpg
getAttributeNS()
The getAttributeNS() method in the DOM is specifically designed to retrieve the value of an attribute within a specified namespace. It's primarily used in XML documents, where namespaces are more commonly employed to prevent naming conflicts and organize elements and attributes. It takes two arguments first is the nameSpace in string or null and second is the localName of attribute you want to get, in the string.
For example:
<!DOCTYPE html>
<html lang="en">
<head>
    <meta charset="UTF-8">
    <meta name="viewport" content="width=device-width, initial-scale=1.0">
    <title>Understanding DOM</title>
</head>
<body>
    <div>
        <input type="text" id="premium" placeholder="username">
        <img src="example.jpg" alt="There was an Image">
        <svg xmlns="http://www.w3.org/2000/svg" width="50" height="50">
            <circle cx="50" cy="50" r="40" stroke="black" stroke-width="2" fill="red" />
        </svg>
    </div>
</body>
</html>
If you have this structure, then in a script tag (<script>) or in a JavaScript file that is linked to the HTML, you will write
// Js for svg tag
let getAtMethod = document.querySelector("circle");
console.log(getAtMethod.getAttributeNS(null, 'fill'));
Output: red
getAttributeNode()
The getAttributeNode() method is part of DOM in JavaScript. It is used to retrieve the attribute node of a specified attribute on an element.
For example:
<!DOCTYPE html>
<html lang="en">
<head>
    <meta charset="UTF-8">
    <meta name="viewport" content="width=device-width, initial-scale=1.0">
    <title>Understanding DOM</title>
</head>
<body>
    <div>
        <input type="text" id="premium" placeholder="username">
        <img src="example.jpg" alt="There was an Image">
        <svg xmlns="http://www.w3.org/2000/svg" width="50" height="50">
            <circle cx="50" cy="50" r="40" stroke="black" stroke-width="2" fill="red" />
        </svg>
    </div>
</body>
</html>
If you have this structure, then in a script tag (<script>) or in a JavaScript file that is linked to the HTML, you will write
// Js for input tag
let getAtMethod = document.querySelector('input');
console.log(getAtMethod.getAttributeNode('type'));
Output: type="text"
getAttributeNodeNS()
The getAttributeNodeNS() method is a part of DOM API, specifically used for working with XML documents. It is used to retrieve an attribute node with a specified namespace URI and local name from an element.
For example:
<!DOCTYPE html>
<html lang="en">
<head>
    <meta charset="UTF-8">
    <meta name="viewport" content="width=device-width, initial-scale=1.0">
    <title>Understanding DOM</title>
</head>
<body>
    <div>
        <input type="text" id="premium" placeholder="username">
        <img src="example.jpg" alt="There was an Image">
        <svg xmlns="http://www.w3.org/2000/svg" width="50" height="50">
            <circle cx="50" cy="50" r="40" stroke="black" stroke-width="2" fill="red" />
        </svg>
    </div>
</body>
</html>
If you have this structure, then in a script tag (<script>) or in a JavaScript file that is linked to the HTML, you will write
// Js for svg tag
let getAtMethod = document.querySelector('circle');
console.log(getAtMethod.getAttributeNodeNS(null, 'stroke'));
Output: stroke="black"
setAttribute()
In DOM, the setAttribute() method is used to set the value of an attribute on a specified element. It takes two arguments: attribute name and its value.
For example:
<!DOCTYPE html>
<html lang="en">
<head>
    <meta charset="UTF-8">
    <meta name="viewport" content="width=device-width, initial-scale=1.0">
    <title>Understanding DOM</title>
</head>
<body>
    <div>
        <input type="text" class="premium" placeholder="username">
        <img src="example.jpg" alt="There was an Image">
        <svg xmlns="http://www.w3.org/2000/svg" width="50" height="50">
            <circle cx="50" cy="50" r="40" stroke="black" stroke-width="2" fill="red" />
        </svg>
    </div>
</body>
</html>
If you have this structure, then in a script tag (<script>) or in a JavaScript file that is linked to the HTML, you will write
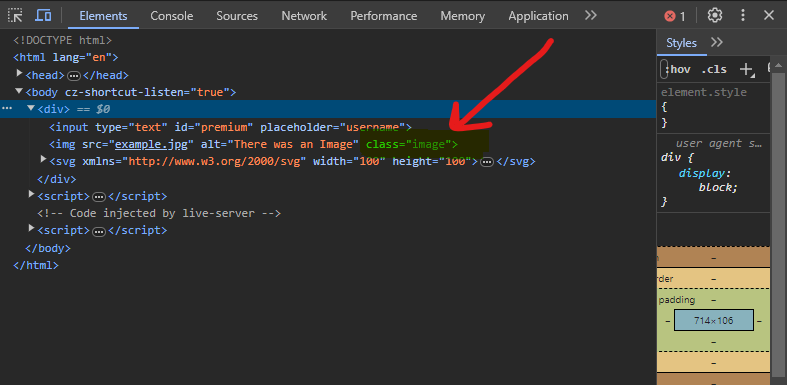
// Js to set class attribute for img tag
let setAtMethod = document.querySelector('img');
console.log(setAtMethod.setAttribute('class', 'image'));
Output: In the image below, you can see image class is set
<input type="text" class="premium" placeholder="username">
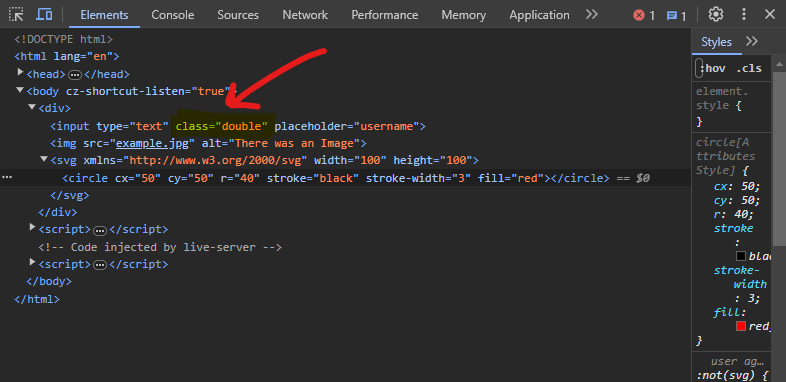
In this if you want to set one more class as double then,
let setAtMethod = document.querySelector("input");
console.log(setAtMethod.setAttribute('class', 'double'));
Output: This will always overwrite the previous class and add the new one.
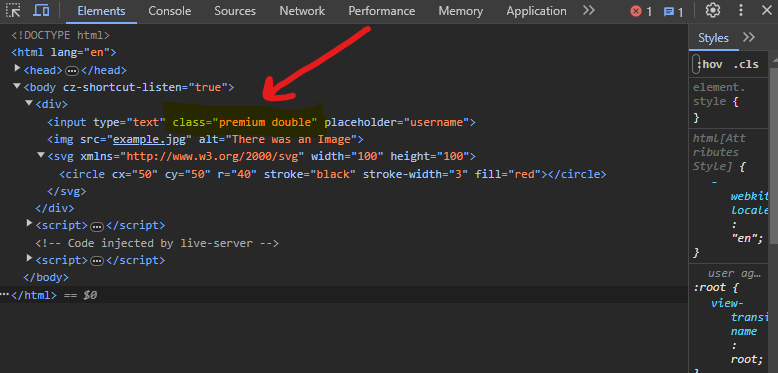
To add one more class you have to write a previous class and then a new class in the code like this:
let setAtMethod = document.querySelector("input");
console.log(setAtMethod.setAttribute('class', 'premium double'));
Output:
setAttributeNS()
The setAttributeNS() method in DOM is used to set the value of an attribute with a specified namespace for a given element. This method is often used in XML or SVG documents where attributes may belong to a specific namespace. It takes three arguments: null or nameSpace as a string, attribute name and its value.
For example:
<!DOCTYPE html>
<html lang="en">
<head>
    <meta charset="UTF-8">
    <meta name="viewport" content="width=device-width, initial-scale=1.0">
    <title>Understanding DOM</title>
</head>
<body>
    <div>
        <input type="text" id="premium" placeholder="username">
        <img src="example.jpg" alt="There was an Image">
        <svg xmlns="http://www.w3.org/2000/svg" width="50" height="50">
            <circle cx="50" cy="50" r="40" stroke="black" stroke-width="2" fill="red" />
        </svg>
    </div>
</body>
</html>
If you have this structure, then in a script tag (<script>) or in a JavaScript file that is linked to the HTML, you will write
// Js to set href attribute for svg tag
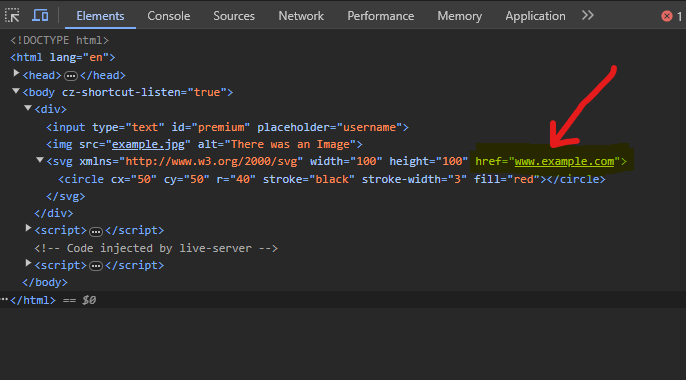
let setAtMethod = document.querySelector('svg');
let nameSpace = 'http://www.w3.org/2000/svg';
console.log(setAtMethod.setAttributeNS(nameSpace, 'href', 'www.example.com'));
Output: In the image below, you can see href value is set
attributes
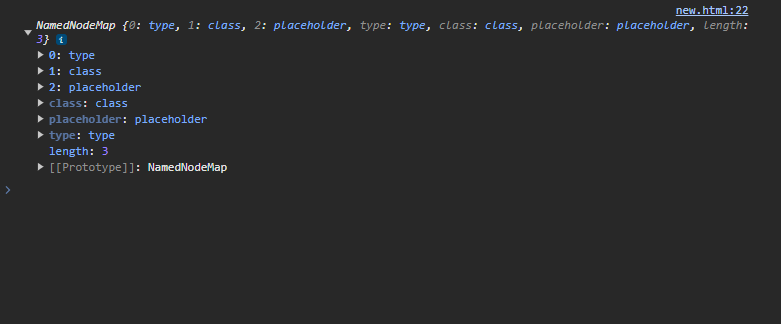
In DOM, the attributes property refers to a collection of all the attributes of a particular DOM element. Each element in an HTML or XML document can have attributes, such as id, class, src, href, etc. The attributes property is typically accessed through a reference to a DOM element. It returns a NamedNodeMap, which is an unordered collection of attribute nodes associated with the element. Each attribute node has a name and a value.
For example:
<!DOCTYPE html>
<html lang="en">
<head>
    <meta charset="UTF-8">
    <meta name="viewport" content="width=device-width, initial-scale=1.0">
    <title>Understanding DOM</title>
</head>
<body>
    <div>
        <input type="text" id="premium" placeholder="username">
        <img src="example.jpg" alt="There was an Image">
        <svg xmlns="http://www.w3.org/2000/svg" width="50" height="50">
            <circle cx="50" cy="50" r="40" stroke="black" stroke-width="2" fill="red" />
        </svg>
    </div>
</body>
</html>
If you have this structure, then in a script tag (<script>) or in a JavaScript file that is linked to the HTML, you will write
let attr = document.querySelector('.premium');
console.log(attr.attributes);
Output: In the image below, you can see all attributes
hasAttribute()
In DOM, hasAttribute() is a method that allows you to check whether an element has a specific attribute. It returns true if attribute is present otherwise false .
For example:
<!DOCTYPE html>
<html lang="en">
<head>
    <meta charset="UTF-8">
    <meta name="viewport" content="width=device-width, initial-scale=1.0">
    <title>Understanding DOM</title>
</head>
<body>
    <div>
        <input type="text" id="premium" placeholder="username">
        <img src="example.jpg" alt="There was an Image">
        <svg xmlns="http://www.w3.org/2000/svg" width="50" height="50">
            <circle cx="50" cy="50" r="40" stroke="black" stroke-width="2" fill="red" />
        </svg>
    </div>
</body>
</html>
If you have this structure, then in a script tag (<script>) or in a JavaScript file that is linked to the HTML, you will write
let hasAtr = document.querySelector('input');
console.log(hasAtr.hasAttribute('class'));
Output: true
Subscribe to my newsletter
Read articles from Muhammad Bilal directly inside your inbox. Subscribe to the newsletter, and don't miss out.
Written by

Muhammad Bilal
Muhammad Bilal
With a passion for creating seamless and visually appealing web experiences, I am Muhammad Bilal, a dedicated front-end developer committed to transforming innovative ideas into user-friendly digital solutions. With a solid foundation in HTML, CSS, and JavaScript, I specialize in crafting responsive and intuitive websites that captivate users and elevate brands. 📈 Professional Experience: In my two years of experience in front-end development, I have had the privilege of collaborating with diverse teams and clients, translating their visions into engaging online platforms. 🔊 Skills: Technologies: HTML5, CSS3, JavaScript, WordPress Responsive Design: Bootstrap, Tailwind CSS, Flexbox, and CSS Grid Version Control: Git, GitHub 🖥 Projects: I have successfully contributed to projects where my focus on performance optimization and attention to detail played a crucial role in delivering high-quality user interfaces. ✨ Continuous Learning: In the fast-paced world of technology, I am committed to staying ahead of the curve. Regularly exploring new tools and methodologies, I am dedicated to enhancing my skills and embracing emerging trends to provide the best possible user experience. 🎓 Education: I hold a BSc degree in Software Engineering from Virtual University, where I gained both technical skills and knowledge. 👥 Let's Connect: I am always open to new opportunities, collaborations, and discussions about the exciting possibilities in front-end development. Feel free to reach out via LinkedIn, Instagram, Facebook, Twitter, or professional email.