#CodeWeekly #2: Headless WordPress and why use it? Hoppscotch, Uptime Kuma, Third-party Scripts and Lazy Loading in Next.js
 Aryan Chaurasia
Hey everyone, I hope you all liked the last write-up, maintaining the consistency of the habit, in this week, we'll talk about Headless WordPress, Hoppscotch, Uptime Kuma, and using Dynamic Imports & Third-party scripts in Next.JS.
Headless WordPress: The CMS no-one asked for!
While WordPress powers over 44% of the web, with its own themes and plugins extending its functionalities far beyond the built-in ones, many overlook its built-in RESTful API.
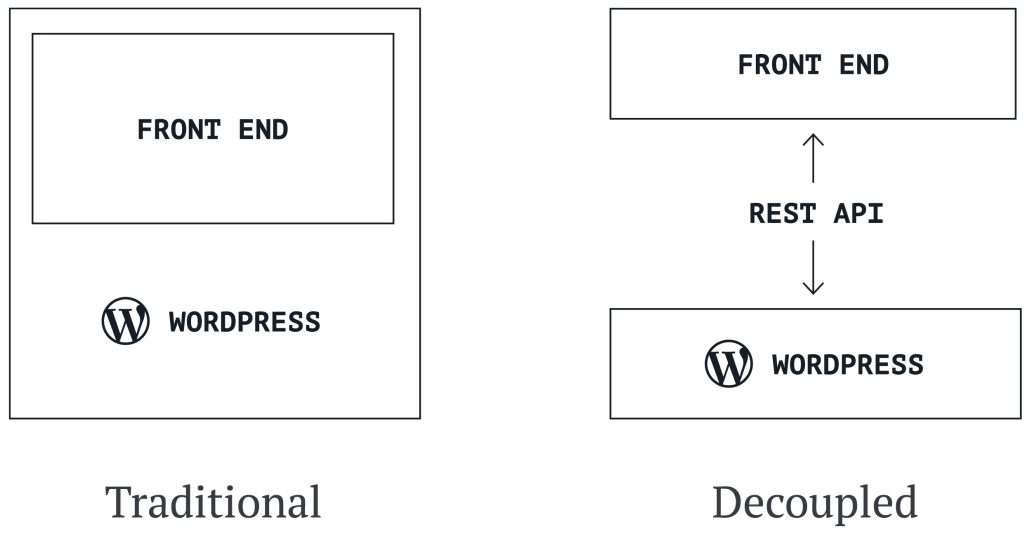
The powerful API of WordPress lets you build entirely new frontends completely separate from the backend, enhancing security by preventing vulnerabilities like XSS and SQL injection. By using the API for data exchange, you gain the flexibility of a decoupled architecture while leveraging WordPress's robust CMS.
Read More: Decoupled WordPress for the Enterprise | WordPress VIP
Why Embrace Decoupled Architecture?
Decoupled Architecture helps us in transcending traditional boundaries while maintaining the modern infrastructure, decoupled architecture stands as a beacon of flexibility, scalability, and innovation. Here's how it empowers your content strategy:
Omnichannel Content Delivery: It allows us to reach a wider audience seamlessly across web, mobile apps, IoT devices, and beyond—all from a unified content source.
Flexible Frontends: Frontend can be freed from the constraints imposed by CMS to make it work. We can create engaging experience for individual platform, unhindered by any backend restrictions.
Simple Data Aggregation: Content from multiple sources can be combined and presented in a single frontend without relying on CMS routing & streamlining workflows for that.
Static Site Performance: With headless CMS, we can easily convert dynamic content into lightning-fast static pages and deliver them directly via CDN for optimal delivery.
Future-Proof Flexibility: With decoupled architecture empowering the backend, we can focus on continuous upgrades and innovation.
Other than WordPress, plugins like ACF Pro, WooCommerce & Learndash, we can bring infinite solutions with WordPress to our own custom frontend.
Docs: REST API Handbook | Developer.WordPress.org
Third-party Scripts in Next.JS
Third-party scripts like Google Analytics, Meta Pixel and Microsoft Clarity plays an important role in tracking the user metric on the websites, while Next.JS supports them out-of-the-box with its @next/third-party library, a lot of users struggle with installing scripts like Facebook Pixel and Microsoft Clarity directly into the <header> tag of the website. So, I thought why not add a solution here:
Adding Microsoft Clarity in Next.JS
Step 1: Add a variable with value in your
.envfile with the nameNEXT_PUBLIC_MSCLARITY.Step 2: Now, open the root
layout.tsxand add the following code just before the<body>tag:
{/* Microsoft Clarity */}
{ process.env.NEXT_PUBLIC_MSCLARITY &&
<Script strategy='beforeInteractive'
    id='msclarity'
    dangerouslySetInnerHTML={{
    __html: `
    (function(c,l,a,r,i,t,y){
        c[a]=c[a]||function(){(c[a].q=c[a].q||[]).push(arguments)};
        t=l.createElement(r);t.async=1;t.src="https://www.clarity.ms/tag/"+i;
        y=l.getElementsByTagName(r)[0];y.parentNode.insertBefore(t,y);
        })(window, document, "clarity", "script", "${process.env.NEXT_PUBLIC_MSCLARITY}");`,
    }}
/>
}
Your root layout should look similar to this:
import './globals.css';
import type { Metadata } from 'next';
import { Poppins } from 'next/font/google';
import Script from 'next/script';

const poppins = Poppins({ subsets: ['latin'], weight: ['400', '600', '700'] });

export default function RootLayout({
  children,
}: {
  children: React.ReactNode;
}) {
  return (
    <html lang='en'>
      {/* Microsoft Clarity */}
      { process.env.NEXT_PUBLIC_MSCLARITY &&
      <Script strategy='beforeInteractive'
        id='msclarity'
        dangerouslySetInnerHTML={{
          __html: `
              (function(c,l,a,r,i,t,y){
                  c[a]=c[a]||function(){(c[a].q=c[a].q||[]).push(arguments)};
                  t=l.createElement(r);t.async=1;t.src="https://www.clarity.ms/tag/"+i;
                  y=l.getElementsByTagName(r)[0];y.parentNode.insertBefore(t,y);
              })(window, document, "clarity", "script", "${process.env.NEXT_PUBLIC_MSCLARITY}");
          `,
        }}
      />
      }
      <body className={poppins.className}>{children}</body>
    </html>
  );
}
That's it, you can try the same method for Meta Pixel as well. With this, the application will still work, even if the environment variable is missing.
Lazy Loading JavaScript to Improve Performance on Client-side in Next.js
Lazy Loading client components and libraries only when they're needed can help in significantly improving the initial loading time of an application/website by decreasing the amount of JS needed to execute when the route is being compiled and rendered.
In Next.js, we can use the lazy loading using the next/dynamic library or by using React.lazy() with the Suspense boundary.
Read More: Optimizing: Lazy Loading | Next.js (nextjs.org)
Lazy loading applies on client components as the server components can send data from server to client with the help of streaming.
Hoppscotch: Faster API Operations than Postman 🚅
Postman and Hoppscotch are one of the very popular tools among the developers if you're working on API-testing. Both the tools support multiple request methods including GET, POST, PUT, DELETE, PATCH & OPTIONS, but there are certain features that I like about Hoppscotch.
I came across Hoppscotch while exploring the FOSS 3.0 events on YouTube. If you're involved in working with RESTful APIs and seek a faster tool with amazing user interface, giving Hoppscotch a try is essential. It supports working with RESTful APIs, GraphQL, and Websockets, providing a seamless and user-friendly experience.
Reasons to Use Hoppscotch:
Open-source and can be deployed directly on Docker.
Supports GraphQL and Websockets.
Lightweight tool with similar features.
Well-organized documentations with brief guides.
Easily sharable API requests with anyone directly from the dashboard.
Uptime Kuma: Self-hosted uptime monitoring in Docker 😱
Kuma is by far one of the best open-source tools that I found online in 2023. It allows me to monitor all my websites, servers and other web applications with ease. Previously, I have used several services like UptimeRobot & BetterStack for uptime monitoring but they're not very useful in other task and requires paid plans.
As it is self-hosted, and launching Kuma on an Indian server recently helped me to reduce the overall response time of the websites by 90% for the targeted audience in India.

If you want to give it a try, you can launch UptimeKuma on Railway with bare minimum cost and unlimited monitors.
The Conclusion
So, this was the 2nd episode of #CodeWeekly, in next episode, we'll cover other open-source CMS, some automations that I use regularly, and much more. As promised last week to update the article on React.js Frameworks, I'll try to do it by the end of this week if all goes well, till then ADIOS! ✌️
Subscribe to my newsletter
Read articles from Aryan Chaurasia directly inside your inbox. Subscribe to the newsletter, and don't miss out.
Written by
