Multi-Cluster Deployment using ArgoCD
 Anil Kumar
In this blog, we will be doing multi-cluster deployment on multiple Amazon EKS Cluster with GitOps Approach using ArgoCD tool.
Complete Credits to Abhishek Veeramalla for his contribution.
Full video here: https://youtu.be/QhDnXsmSnfk?si=l_xwXq_UeoY6Z0fZ
In the previous blog, we have deployed a 3-tier robot Stan Microservices architecture on AWS EKS Cluster using helm.
In this blog, I will deploy Multiple applications on multiple Clusters using ArgoCD. ArgoCD is a giropas tool and popular in Continuous Deployment Space.
Generally in Jenkins CI/CD pipeline, CD process will be taken care by shell scripting, python or Ansible. They have following drawbacks and can be covered by ArgoCD tool.
When you deploy your applications using CI/CD. In CD stage you will use Shell/ansible/python to apply Kubernetes manifest files.
For example, Your Cluster is working fine and then someone from your team manually changed apiVersion or any other line in manifest file. Then, your cluster will be down because of memory issues or configuration mismatch things. You cannot know who modified manifest files or what might be the root cause of the issue causing a potential downtime for your application.
So to avoid above situation, we will use GitOps tools like ArgoCD, Flux, Spinnaker.
GitOps and ArgoCD:
GitOps is like having a personal assistant for your software. Instead of manually making changes to your applications.Kubernetes manifest files, you use Git as a tool to track changes. All the configuration of how your app should look will be in a Git repository. GitOps then takes care of automatically updating and deploying your application based on the changes you've made in Git. ArgoCD works with GitOps, a smart way of handling changes to your software. With GitOps, you use Git, the popular version control system, to keep track of all the changes in your application. ArgoCD then uses this information to automatically update and deploy your application. It's like magic for making sure your software is always up-to-date and running smoothly!
In simple words, Imagine a team contains 2 developers Dev1 and Dev2. Dev1 triggered a CI/CD pipeline and configured k8 configmap and secrets using ArgoCd as CD tool. Since Dev2 has access to Kubernetes cluster, he then modified configmap value in manifest files directly instead of doing that on Git. Now ArgoCD will detect these changes and undo these changes as it a manual change and not done in GitHub.
Git always acts as a single source of truth in GitOps Approach as the name indicates.
ArgoCD continuously tracks git repo and makes sure that the Git Repo and Dev Cluster both were in same state. ArgoCD performs the following functions:
Tracking, Auditing, Monitoring, Revoking and Auto-healing.
Modes of Deployment:
ArgoCD comes with 2 modes of deployment:
Hub-Spoke mode:
In this mode, a single ArgoCD controller will deploy applications on multiple clusters. Here, one ArgoCD will mange multiple clusters.
There is no need of installing ArgoCD on multiple clusters but it also has some disadvantages:
i) You need to configure ArgoCd in Highly Available mode.
ii) You need to take care of High CPU and Memory requirements as
one ArgoCD needs to maintain multiple or 1000's of Kubernetes manifest files.
Standalone Mode:
In this mode, for every Cluster there will be a ArgoCd configured which tracks a single Git Repo or multiple Git Repo's for multiple Kubernetes manifest files.
Here less utilization of memory/ CPU will be used compared to former one.
But, If we need to change ArgoCd to another GitOps tool, then we need to change it on each and every cluster.
Pre-requisites:
Create a new user in AWS with administrative access or you can login via root user account as it also possess administrative access. Also create a Access key/secret access keys as you need them while installing multiple softwares further.
Now create a new instance with ami id of "Ubuntu" type and instance-type as "t2.medium" . Select the appropriate key-pair and Security groups with required inbound and outbound addresses open.
You can open ports 22 just for now as you need to ssh to that machine.
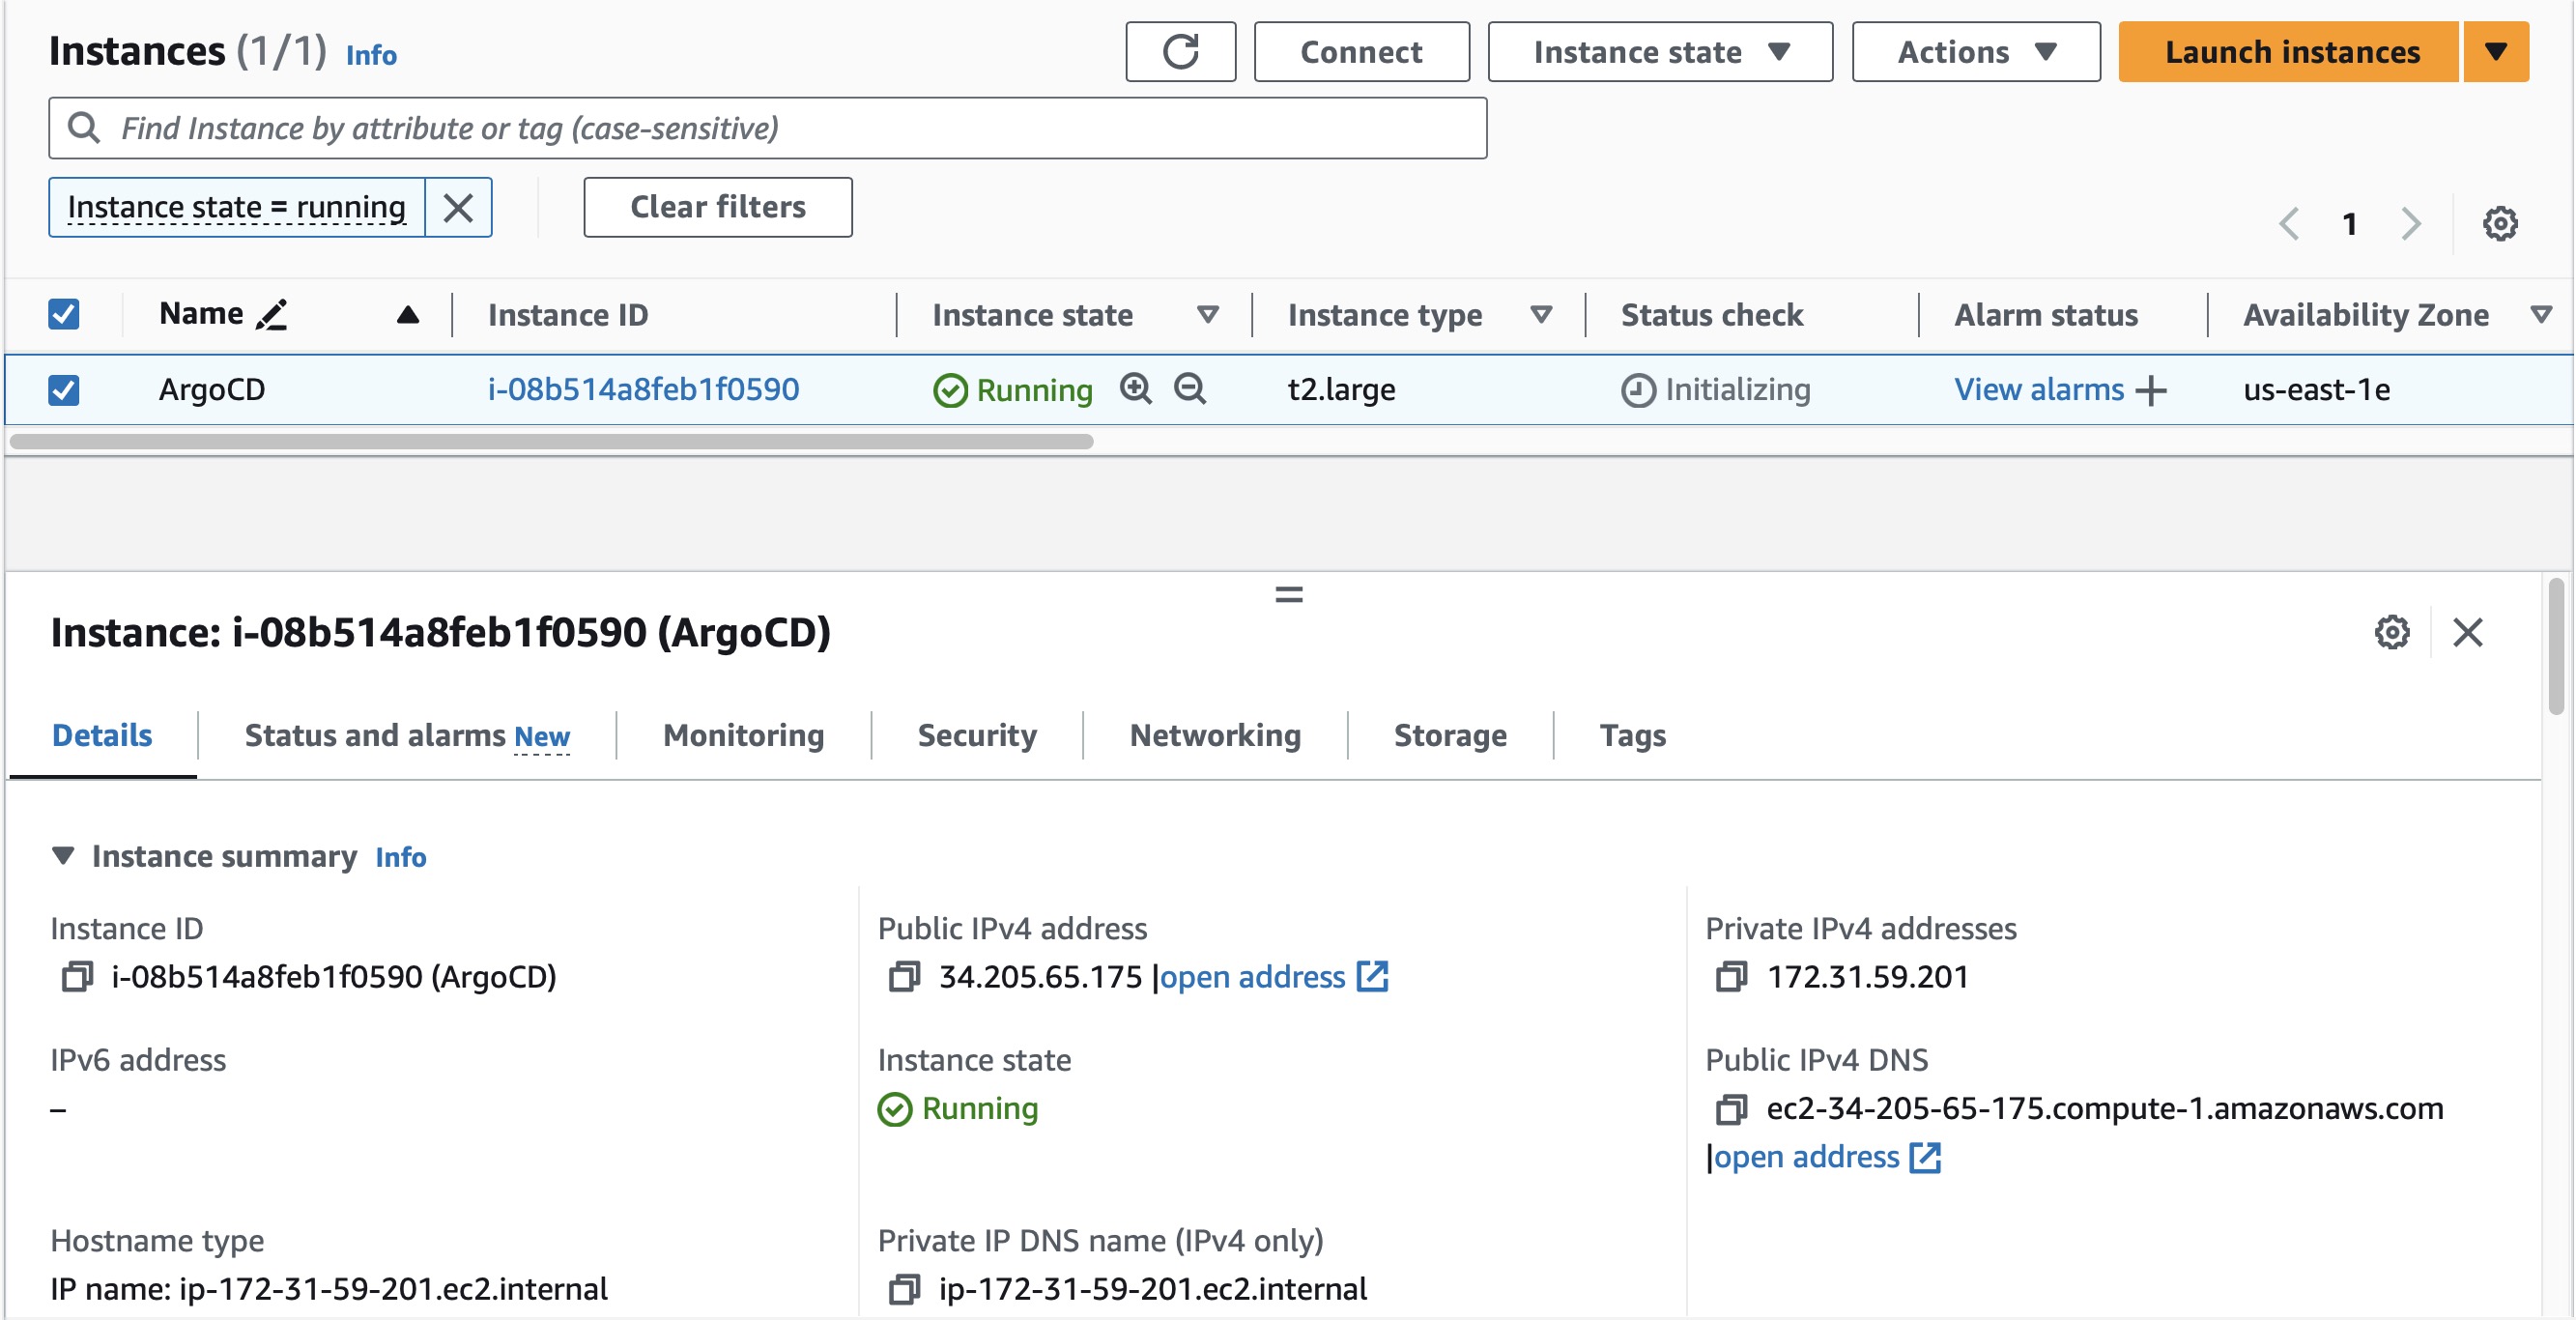
Now connect to that instance using EC2 Instance Connect or SSH terminal as per your convenience.
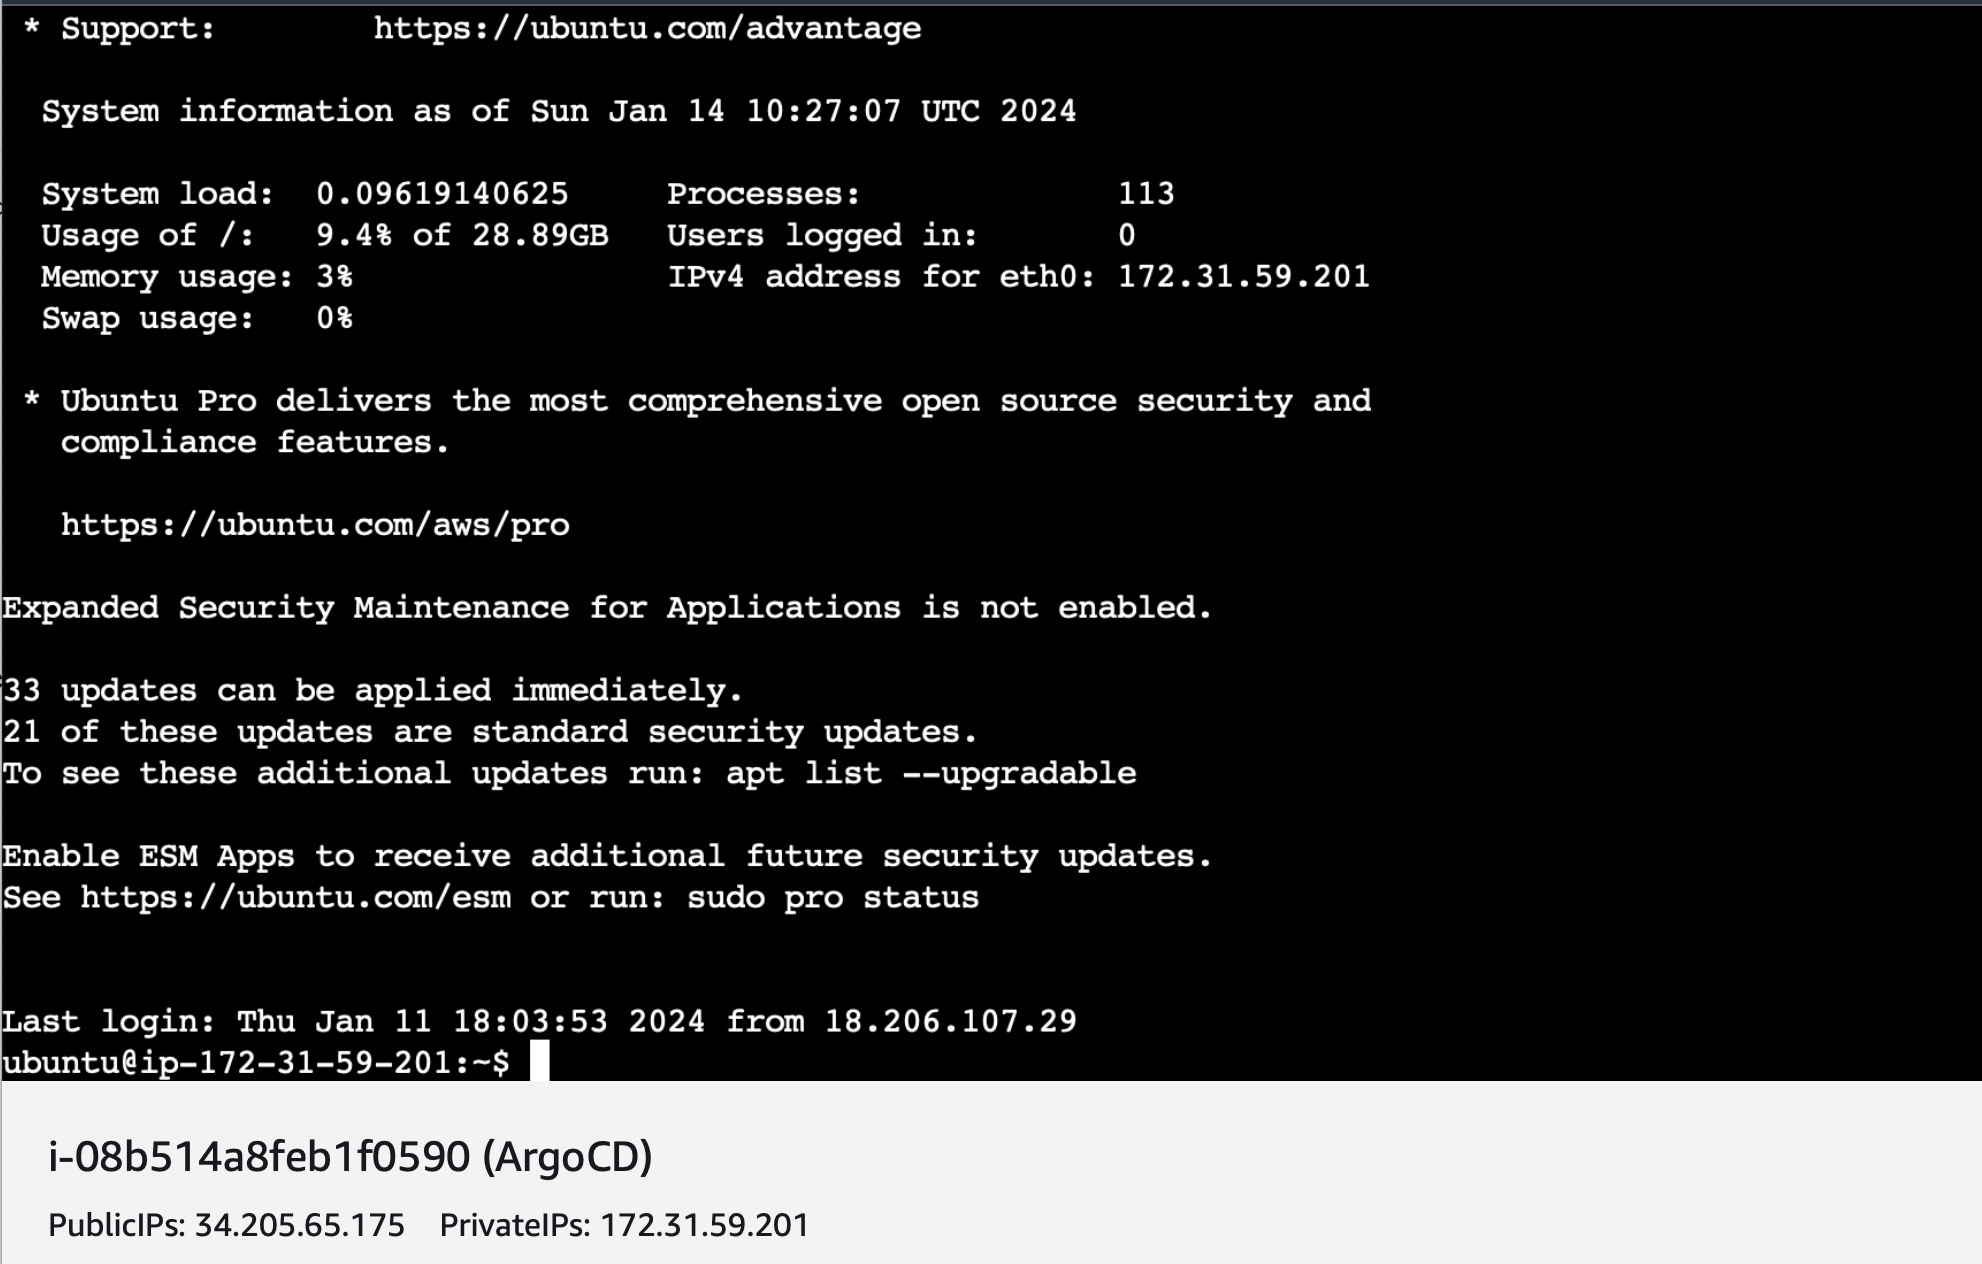
Once connected, Install kubectl, eksctl and awscli using the below commands.
- AWSCLI:
sudo apt install unzip -y
curl "https://awscli.amazonaws.com/awscli-exe-linux-x86_64.zip" -o "awscliv2.zip"
unzip awscliv2.zip
sudo ./aws/install
KUBECTL
  curl -O https://s3.us-west-2.amazonaws.com/amazon-eks/1.28.3/2023-11-14/bin/linux/amd64/kubectl
  chmod +x ./kubectl
  mkdir -p $HOME/bin && cp ./kubectl $HOME/bin/kubectl && export PATH=$HOME/bin:$PATH
  kubectl version --client
EKSCTL:
  sudo apt update
  curl --silent --location "https://github.com/weaveworks/eksctl/releases/latest/download/eksctl_$(uname -s)_amd64.tar.gz" | tar xz -C /tmp
  sudo mv /tmp/eksctl /usr/local/bin
  eksctl version
Once Installed check whether all are working fine by using the below commands:
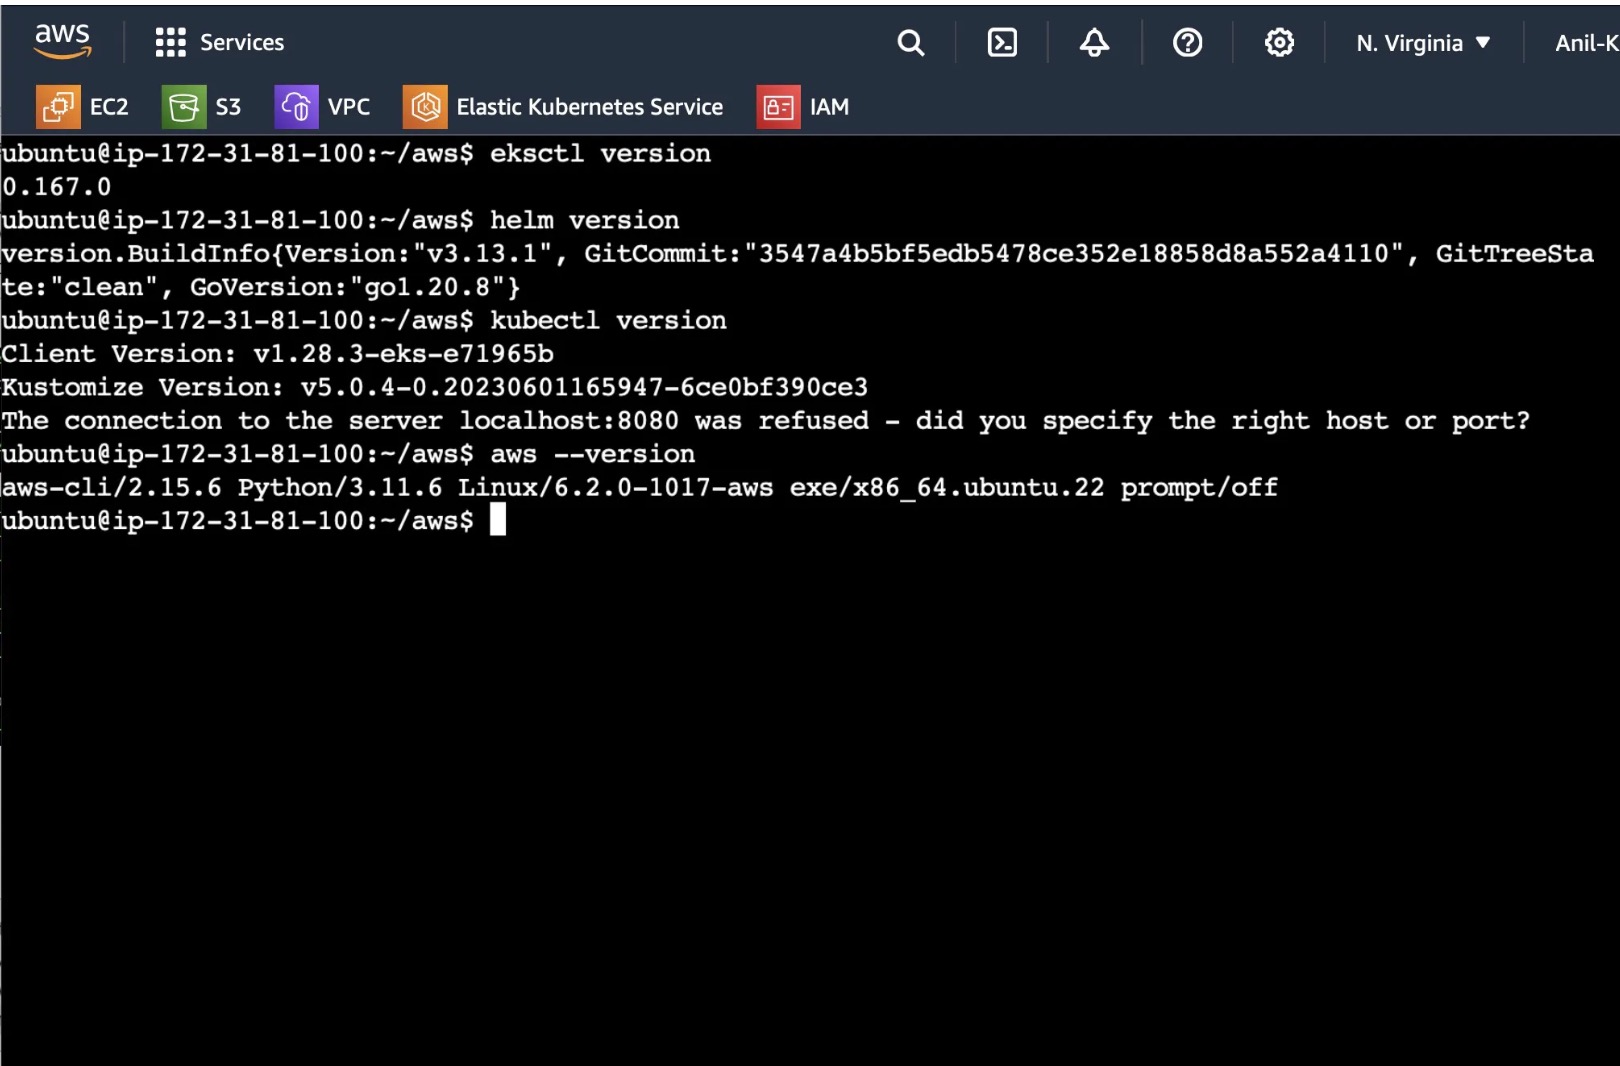
EKS SetUp:
Once all the packages were installed, now we need to create EKS Clusters, since we are deploying multiple applications we need to create multiple EKS Clusters.
Before creating EKS Clusters, configure the AWS CLI using the access key and secret access key which were created while generating security access.
Make sure to not disclose access and secret keys.

(Note: I have deactivated and deleted above access keys after this project)
Now create 3 clusters using the below commands:
eksctl create cluster --name hub-cluster --region us-east-1
eksctl create cluster --name spoke-cluster-1 --region us-east-1
eksctl create cluster --name spoke-cluster-2 --region us-east-1

Similarly create spoke-cluster-1 and spoke-cluster-2 and wait for some time tilll the cluster creation process completes.
ArgoCD Installation:
Instead of using kubectl multiple times for every command, you can set an alias for kubectl with k, so that typing the commands would get easy.
alias k=kubectl
Now you have created 3 clusters, kubectl will be configured at the last cluster it is created. So change it to the Hub Cluster using the below command.
kubectl config current-context    //Shows the current context kubectl is configured with
kubectl config use-context <cluster_details>.  //Configures the kubectl with mentioned cluster details

Once the correct cluster is configured, now install ArgoCD in the configured cluster using the below commands:
kubectl create namespace argocd
kubectl apply -n argocd -f https://raw.githubusercontent.com/argoproj/argo-cd/stable/manifests/install.yaml
Once the ArgoCD is installed, you can verify whether the pods and services are up and running using the below commands:
kubectl get pods -n argocd   //Lists all pods available in argocd namespace
kubectl get svc -n argocd    //Lists all services available in argocd namespac
We need to run ArgoCD in HTTP mode(insecure), we will be doing this as we do not have certificates and established dns to run it in HTTPS mode. For this, we need to edit the configmap "argued-cmd-params-cm" and add a line at the end of it.
k get cm -n argocd
k edit cm argocd-cmd-params-cm -n argocd
data:
  server.insecure: "true"
The above configmap will be mounted on the deployment and service, so changing it here will impact them.
Now we need to view ArgoCD in GUI, so we need to expose the service ArgoCD is running on, we can do it by multiple ways like Ingress, LoadBalancer or NodePort.
We will be using NodePort here to expose our cluster, so go the service and edit type from 'ClusterIP' to 'NodePort'.
k edit svc argocd-server -n argocd
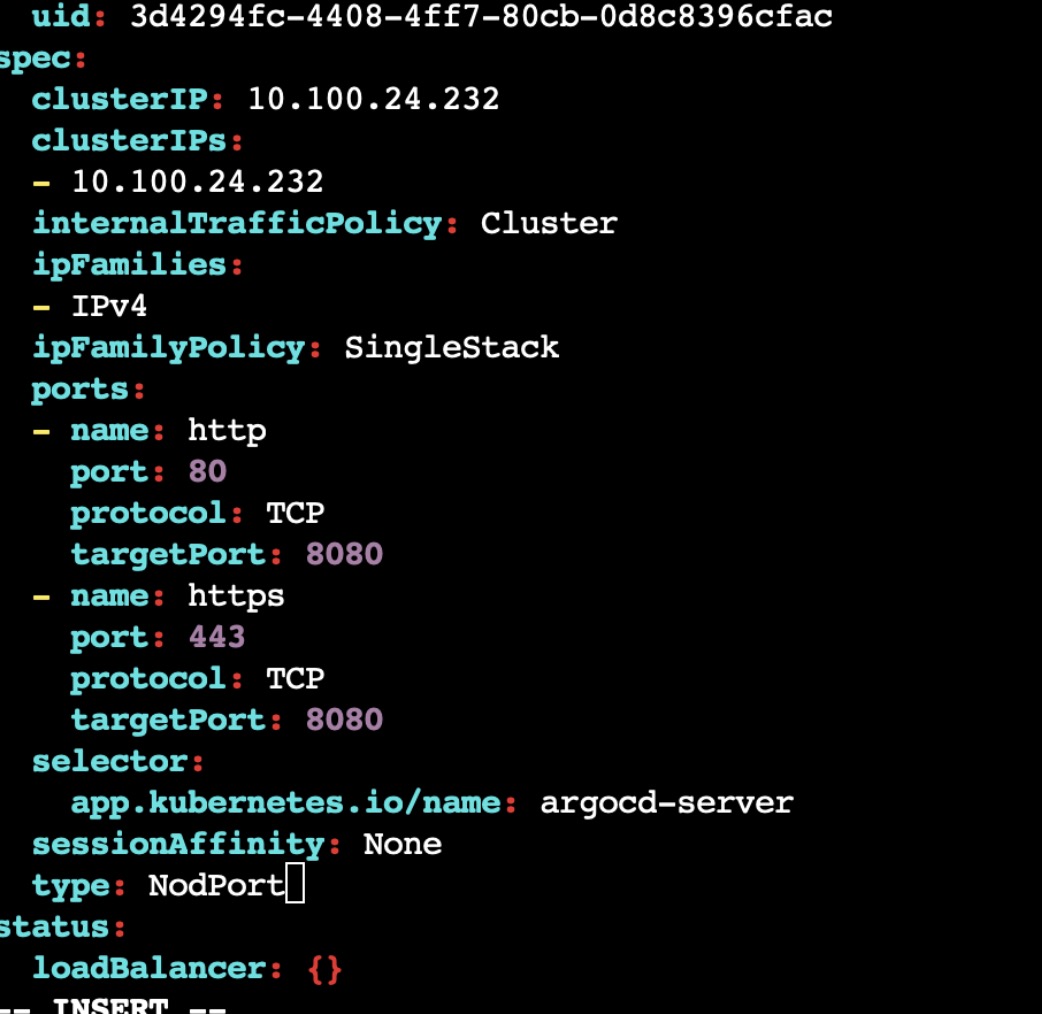
verify whether the type is changed by checking with "k get svc -n argocd" and note down the NodePort associated with it.
Now go the any of the 2 Hub-Node Instances and copy that <ip-addr>:<Nodeport> and paste it in browser.
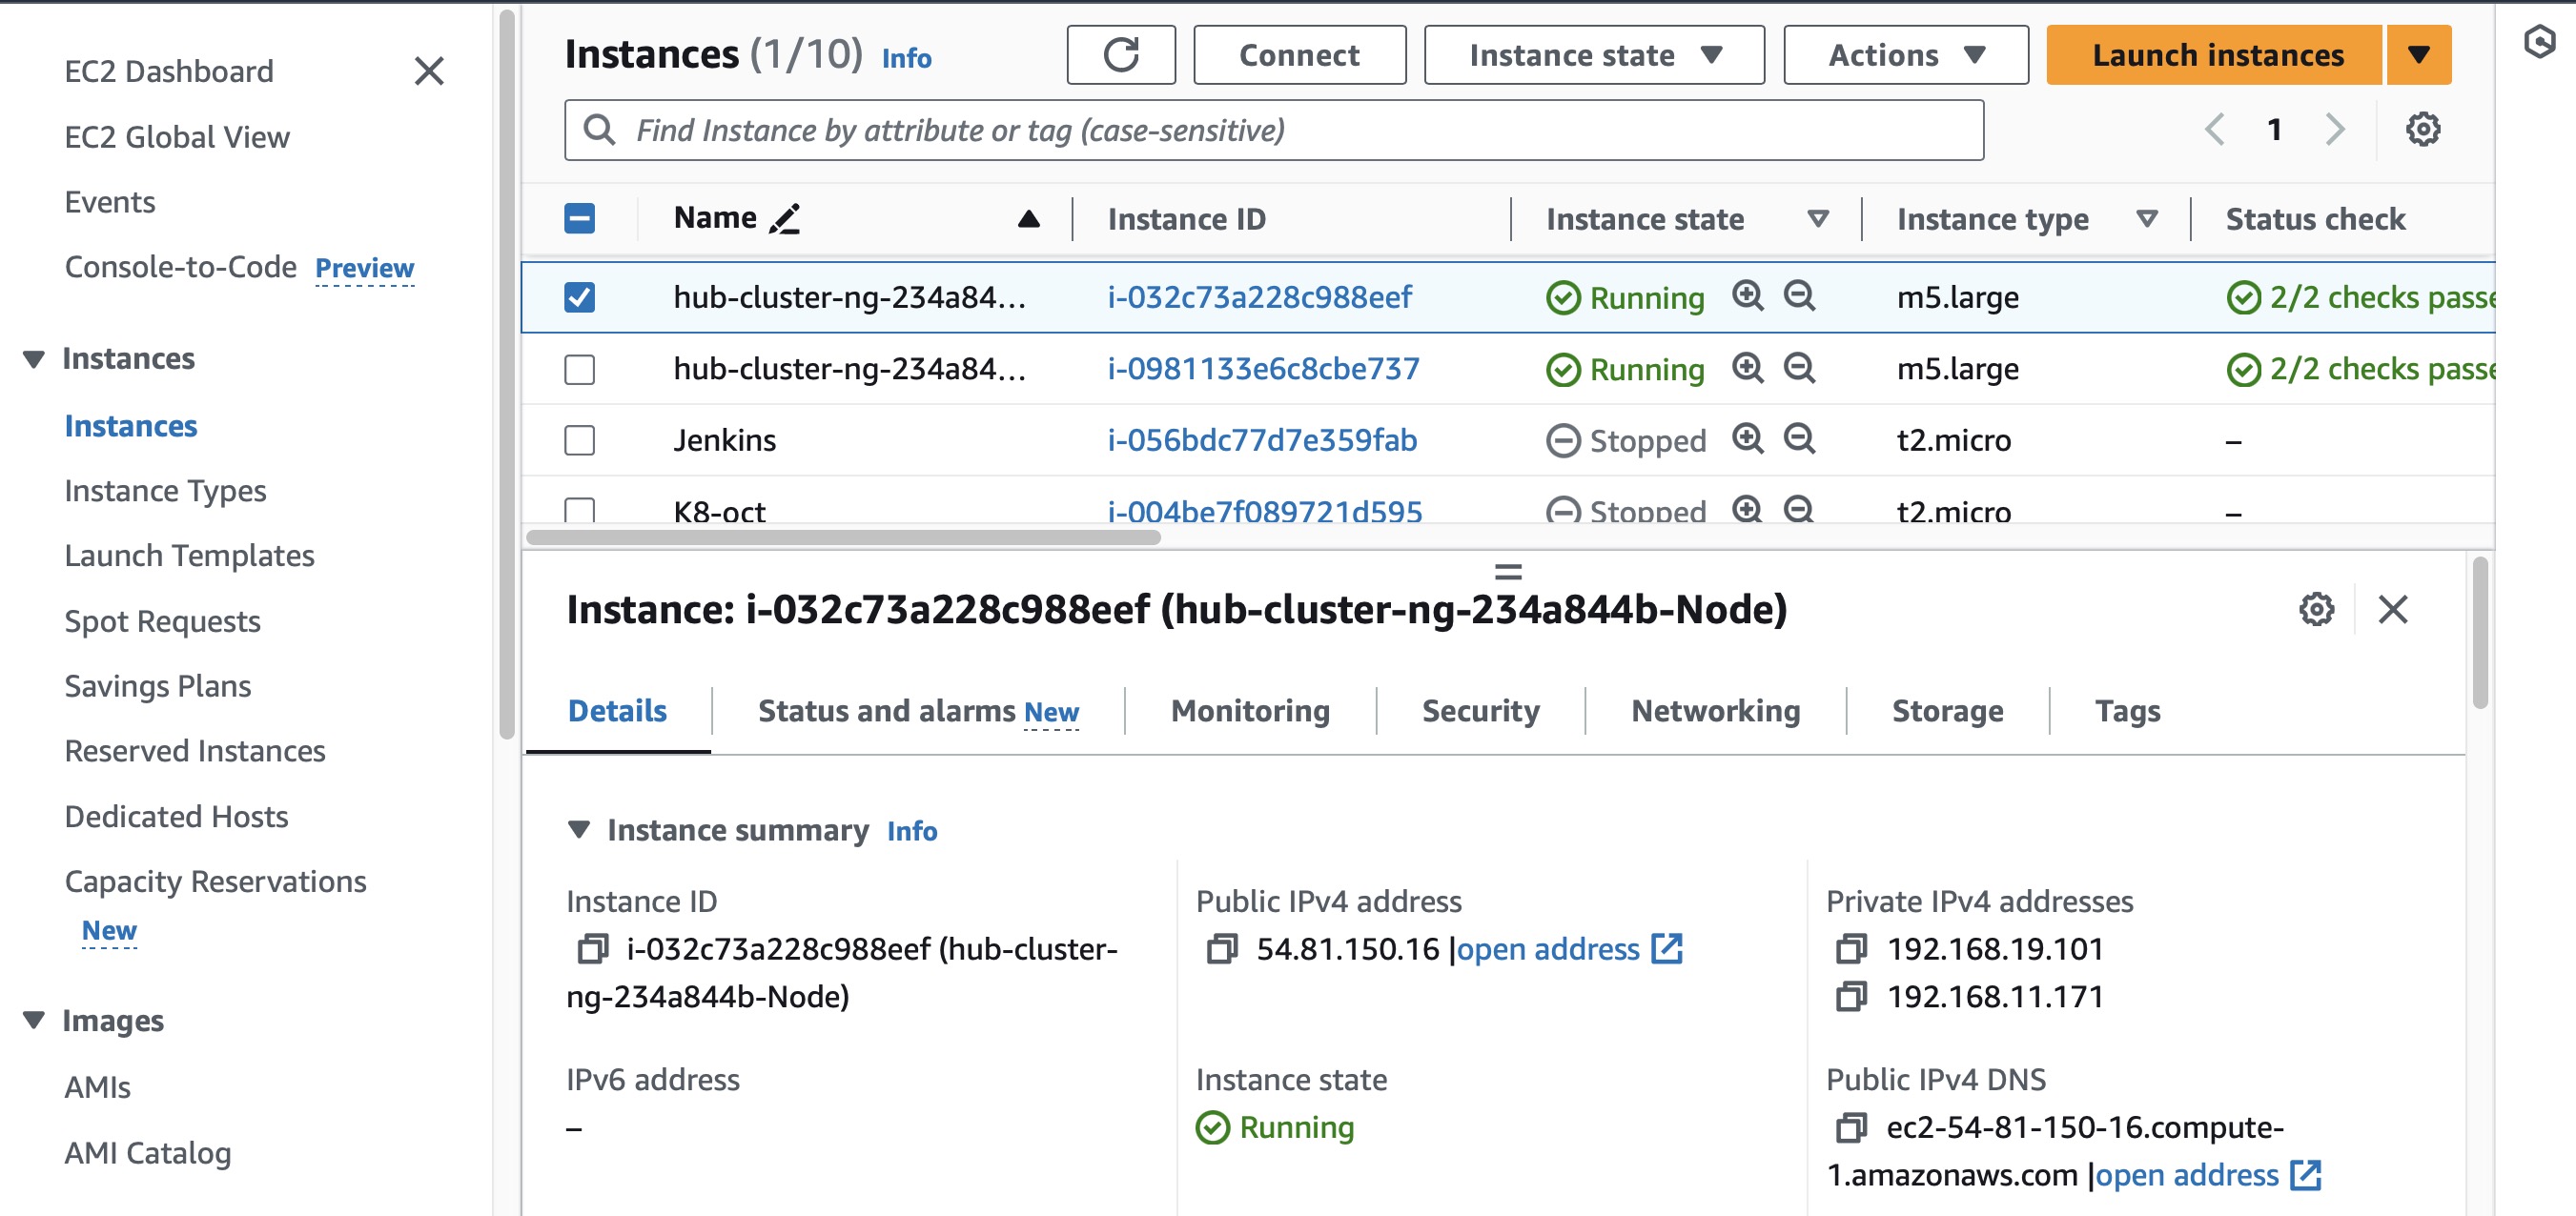
Also go to the security group associated with that Instance and allow inbound connections to that specific NodePort.

ArgoCD Login:
Username will be admin and password you need to find it from the secrets.
List all the secrets and then go to the "argued-initial-admin-secret".
k get secrets -n argocd
k edit secret argocd-initial-admin-secret -n argocd
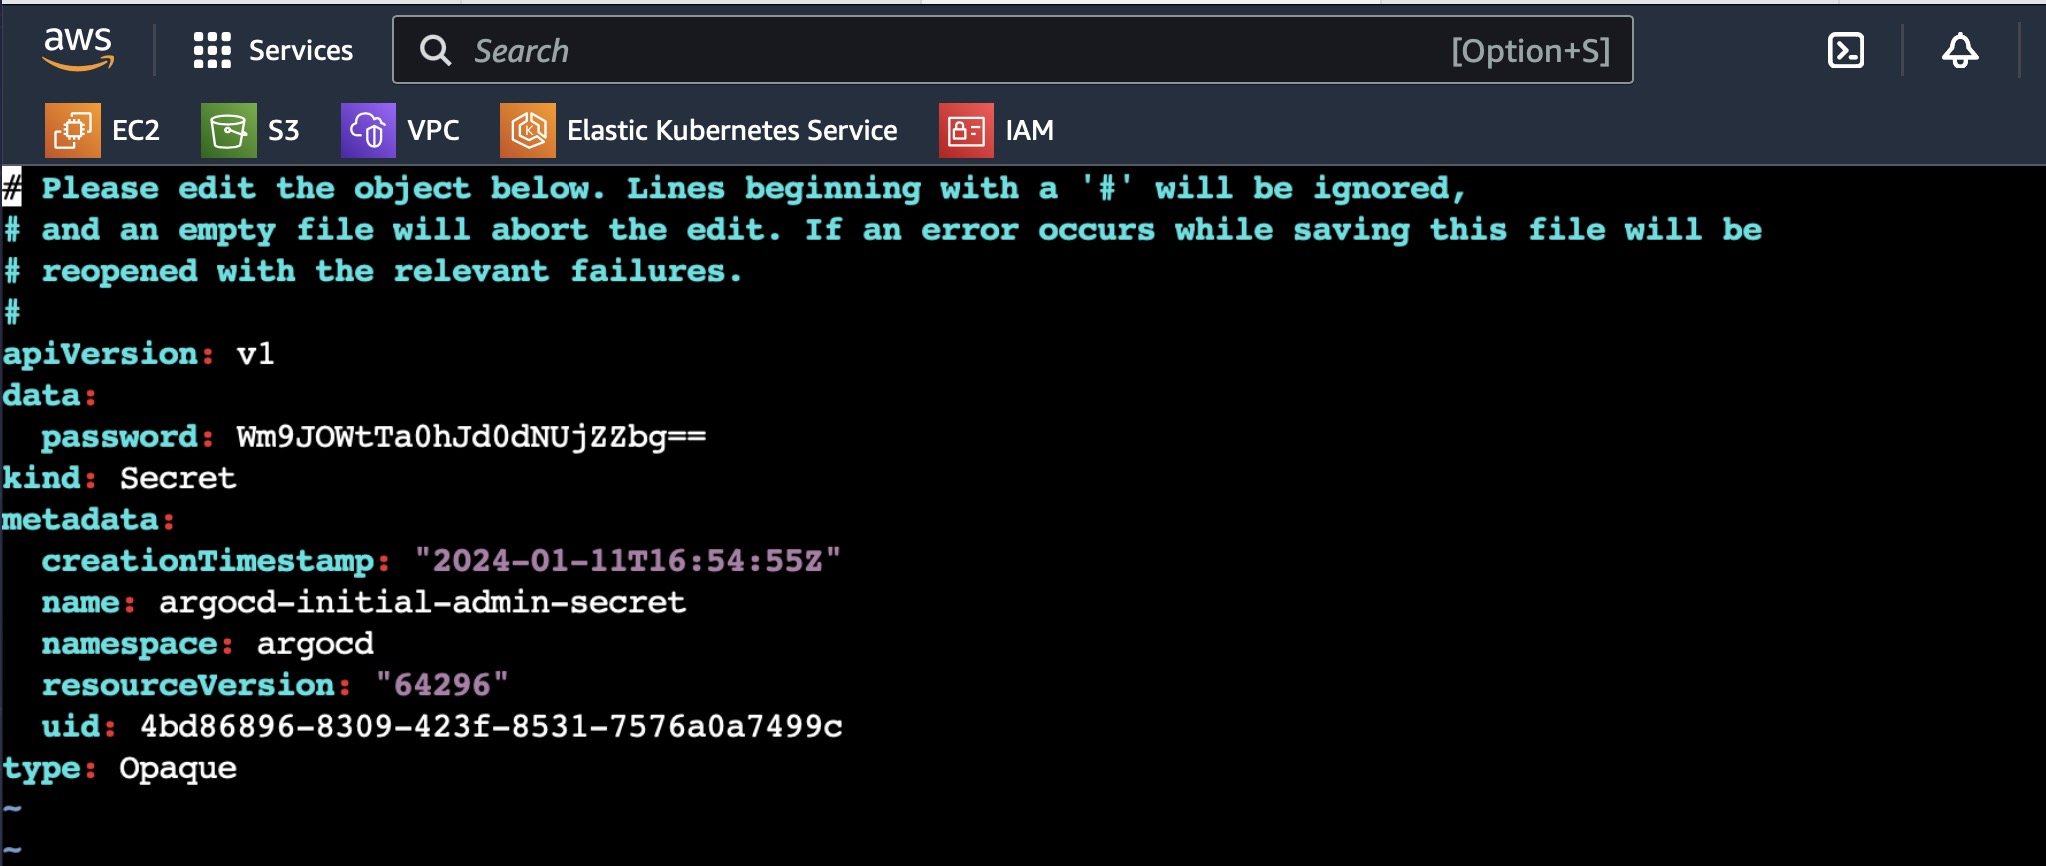
In the above pic, you can see the password which is base64 encoded.
To decode that base64 password, enter the following command:
echo <password> | base64 --decode
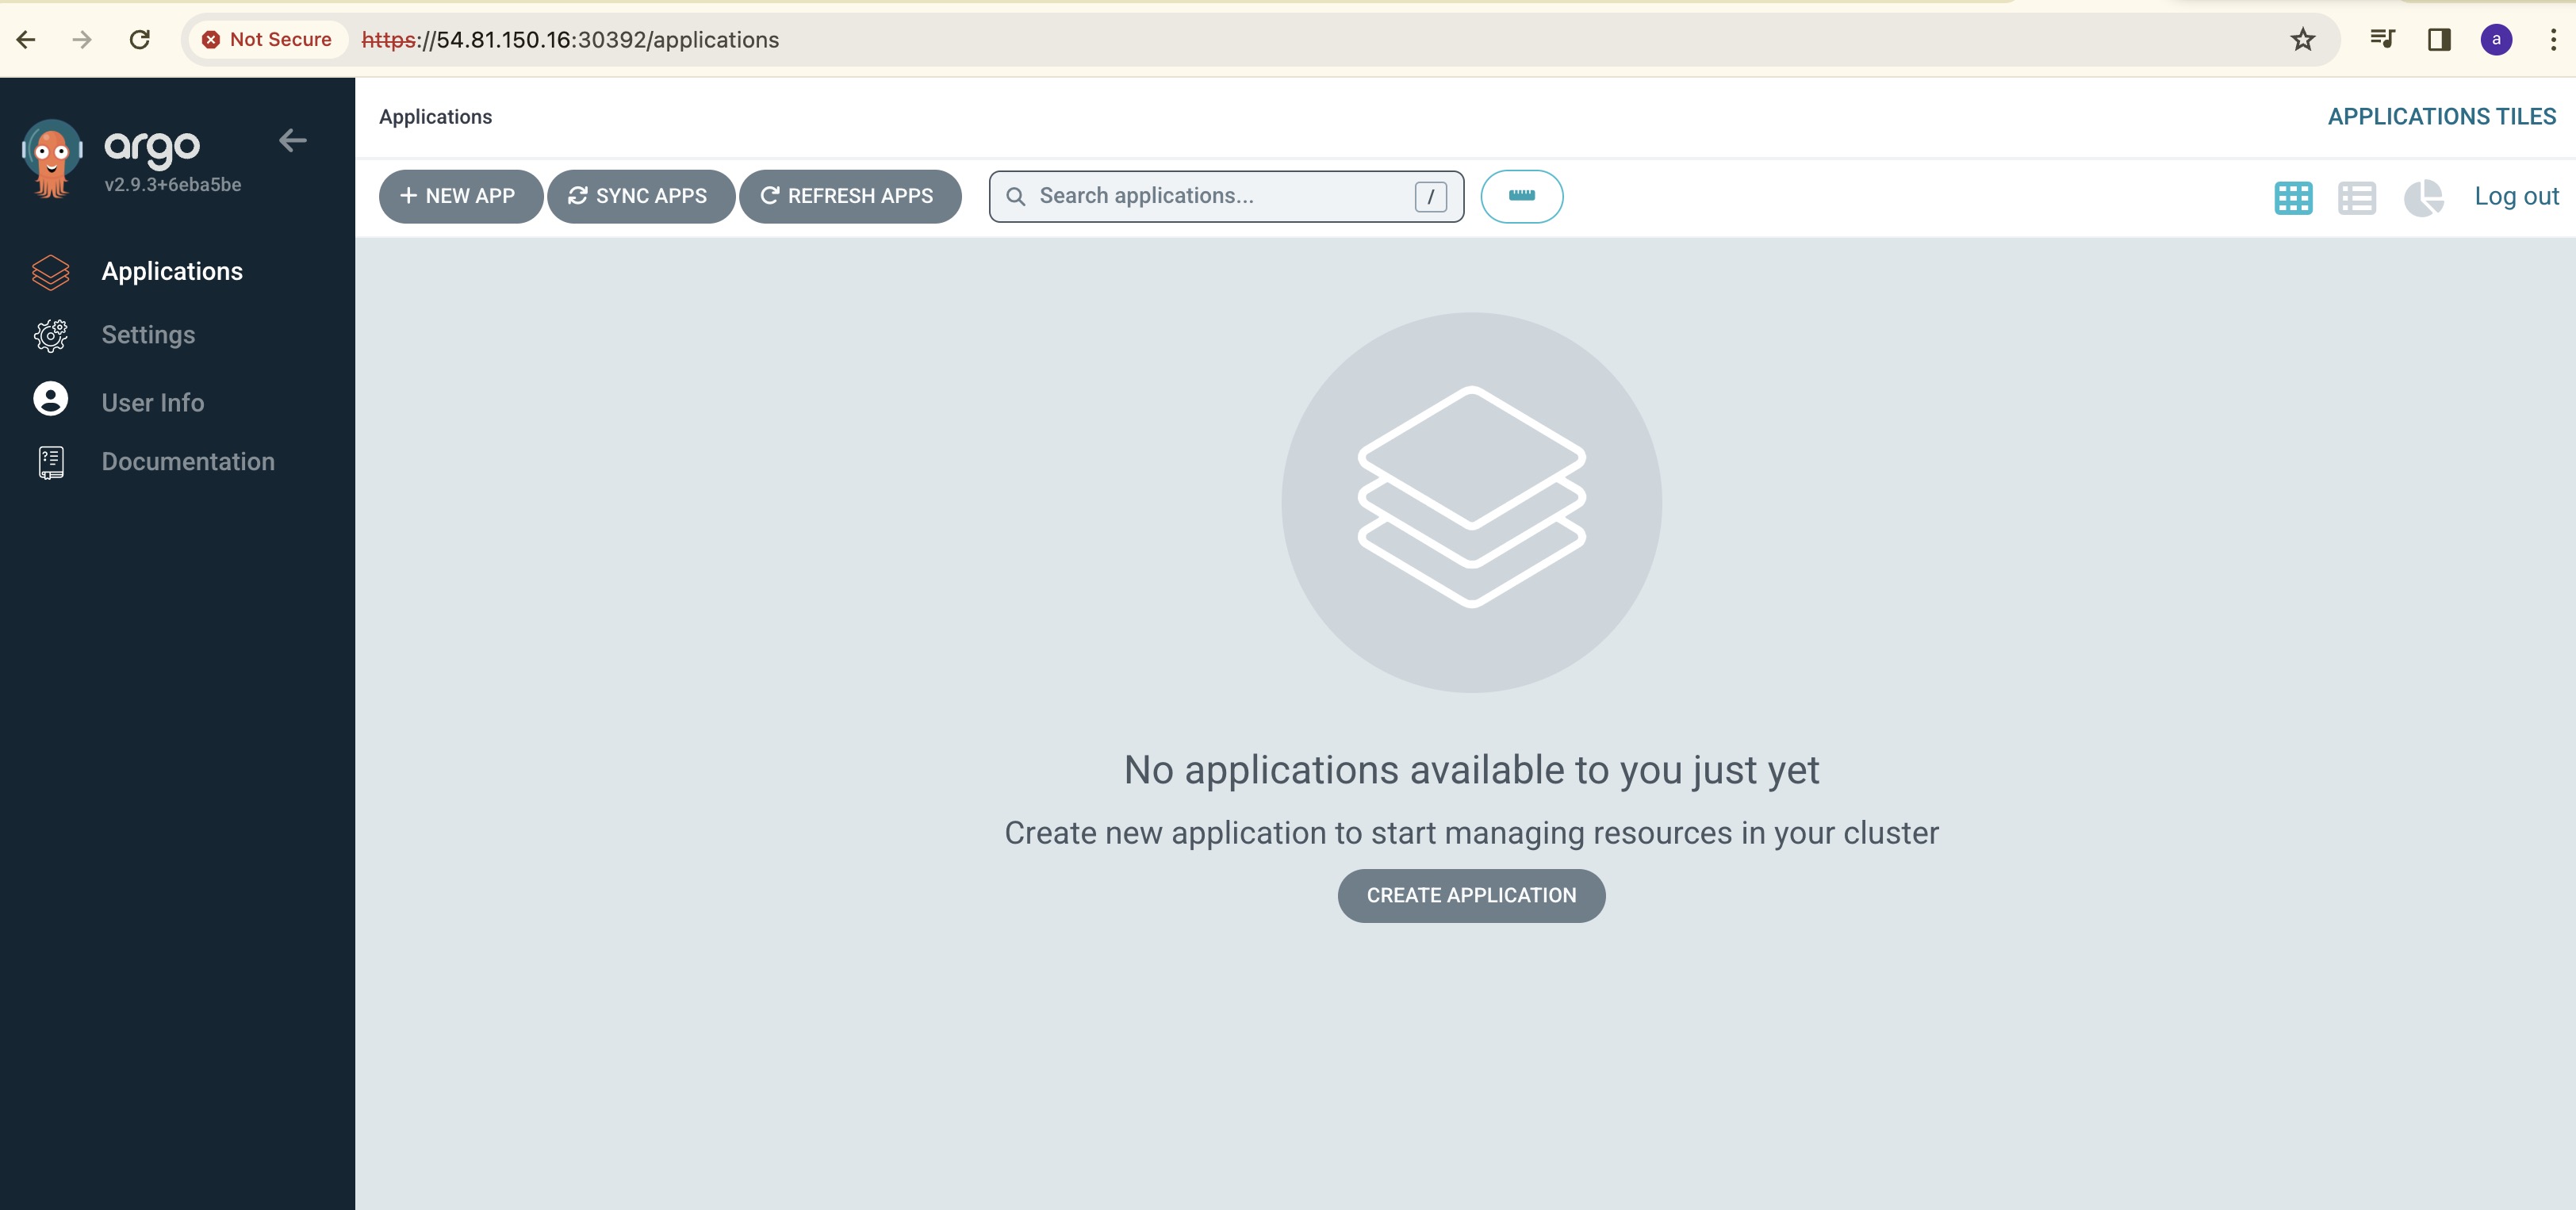
Now you will get the password, enter the username as admin and password.
You will be able to login to ArgoCD.
Adding Spoke Clusters in ArgoCD:
Since this is a hub and spoke mode, we need to add the spoke clusters to the ArgoCD
Go to settings and check the target clusters associated with ArgoCD
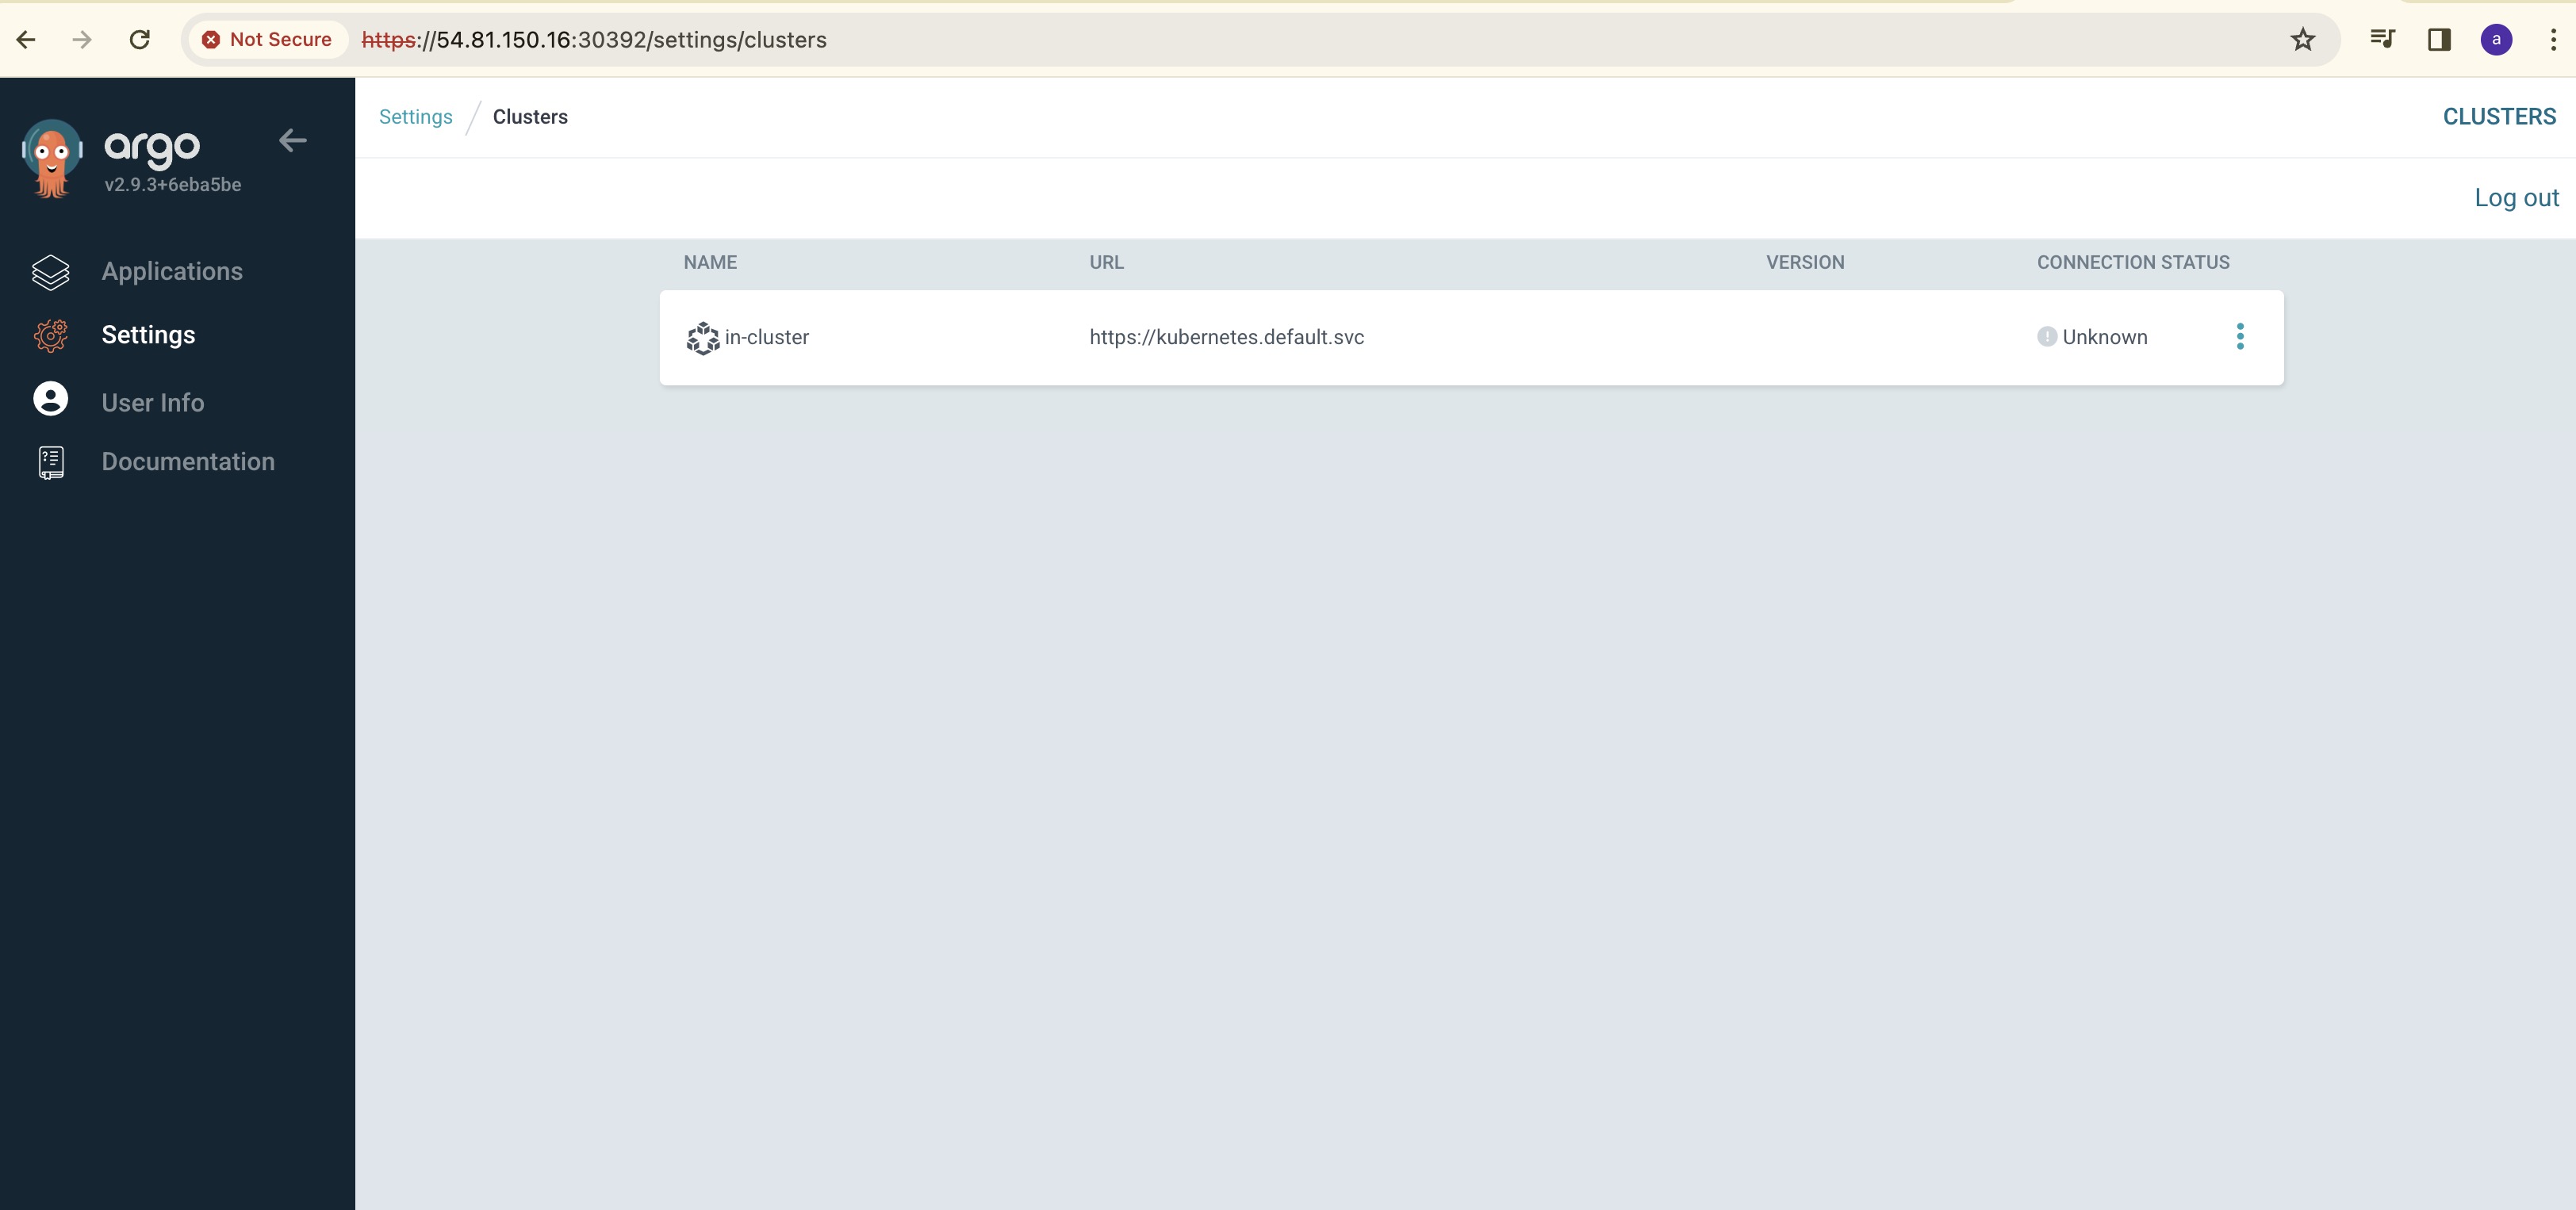
Now we need to add the remaining 2 spoke clusters, we cannot add it using GUI, we need to do this by using CLI.
Install ArgoCD CLI using the below commands from the given page
curl -sSL -o argocd-linux-amd64 https://github.com/argoproj/argo-cd/releases/latest/download/argocd-linux-amd64
sudo install -m 555 argocd-linux-amd64 /usr/local/bin/argocd
rm argocd-linux-amd64
Also login to the ArgoCD before adding targets using the below command:
argocd login <ip-addr>:NodePort
Give the username and password

Once the login now add the spoke-cluster-1 and spoke-cluster-2 to the ArgoCD using the below commands:
To find the cluster details, use "k config get-contexts" and copy cluster details:
argocd cluster add <cluster-details> --server <ip-addr>:NodePort

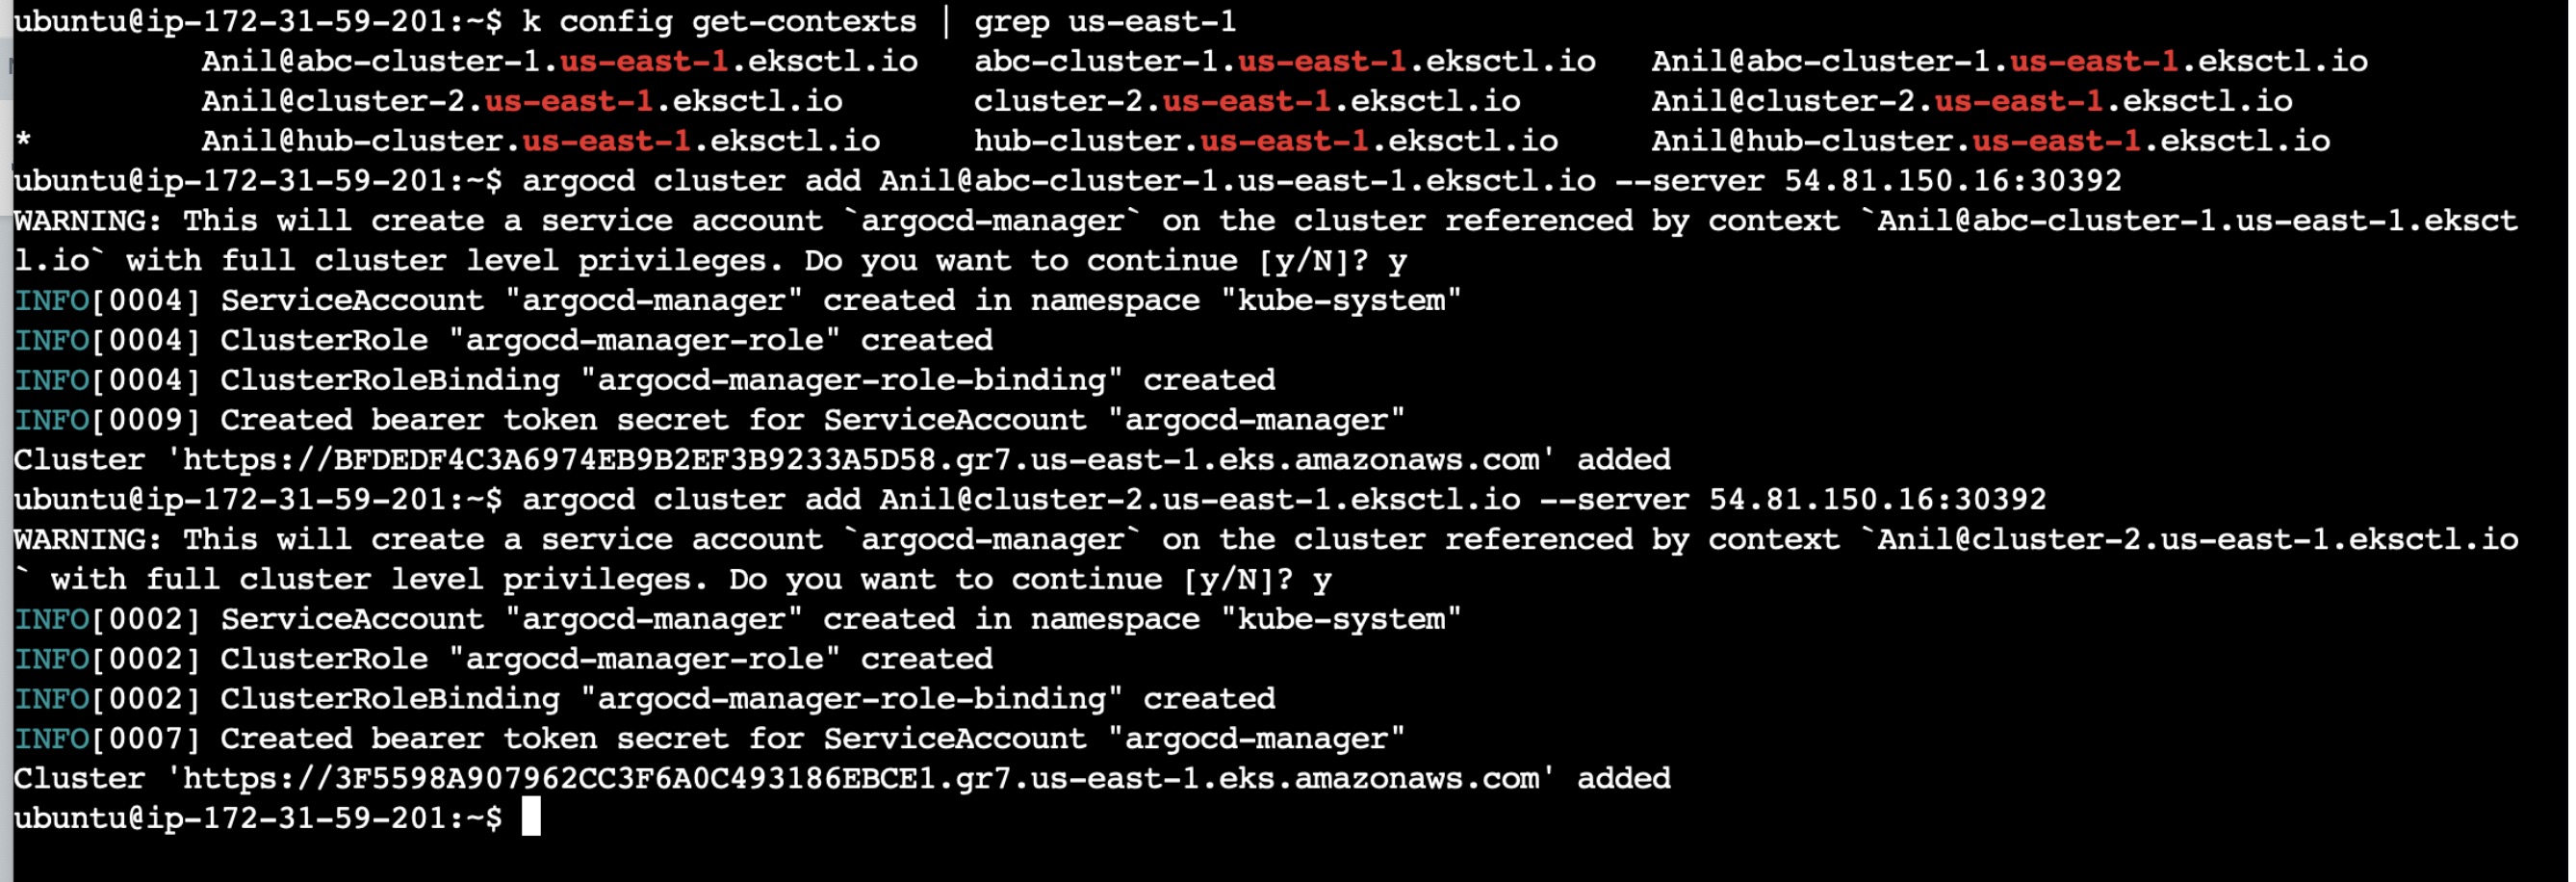
Once adding clusters via CLI is done, now check whether these cluster details are found in ArgoCD GUI by going to settings:

Connecting with GitHub:
Now the setup is completed and the only thing we need to connect the ArgoCd cluster with the GitHub applications.
In the ArgoCD Home Page, click on create Application and enter the following details:
Application Name, Sync Policy, Repo URL, path, Destination Cluster URL and Namespace.
GitHub URL: https://github.com/AnilKumar-Noolu/argocd-hub-spoke-demo.git
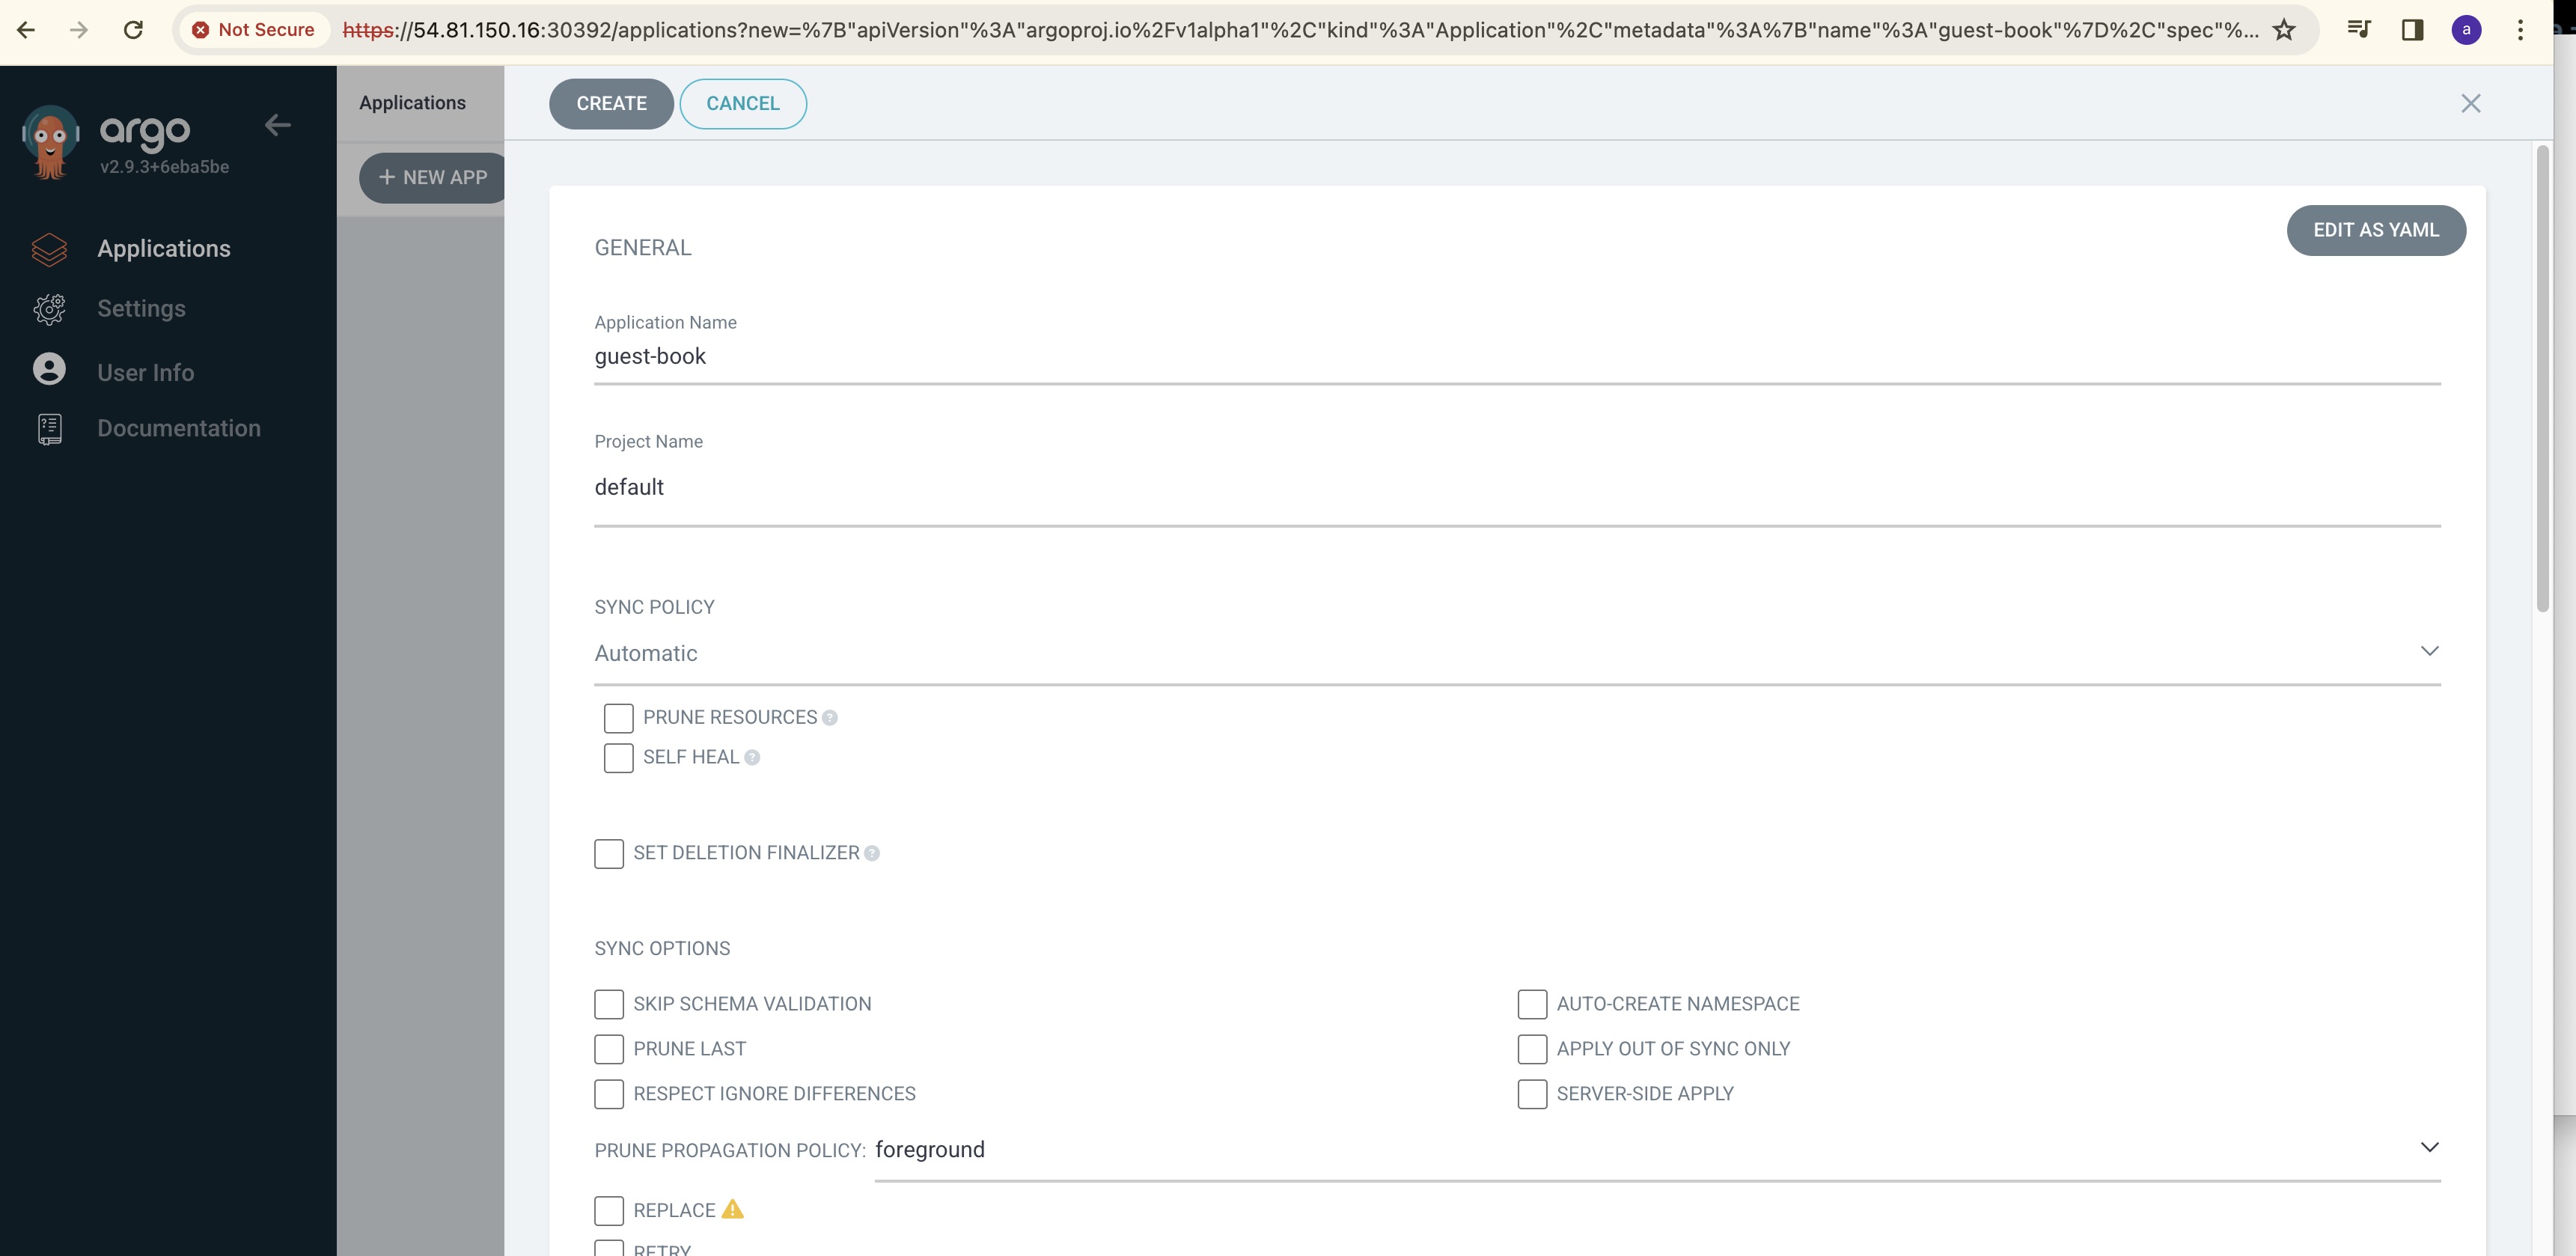
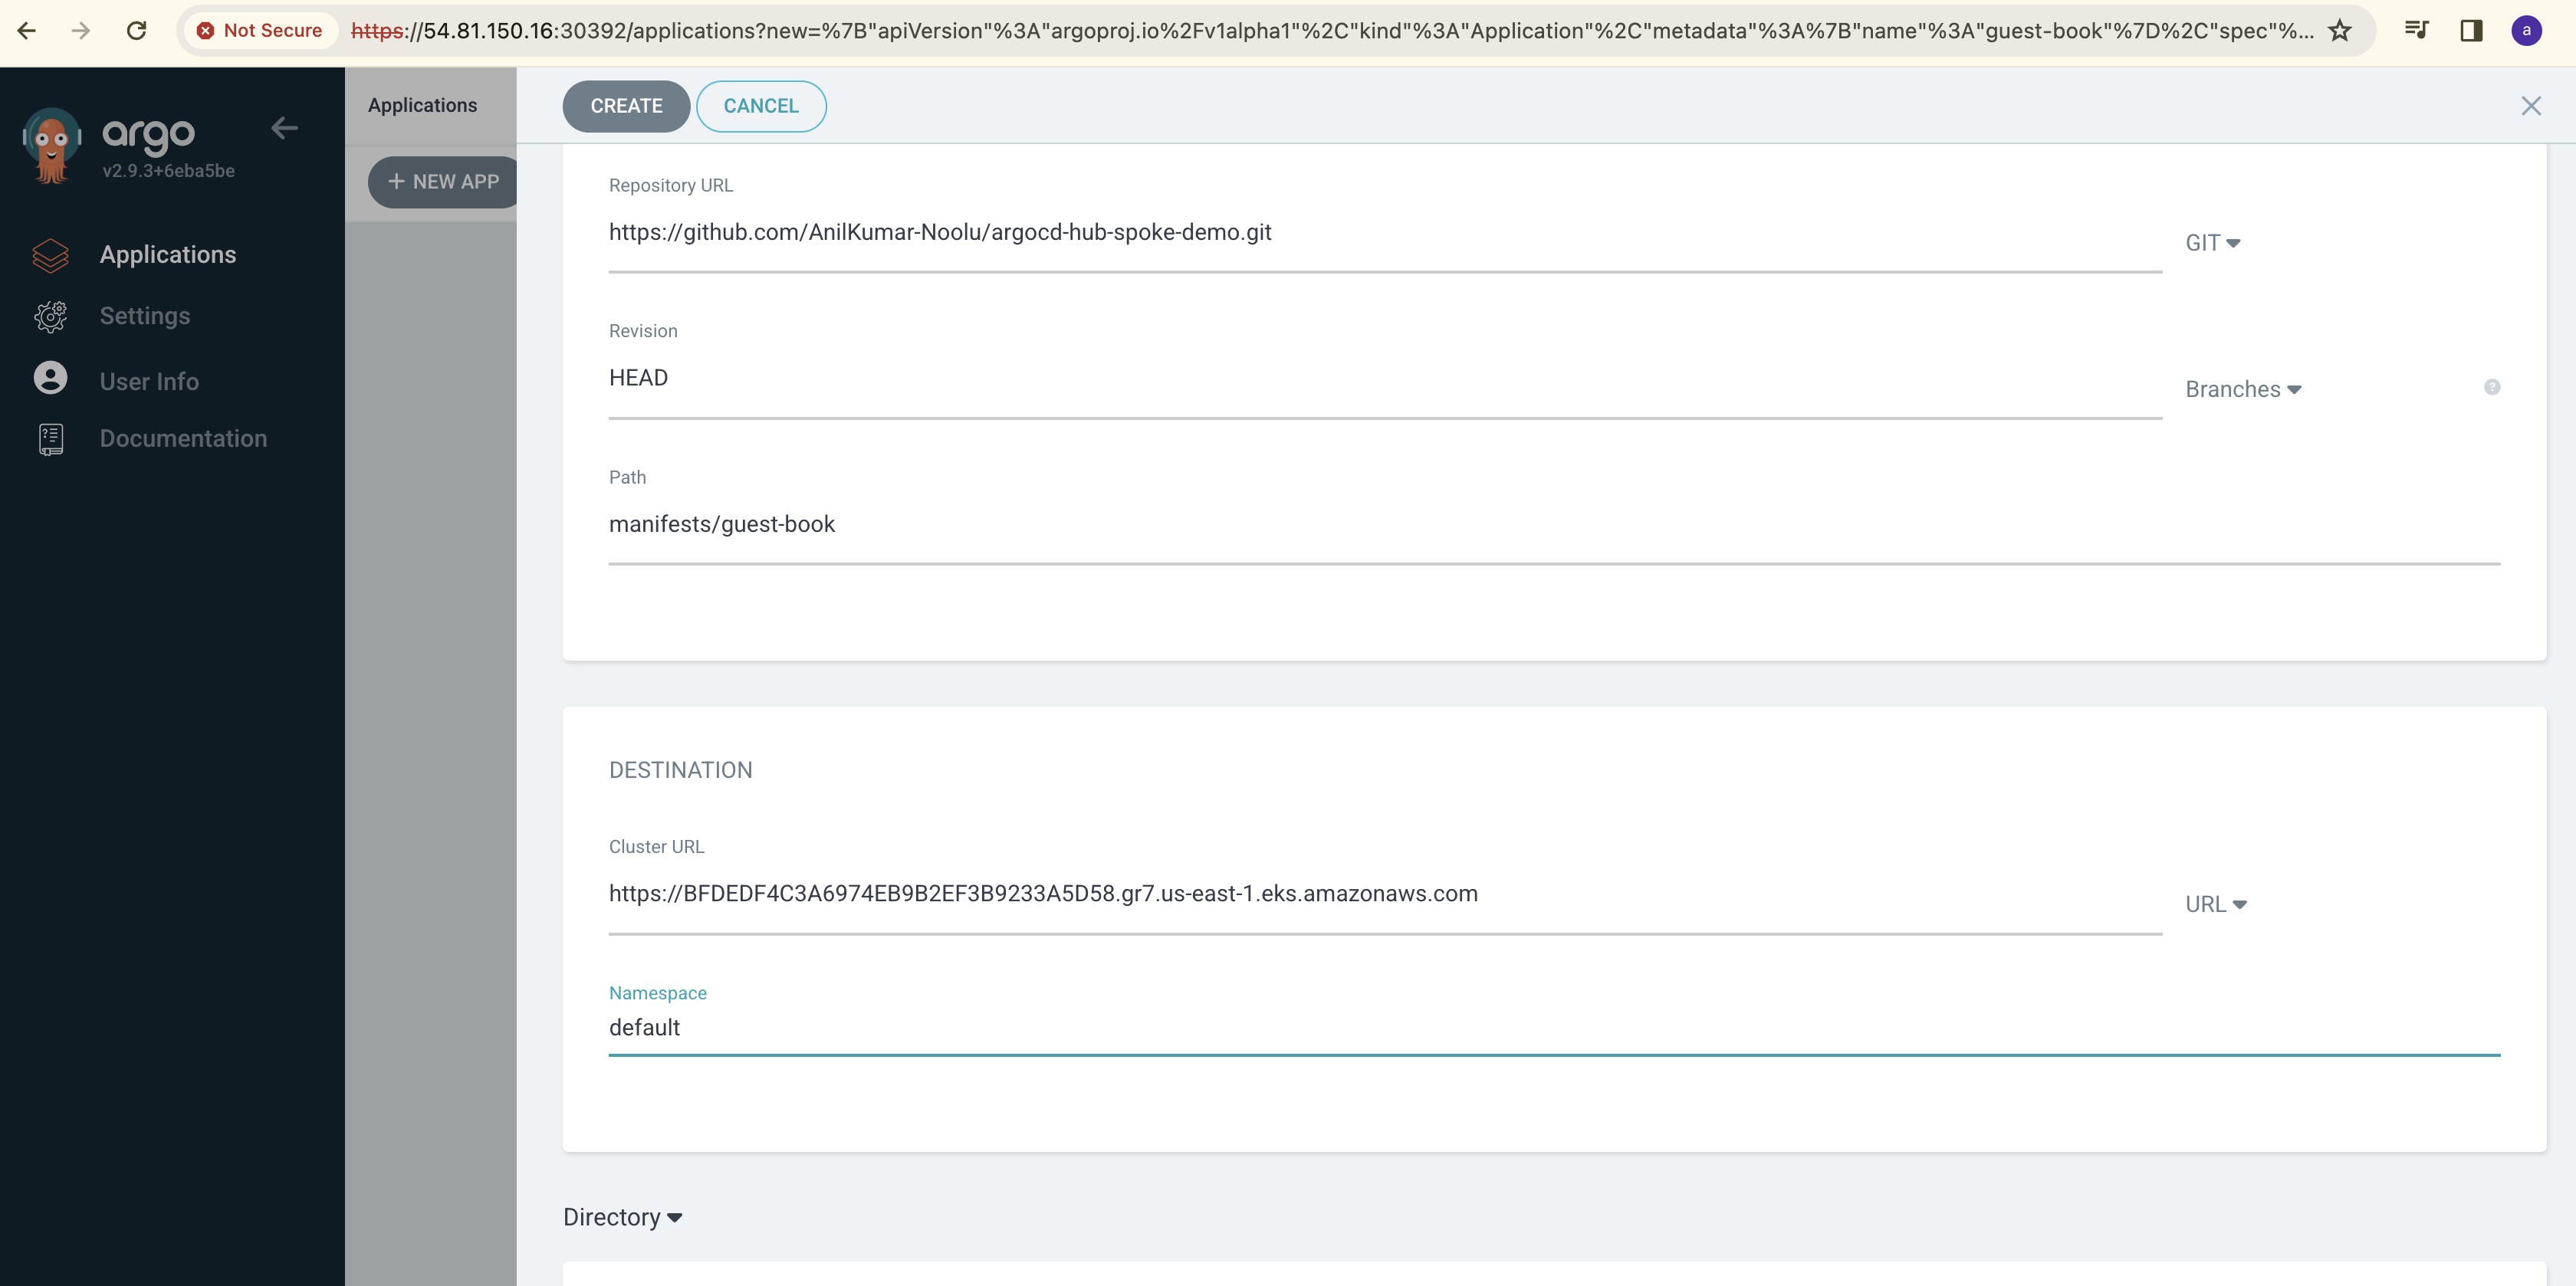
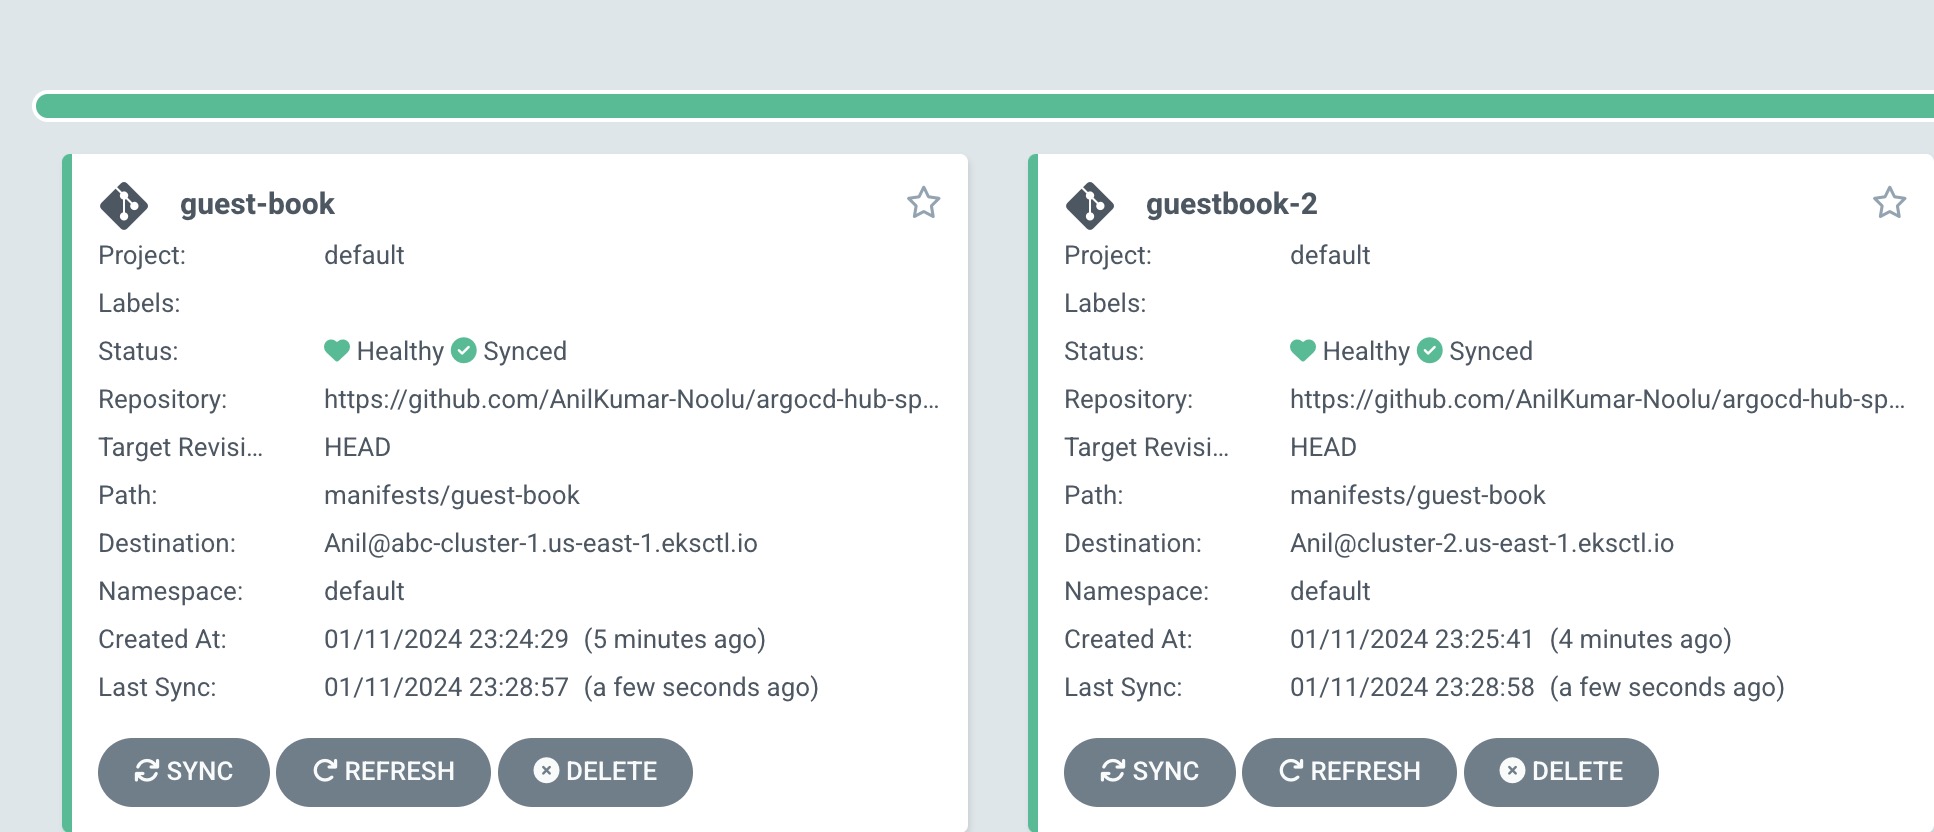
Once all the details were entered correctly, you can see the cluster running successfully as shown below.
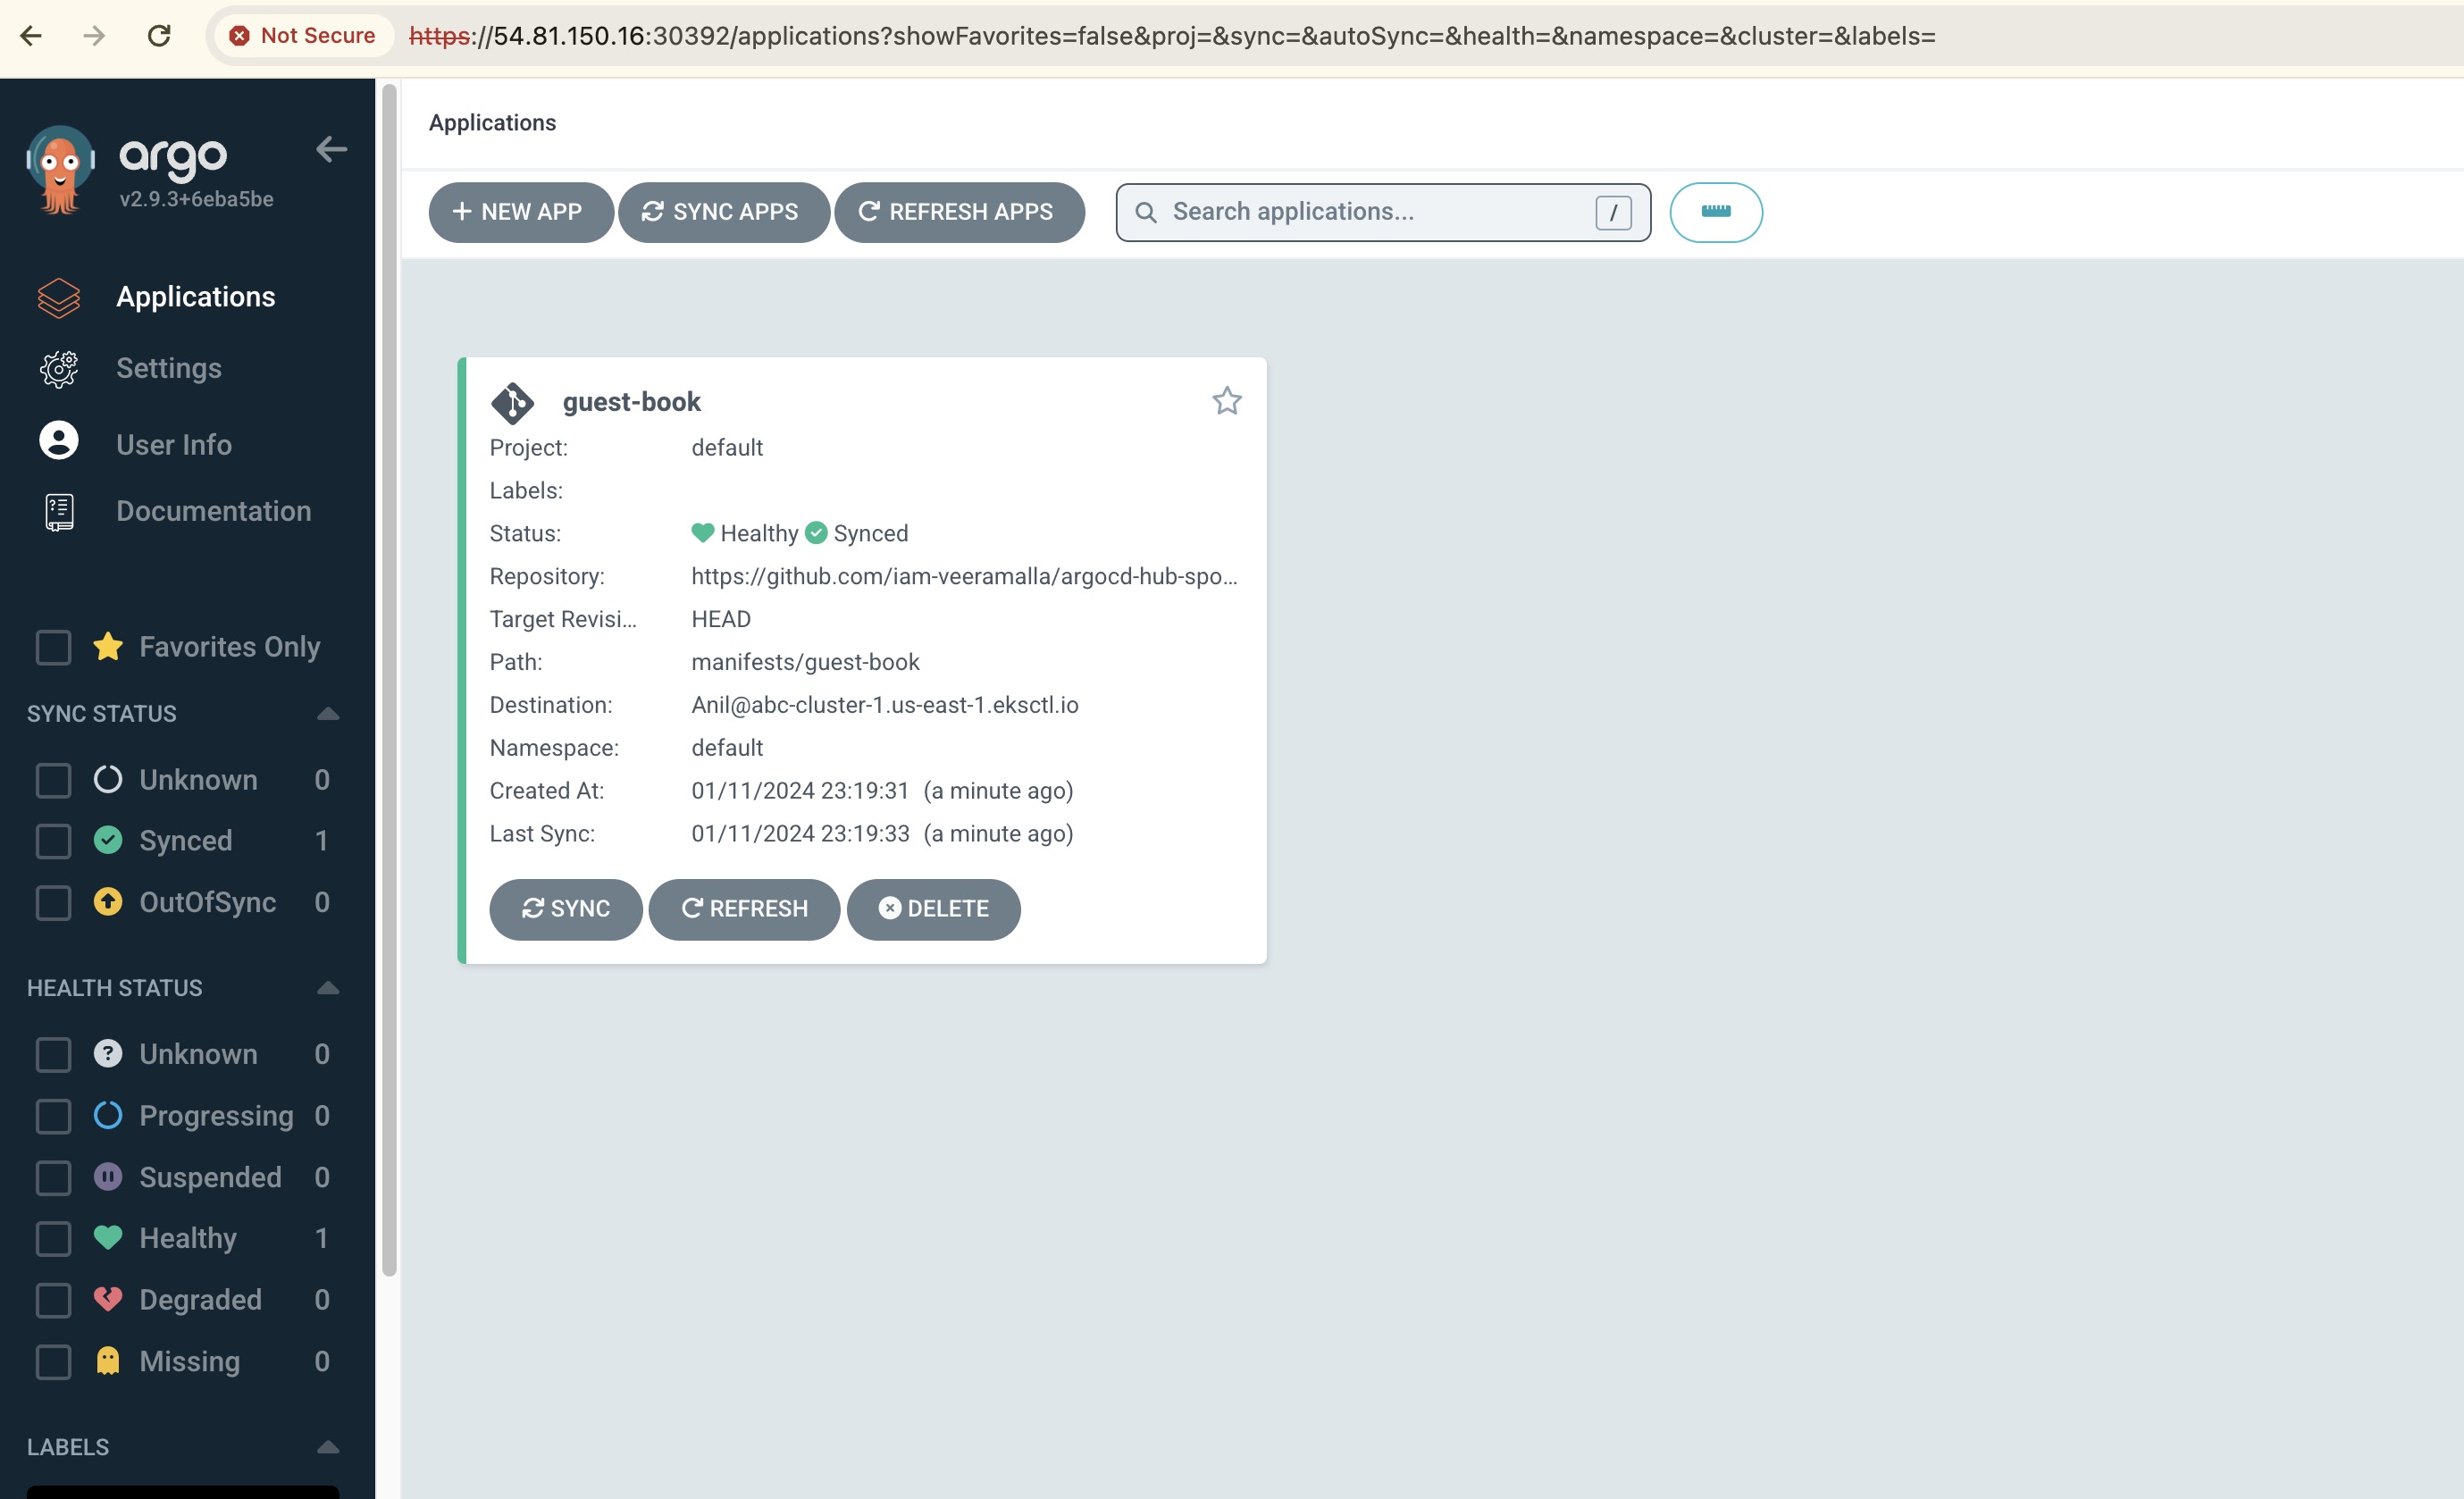
Similarly create a new application with the same details as first application with the only change in Cluster details:
Give the cluster destination URL as second spoke-cluster-2
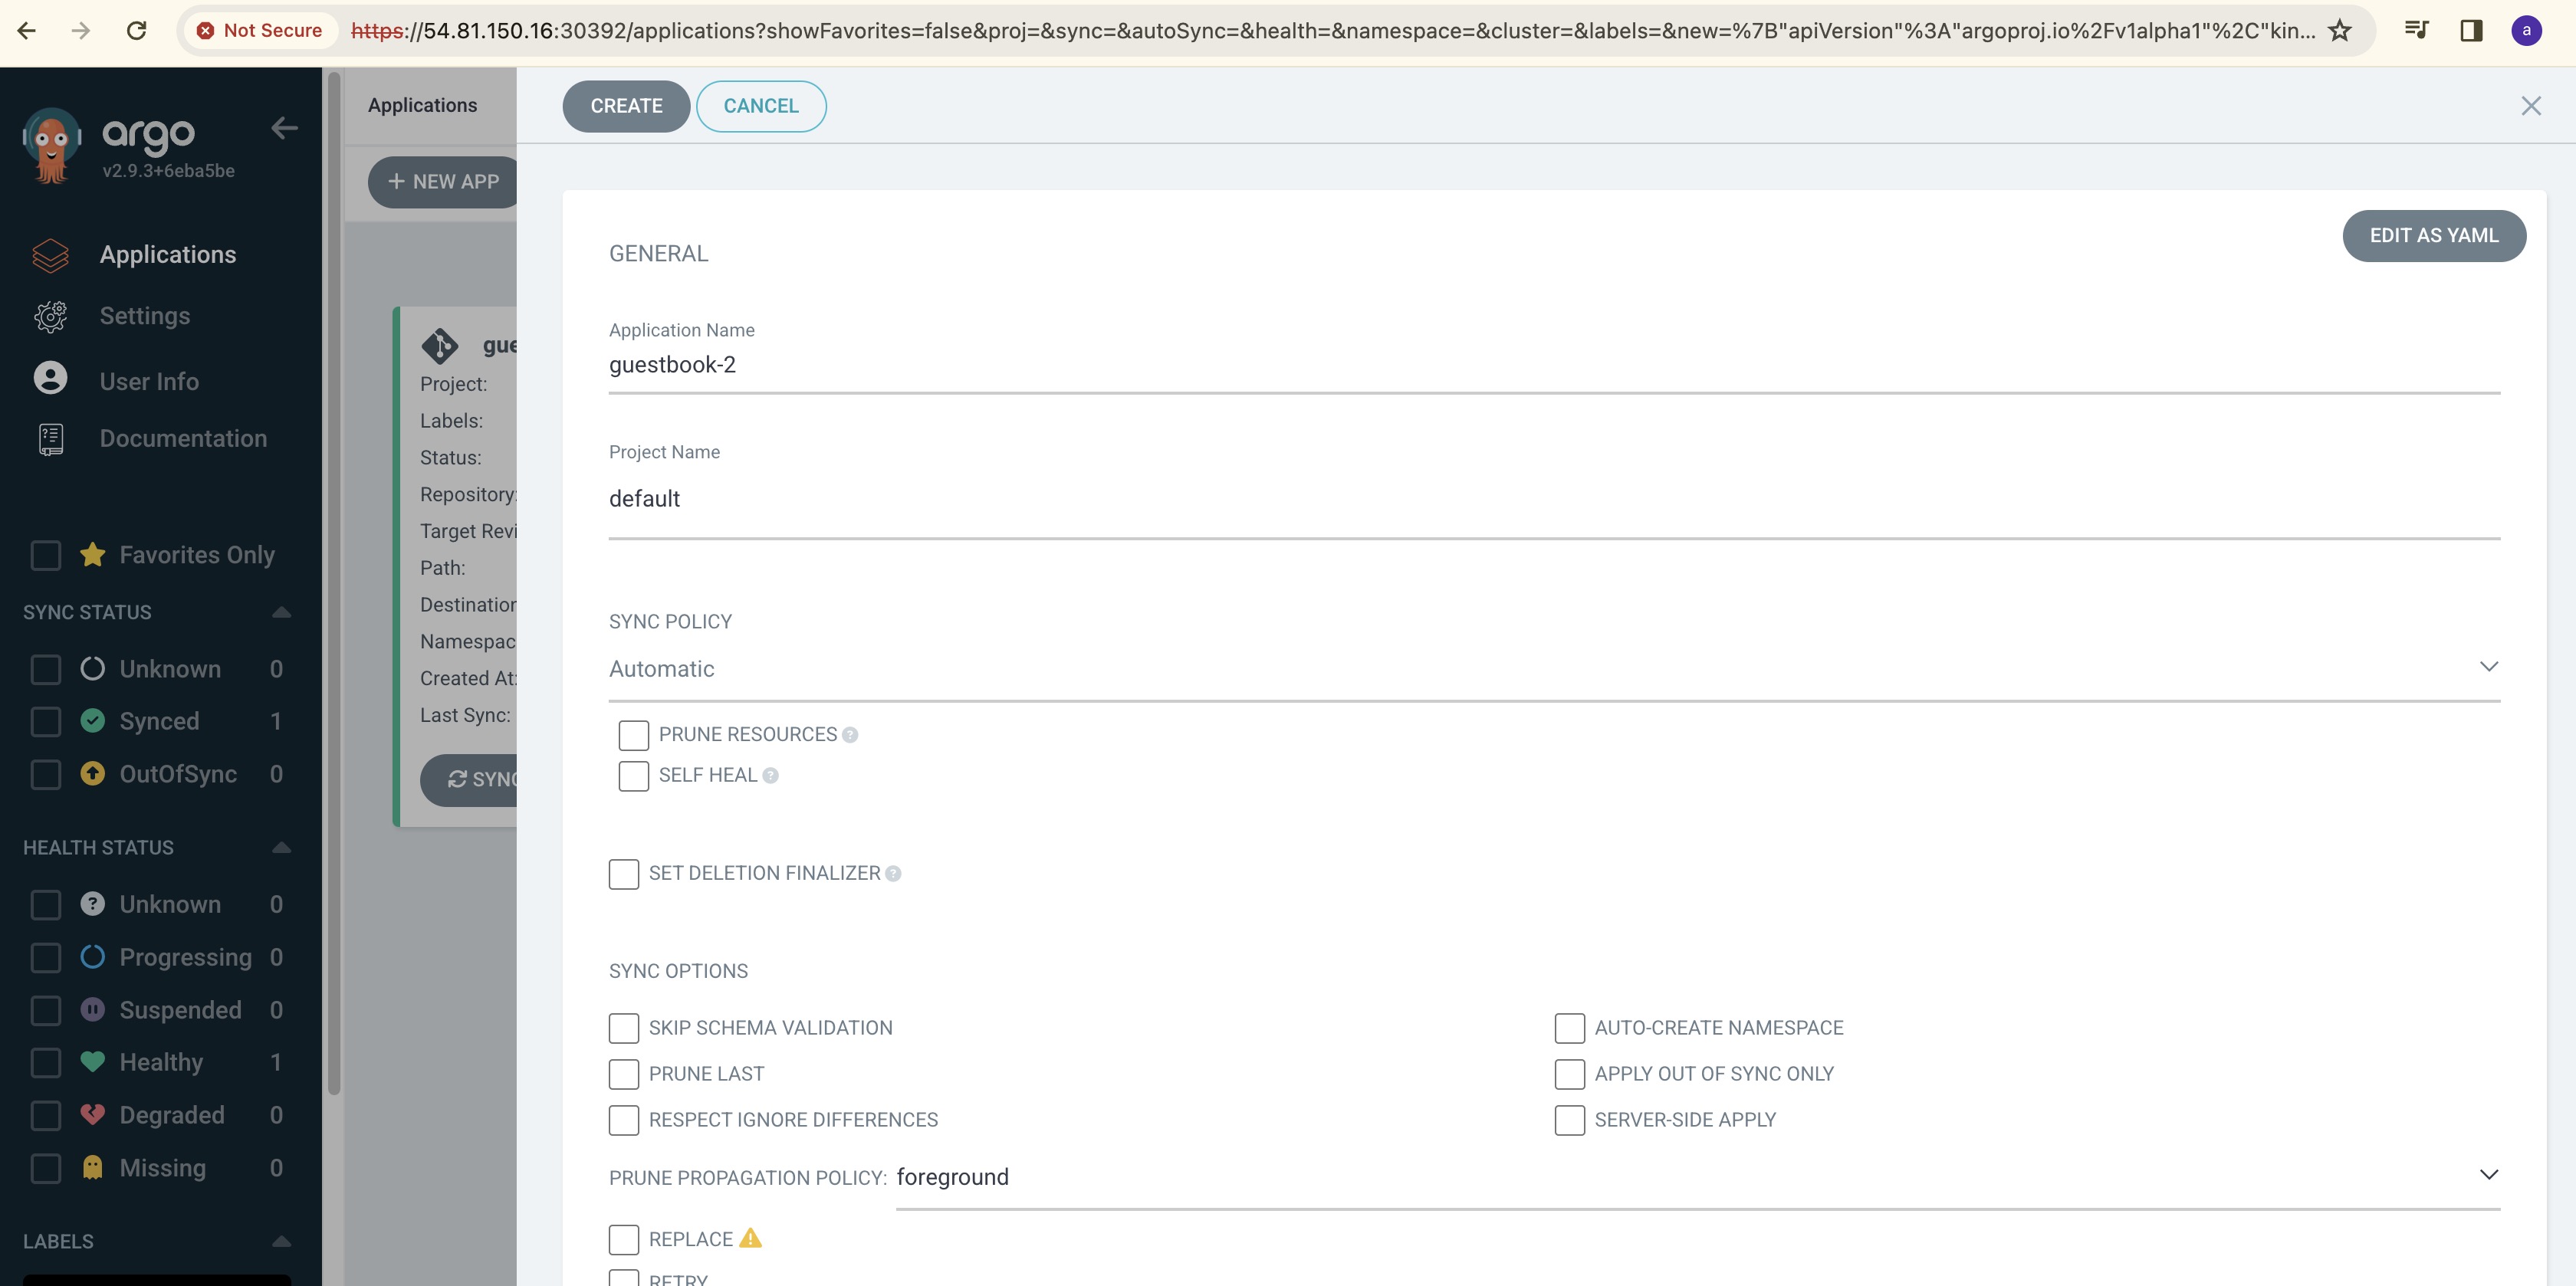
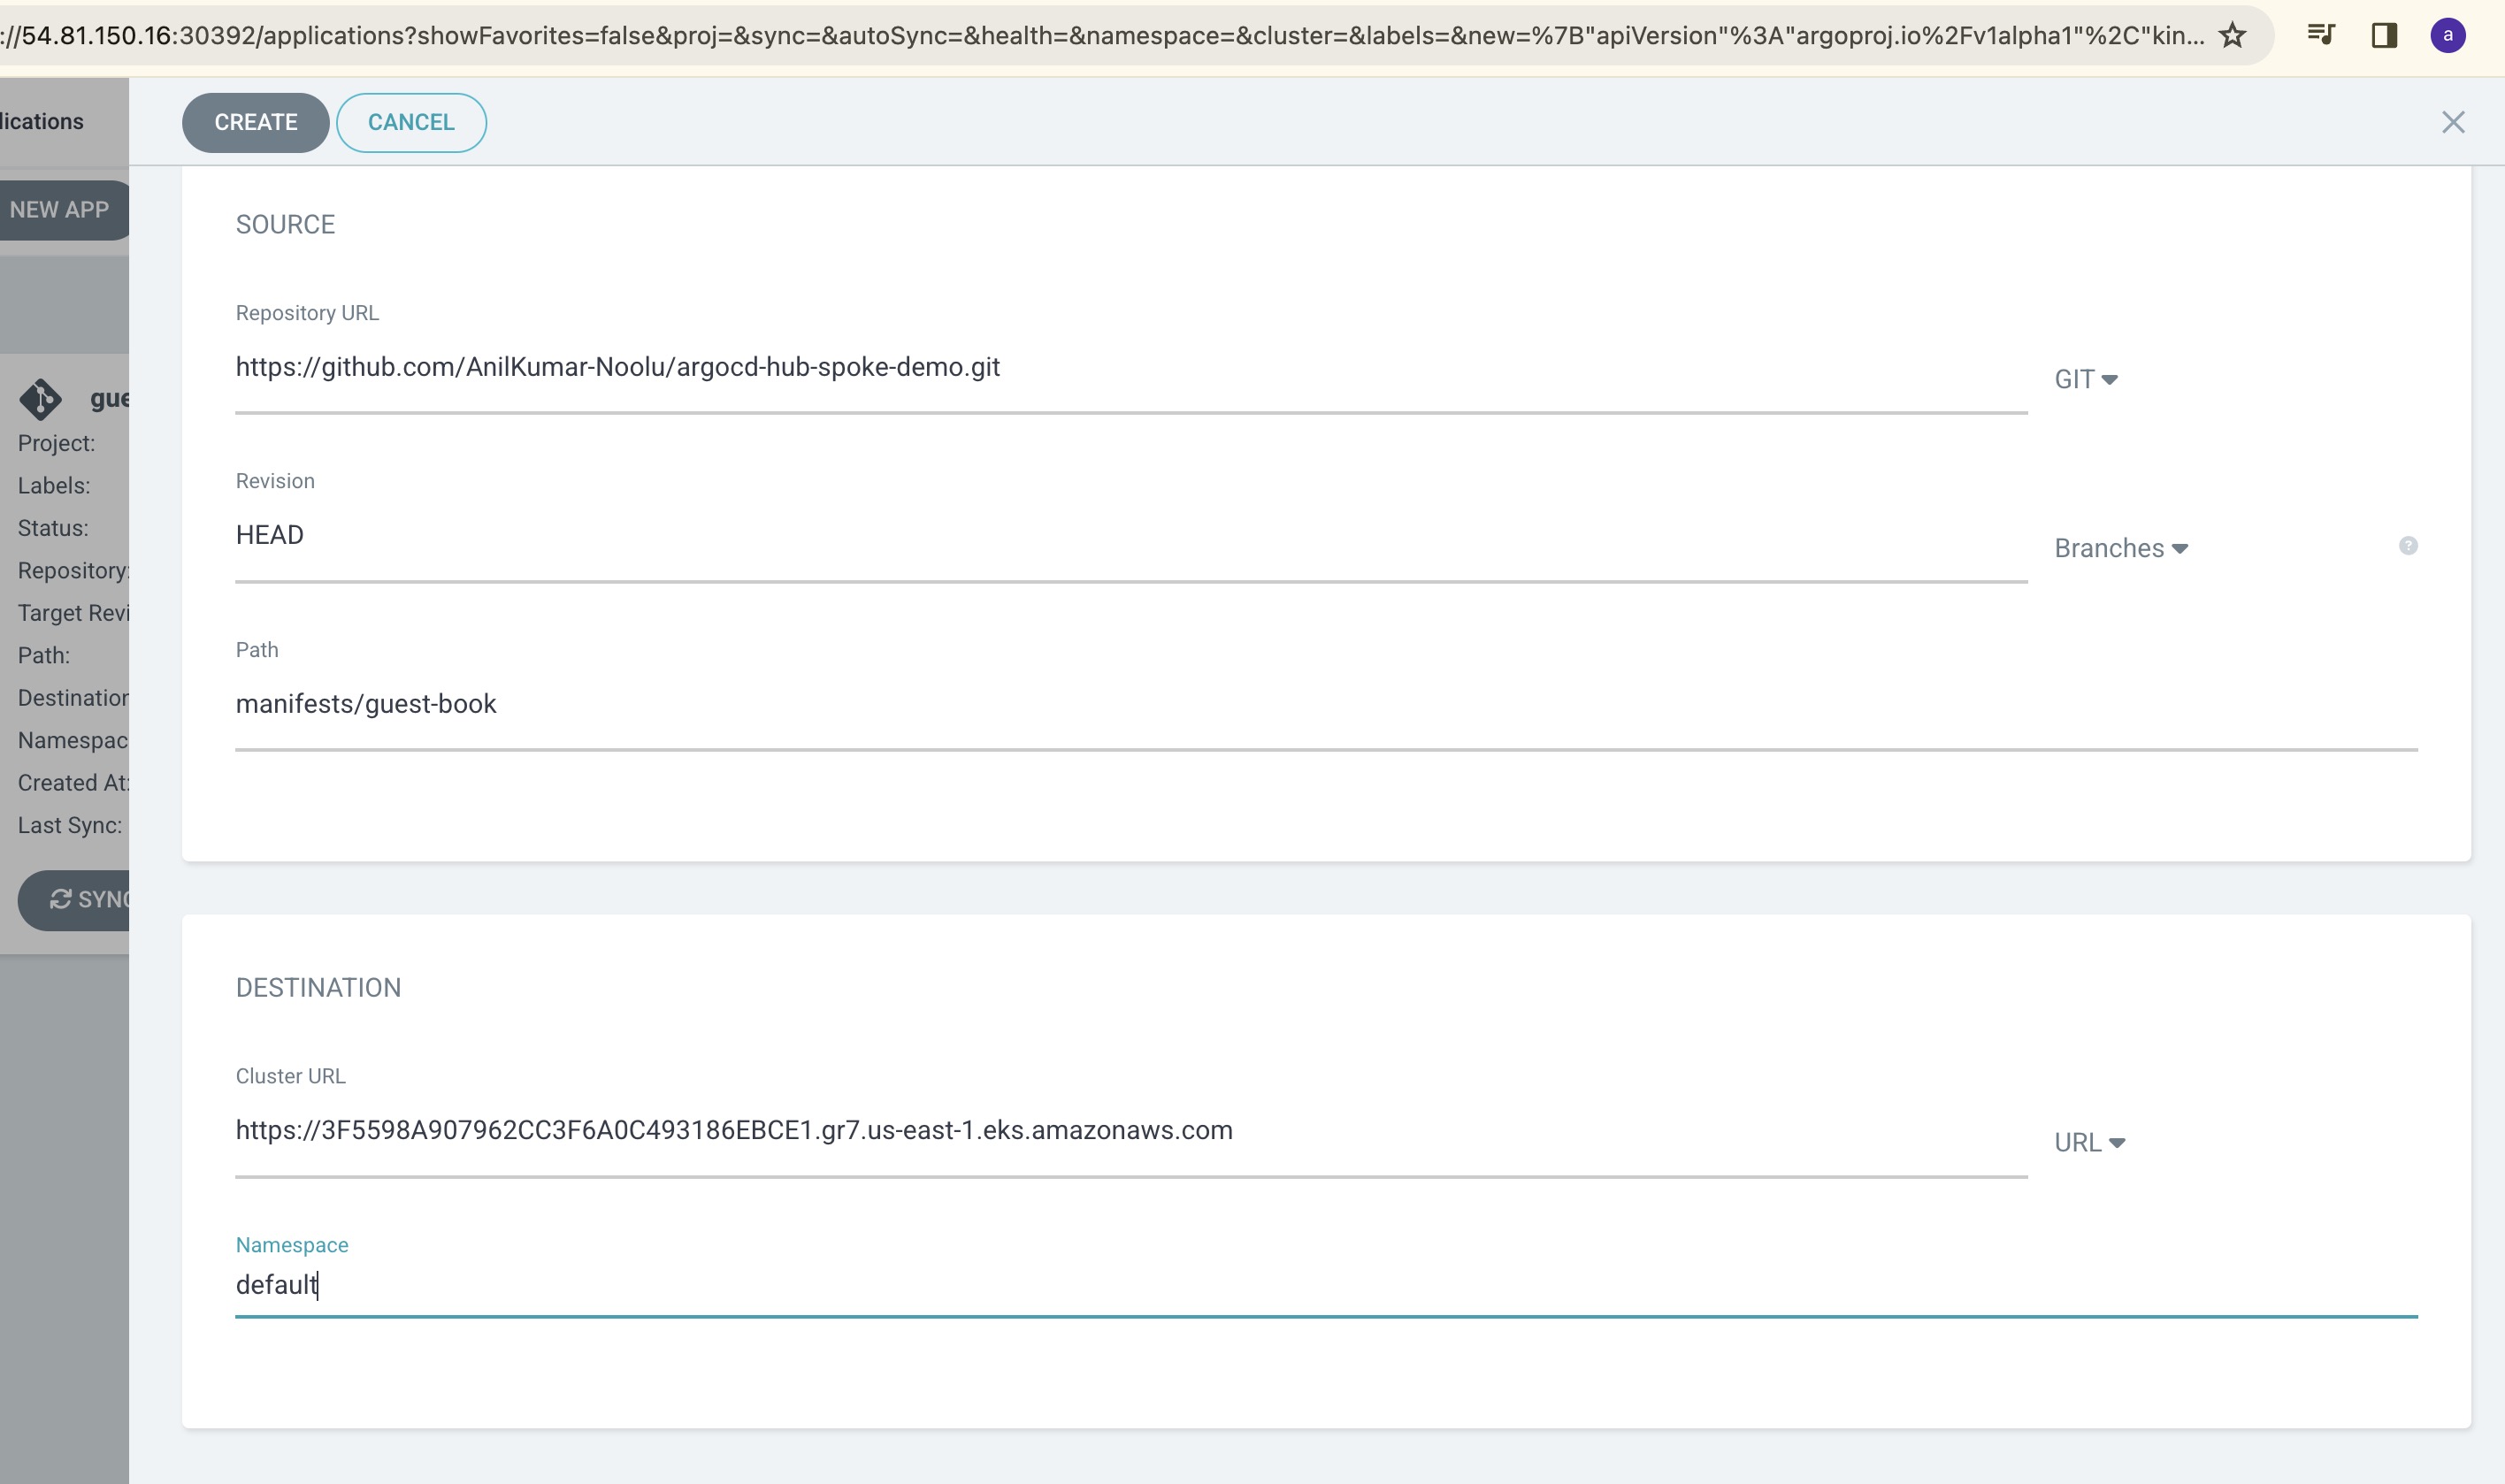
After entering all the details, you can see the 2 clusters were running successfully.
In the GitHub repo, you can see in guestbook folder. There is one deployment, one service and one configmap.
Now as everything is deployed, try to check whether deployment and service is up and running using kubectl.
Change the cluster to spoke cluster using kubectl config command mentioned below:
k config use-context <cluster-name>
and check the Kuberenetes objects created using below command:
kubectl get all
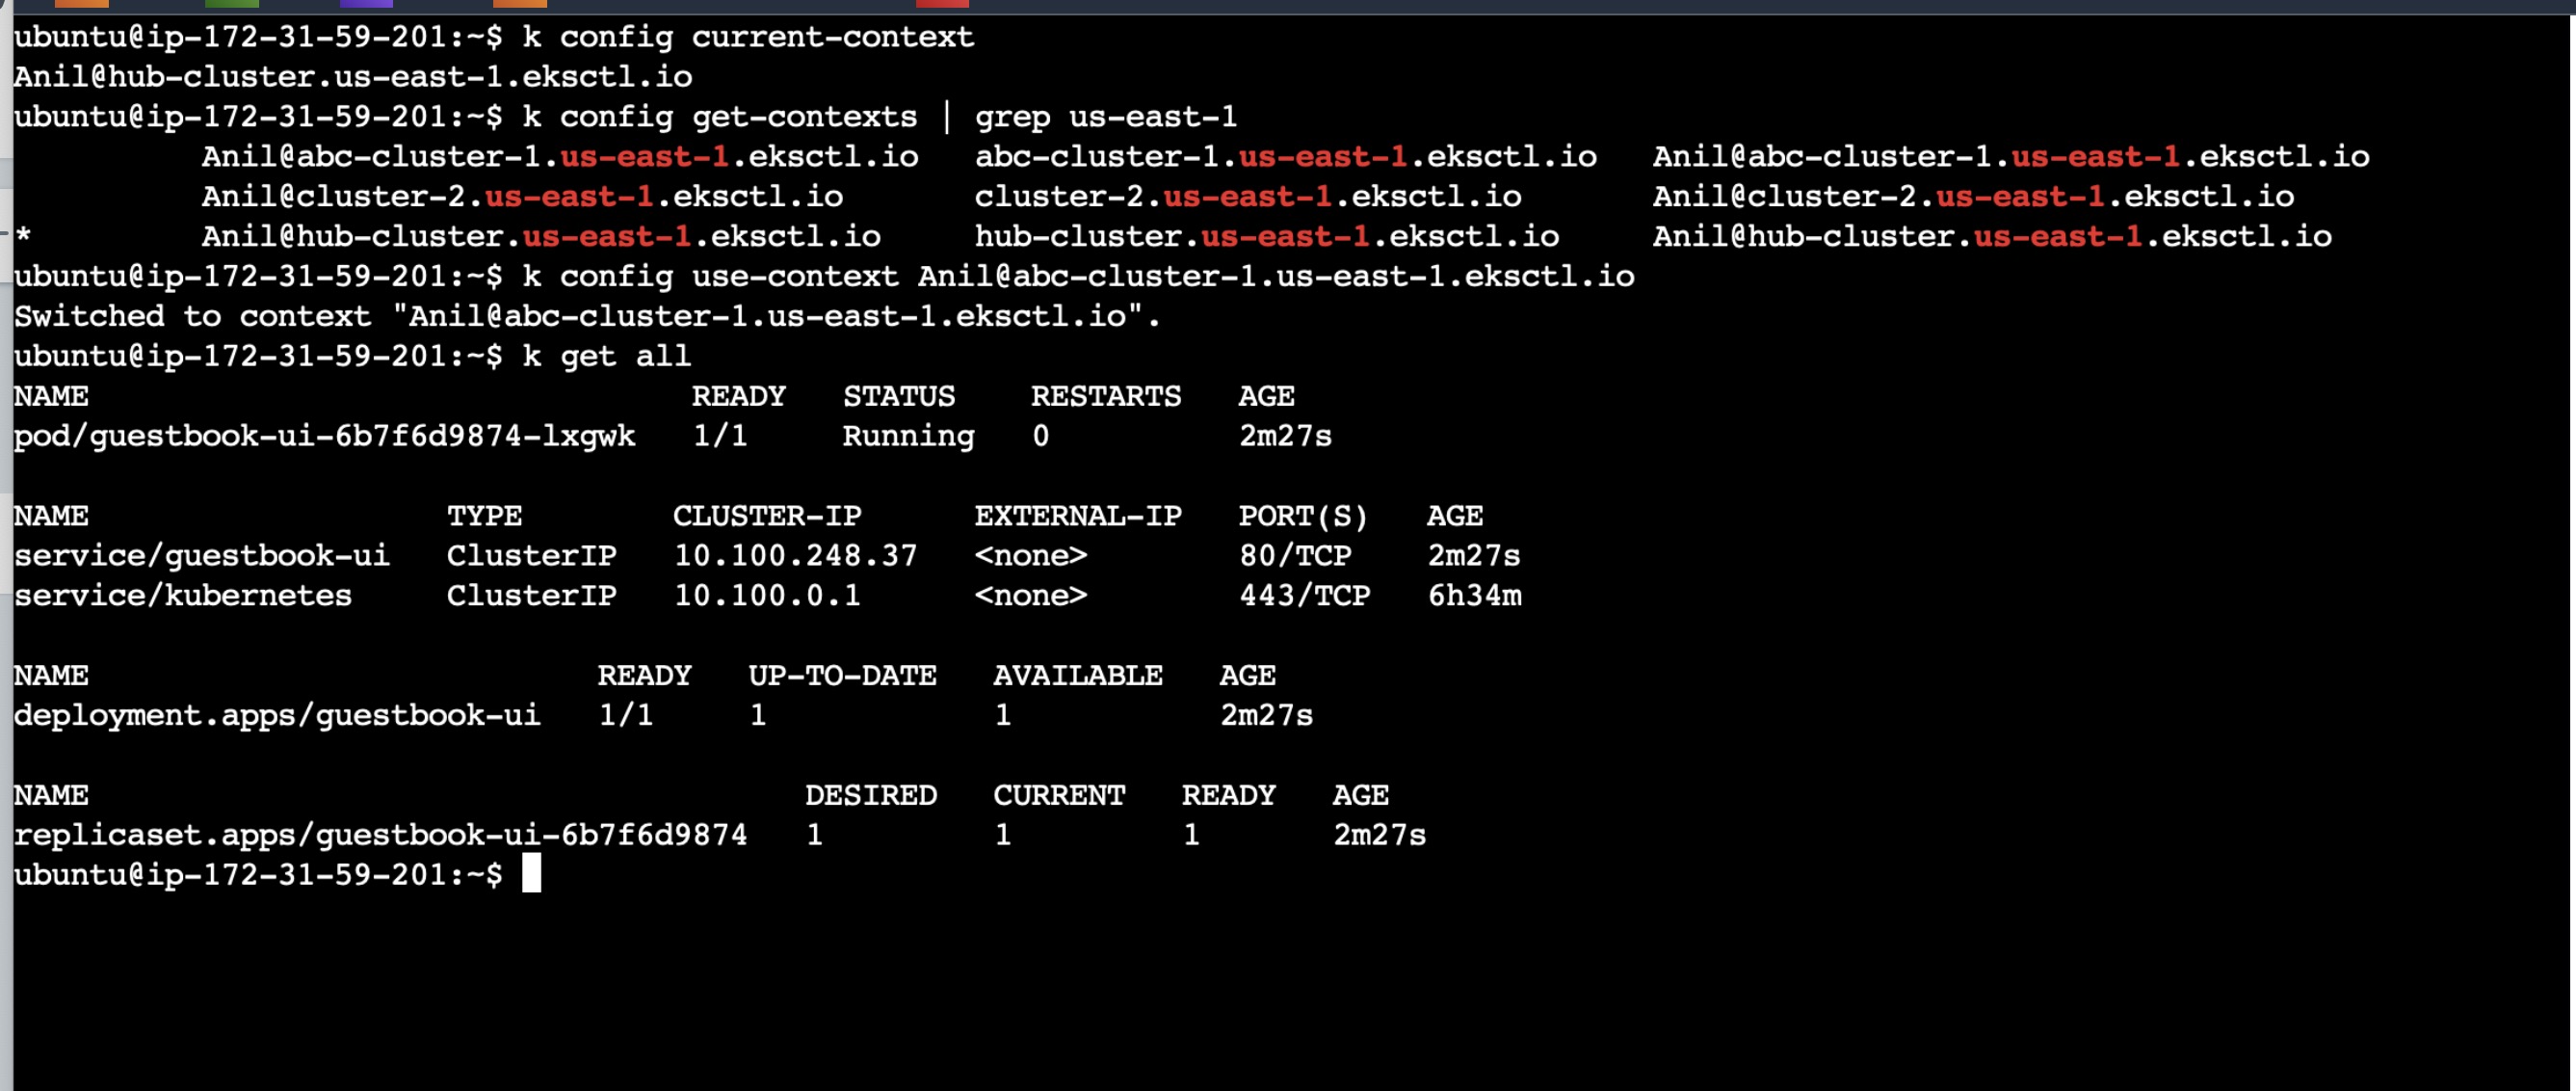

Verifying ArgoCD Working:
Now test the ArgoCD by doing changes in GitHub and manually editing the Kubernetes manifest files:
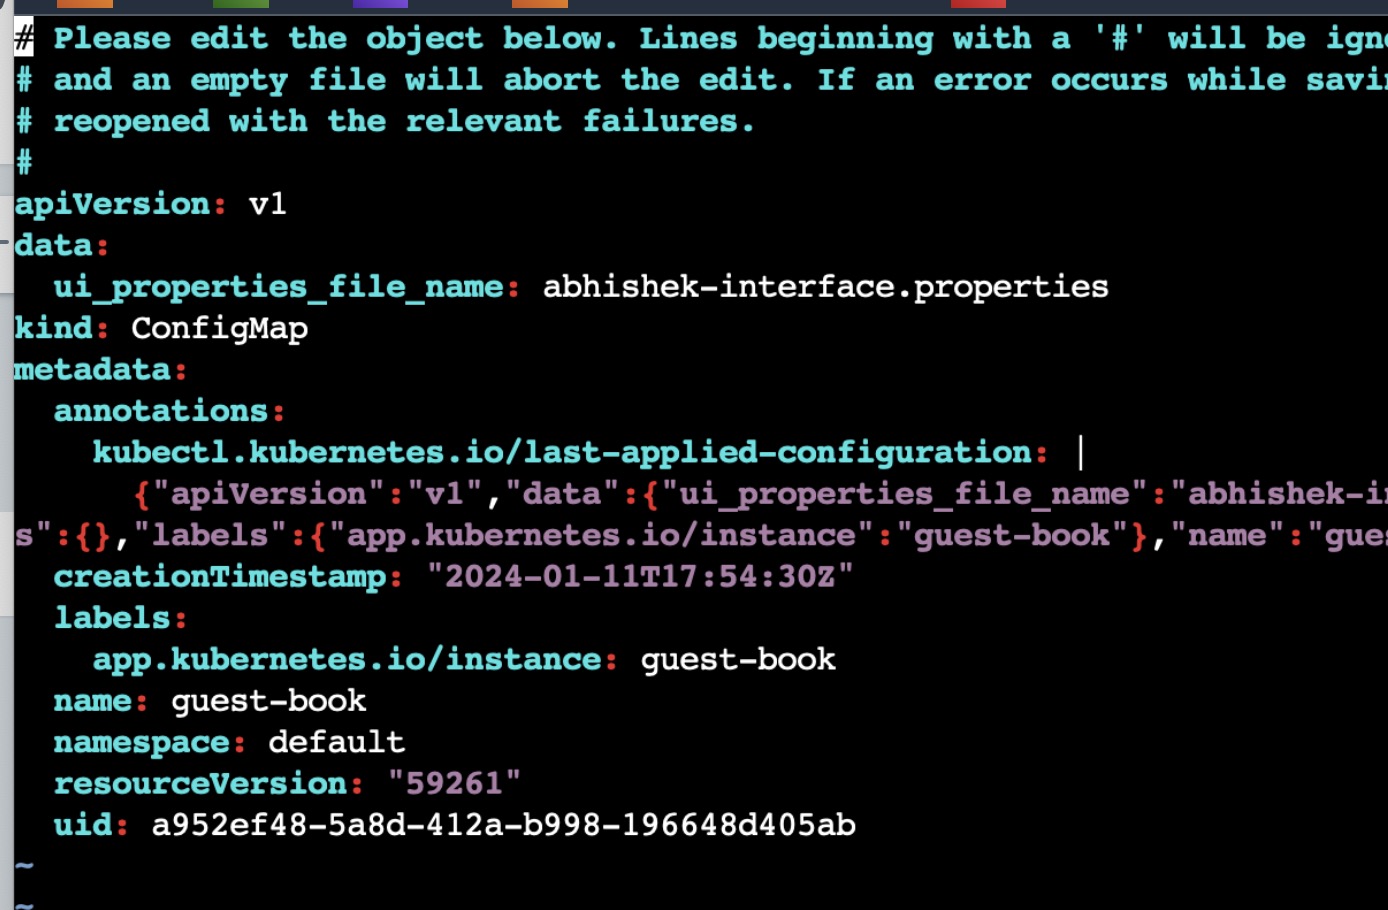
In the below pic, you can see in config map properties file name is mentioned as abhishke-interface.properties.
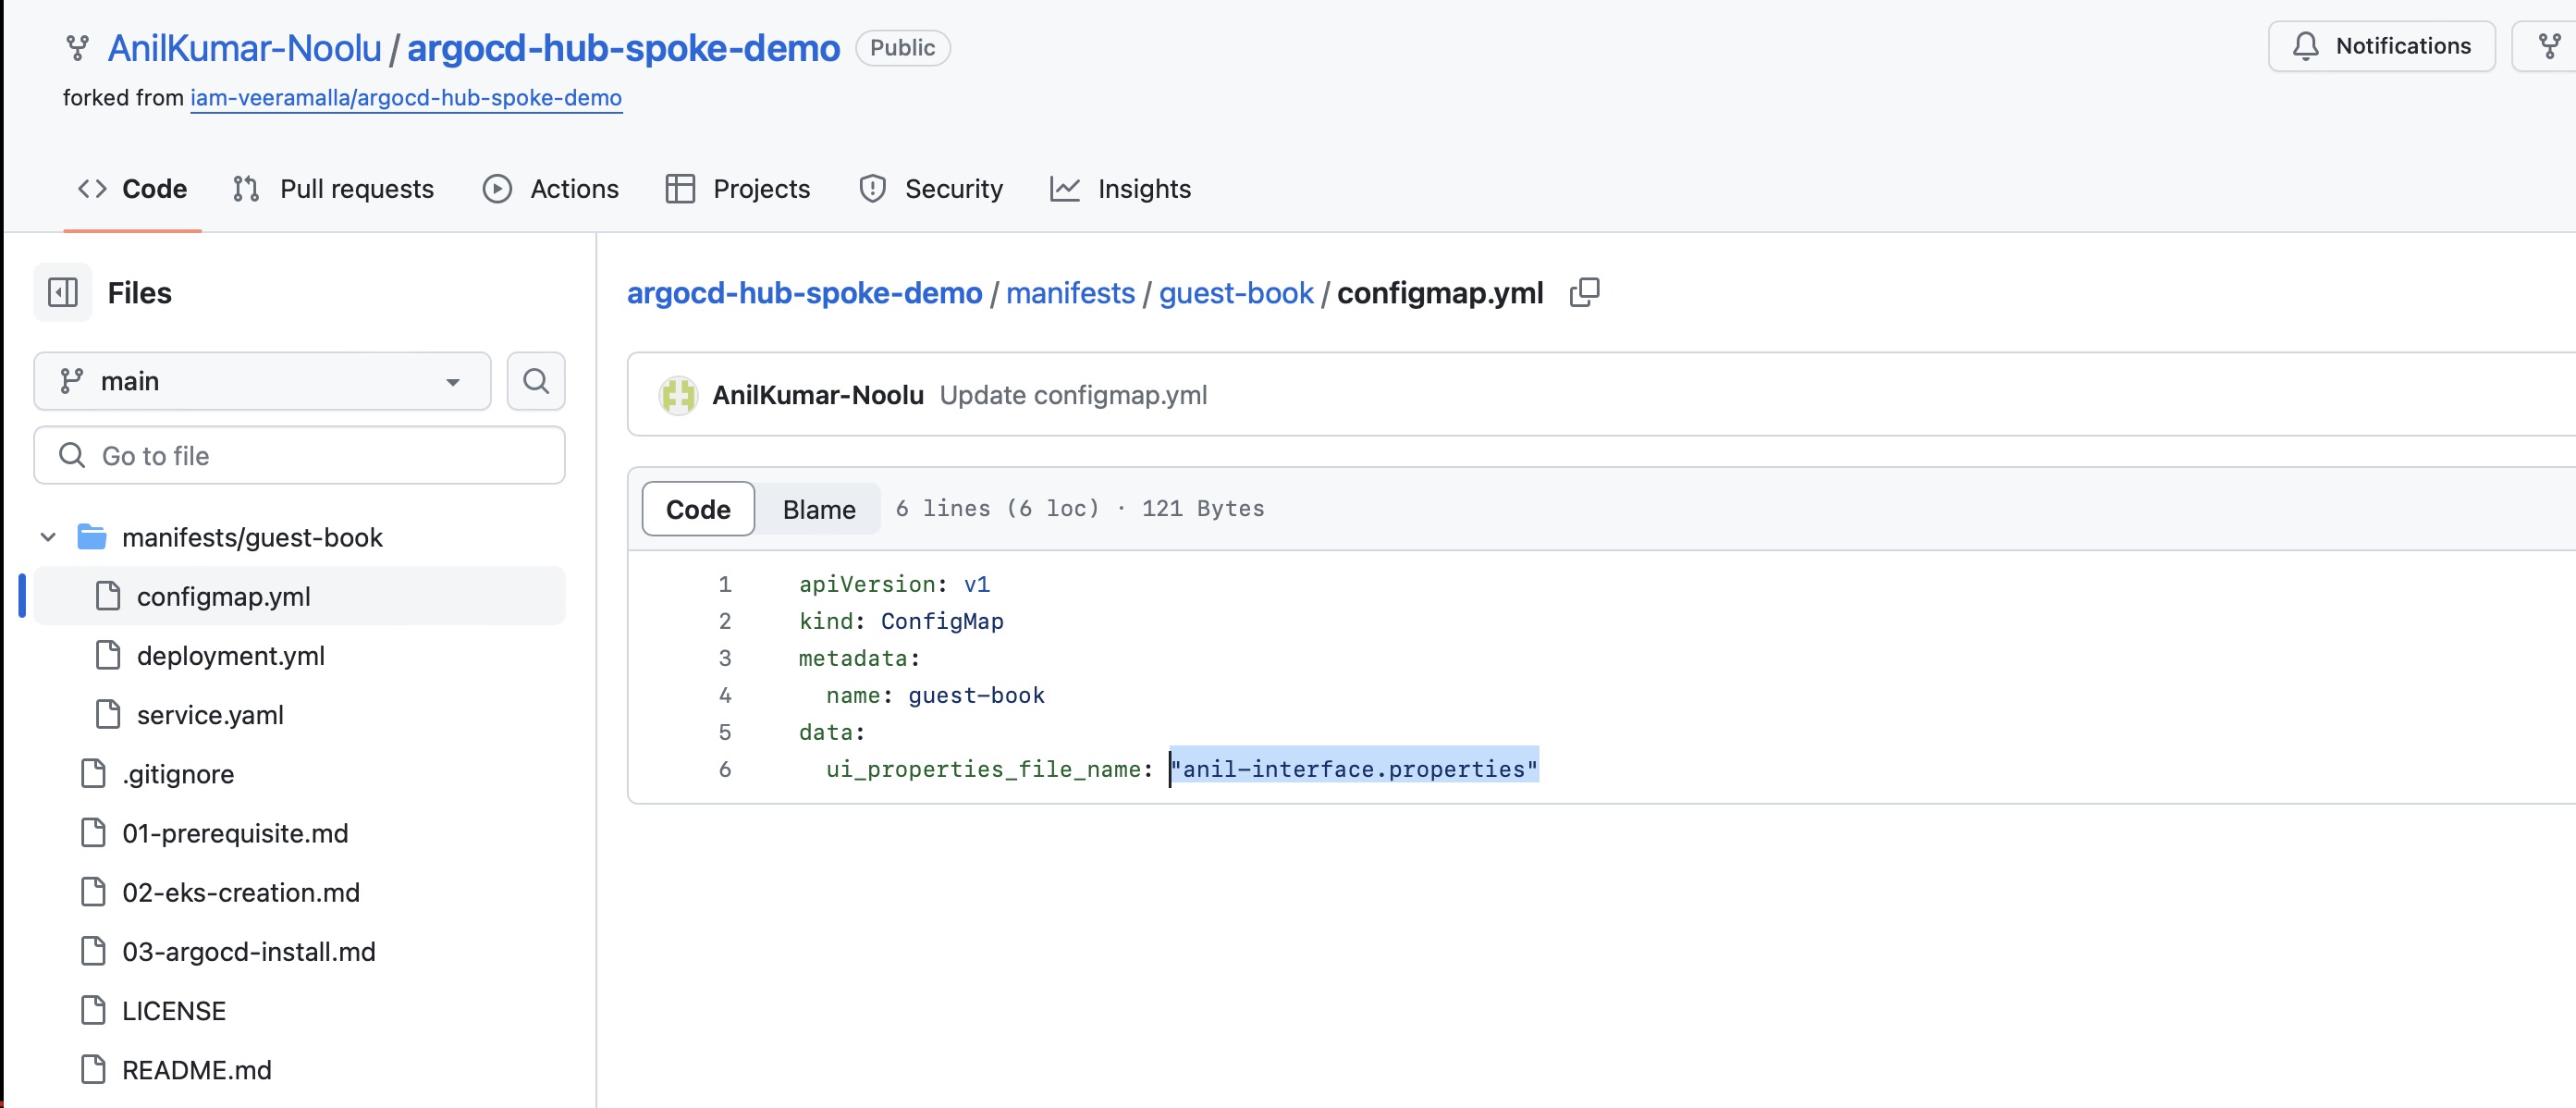
Now change the config map file name to anil-interface.properties in GitHub and since the apps in ArgoCD and check the same configmap details in Cluster.
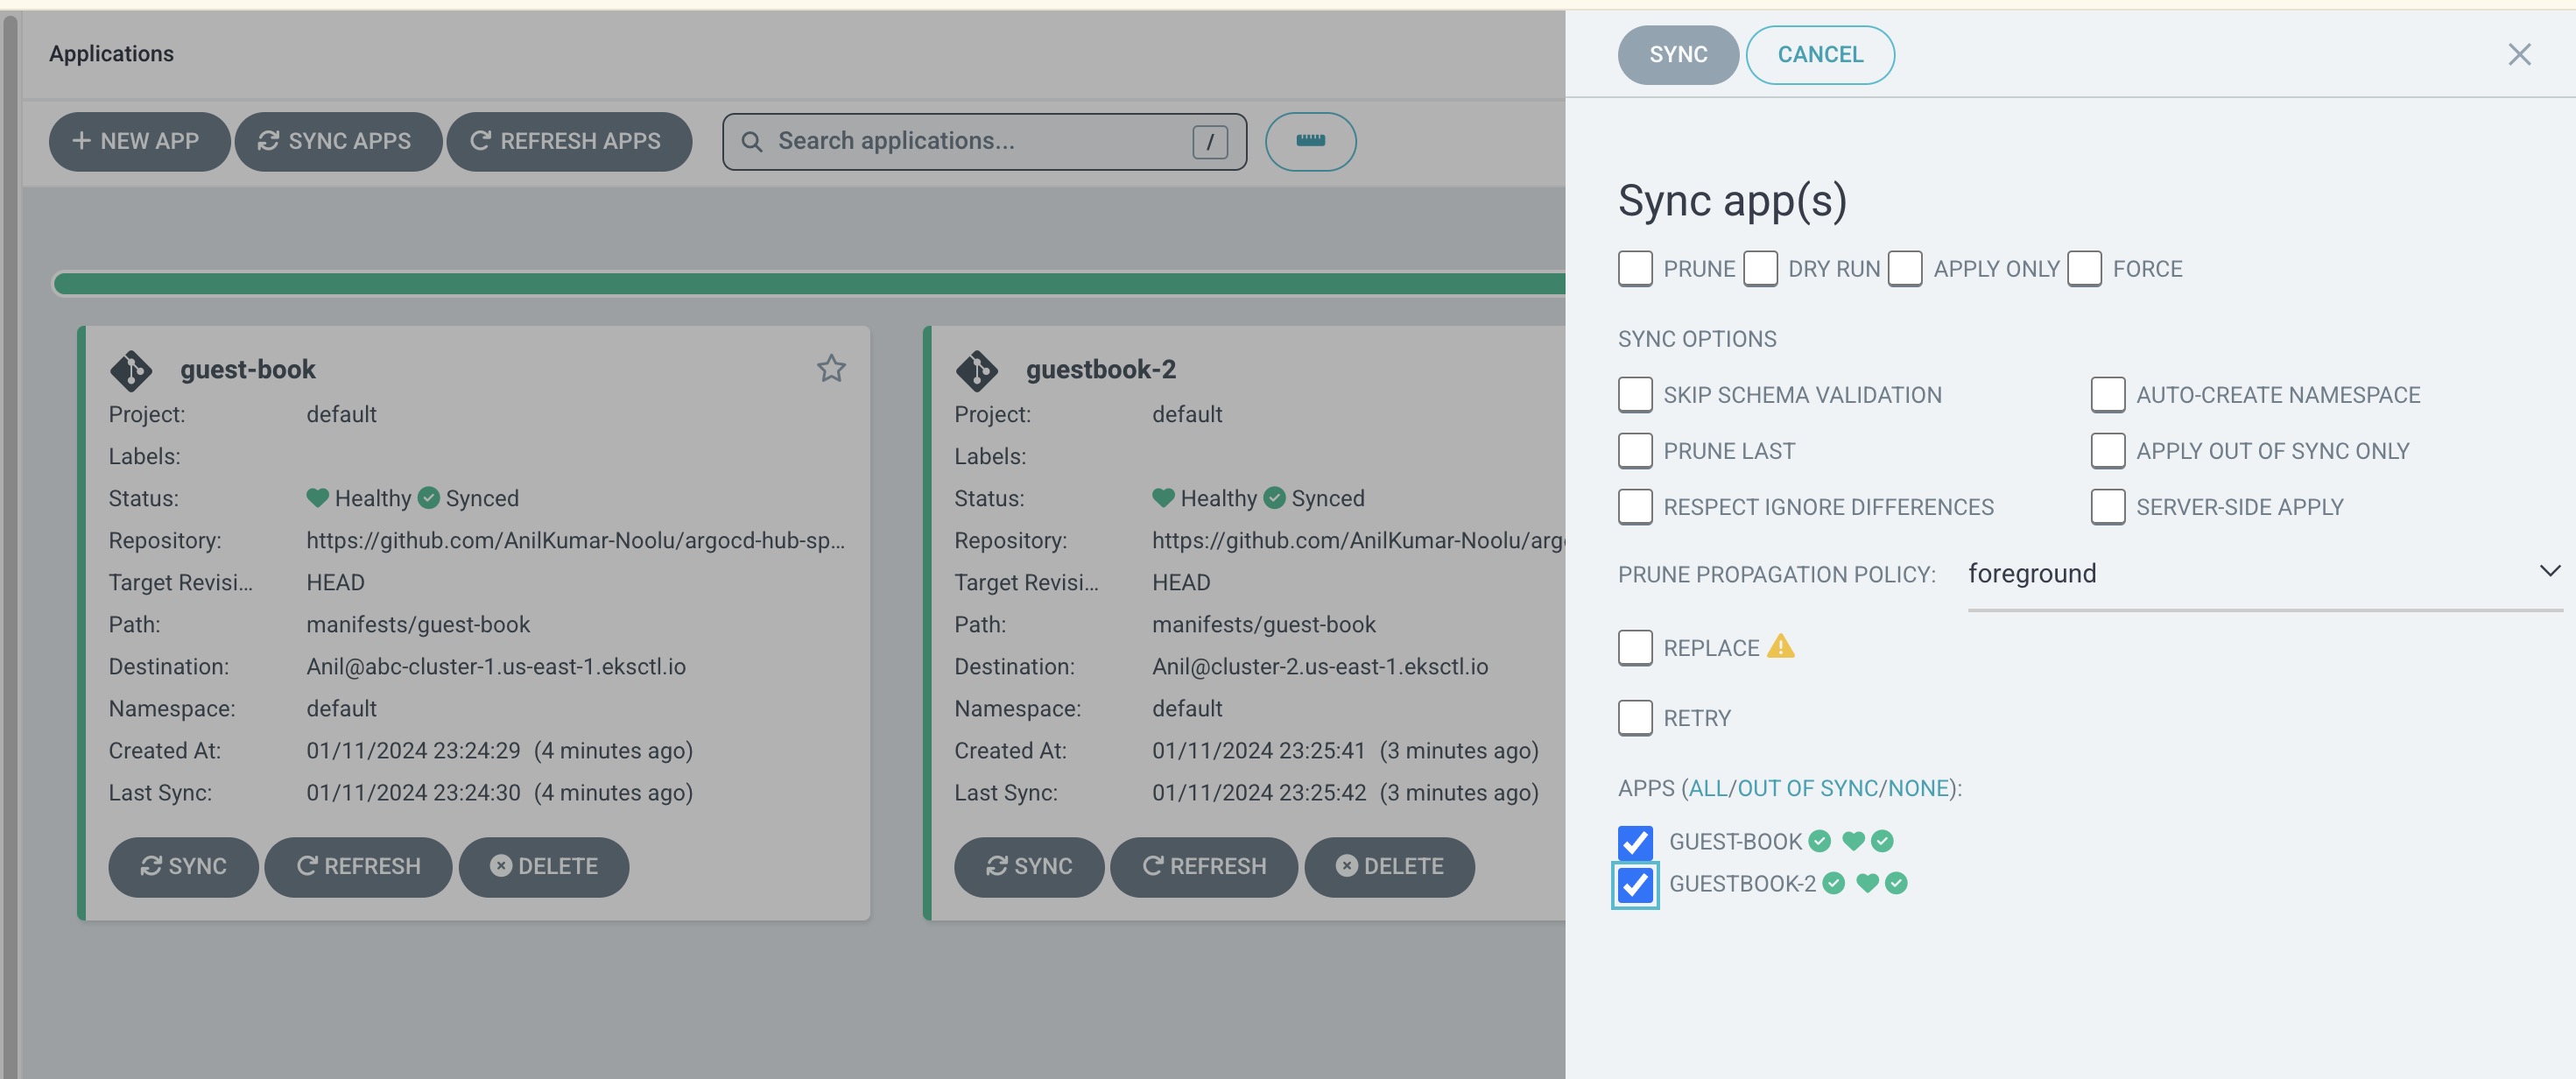
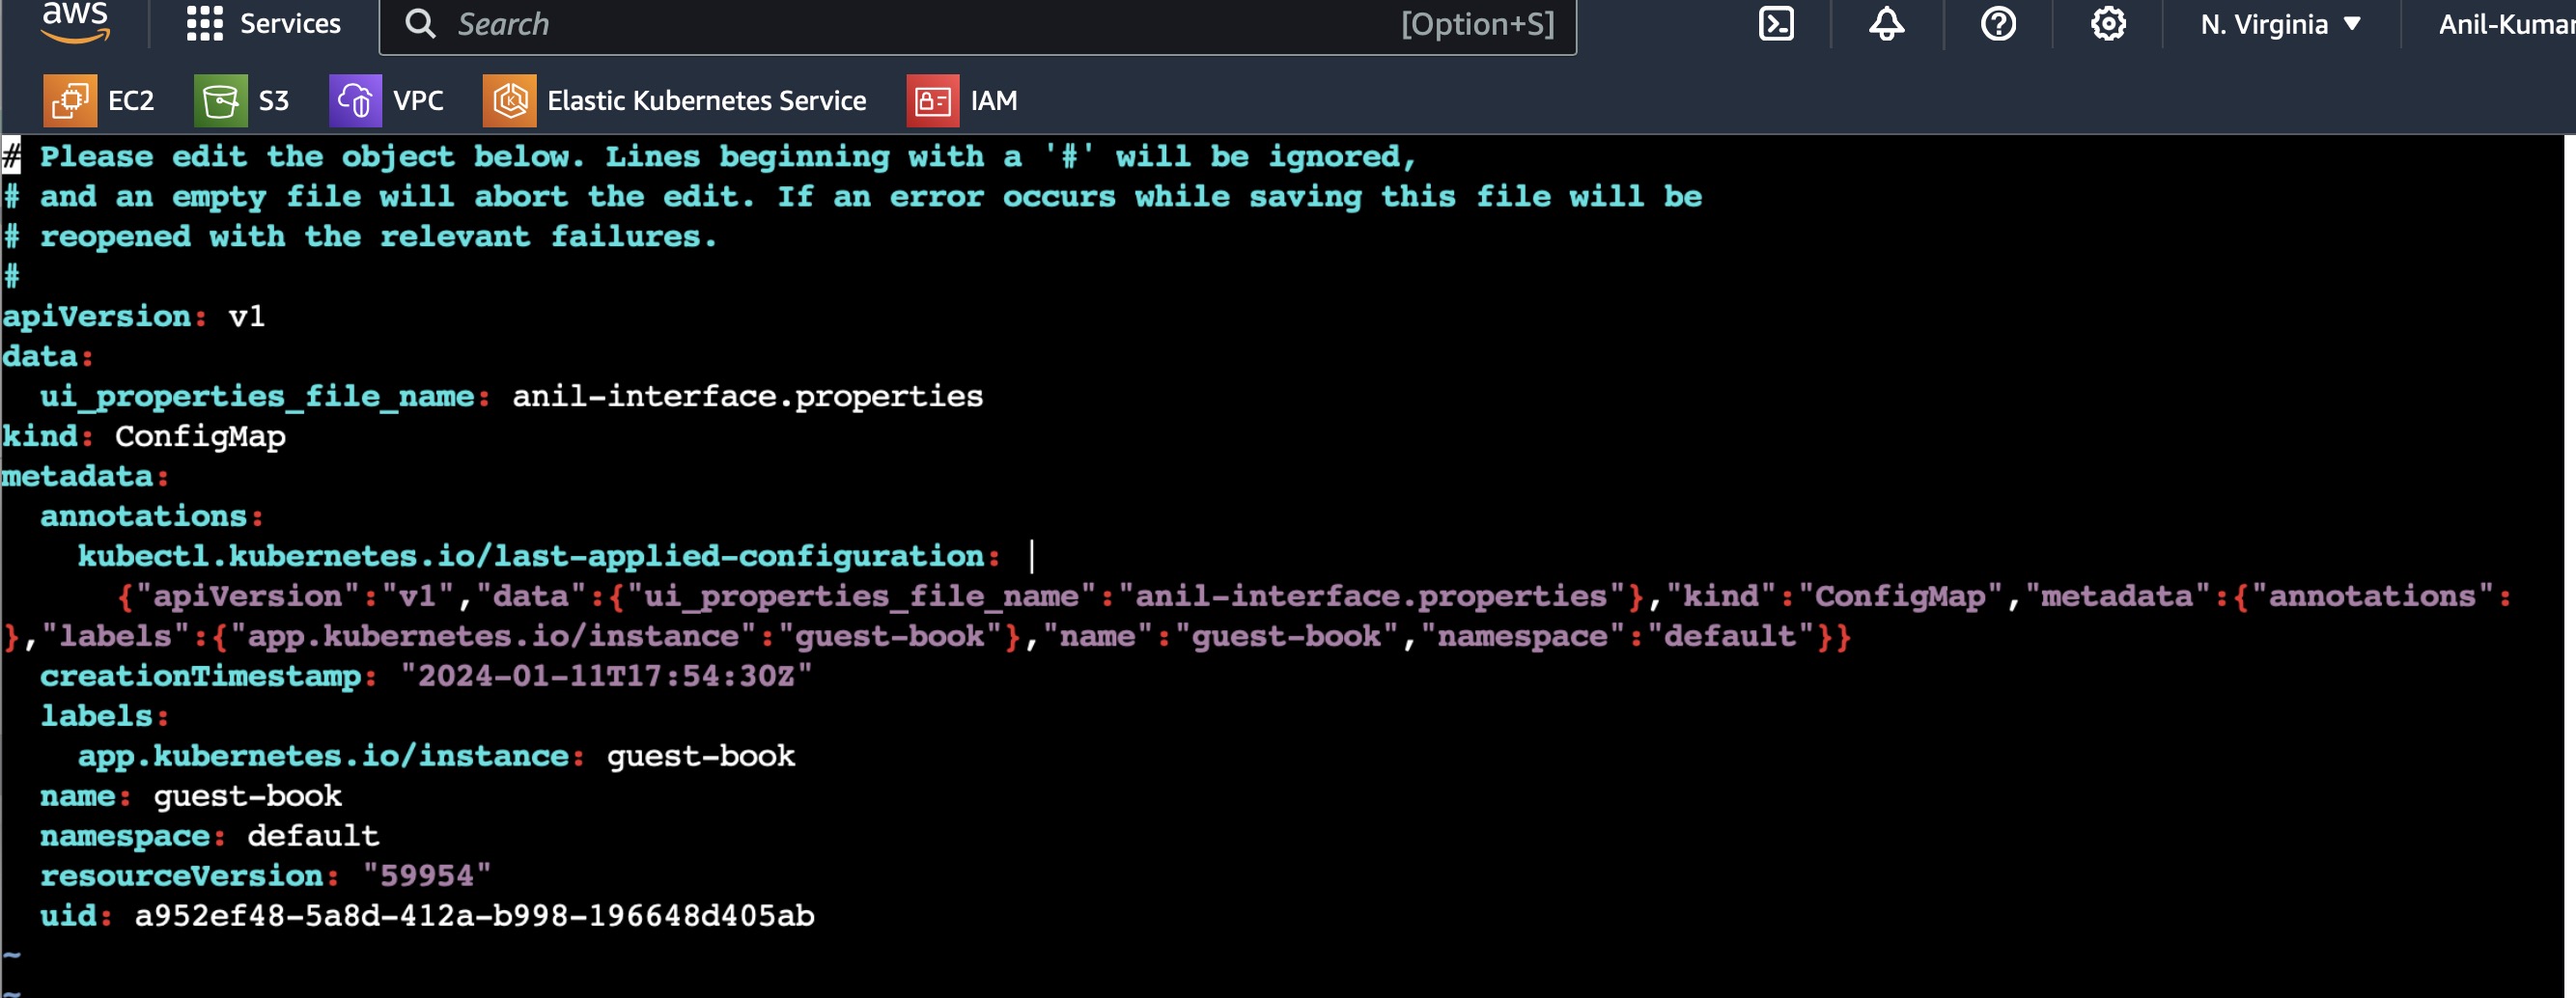
You can see the configmap details have been changed in manifest files of Kubernetes as soon as the sync is happened in ArgoCD.
In this way you can make changes in your Kubernetes cluster easily with this GitOps approach without manually doing changes in manifest files.
Now try to do the changes in reverse order, change the config map in Kubernetes cluster manually and see how is ArgoCD responding.
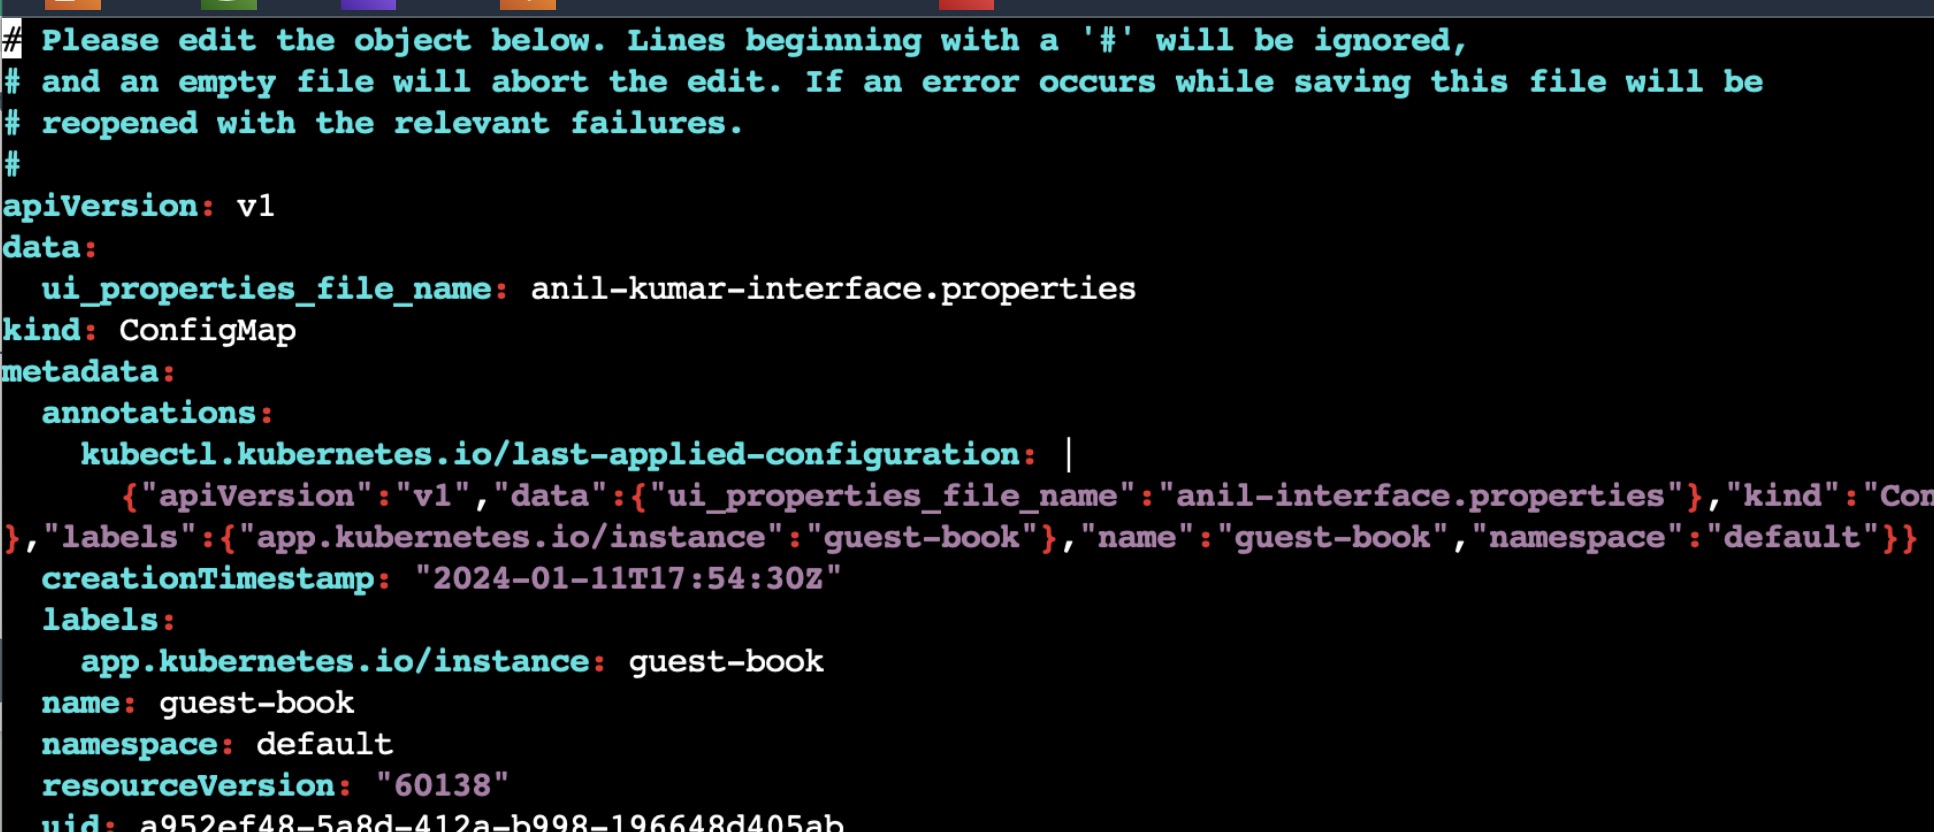
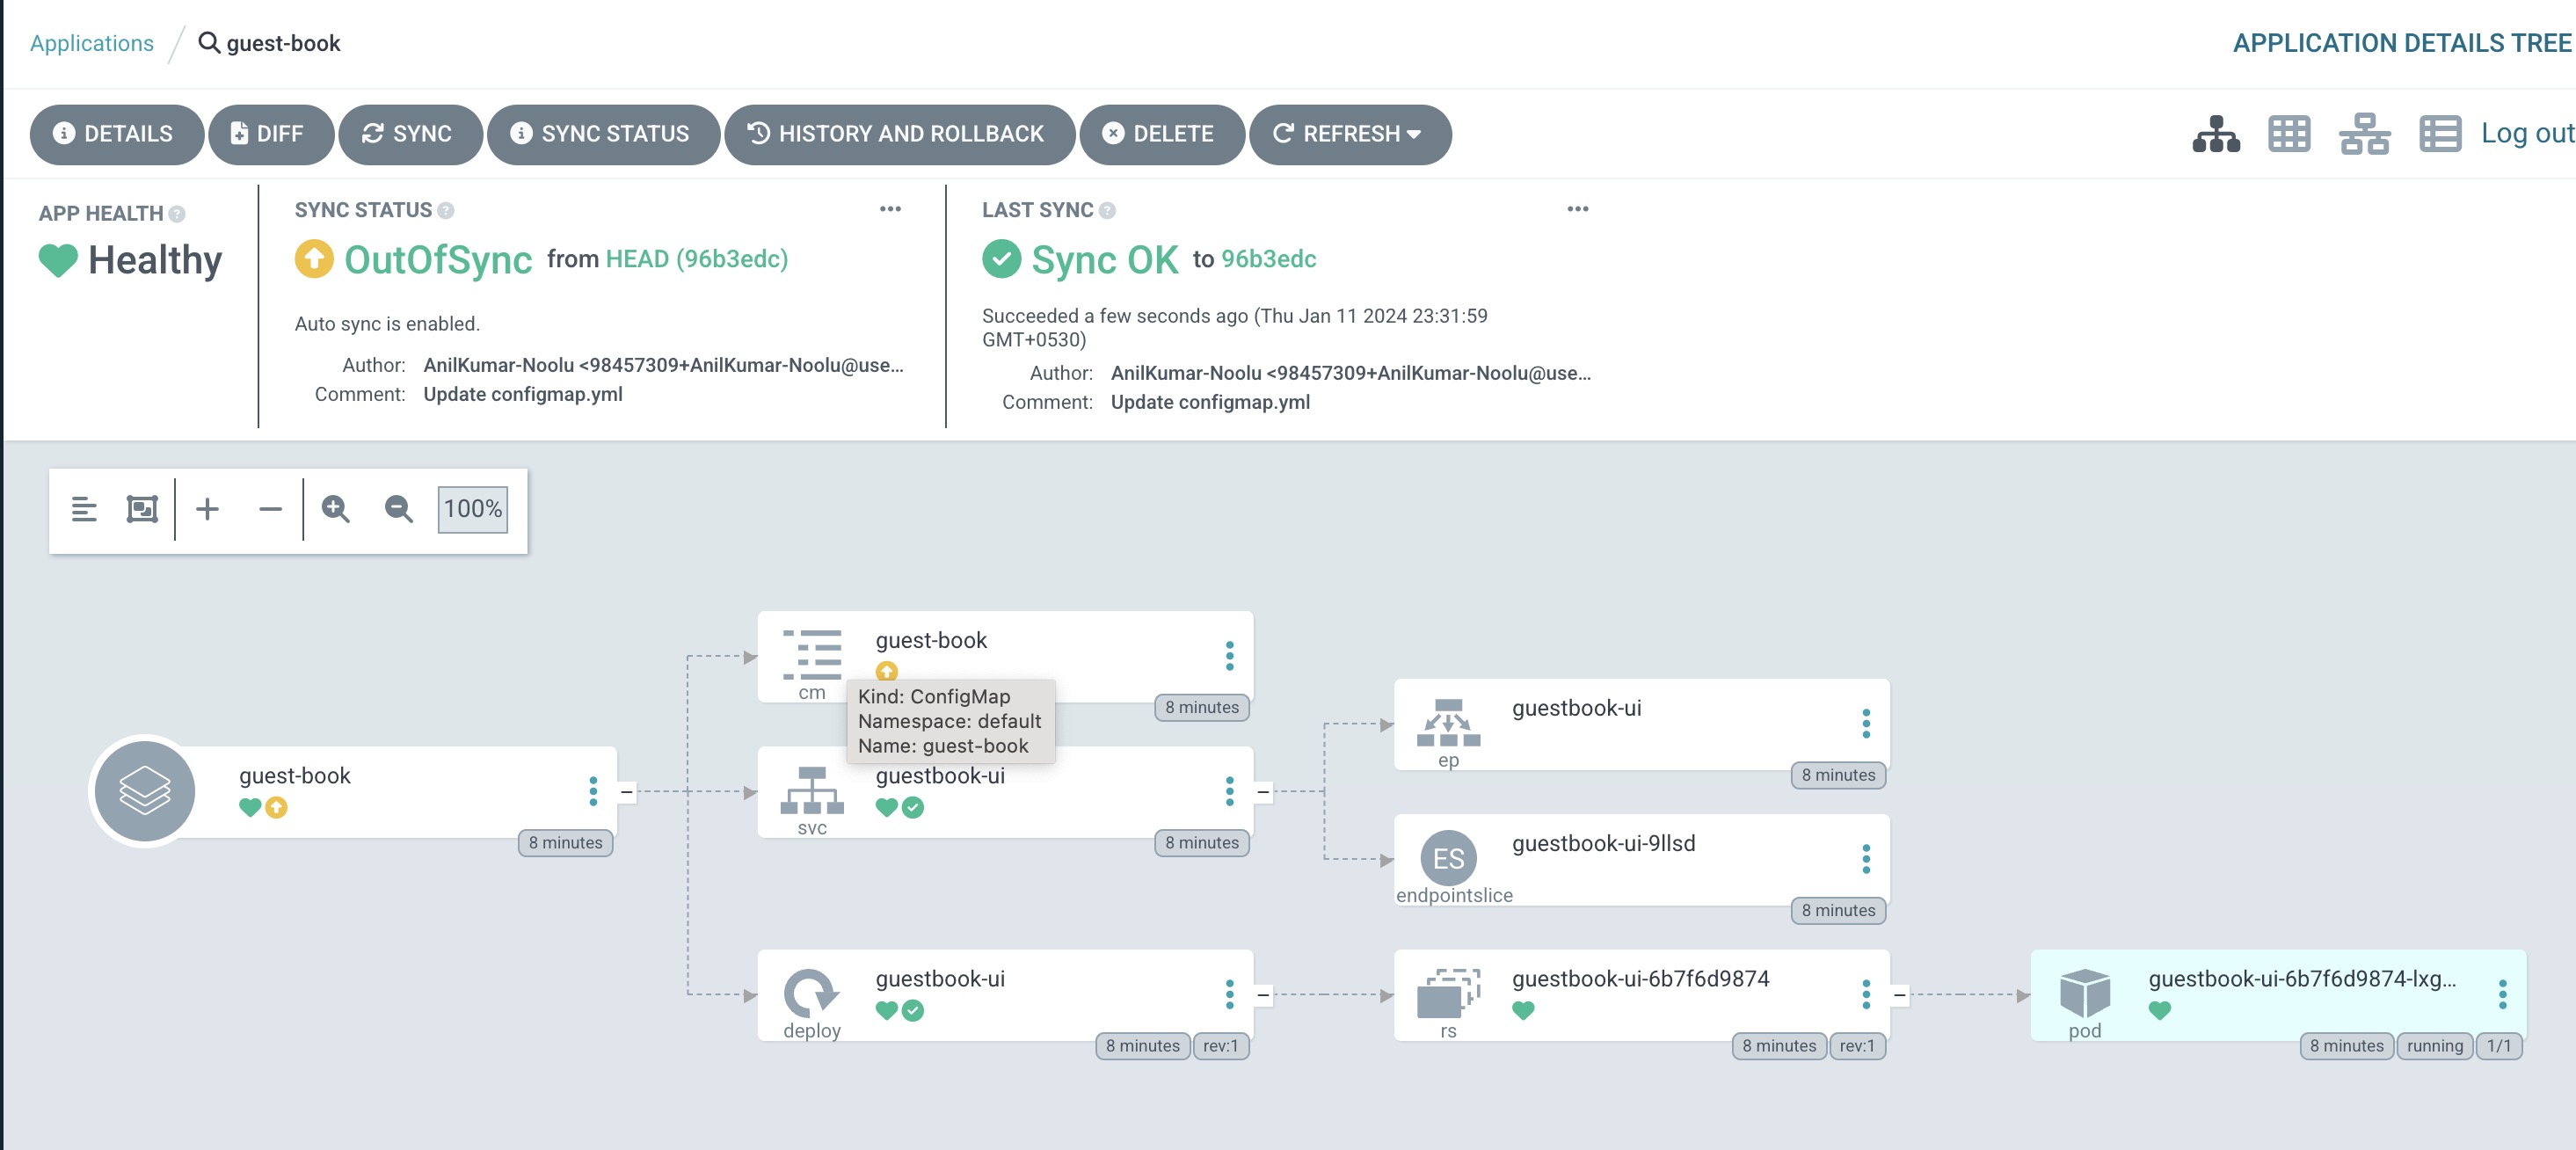
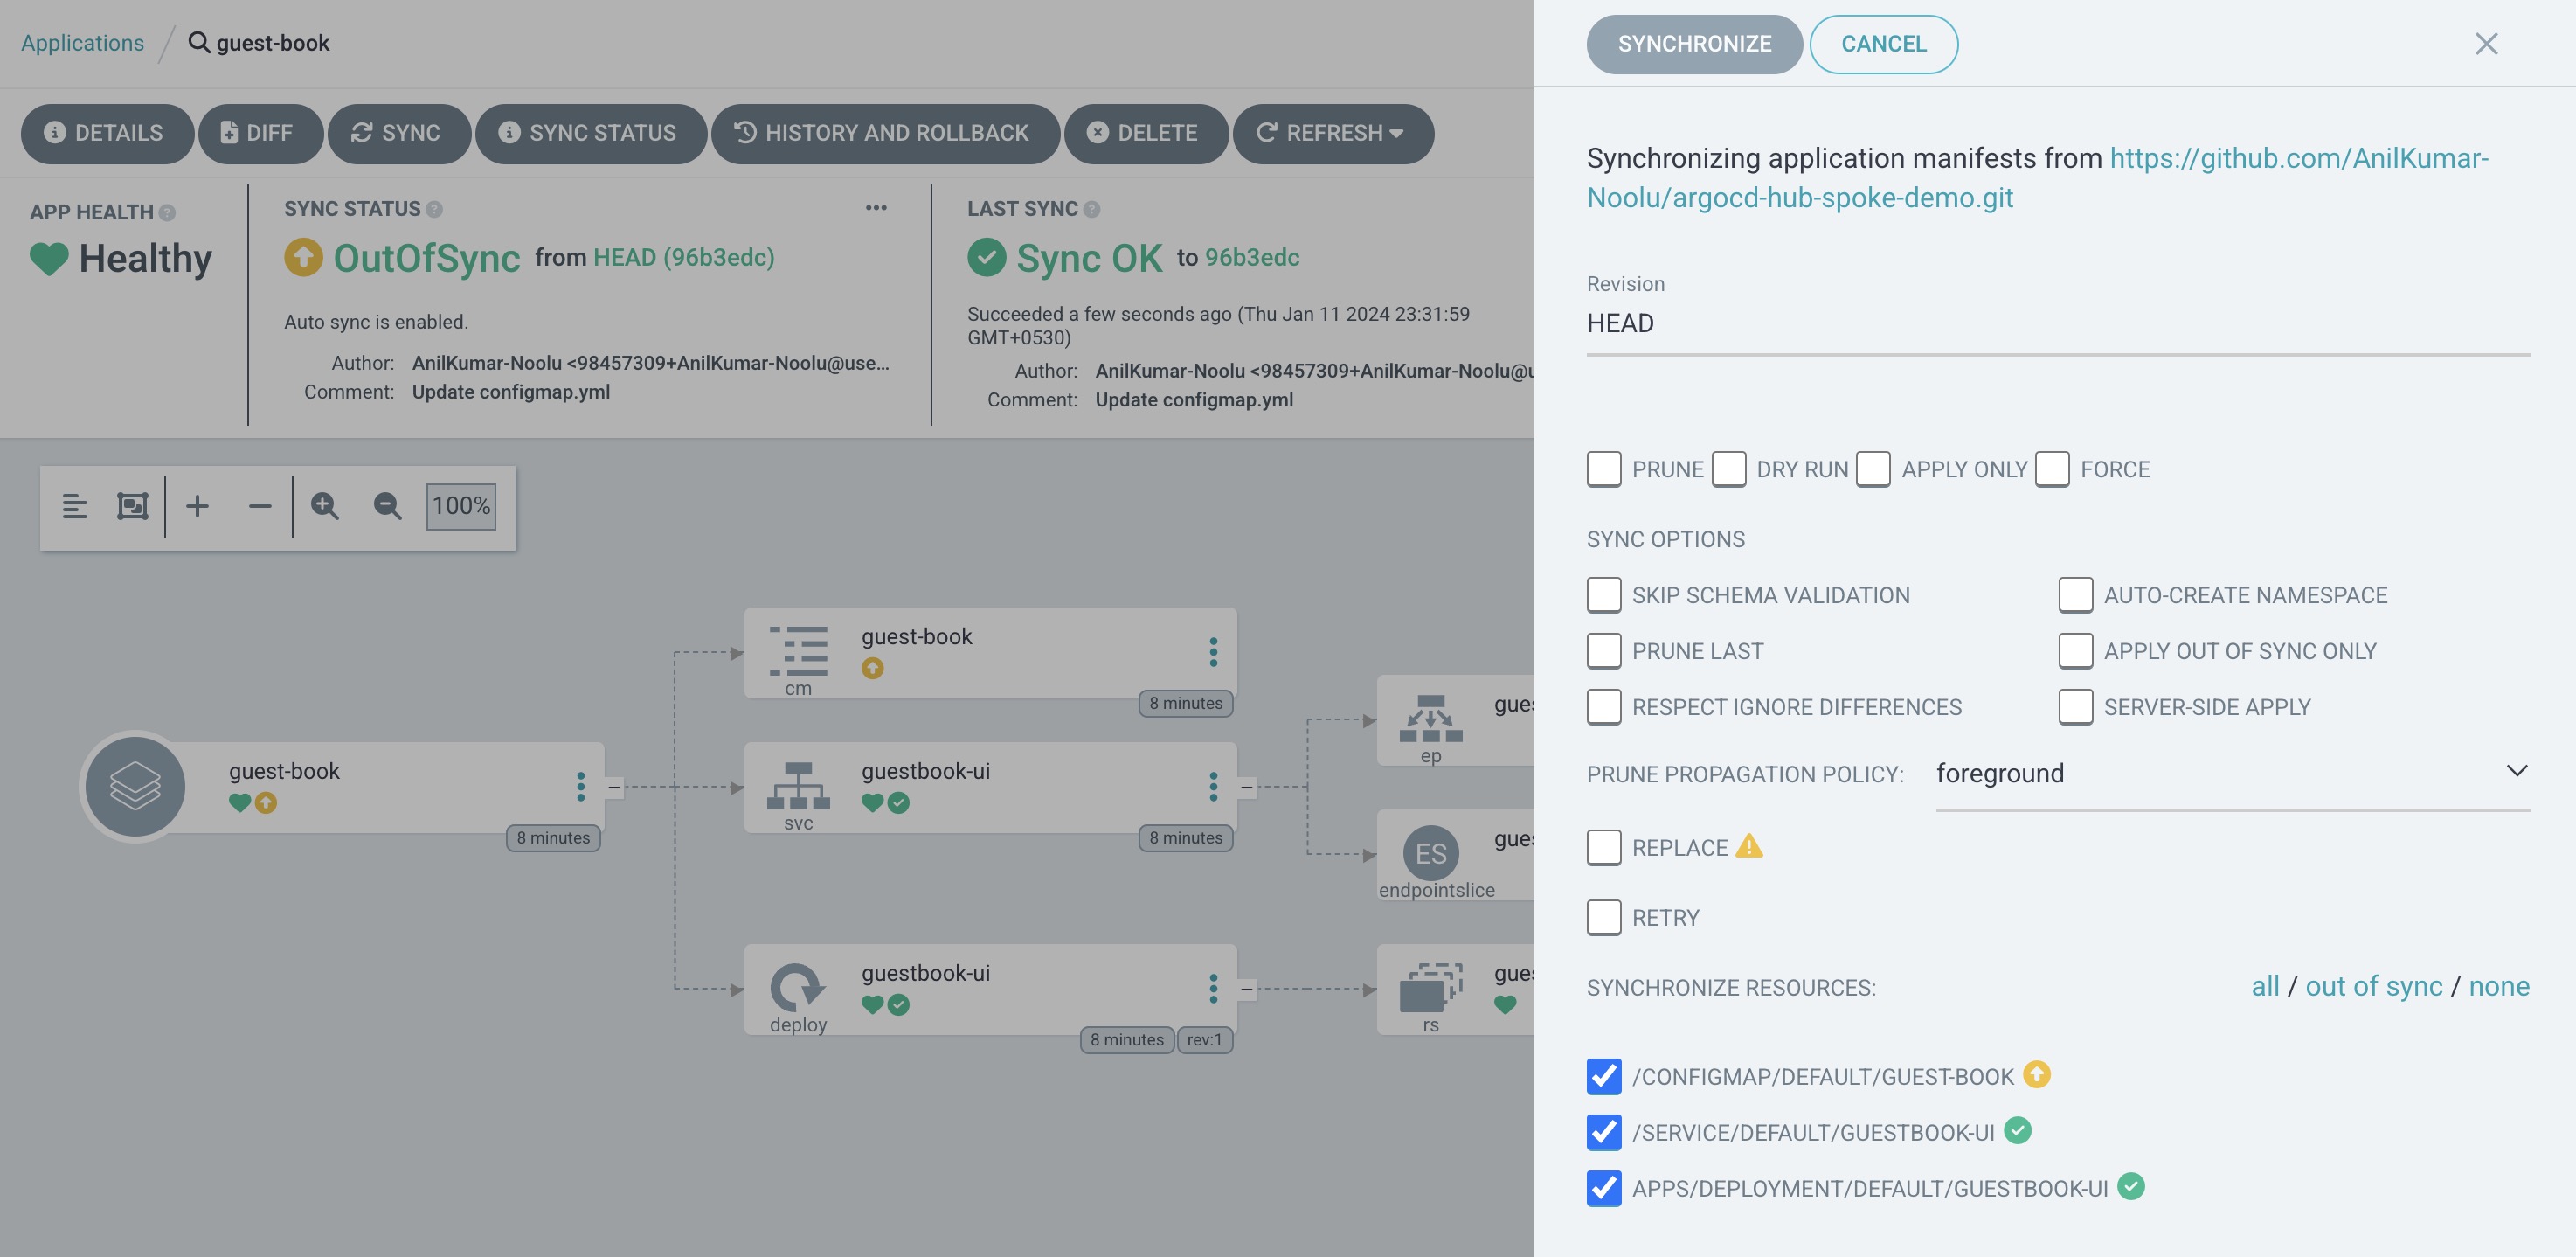
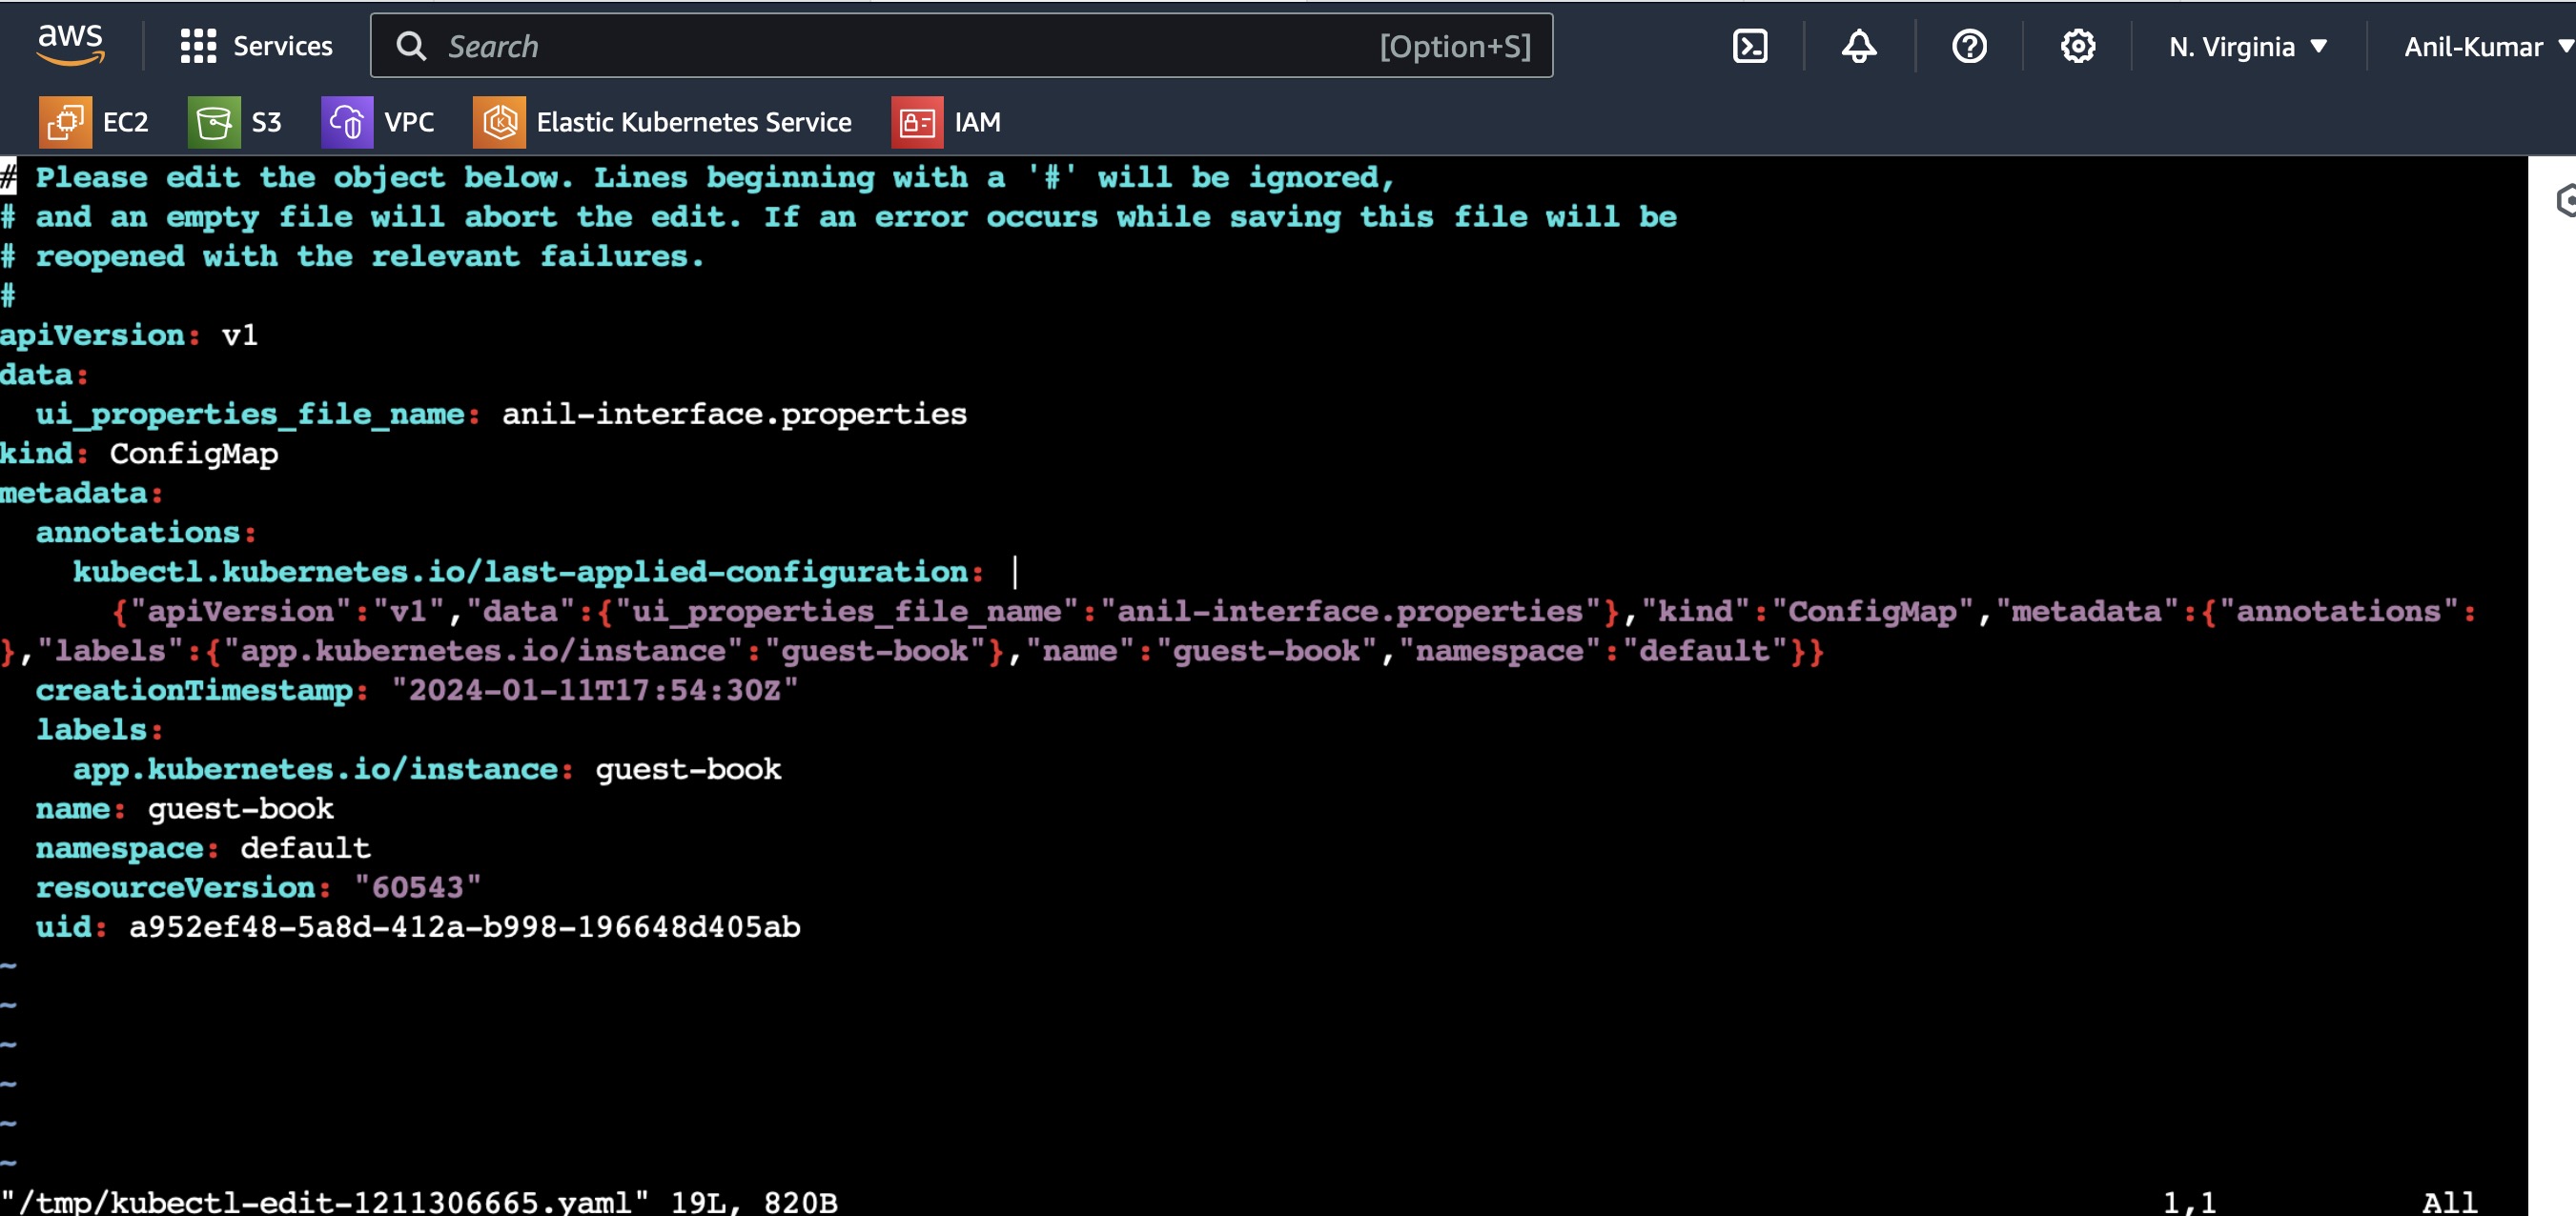
You can see even though we have changed the file name to anil to anil-kumar manually in manifest files, ArgoCD is showing OutOfSync status and once sync is done, it is returning back the first configmap cancelling the edits made.
Also make sure to delete the 3 EKS Clusters we have created once we completed this experiment as it may incur charges if they are not turned down.
eksctl delete cluster --name hub-cluster --region us-east-1
eksctl delete cluster --name spoke-cluster-1 --region us-east-1
eksctl delete cluster --name spoke-cluster-2 --region us-east-1
In conclusion, ArgoCD emerges as a powerful ally in the realm of multi-cluster deployments, streamlining the management of applications across diverse environments. Its declarative and GitOps-driven approach not only enhances the efficiency of deployment workflows but also brings forth several key advantages. With ArgoCD, teams can enjoy centralized control, versioned configuration, and automated synchronization, leading to increased reliability and consistency in their multi-cluster deployments. The ability to track changes through Git repositories ensures transparency and auditability, while the real-time feedback loop minimizes errors and accelerates the development lifecycle. ArgoCD stands as a testament to the evolving landscape of deployment tools, empowering organizations to navigate the complexities of multi-cluster environments with confidence and ease.
In this way, we can complete our Multi-Cluster Deployment for multiple applications using ArgoCD a GitOps tool.
I hope this blog has provided you some insights and practical guidance, empowering you to advance your knowledge and proficiency in GitOps Approach and using tools like ArgoCD.
Thanks for reading this Blog!!
Subscribe to my newsletter
Read articles from Anil Kumar directly inside your inbox. Subscribe to the newsletter, and don't miss out.
Written by
