A Beginner's Guide to Creating a Virtual Private Cloud (VPC) in AWS
 Sumit Mondal
Table of contents

Introduction:
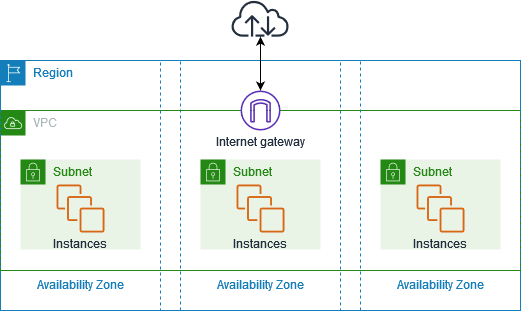
Welcome to the world of cloud computing! If you're just getting started with Amazon Web Services (AWS), one of the fundamental concepts you need to grasp is the Virtual Private Cloud (VPC). A VPC allows you to create a logically isolated section of the AWS Cloud where you can launch resources in a virtual network that you define.
In this beginner-friendly guide, we'll walk you through the process of creating a VPC in AWS in a simple and straightforward manner.
Step 1: Sign in to the AWS Management Console
To begin, sign in to your AWS account. If you don't have an account, you can create one on the AWS website.
Step 2: Navigate to the VPC Dashboard
Once you're logged in, navigate to the AWS Management Console, and in the 'Find Services' search bar, type 'VPC.' Click on the 'Virtual Private Cloud (VPC)' link that appears in the search results.
Step 3: Start the VPC Creation Wizard
On the VPC Dashboard, you'll find a button that says 'Start VPC Wizard.' Click on it to launch the VPC creation wizard, which simplifies the process for creating a VPC.
Step 4: Choose a VPC Configuration
The wizard will present you with several VPC configuration options. For beginners, we recommend selecting the 'VPC with a Single Public Subnet' option. This option sets up a basic VPC with a single public subnet and an internet gateway, making it suitable for many common use cases.
Step 5: Configure VPC Details
In this step, you'll need to provide some basic information about your VPC, such as the VPC name and the CIDR block (the IP address range) for your VPC. The CIDR block is crucial, so make sure it doesn't overlap with other CIDR blocks in your AWS environment.
Step 6: Configure Subnet Details
Next, you'll set up the details for your subnet, including the subnet name, availability zone, and CIDR block. Keep in mind that a subnet is a range of IP addresses in your VPC.
Step 7: Configure Route Table
The wizard will prompt you to either create a new route table or use an existing one. For simplicity, let's create a new one. This table helps control the traffic leaving your subnet.
Step 8: Review and Create
After configuring all the details, review your choices and click on the 'Create VPC' button. AWS will then create your VPC and associated resources.
Congratulations! You've successfully created a Virtual Private Cloud in AWS. You can now launch and manage your resources within this isolated network environment.
Conclusion:
Creating a VPC in AWS might seem daunting at first, but with the user-friendly wizard and these step-by-step instructions, you can confidently set up your virtual network. As you become more familiar with AWS, you can explore advanced VPC configurations to meet the specific needs of your applications. Happy cloud computing!
Subscribe to my newsletter
Read articles from Sumit Mondal directly inside your inbox. Subscribe to the newsletter, and don't miss out.
Written by

Sumit Mondal
Sumit Mondal
Hello Hashnode Community! I'm Sumit Mondal, your friendly neighborhood DevOps Engineer on a mission to elevate the world of software development and operations! Join me on Hashnode, and let's code, deploy, and innovate our way to success! Together, we'll shape the future of DevOps one commit at a time. #DevOps #Automation #ContinuousDelivery #HashnodeHero