Integrating OpenLayers and ol-ext with Next.js: A Step-by-Step Guide to Create a Dual Map Layout
 Shreyas Ingale
As seasoned developers, we've all felt the rush and hurdles that come with crafting GIS web apps. Geospatial data can be a wild beast to tame, and creating interactive maps adds a layer of complexity.
In this blog, we'll explore a basic use case of a dual map layout to demonstrate how OpenLayers and ol-ext can be your trusty allies in conquering the GIS web app domain within the confines of Next.js. But hey, let's keep it real – integrating these tools isn't a walk in the park. So, buckle up as we embark on a rollercoaster ride through the exhilarating realm of geospatial web development! 🚀
Step 1: Create a Next.js Project
Start by creating a new Next.js project using the following commands:
npx create-next-app dualmaps
cd dualmaps
For this project we will use JavaScript, Tailwind and App Router of Next.js.
Step 2: Install Dependencies
Install the required packages of OpenLayers and ol-ext:
npm install ol ol-ext
Step 3: Create Map Components
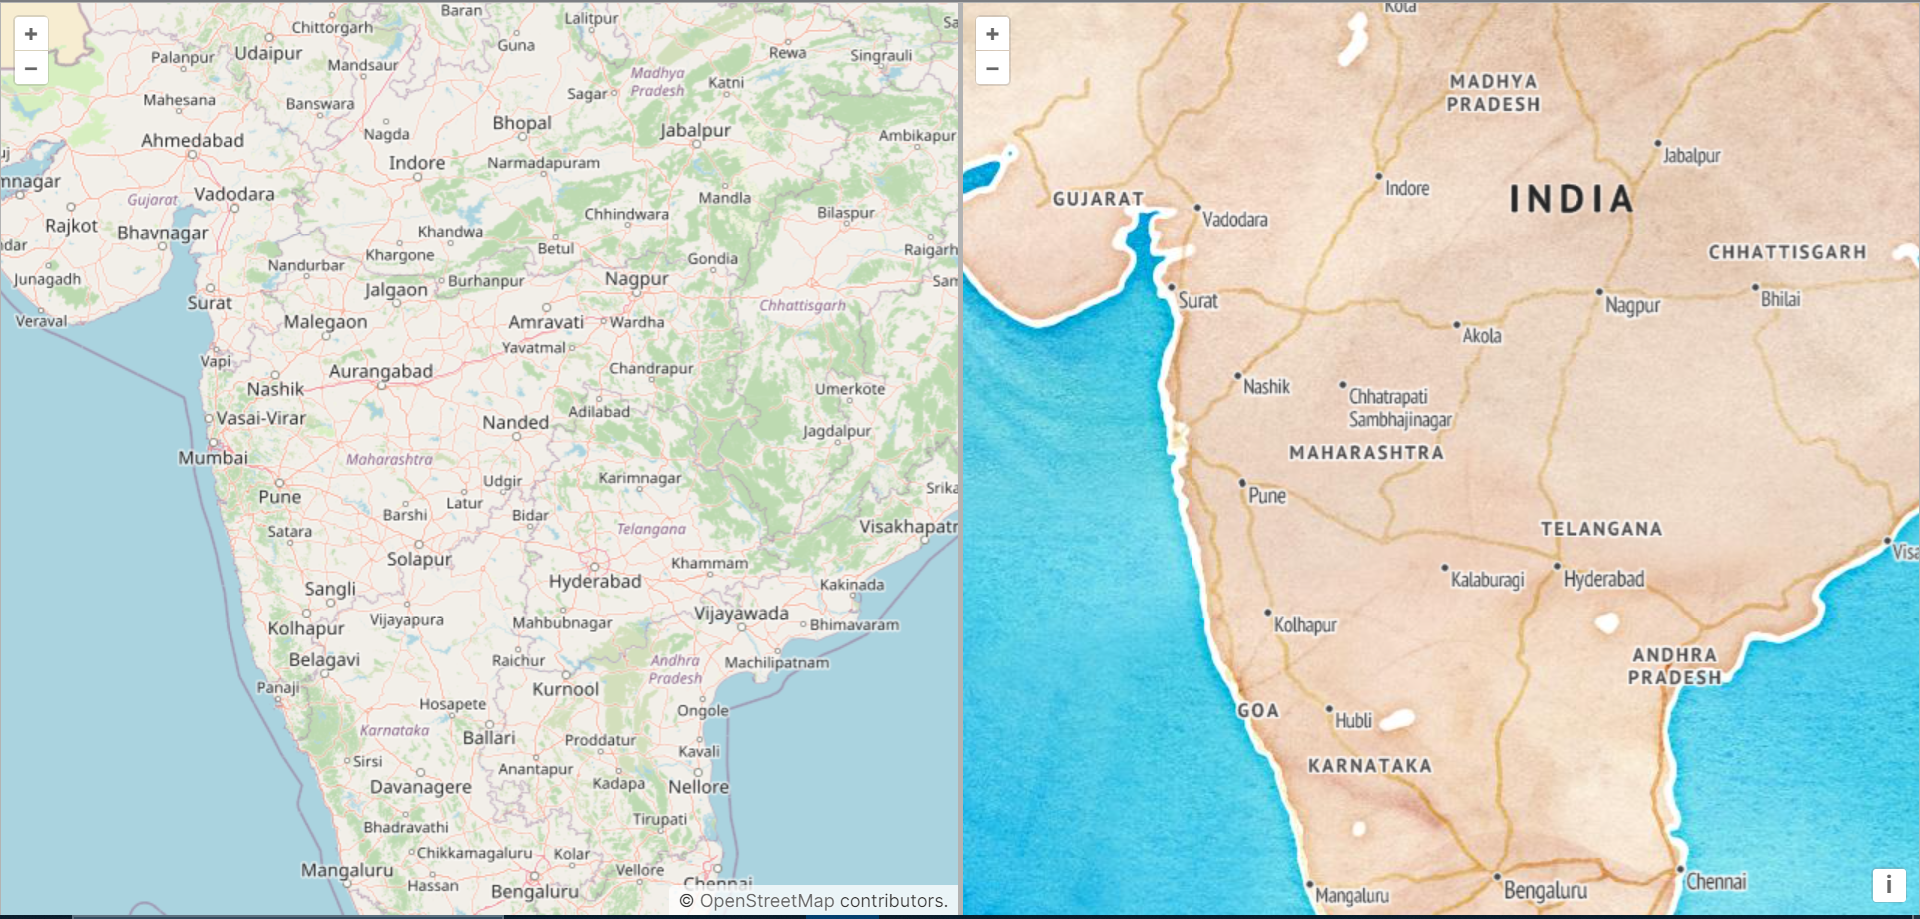
First, create a components folder inside the src folder. Inside that folder, create two components, Map1.js with an OpenStreetMap (OSM) layer and Map2.js with a Stamen watercolor layer with terrain labels, to represent the individual maps. Also apply styles to them using ol.css file:
// components/Map1.js
'use client'
import { useEffect, useRef } from 'react';
import 'ol/ol.css';
import Map from 'ol/Map';
import View from 'ol/View';
import TileLayer from 'ol/layer/Tile';
import OSM from 'ol/source/OSM';

const Map1 = ({setMap1Object}) => {

  const map1Container = useRef();

  // on component mount create the map and set the map refrences to the state
  useEffect(() => {
    const map1 = new Map({
      layers: [
        new TileLayer({
          source: new OSM(),
        }),
      ],
      view: new View({
        //Coordinate System: WGS 84 / Pseudo-Mercator-EPSG:3857
        center: [8546575.886939, 2137169.681579], // Longitude, Latitude
        zoom: 6
      }),
    });

    map1.setTarget(map1Container.current);
    setMap1Object(map1);

    // on component unmount remove the map refrences to avoid unexpected behaviour
    return () => {
      map1.setTarget(undefined);
      setMap1Object(null);
    };
  }, []);

  return (<><div ref={map1Container} className="absolute inset-0"></div></>);
};

export default Map1;
// components/Map2.js
'use client'
import { useEffect, useRef } from 'react';
import 'ol/ol.css';
import Map from 'ol/Map';
import View from 'ol/View';
import TileLayer from 'ol/layer/Tile';
import StadiaMaps from 'ol/source/StadiaMaps';

const Map2 = ({setMap2Object}) => {

  const map2Container = useRef();

  // on component mount create the map and set the map refrences to the state
  useEffect(() => {
    const map2 = new Map({
      layers: [
        new TileLayer({
          source: new StadiaMaps({
            layer: 'stamen_watercolor',
          }),
        }),
        new TileLayer({
          source: new StadiaMaps({
            layer: 'stamen_terrain_labels',
          }),
        }),
      ],
      view: new View({
        //Coordinate System: WGS 84 / Pseudo-Mercator-EPSG:3857
        center: [8546575.886939, 2137169.681579], // Longitude, Latitude
        zoom: 6
      }),
    });

    map2.setTarget(map2Container.current);
    setMap2Object(map2);

    // on component unmount remove the map refrences to avoid unexpected behaviour
    return () => {
      map2.setTarget(undefined);
      setMap2Object(null);
    };
  }, []);

  return (<><div ref={map2Container} className="absolute inset-0"></div></>);
};

export default Map2;
Step 4: Create DualMap Page
Inside the app folder, edit the page.js file to combine both maps on a single page and add the synchronize from ol-ext to sync both the maps. Also add ol-ext.css to properly visualise the sync effect:
// Main Landing Page "/" with dual maps
'use client'
import { useEffect, useState } from "react";
import Synchronize from "ol-ext/interaction/Synchronize";
import Map1 from "@/components/Map1";
import Map2 from "@/components/Map2";
import 'ol-ext/dist/ol-ext.css';

function DualMap() {

  const [map1Object, setMap1Object] = useState(null);
  const [map2Object, setMap2Object] = useState(null);

  // use synchronize from 0l-ext to sync both the maps
  useEffect(() => {
    if(!map1Object && !map2Object) return;
    var synchronize_12 = new Synchronize({ maps: [map2Object] });
    var synchronize_21 = new Synchronize({ maps: [map1Object] });

    map1Object.addInteraction( synchronize_12 );
    map2Object.addInteraction( synchronize_21 );

    return () => {
      if(map1Object) map1Object.removeInteraction(synchronize_12);
      if(map2Object) map2Object.removeInteraction(synchronize_21);
    }
  }, [map1Object, map2Object])

  return (
    <div className="flex h-[100vh] gap-[2px] bg-white/70" >
      <div className='relative w-1/2   border border-transparent'>
        <Map1 setMap1Object={setMap1Object}/>
      </div>
      <div className='relative w-1/2 border border-transparent'>
        <Map2 setMap2Object={setMap2Object}/>
      </div>
    </div>
  );
}

export default DualMap;
Step 5: Run the Application
Start your Next.js application:
npm run dev
Visit http://localhost:3000/ in your browser to see the dual map layout.

Step 6: Additional Configuration
Depending on your use case, you may need additional configuration. If more OpenLayers or ol-ext features are required, import the necessary modules and configure them within your map components. Explore the official documentation of OpenLayers and ol-ext for advanced features and customization options tailored to your specific requirements.
Reference:
ol-ext Synchronize interaction: https://viglino.github.io/ol-ext/examples/misc/map.interaction.synchronize.html
For the whole code, visit this GitHub Repository.
With this we have built a fully functional Dual Map Layout using Next.js, OpenLayers and ol-ext. I hope this helps you in some way in your development journey.
Subscribe to my newsletter
Read articles from Shreyas Ingale directly inside your inbox. Subscribe to the newsletter, and don't miss out.
Written by
