Deploying an Avail Light Client Node Using Spheron: A Quick Guide
 Spheron Network
Are you interested in deploying an Avail Light Client node but don't know where to start? Look no further! In this step-by-step guide, we'll show you how to deploy an Avail Light Client node using Spheron Network easily. With just a few clicks, you can set up and manage your own Avail Light Client node, giving you access to the features and benefits of the Avail ecosystem.
Why Use a Light Client Node?
A light client node is a streamlined version of a blockchain node that allows users to interact with the blockchain without downloading the entire transaction history. This significantly reduces the resource requirements and enhances accessibility, making it suitable for a broader range of devices.
How do you deploy an Avail Light Client Node using Spheron Compute?
Deploying an Avail Light Node on Spheron is a simple, streamlined process that does not require any DevOps knowledge!
Step 1: Create a Free Spheron Network Account
Visit Spheron Network: https://spheron.network/
On the Spheron homepage, locate and click the "Free Trial" button.
You'll be directed to a signup page. Choose your preferred authentication method: Web2 (GitHub account, GitLab account, or Bitbucket account) or Web3 (Ethereum).
Follow the provided prompts to authenticate your chosen account securely. This step ensures safe access to the Spheron Network platform. After successful authentication, you'll be guided to a confirmation page confirming the completion of your account setup.
Step 2: Creating an Organization
1. Upon logging in, you'll be directed to the Create Organization page, where you can give your organization name and choose Avatar. Ensure the "compute" option is selected from the drop-down menu of the "Start With" option. Click “Continue”.
2. Next, you'll be taken to a new page. Click the "Create New Projects" button.
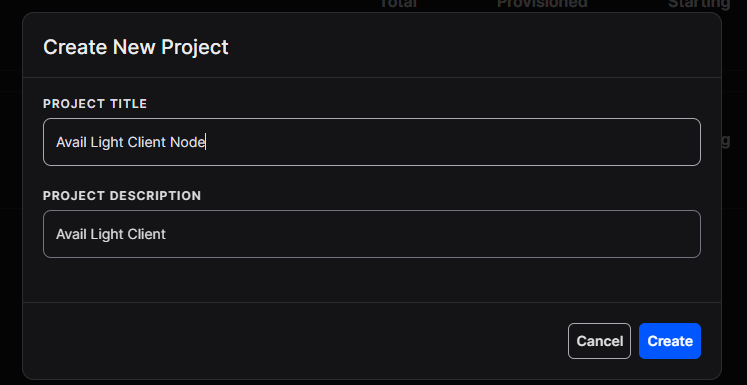
3. Add 'Project Title' And 'Project Description' and Click Create.
Step 3: Deploying an Avail Light Client Node With Spheron Platform UI
Follow these steps to deploy an Avail Light Client Node:
1. Choose "Compute" to use CPU-based instances for running containers.
2. Choose your desired Compute Type option under Compute Type.
NOTE: Please schedule a team call to gain early access to the "Spot" Type.
3. Click "Start from Marketplace App" and Select "Avail Light Client" from the marketplace.
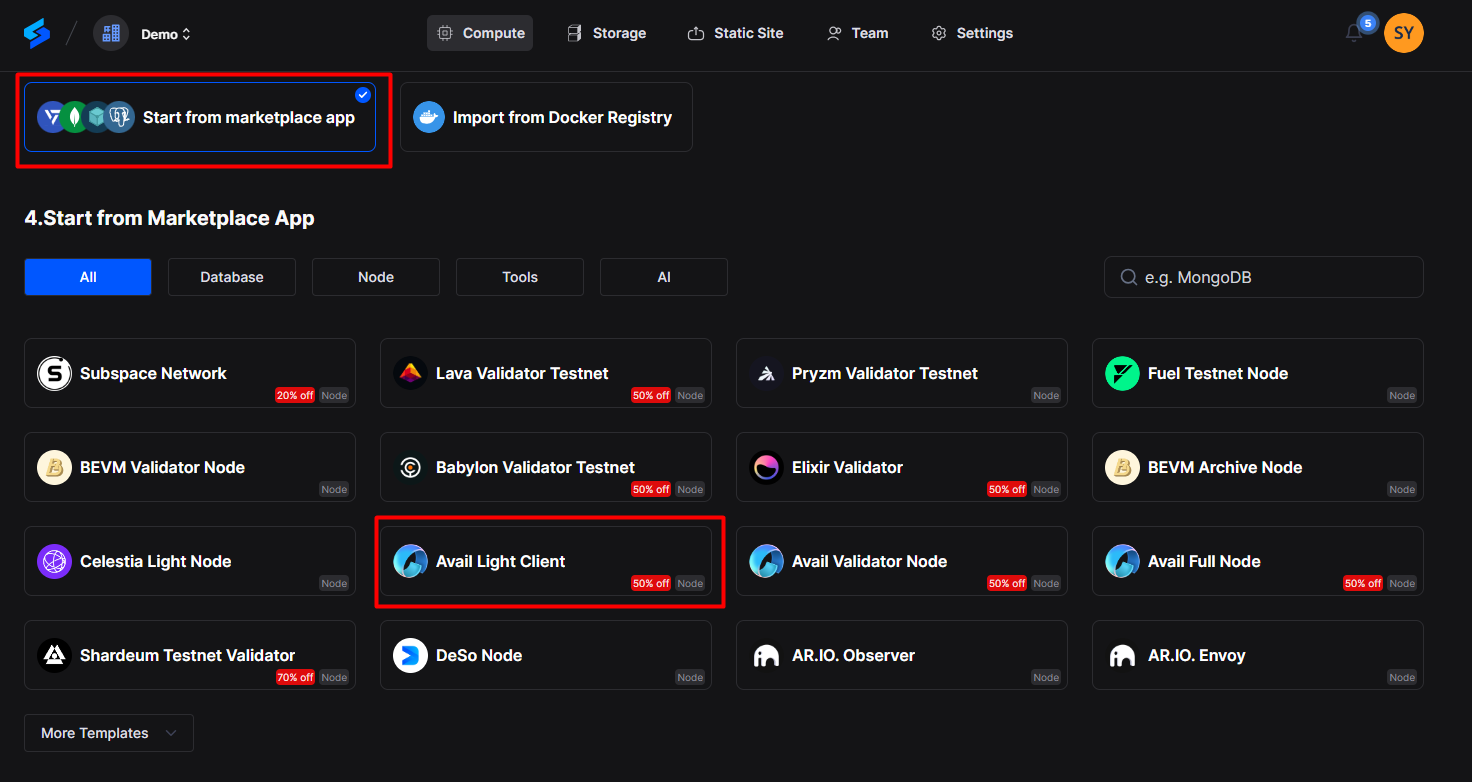
4. Select Region: Select your preferred region for deployment. Choosing a region closer to your users can improve performance and reduce latency.
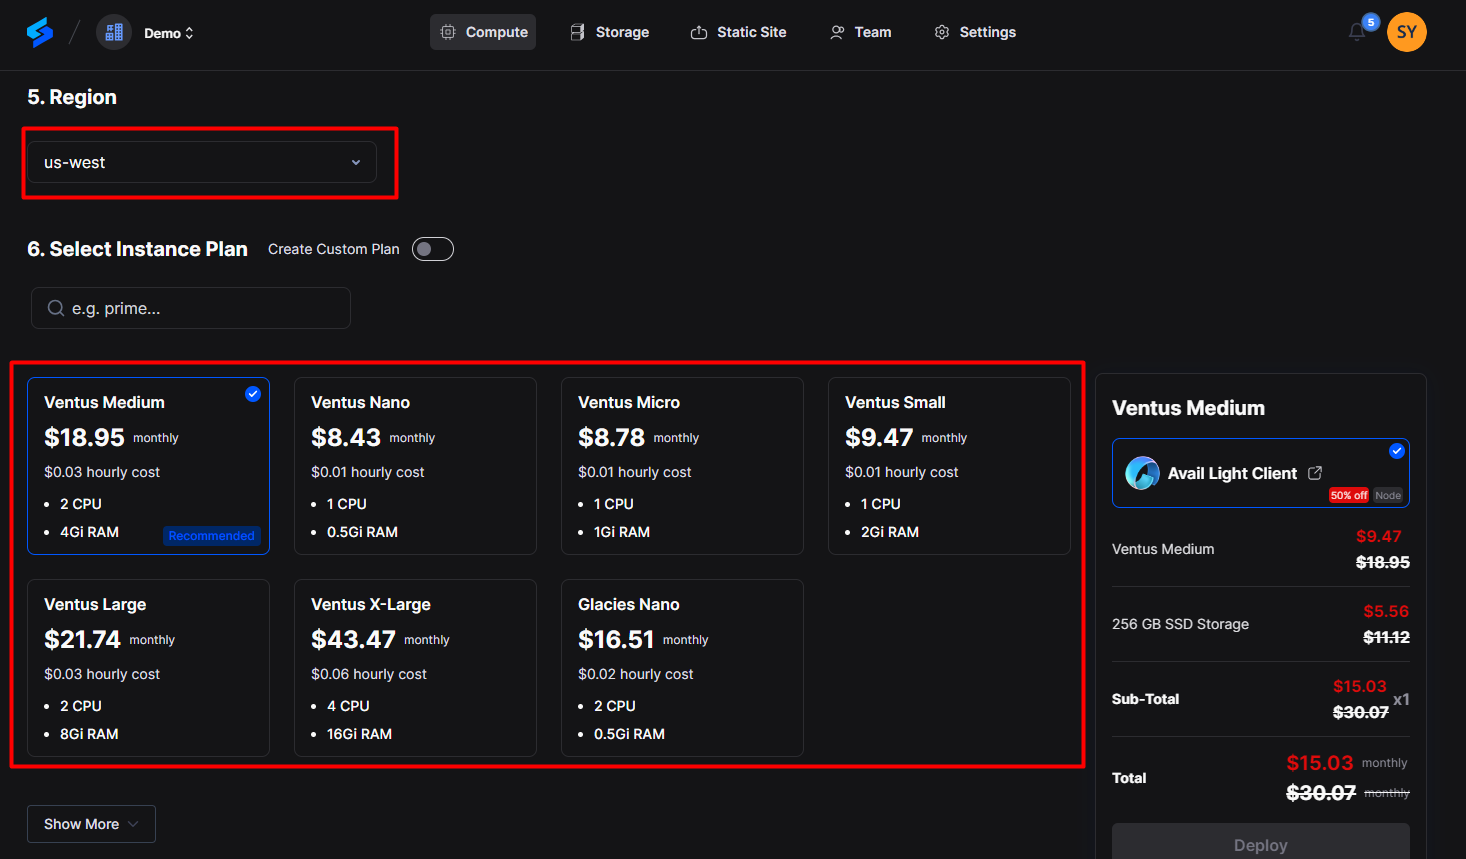
5. Next, Choose an instance plan that aligns with your requirements. Spheron will recommend a suitable plan according to the Avail Light Client template, but you can customize it from available plans or choose to 'Create Custom Plans.'
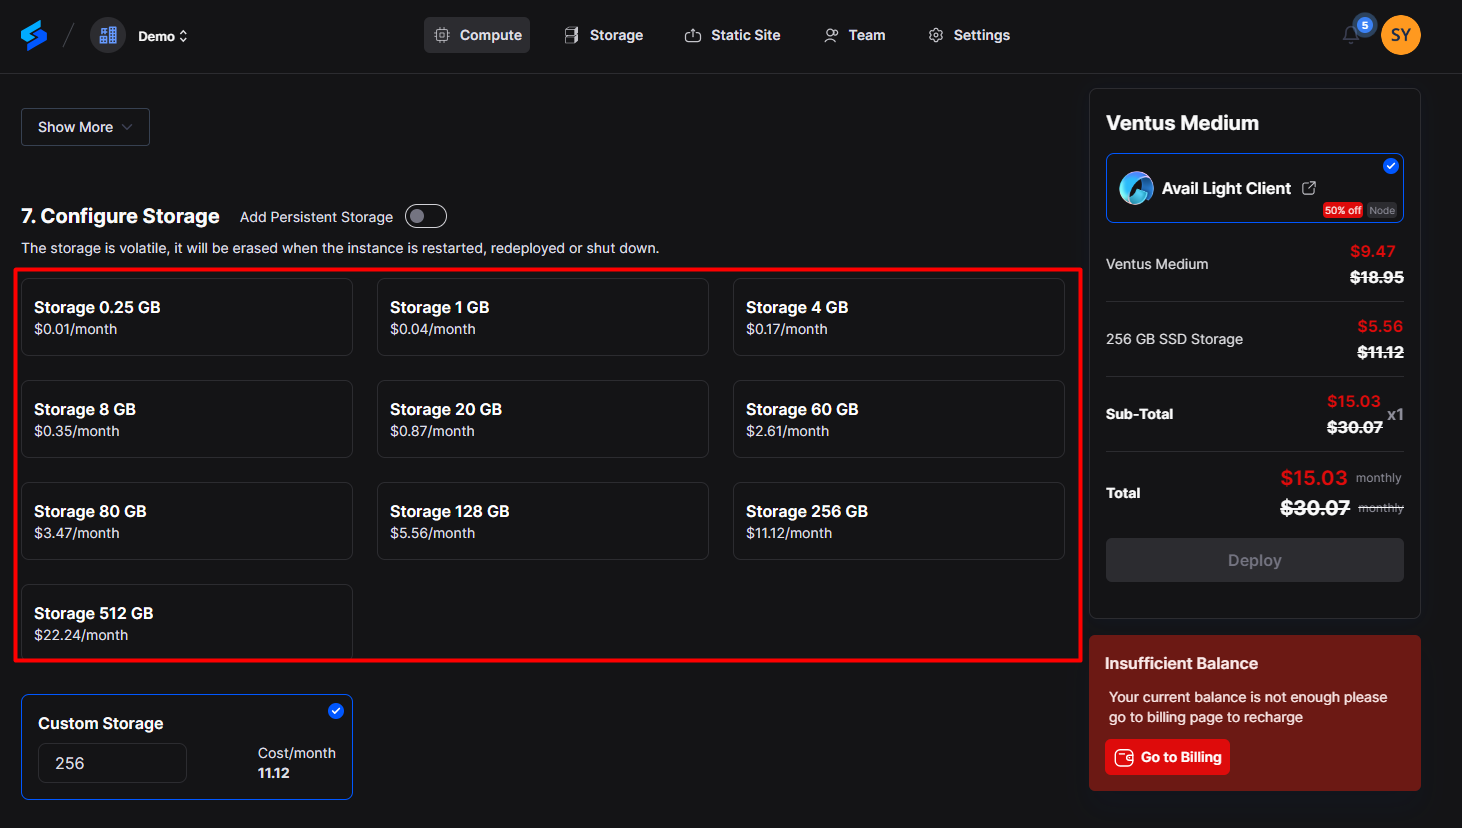
6. Next, Configure storage:
You have to choose storage from the available options or the custom storage option that fits your needs. This storage will be volatile and is erased when the instance is restarted, redeployed, or shut down. Additionally, you get the option to choose Persistent Storage.
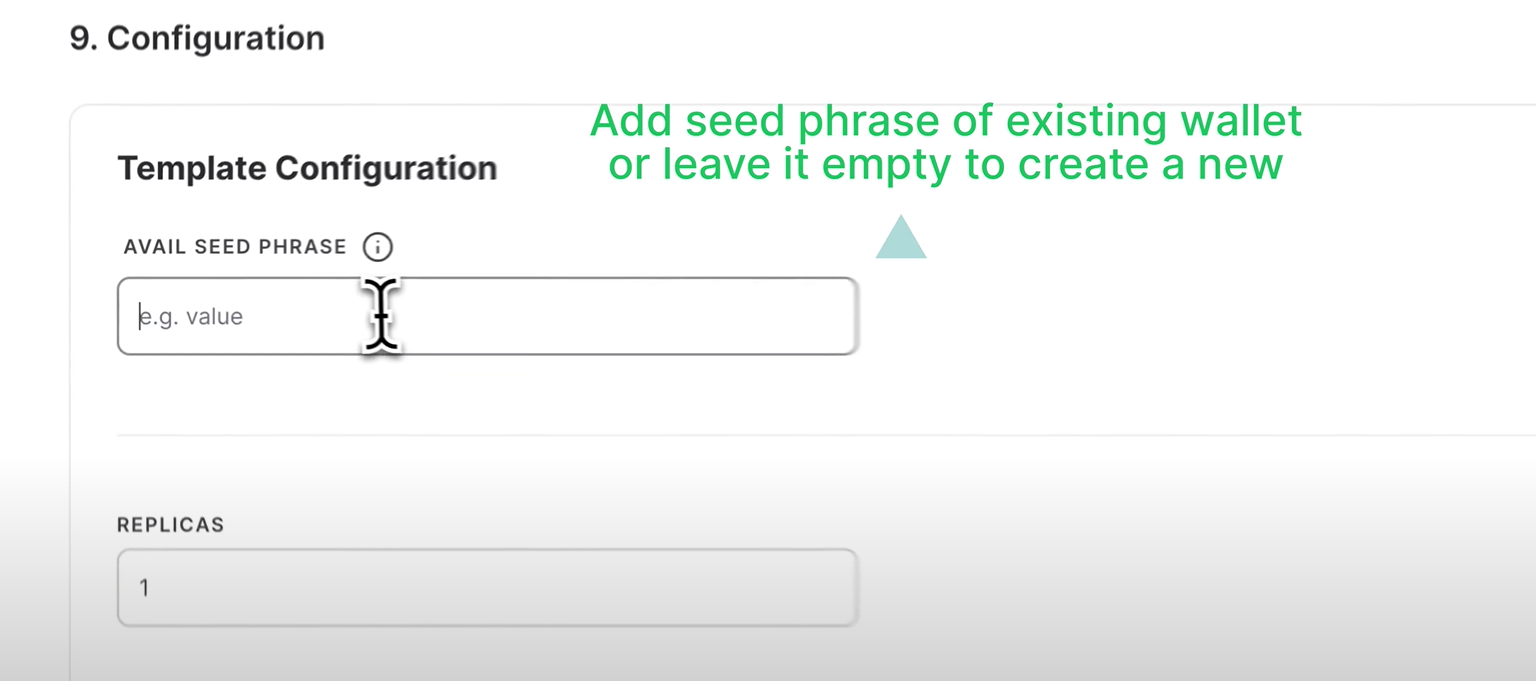
7. Next, you will see the configuration section. Add a seed phrase of an existing wallet or leave it empty to create a new one. Click "Deploy" to start the deployment process. It's as simple as that!
That's it! Your Avail Client Node will now be deployed.
8. Wait for your node to be fully set up. After it's provisioned, you'll see an option called ‘Overview’ in the dashboard; click on it to see all the details of the deployed node on the 'Avail'.
Step 4: Access the node
1. Once the deployment is complete, you can access the Avail Light Client node using the Connection URL provided by Spheron under Port Policy for Port Internal Port 7000 by clicking on the 'Connection URL.'
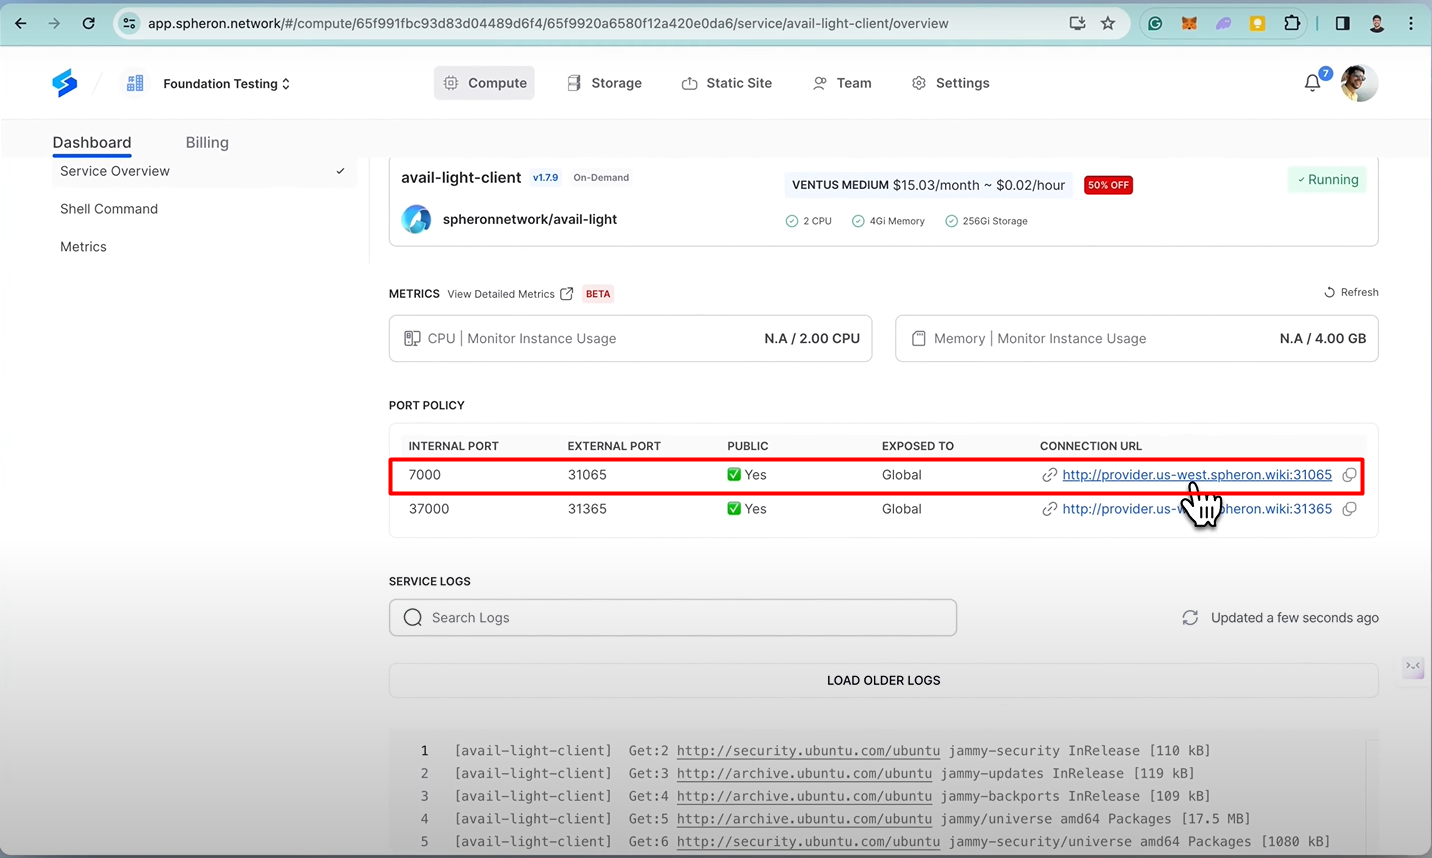
2. To check the latest block, Add /v1/latest_block to the connection. e.g.http://<connection URL of 7000 port>/v1/latest_block
v1/latest_block

3. To check the status, Add /v1/status to the connection. e.g.http://<connection URL of 7000 port>/v1/status
/v1/status

4. Append/Add v1/confidence/ to the connection URL again and add the latest block. If it reflects confidence, as stated, it means the block is running successfully.
v1/confidence/
Step 5: Check for the Avail Wallet
1. Type ls in the shell.
ls

2. Type cat identity.toml to access the seed phrase. The following is the seed phrase of the light client’s wallet.
cat identity.toml
Step 6: Setting up the wallet
1.Go to the URL https://goldberg.avail.tools/#/accounts, and click on the +Account button.
2. Add the mnemonic seed phrase you copied, select You have saved the mnemonic, see safely, and click on Next.
3. Input the name and password, repeat the password, then click on next.
4. Click on the save to setup the wallet completely.
5. Finally, the wallet will reflect on the dashboard, similar to the screenshot below.
Conclusion
In conclusion, deploying an Avail Light Client node using Spheron offers a user-friendly and accessible way to interact with the Avail blockchain. It is a straightforward process that requires no coding knowledge. Following the steps outlined above, you can quickly set up and manage your Avail Light Client node on the Spheron platform.
References
Avail Light Client Doc -https://docs.availproject.org/operate/node/light-client/
Spheron Doc -https://docs.spheron.network/marketplace-guide/avail-light
Subscribe to my newsletter
Read articles from Spheron Network directly inside your inbox. Subscribe to the newsletter, and don't miss out.
Written by

Spheron Network
Spheron Network
On-demand DePIN for GPU Compute