Lets Talk Azure: Storage Accounts.
 Pedetin Avoseh-Akoteyon
One of the numerous services provided by Azure is data storage. Data storage is unarguably one of the most crucial needs of an organization in the digital space and this data ranges from type to type. Azure makes provision for the storage of this variety of data. To access this service, you will need to first create a storage account.
Creating a storage account is more like creating for yourself or for your organization a unique namespace for your storage space.
An Azure Storage Account is a service provided by Microsoft Azure. Think of it as a digital storage space on the internet where you can keep various types of data, such as files, images, videos, and more. This storage account acts like a secure and scalable container in the cloud to store and manage your information.
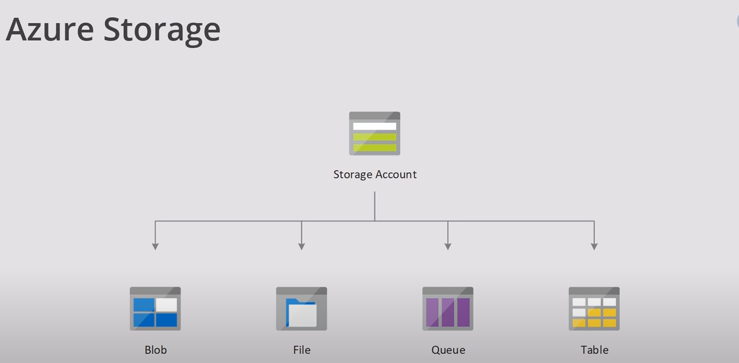
Azure Storage offers different types of storage services, including:
Blob Storage: Ideal for storing large amounts of unstructured data, like documents, images, and videos. Blobs contains containers and inside the containers are the files. Blob storage also has different access levels; they are hot, cool and archive.
File Storage: Similar to traditional file shares, allowing multiple virtual machines to share the same files.
Table Storage: A NoSQL data store that can handle large amounts of semi-structured data.
Queue Storage: Helps in building scalable applications by providing a messaging solution for communication between different components.
Disk Storage: Provides managed disks for virtual machines, offering high-performance and reliable storage for VMs.
Azure Storage Accounts are accessible from anywhere in the world over the internet, making it easy to store, retrieve, and manage your data. They also come with features like redundancy and scalability, ensuring that your data is secure, available, and can grow with your needs.
Lets get into how to create a storage account, a container and a blob.
Before the steps ahead, there are key details that define the storage account, they are:
Subscription: The Azure subscription that's billed for the services in the account.
Location: The datacenter where the storage account will reside.
Performance: Determines the data services you can have in your storage account and the type of hardware disks used to store the data.
Standard allows you to have any data service amongst Blob, File, Queue, and Table. It also uses magnetic disk drives.
Premium provides more services for storing data than the ones listed in standard. It uses solid-state drives (SSD) for storage.
Replication: Determines the method to be used to make copies of your data to prevent complete data loss during hardware failure or natural disaster. The minimum replication method is called locally redundant storage (LRS).
Access tier: Refers to the frequency of access required for your storage account. Hot is the default value of a newly created blob.
Secure transfer required: This is to determine the security protocol of web access for the storage services. To enable is to require HTTPS, to disable is to use HTTP.
Now to the steps;
Login to your azure account, search for "Storage Accounts".
Click on create, fill up the project details and storage details blocks according to preference. (Storage account name can only be in small letters).
Click Next:Advanced*, fill up the Security, Hierarchical Namespace, and Access protocols. For the Blob storage segment, select the preffered Access Tier for your blob. Hot*is for data that will be frequently accessed, whileCoolis less-frequently accessed. Archive is another azure access tier, but it isn't available at set up. You can move a hot or cold access tier to archive and back as well.*
Click Next:Networking, and select preferred choices.
Click Next:Data Protection, Encyption and Tags
Finally, Review and Create.
You have successfully created a storage account. Now, lets create a storage service in that account, we will be creating a Blob.
Click on the storage account you have just created, then create a container.
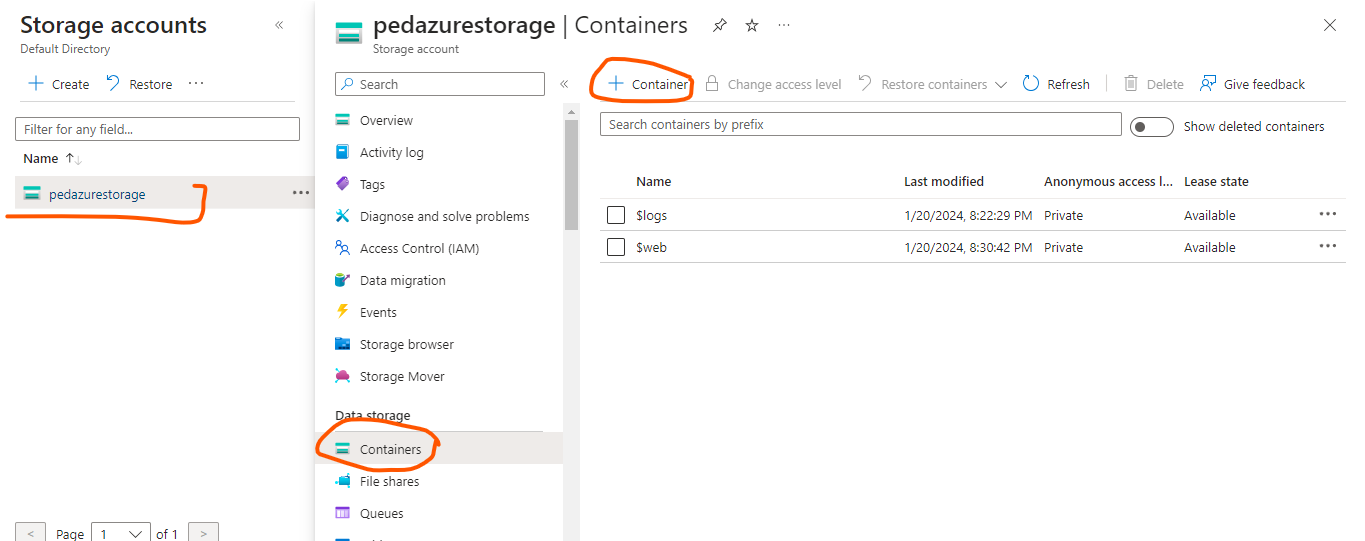
After creating a container, then proceed to upload anything into it. It could be files, images, videos; anything! Everything you upload into a container is called a Blob.

You can also generate a SAS key for your blobs; SAS stands for Shares Access Signature. It primarily provides a point of access to your data.
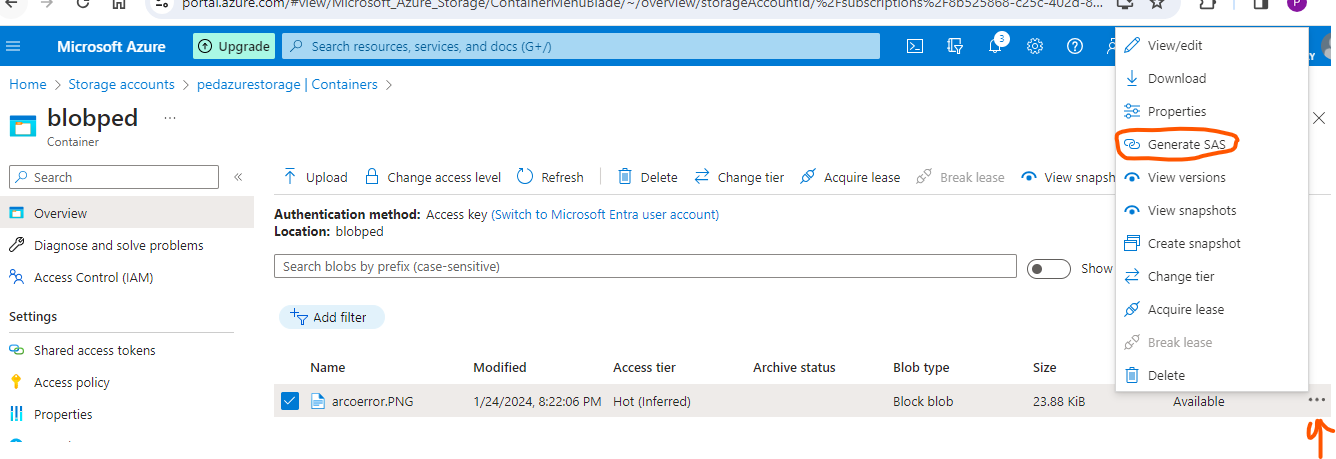
You can set the time frame for the SAS URL to be valid as well
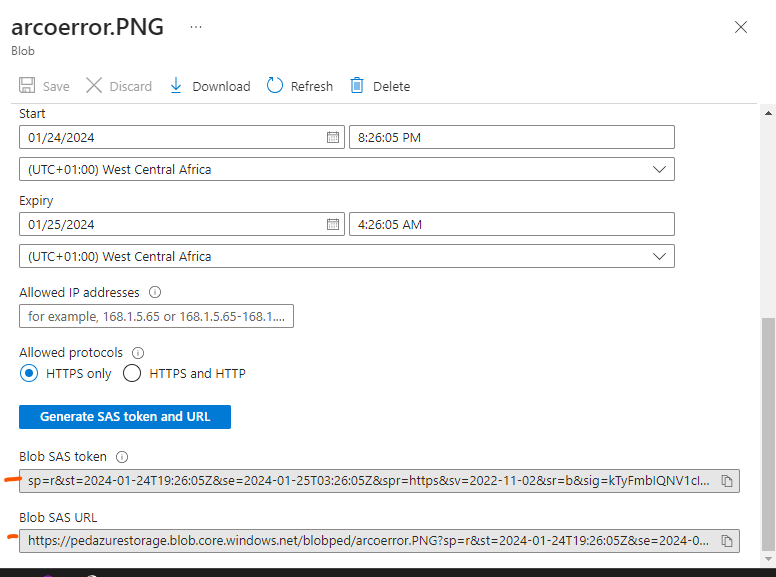
Copy the Blob SAS URL and access the content.
There you go! You are welcome.
Subscribe to my newsletter
Read articles from Pedetin Avoseh-Akoteyon directly inside your inbox. Subscribe to the newsletter, and don't miss out.
Written by
