Mastering File Handling in Node.js with Multer
 Keshav Aneja
Multer is a popular body-parsing middleware that is used to handle the content type of "multipart/form-data". It makes handling files in Node.js very easy. As Multer is as middleware, it can be added to specific routes to handle file uploads.
Without Multer, you would have to manually parse raw data yourself if you want to access files from your HTTP request. Multer processes the file and makes it available in the "req" object for further handling. So now you can access the file directly using the "req" object.
To use Multer, import it into your Node.js application. Now you have to define the storage configuration for the files in Multer, which will handle where the files will be stored. Use multer.diskStorage(). It takes an object as a parameter with two functions: destination and filename. These functions themselves take three parameters (request, file, callback). Now, using this, you can set the location where the files should be stored.
import multer from "multer";

const storage = multer.diskStorage({
  destination: function (req, file, cb) {
    cb(null, "./public/temp");
  },
  filename: function (req, file, cb) {
    cb(null, file.originalname + "_" + Date.now());
  },
});

export const upload = multer({ storage });
In this example, the destination is set as "./public/temp", which means that any file handled using Multer will be stored at this destination in the root folder of your project. You also have access to the original name of the file using file.originalname, but it is generally avoided to keep the same name as there is always a chance of duplicate names. To handle this, we add Date.now() to the original filename, which maintains uniqueness. By default, Multer will rename the file in case of any name conflicts.
Aside from disk storage, Multer also provides the option to store your file in memory storage, where you can access the file as a Buffer. This means that the file will not actually be stored on the disk. Multer also supports custom storage engines, where you can handle storage by yourself or with plugins like S3 or GCS.
It is recommended that after further processing of your stored file and uploading it to your storage platforms like Cloudinary or S3, you should delete the file from your local disk storage if it doesn't provide any further use. Otherwise, your application can run out of memory soon if you continue uploading files without deleting them.
For deleting the file, you can use the fs library built into Node.js. The File system provides the method unlink(localFilePath) to unlink the file.
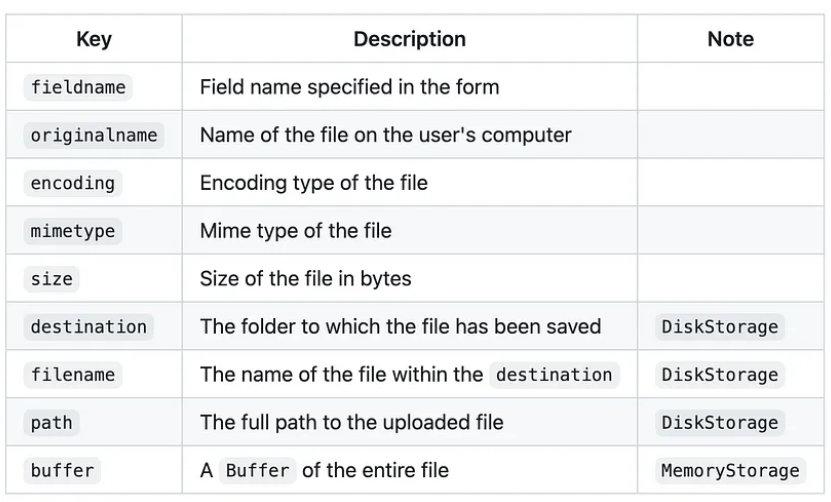
After setting up your configuration for storage, you create an instance of Multer by calling multer({storage}) and passing in the storage config. Now you can import this middleware in other scripts and use it as middleware to handle files. By using this, you will now have access to your files in the request object via req.file. Each file object contains the following information with it:

While using as a middleware in your route, you can very easily specify how you want to upload the files:
app.post("/", upload.single('avatar'), function (req, res, next) {})
//OR
app.post("/", upload.array('photos',10), function(req,res,next) {})
//OR
app.post("/", upload.fields([
    {
      name: "avatar",
      maxCount: 1,
    },
    {
      name: "coverImage",
      maxCount: 1,
    },
  ]),
function(req,res,next) {})
Multer can be easily configured to set file size limits, handle multiple files, or even validate the files. In conclusion, using Multer can streamline your task of handling files and save you valuable time.
Subscribe to my newsletter
Read articles from Keshav Aneja directly inside your inbox. Subscribe to the newsletter, and don't miss out.
Written by
