Day 3 - Basic Linux Commands
 Aakash
Table of contents


In this blog we will be learning and understanding some basic Linux Commands using suitable examples.
Commands:
To View what's written in a file:
For this we use the cat command. What it basically does is, it enters the file and print its content on the terminal.
cat <file_name>To change the access permissions of files.
File Permissions are permissions granted to a file in the order of Read(r), Write(w) and Execute(x). These permissions are granted to the Owners(u), Groups(g) and Others(o) respectively. Only those who have the appropriate permissions can perform tasks like read, write delete etc.
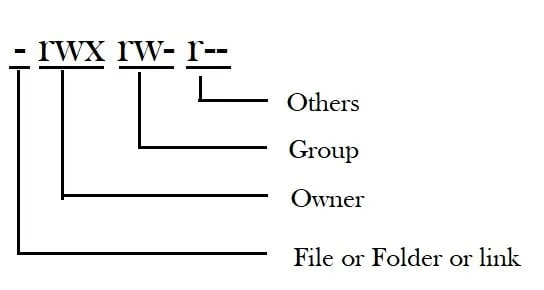
In the image above we can see that the user has all the permissions, the group has only read and write permission and others i.e. other users have only read permission that means they cannot write or execute any action with the file.
The Command for changing file permission is chmod i.e. change mode
chmod rwxrw-r-- <file_name>
Note: Only the current owner or Super User can change file permissions. For other user to change the permission.
There are other variations of File Permissions in Linux which we will cover in depth on Day 6.
To remove a directory/ Folder.
To remove any file and folder in linux, the command used is rm i.e. Remove, followed by the file or folder name.
rm <file_name>But there's a catch when we move forward to delete a directory/folder. The folder may contain some files, so using simply rm will not work. We have to remove the files as well that's inside the folder, so we need to use the -r flag along with rm command.
The -r flag stands for Recursive i.e. in simple words it will delete the files first and then the folder.
rm -r <folder_name>To check which commands you have run till now.
To check the history of commands that have been run on the the terminal, we type history and press enter. This will print all the commands that have been run on the screen.
history
To add Content in a file:
To add any content or edit a file we use vim editor. This editor helps us in editing the file inside the terminal.
vim <file_name>Once we enter the file, we can edit it as per our need. Press " i " as you enter the editor to enable editing mode or interactive mode.
Note: To exit the vim editor while saving your changes/edits, press esc first and then write :wq and press enter.
To View top or bottom few lines of a file:
To view the top few lines use the head command, followed by the number of lines you want to see and the name of the file.
To view the bottom few lines use the tail command.
head <file_name> -n n
tail <file_name> -n n
n: any integer
-n: flag used for taking input of the number
Scenario based Practice:
Scenario:
You find yourself in a virtual command-line environment, eager to embark on a coding adventure. First, you decide to create a file named fruits.txt to store your favorite fruits. How would you go about creating this file and adding the following fruits, each on a new line: Apple, Mango, Banana, Cherry, Kiwi, Orange, and Guava?
With your fruit list in place, you now want to explore some interactive operations. How would you view the content of fruits.txt to confirm that your fruits are all there? Once satisfied, how would you narrow down your favorite fruits to display only the top three?
Curiosity strikes, and you wonder about the bottom three fruits. How would you go about showing only the bottom three fruits from the fruits.txt file?
But the coding journey doesn't end there. Now, shift your focus to colors. How would you create a new file called Colors.txt and add the following colors, each on a separate line: Red, Pink, White, Black, Blue, Orange, Purple, and Grey?
Feeling up for a challenge, how would you find the difference between the contents of fruits.txt and Colors.txt files?
Now I want you to solve it by yourself and check the answers later below.
Creating a fruits.txt file
touch fruits.txtAdding each of the fruits on a new line.

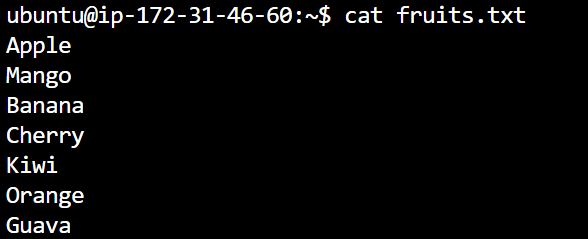
- Showing only top three fruits from the file.

- Showing only bottom three fruits from the file.

Creating another file Colors.txt .

Adding content in Colors.txt (One in each line) - Red, Pink, White, Black, Blue, Orange, Purple, Grey.
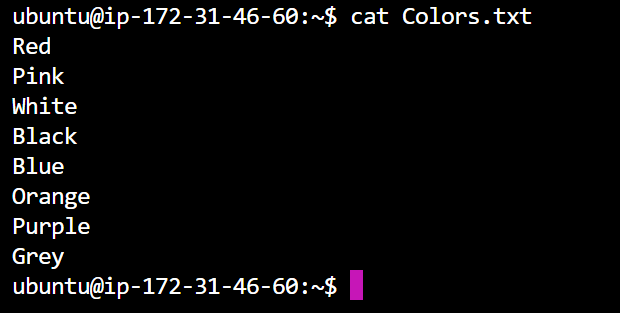
Finding the difference between fruits.txt and Colors.txt file
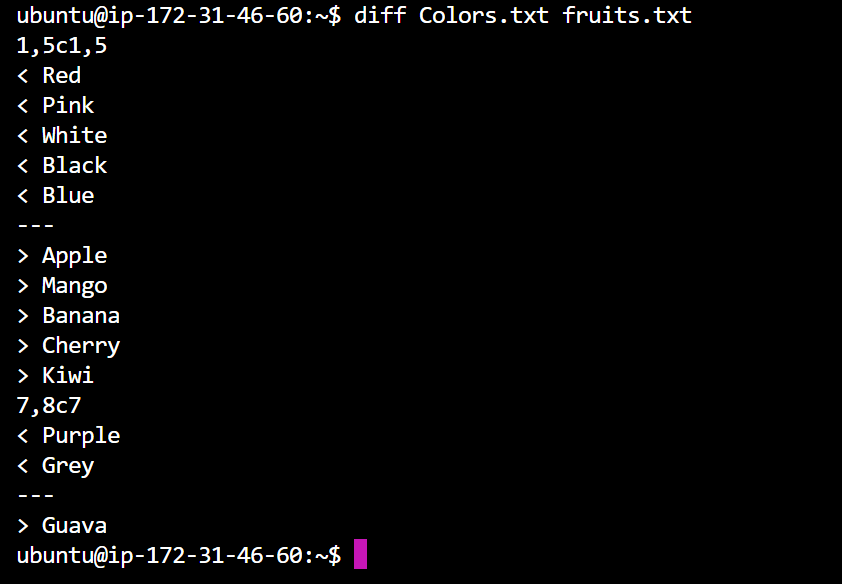
NOTE: This is only showing the differences in both the file. If you notice "Orange" was similar in both the files, so there's no Orange printed on the screen.
That's it for this blog and I hope this added value to your learnings. Ending this with a quote by Linus Torvalds:
That's what makes Linux so good: you put in something, and that effort multiplies. It's a positive feedback cycle.
Happy Learning.
Subscribe to my newsletter
Read articles from Aakash directly inside your inbox. Subscribe to the newsletter, and don't miss out.
Written by

Aakash
Aakash
🚀 Welcome to the world of DevOps with Aakash! 🌐 Hey tech enthusiasts! 👋 I'm Aakash, a dedicated freelance Linux System Admin @xFusionCorp, and I'm on a mission to conquer the world of DevOps. Currently, I'm immersed in building exciting projects and sharing my learning experiences with you all. 🛠️ My Tech Arsenal: Docker Linux Kubernetes Jenkins AWS Python Java Prometheus Grafana Ansible Terraform Join me in navigating the intricate realms of AWS DevOps technology. Let's embrace learning with gratitude and thrive in this ever-evolving landscape! 🤝 Connect with me for: Friendly chats Shared experiences Learning moments Follow my journey on Twitter and Linkedin for daily insights and tech goodness. Let's build, automate, and innovate our way through the exciting world of DevOps! 🚀 #DevOps #AWS #TechEnthusiast #InnovationJourney #90DaysOfDevOps