Day-11:AWS CloudFormation
 yasaswini dharmavaram
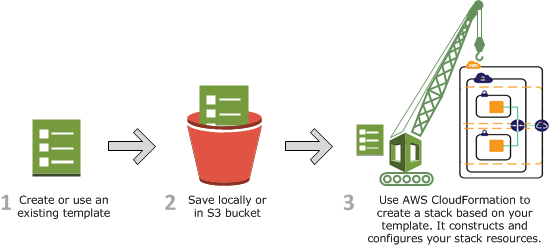
Cloud Formation is a tool or solution that enables you to manage AWS resources using a template file.AWS CloudFormation is a service that helps you model and set up your AWS resources so that you can spend less time managing those resources and more time focusing on your applications that run in AWS.
Templates
A CloudFormation template is a JSON or YAML formatted text file. You can save these files with any extension, such as .json, .yaml, .template, or .txt. CloudFormation uses these templates as blueprints for building your AWS resources. For example, in a template, you can describe an Amazon EC2 instance, such as the instance type, the AMI ID, block device mappings, and its Amazon EC2 key pair name. Whenever you create a stack, you also specify a template that CloudFormation uses to create whatever you described in the template.
Getting started with AWS CloudFormation
Step 1: Pick a template
First, you'll need a template that specifies the resources that you want in your stack. For this step, you use a sample template that's already prepared. The sample template creates a basic WordPress blog that uses a single Amazon EC2 instance with a local MySQL database for storage. The template also creates an Amazon EC2 security group to control firewall settings for the Amazon EC2 instance.
Step 2: Make sure you have prepared any required items for the stack
Before you create a stack from a template, you must ensure that all dependent resources that the template requires are available. A template can use or refer to both existing AWS resources and resources declared in the template itself. CloudFormation takes care of checking references to resources in the template and also checks references to existing resources to ensure that they exist in the region where you are creating the stack. If your template refers to a dependent resource that doesn't exist, stack creation fails.
Step 3: Create the stack
You will create your stack based on the WordPress-1.0.0 file discussed earlier. The template contains several AWS resources, such as an EC2 instance.
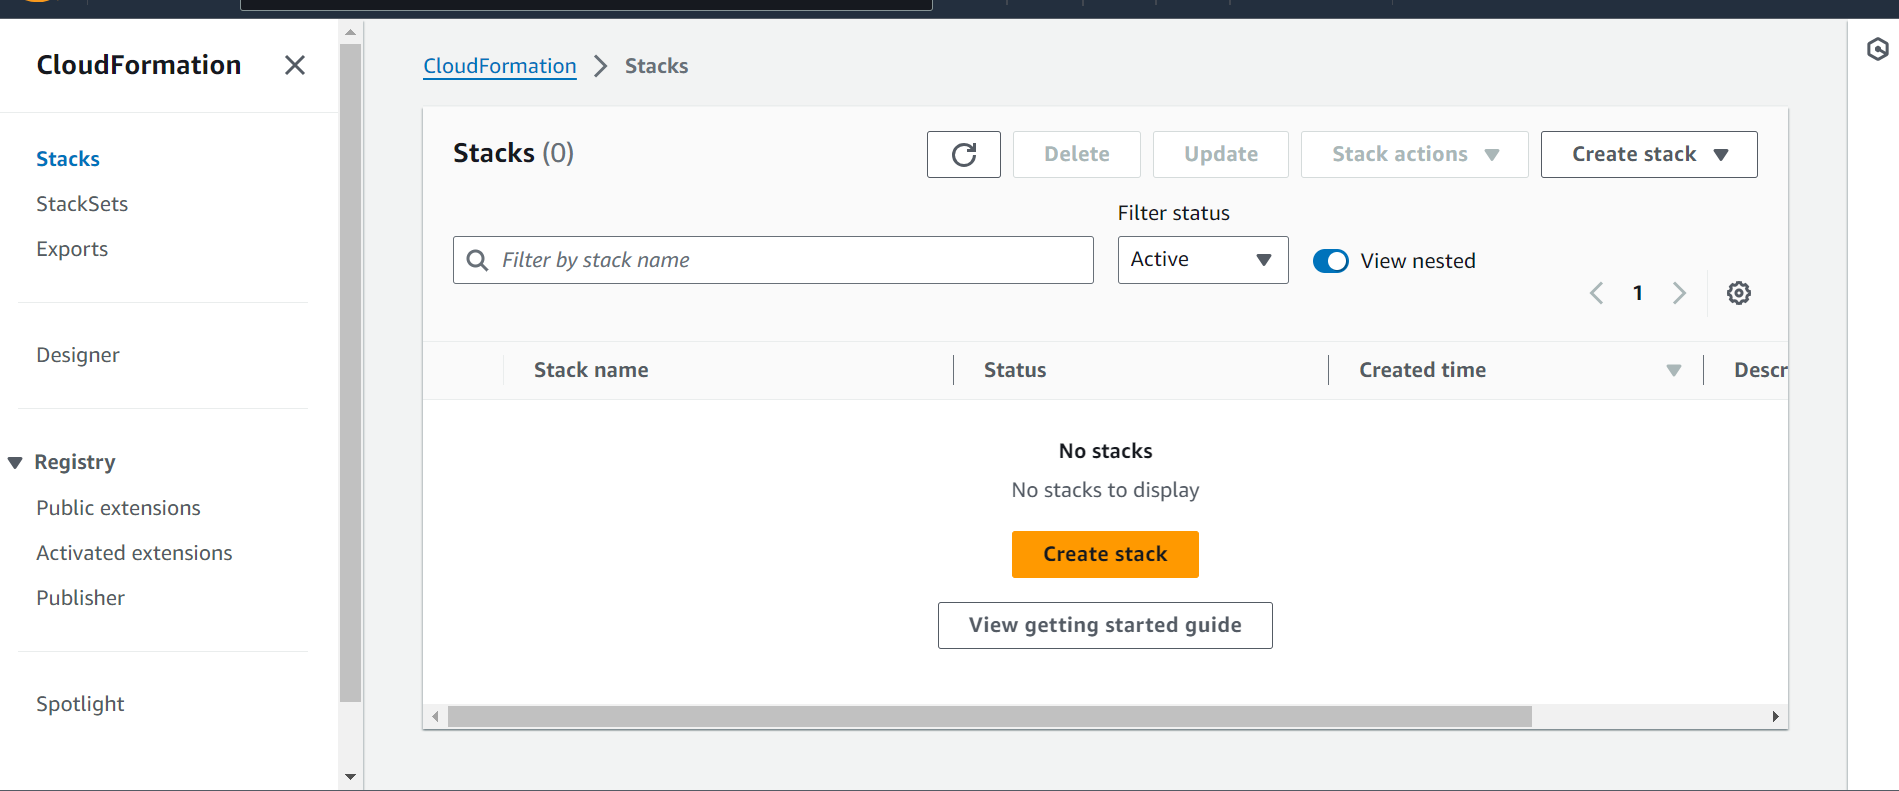
Sign in to the AWS Management Console and open the AWS CloudFormation console at https://console.aws.amazon.com/cloudformation.
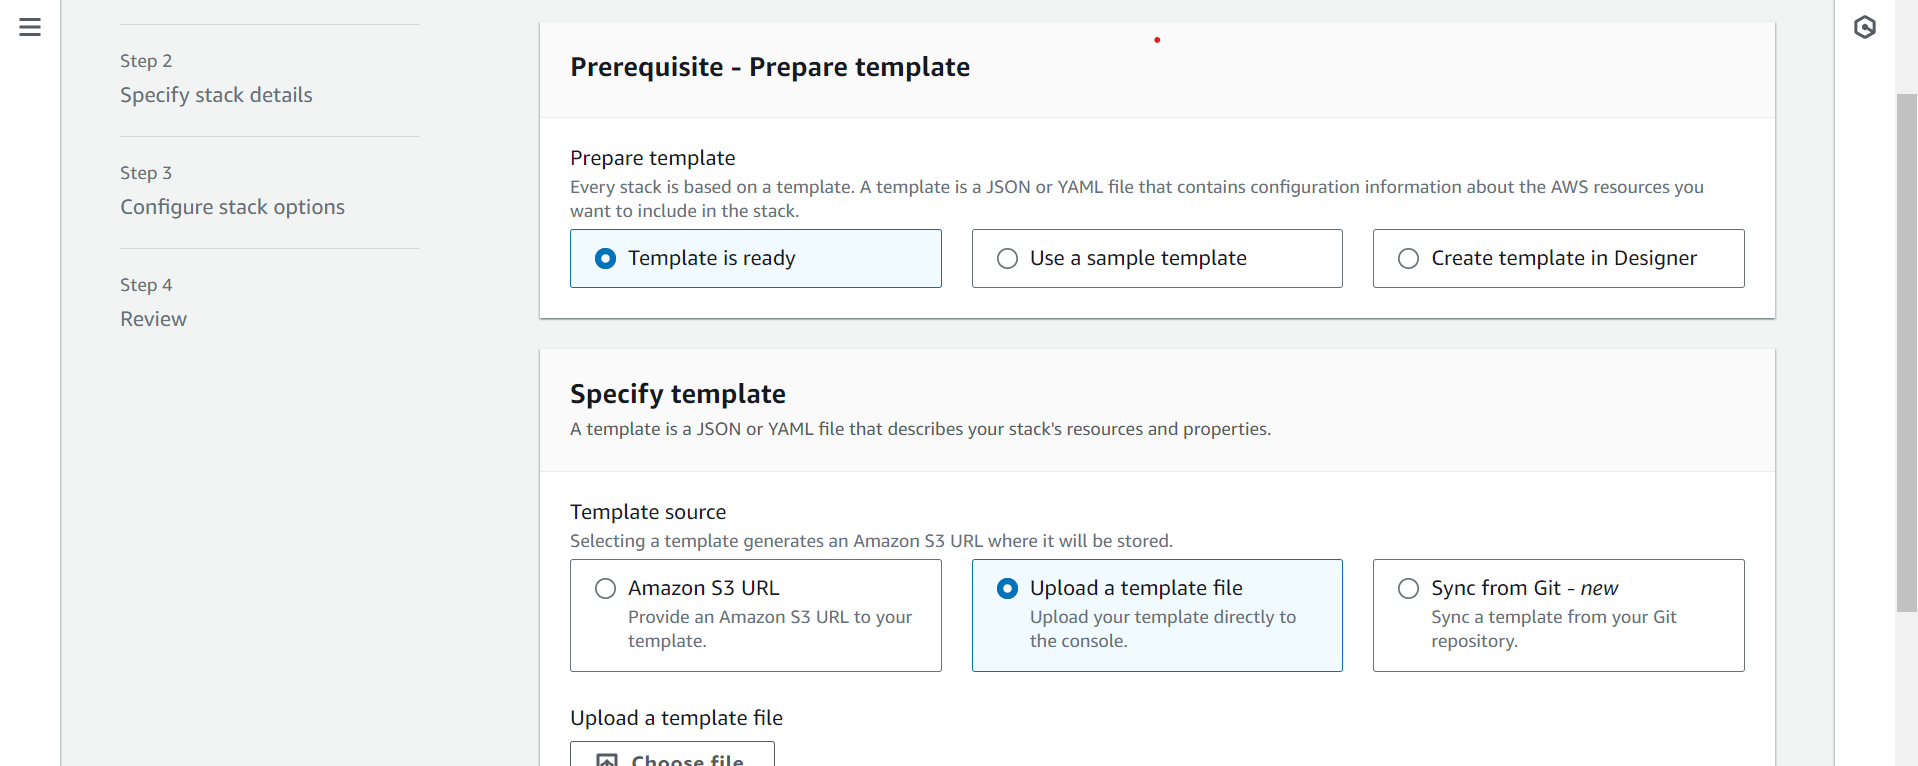
Choose Create Stack.
In the Specify template section, select Amazon S3 Template URL to type or paste the URL for the sample WordPress template, and then choose Next:
In the Specify stack details section, enter a name in the Stack name field. For this example, use
MyWPTestStack. The stack name can't contain spaces.In the Parameters section, you must provide values for all parameters that don't have default values, including DBUser, DBPassword, DBRootPassword, and KeyName. In the KeyName field, enter the name of a valid Amazon EC2 pair in the same region you are creating the stack.
Choose Next.
In this scenario, we won't add any tags. Choose Next. Tags, which are key-value pairs, can help you identify your stacks. For more information, see Adding tags to your CloudFormation stack.
Review the information for the stack. When you're satisfied with the settings, choose Submit.
Your stack might take several minutes to create – but you probably don't want to just sit around waiting. If you're like us, you'll want to know how the stack creation is going.
Step 4: Monitor the progress of stack creation
After you complete the Create Stack wizard, CloudFormation begins creating the resources that are specified in the template. Your new stack, MyWPTestStack, appears in the list at the top portion of the CloudFormation console. Its status should be CREATE_IN_PROGRESS. You can see detailed status for a stack by viewing its events.
To view the events for the stack
On the CloudFormation console, select the stack
MyWPTestStackin the list.In the stack details pane, choose the Events tab.
The console automatically refreshes the event list with the most recent events every 60 seconds.
The Events tab displays each major step in the creation of the stack sorted by the time of each event, with latest events on top.
The first event (at the bottom of the event list) is the start of the stack creation process:
2013-04-24 18:54 UTC-7 CREATE_IN_PROGRESS AWS::CloudFormation::Stack MyWPTestStack User initiated
Next are events that mark the beginning and completion of the creation of each resource. For example, creation of the EC2 instance results in the following entries:
2013-04-24 18:59 UTC-7 CREATE_COMPLETE AWS::EC2::Instance...
2013-04-24 18:54 UTC-7 CREATE_IN_PROGRESS AWS::EC2::Instance...
The CREATE_IN_PROGRESS event is logged when CloudFormation reports that it has begun to create the resource. The CREATE_COMPLETE event is logged when the resource is successfully created.
When CloudFormation has successfully created the stack, you will see the following event at the top of the Events tab:
2013-04-24 19:17 UTC-7 CREATE_COMPLETE AWS::CloudFormation::Stack MyWPTestStack
If CloudFormation can't create a resource, it reports a CREATE_FAILED event and, by default, rolls back the stack and deletes any resources that have been created. The Status Reason column displays the issue that caused the failure.
Step 5: Use your stack resources
When the stack MyWPTestStack has a status of CREATE_COMPLETE, CloudFormation has finished creating the stack, and you can start using its resources.
The sample WordPress stack creates a WordPress website. You can continue with the WordPress setup by running the WordPress installation script.
To complete the WordPress installation
On the Outputs tab, in the WebsiteURL row, choose the link in the Value column.
The
WebsiteURLoutput value is the URL of the installation script for the WordPress website that you created with the stack.On the web page for the WordPress installation, follow the on-screen instructions to complete the WordPress installation. For more information about installing WordPress, see https://wordpress.org/support/article/how-to-install-wordpress/.
After you complete the installation and log in, you are directed to the dashboard where you can set additional options for your WordPress blog. Then, you can start writing posts for your blog that you successfully created by using a CloudFormation template.
Step 6: Clean up
You have completed the CloudFormation getting started tasks. To make sure you aren't charged for any unwanted services, you can clean up by deleting the stack and its resources.
To delete the stack and its resources
From the CloudFormation console, select the
MyWPTestStackstack.Choose Delete Stack.
In the confirmation message that appears, choose Yes, Delete.
The status for MyWPTestStack changes to DELETE_IN_PROGRESS. In the same way you monitored the creation of the stack, you can monitor its deletion by using the Event tab. When CloudFormation completes the deletion of the stack, it removes the stack from the list.
Congratulations! You successfully picked a template, created a stack, viewed, and used its resources, and deleted the stack and its resources. Not only that, you were able to set up a WordPress blog using a CloudFormation template.
Subscribe to my newsletter
Read articles from yasaswini dharmavaram directly inside your inbox. Subscribe to the newsletter, and don't miss out.
Written by
yasaswini dharmavaram
yasaswini dharmavaram
Hey Folks! Am Yasaswini, DevOps and OpenSource Enthusiast. Currently am doing LearnInPublic and BuildInPublic.