Introducing gitHash - Let's utilize the power of : 'git push'
 Rajesh Khadka
Table of contents
- Project Introduction 🙋♂️
- Inspiration, idea, and problem : 🧐
- Demo of the website : 💻
- Demo Video : 📺
- Features of application : ⚙
- What if you want to publish your own markdown instead of publishing the the auto generated md by our application which includes all the commit details ?
- What if you want to skip publishing article but still want to push the change to repo ?
- Access to Dashboard to track the publishing process :
- Inside the dashboard user can :
- How gitHash works ? 💁♀️
- Use cases of this app : 👥
- How to use gitHash ?🔁
- How did I build the application ?
- Yaml script used :
- Future plans :
- What I learned : 💡
- Important links : 🔗
- Resources that helped me 🎁
- Final Words : 🎙
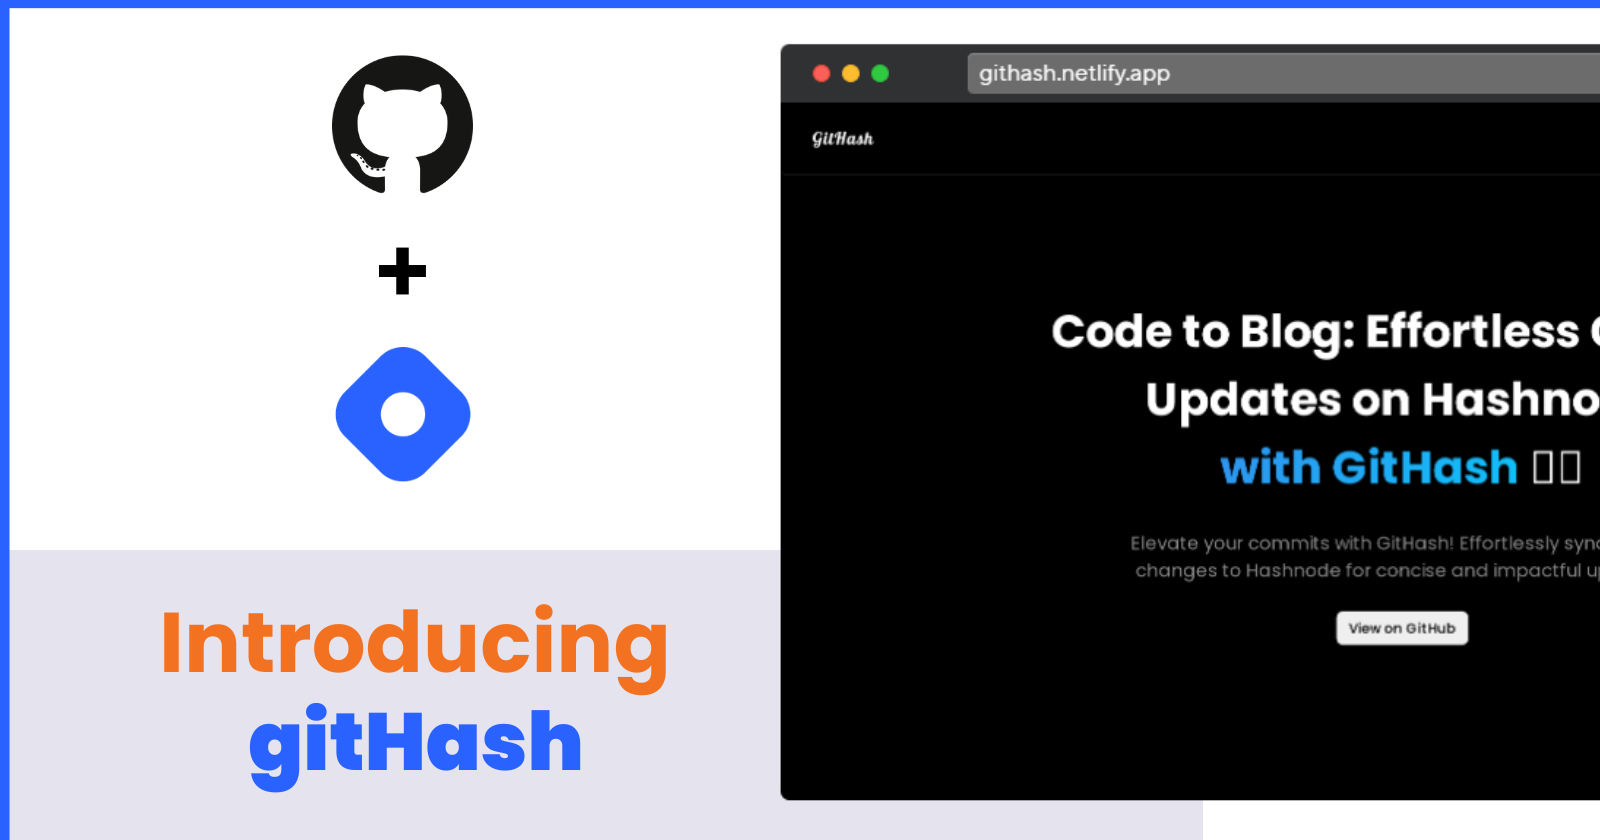
Project Introduction 🙋♂️
GitHash is an open-source web application licensed under MIT that harnesses the power of GitHub actions and gitHub API to effortlessly publish articles on Hashnode. With GitHash, you can seamlessly share detailed insights into your latest commits on GitHub, highlighting changes made, files added or deleted, and showcasing the actual code modifications. (Perfect for those who want to share their project progress to their audience.)
Furthermore, GitHash offers the flexibility to configure and publish your custom markdown file (markdown.md) after each repository push. To get started, simply connect your Hashnode account to GitHash, and let GitHash handle the publishing process for your desired repository.
I'll be exploring the inner workings of this application in the upcoming section of this blog.
Inspiration, idea, and problem : 🧐
While exploring Hashnode, I encountered potential app ideas, yet I found myself uncertain about which elements to include. Following some brainstorming, the idea of automating the blog-sharing process emerged. Let's harness the capabilities of 'git push' .
The main idea is : 👇
You can publish article in two ways :
Option 1 : -> Handing over all the responsibilities to gitHash, where your task is to push changes to the repository as you would do on any regular day.
Option 2 : -> Specify the custom markdown file [markdown.md] at the root of repo and then proceed with pushing it to the repo.🚀
Note : I will be explaining both of these methods in the Features section of this blog.
Demo of the website : 💻
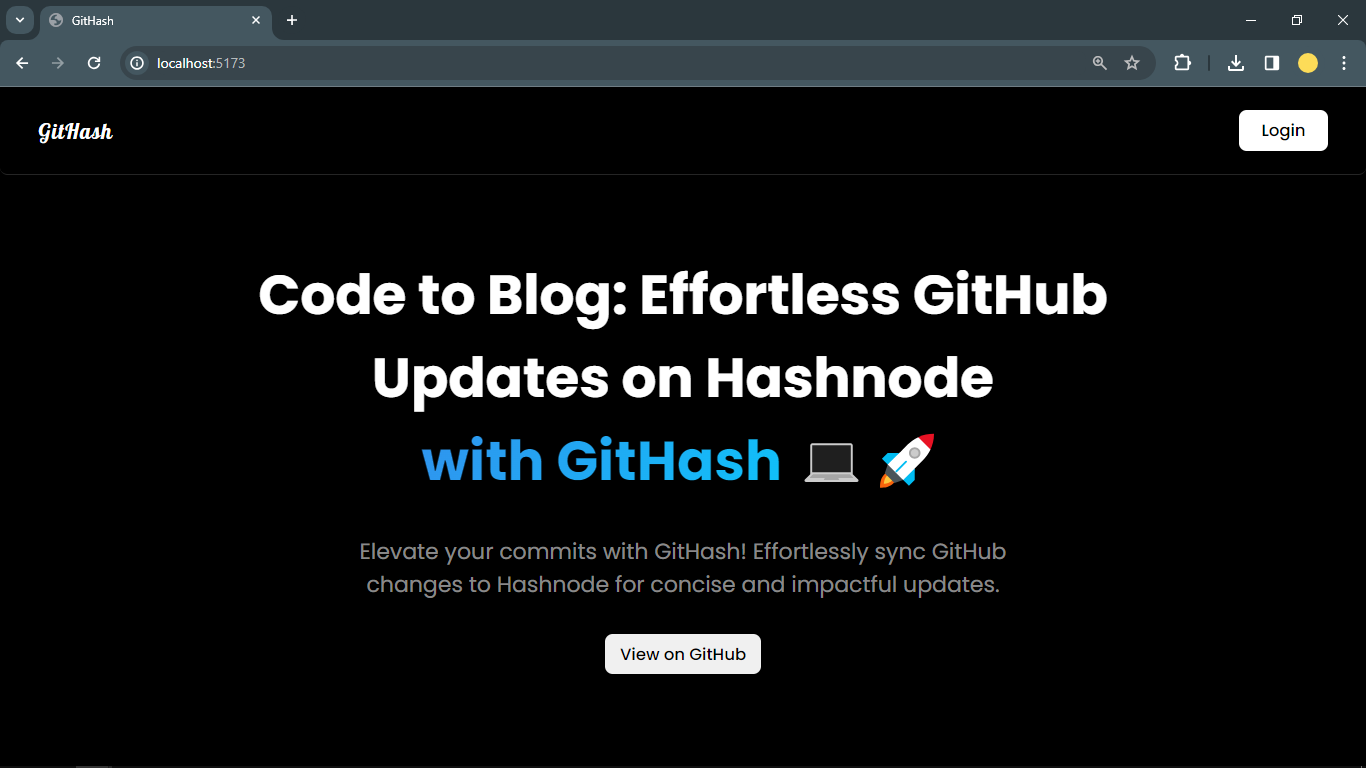
Home Page :
When you go to GitHash's website, the first thing you see is some text and buttons. You can login using your Google account. There is also a button that has a link to the app's GitHub repository.
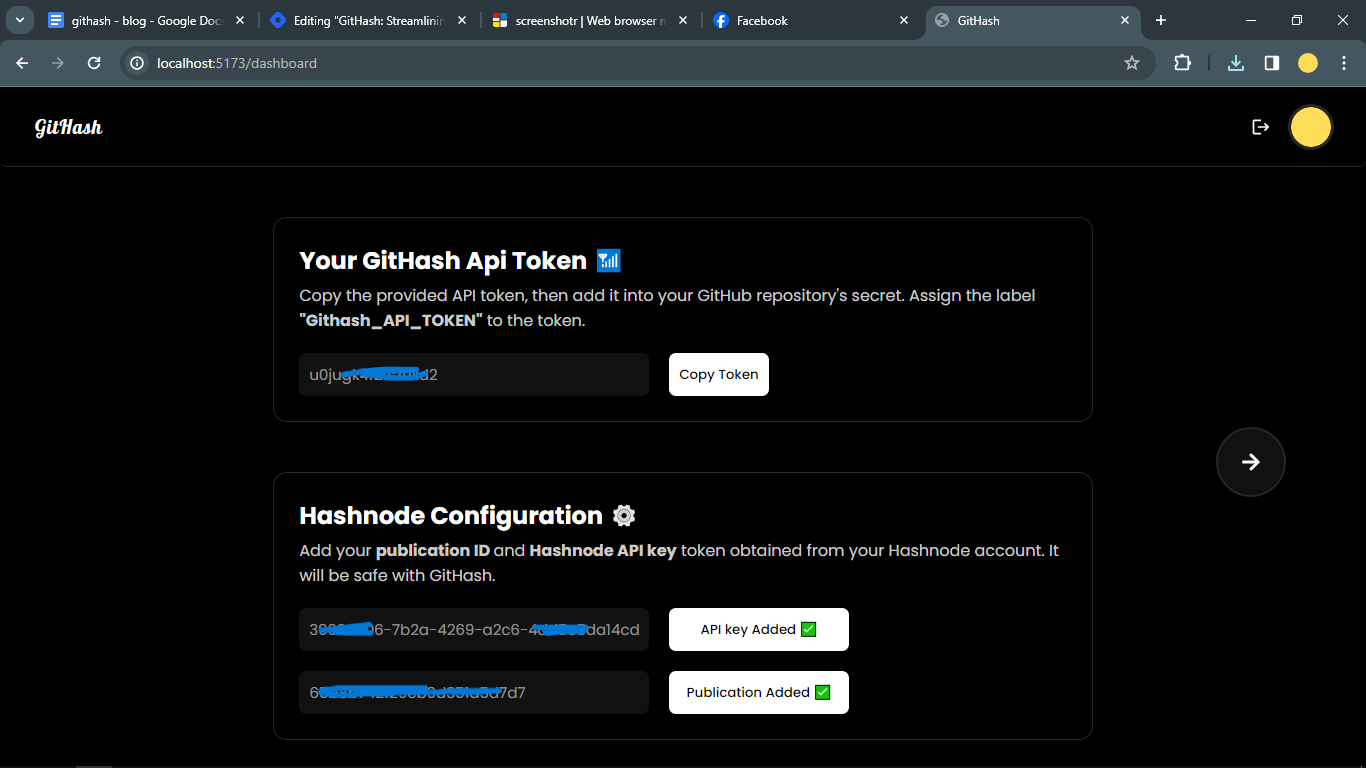
Setup credentials page :
This is the page where you need to add your Personal Access Token (PAT) and the Publication ID of your Hashnode account.
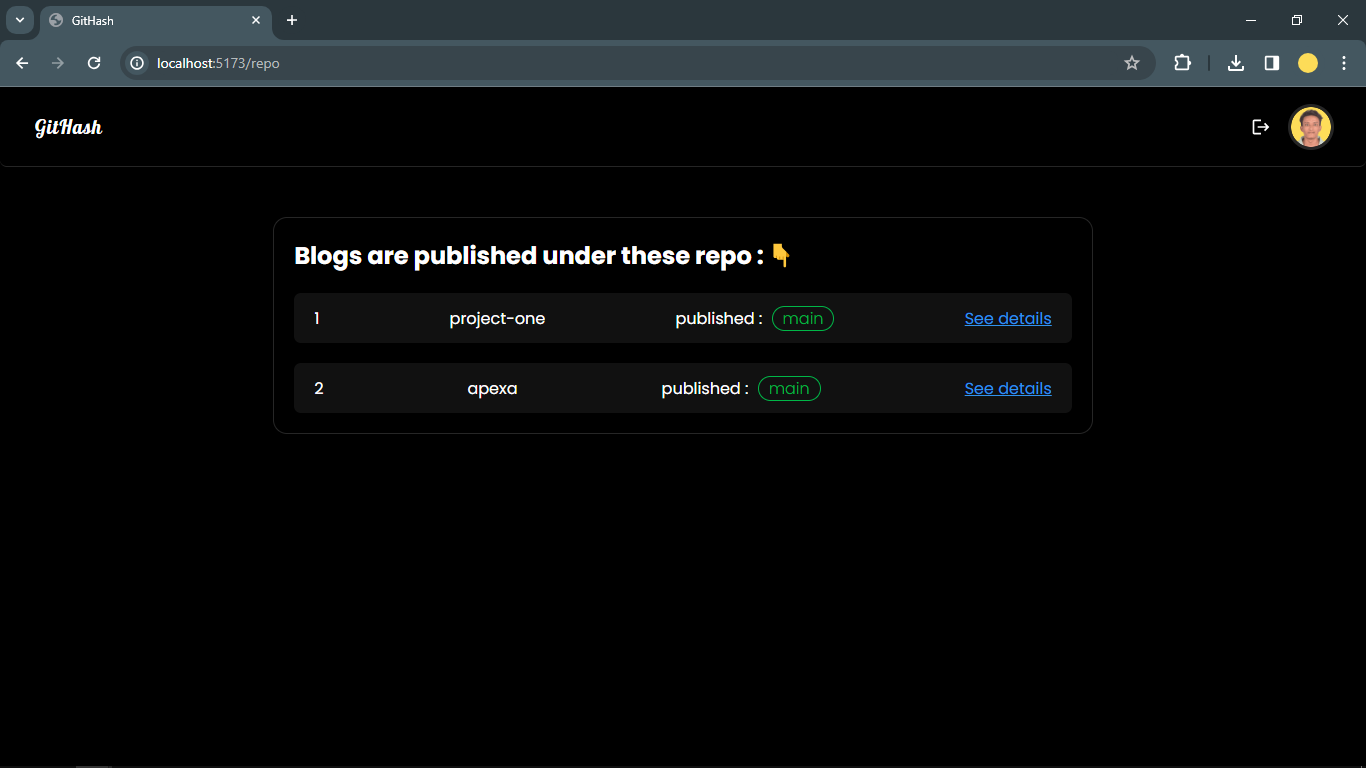
Repo Tracks :
Here you can find all of your repository under which the blogpost are published after successfully committing the changes into the desired github repo. Additionally, you'll find a "See All" button to access more details.
Blogs under specific repo :
Here, you can discover all of your blogposts published within a particular repository. The list includes the
commit messagealong with its correspondingblog post.
Demo Video : 📺
Features of application : ⚙
Well, the application starts working when user hits git push to the desired repo.
The main function of this application is to look after the user latest commit inside the user selected repo. Then, utilizing the gitHub api to get all the information related to the latest commit. Then, generating the markdown based on the commit and publish the article to the hashnode. (This is pretty straight forward.)
BUT :
What if you want to publish your own markdown instead of publishing the the auto generated md by our application which includes all the commit details ?
-> It is not mandatory to publish an article with commit details (such as code changes, file modifications, additions, deletions) every time you push to the repository. However, you have the option to publish your own markdown file. Simply add a markdown[.]md file to the root of the repository and include the specific phrase "my md" in the commit message while pushing into repo.

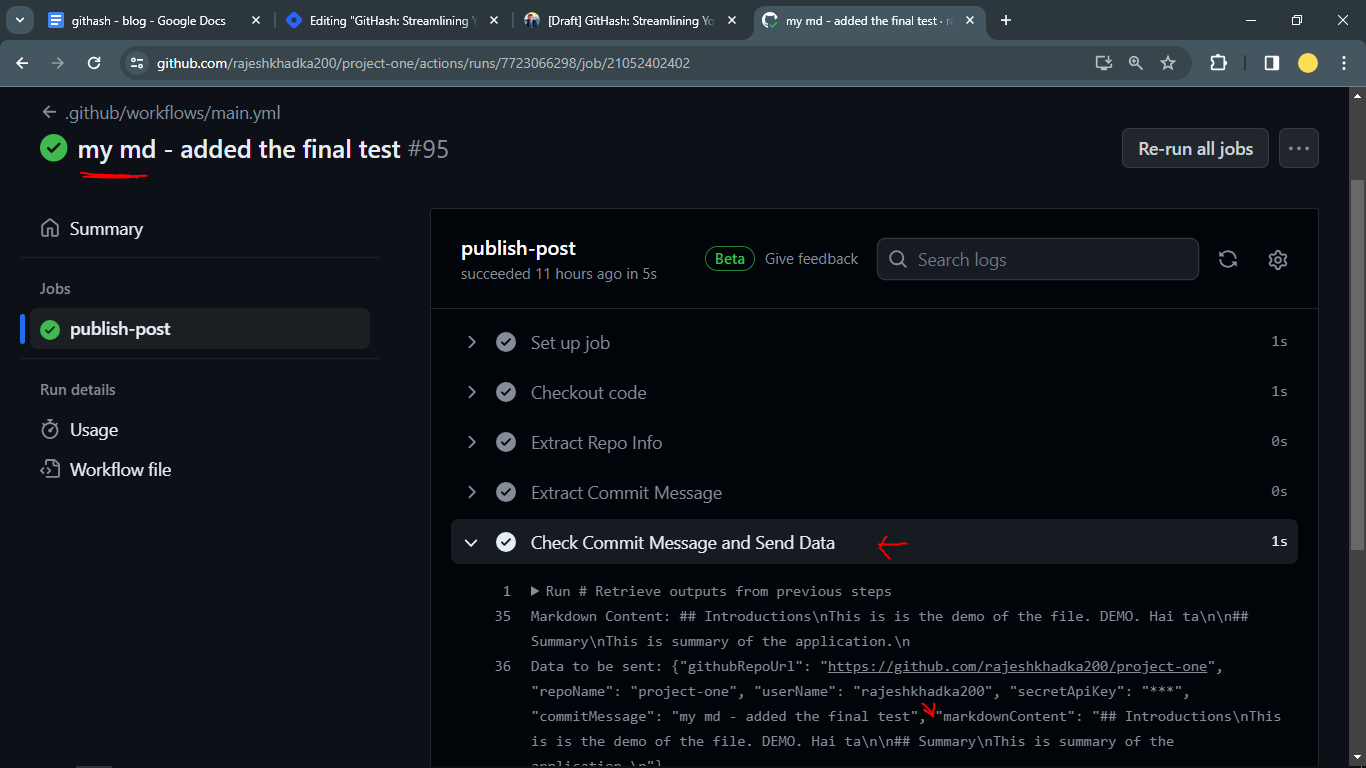
Then workflow starts reading the markdown file located at the root of the repo.👇
What if you want to skip publishing article but still want to push the change to repo ?
-> Publishing the article with every commit to the repository is not obligatory. You have the flexibility to skip the publishing step. When providing the commit message, include the specific phrase
"avoid publish"and GitHub actions will handle your choice accordingly.
Access to Dashboard to track the publishing process :
-> Well it's not only about triggering the actions. It's necessary to get the update Whether the blogpost is published or not for better user experience. So, I made a minimal dashboard in order to keep the tracks and identify under which repo articles are published.
Inside the dashboard user can :
Add the hashnode credentials. (PAT and Publication Id)
View the tracked repos
View the published blogpost under the specific repo.
How gitHash works ? 💁♀️
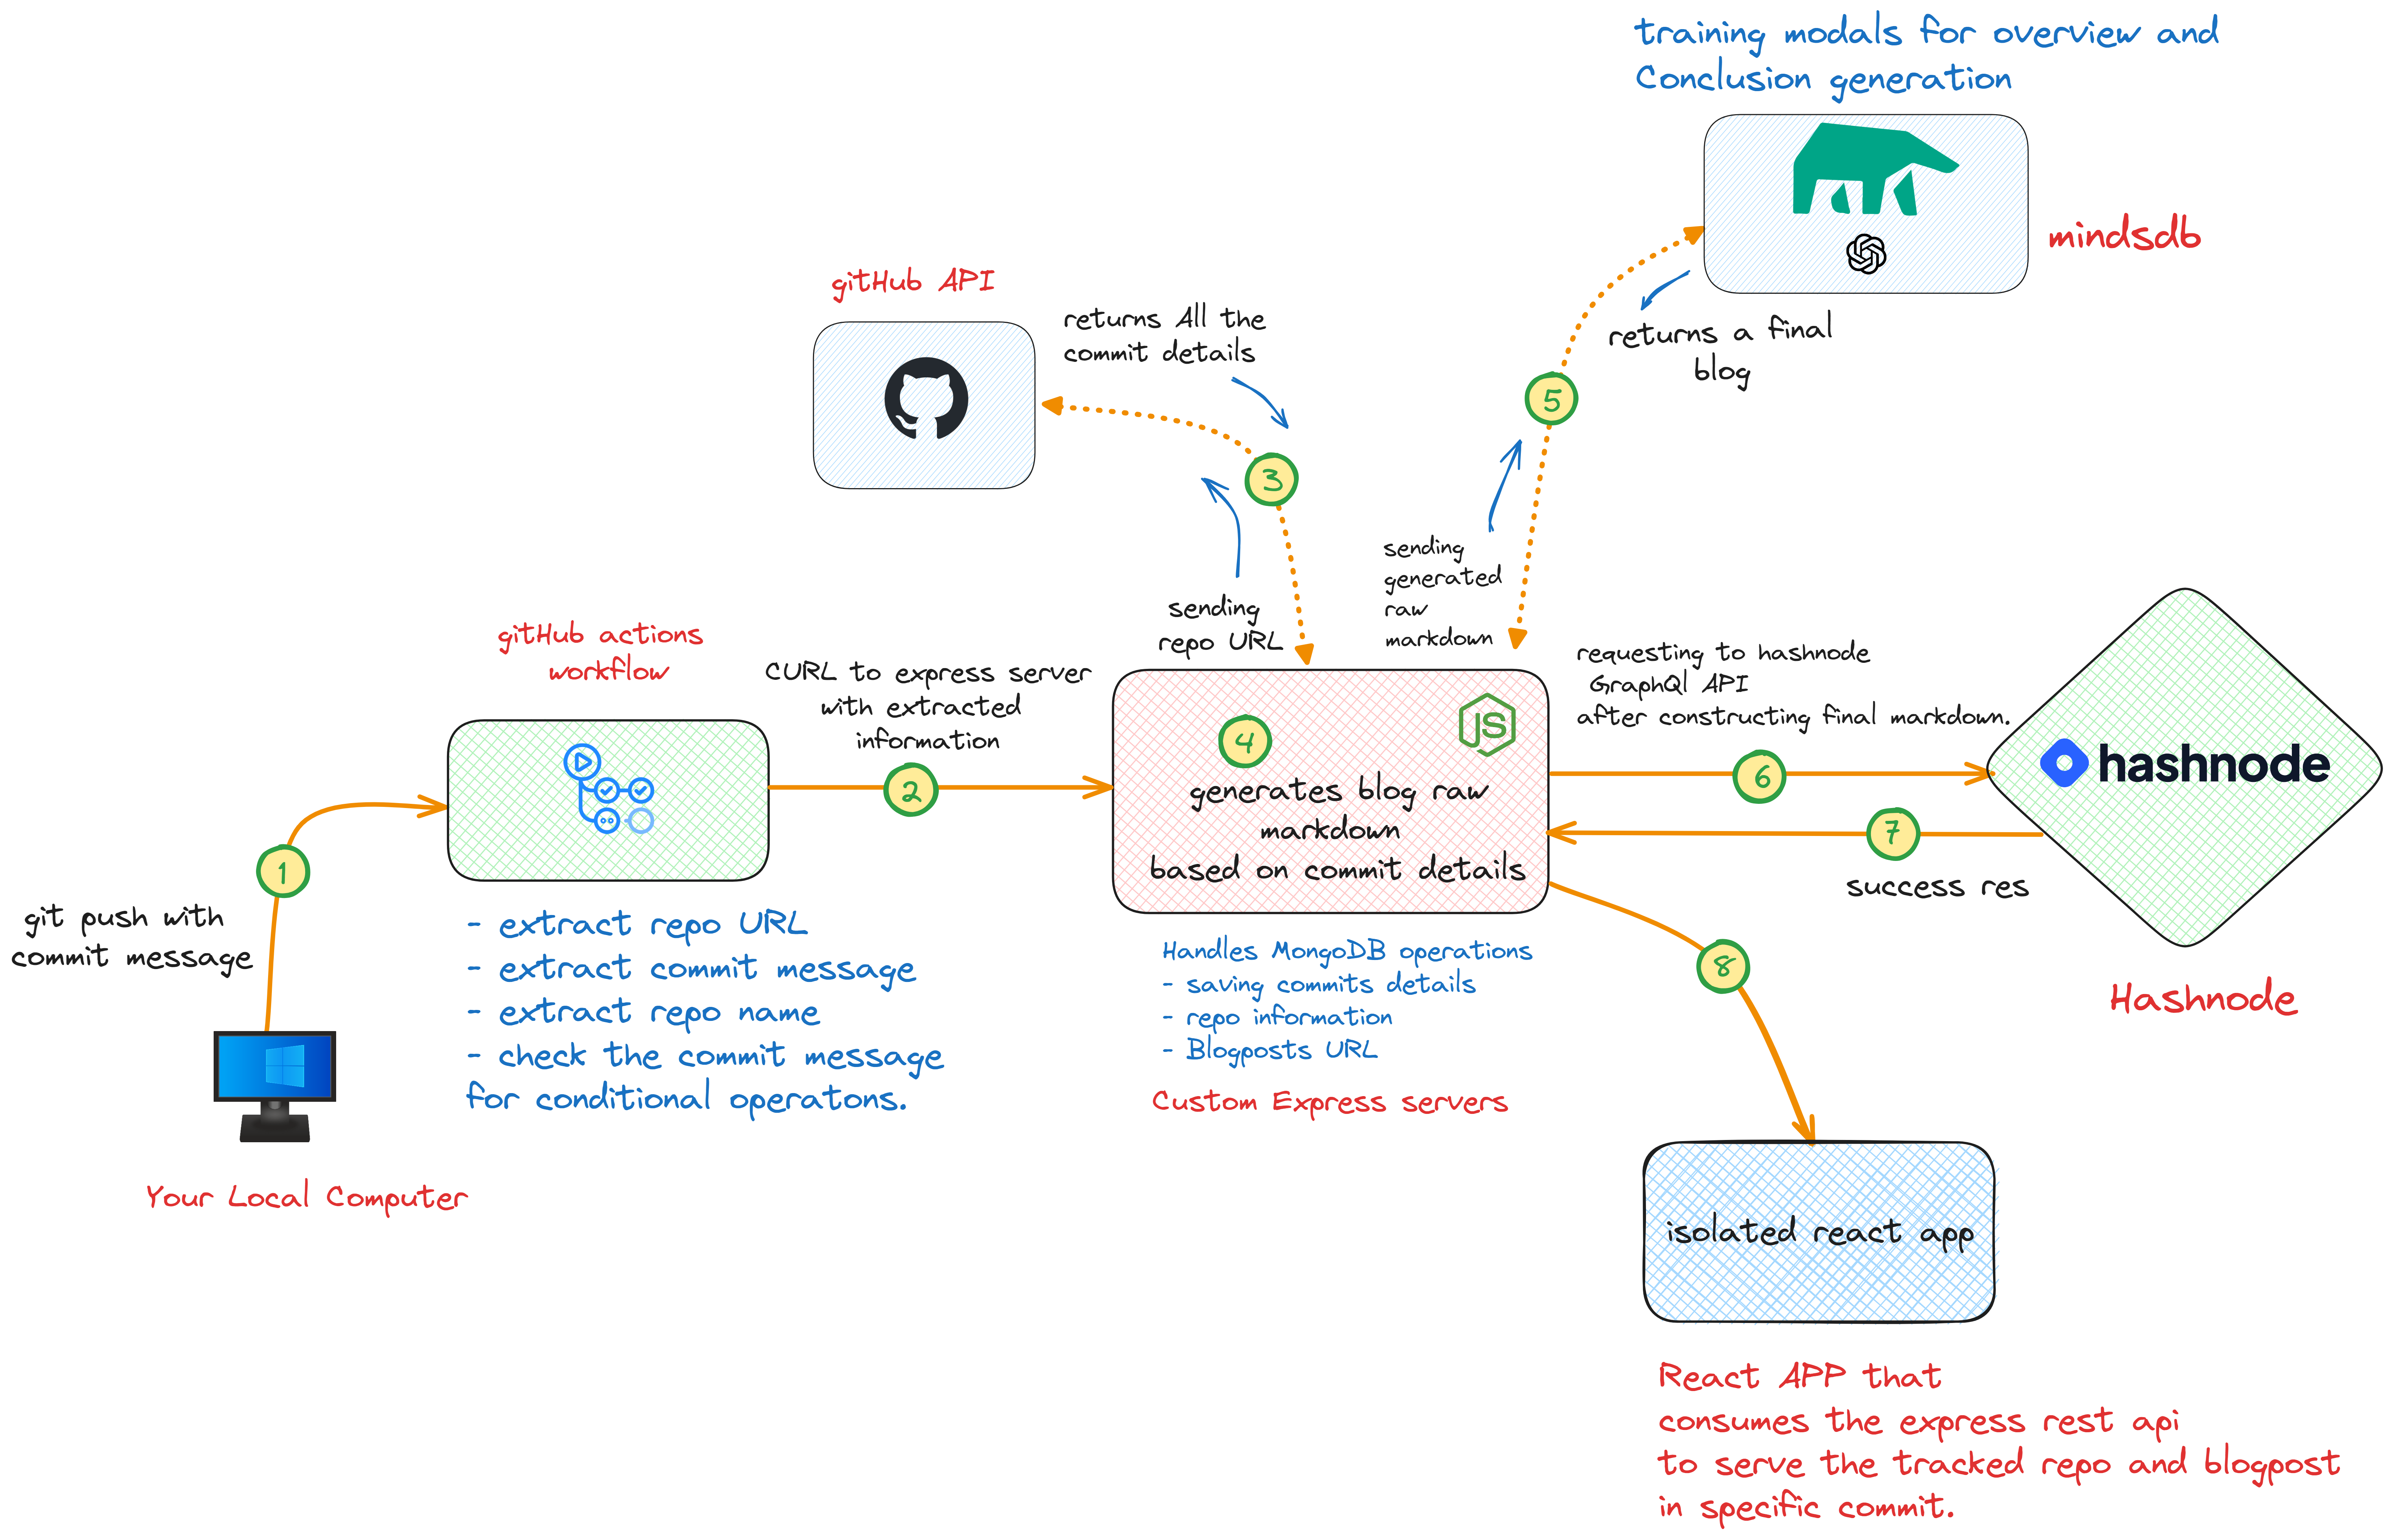
Conclusion :
Git push with commit message ->
git commit -m"added the changes"andgit pushTriggers the github action -> It extracts all the commit information and send it to the express server (commit name, repo URL, gitHash token from repo secrets)
Express server gets the repo information sent from actions into the
req.bodyThen, Express server sends req to Github api with the github URL.
Github api returns the information for latest commit details.
Express server craft the raw markdown based on commit details.
Then, Express server sends the crafted raw markdown to mindsdb model.
Model returns the fully fleshed markdown.
Then finally, Express server req to hashnode graphql api along with fully fleshed markdown to
PublishPostmutation.Then, React App consumes the rest api to showcase the tracked repo along with the blogpost in respective commits.
Note: This architecture is applicable if the user wants to publish the article including the commit details (fetched from the github api). If User wants to publish own markdown then the github api and mindsdb part are excluded from the architecture diagram. Rest of the process is same.
View the Architecture more clearly : 👉 Here.
As the MindsDB Cloud Editor is currently unavailable for use so I have utilized its local Python installations to conduct testing on my local machine. However, when publishing the application, I chose to comment out the section that involves MindsDB.
Use cases of this app : 👥
Craft the project documentation : Developers have the ability to create project documentation and choose when to share it with their audience. This involves adding a markdown (.md) file to the working repository. As developers implement new features into the project, they can update the markdown file locally and make a final push when the project is completed, ultimately publishing a comprehensive article on Hashnode.
How to use gitHash ?🔁
In this section, I will provide a brief overview of the necessary steps to utilize this application.
Visit website : Head towards the gitHash website.
Login : Authenticate via Google account.
Add GitHash Token: Include the GitHash token (generated by the application) in the repository secrets labeled as
Githash_API_TOKEN.Add Hashnode Credentials : Connect GitHash with Hashnode by adding the
publication IDandPersonal Access Token.Workflow Setup: Add the provided YAML script to the your repository actions inside 👉
(.github/workflows)Push Changes: Test the application functionality by making changes to your codebase, adding a commit message, and pushing changes to the repository.
(In case you want to publish the custom markdown, just prepare your markdown file and push to the repository including "my md" phrase anywhere in the commit message).The moment you hit the command "git push" , the github actions running in your repository starts working for you, based on your commit message.

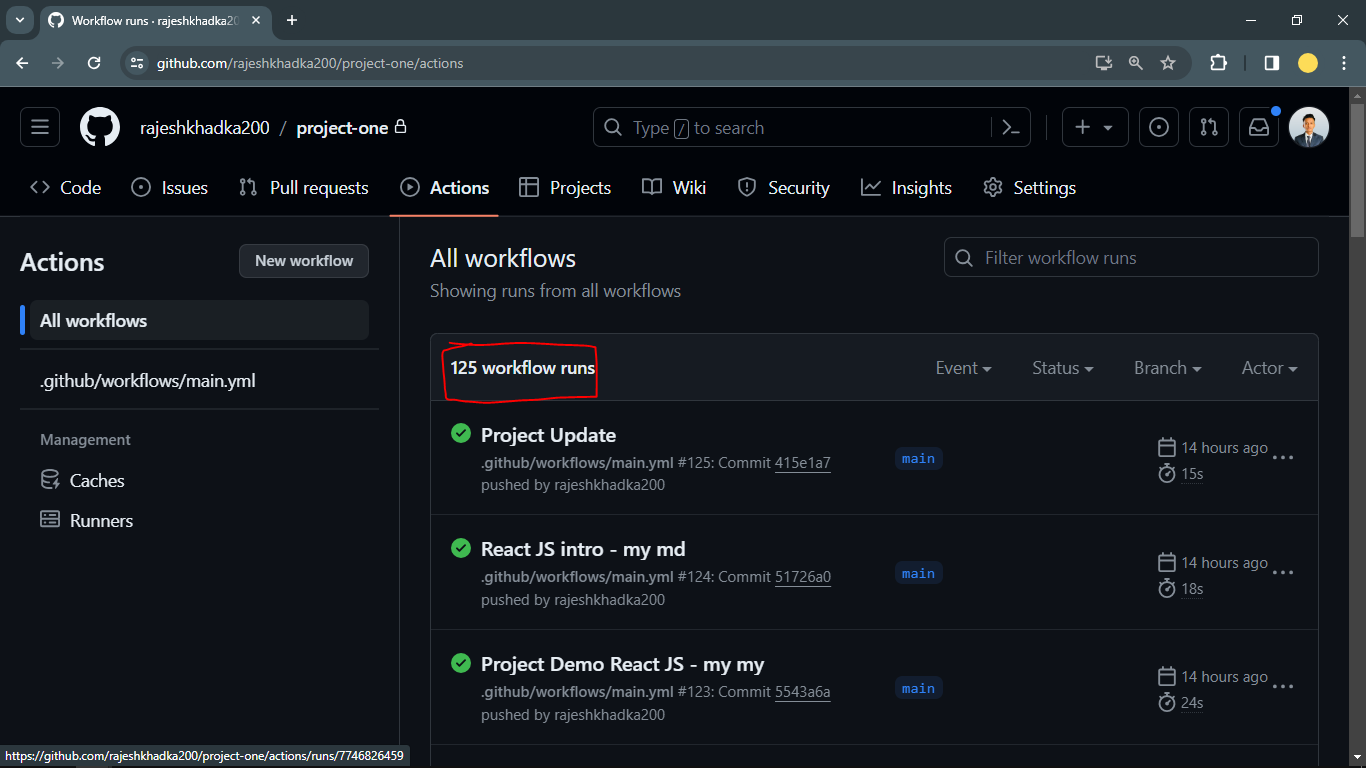
In the above screenshot the commit message is "my md - added the final test". It includes "my md" inside the commit message. So, gitHub action read the custom markdown file present at the root of the repo and curl to express server.
How did I build the application ?
I used react js for frontend, express for backend, mongodb for database and github actions to automate the flow.
Tech Stack used : 👩💻
Development :
React JS -> Frontend
MongoDB Atlas -> For mongoDB database
Express JS -> For Rest API
Mindsdb -> For generating overview and summary from the markdown.
Github API -> For getting the details of latest commit.
Hashnode GraphQL API -> To communicate with hashnode to perform mutations.
Ngrok -> To expose the local express server to the public in order to use it in the github action. (As, it is not possible to curl to express server running on localhost from workflow.)
Deployment :
Netlify -> To deploy frontend.
Render.com -> To deploy backend.
Process :
No, it's not a whole tutorial here on how to make the whole website. Better you can think of it as a general idea and steps.
1.🏠 Frontend : I am quite familiar with react so it wasn't that hard to start. I started with create-vite-app. And I have written some custom CSS also.
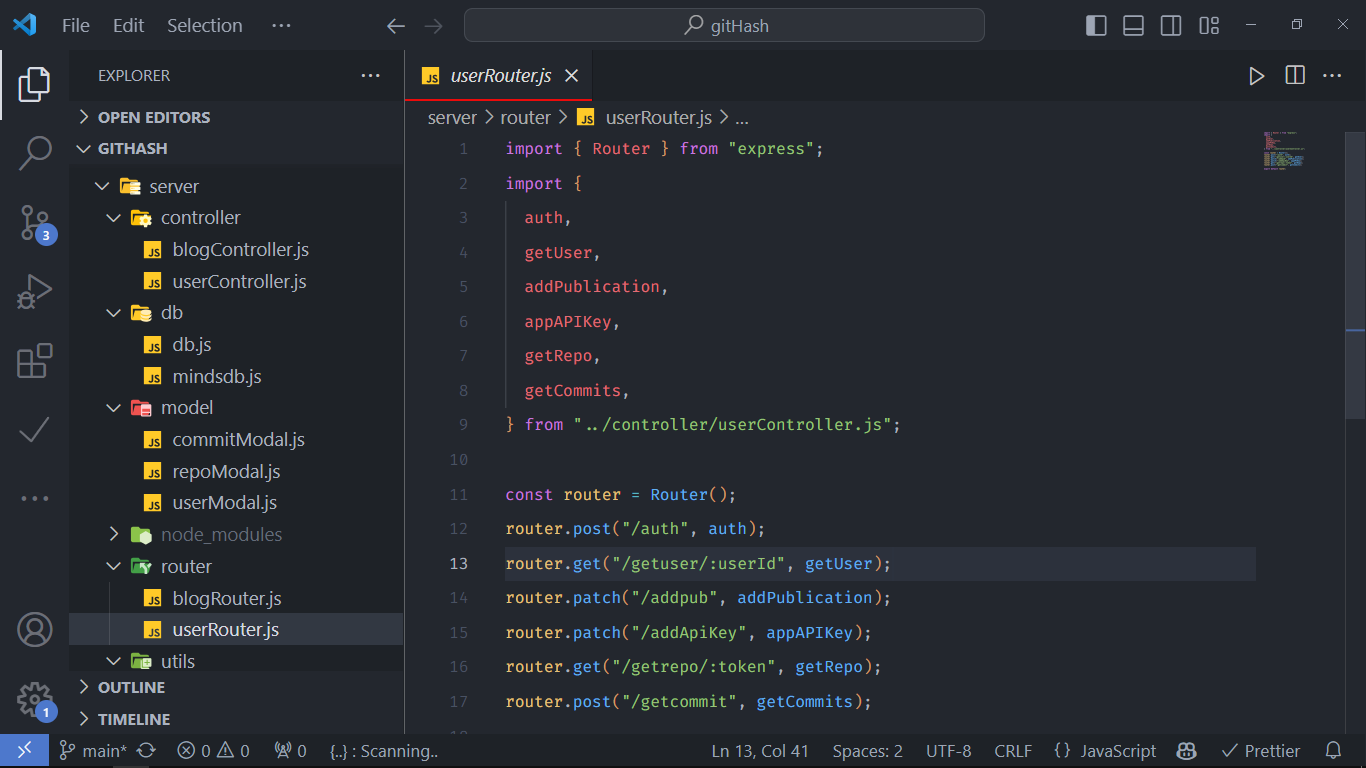
2.📝 Rest API : As I was creating the frontend, somehow I had to communicate with the backend. So, I created an express server to listen on port 5000 and when I hit different endpoints. I was able to perform different tasks.
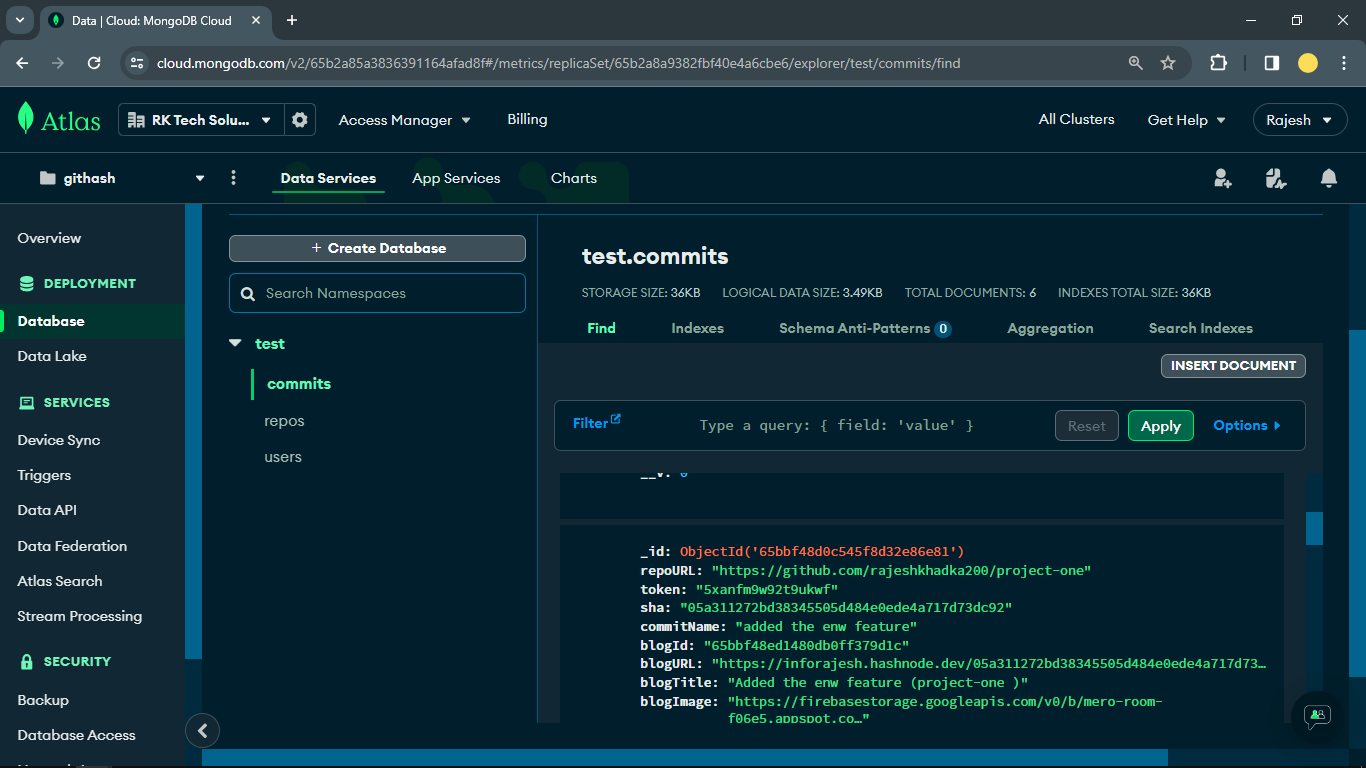
3.🛢️ Setting Database : I used mongoDB, if I have to be more specific, I used mongoDB atlas to store the information related to the user, repo and commits with respective blogpost. I made different models and only allowed the server to communicate.
4.🔁 Configuring GitHub workflow in Actions : This task was challenging as I was new to it. After numerous unsuccessful attempts 😓, I finally created the YAML action file.
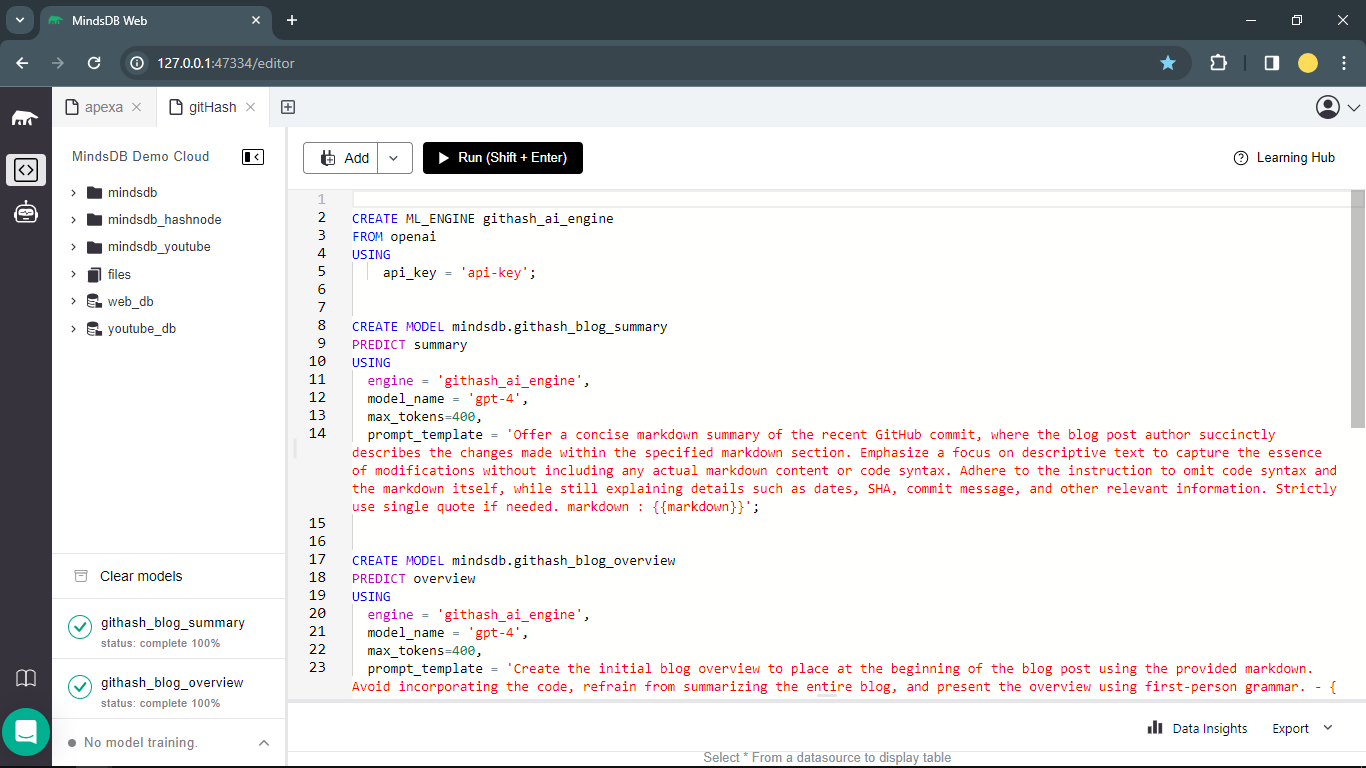
5.🐘 Setting up mindsDB : I have used mindsdb to generate the blog summary and blog introduction to attach it into the final markdown in the hashnode.
Yaml script used :
If I elaborate on the entire YAML file here, the article's length will unnecessarily extend. Therefore, I will provide a concise overview of the YAML scripts utilized during the hackathon period. 👉 (Full Explanation).
Brief Explanation :
The YAML file configures a GitHub Actions workflow triggered on each push to the main branch. Workflow contains extracting repository information (URL, name, username), and extracting the commit message from the latest commit.
Additionally, it checks the commit message for specific keywords, and based on conditions, it sends data including repository details, commit message, repository secrets and, if applicable, markdown content to a backend API for further processing. The workflow handles scenarios where certain commit messages trigger skipping the publishing process.
-> I plan to release this action on the GitHub Marketplace as soon as my hectic semester exams are over. 😅
Actual Script :
# Trigger the workflow on each push to the main branch
on:
  push:
    branches: [main]

# Define the jobs to be executed
jobs:
  # Job for publishing the blog post
  publish-post:
    # Operating system for the job
    runs-on: ubuntu-latest

    # Steps to be executed in the job
    steps:
      # Step to checkout the code
      - name: Checkout code
        uses: actions/checkout@v2

      # Step to extract repository information
      - name: Extract Repo Info
        env:
          SECRET_API_KEY: ${{ secrets.Githash_API_TOKEN }}
        id: repo-info
        run: |
          # Extract GitHub repository URL
          REPO_URL="https://github.com/${GITHUB_REPOSITORY}"
          echo "GitHub Repo URL: $REPO_URL"

          # Get GitHub repository name
          REPO_NAME=$(echo $GITHUB_REPOSITORY | awk -F/ '{print $2}')
          echo "Repository Name: $REPO_NAME"

          # Get GitHub username
          USER_NAME=$(echo $GITHUB_REPOSITORY | awk -F/ '{print $1}')
          echo "GitHub Username: $USER_NAME"

          API_KEY=$SECRET_API_KEY
          echo "API Key: $API_KEY"

          # Set output for later steps
          echo "::set-output name=repo-url::$REPO_URL"
          echo "::set-output name=repo-name::$REPO_NAME"
          echo "::set-output name=user-name::$USER_NAME"
          echo "::set-output name=secret-api-key::$API_KEY"

      # Step to extract commit message
      - name: Extract Commit Message
        id: extract-commit-message
        run: |
          COMMIT_MESSAGE=$(git log --format=%B -n 1)
          echo "Commit Message: $COMMIT_MESSAGE"
          echo "::set-output name=commit-message::$COMMIT_MESSAGE"

      # Step to check commit message and send data to backend accordingly
      - name: Check Commit Message and Send Data
        run: |
          # Retrieve outputs from previous steps
          REPO_URL="${{ steps.repo-info.outputs.repo-url }}"
          REPO_NAME="${{ steps.repo-info.outputs.repo-name }}"
          USER_NAME="${{ steps.repo-info.outputs.user-name }}"
          SECRET_API_KEY="${{ steps.repo-info.outputs.secret-api-key }}"
          COMMIT_MESSAGE="${{ steps.extract-commit-message.outputs.commit-message }}"

          # Check if commit message contains "avoid publish"
          if [[ $COMMIT_MESSAGE == *"avoid publish"* ]]; then
            echo "Commit message contains 'avoid publish'. Skipping publishing."
            exit 0  # Skip the rest of the steps
          fi

          # Check if commit message contains "own md"
          if [[ $COMMIT_MESSAGE == *"my md"* ]]; then
            MARKDOWN_CONTENT=$(cat markdown.md | jq -s -R '.' | sed -e 's/^"//' -e 's/"$//')
            echo "Markdown Content: $MARKDOWN_CONTENT"
          else
            MARKDOWN_CONTENT=""
          fi

          # Include the secret, commit message, and markdown content in the payload
          curl_data="{\"githubRepoUrl\": \"$REPO_URL\", \"repoName\": \"$REPO_NAME\", \"userName\": \"$USER_NAME\", \"secretApiKey\": \"$SECRET_API_KEY\", \"commitMessage\": \"$COMMIT_MESSAGE\", \"markdownContent\": \"$MARKDOWN_CONTENT\"}"
          echo "Data to be sent: $curl_data"

          # Use curl to send data to the backend API
          if ! curl -X POST 'https://githash-server.onrender.com/api/publish' \
              -H "Content-Type: application/json" \
              -d "$curl_data"; then
            echo "Error: Failed to send data to the backend."
            exit 1
          fi
Future plans :
I'm uncertain whether I'll integrate these features in the future, but I have some interesting plans in mind. Hopefully, I'll implement these features once my semester exams are over. 😅
Realtime notification to frontend on publishing blog : Since the primary request was signaled by the GitHub action, successful responses are also relayed back to GitHub actions. However, in the future, I plan to integrate a real-time notification system for clients upon article publication.
All the logs of github actions showed in the UI itself : It's not always the same case. Sometimes, publishing the blogpost may be interrupted due to various reasons. So, in this case, I will be integrating showing all the logs to the user account in the gitHash Dashboard.
Enable to add the custom cover image: I have integrated the app to use a static blog cover image at the moment (view here). However, I plan to introduce a feature in the future that will enable users to incorporate their own custom blog cover images. This might involve allowing users to input an image URL in the repository secrets or specifying it directly in the markdown file using a label such as "coverimg". This way, I can programmatically extract the cover image to incorporate it within the mutation.
What I learned : 💡
I've done a few projects before, but this one was different. During the hackathon, I learned to use GraphQL API to perform queries and mutations. I also got good command at GitHub Actions, figuring out how to handle workflows, jobs, and steps. But I can summarize my outcomes here as follows:
Using Graphql : I was able to make some queries and mutations.
GitHub actions : From complete beginner to being able to use it conveniently.
GitHub API : I got to know how flexible GitHub API is. 😊
Important links : 🔗
Resources that helped me 🎁
Final Words : 🎙
The hackathon was an excellent learning experience. I explored GraphQL API, GitHub Actions, the developer console's network tab, and improved my Google search skills. Collaborating with the community on Discord to shape the app made the journey truly enjoyable. Thanks to Favourite Jome for amazing discord support. 🙂
Feel free to leave a comment if you have any questions - I'd be more than happy to respond. 😊
Connect with me on Twitter @rajeshkhadka200
Subscribe to my newsletter
Read articles from Rajesh Khadka directly inside your inbox. Subscribe to the newsletter, and don't miss out.
Written by

Rajesh Khadka
Rajesh Khadka
Software Developer 👩💻 | Technical Writer 📝 | Student 🎓