Linux Fundamentals
 Suraj
SurajTable of contents
- Linux Command Syntax:
- File Permissions
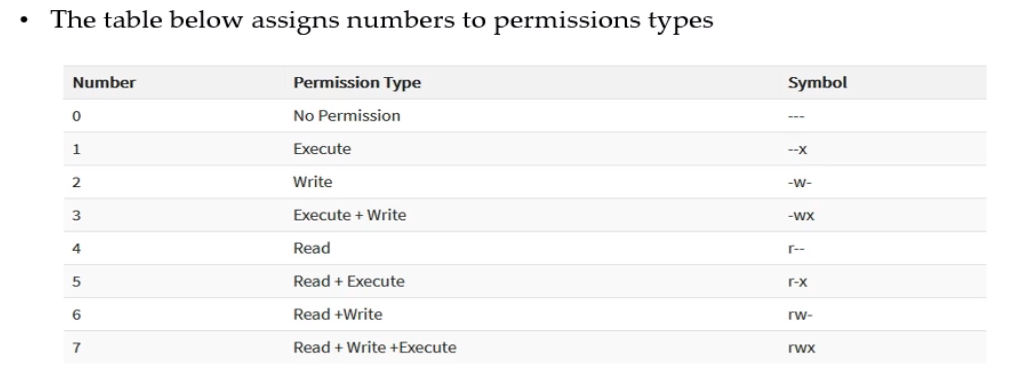
- File permission using numeric mode:
- Below you can see the table of these numeric values
- File Ownership commands (chown, chgrp)
- Access Control List (ACL):
- Help Commands
- TAB completion and Up Arrow:
- Adding text to files (Redirects)
- Input and output Redirects:
- Standard Output to a file (tee)
- Pipes ( | ):
- File Maintenance Commands:
- File display commands
- Filters/text processors commands

Linux Command Syntax:
Commands typically have the syntax:
command option argument or
ls [OPTION]... [FILE]…
for example:
ls -ltr linux.txt
OPTION: Modify the way that a command works
usually consists of a hyphen or dash followed by a single letter
Some commands accept multiple options which can usually be grouped after a single hyphen
ARGUMENT:
Most commands are used together with one or more arguments
Some commands assume a default argument if none is supplied
Arguments are optional for some commands and required by others
These are the three main commands that you are going to use when working in any company:
whoami
hostname
pwd
File Permissions
UNIX is a multi-user system. Every file and directory in your account can be protected from or made accessible to other users by changing its access permissions. Every user has the responsibility for controlling their files.
Permissions for a file or directory may be restricted to by types
There are 3 types of permissions
r - read
w - write
x - execute = permission to run a program
Each permission (rwx) can be controlled at three levels:
u - user =yourself
g - group = can be people in the same project
o - other = everyone on the system
File or Directory permission can be displayed by running ls -l command
- rwxrwxrwxrwx
man chmod→ to check more about this ‘chmod’ commandchmod: chmod changes the file mode bits of each given file according to mode, which can be either a symbolic representation of changes to make or an octal number representing the bit pattern for the new mode bits.
File permission using numeric mode:
Permission to a file and directory can also be assigned numerically
chmod ugo+r file_nameor
chmod 444 file_nameBelow you can see the table of these numeric values

File Ownership commands (chown, chgrp)
There are 2 owners of a file or directory
- User and Group
Command to change file ownership
chown changes the ownership of a file
chgrp changes the group ownership of a file
Recursive ownership change option (Cascade)
- -R (know more about this!)
Access Control List (ACL):
- The access control list provides an additional more flexible permission mechanism for file systems. It is designed to assist with UNIX file permission. ACL allows you to give permission for any user or group to any disc resource.
Use of ACL
Think of a scenario in which a particular user is not a member of the group created by you but still, wants to give some read or write access, how can you do it without making the user a member of the group, here ACL comes into the picture, ACL helps us to do this trick
ACLs are used to make a flexible permission mechanism in Linux.
From Linux man pages, ACLs are used to define more fine-grained discretionary access rights for files and directories.
commands to assign and remove ACL permission are:
setfacl and getfacl
List of commands for setting up ACL:
To add permission for user:
setfacl -m u:user:rwx /path/to/fileTo add permission for a group:
setfacl -m g:group:rwx /path/to/fileTo allow all files or directories to inherit ACL entries from the directory it is within
setfacl -Rm “entry” /path/to/fileTo remove a specific entry:
setfacl -x u:user /path/to/fileTo remove all the entries:
setfacl -b path/to/file
Note: As you assign the ACL permission to a file/directory it adds a + sign at the end of the permission
Help Commands
There are 3 types of help commands
whatiscommandcommand
- - helpmancommand
TAB completion and Up Arrow:
Hitting the TAB key completes the available commands, files, or directories
chm TABls j<TAB>cd Des<TAB>
Adding text to files (Redirects)
3 Simple ways to add text to a file
vi
Redirect command output > or >>
echo
>or>>‘>’This will enter your data in the first line‘>>’This will enter your data in the next line
ls -ltr > filename:it will copy all the data that are present in ls -ltrdate >> filename:copy the date in the filename
Input and output Redirects:
ls -la : a is append here and will show the hidden files starting with ‘.’
for example:
.git, .bashrc, .profile, etcThere are 3 redirects in Linux:
stdin(Standard Input): It has a file descriptor number as 0
stdout( Standard output): It has a file descriptor number as 1
stderr(Standard Error): It has file descriptor number as 2
Output(stdout) - 1
By default when running a command its output goes to the terminal
The output of a command can be routed to a file using
>symbolls -l > file_namepwd > file_nameIf using the same file for additional output or to append to the same file then use
>>ls -la >> file_nameecho “Hello Linux” >> file_name
Input (stdin) - 0
input is used when feeding the contents to a file.
cat < file_namemail -s "Office memo" allusers@abc.com < memoletter
Error (stderr) - 2
When a command is executed we use a keyboard and that is also considered (stdin -0)
That command output goes on the monitor and that output is (stdout-1)
If the command produces any error on the screen then it is considered (stderr- 2)
We can use redirects to route errors from the screen.
ls -l /root 2> file_nametelnet localhost 2> error_file
Standard Output to a file (tee)
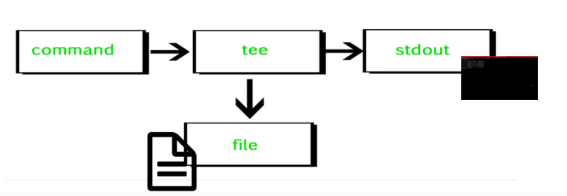
The ‘
tee’ command is used to store and view (both at the same time) the output of any command.The command is named after the T-splitter used in plumbing. It breaks the output of a program so that it can be both displayed and saved in a file. It does both tasks simultaneously, copies the result into the specified files or variables, and also displays the result.
echo "Hello Linux bro" | tee file_name
We can store it in multiple files:
echo "Hello Linux bro" | tee file1 file2 file3
Here ‘ -a ‘ command is for adding a new line or appending to a file:
echo "Hello Linux bro" | tee -a file_name
This command will display how many characters you have in your file:
wc -c file_name
Check more about tee:
tee --version
Pipes ( | ):
A pipe is used by the shell to connect the output of one command directly to the input of another command.
The symbol for a pipe is the vertical bar
|The command syntax is:
command1 [arguments] | command2 [arguments]

File Maintenance Commands:
cp- copy files and directories
cp file_name_you_want_copy new_file_name

or

cp file_name /directory_name
rm- remove the files.
rm file_name
mv- move the file and rename it but do not change the content.
mv file_name new_file_name
mkdir- to make a new folder/directory
mkdir folder_name
rmdir- to remove the directories
rmdir directory_name
rm -r- will forcefully remove sub-directories and its contents as well
rm -r directory
using a path:
rm -r /path/to/directory
force delete:
rm -r -f directory_name
chgrp- used to change the group name, to do so first go into the root directory
chgrp root file_name or directory_name
chown- used to change ownership
chown suraj linux.txt
This command will change the owner and group of the specified file
chown suraj:suraj linux.txt
File display commands
cat- displays the content of the file
cat file_name
more- It will give the information page by page and hit the space bar to go page by page. And to quit this just simply type ‘q’.
more file_name
less- ‘less’ and ‘more’ are very similar just the less has a lot more options in its navigation. you can search here
less file_name
head- this will display by default the first 10 lines of your content
head file_name
Now this will display the first 5 number of lines of your content because we have specified it using the ‘-n’ flag
head -n 5 file_name
tail- this will display by default of last 10 lines of your content
tail -n 5 file_name
Filters/text processors commands
- cut - cut is a command line utility that allows you to cut parts from specified files or piped data and print the result to standard output. It can be used to cut parts of a line by delimiter, byte position, and character
cut file_name              = does not work
cut --version              = check version
cut -c1 file_name          = List one character
cut -c1,2,4                = Pick and choose character
cut -c1-3 filename         = list range of character
cut -c1-3,6-8 file_name    = list specific range of character
cut -b1-3 file_name        = list by byte size
cut -d: -f 6 /etc/passwd   = list first 6th column separated by :
cut -d: -f 6-7 /etc/passwd = list first 6th and 7th column separated by :
ls -l | cut -c2-4          = only print user permissions of files/dir
- awk: awk is a utility/language designed for data extraction. Most of the time it is used to extract fields from a file or an output
awk --version                                     = Check version
awk '{print $1}' file_name                        = List 1st field from a file
ls -l | awk '{print $1,$3}'                       = List 1 and 3rd field of ls -l output
ls -l | awk '{print $NF}'                         = Last field of the output
awk '/suraj/ {print}' file_name                   = Search for a specific word
awk -F: '{print}' /etc/passwd                     = Output only 1st field of /efc/passwd
echo "Hello World" | awk '{$2="suraj"; print $0}' = Replace words field words
cat file | awk '{$2="suraj"; print $0}'           = Replace words field words
awk 'lenth($0) > 15' file_name                    = Get Lines that have more than 15 byte size
ls -l | awk '{if($9 == "suraj") print $0;}'       = Get the field matching suraj in directory you are in
ls -l | awk '{print NF}'                          = Number of fields
grepandegrep:What is grep: the grep command which stands for “global regular expression print,” processes text line by line and prints any lines which match a specified pattern.
grep --version
grep keyword file_name
grep -c keyword file_name
grep -i KEYword file_name
grep -n keyword file_name
grep -v keyword file_name
grep -vi keyword file_name
grep keyword file_name | awk '{print $1}'
ls -l | grep Desktop
egrep uses- egrep is a little more powerful than grep see the example below:
egrep -i "keyword|keyword2" file_name
- sort: Sort command sorts in alphabetical order**:**
sort --version OR man sort OR sort --help = Check version or help
sort file                                 = Sorts file in alphabetical order
sort -r file                              = Sort in reverse alphabetical order
sort -k2 file                             = Sort by field number, and 2 here is the field number
- uniq: The Uniq command filters out the repeated or duplicate lines:
uniq file
sort file | uniq     = Always sort first before using uniq their line numbers and it'll not show the duplicates
sort file | uniq -c  = Sort first then uniq and list count
sort file | uniq -d  = Only show repeated lines.
- wc( Word Count): The command read either standard input or a list of files and generates: newline count, word count, and byte count
wc --version OR wc --help = check version or help
wc file                   = Check file line count, word count, and byte count
wc -l file                = Get the number of lines in a file
wc -w file                = Get the number of words in a file
wc -c file                = Get the number of bytes in a file
wc Directory_name         = Not Allowed
ls -l | wc -l             = Number of files
grep keyword | wc -l      = Number of keyword lines.
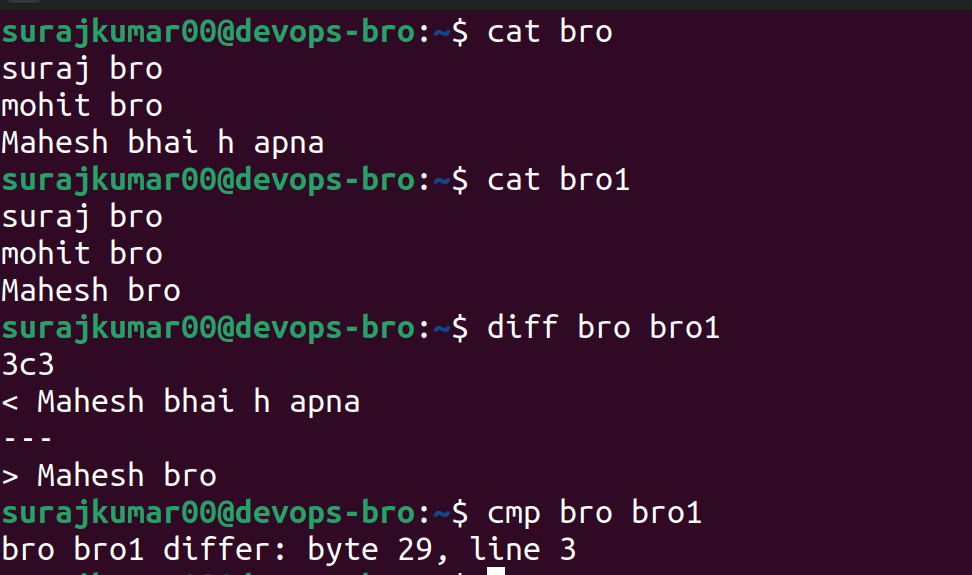
Compare files:
- diff (line by line)
diff file_name1 file_name2
- cmp ( byte by byte)
cmp file_name1 file_name2
Compress and un-Compress File
tar: used to make a zip file
The below command is to zip your file with tar extension in the current directory
tar cvf your_username.tar .
to unzip the file:
tar -xvf filename.tar
gzip: used to make a file compress
to compress this tar file:
gzip file_name.tar
gzip -d OR gunzip :used to make a file un-compress
to un-compress
gzip -d file_name.tar
Truncate file size (truncate):
- The Linux truncate command is often used to shrink or extend the size of a file to the specified size
truncate -s 10 file_name
By running the below command the file size will be of 60 characters:
truncate -s 60 file_name
Combining and Splitting Files
Multiple files can be combined into one and
One file can be split into multiple files
cat file1 file2 file3 > file4split file4split -l 300 file.txt childfileafter running the above command we can see our file countries here split into parts you can see the below image.
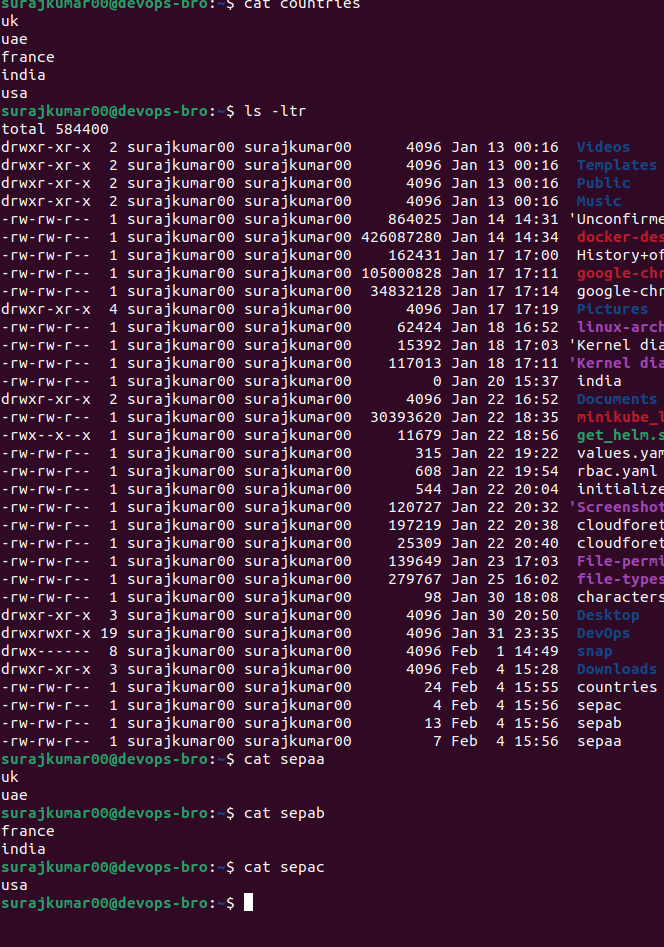
split file.txt into 300 lines per file and output to childfileaa, chilfileab, and childfileac
Linux Vs Windows Commands:
- We should be aware of Windows CLI commands also.
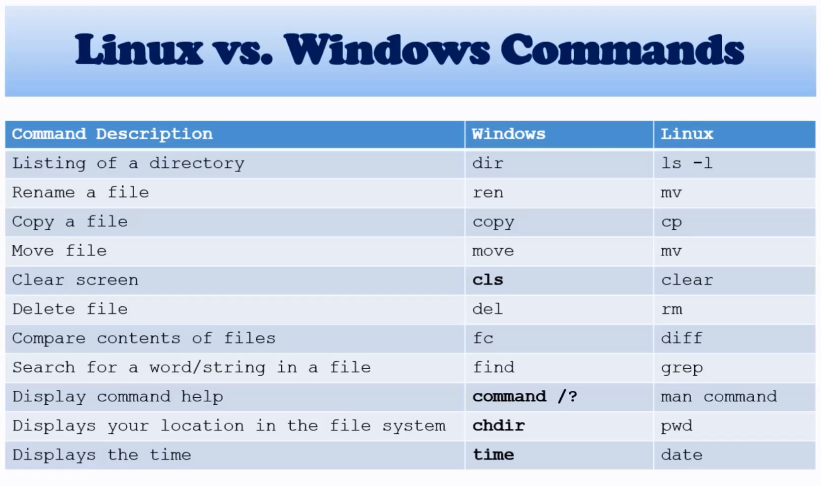
Hope this blog will be helpful for you and I'll come back with another blog. Thanks for reading.
Subscribe to my newsletter
Read articles from Suraj directly inside your inbox. Subscribe to the newsletter, and don't miss out.
Written by

Suraj
Suraj
I'm a Developer from India with a passion for DevOps ♾️ and open-source 🧑🏻💻. I'm always striving for the best code quality and seamless workflows. Currently, I'm exploring AI/ML and blockchain technologies. Alongside coding, I write Technical blogs at Hashnode, Dev.to & Medium 📝. In my free time, I love traveling, reading books