Project:Building a Two-Tier Application with Flask and MySQL
 Vishal Parit
Introduction:
Docker has revolutionized the way we develop, deploy, and scale applications. One key aspect of Docker is its networking capabilities, allowing seamless communication between containers and enabling the creation of complex, multi-tiered applications. In this blog post, we'll explore Docker networking by building a two-tier application with Flask and MySQL.
Step 1:Setting Up Docker Networking:
The first step in our journey is to create a Docker network that will facilitate communication between the Flask and MySQL containers. Using the following command, we create a bridge network named two-tier-app-nw:
docker network create -d bridge two-tier-app-nw
To verify the network configurations, the following command provides detailed information:
docker inspect two-tier-app-nw
[
    {
        "Name": "two-tier-app-nw",
        "Id": "d29fbb3881da42971db6cf79489303289ffe898949ccae443de8f3443ae0cc14",
        "Created": "2024-02-04T11:26:25.514478005Z",
        "Scope": "local",
        "Driver": "bridge",
        "EnableIPv6": false,
        "IPAM": {
            "Driver": "default",
            "Options": {},
            "Config": [
                {
                    "Subnet": "172.18.0.0/16",
                    "Gateway": "172.18.0.1"
                }
            ]
        },
        "Internal": false,
        "Attachable": false,
        "Ingress": false,
        "ConfigFrom": {
            "Network": ""
        },
        "ConfigOnly": false,
        "Containers": {
            "27d26a2e08088075616fb9ecc75781b7b2b6adabded2476ab4cf7581e3e6ebe9": {
                "Name": "mysql",
                "EndpointID": "cf2a70fdf302bf6c1d58682e1e08c0232e32f15f84e49302f5f2f24b2e66de29",
                "MacAddress": "02:42:ac:12:00:02",
                "IPv4Address": "172.18.0.2/16",
                "IPv6Address": ""
            },
            "f29563b0e79f3670aaff66915b0b7245b4563cf35a7bf881ba8fe6341f7022f6": {
                "Name": "flask-app",
                "EndpointID": "007dbe39d6a9cb5d6497b019229304f6fab9c25542eea4d537ff9e4e9963288d",
                "MacAddress": "02:42:ac:12:00:03",
                "IPv4Address": "172.18.0.3/16",
                "IPv6Address": ""
            }
        },
        "Options": {},
        "Labels": {}
    }
]
Step 2:Creating the MySQL Container:
Now that our network is in place, we proceed to create a MySQL container using the official MySQL image. This container will serve as the backend database for our two-tier application:
docker run -d -p 3306:3306 -e MYSQL_ROOT_PASSWORD=test@123 -e MYSQL_DATABASE=testdb -e MYSQL_USER=admin -e MYSQL_PASSWORD=admin --name mysql --network two-tier-app-nw mysql:latest
Step 3:Building and Running the Flask Application:
With the MySQL container up and running, we move on to building the Flask application image. Clone the repository and execute the following commands:
git clone https://github.com/vishalparit10/two-tier-flask-app
cd two-tier-flask-app
docker build -t flask-app .
docker run -d -p 5000:5000 -e MYSQL_HOST=mysql -e MYSQL_DB=testdb -e MYSQL_USER=admin -e MYSQL_PASSWORD=admin --name flask-app --network two-tier-app-nw flask-app:latest
Github Project URL:https://github.com/vishalparit10/two-tier-flask-app
Step 4:Verifying Network Configurations:
To ensure the containers are connected within the specified network, inspect the network configurations:
docker inspect two-tier-app-nw
We can expect the output as below:
[
    {
        "Name": "two-tier-app-nw",
        "Id": "d29fbb3881da42971db6cf79489303289ffe898949ccae443de8f3443ae0cc14",
        "Created": "2024-02-04T11:26:25.514478005Z",
        "Scope": "local",
        "Driver": "bridge",
        "EnableIPv6": false,
        "IPAM": {
            "Driver": "default",
            "Options": {},
            "Config": [
                {
                    "Subnet": "172.18.0.0/16",
                    "Gateway": "172.18.0.1"
                }
            ]
        },
        "Internal": false,
        "Attachable": false,
        "Ingress": false,
        "ConfigFrom": {
            "Network": ""
        },
        "ConfigOnly": false,
        "Containers": {
            "27d26a2e08088075616fb9ecc75781b7b2b6adabded2476ab4cf7581e3e6ebe9": {
                "Name": "mysql",
                "EndpointID": "cf2a70fdf302bf6c1d58682e1e08c0232e32f15f84e49302f5f2f24b2e66de29",
                "MacAddress": "02:42:ac:12:00:02",
                "IPv4Address": "172.18.0.2/16",
                "IPv6Address": ""
            },
            "61c9c5a69ebcf0ccc8765656572006a6c63b6679efe102b2e4279b0f97b96696": {
                "Name": "flask-app",
                "EndpointID": "5bf8260a5ddcc64e273cdadf8f433ecb2158b88b747442fe34d9b4704b05a073",
                "MacAddress": "02:42:ac:12:00:03",
                "IPv4Address": "172.18.0.3/16",
                "IPv6Address": ""
            }
        },
        "Options": {},
        "Labels": {}
    }
]
Step 5: Open Ports in Security Groups
Access your instance's security groups and open port 5000 for external access.
Step 6: Access the Application
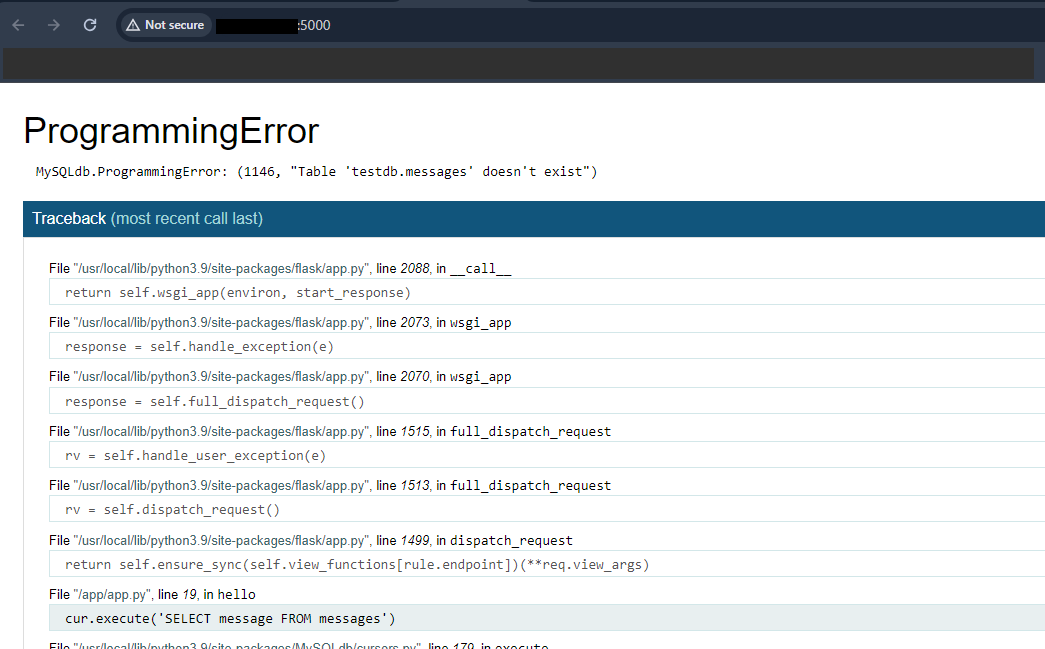
Open your web browser and navigate to instance_ip:5000. You might encounter an error related to the absence of the 'testdb.messages' table.

The error message "MySQLdb.ProgrammingError: (1146, "Table 'testdb.messages' doesn't exist")" indicates that there is an attempt to perform an operation on a table in a MySQL database, but the specified table ('testdb.messages') does not exist in the database.
Step 7:Addressing MySQL Table Creation Issue:
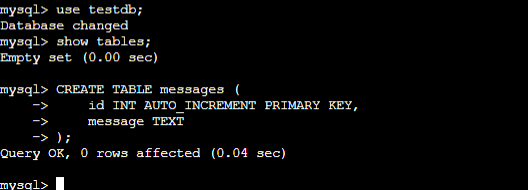
Upon accessing the Flask application in a web browser, you may encounter a MySQL error related to a missing table. To resolve this, follow these steps:
- Access the MySQL container's bash prompt:
docker exec -it container_ID bash
- Enter the MySQL prompt:
mysql -u root -p
- Switch to the 'testdb' database:
use testdb;
- Create the 'messages' table:
CREATE TABLE messages (
    id INT AUTO_INCREMENT PRIMARY KEY,
    message TEXT
);

With the table created, you should now be able to access the Flask application without encountering the previous error.

Step 8:Retrieving Data from the Database:
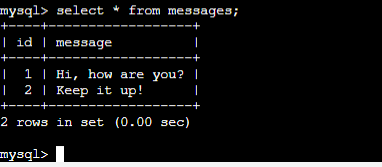
To confirm that data entered in the application is stored in the database, use the following MySQL query:
select * from messages;

Conclusion:
Docker networking is a crucial aspect of building and deploying multi-container applications. By following this guide, we've learned how to set up a two-tier application with Flask and MySQL, overcome common issues, and ensure seamless communication between containers. Docker's flexibility and robust networking capabilities empower developers to build scalable and resilient applications with ease.
Subscribe to my newsletter
Read articles from Vishal Parit directly inside your inbox. Subscribe to the newsletter, and don't miss out.
Written by
