Day 10 Task: Advance Git & GitHub for DevOps Engineers
 Supriya Surkar
This is #90DaysofDevops challenge under the guidance of Shubham Londhe sir.
Day 10 TASK
Introduction
In the journey of DevOps, mastering Git and GitHub stands as a pivotal skill. As we delve into Day 10's task, we explore advanced Git functionalities crucial for DevOps engineers. Let's dive deep into Git Branching, Revert, Reset, Rebase, and Merge.
Git Branching
Branching in Git serves as a powerful mechanism to isolate development work, allowing seamless collaboration without disrupting the main codebase.
By creating branches, developers can experiment, add features, or fix bugs in a controlled environment.
With the ability to merge branches through pull requests, Git ensures smooth integration of changes while maintaining code integrity.
Git Revert and Reset
Git offers two essential tools,
git revertandgit reset, empowering developers to manage changes effectively.Git revertundoes specific commits by creating new ones, ensuring a safe rollback without altering repository history.Conversely,
git resetallows for more granular control by resetting the repository to a previous state, offering flexibility in managing code changes.
Git Rebase and Merge
Git Rebase and Merge serve as cornerstone techniques for branch integration.
Git rebase facilitates seamless integration of branch changes by modifying commit logs, addressing the limitations of traditional merging.
On the other hand, Git merge preserves commit logs while merging branch changes, ensuring clarity in project history.
Despite the semantic nuances, both methods play a vital role in maintaining code integrity and facilitating collaborative development.
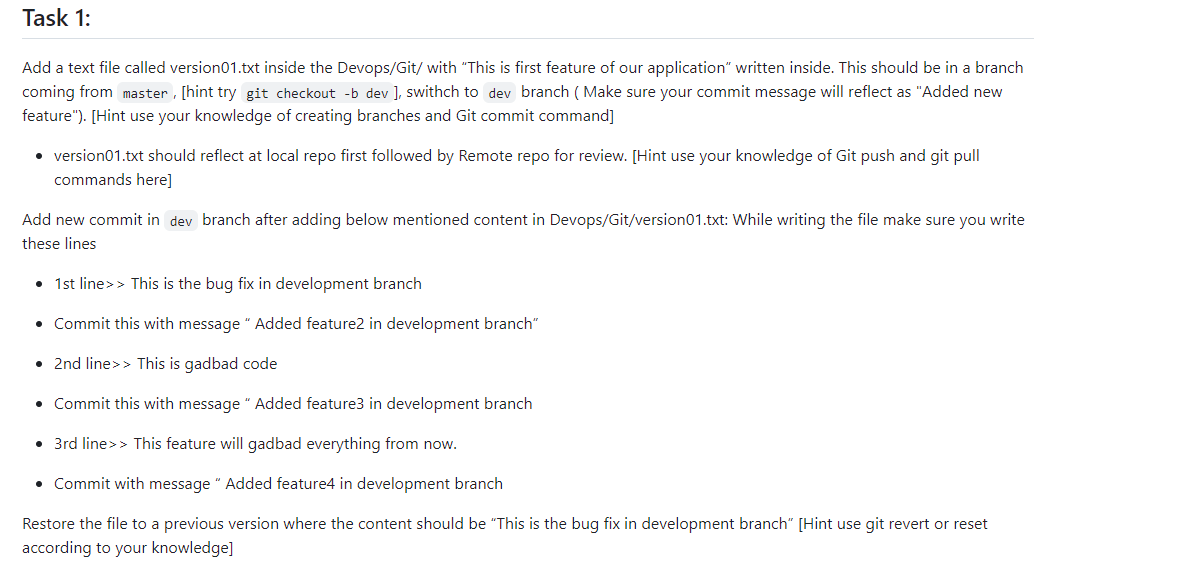
Task 1

- Clone the Repository: Open your terminal and navigate to the directory where you want to clone the repository. Use the following command to clone the repository:
git clone https://github.com/Supu-27/Devops1.git

- Navigate to the Cloned Repository: Once the cloning process is complete, navigate into the cloned repository directory using the cd command:
cd Devops1

- Start the Task:
Step 1: Create a New Branch from Main: Execute the following command to create a new branch named 'dev' and switch to it:
git checkout -b dev

Step 2: Add version01.txt File with Initial Content: Within the 'Devops/Git/' directory, create a text file named 'version01.txt' and write the initial feature description inside it. You can use any text editor to create and edit the file. The content should be: "This is the first feature of our application."
Step 3: Commit Changes to the Dev Branch: After adding the file, stage it for commit using the following command:
git add Devops/Git/version01.txt

- Then commit the changes with an appropriate message indicating the addition of a new feature:
git commit -m "Added new feature"

- By following these steps, you'll successfully clone the repository, navigate to the cloned directory, and start the task by creating a new branch, adding the 'version01.txt' file with the specified content, and committing the changes to the 'dev' branch.
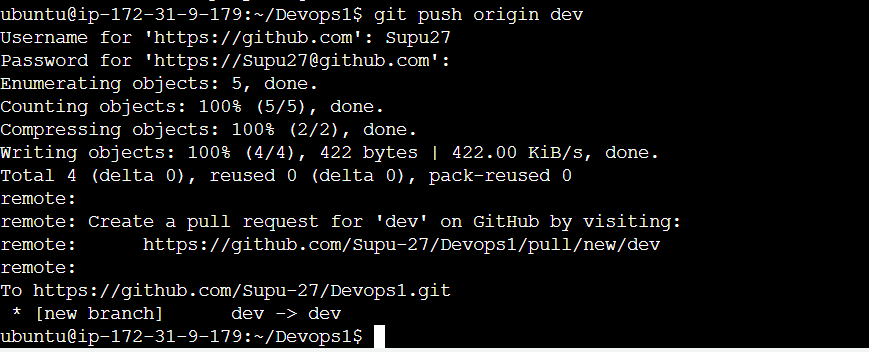
Push Changes to the Remote Repository: To sync the changes to the remote repository for review, execute the following command:
git push origin dev

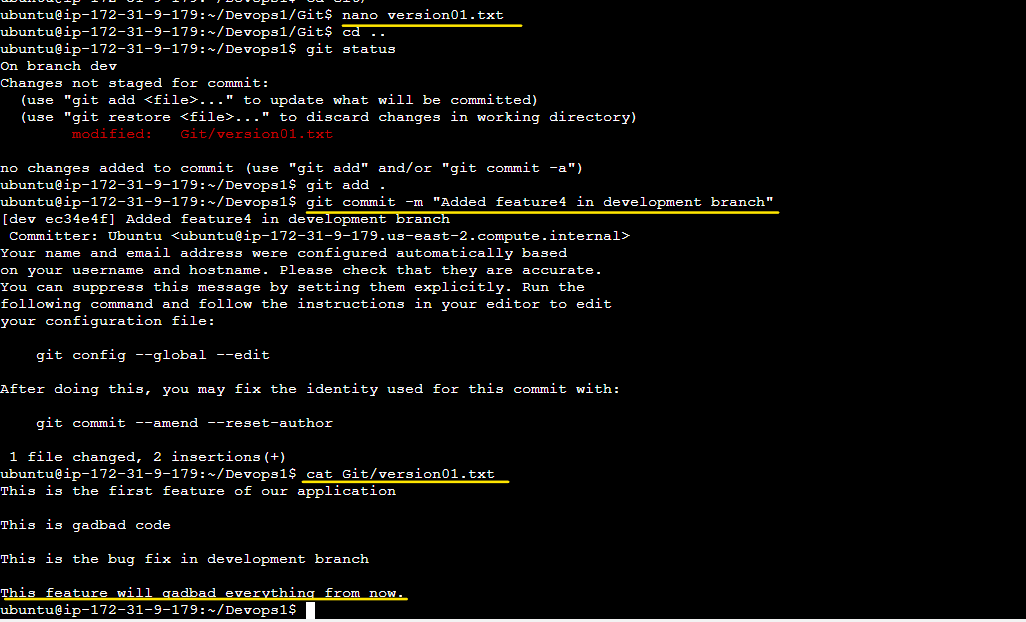
Add New Commits with Additional Content: Open the 'version01.txt' file and append the following lines:
This is gadbad code
This is the bug fix in development branch
This feature will gadbad everything from now.
- Save the file after adding the lines.
- Commit the Changes with Descriptive Messages: Stage the modified file for commit:
git add Devops/Git/version01.txt
- Commit the changes with descriptive messages for each addition:
git commit -m "Added feature2 in development branch"
git commit -m "Added feature3 in development branch"
git commit -m "Added feature4 in development branch"


- Restore the File to a Previous Version: Use either 'git revert' or 'git reset' based on your preference and knowledge. For example, to revert to the previous version of 'version01.txt':
git revert HEAD~3 # Reverts the last 3 commits, assuming they are the ones adding the features

- These steps will guide you through Task 1, allowing you to add, modify, commit, and revert changes in the Git repository effectively.
Task2

Create New Branches: Open your terminal and navigate to the project directory. Execute the following commands to create two new branches, namely 'feature1' and 'feature2':
 git checkout -b feature1
 git checkout -b feature2
Make Changes in Each Branch: In each branch, make some changes to the project files relevant to the respective features. You can add, modify, or delete files as needed. Ensure that the changes are distinct for each branch to demonstrate the concept effectively.
Commit Changes: Stage the changes for commit and commit them in each branch:
 git add .
 git commit -m "Added feature1"   # In the feature1 branch
 git add .
 git commit -m "Added feature2"   # In the feature2 branch

Switch to the Dev Branch: Return to the 'dev' branch using the following command:
git checkout dev
Merge Feature Branches into Dev: Merge the changes from the 'feature1' and 'feature2' branches into the 'dev' branch:
 git merge feature1
 git merge feature2
Resolve any Merge Conflicts (if any): If there are any merge conflicts, resolve them manually by editing the conflicting files. Once resolved, stage the changes and commit them.

Switch to the Master Branch: Move to the 'master' branch to integrate the changes from the 'dev' branch:
git checkout main
Merge Dev Branch into Master: Merge the changes from the 'dev' branch into the 'master' branch:
git merge dev
Rebase the Dev Branch (Optional): As an advanced practice, you can try rebasing the 'dev' branch onto the 'master' branch to maintain a cleaner commit history:
 git checkout dev
 git rebase main
Resolve any Rebase Conflicts (if any): Similar to merge conflicts, resolve any conflicts that arise during the rebase process. Follow the on-screen prompts or use a text editor to resolve conflicts.
Push Changes to Remote Repository: Once all changes are merged and conflicts resolved, push the changes to the remote repository:
git push origin main

- These steps demonstrate the effective use of branches, merging, and rebasing in Git, enabling seamless collaboration and version control in DevOps workflows.


Conclusion
Mastering Git and GitHub elevates DevOps engineers to new heights of efficiency and collaboration. By harnessing advanced Git functionalities like branching, reverting, resetting, rebasing, and merging, engineers empower themselves to navigate complex development scenarios with ease.
With continuous practice and exploration, DevOps professionals can unlock the full potential of version control, driving innovation and excellence in software development.
Feel free to drop any questions in the comments section. I'm here to help!
If you liked what you read, please consider following and giving it a thumbs up 👍 to show your support 😄
Thanks for taking the time to read! 💚
Subscribe to my newsletter
Read articles from Supriya Surkar directly inside your inbox. Subscribe to the newsletter, and don't miss out.
Written by
