Deploy your first Firebase function
 Rajan Lal
Introduction
Firebase functions are the serverless framework which runs in a backend server without you to maintain the server. This is secured infrastructure managed by Google. The function can be written in JavaScript, TypeScript or Python code. Managing and scaling of the backend server is taken care by Google. Firebase function can be used to expose a function in form of web API, or can be used to schedule some task, or trigger some action based on an event, etc. In this article we will see how we can create and deploy a firebase function to cloud.
Prerequisite
You need to have an account in firebase. Please create one here https://console.firebase.google.com/
Firebase function feature needs the account and the project to be atleast in Blaze plan (pay as you use). The cost is very minimal and it won't cost any for this demo
Steps to create and deploy
Install the Firebase Command Line Interface (CLI) Tools
Firebase CLI can be used to test, manage, and deploy your Firebase project from the command line.
npm install -g firebase-tools
Firebase CLI can be used for following:
Deploy code and assets to your Firebase projects
Run a local web server for your Firebase Hosting site
Interact with data in your Firebase database
Import/Export users into/from Firebase Auth
Login to your firebase account
Use this command to login to your firebase account under which you want to create and deploy your function
firebase login
Initialize the project
Go to the folder where you want to initialize your firebase function project and run following command. This folder should be the root folder of your project.
firebase init
Next it will ask for the firebase feature you want to initialize the project for. As we are doing this for firebase function, select the same using the arrows and space
Next it will ask to select option for the project. Use the appropriate option as per your need. Here I have already created a project in firebase console, so I will use the existing project
Next it will ask to select the language. For this example, we will use JavaScript. Hence select JavaScript option
It will ask "Do you want to use ESLint to catch probable bugs and enforce style", lets select "y" for this. This will help in debugging in case there are any error in the scripts/code of your function.
"Do you want to install dependencies with npm now" - Select Yes. This will install all the dependencies
Once above step is complete, you will see a folder named "functions" created in the root folder of your project, along with other dependent files. Now the "functions" folder is the main folder which contains all your code.
The complete set-up will output something like this
C:\ECOM\Source\Firebase\blog_function>firebase init

     ######## #### ########  ######## ########     ###     ######  ########
     ##        ##  ##     ## ##       ##     ##  ##   ##  ##       ##
     ######    ##  ########  ######   ########  #########  ######  ######
     ##        ##  ##    ##  ##       ##     ## ##     ##       ## ##
     ##       #### ##     ## ######## ########  ##     ##  ######  ########

You're about to initialize a Firebase project in this directory:

  C:\ECOM\Source\Firebase\blog_function

Before we get started, keep in mind:

  * You are currently outside your home directory

? Are you ready to proceed? Yes
? Which Firebase features do you want to set up for this directory? Press Space to select features, then Enter to confirm your choices. Functions: Configure a Cloud Functions directory and its files

=== Project Setup

First, let's associate this project directory with a Firebase project.
You can create multiple project aliases by running firebase use --add,
but for now we'll just set up a default project.

? Please select an option: Use an existing project
? Select a default Firebase project for this directory: spd-app-dev (spd-app-dev)
i  Using project spd-app-dev (spd-app-dev)

=== Functions Setup
Let's create a new codebase for your functions.
A directory corresponding to the codebase will be created in your project
with sample code pre-configured.

See https://firebase.google.com/docs/functions/organize-functions for
more information on organizing your functions using codebases.

Functions can be deployed with firebase deploy.

? What language would you like to use to write Cloud Functions? JavaScript
? Do you want to use ESLint to catch probable bugs and enforce style? Yes
+  Wrote functions/package.json
+  Wrote functions/.eslintrc.js
+  Wrote functions/index.js
+  Wrote functions/.gitignore
? Do you want to install dependencies with npm now? Yes
npm WARN EBADENGINE Unsupported engine {
npm WARN EBADENGINE   package: undefined,
npm WARN EBADENGINE   required: { node: '18' },
npm WARN EBADENGINE   current: { node: 'v20.11.0', npm: '10.2.4' }
npm WARN EBADENGINE }

added 353 packages, and audited 354 packages in 36s

43 packages are looking for funding
  run `npm fund` for details

found 0 vulnerabilities

i  Writing configuration info to firebase.json...
i  Writing project information to .firebaserc...
i  Writing gitignore file to .gitignore...

+  Firebase initialization complete!
Write the code
Open index.js which is created under functions folder and lets write some code here.
const {onRequest} = require("firebase-functions/v2/https");
const logger = require("firebase-functions/logger");

// Create and deploy your first functions
// https://firebase.google.com/docs/functions/get-started

exports.helloWorld = onRequest((request, response) => {
  logger.info("Hello logs!", {structuredData: true});
  response.send("Hello from Firebase!");
});
As per the above code, when our firebase function will be invoked, it will add a log message to the firebase logger which can be viewed from log explorer in firebase console. Also it will respond back with a simple text message saying "Hello from Firebase!".
Deploy
Once our project setup and the code is ready, we can all set to deploy our first firebase function to cloud. We can use following CLI command to deploy the function:
firebase deploy --only functions
NOTE: Make sure to delete packages.json.lock file from the root of your project, else this will throw error.
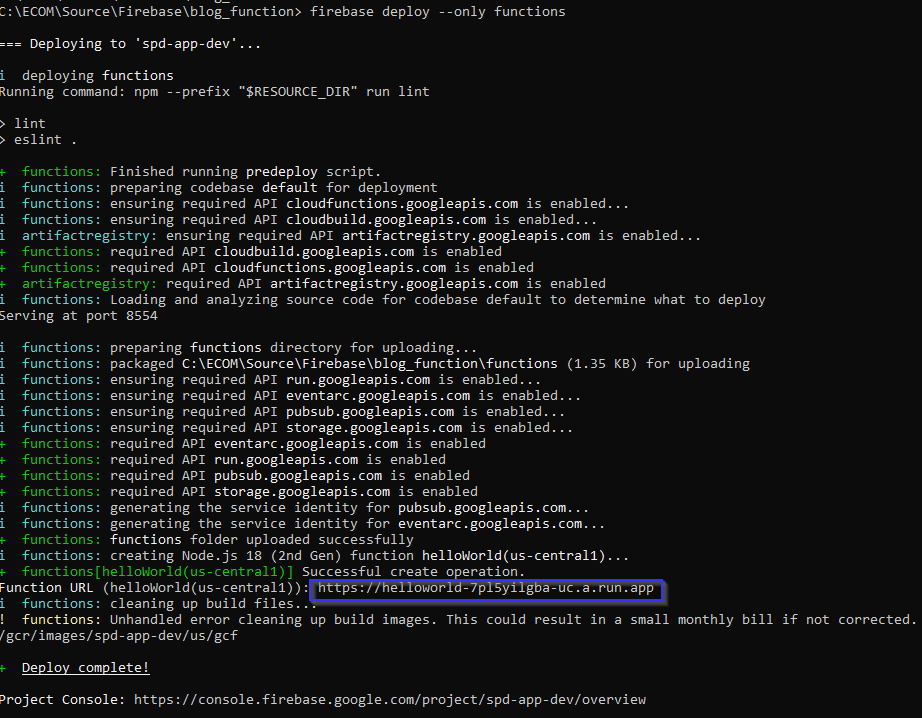
This is how the deploy success result would look like

Once this is success, this is print the function URL (highlighted in above image). We can also check the created function in firebase console under the selected project -> functions options. Now we can check if the firebase function is working fine or not by just entering the function URL ("https://helloworld-7pl5yilgba-uc.a.run.app/" in our case) in browser.

Delete the function
In case you need to delete this function (or any function created using CLI), we can use following command
firebase functions:delete helloWorld
Conclusion
So we saw how we can develop and deploy our own cloud function using firebase CLI. This function can invoked based on the events triggered by background events, HTTPS requests, the Admin SDK, or Cloud Scheduler jobs.
Happy learning!!!
Subscribe to my newsletter
Read articles from Rajan Lal directly inside your inbox. Subscribe to the newsletter, and don't miss out.
Written by

Rajan Lal
Rajan Lal
An accomplished Software Engineer specializing in Object-Oriented design and analysis with 16+ years of experience. Extensive experience in leading a development team, full life cycle of the software design process including requirement definition, writing proof of concept applications, design, development, integration testing and maintenance. Strong collaborative leader adept in delivering a product as a team and partnering with peers across the organization. Excels in reaching out to people, working out strategies together and developing positive relationships