Advanced Linux Shell Scripting for DevOps Engineers with User management
 Harish Gawande
Loops (for loop):
Execute a block of code repeatedly.
#!/bin/bash

for i in {1..5}; do
  echo "Iteration $i"
done
Example 1 : Write the script, if executed as ./CreateDirectories.sh
then it creates 90 directories as day1 day2 day3 .... day90
nano CreateDirectories.sh
#!/bin/bash

# Create 90 Directory using for loop.

for i in {1..90};
do
  mkdir day"$i"
done
echo "All the $i directories are created successfully"
Example 2 : Write the script, if executed as
./CreateDirectories.shMovie 20 50 then it creates 30 directories as Movie20 Movie21 Movie23 ...Movie50
#!/bin/bash

name=$1
start=$2
end=$3

for (( i = start ; i<= end ; i++ ));
do
    mkdir "$name$i"
    echo "Directory $name$i created successfully"
done
Create a Script to get backup.
Backups are an important part of DevOps Engineer's day to Day activities The below code in References will help you to understand, How a DevOps Engineer takes backups (it can feel a bit difficult but keep trying, Nothing is impossible.)
#!/bin/bash

#That is Backup_script.sh

# To create source_dir & backup_dir first
mkdir /home/user/source
mkdir /home/user/backup

# Source directory to be backed up
source_dir="/home/user/source"

# Backup destination directory
backup_dir="/home/user/backup"

# Timestamp for backup filename
time_stamp=$(date +"%Y%m%d-%H%M%S")

# Create a backup archive
backup_filename="backup_$time_stamp.tar.gz"
backup_filepath="${backup_dir}/${backup_filename}"

echo "Creating backup of $source_dir..."

tar -czvf "$backup_filepath" "$source_dir"

if [ $? -eq 0 ]; then
  echo "Backup successful! Archive saved to: $backup_filepath"
else
  echo "Backup failed. Check for errors."
fi
Output :

Here's a breakdown of the script:
Source and Backup Directories:
Set the
source_dirvariable to the directory you want to back up.Set the
backup_dirvariable to the location where you want to store the backup.
Timestamp for Backup Filename:
- Generate a timestamp to include in the backup filename.
Backup Archive Creation:
Use the
tarcommand to create a compressed archive (tar.gz) of the source directory.The
-czvfoptions stand for:c: create a new archive.z: compress the archive using gzip.v: verbosely list the files processed.f: use archive file specified.
Check Backup Status:
Verify if the backup was successful by checking the exit status of the
tarcommand.Display a success message with the backup file path or an error message.
Adjust the source_dir and backup_dir variables according to your setup. Save the script to a file (e.g., backup_script.sh), make it executable using chmod +x backup_script.sh, and execute it with ./backup_script.sh.
About Cron and Crontab.
Cron is a time-based job scheduler in Unix-like operating systems. It allows users to schedule jobs (commands or scripts) to run periodically at fixed times, dates, or intervals. Cron jobs are defined and managed using the crontab command and configuration files.
Here's a brief overview of cron and crontab in shell scripting:
- Cron Syntax :
Cron jobs are defined using a specific syntax, which consists of five fields representing minute, hour, day of the month, month, and day of the week.
* * * * * command_to_be_executed
*represents a wildcard, meaning "every."The five fields are space-separated.
You can use numbers or ranges to specify specific values.
Example :
# Run a job every day at 2:30 AM
30 2 * * * command_to_be_executed
- Crontab :
crontab is the command used to manage user-specific cron jobs. Each user can have their own crontab file, which is a table containing cron jobs.
Viewing Current Cron Jobs :
crontab -lEditing Cron Jobs :
crontab -eRemoving All Cron Jobs :
crontab -r
- Shell Script in Cron :
You can run shell scripts as cron jobs by specifying the script's path in the crontab file.
# Run a shell script every day at 3:00 AM
0 3 * * * /path/to/your_script.sh
- Cron Job Examples :
a. Running a Script Every Hour :
0 * * * * /path/to/your_script.sh
b. Running a Script Every Day at Midnight :
0 0 * * * /path/to/your_script.sh
c. Running a Script Every Monday at 8:30 AM :
30 8 * * 1 /path/to/your_script.sh
- Common Fields :
*(Wildcard) - Any value.*/n- Every n units (e.g.,*/15for every 15 minutes).Here's a breakdown of the meaning of each asterisk (*) in a cron job:
Minute (0 - 59):
0-59 * * * **: Every minute.
Hour (0 - 23):
* 0-23 * * * **: Every hour.
Day of the Month (1 - 31):
* * 1-31 **: Every day of the month.
Month (1 - 12 or names):
* * * 1-12 **: Every month.
Day of the Week (Sunday is 0 and Saturday is 6):
* * * * 0-6*: Every day of the week.
- Logs :
Cron jobs typically generate output and errors. Ensure your script redirects output appropriately.
0 3 * * * /path/to/your_script.sh >> /path/to/logfile.log 2>&1
This example redirects both standard output and error to a log file.
Cron jobs are a powerful tool for automating repetitive tasks. When using crontab, ensure that the environment variables and paths necessary for your script are correctly set, as cron jobs run in a minimal environment. Test your cron jobs thoroughly to avoid surprises.
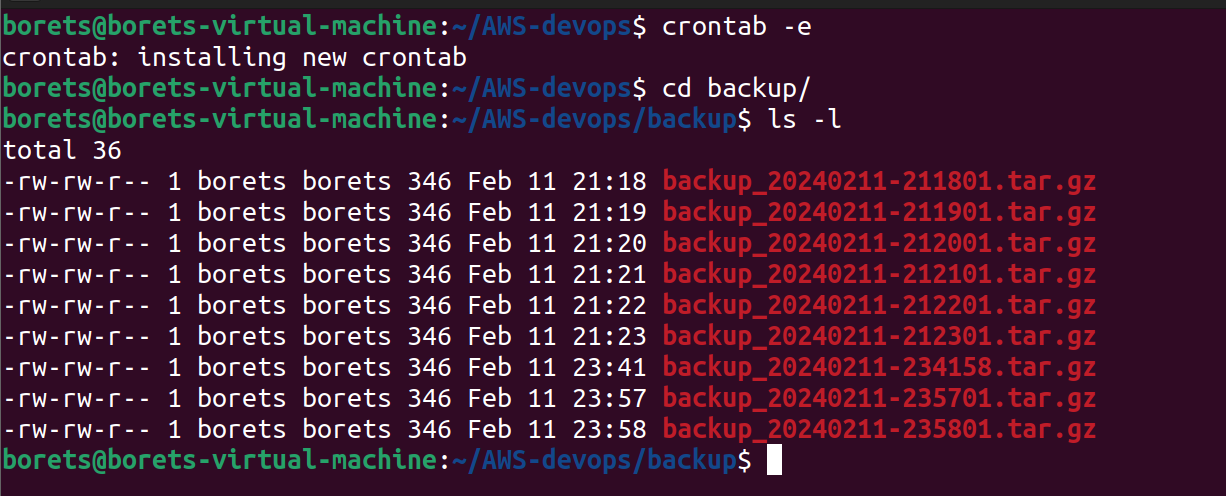
Using Cron job to automate the backup Script.
We have already created the #Backup_script.sh in the above section, we are trying to automate that script to execute automatically after some interval.
# To check if any cron job running in background
crontab -l
# To execute Cron job
crontab -e

# It will ask to select the text editor (like nano, vim, etc), if you are trying for first time.
1
we are trying to execute that script for every single minute.
# Edit this file to introduce tasks to be run by cron.
#
# Each task to run has to be defined through a single line
# indicating with different fields when the task will be run
# and what command to run for the task
#
# To define the time you can provide concrete values for
# minute (m), hour (h), day of month (dom), month (mon),
# and day of week (dow) or use '*' in these fields (for 'any').
#
# Notice that tasks will be started based on the cron's system
# daemon's notion of time and timezones.
#
# Output of the crontab jobs (including errors) is sent through
# email to the user the crontab file belongs to (unless redirected).
#
# For example, you can run a backup of all your user accounts
# at 5 a.m every week with:
# 0 5 * * 1 tar -zcf /var/backups/home.tgz /home/
#
# For more information see the manual pages of crontab(5) and cron(8)
#
# m h  dom mon dow   command
*/1 * * * * bash /home/borets/AWS-devops/bacukp.sh
# To end the cron job put '#' as prefix and make it comment.
#*/1 * * * * bash /home/borets/AWS-devops/bacukp.sh
Output :

About User Management
A user is an entity, in a Linux operating system, that can manipulate files and perform several other operations. Each user is assigned an ID that is unique for each user in the operating system. we will learn about users and commands that are used to get information about the users. After installation of the operating system, the ID 0 is assigned to the root user and the IDs 1 to 999 (both inclusive) are assigned to the system users. hence the ids for local users begin from 1000 onwards.
In a single directory, we can create 60,000 users. Now we will discuss the important commands to manage users in Linux.
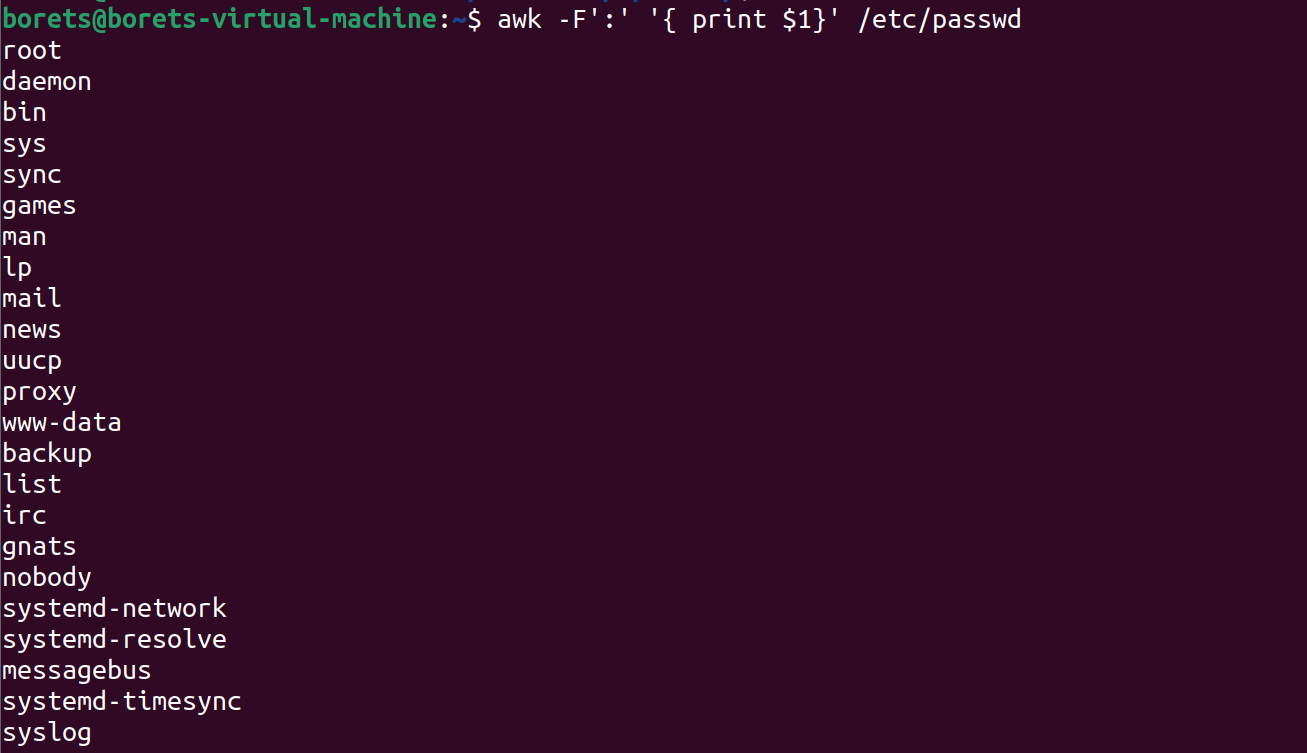
- To list out all the users in Linux, use the
awkcommand with-Foption. Here, we are accessing a file and printing only the first column with the help of print $1 andawk.
awk -F':' '{ print $1}' /etc/passwd

- Using
idcommand, you can get the ID of any username. Every user has an id assigned to it and the user is identified with the help of this id. By default, this id is also the group id of the user.
id username

- The command to add a user,
useraddcommand adds a new user to the directory. The user is given the ID automatically depending on which category it falls in. The username of the user will be as provided by us in the command.
sudo useradd username

- Using
passwdcommand to assign a password to a user. After using this command we have to enter the new password for the user and then the password gets updated to the new password.
sudo passwd username

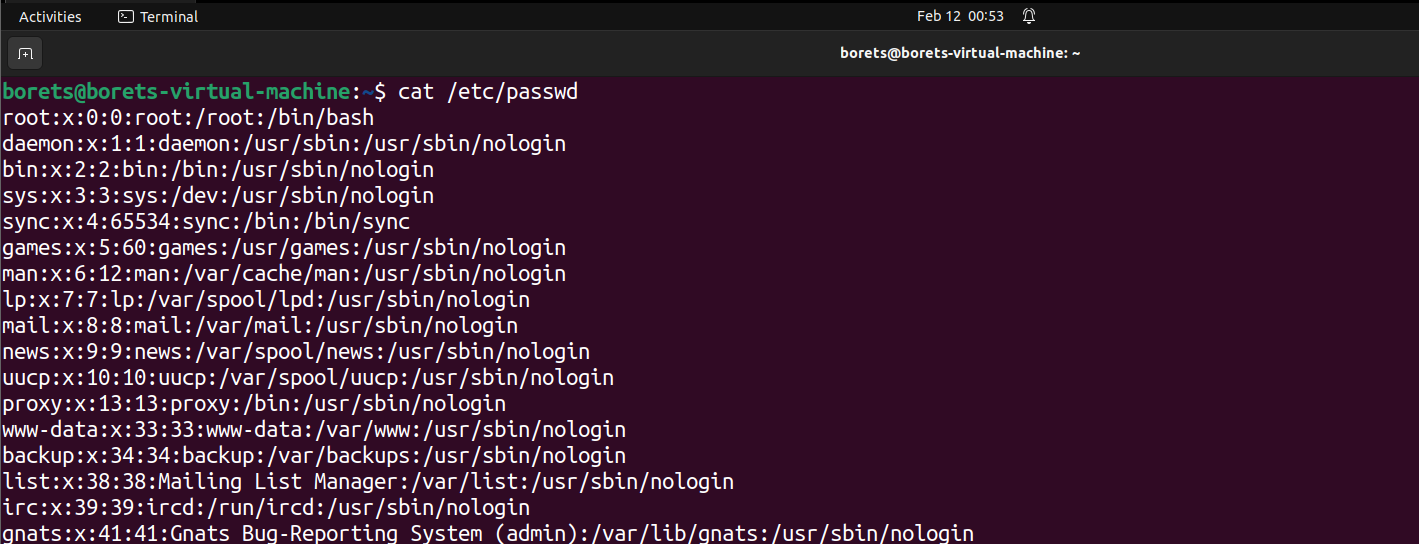
- Accessing a user configuration file.
cat /etc/passwd commands prints the data of the configuration file. This file contains information about the user in the format.
username : x : user id : user group id : : /home/username : /bin/bash
cat /etc/passwd

Now we will go through the commands to modify information.
- The command to change the user ID for a user.
sudo usermod -u new_id username
This command can change the user ID of a user. The user with the given username will be assigned with the new ID given in the command and the old ID will be removed.

- Command to Modify the group ID of a user.
sudo usermod -g new_group_id username
This command can change the group ID of a user and hence it can even be used to move a user to an already existing group. It will change the group ID of the user whose username is given and sets the group ID as the given new_group_id.

- You can change the user login name using
usermodcommand. The below command is used to change the login name of the user. The old login name of the user is changed to the new login name provided.
sudo usermod -l new_login_name old_login_name

- The command to change the home directory. The below command change the home directory of the user whose username is given and sets the new home directory as the directory whose path is provided.
sudo usermod -d new_home_directory_path username

- You can also delete a user name. The
userdel -rcommand deletes the user whose username is provided. Make sure that the user is not part of a group. If the user is part of a group then it will not be deleted directly, hence we will have to first remove him from the group and then we can delete him.
userdel -r username

Hope in this blog find you sound knowledge of Advance Shell scripting & User management.
Happy Learning : )
Subscribe to my newsletter
Read articles from Harish Gawande directly inside your inbox. Subscribe to the newsletter, and don't miss out.
Written by
