ADVANCED DECLARATIVE JENKINS PIPELINE WITH MASTER and Agent Node Configuration
 Sidharth Dash
What is a Pipeline ?
A pipeline is a collection of steps or jobs interlinked in a sequence. The goal of a pipeline is to automate and streamline the process of building, testing, and deploying software code, reducing manual intervention and improving efficiency.

What is a Declarative Pipeline ?
Declarative pipelines introduce a more structured and declarative way of defining pipeline stages, tasks, and parameters. They utilize a more human-readable syntax and break down complex processes into manageable stages.
It has richer syntactical features over Scripted Pipeline syntax, and is designed to make writing and reading Pipeline code easier. Where as a scripted pipeline is a original approach to Jenkins Pipeline. It allows writing arbitrary groovy code with in a pipeline , granting complete control over the execution flow. The scripted Pipeline utilizes groovy language for defining pipeline steps and logic.
pipeline {
agent any
stages {
stage("Code") {
steps{
echo "Code Cloned" // This is ==== stage 1 where Code Cloned===== //
}
}
stage("Build"){
steps{
echo "Code built" //This is === stage2 where code is build ====//
}
}
stage("Test"){
steps{
echo "Code Tested" //=== stage 3 code tested==//
}
}
stage("Deploy"){
steps{
echo "Code Deployed" //---- stage 4 code is deployed --//
}
}
}
}
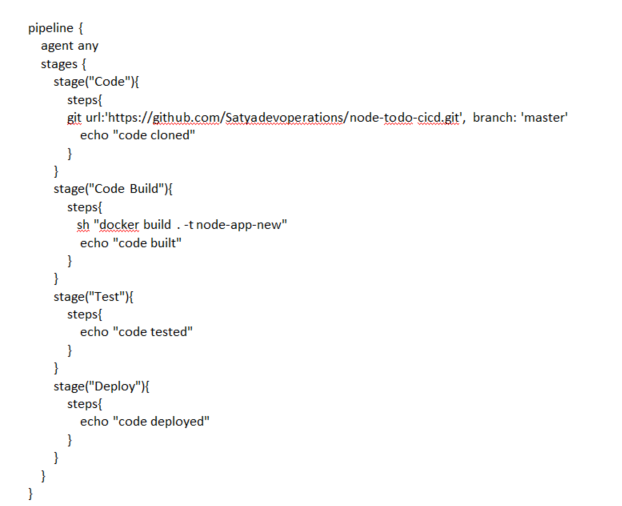
Here in the below example I can see the code has been cloned and after then it got built then tested and finally Deployed.
Here I have selected Add a new item ---> pipeline
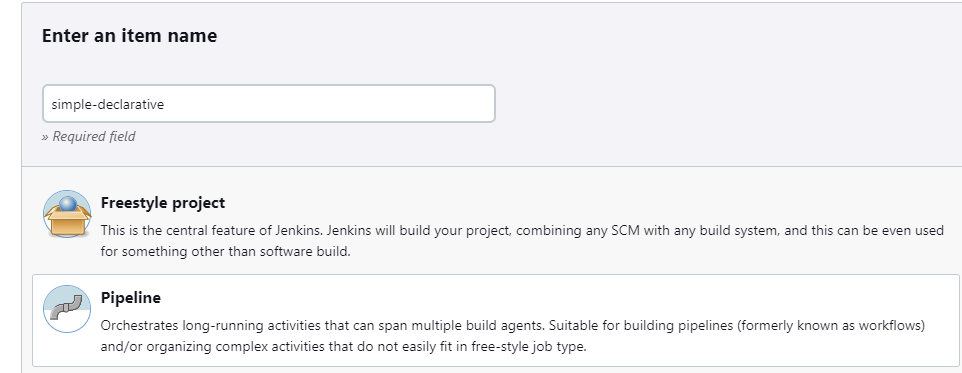
Now under advanced project options i have selected Pipeline script.

Then in the Script option in Groovy language i have written a simple declarative script which will clone the code from Git repository and then build the code using docker build command.
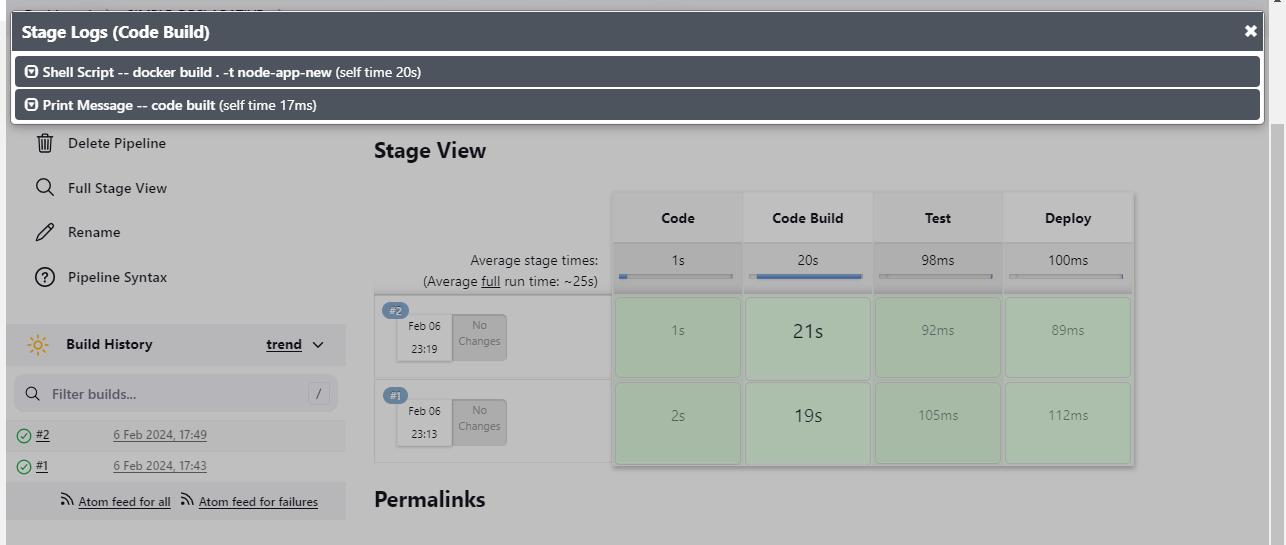
When i click on Build Now i will get the output in a modular format. One phase my code is getting cloned another phase it's getting build and then test and deployed.
Suppose i want to see the logs in a modular format that i can also see in the below screen shot
Well the above is a simple narration how declarative pipeline works. Now Lets learn a bit advanced options which is : production ready Declarative pipeline....
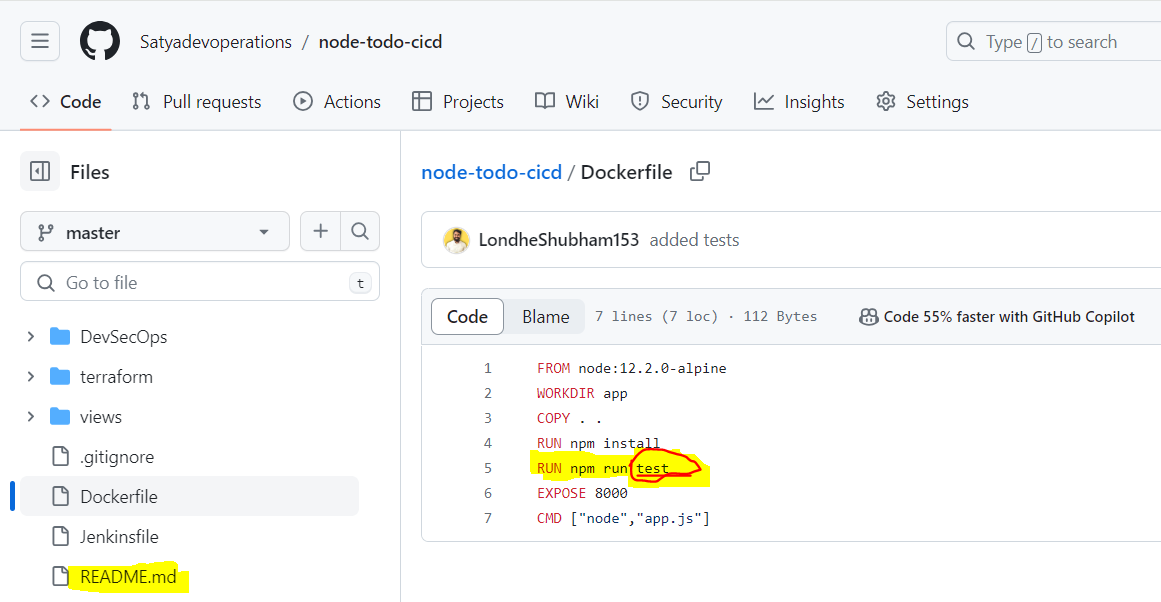
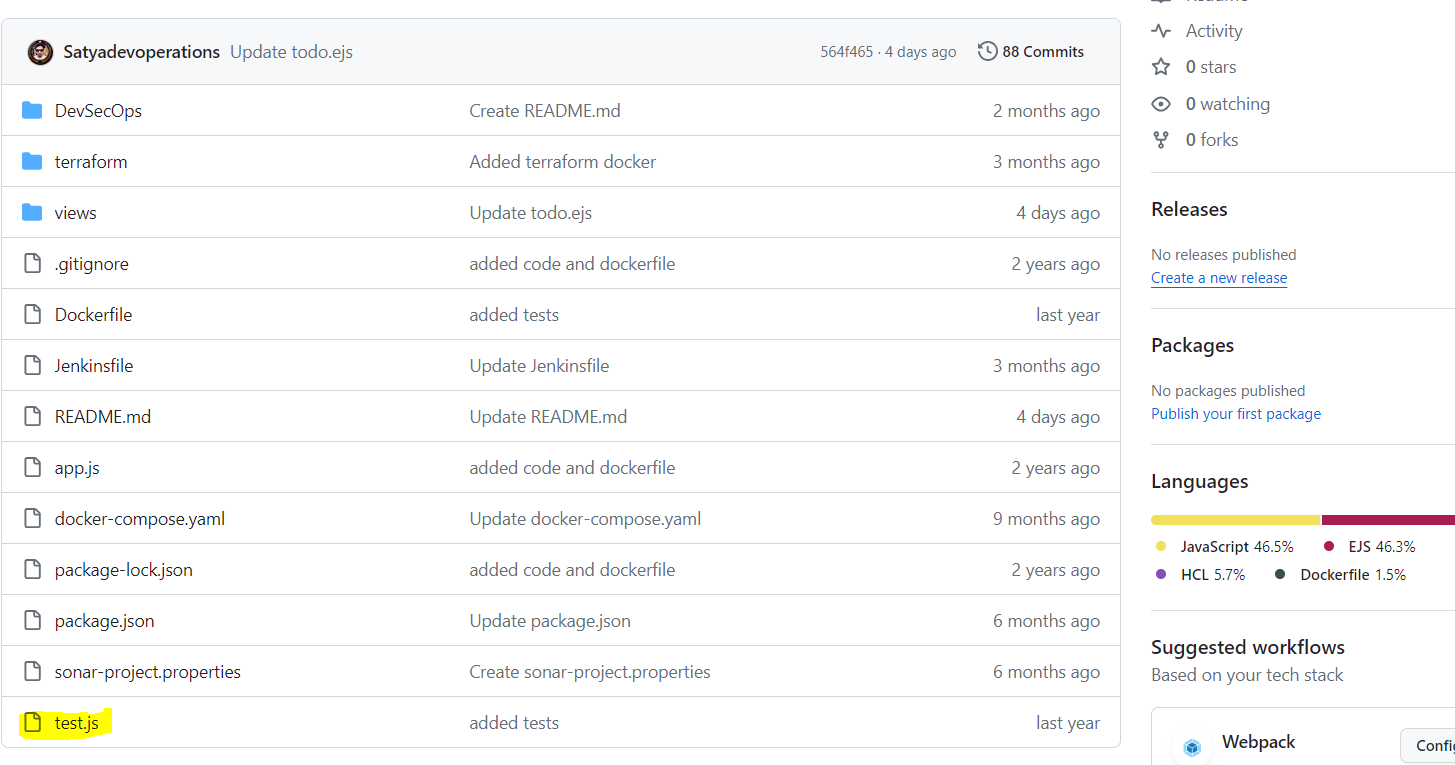
In production ready Pipeline first code is getting Cloned via Github and then its getting build by tool docker and then code push is performed to the Docker hub and code testing is done by sonarqube(but here code testing is done by the command:- RUN npm run test it's available in the docker file) and the test case are written in test.js file in Github repository) and finally its deployed Successfully in the EC2 instance.
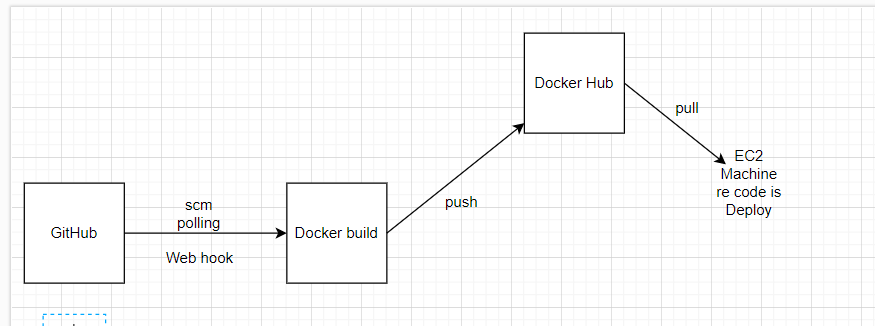
Jenkins basically asks GitHub to clone the code instructs Docker to build the code and then push the code in Docker hub and then finally deploy to EC2. For that there is a dedicated Jenkins server which is called as Master node. In the Master node Jenkins and Java will be installed. Here in the Master node job Definition will be there and there will be agents where we will run the jobs.
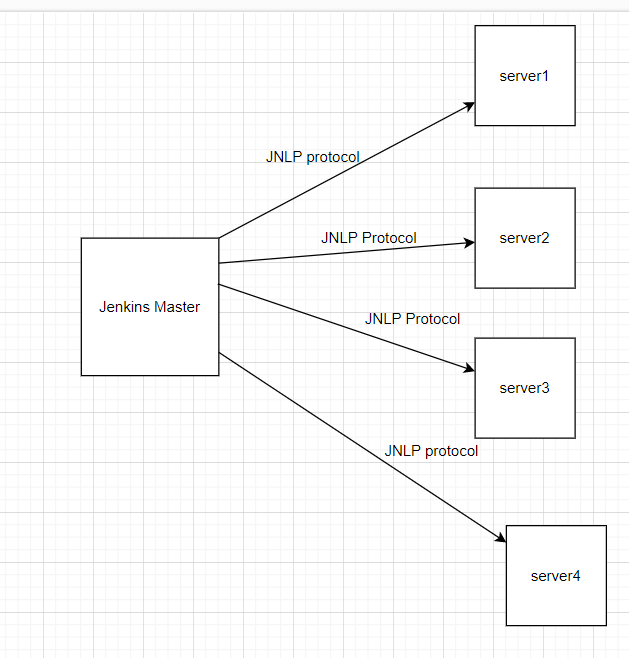
The connections happens from Jenkins Master to Slave nodes through http by JNLP protocol.(It's called Java Network Launch Protocol) Suppose the Jenkins master URL changes frequently then it's tough to connect to the slave nodes. So i need to allocate the Elastic I.P(public ip) to the running EC2 instance.
Lets discuss how we will create Node Master and Worker node and create connection between them.
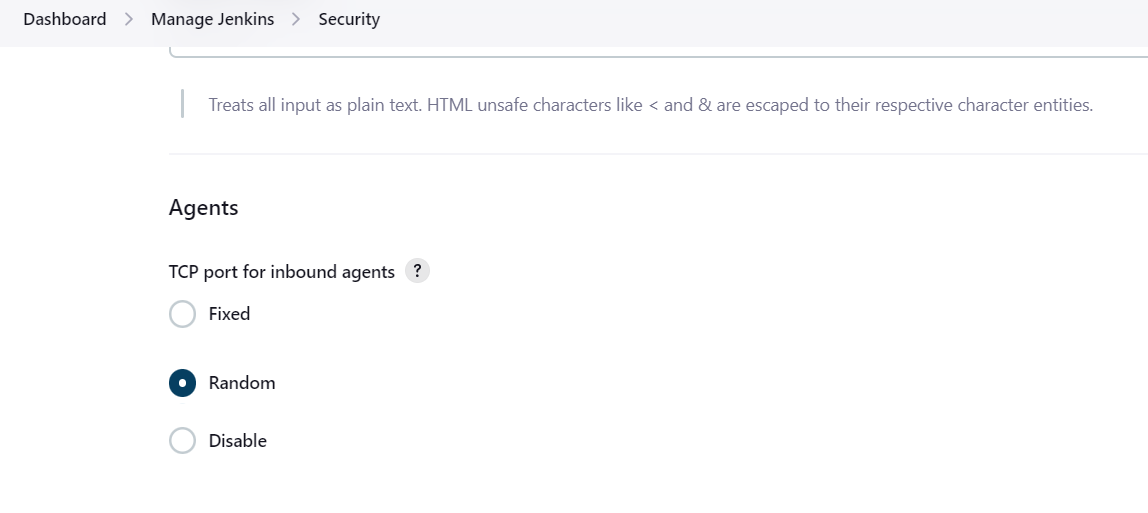
Under Dash board --> Manage Jenkins --> Security. There will be three options such as 1. Fixed 2. Random 3. Disable.
Fixed option is used where we know the port details where Jenkins want to communicate. But in this scenario i don't know which port Jenkins want to communicate so i opt for Random option
But in our current project i will connect with the slave machines with ssh key pair combination. So we have launched two ec2 instances named Jenkins-Master and Jenkins-demo-agent respectively.
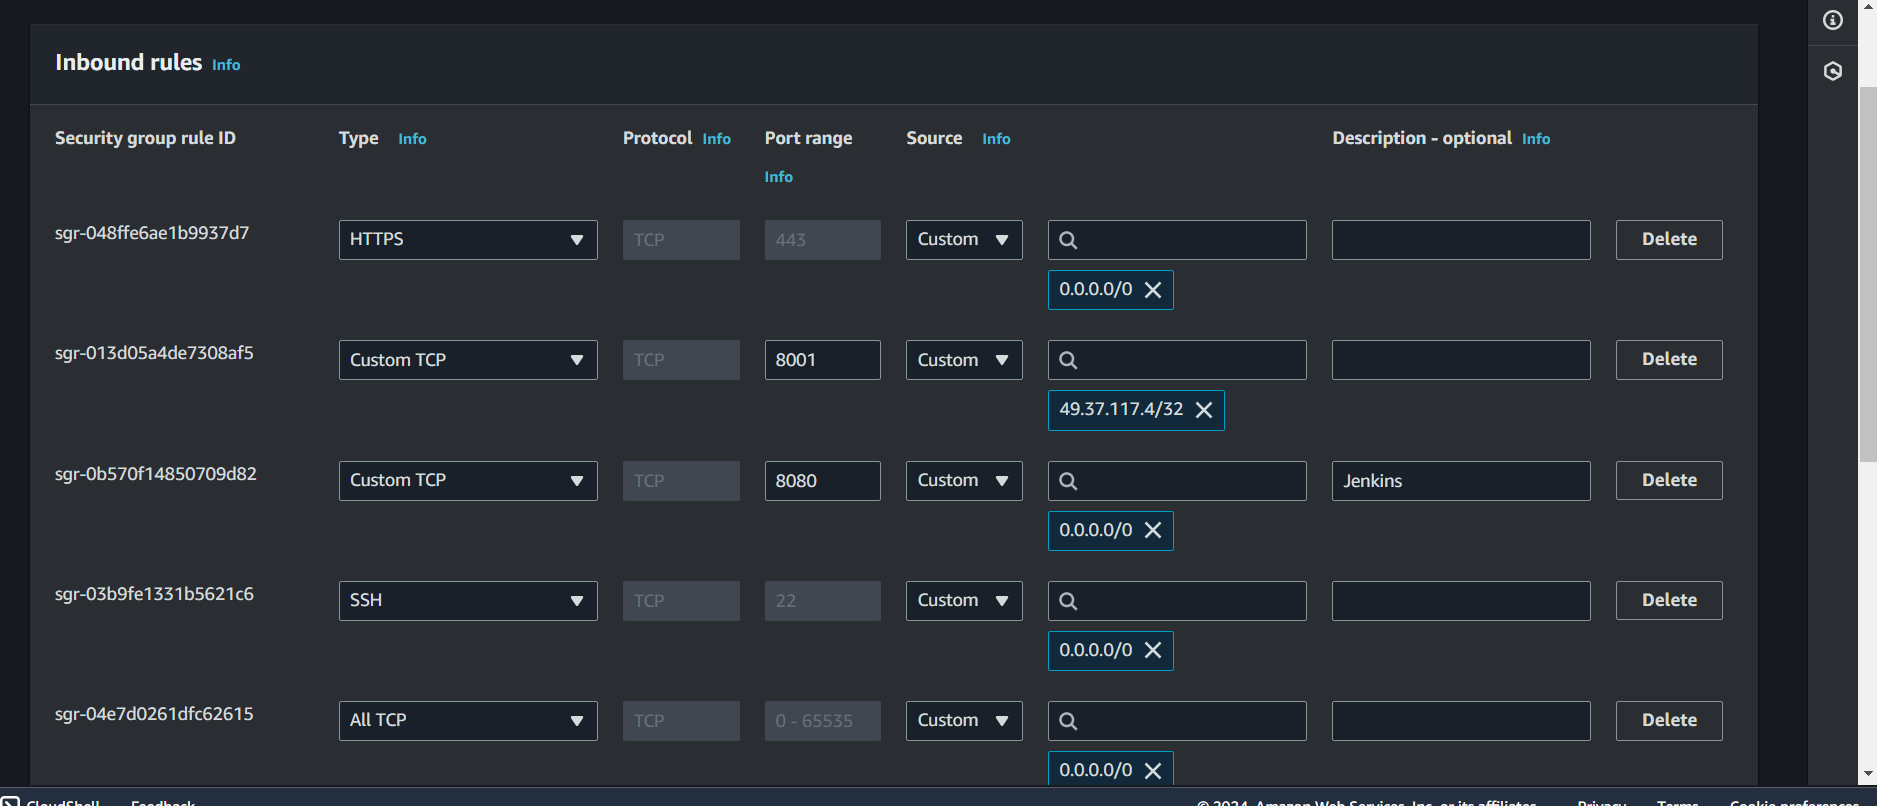
In EC2 i have launched a new instance named slave1 and under security group options i have done some modifications,
Now under Dashboard -->Manage Jenkins-->Nodes---> New node
Here under New node mention the node server details. And then i installed Java on the node server. After installing Java we can run the below commands


Here the curl command will download the agent.jar file. And then when i ran the below command
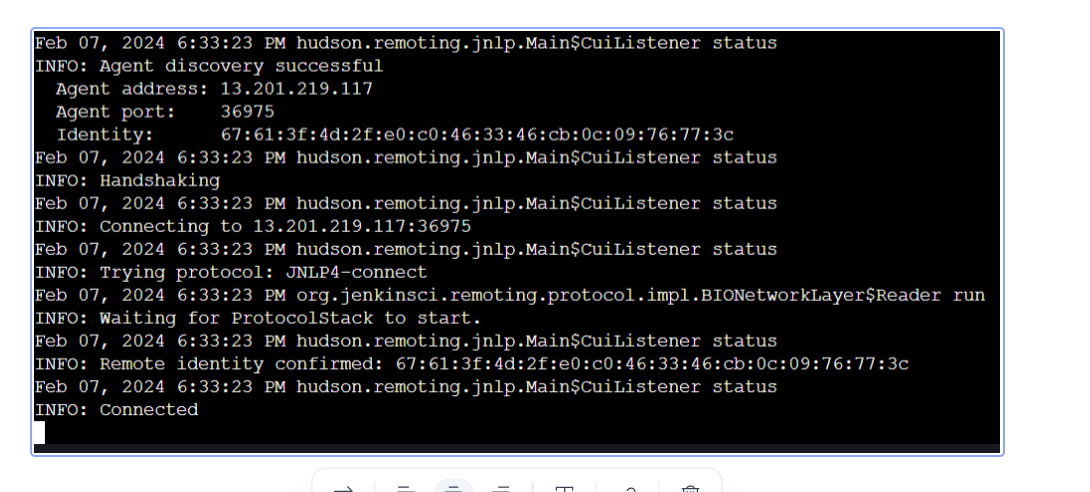
java -jar agent.jar -jnlpUrl http://13.201.219.117:8080/computer/server1/jenkins-agent.jnlp -secret 2142f3f7a2ec92b3b719d27b20ab74b0b176a3fd06e53d0747dfde2df7e903cb -workDir "/home/ubuntu"
I can see the connection has been established and it has been connected on 36975 port and its showing status connected
Now go to the Jenkins and just refresh it i can see the connection is established.
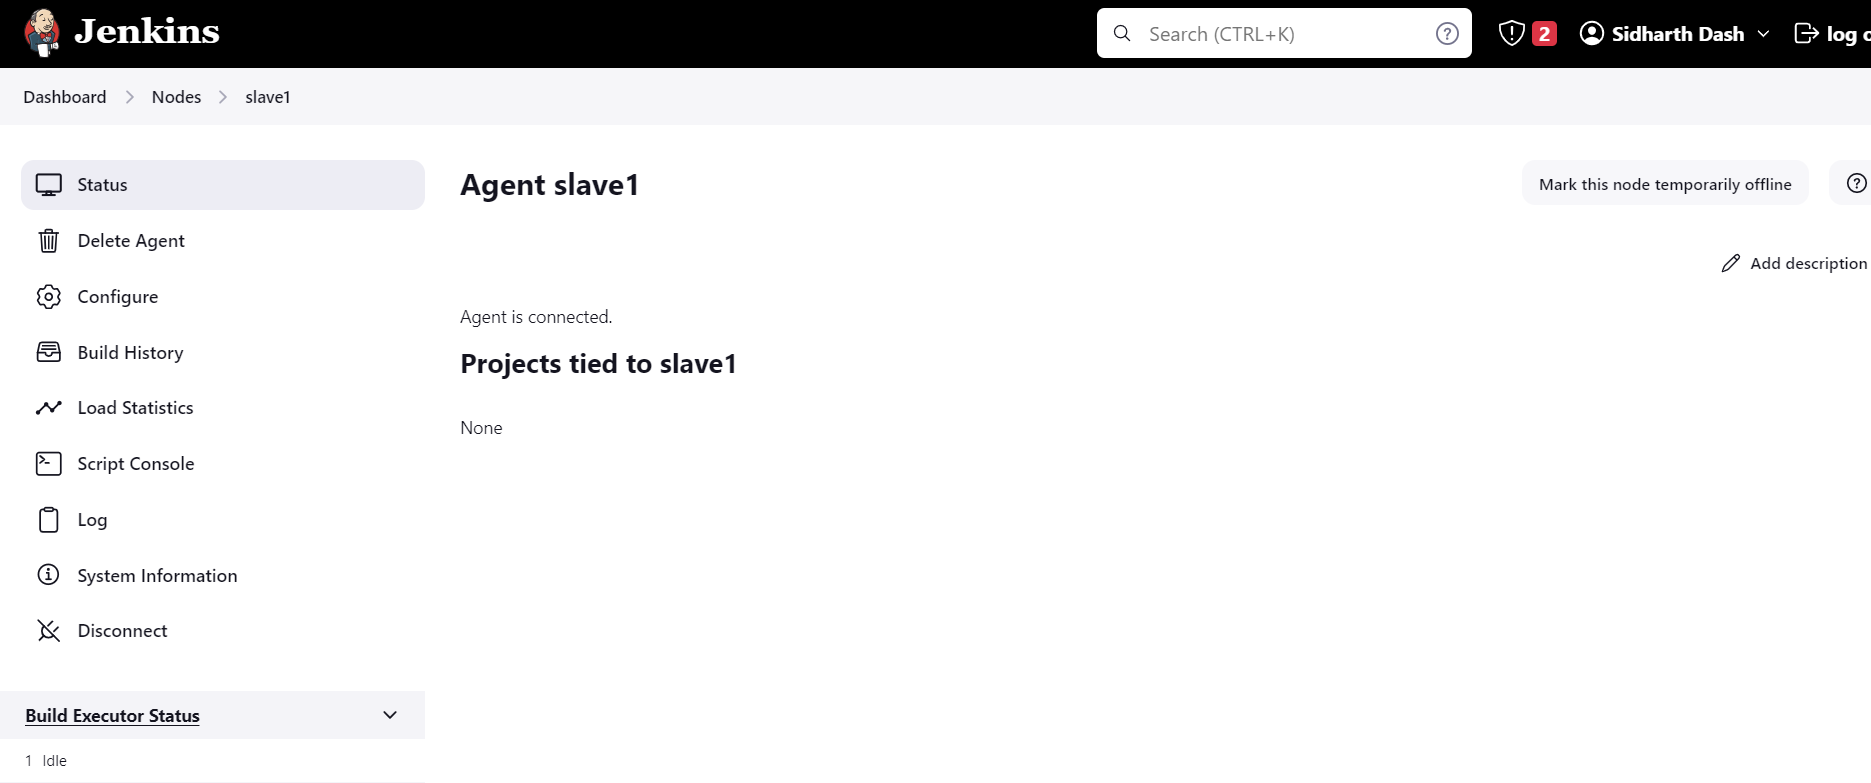
under nodes i have created a node named slave1 and could see it has been connected with the master node and in-sync as well.

Now Lets discuss how will i connect the Jenkins-Master Node with Jenkins-demo agent with the SSH key pair combination. Here i have created two instances named Jenkins-Master and jenkins-demo-agent and for the master i have opened the port 8080 and for Jenkins-demo-agent i have opened the port 8000 in the security group option.

Here in the master node (server) i will generate a ssh-key and keep the Private key in the master only and then in the Agent node i will share the public key . Through the key pair combination i can connect the Agent by logging in with the Master.
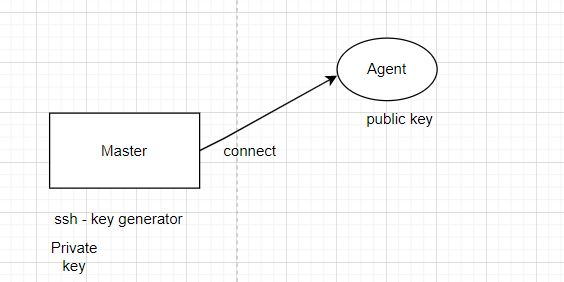
In the MASTER server i have done the below commands
cd .ssh/
then i have typed
$ ssh-keygen
Generating public/private rsa key pair
Enter file in which to save the key (/home/ubuntu/.ssh/id_rsa): //If i skip this then a file named id_rsa will be created automatically //
Enter passphrase(empty for no passphrase):
Enter same passphrase again:
Your identification has been saved in /home/ubuntu/.ssh/id_rsa.
In the Master node only i have to do Keygen then the below details will come

Now here i have to copy the public key from the master node and then paste in the authorized_keys folder in demo-agent-node instance under the .ssh folder.
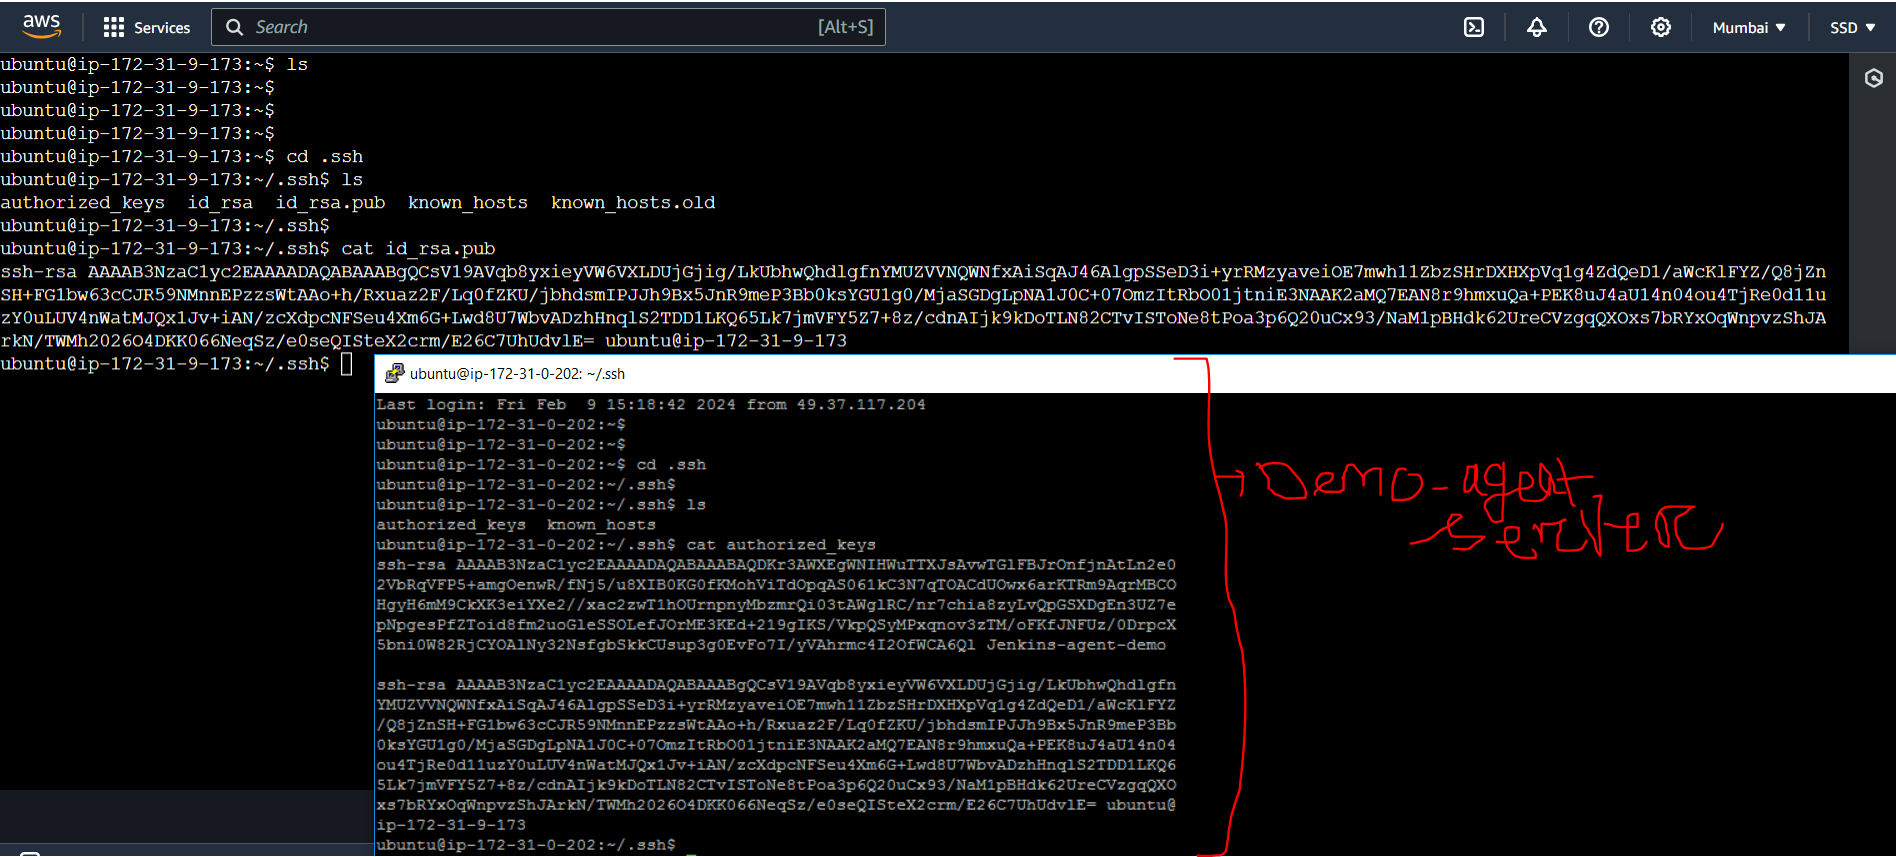
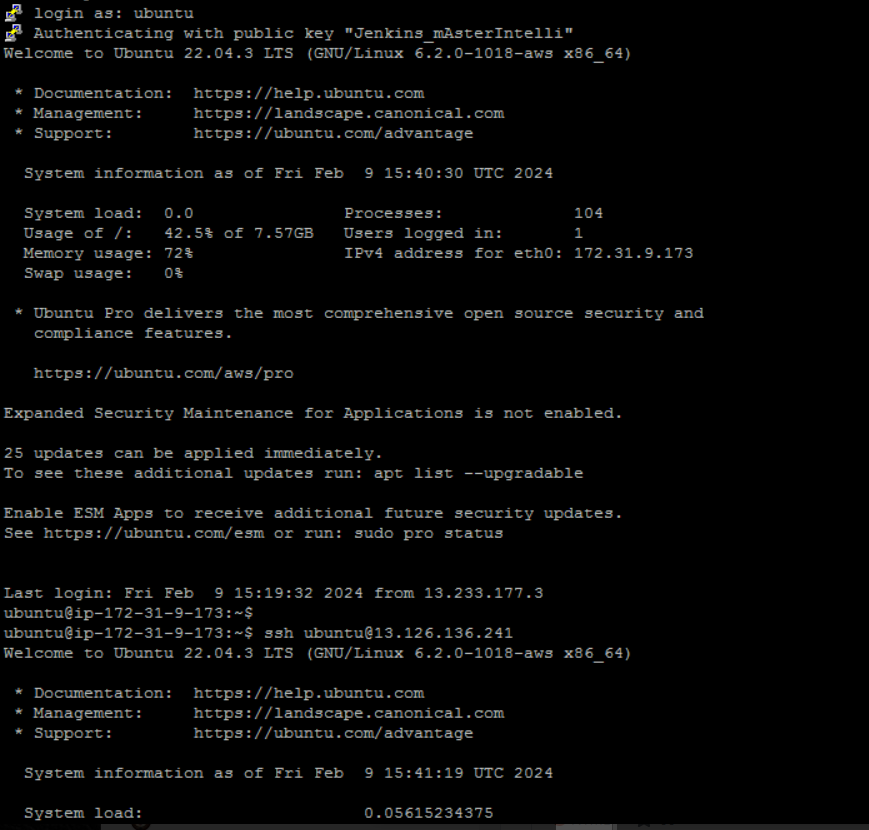
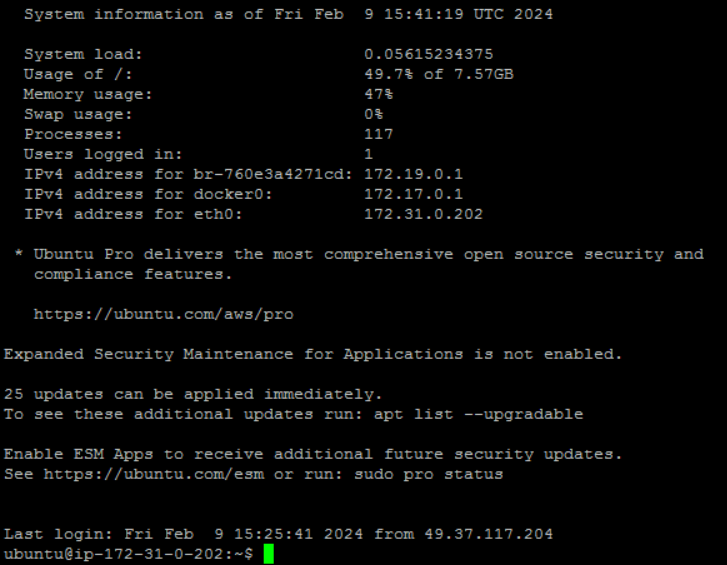
From my Master instance i have established connection to the agent node
Jenkins-demo-agent node from master with
ssh command :-- ssh ubuntu@i.paddressoftheagentnode.

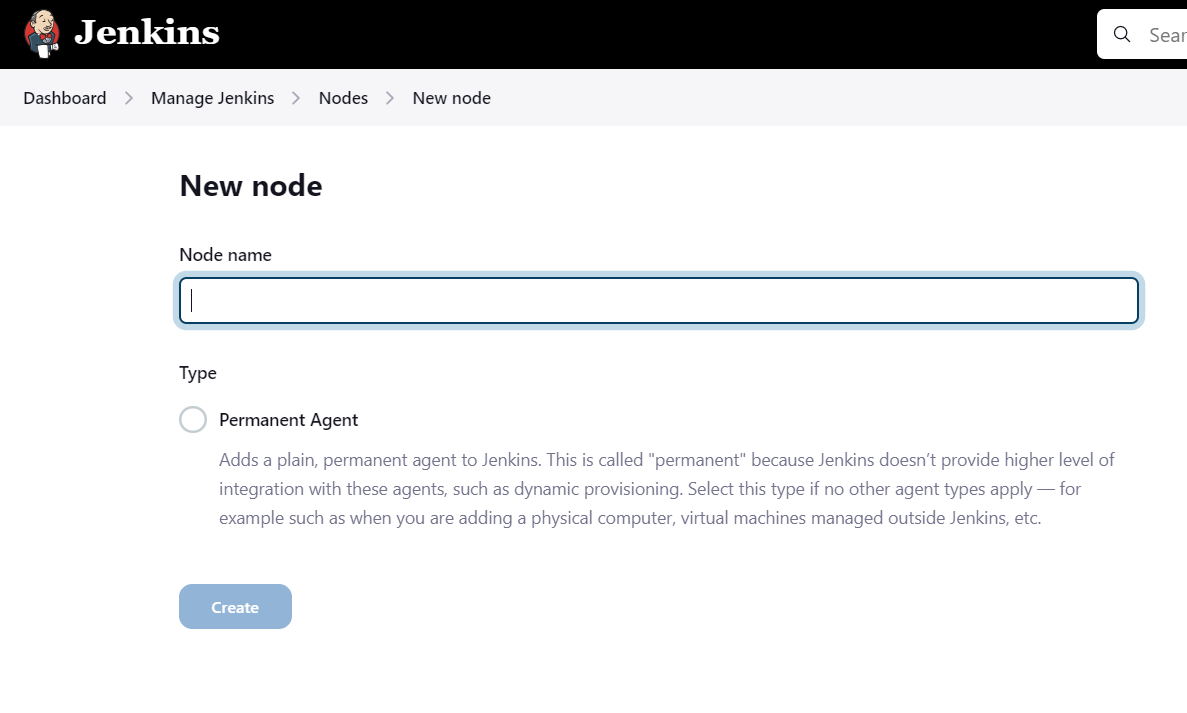
Now i will go to the Jenkins there under node i will create a new node and name as dev-agent. and i will select Permanent Agent option.
Now under dev-agent in configure option i will be providing my agent description. So here under Remote root directory option i will be providing the path where the operations will be performed as per the instructions given by the groovy language.
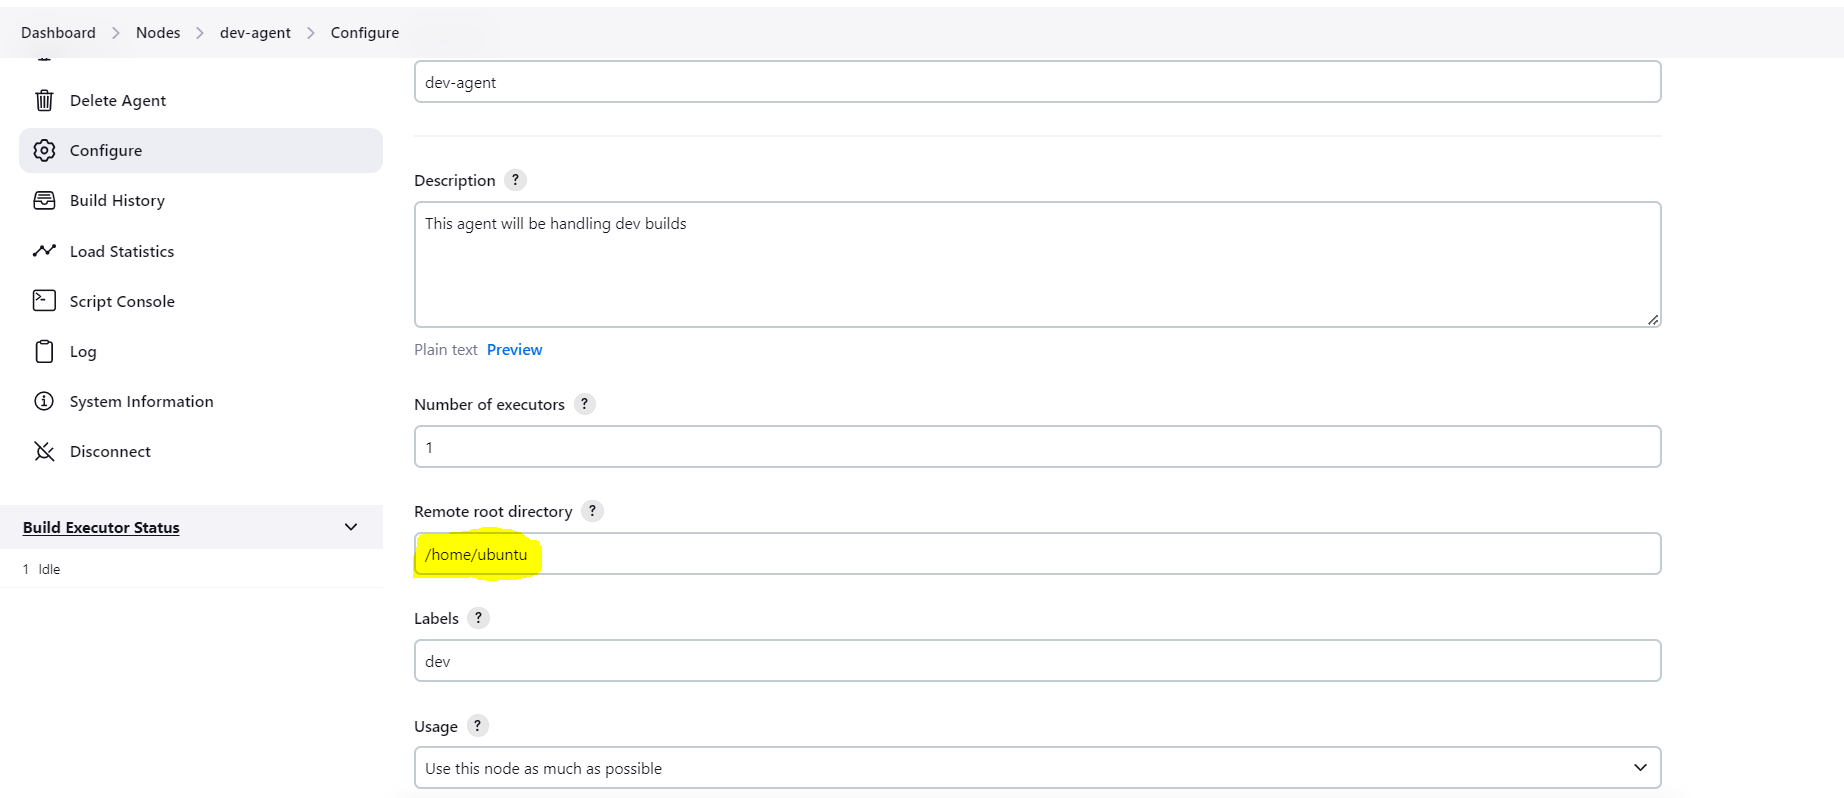
Under usage option there will be two options i will found..
Use this node as much as possible
Only build job with label expression matching this node: This option says that exclusively under dev agent jobs will be build.
Then under Credentials option i will click on Add --> Jenkins then below pop up will come.
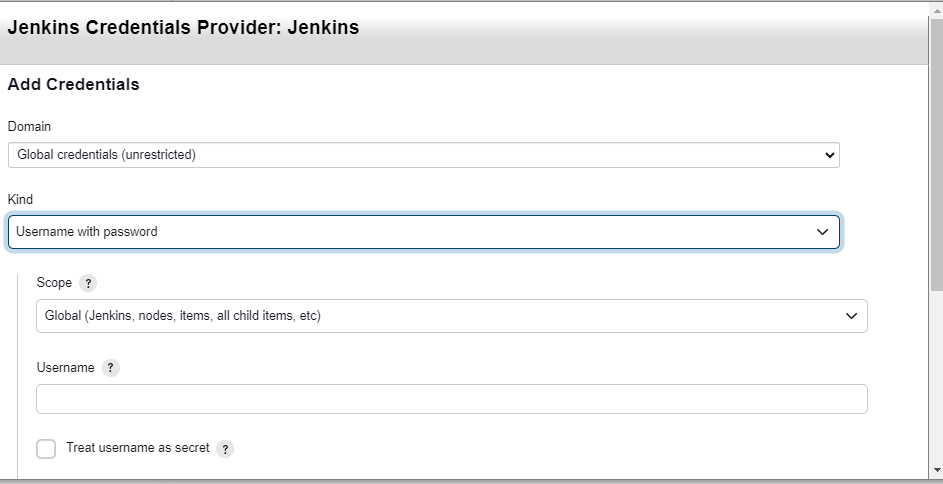
Here under kind label i will select option SSH Username with private key and agent username is ubuntu
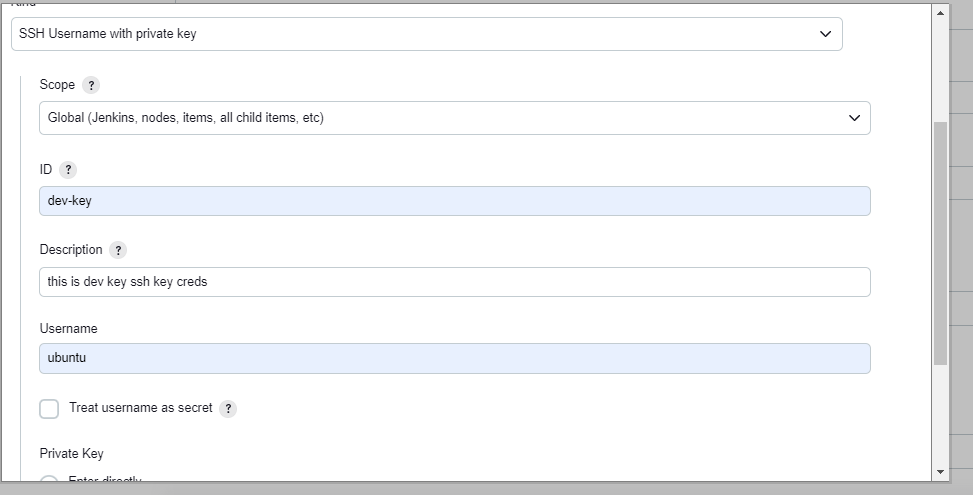
Then i will select Private Key---> enter directly

Then i will go to my master server there id_rsa is the private key and id_rsa.pub is the public key and then copy the private key and paste it in the Enter directly option in Jenkins.

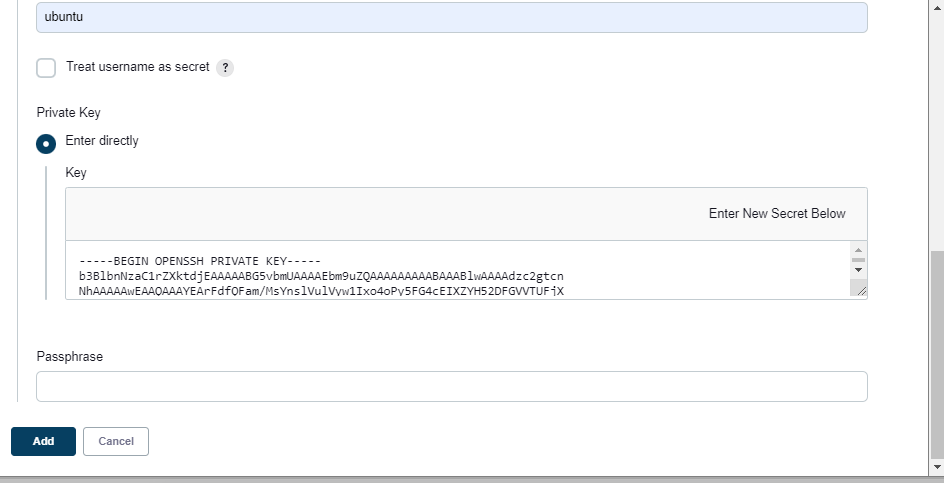
So Here i am connecting Jenkins to the agent node by providing the Private Key of the Master node to Jenkins so that it will automatically connect to the agent node(here agent node has already the public key) for that we are selecting the option Non verifying Verification Strategy under Host Key Verification Strategy.

We have another option as Known hosts file verification Strategy. Here we have to copy the content of the known_host and paste it in the agent node in Jenkins but as of now we are working on Non verifying Verification Strategy.

Now if you check the status of the dev-agent it will show the below image which shows not connected why because the Java which is prerequisite to run the jobs is not install so we have to install java. Here we will install the java version 17.0.9.

Once Java has been installed in the dev-agent node (Jenkins-demo-agent) Then and then if i launch dev-agent . And we will get the below
-- Java installation commands ---
apt update -y
apt install fontconfig openjdk-17-jre -y
java -version
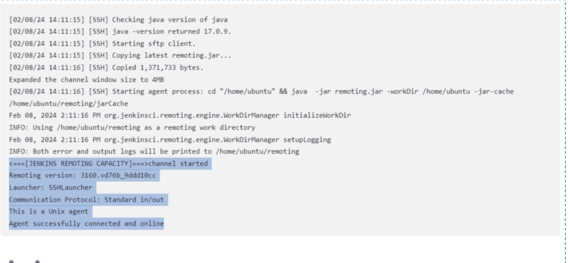
Now if i check the status i will get details of the Built-In Node --> In sync
Means Master and agent node both are in connected state and in Sync as well.

So Now i assign tasks to my dev-agent. So i have created a new job name
node-todo-cicd. and under description i have provided the below details. In real time environment when we work we will be assigning agents suppose for production its prod for development its dev etc.
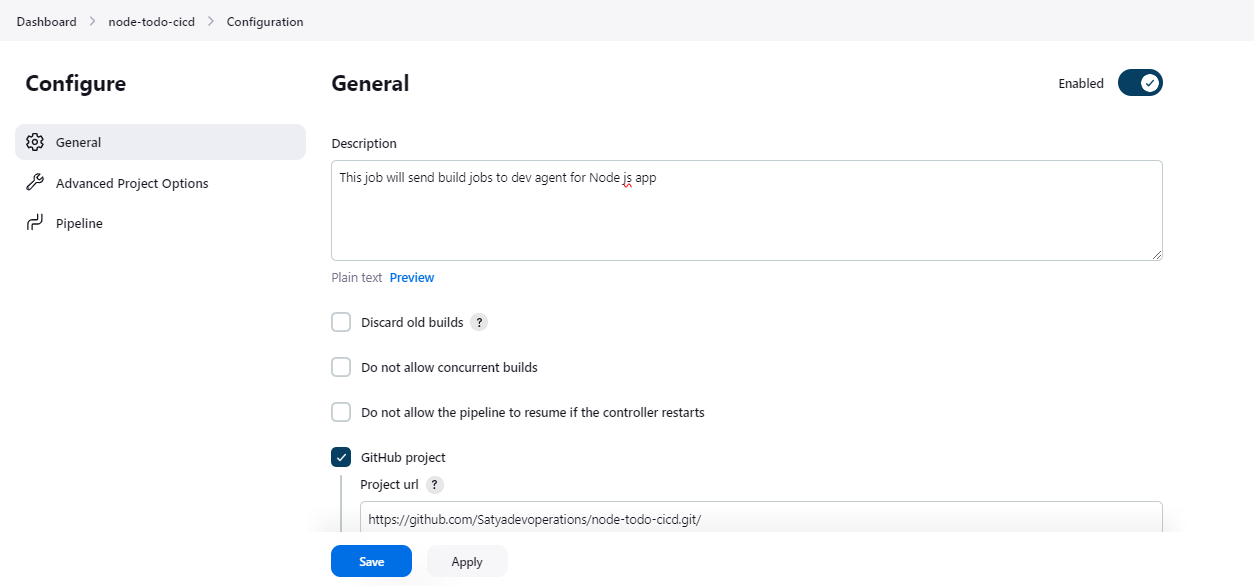
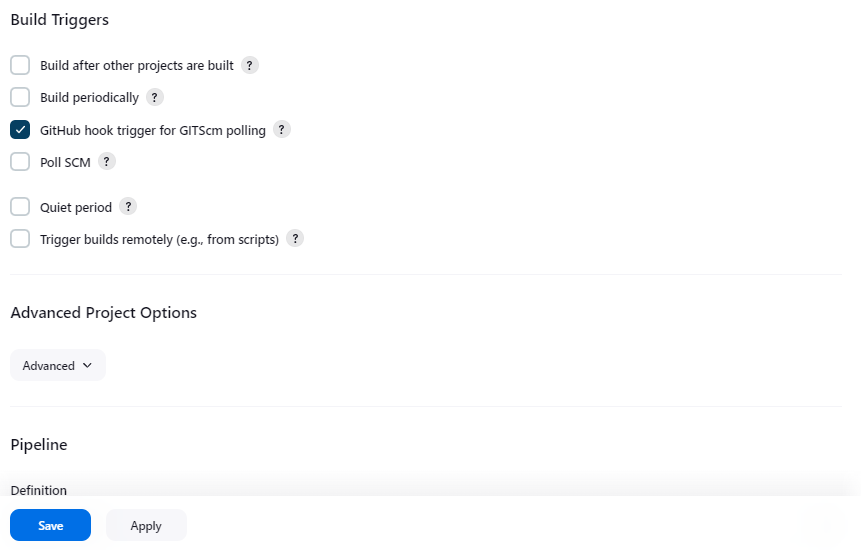
As i have selected GitHub hook trigger for GITScm polling. here i will login to my Github and then Under Web hook option i will add Web hook here i will copy the i.p address of master node and will paste it in the Payload URL section and will select the Just the push event means when the developer will perform any code push operation it will automatically perform the scm polling.. Before doing that i will make sure i will open the port number 8080 in the security group the Master server.
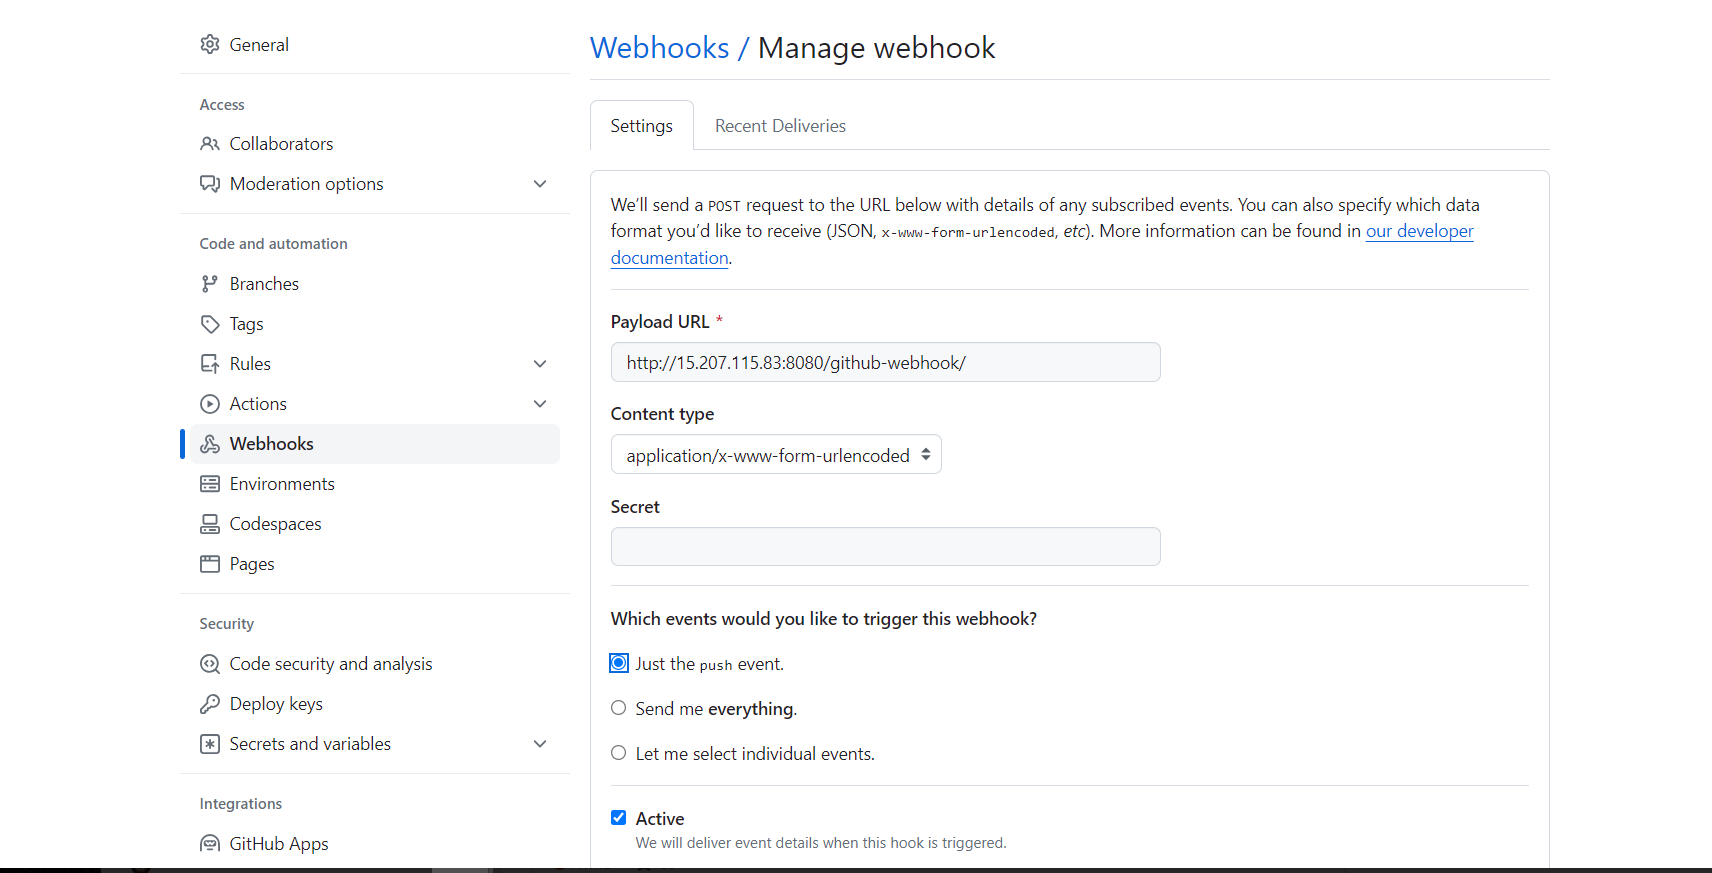
Once we will get the tick option means in Web hook (just refresh the page) it shows both GitHub and Jenkins are connected.

In the agent machine we will be installing docker and docker compose.
sudo apt-get install docker.io
sudo apt-get install docker-compose
then i will add the current user to the docker group.. and then reboot the server.

Then In Jenkins under Dashboard ---> Manage Jenkins --> Plugins
I will select plugin named:-- Environment Injector(This plugin makes it possible to set an environment for the build). and then restart the Jenkins,

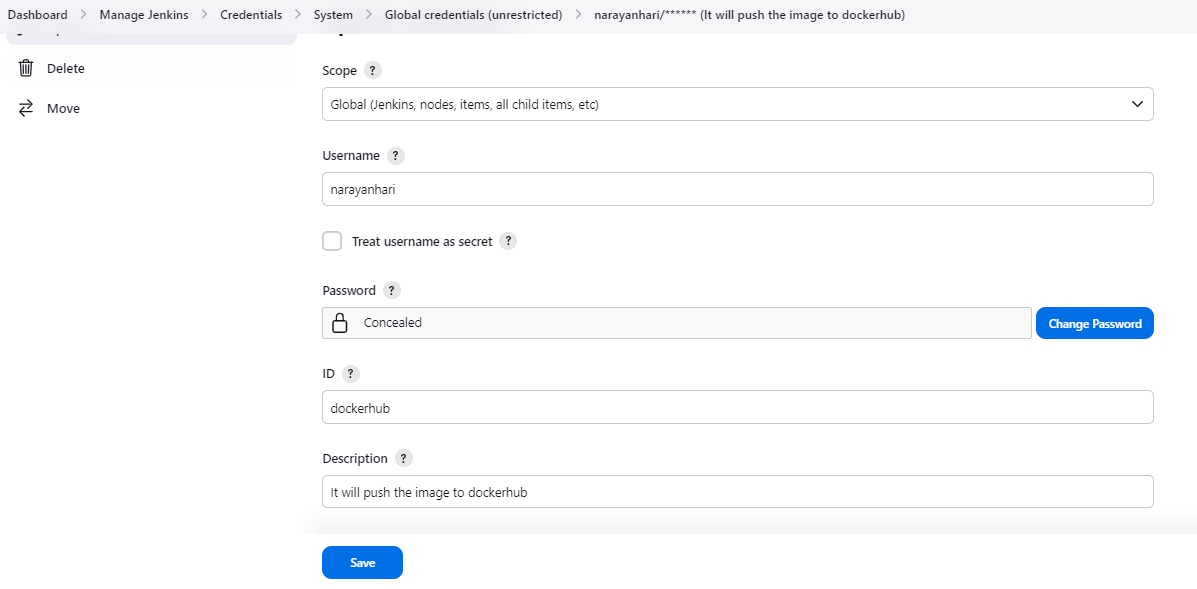
Then in Jenkins Dashboard --> Manage Jenkins --> Credentials --> System --> Global credentials(unrestricted) i will provide my docker hub username and dockerhub password.

Now under Pipeline script section we will understand the groovy language written for the declarative pipeline creation. The purpose of the Pipeline is mentioned below. Steps
It will take code from Github and then through webhook or scm polling it will build code and then Deploy the code.
Then Once the code has been build and deployed then the code will be packaged and it will be pushed into the docker hub.
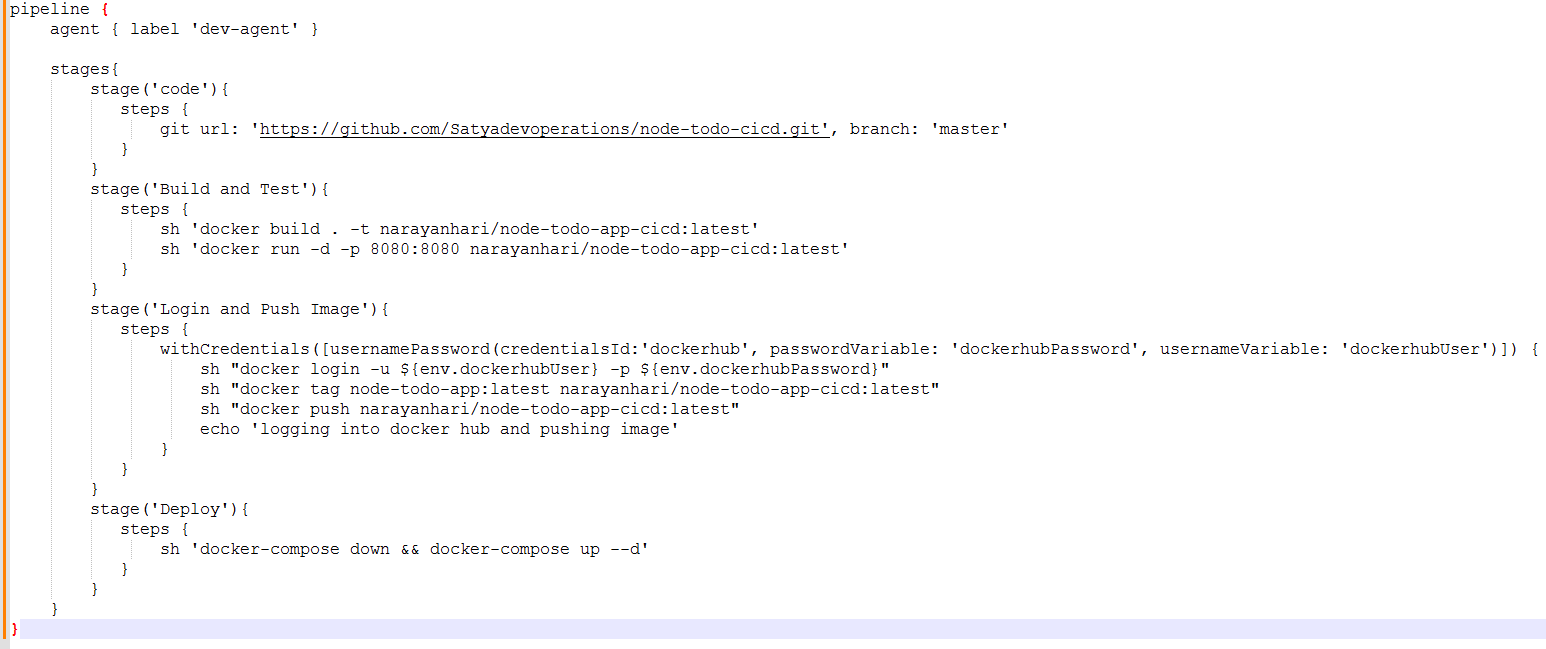
In pipeline we have to make stages under stages there will be option for stage: code, Build and Test and then Login and Push Image and then finally Deploy.
agent { label 'dev-agent' } :-- It means master node will run the job/pipeline on the dev-agent.
sh docker build . -t narayanhari/node-todo-app ----> i am building the code and also testing the code also and then tagging it with the version latest.
in the docker file i can clearly see the details.
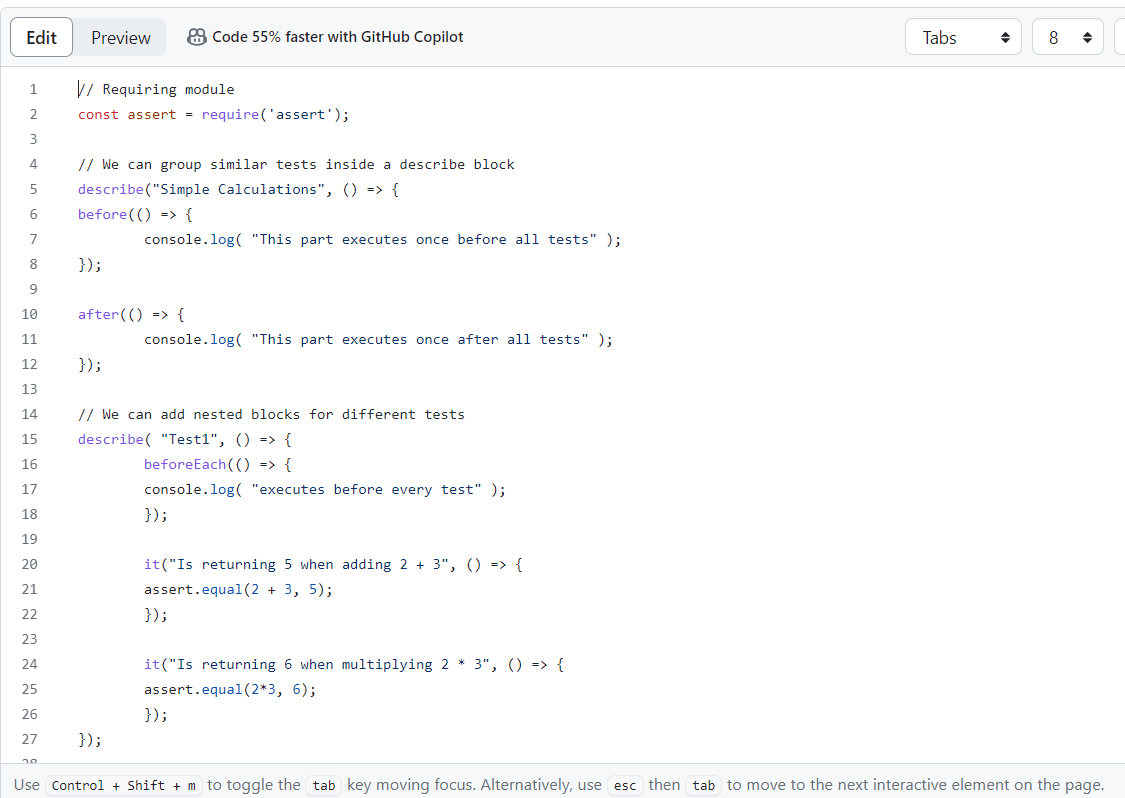
Then in the test.js the test cases has been written.
docker-compose down && docker-compose up --d ----> It will perform the deployment --d means no dependency..
withCredentials([usernamePassword(credentialsId:'dockerhub', passwordVariable: 'dockerhubPassword', usernameVariable: 'dockerhubUser')])
The withCredentials step in a Jenkins pipeline script is used to securely provide and use sensitive credentials, such as usernames and passwords, within the context of the pipeline.
withCredentials([usernamePassword(credentialsId:'dockerhub', passwordVariable: 'dockerhubPassword', usernameVariable: 'dockerhubUser')]) { ----- This code block is typically used when interacting with a Docker registry, such as Docker Hub, in a Jenkins pipeline. Let's break down the parameters:
credentialsId: This is the identifier of the Jenkins credential containing the Docker Hub credentials. It's a way to reference the stored credentials securely.How to see in the Jenkins:-- Dashboard -->Manage Jenkins--> Credentials
In short i am fetching the username and password from Jenkins in the dockerhub named variable named substituting these values in variable named 'dockerhubPassword' and 'dockerhubUser'
"docker login -u ${env.dockerhubUser} -p ${env.dockerhubPassword}" // thru environment variable it s loggin in to docker hub
docker run -d -p 8080:8080 narayanhari/node-todo-app-cicd:latest :-- I am running the container with tagging the version named latest


passwordVariable: This specifies the name of the environment variable that will store the password. The value of the password will be retrieved securely from the Jenkins credential.usernameVariable: Similar topasswordVariable, this specifies the name of the environment variable that will store the username. The username will be retrieved securely from the Jenkins credential.The credentials are automatically masked to prevent them from being printed in the console output, enhancing security.
Code is getting cloned from the Git repository and all the necessary items to build the code is present in the agent machine
git url: 'https://github.com/Satyadevoperations/node-todo-cicd.git', branch: 'master'

But when initially i started to do the trigger the build it failed because with the below highlighted error.
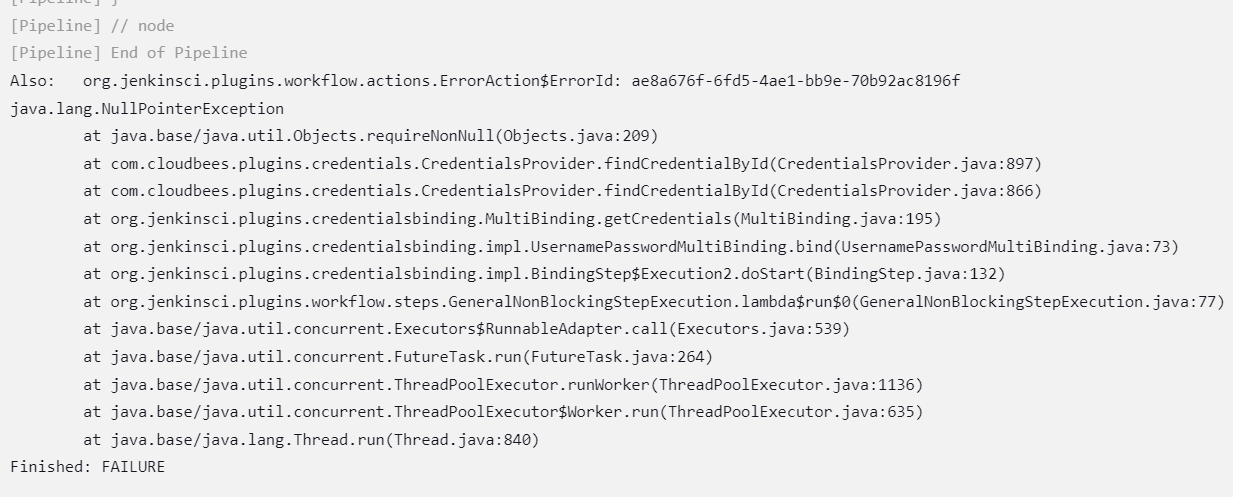
After then when i check from end i found there is some syntactical error in my groovy language which i have fixed. after then when i performed the build it went successfully.

Below is my Output
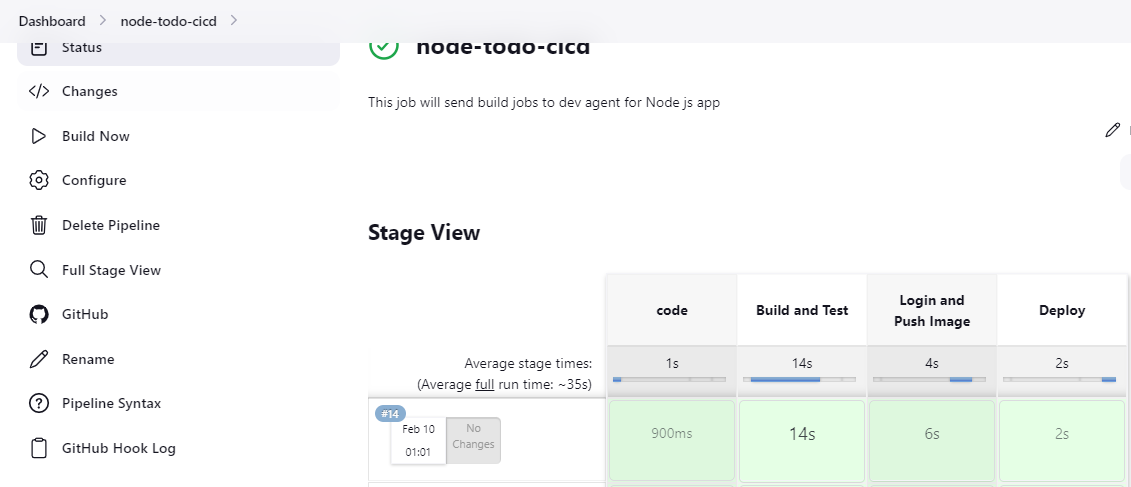
Now i can see the output
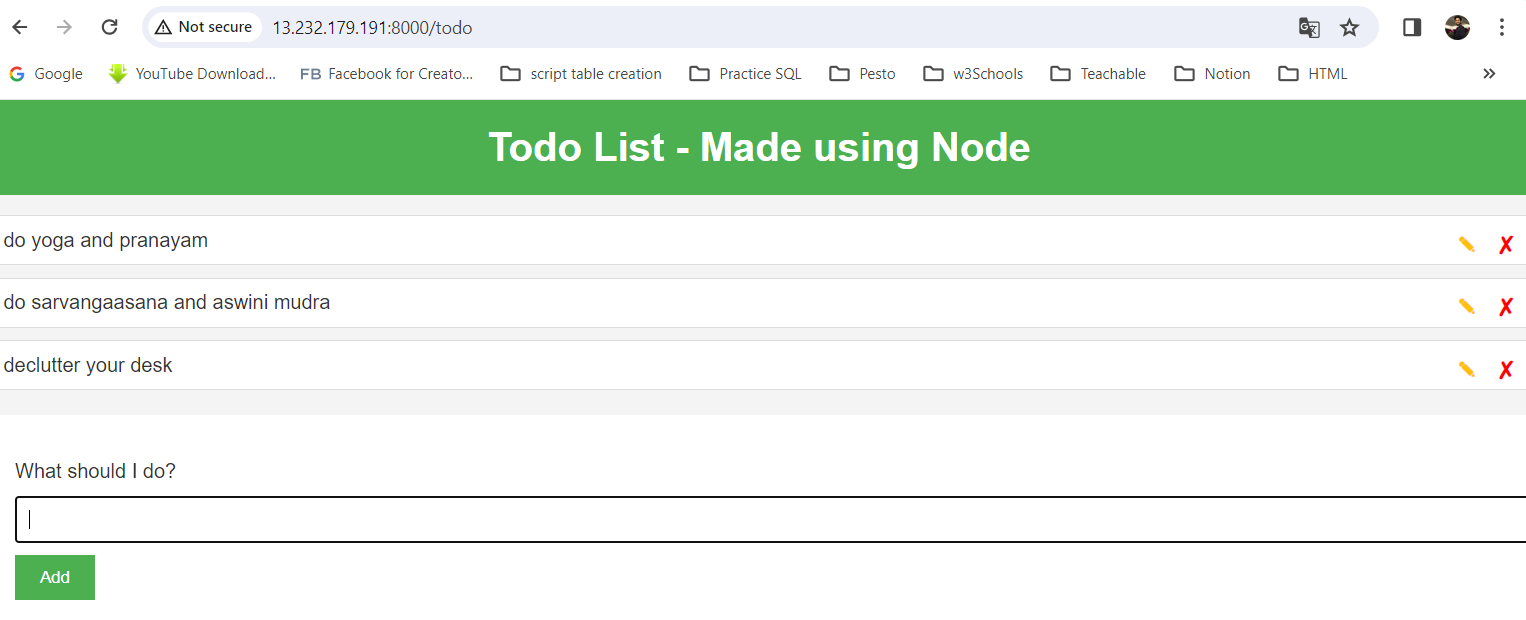
and my container status i can see it we have ran the image as a container.

Now i have created a Jenkins file(Satyadevoperations --> node-todo-cicd) and then copied the entire groovy script and pasted it and commit the changes to master.
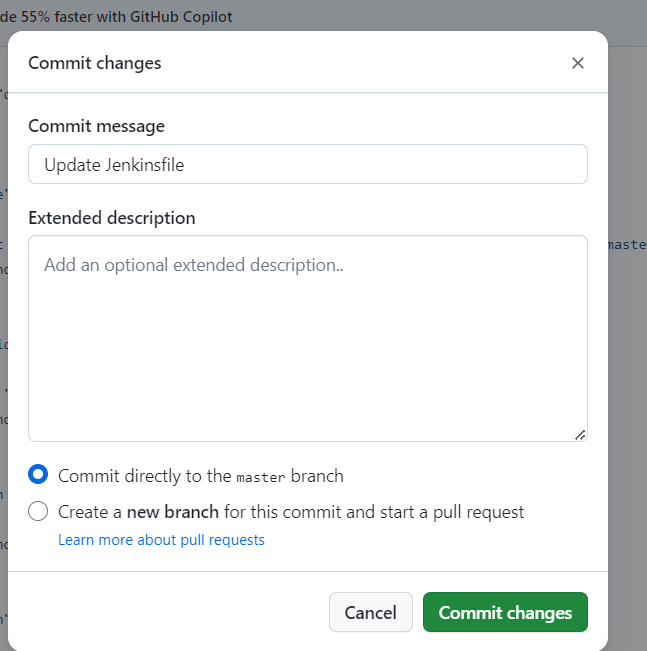
Then under pipeline i will put Pipeline script with SCM and then i will provide the Github URL
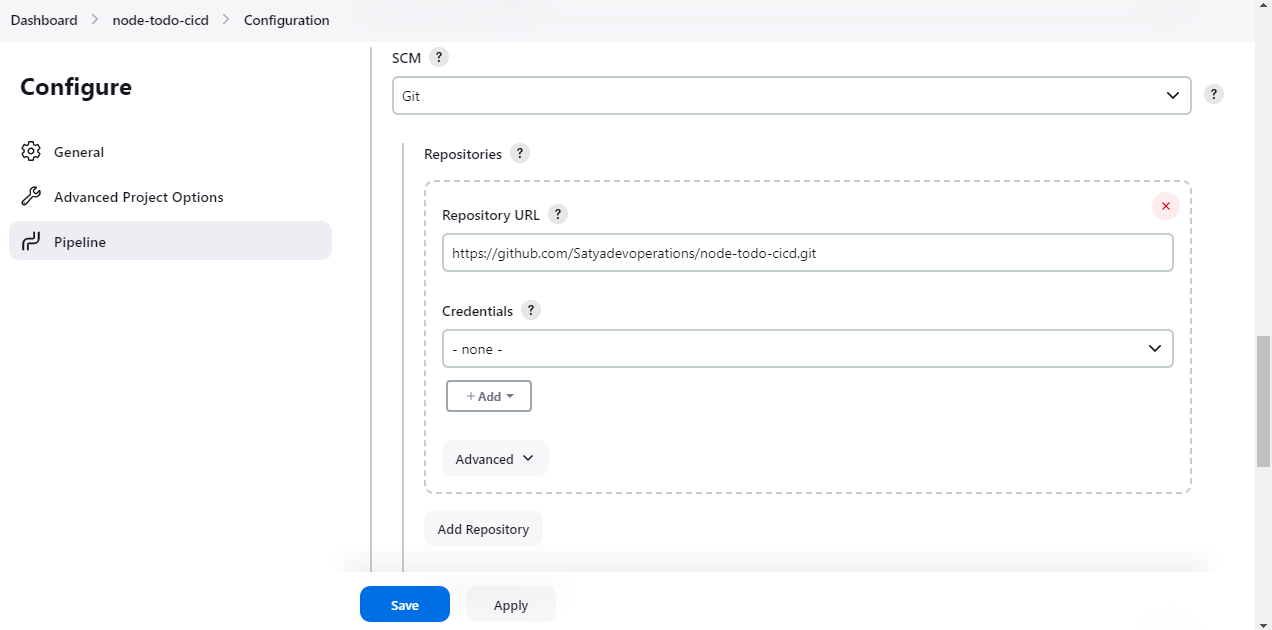
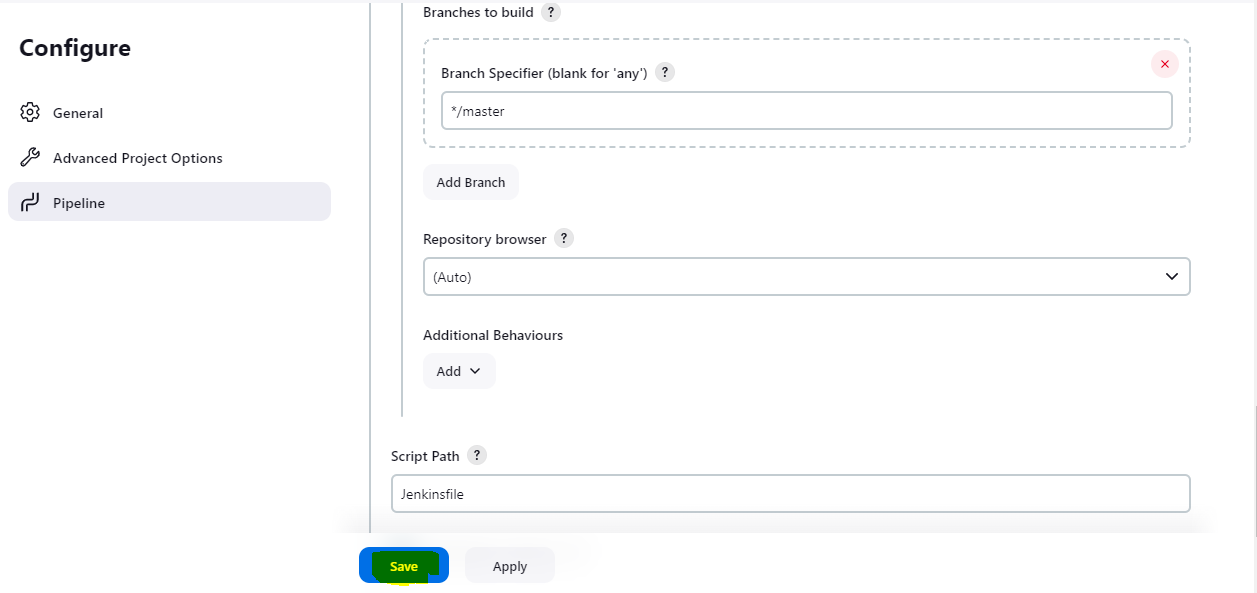
After selecting the above details i will save it and then when i click on build, then the below output will come
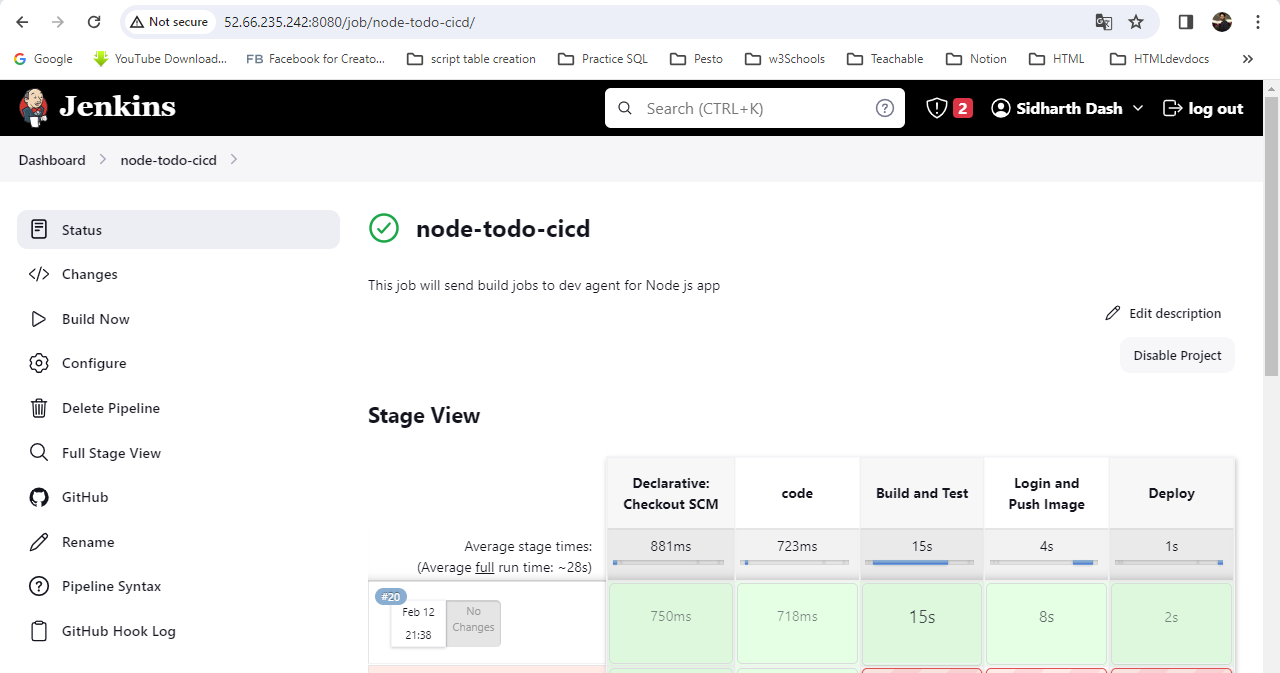
Note:--
"Declarative Checkout SCM" typically refers to a step in the Jenkins Pipeline, a popular automation server. Jenkins Pipelines allow you to define and manage the entire build, test, and deployment process as code. The "Declarative Checkout SCM" is a specific syntax used in Jenkins Declarative Pipelines to instruct Jenkins to check out source code from a version control system (SCM).
Subscribe to my newsletter
Read articles from Sidharth Dash directly inside your inbox. Subscribe to the newsletter, and don't miss out.
Written by

Sidharth Dash
Sidharth Dash
Hello Team, Working Devops Support Engineer having 8.2 years of experience in Unix, Shell Scripting, SQL. Since one year i started my journey as a DevOps support engineer where i am involved in Deployments, Infrastructure monitoring using AWS- cloud-watch, Automating simple task using shell scripts.