Day 5 Task: Advanced Linux Shell Scripting for DevOps Engineers with User management
 prince meenia
If you noticed that there are a total 90 sub-directories in the directory '2023' of this repository. What did you think, how did I create 90 directories? Manually one by one or using a script, or a command?
All 90 directories within seconds using a simple command.
mkdir day{1..90}
You have to do the same using Shell Script i.e using either Loops or command with start day and end day variables using arguments -
Example 1: When the script is executed as
./createDirectories.shday 1 90
then it creates 90 directories asday1 day2 day3 .... day90
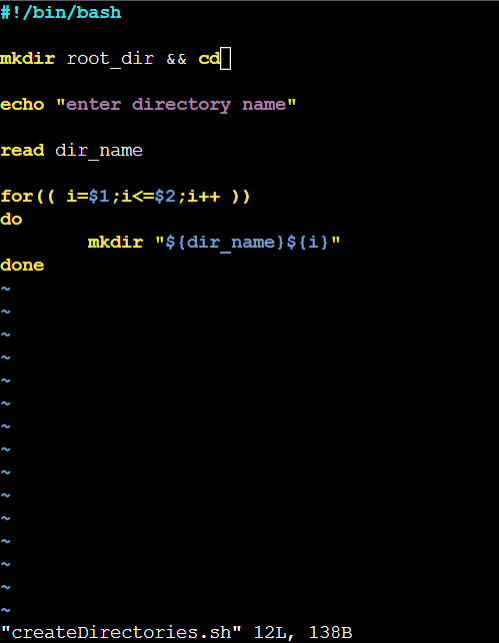
Firstly ,we will create a bashscript with name createDirectories.sh

Then, write the entire the script inside the editor

chmod 755createDirectories.sh sets the permissions of the file createDirectories.sh to allow the owner to read, write, and execute the file (7), while allowing the group and others to only read and execute the file (5).

Then , we execute the bashcript with ./createDirectories.sh

Switch the newly created directory where are the files day{1..90} is created

Here is the output created in dir/ directory,

- Create a Script to backup all your work done till now.
Firstly, create a target folder where we need to save the backup files

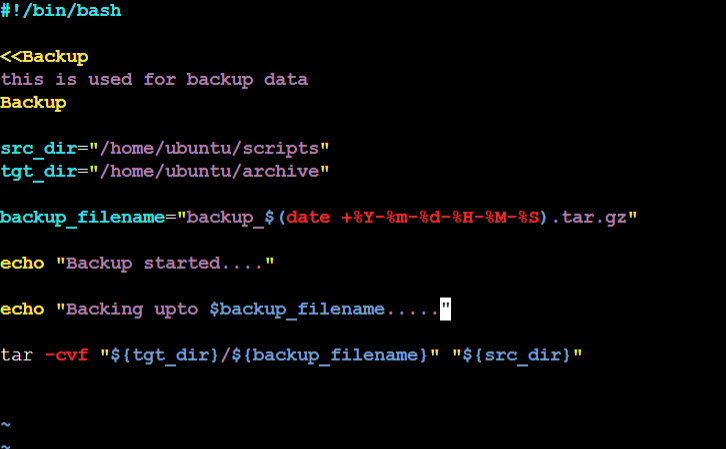
Then, edit a newly created script using vim editor for the backup script

Then, write the script inside it for backup

Then, use chmod 755archive.sh sets the permissions of the file archive.sh to allow the owner to read, write, and execute the file (7), while allowing the group and others to only read and execute the file (5).

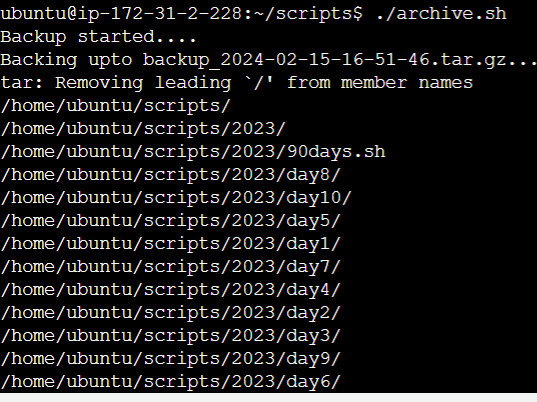
To execute the script, use this command

Backup started....

Switch the directory to target directory where all the backups are saved

Here is the backup files which are saved in .tar.gz format inside archive folder

Read About Cron and Crontab, to automate the backup Script
Here's a simple explanation of Cron and Crontab:
Cron: Cron is a time-based job scheduler in Unix-like operating systems. It allows users to schedule tasks or commands to run automatically at specific times, dates, or intervals.
Crontab: Crontab is the command used to interact with Cron. It stands for "cron table" and is essentially a configuration file that specifies the schedule for running cron jobs. Users can use the crontab command to view, edit, and manage the cron jobs scheduled for execution.
In simpler terms, Cron is like a clock that can automatically execute tasks at scheduled times, and Crontab is the tool you use to set up those scheduled tasks.
For example, to automate the backup script using cron and crontab, you can schedule the script to run at a specific time each day. You would use crontab to edit the cron table and add an entry specifying when and how often you want the backup script to run. Once configured, cron will automatically execute the backup script according to the schedule you defined in crontab.
Here are steps how we can apply crontab in backup script to automate it:
Firstly enter this commands in the backup directory, where backup files are being saved

Then a script will open you have to enter the cron commands to automate the script that is present in the scripts/ folder with archive.sh name:
Adding Your Backup Schedule: In the Crontab editor, you'll add an entry specifying the schedule for your backup script. The syntax is straightforward:
m h dom mon dow command
m: Minute (0 - 59)h: Hour (0 - 23)dom: Day of the month (1 - 31)mon: Month (1 - 12)dow: Day of the week (0 - 7, where 0 and 7 represent Sunday)command: The command or script you want to run

after saving this scripts, we can see in archive folder that backups are coming after every 2 minutes, as per the crontab format

User Management
User management is a critical aspect of system administration, enabling you to control access, permissions, and resources on your system. In this guide, we'll explore the fundamentals of user management, including user creation, modification, deletion, and more, with practical examples to help you become a proficient user administrator.
Creating Users 🧑💻
To create a new user, use the useradd command followed by the username. For instance, to add a user named "john", simply run:
sudo useradd john
You can customize the user creation process by specifying additional options such as home directory, shell, or UID.
Setting User Passwords 🔒
After creating a user, it's crucial to set a password for their account. Use the passwd command followed by the username to accomplish this. For example:
sudo passwd john
Follow the prompts to set a secure password for the user.
Modifying User Properties 🛠️
To tweak user properties like the username, home directory, or shell, utilize the usermod command. For instance, to rename the user "john" to "jdoe", execute:
sudo usermod -l jdoe john
Creating Groups 🛡️
Groups help organize users with similar permissions. To create a new group, employ the groupadd command followed by the group name. For instance, to establish a group named "developers", run:
sudo groupadd developers
Adding Users to Groups 🤝
To grant a user access to a specific group, use the usermod command with the -aG option, followed by the group name and username. For instance, to add "john" to the "developers" group, execute:
sudo usermod -aG developers john
Deleting Users and Groups 🗑️
When it's time to remove a user, utilize the userdel command followed by the username. To delete both the user and their home directory, add the -r option. For instance:
sudo userdel -r john
Similarly, to delete a group, use the groupdel command followed by the group name. For example:
sudo groupdel developers
Conclusion 🎉
Congratulations! You've mastered the essentials of user management. By understanding how to create, modify, and delete users and groups, you can effectively control access and permissions on your system. Practice these techniques to become proficient in user administration. Happy managing! 🚀
Create 2 users and just display their Usernames
Step 1: Create Users 📝
Using the useradd command, we'll create two new users named "john" and "Jack".
sudo useradd tom
sudo useradd sarah

These commands will add the users "tom" and "sarah" to your system.
Step 2: Display Usernames 📋
We'll utilize the awk command to extract the first field (username) from the /etc/passwd file and then filter out the relevant usernames using grep.
awk -F: '{print $1}' /etc/passwd | grep -E "^tom|^sarah"
This command will display the usernames "john" and "Jack". from the /etc/passwd file.

Note:-
🔍 awk -F::: This command starts with
awk, a versatile text processing tool. The-F:option tellsawkto use ":" as the field separator. This is because the/etc/passwdfile uses ":" to separate different fields, such as username, password, and so on.💬 '{print $1}': Within the single quotes,
awkis instructed to print the first field of each line it processes. The$1represents the first field, which in this case is the username.📄 /etc/passwd: This is the file that
awkwill process./etc/passwdis a system file that contains information about user accounts on the system.🔀 |: This is called a pipe. It's used to send the output of one command as the input to another command.
🔎 grep -E "^john|^Jack": This part of the command is using
grep, a tool used for searching patterns in text. The-Eoption enables extended regular expressions. Here, we're tellinggrepto search for lines that start with either "john" or "Jack".In simpler terms, when we put it all together:
🔍
awk -F: '{print $1}' /etc/passwdextracts the usernames from the/etc/passwdfile.🔎
grep -E "^john|^Jack"filters out the usernames that start with either "john" or "Jack" from the output of the previous command.So, the overall command finds and displays the usernames "john" and "Jack" from the
/etc/passwdfile.
Step 3: Verify Usernames 🕵️♂️
Verify that the usernames were displayed correctly. You should see output similar to the following:
tom
sarah
These lines confirm the existence of users "john" and "Jack".

Alternative

This command filters the contents of the /etc/passwd file using grep with extended regular expressions (-E). It searches for lines that start with either "john" or "Jack". The output displays two lines
Subscribe to my newsletter
Read articles from prince meenia directly inside your inbox. Subscribe to the newsletter, and don't miss out.
Written by
