6.12 Create, manage and diagnose advanced file system permissions with (lsattr, chattr, getfacl, setfacl)
 Vijay Kumar Singh
Table of contents

Introduction:
Understanding File Permissions in Linux and UNIX-Based Systems
In the realm of Linux and UNIX-based operating systems, file permissions play a crucial role in determining access rights to files and directories. Every file is associated with a user who owns it and a group that has certain rights over it. In this comprehensive guide, we delve into the intricacies of file ownership and permissions, exploring the utility programs involved and the various modes of permission manipulation.
File Ownership
In Linux and UNIX-based systems, each file is owned by a specific user and group. The owner has the most control over the file, while the group represents a subset of users who share certain access rights.
Utility Programs for Managing Ownership
chown: This command is used to change the user ownership of a file or directory. Its usage is straightforward:chown [new_owner] [file].chgrp: Used to alter the group ownership of a file or directory,chgrpchanges the group associated with the specified file:chgrp [new_group] [file].
File Permission Modes and chmod
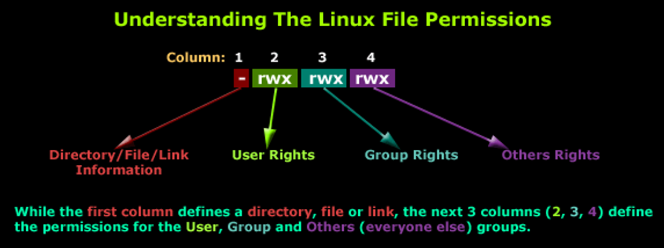
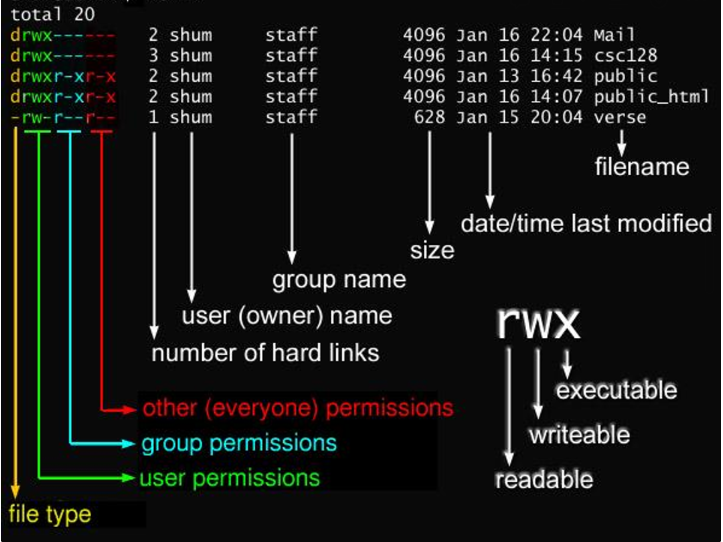
File permissions in Linux are represented by three types of access: read (r), write (w), and execute (x). These permissions can be set for three categories of users: the owner (u), the group (g), and others (o).
Understanding Permission Modes
Permissions are represented in the form of
rwx, where each letter corresponds to a specific access right (read, write, execute).There are three groups of permissions: owner (
u), group (g), and others (o), each having their own set ofrwxpermissions.
Simplifying Permission Management with chmod
While the rwx notation provides granular control over file permissions, it can be cumbersome to use. To simplify permission management, the chmod command allows users to set permissions using numeric notation.
Numeric Notation
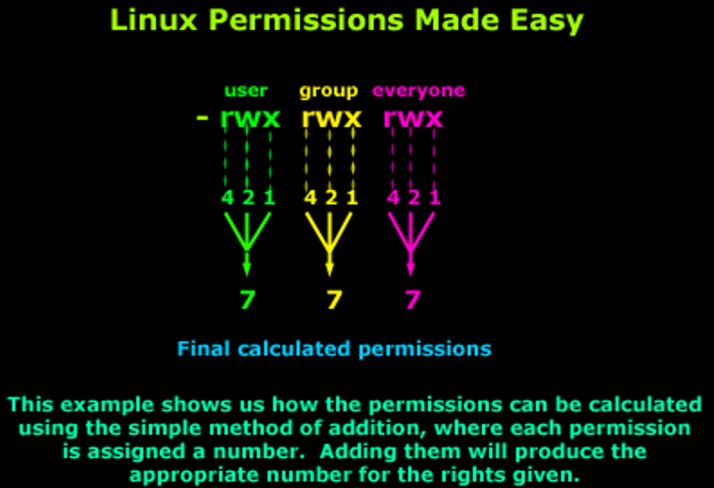
In numeric notation, each permission is assigned a value:
Read (
r) = 4Write (
w) = 2Execute (
x) = 1
By summing these values, users can assign permissions more efficiently. For example, 7 signifies read/write/execute, 6 indicates read/write, and 5 represents read/execute.


Practical Examples
Let's explore some practical examples to better understand file permissions and ownership manipulation:
Changing Ownership
# Change the owner of file.txt to user1
chown user1 file.txt

# Change the group of file.txt to group1
chgrp group1 file.txt
Setting Permissions
# Give read and write permissions to the owner
chmod u+rw file.txt

# Remove execute permission for others
chmod o-x file.txt

# Set read/write/execute for owner, read/execute for group, and read-only for others
chmod 751 file.txt
File permissions are a fundamental aspect of Linux and UNIX-based systems, governing access to files and directories.
Understanding umask in Linux and UNIX-Based Systems
In the world of Linux and UNIX-based operating systems, file creation comes with default permissions that determine who can read, write, and execute the newly created files and directories. These default permissions are influenced by a concept known as umask, which acts as a mask to specify which permissions should be denied. In this detailed guide, we'll explore umask, its role in file creation, and how to manipulate it to control default permissions effectively.
What is umask?
The umask command in Linux defines the default permissions that are applied when new files and directories are created. It serves as a mask, indicating which permissions should be blocked or denied by subtracting its value from the maximum permissions allowed (usually 777 for directories and 666 for files).
Understanding Default Permissions
By default, files are created with permissions 666 (read and write for owner, group, and others), while directories are created with permissions 777 (read, write, and execute for owner, group, and others).
Working Principle of umask
The umask value is subtracted from the maximum permissions to determine the actual permissions assigned to new files and directories. For example, if the umask value is 002, it means that write permissions (2) for the group and others will be blocked.
Example Calculation
# Maximum permissions for files: 666
# Default umask value: 002
# Calculation: 666 - 002 = 664 (rw-rw-r--)
Manipulating umask
Users can modify the umask value at any time using the umask command. The default umask value is typically set in /etc/profile, while the root user's umask is 022.
Setting umask
# Set the umask value to 0022
umask 0022
Practical Examples
Let's explore some practical scenarios to better understand how umask affects file and directory creation:
Default Permissions with umask
# Current umask value
umask
# Output: 0022

# Create a new file
touch newfile.txt

# Check permissions
ls -l newfile.txt
# Output: -rw-r--r--

# Create a new directory
mkdir newdir

# Check permissions
ls -ld newdir
# Output: drwxr-xr-x
Customizing umask
# Change umask to 0002 (allowing group write)
umask 0002

# Create a new file
touch anotherfile.txt

# Check permissions
ls -l anotherfile.txt
# Output: -rw-rw-r--

# Create a new directory
mkdir anotherdir

# Check permissions
ls -ld anotherdir
# Output: drwxrwxr-x
umask is a powerful tool in Linux and UNIX-based systems for controlling default permissions on newly created files and directories.
Understanding Special Permissions in Linux
In Linux and other UNIX-based operating systems, special permissions introduce a fourth access level alongside user, group, and other permissions. These special permissions, denoted by SUID, SGID, and the sticky bit, offer additional functionality beyond standard permission sets. Let's delve into each of these special permissions and understand their significance.
SUID (Set User ID) Permission
SUID, or Set User ID, is a special permission that allows a user to execute a file with the privileges of the file owner rather than the user who launched the program. This permission is denoted by the lowercase 's' in the user execute position. If the file owner doesn't have execute permissions, an uppercase 'S' is displayed instead.
Practical Example:
Consider the /usr/bin/passwd command, which allows users to change passwords. By default, this command has the SUID permission set:
ls -l /usr/bin/passwd
-rwsr-xr-x. 1 root root 33544 /usr/bin/passwd
SGID (Set Group ID) Permission
SGID, or Set Group ID, is another special permission that can be applied to files and directories. When applied to a file, it allows the file to be executed with the permissions of the group that owns the file. When applied to a directory, any files created within that directory inherit the group ownership of the directory rather than the default group of the user who created the file. The SGID permission is represented by the lowercase 's' in the group execute position.
Practical Example:
Consider a directory named my_articles with the SGID permission set:
ls -l
total 0
drwxrws---. 2 tcarrigan tcarrigan  69 Apr 7 11:31 my_articles
Sticky Bit Permission
The sticky bit is a special permission applied at the directory level. When set, it restricts file deletion within that directory to only the file owner (and root). This permission is particularly useful for directories that are shared among multiple users, such as the /tmp directory. The sticky bit is represented by a lowercase 't' in the other execute position.
Practical Example:
Consider the /tmp directory, which typically has the sticky bit set:
ls -ld /tmp/
drwxrwxrwt. 15 root root 4096 Sep 22 15:28 /tmp/
Setting and Removing Special Permissions
Special permissions can be set or removed using the chmod command along with symbolic or numeric notation. For example:
# Set SUID permission
chmod u+s file.txt

# Remove SGID permission
chmod g-s file.txt
Setting special permissions
To set special permissions on a file or directory, you can utilize either of the two methods outlined for standard permissions above: Symbolic or numerical.
Let's assume that we want to set SGID on the directory community_content.
To do this using the symbolic method, we do the following:
chmod g+s community_content/
Using the numerical method, we need to pass a fourth, preceding digit in our chmod command. The digit used is calculated similarly to the standard permission digits:
Start at 0
SUID = 4
SGID = 2
Sticky = 1
The syntax is:
chmod X### file | directory
Where X is the special permissions digit.
Here is the command to set SGID on community content using the numerical method:
chmod 2770 community_content/
ls -ld community_content/
drwxrws---. 2 tcarrigan tcarrigan 113 Apr  7 11:32 community_content/
Understanding special permissions in Linux is crucial for managing file and directory access effectively.
Understanding ACL (Access Control Lists) in Linux
In Linux, Access Control Lists (ACLs) provide a flexible mechanism for managing file and directory permissions beyond traditional ownership and permission settings. ACLs allow administrators to grant specific permissions to users or groups without altering the base ownership and permissions of the file or directory. Let's explore how ACLs work and how they can be used effectively.
How ACLs Work
ACLs extend the standard UNIX permissions model by allowing administrators to define a list of additional permissions for specific users or groups. These permissions are stored as part of the file's metadata and can be applied to both files and directories.
ACLs consist of entries that define who has access to the file or directory and what type of access they have. Each entry contains three components:
User or Group: Specifies the user or group to which the entry applies.
Permissions: Defines the permissions granted to the user or group, such as read, write, or execute.
Type: Indicates whether the entry is a user entry (starting with 'u:'), a group entry (starting with 'g:'), or a default entry (starting with 'd:').
Using setfacl and getfacl Commands
setfacl Command
The setfacl command is used to set or modify ACLs for files and directories. It allows administrators to add or remove specific permissions for users or groups.
# Add read and write permissions for user 'john' to a file
setfacl -m u:john:rw file.txt

# Add execute permission for group 'developers' to a directory
setfacl -m g:developers:x directory
getfacl Command
The getfacl command is used to display the ACLs of files and directories. It provides detailed information about the existing ACL entries, including the user or group, permissions, and type.
# Display ACLs for a file
getfacl file.txt

# Display ACLs for a directory
getfacl directory
Practical Example
Consider a scenario where a particular user, 'alice,' needs read access to a directory without being a member of the group that owns the directory. ACLs can be used to grant 'alice' the necessary permissions without modifying the directory's group ownership.
# Set read permission for user 'alice' on the directory
setfacl -m u:alice:r directory

# Verify the ACLs to ensure 'alice' has been granted read access
getfacl directory
#1) To add permission for user (-m:modify)
setfacl -m "u:user:permissions" /path/to/file

#2) To add permissions for a group
setfacl -m "g:group:permissions" /path/to/file

#3) To allow all files or directories to inherit
#ACL entries from the directory it is within (-d:default)
setfacl -dm "entry" /path/to/dir

#4) To remove a specific entry (-x:remove)
setfacl -x "entry" /path/to/file

#5) To remove all entries
setfacl -b path/to/file
#deny all permissions to specific user
sudo setfacl -m user:aaron:--- examplefile

#remove an ACL for a specific user or a specific group
sudo setfacl -x user:aaron examplefile

#Apply operations to all files and directories
sudo setfacl -R -m user:aaron:rwx dir1/
#Set File Access Control List (setfacl)
setfacl -m user:owl:rw examplefile

#to view the current ACL
getfacl test/declarations.h
# file: test/declarations.h
# owner: owl
# group: owl
user::rw-
group::rw-
other::r--
mask::rw-
#Mask defines the maximum permissions that this file or directory
#can have.

#if we want to limit already existing permissions
#setting maximum permissions we want
#would be the ability to read the file, no writing, and no executing.
sudo setfacl -m mask:r examplefile

getfacl examplefile
# file: examplefile
# owner: adm
# group: ftp
user: :rw-
user:aaron : rw-
group: : rw-        #effective: r- -
mask::r- -          #effective: r--
other: : r--
#This tells us that even though the ACL says of user Aaron can read
#and write, the effective real permissions are read-only
#and that's because the mask limits the permissions.
ACLs provide a powerful mechanism for fine-grained access control in Linux systems.
Understanding Immutable and Append-Only Attributes in Linux
In Linux, file attributes provide additional control over file behavior and access permissions beyond traditional ownership and permission settings. Two important attributes are immutability and append-only, which are managed using the lsattr and chattr commands. Let's explore these attributes in detail and understand how they enhance file security and management.
Overview of Extended Attributes
Extended attributes are metadata associated with files in a Linux filesystem. They provide additional information about a file that is not interpreted directly by the filesystem. Four namespaces exist for extended attributes: user, trusted, security, and system. The system namespace, in particular, is used for Access Control Lists (ACLs), while the security namespace is utilized by SELinux.
Immutable Attribute (i)
The immutable attribute, denoted by the i flag, prevents a file from being modified, deleted, or renamed, even by the root user. Once set, the file becomes immutable, and its contents cannot be altered. Additionally, no hard links can be created to an immutable file, and no data can be written to it. This attribute provides a high level of security for critical files and prevents accidental or malicious changes.
Immutable directories inherit similar restrictions. They cannot be deleted or renamed, and files cannot be added or removed within them. This feature protects directory structures and prevents unauthorized modifications.
Append-Only Attribute (a)
The append-only attribute, indicated by the a flag, restricts file modification to appending data only. Once set, a file can only be opened in append mode for writing. This attribute is particularly useful for log files and other data that should only grow over time. Only the superuser can set or clear the append-only attribute, ensuring that critical files remain intact and tamper-proof.
Append-only directories allow new files or subdirectories to be created with zero-byte length. All newly created files and subdirectories inherit the append-only attribute automatically, ensuring that data integrity is maintained within the directory.
Managing Attributes with lsattr and chattr
The lsattr command is used to display the attributes of files in a directory. It provides information about the attributes set on each file, including the immutable and append-only flags.
lsattr filename
The chattr command is used to modify file attributes, including setting or clearing the immutable and append-only flags. It supports various operators (+, -, =) to add, remove, or set attributes.
chattr +i filename  # Set immutable attribute
chattr -a filename  # Clear append-only attribute
#For demonstration purpose, let's use folder demo and file important_file.conf respectively
ls -l
    total 0
    drwxr-xr-x. 2 root root 6 Aug 31 18:02 demo
    -rwxrwxrwx. 1 root root 0 Aug 31 17:42 important_file.conf\
#IMMUTABLE : add attributes on files to secure from deletion
#SET ATTRIBUTES
#The immutable bit +i can only be set by superuser
#(i.e root) user or a user with sudo privileges can able to set.
#To set attribute, we use the + sign and to unset use the – sign
#with the chattr command
sudo chattr +i demo/
sudo chattr +i important_file.conf

#view attributes
lsattr
----i----------- ./demo
----i----------- ./important_file.conf

#UNSET ATTRIBUTES
sudo chattr -i demo/ important_file.conf

lsattr
---------------- ./demo
---------------- ./important_file.conf
#APPEND : Append data without Modifying existing data on a File
chattr +a example.txt

lsattr example.txt
-----a---------- example.txt

#UNSET ATTRIBUTES
chattr -a example.txt

#Secure Directories

#To set permission
chattr -R +i myfolder

#To unset permission
chattr -R -i myfolder
The immutable and append-only attributes in Linux provide powerful mechanisms for enhancing file security and control.
Conclusion:
File permissions, umask, special permissions, ACLs, and the immutable and append-only attributes are integral components of Linux and UNIX-based systems, collectively empowering users and administrators to manage access control, security, and data integrity effectively. By mastering these tools and understanding their nuances, users can navigate the filesystem with confidence, ensure adherence to security policies, and maintain the integrity of critical data. Together, these features provide a robust framework for securing sensitive information and managing resources efficiently in diverse computing environments.
Subscribe to my newsletter
Read articles from Vijay Kumar Singh directly inside your inbox. Subscribe to the newsletter, and don't miss out.
Written by

Vijay Kumar Singh
Vijay Kumar Singh
I'm Vijay Kumar Singh, a Linux, DevOps, Cloud enthusiast learner and contributor in shell scripting, Python, networking, Kubernetes, Terraform, Ansible, Jenkins, and cloud (Azure, GCP, AWS) and basics of IT world. 💻✨ Constantly exploring innovative IT technologies, sharing insights, and learning from the incredible Hashnode community. 🌟 On a mission to build robust solutions and make a positive impact in the tech world. 🚀 Let's connect and grow together! #PowerToCloud