Beginners project : Make a Node JS Command Line Application to convert text to speech using hugging face inference API.
 Yashwanth
Prerequisites :
Knowledge of basic JavaScript
Knowledge of basic Node JS
Basics of Bash Commands (recommended not compulsory)
Node JS installed in your system
Bash installed in your system
Introduction :
View the final completed project here : click here
In this blog, we embark on a journey to create a powerful yet user-friendly Node.js Command Line Application. Our goal is to harness the capabilities of the Hugging Face Inference API to convert text to speech effortlessly. Command line applications, with their accessibility and simplicity, offer a practical way to incorporate diverse projects.
Whether you're a beginner or a intermediate in the world of programming, this guide will equip you with the skills to craft a robust text-to-speech application. By the end, you'll have not only a functional tool at your disposal but also a deeper understanding of how Node.js and the Hugging Face Inference API can seamlessly collaborate to bring your projects to life.
Join me on this exploration of code and creativity as we delve into the process of creating a Node.js Command Line Application that transforms text into speech, all powered by the remarkable capabilities of Hugging Face. Let's dive in!
Create Folders :
Prerequisite :
You should have Node JS and Bash installed in your computer.
This would be your folder structure after this section. Don't try this on your own, I'll walk you through this step, this is just for your reference :
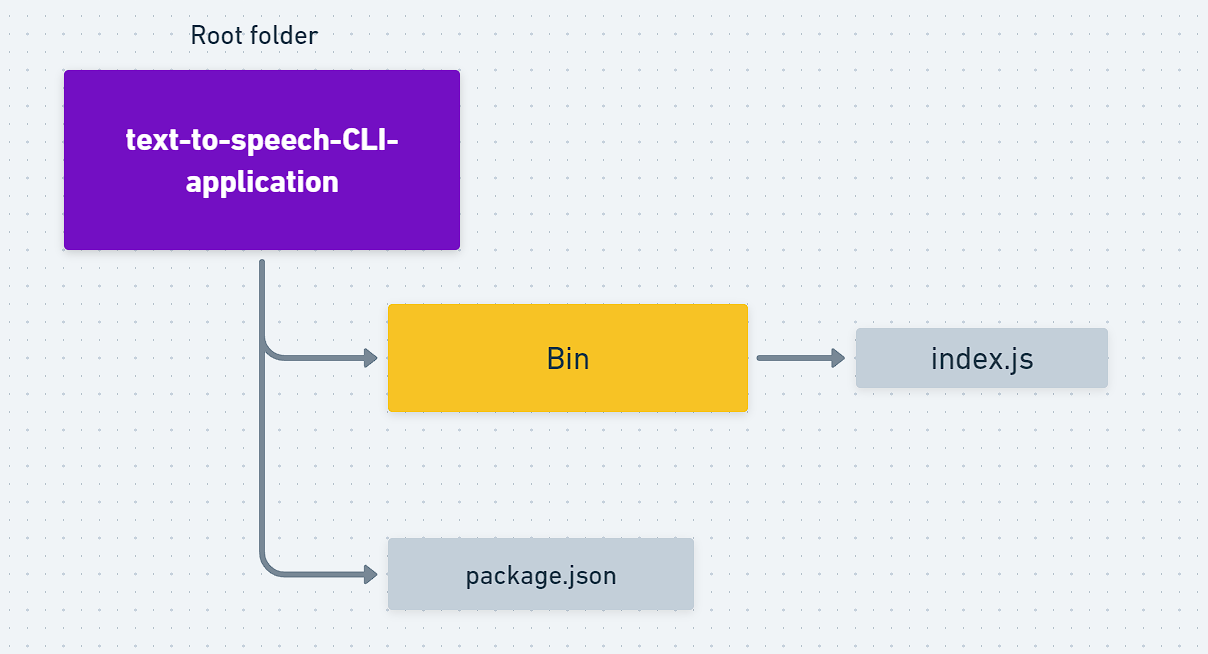
Open Bash :
when you'll open bash you'll be in root folder. Now you can go to your prefered folder to keep this project. In my case i have a folder called
text-to-speech-CLI-applicationas my main directory.Creating necessary folders :
Run these series of commands in you main directory, in my case
text-to-speech-CLI-applicationis my main directory.$ mkdir bin $ cd bin $ touch index.jsSo here you are making new folder called
bin. And moving your terminal tobinand creating a file calledindex.js.Creating a
binfolder in a Node.js CLI application is a common convention for organizing executable scripts. Thebinfolder stands for "binary," and it typically contains the entry point script that will be executed when your CLI tool is invoked.Your folder structure should be as follows now :
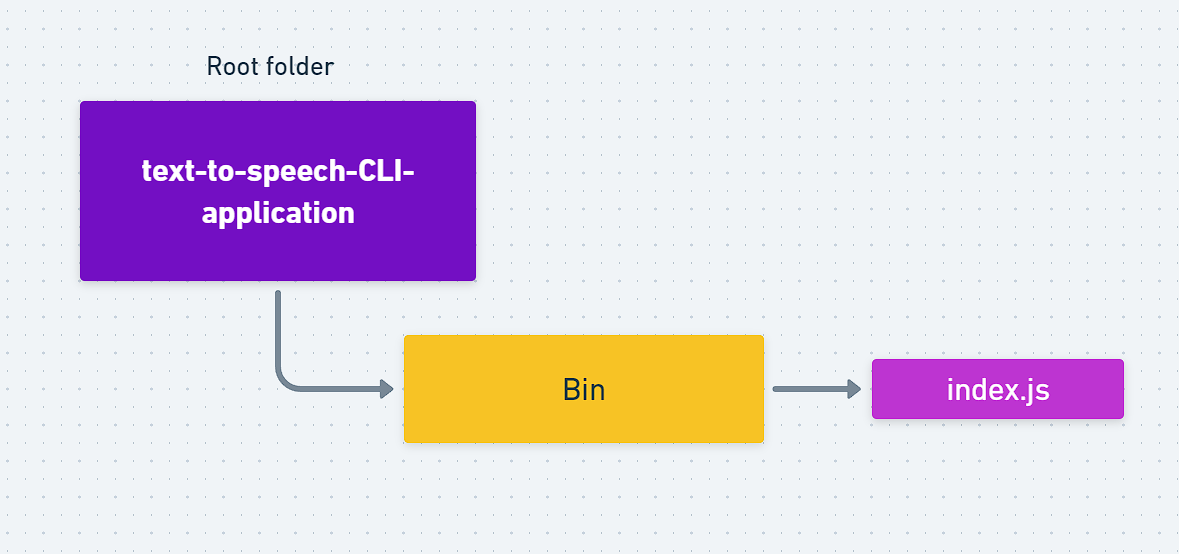
Creating package.json :
Now got to the root folder. In my case
text-to-speech-CLI-application. If You are still in bin folder like this
Run the below command to go to parent directory :
$ cd ..now you'll be in parent directory like this :

Now we need to create a package.json file to write entry points and dependencies.
Run the following command to create a package.json file :
$ npm initby running the following command you will asked some questions. Answer them carefully. Typically take care of the
entry pointit should be./bin/index.js.Below is my example :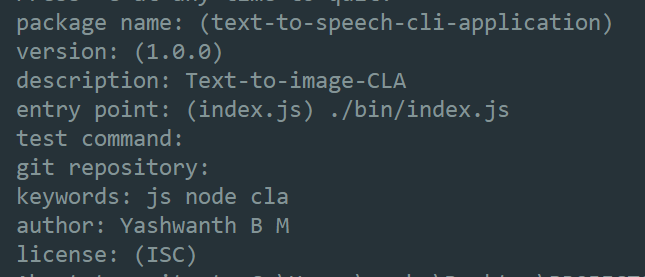
Now go inside your package.json file and modify
text-to-speech-cli-applicationto something easy to write likettsor anything according to you."bin": { "tts": "bin/index.js" },And now your package.json should look like this : click here
Completed Folder Structure :
Finally you folders should look like this :
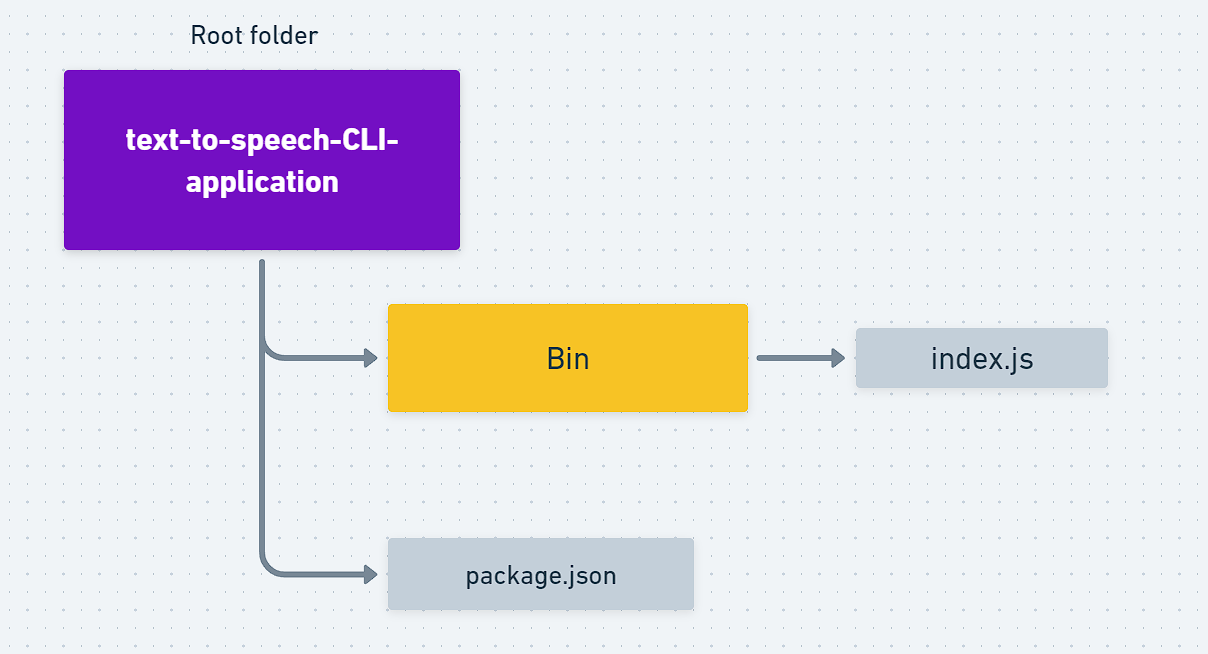
Printing "Hello World" in Bash :
Shebang (hashbang) :
Now open your index.js file in your prefered IDE in my case VS Code.
In your empty index.js file in the first line write this code :
#!/usr/bin/env nodeThe
#!/usr/bin/env nodeat the beginning of a script is called a shebang or hashbang. It is a special line in a script that tells the operating system what interpreter should be used to execute the script. In this case, it specifies that the script should be run using thenodeinterpreter in the command line . Why do we need node interpreter, remember javascript can only run in the browser and here we need JavaScript to run in command line like Bash, so we nodeJS to interpret our JS code.Hello world :
Below the shebang write code to log "Hello World!" in console.
console.log("Hello world!");Your first CLI application is ready (not joking) :
Open Bash in your main directory, in my case
text-to-speech-CLI-application. Now run the below command which installs your local command line application globally.$ npm install -g .The
-gindicates global option.The dot
.in the command indicates present directory.My example:

Hurray! It is ready, your first command line application , not joking type
ttsin your command prompt or Bash. see what happens.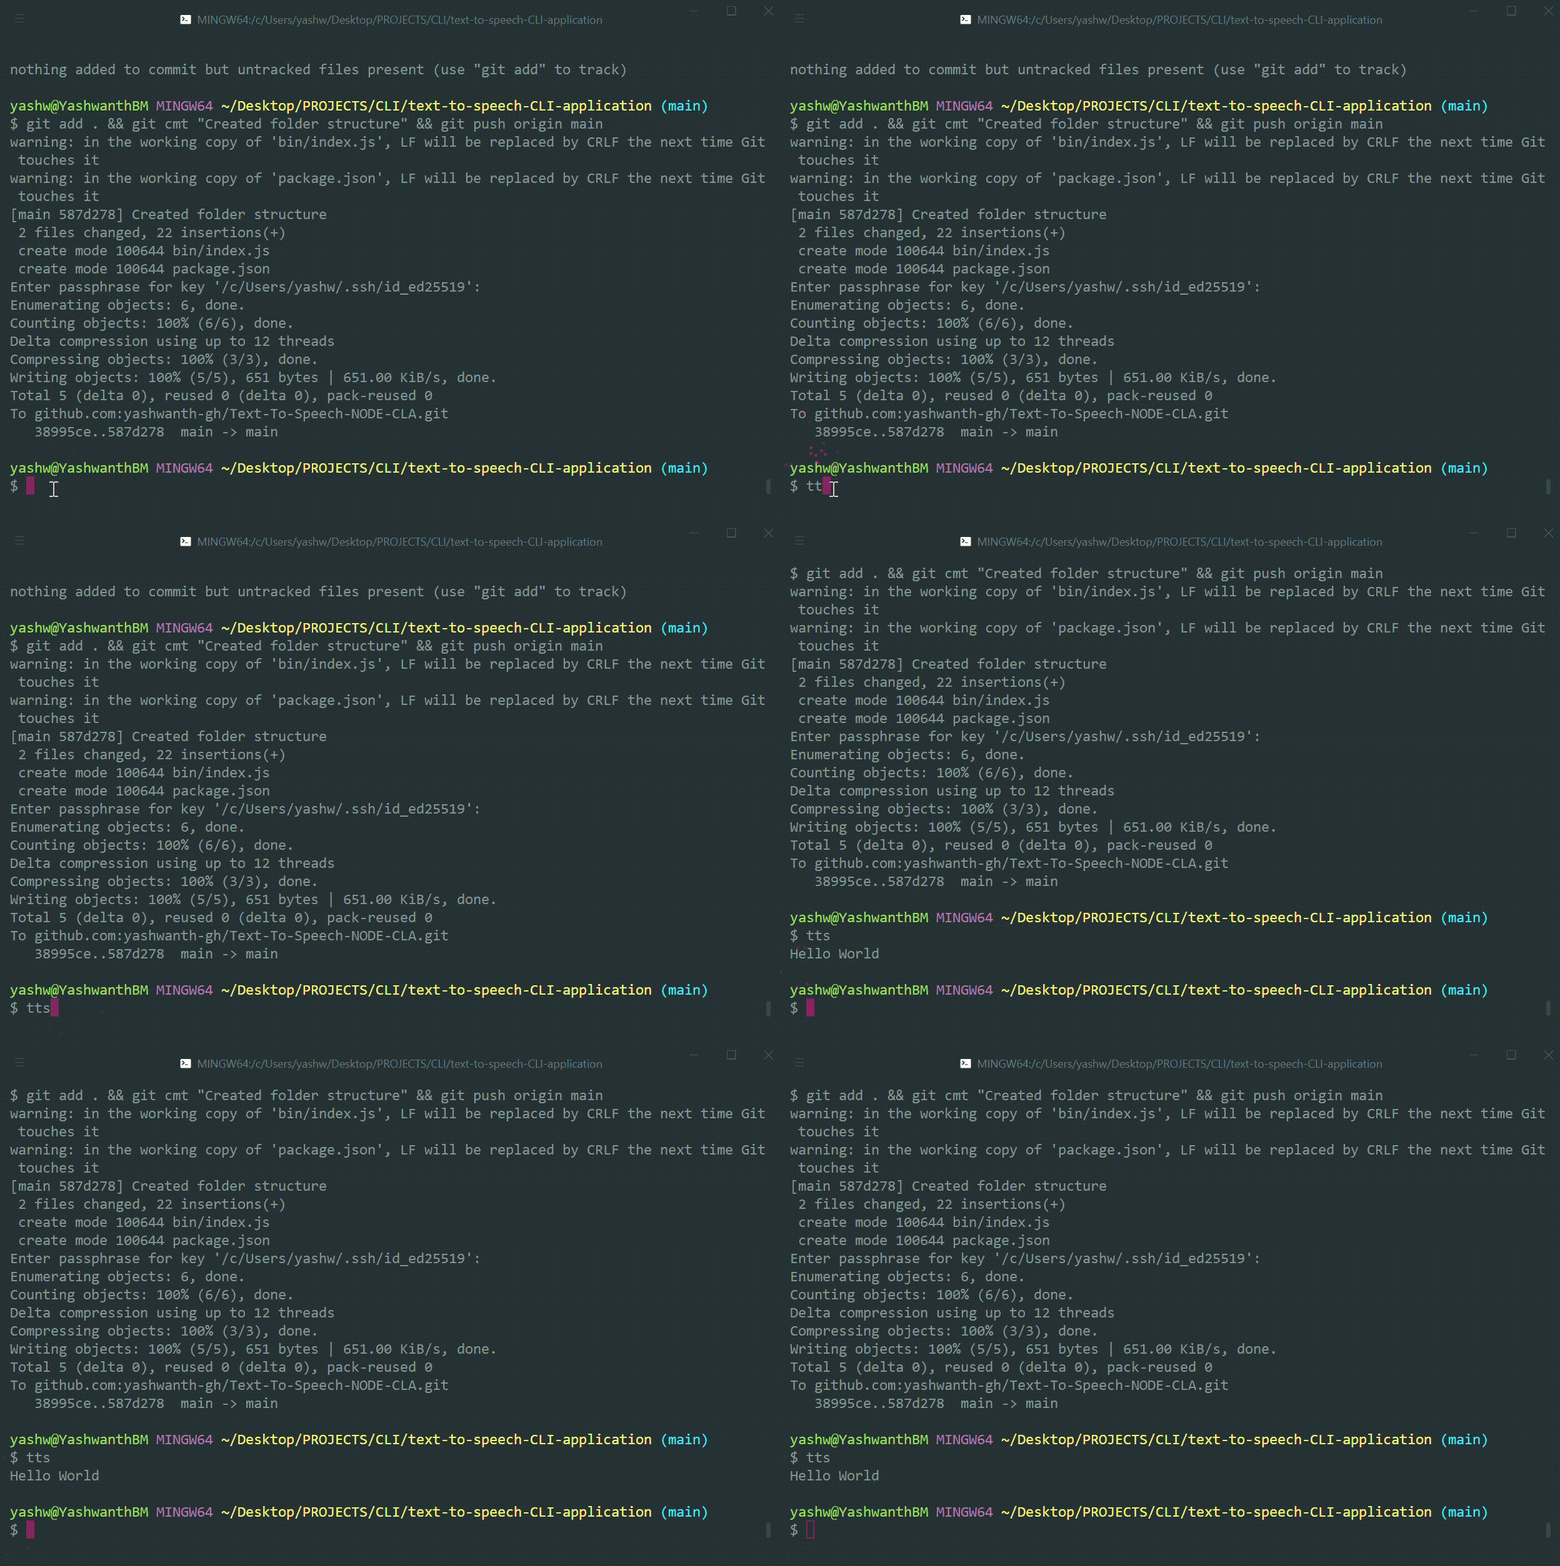
Does it print "Hello World!".
If not maybe you have made some steps above follow through this blog again you'll get it correct.
Building our project :
Idea :
We open our terminal in any directory or anywhere on your computer, when we type
tts(short form for "text-to-speech"), terminal should give us option to ask if we wish to type the text in the terminal itself or if we wish to put the text in ainput_text.txtfile that will be present in the directory we specify in the code. Then code will get access to our input and makes an API call to the API server to get back some binary data from API. Then we should convert the received data to mp3 or any other playable format. The Playable file will be saved to a specified directory. See it's that simple not complicated at all.See how this works in this demo : clickhere
Creating our input/output folder :
Create a folder in any place (But you should know its complete path) and name it
Text-to-speech-CLA-data. In my case i have created a folder here :'C:\Users\yashw\Documents\Text-to-speech-CLA-data'.Create a file called
text_Input.txtin the folder you just created. This is where you will put your input text. Put some text inside it just to test it in future.Writing Code :
First, remove the
console.log("Hello world"), now we need to get the input from ourtext_Input.txtfile. So get the absolute path for that folder. importpathlibrary from NodeJS no need to npm install because it comes within NodeJS as core package.import path from "path"; const dataFolderPath = path.join( "C:", "Users", "yashw", "Documents", "Text-to-speech-CLA-data" );Now you have the path to your input file.
Taking Input from user in terminal :
We will use
readlinelibrary from NodeJS again it is a core NodeJS library no need to install it. We will usereadlineto take input from terminal. We need to configurereadlineto use it.Make sure to import all of these packages we'll need it further in project.
 import * as readline from "readline";
 import fs from "fs";
 import path from "path";
First we will create a interface to ask question and to take input.
 const rl = readline.createInterface({
   input: process.stdin,
   output: process.stdout,
 });
You can read more about this in NodeJS docs.
Now let us create a function to ask question and take input :
 const question = (query) => {
   return new Promise((resolve) => {
     rl.question(query, resolve);
   });
 };
This defines a function named
questionwhich takes aquery(a prompt) as a parameter. The function returns a promise, encapsulating the asynchronous nature of reading user input. Therl.questionmethod is used to prompt the user with the provided query and resolves the promise with the user's input. If you did not understand this, please bear with me. You will understand it further when you test it.
Now let us ask question to user. Through this function below and then take user's preferred input type:
        async function getUserChoice() {
          chooseOption = await question(`Select input source:
            1. Load from 'text_Input.txt' file present in this path ${dataFolderPath}
            2. Enter input text manually
            Enter 1 or 2: `);
          console.log(`\nYou chose option ${chooseOption}\n`);

          if (chooseOption === "1") {
            inputText = fs
              .readFileSync(path.join(dataFolderPath, "text_Input.txt"), "utf8")
              .trim();
          } else {
            inputText = await question("Enter your text here : ");
          }

          rl.close();
        }
async function getUserChoice() { ... }:
This defines an asynchronous function named getUserChoice. Inside this function:
chooseOption = await question(...) :
prompts the user to select an input source (either load from a file or enter text manually) and awaits their response. The chosen option is stored in the chooseOption variable.
console.log(...) :
prints a message indicating the chosen option.
The code checks if the chosen option is "1" (loading from a file). If true, it reads the contents of the "text_Input.txt" file from the specified path (dataFolderPath), trims whitespace, and assigns it to the inputText variable. If false, it prompts the user to enter text manually.
rl.close() :
closes the readline interface, indicating the end of user interaction.
Now we need to ask the Question and take input from user :
        let chooseOption;
        let inputText = "";
        await getUserChoice();
This code declares variables chooseOption and inputText, initializes them, and awaits the execution of the getUserChoice function. The await keyword is used because getUserChoice is an asynchronous function.
Now we need to check if user input is valid or not. By using the code below we can check it :
        if (inputText.length>0) {
          console.log("\n Converting Text to Speech !\n");
        }else{
          console.log("\n Invalid Input !\n");
          process.exit(1);
        }
Checks if the inputText is not empty. If it's not empty, it indicates a valid input, and the code proceeds to the text-to-speech conversion. Otherwise, it displays an error message and exits the process.
Now you can test it by putting a console.log() below this code to test if there is any error while reading the data.
Getting Access Token from Hugging face :
So, what is Hugging face?, Hugging Face is a company and an open-source community that focuses on natural language processing (NLP) and artificial intelligence (AI). The company is known for its contributions to the development and sharing of state-of-the-art models for various NLP tasks.
Click here to redirect to hugging face website. You need to SignUp to get access token.
Now follow all these steps below shown in these series of images:
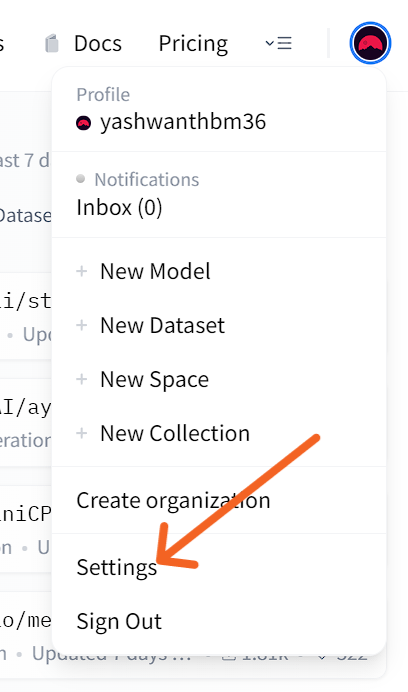
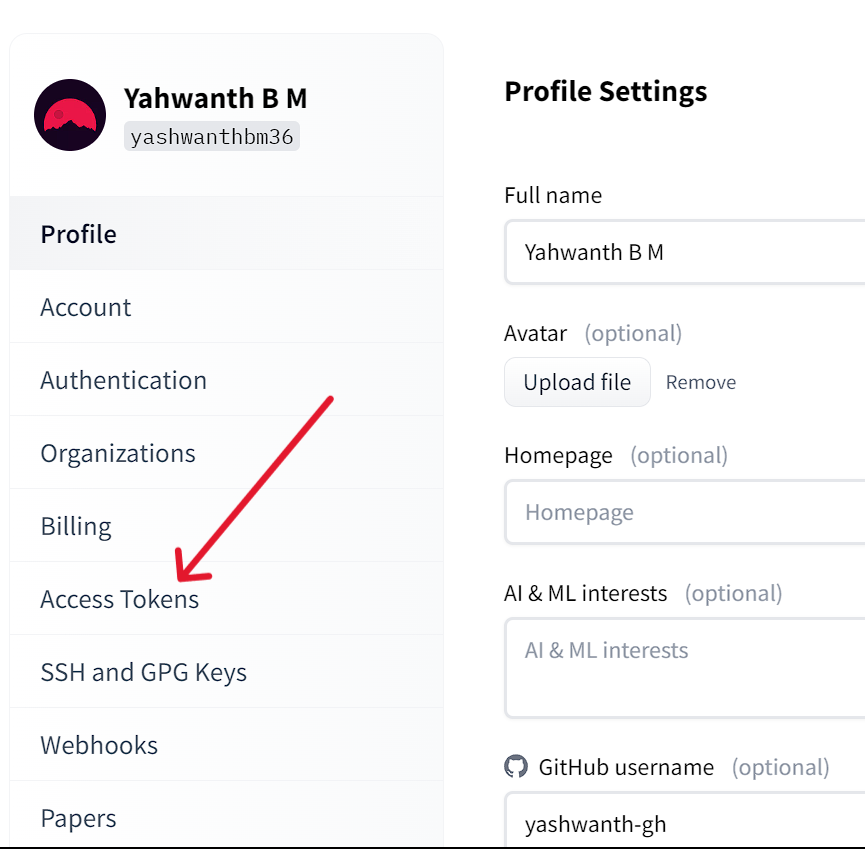
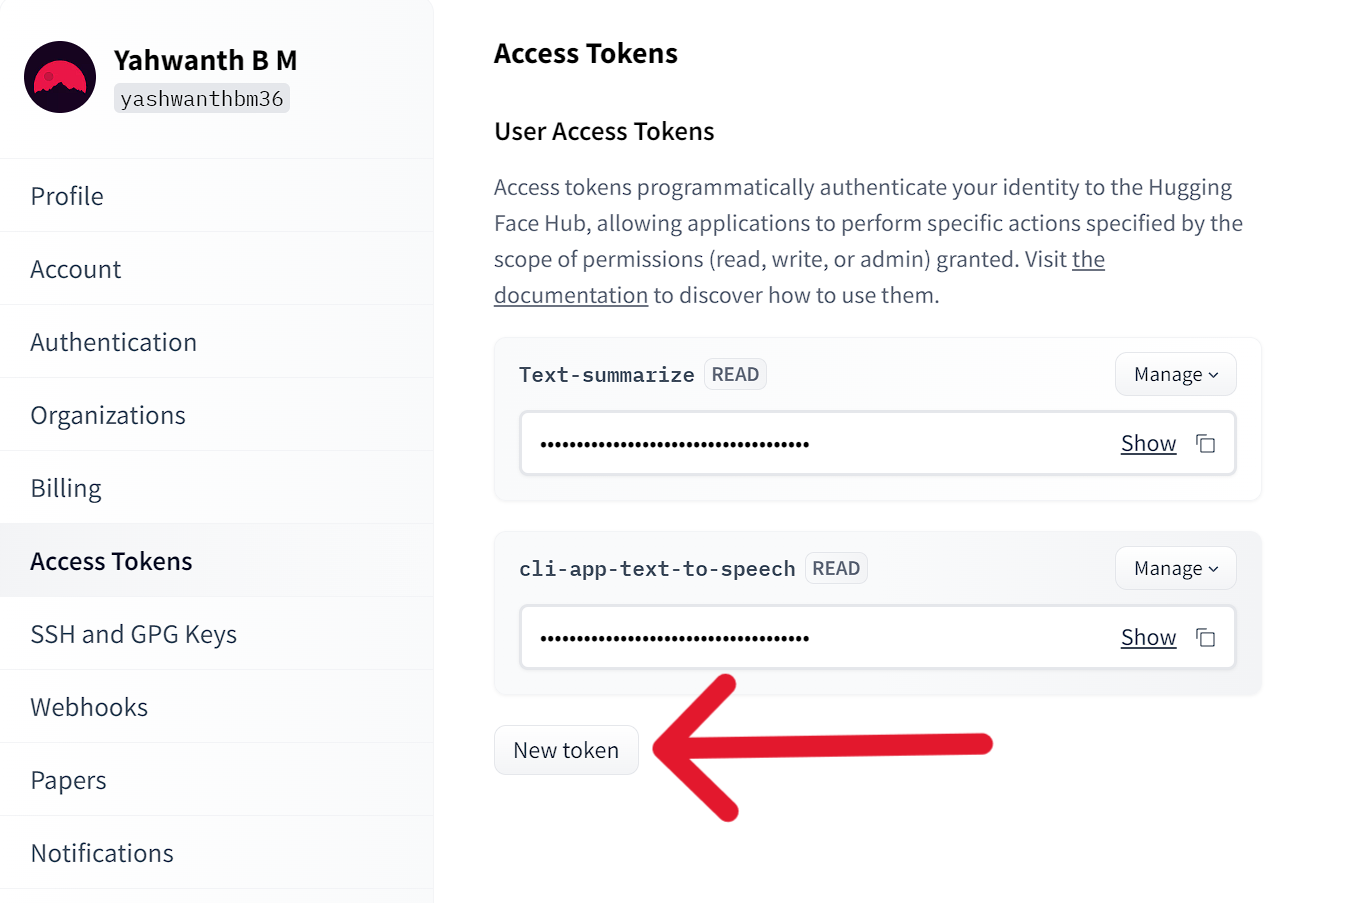
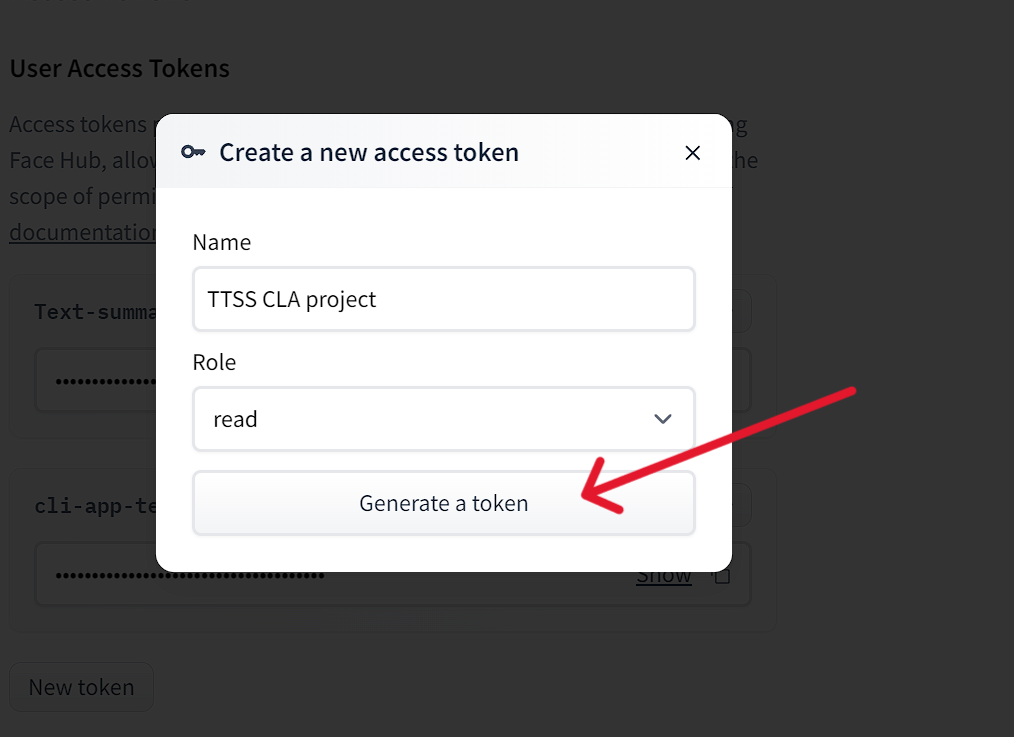

Now that you have your access token copied in clipboard, we can move further.
Making our API call :
For this project we will be using
facebook/mms-tts-engmodel , you can discover more about it here.As making a API call is an asynchronous operation, we will use a async function and put all our API related code in that function.
Explanation for the below code is given after the code :
const requestHuggingFace = async (data) => { try { // Making a POST request to the Hugging Face API const response = await fetch( "https://api-inference.huggingface.co/models/facebook/mms-tts-eng", { headers: { Authorization: "Bearer <Your_access_token>", }, method: "POST", body: JSON.stringify(data), } ); // Handling the response data as an ArrayBuffer const result = await response.arrayBuffer(); // Returning the result (audio data) return result; } catch (error) { // Handling errors and throwing a custom error message throw new Error("ERROR :: Error in API request:"); } };requestHuggingFaceFunction:This is an asynchronous function that takes
dataas a parameter.It makes a POST request to the Hugging Face API for the model "facebook/mms-tts-eng," which is designed for text-to-speech (TTS) in English.
The request includes an authorization token in the header and the input data (
JSON.stringify(data)) in the request body.
Handling the Response:
The function awaits the response from the API.
It then uses
response.arrayBuffer()to convert the response data into an ArrayBuffer. In this context, it's likely audio data generated by the TTS model.
Error Handling:
The function is wrapped in a try-catch block to handle potential errors during the API request.
If an error occurs, it throws a custom error message.
Make sure to replace
<Your_access_token>with your copied access token from hugging face. Don't paste it inside < > , remove<Your_access_token>completely.- It should look like this :
                    headers: {
                      Authorization: "Bearer This_Is_A_Fake_AccessToken_hKgfhrGHag",
                    },
Calling the API :
Call the above function by writing the following code :
const data = await requestHuggingFace({ inputs: inputText });The function is called with the input data (
inputText), and the result (audio data) is stored in thedatavariable.Saving the data to a file :
Write the below code to save the data to file :
 try {
   fs.writeFileSync(path.join(dataFolderPath, "audio.mp3"), Buffer.from(data));
   console.log("\ncheck for audio.mp3 in this folder", dataFolderPath);
   console.log("\nDone! Check you directory for file!");
 } catch (err) {
   console.log("ERROR :: Unable to create file");
 }
File Writing in the Try Block:
This line attempts to write the audio data (`data`) to a file named "audio.mp3" in the specified directory (`dataFolderPath`).
fs.writeFileSyncis a synchronous operation that writes the file, and it takes the file path and content (Buffer) as parameters.
Success Message :
If the file writing is successful, these lines print messages indicating the successful creation of the "audio.mp3" file. - The first line provides a reminder to check the specified folder for the file.
The second line gives a general success message.
Catch Block for Error Handling:
If an error occurs during the file writing operation, the catch block is executed.
The catch block logs an error message indicating that the file creation was unsuccessful.
- Install it globally one more time and run it :
Yup! it's done, it was that easy doing this project.
Now one more step is pending here, Go to your terminal and run the below command in the root directory where our
text-to-speech-CLI-applicationwas present.For me it is :
This installs our project globally in our system.
- Run and test it yourself :
Yes run the command
ttsor any other command that you specified here"bin": { "tts": "bin/index.js" },And see the magic. wait for some time and till the code executes and till our API responds. After the completion go to the directory that you specified initially and see there, there will be a
audio.mp3file, Play it! , is it working?.If Yes then well done your project is complete.
If No then go through each step again and figure out where you made mistake. If you can't figure out make some google searches and prompt Chat GPT or Gemini to get solution to your problem. After all debugging is programmers most important job!
Add A Progress Bar and ASCII art to improve user experience :
I used this website to generate ASCII art.
And i used
cli-progressnpm package to add loading progress bar in my code.I'm not going to explain how to add them, you can figure out by reading their docs and add it according to you taste.
Resources :
Conclusion :
In wrapping up our journey through building this Node.js Command Line Application for text-to-speech using Hugging Face's API, I hope you've found this guide both insightful and approachable. We've covered the basics of user interaction, seamlessly integrating with Hugging Face's API, and handling audio file creation with ease.
As you explore the code snippets and functionalities presented, remember that this application is designed to be beginner-friendly and efficient. .
Feel free to adapt and enhance the application to suit your needs. The world of command line applications and natural language processing is vast, and this project serves as a stepping stone for your future endeavors.
As you embark on your coding adventures, keep the passion alive, and may your projects bring joy and satisfaction. Happy coding! 🚀
My socials :
Subscribe to my newsletter
Read articles from Yashwanth directly inside your inbox. Subscribe to the newsletter, and don't miss out.
Written by
