Creating a RAID 0 Volume in Ubuntu
 Cloud Tuned
Creating a RAID 0 Volume in Ubuntu
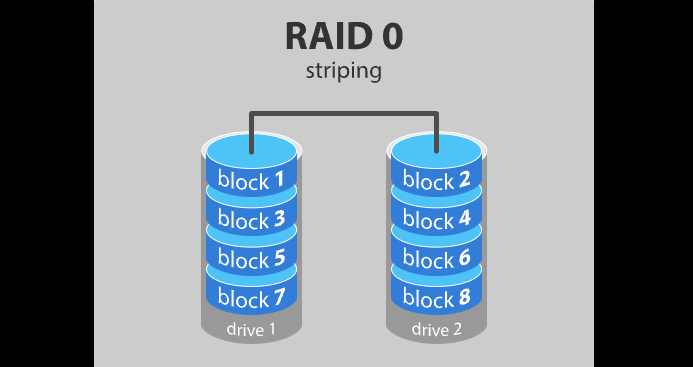
RAID 0, also known as striping, is a RAID configuration that combines multiple disks into a single volume for enhanced performance and capacity. In this guide, we'll walk through the steps to create a RAID 0 volume in Ubuntu using the mdadm utility.
Step 1: Install mdadm
First, ensure that the mdadm package is installed on your Ubuntu system. If not, you can install it using the following command:
sudo apt-get update
sudo apt-get install mdadm
Step 2: Identify Disks
Identify the disks you want to use for the RAID 0 volume. You can use the lsblk command to list all available disks and their partitions:
lsblk
Make a note of the device names of the disks you want to include in the RAID 0 array (e.g., /dev/sdb, /dev/sdc, etc.).
Step 3: Create the RAID 0 Array
Use the mdadm command to create the RAID 0 array. Replace /dev/sdX with the device names of the disks you identified earlier:
sudo mdadm --create --verbose /dev/md0 --level=stripe --raid-devices=2 /dev/sdX /dev/sdY
In this example, we're creating a RAID 0 array named /dev/md0 with two disks (/dev/sdX and /dev/sdY). Adjust the --raid-devices parameter accordingly if you're using more than two disks.
Step 4: Format the RAID Volume
Once the RAID 0 array is created, format it with the desired filesystem. For example, to format it as ext4, use the following command:
sudo mkfs.ext4 /dev/md0
Replace ext4 with the filesystem of your choice if needed.
Step 5: Mount the RAID Volume
Create a mount point directory where you want to mount the RAID volume:
sudo mkdir /mnt/raid0
Then, mount the RAID volume to the mount point directory:
sudo mount /dev/md0 /mnt/raid0
Step 6: Automate RAID Mounting
To ensure that the RAID volume is mounted automatically at boot, you can add an entry to the /etc/fstab file:
echo '/dev/md0 /mnt/raid0 ext4 defaults 0 2' | sudo tee -a /etc/fstab
This entry will mount the RAID volume at /mnt/raid0 with ext4 filesystem and default options.
Step 7: Verify RAID Configuration
Finally, verify that the RAID 0 volume is configured correctly by checking its status:
cat /proc/mdstat
You should see the RAID volume (/dev/md0) listed with the appropriate RAID level (0) and member disks.
Conclusion
By following these steps, you can create a RAID 0 volume in Ubuntu using the mdadm utility. RAID 0 provides improved performance and capacity by striping data across multiple disks. However, keep in mind that RAID 0 does not provide redundancy, so a failure of any disk in the array can result in data loss.
This guide outlines the steps required to create a RAID 0 volume in Ubuntu using the mdadm utility, along with explanations for each step.
Subscribe to my newsletter
Read articles from Cloud Tuned directly inside your inbox. Subscribe to the newsletter, and don't miss out.
Written by
