Strapi CMS on Google Cloud Platform: The Definitive Guide - Part 3
 Kevin Blanco
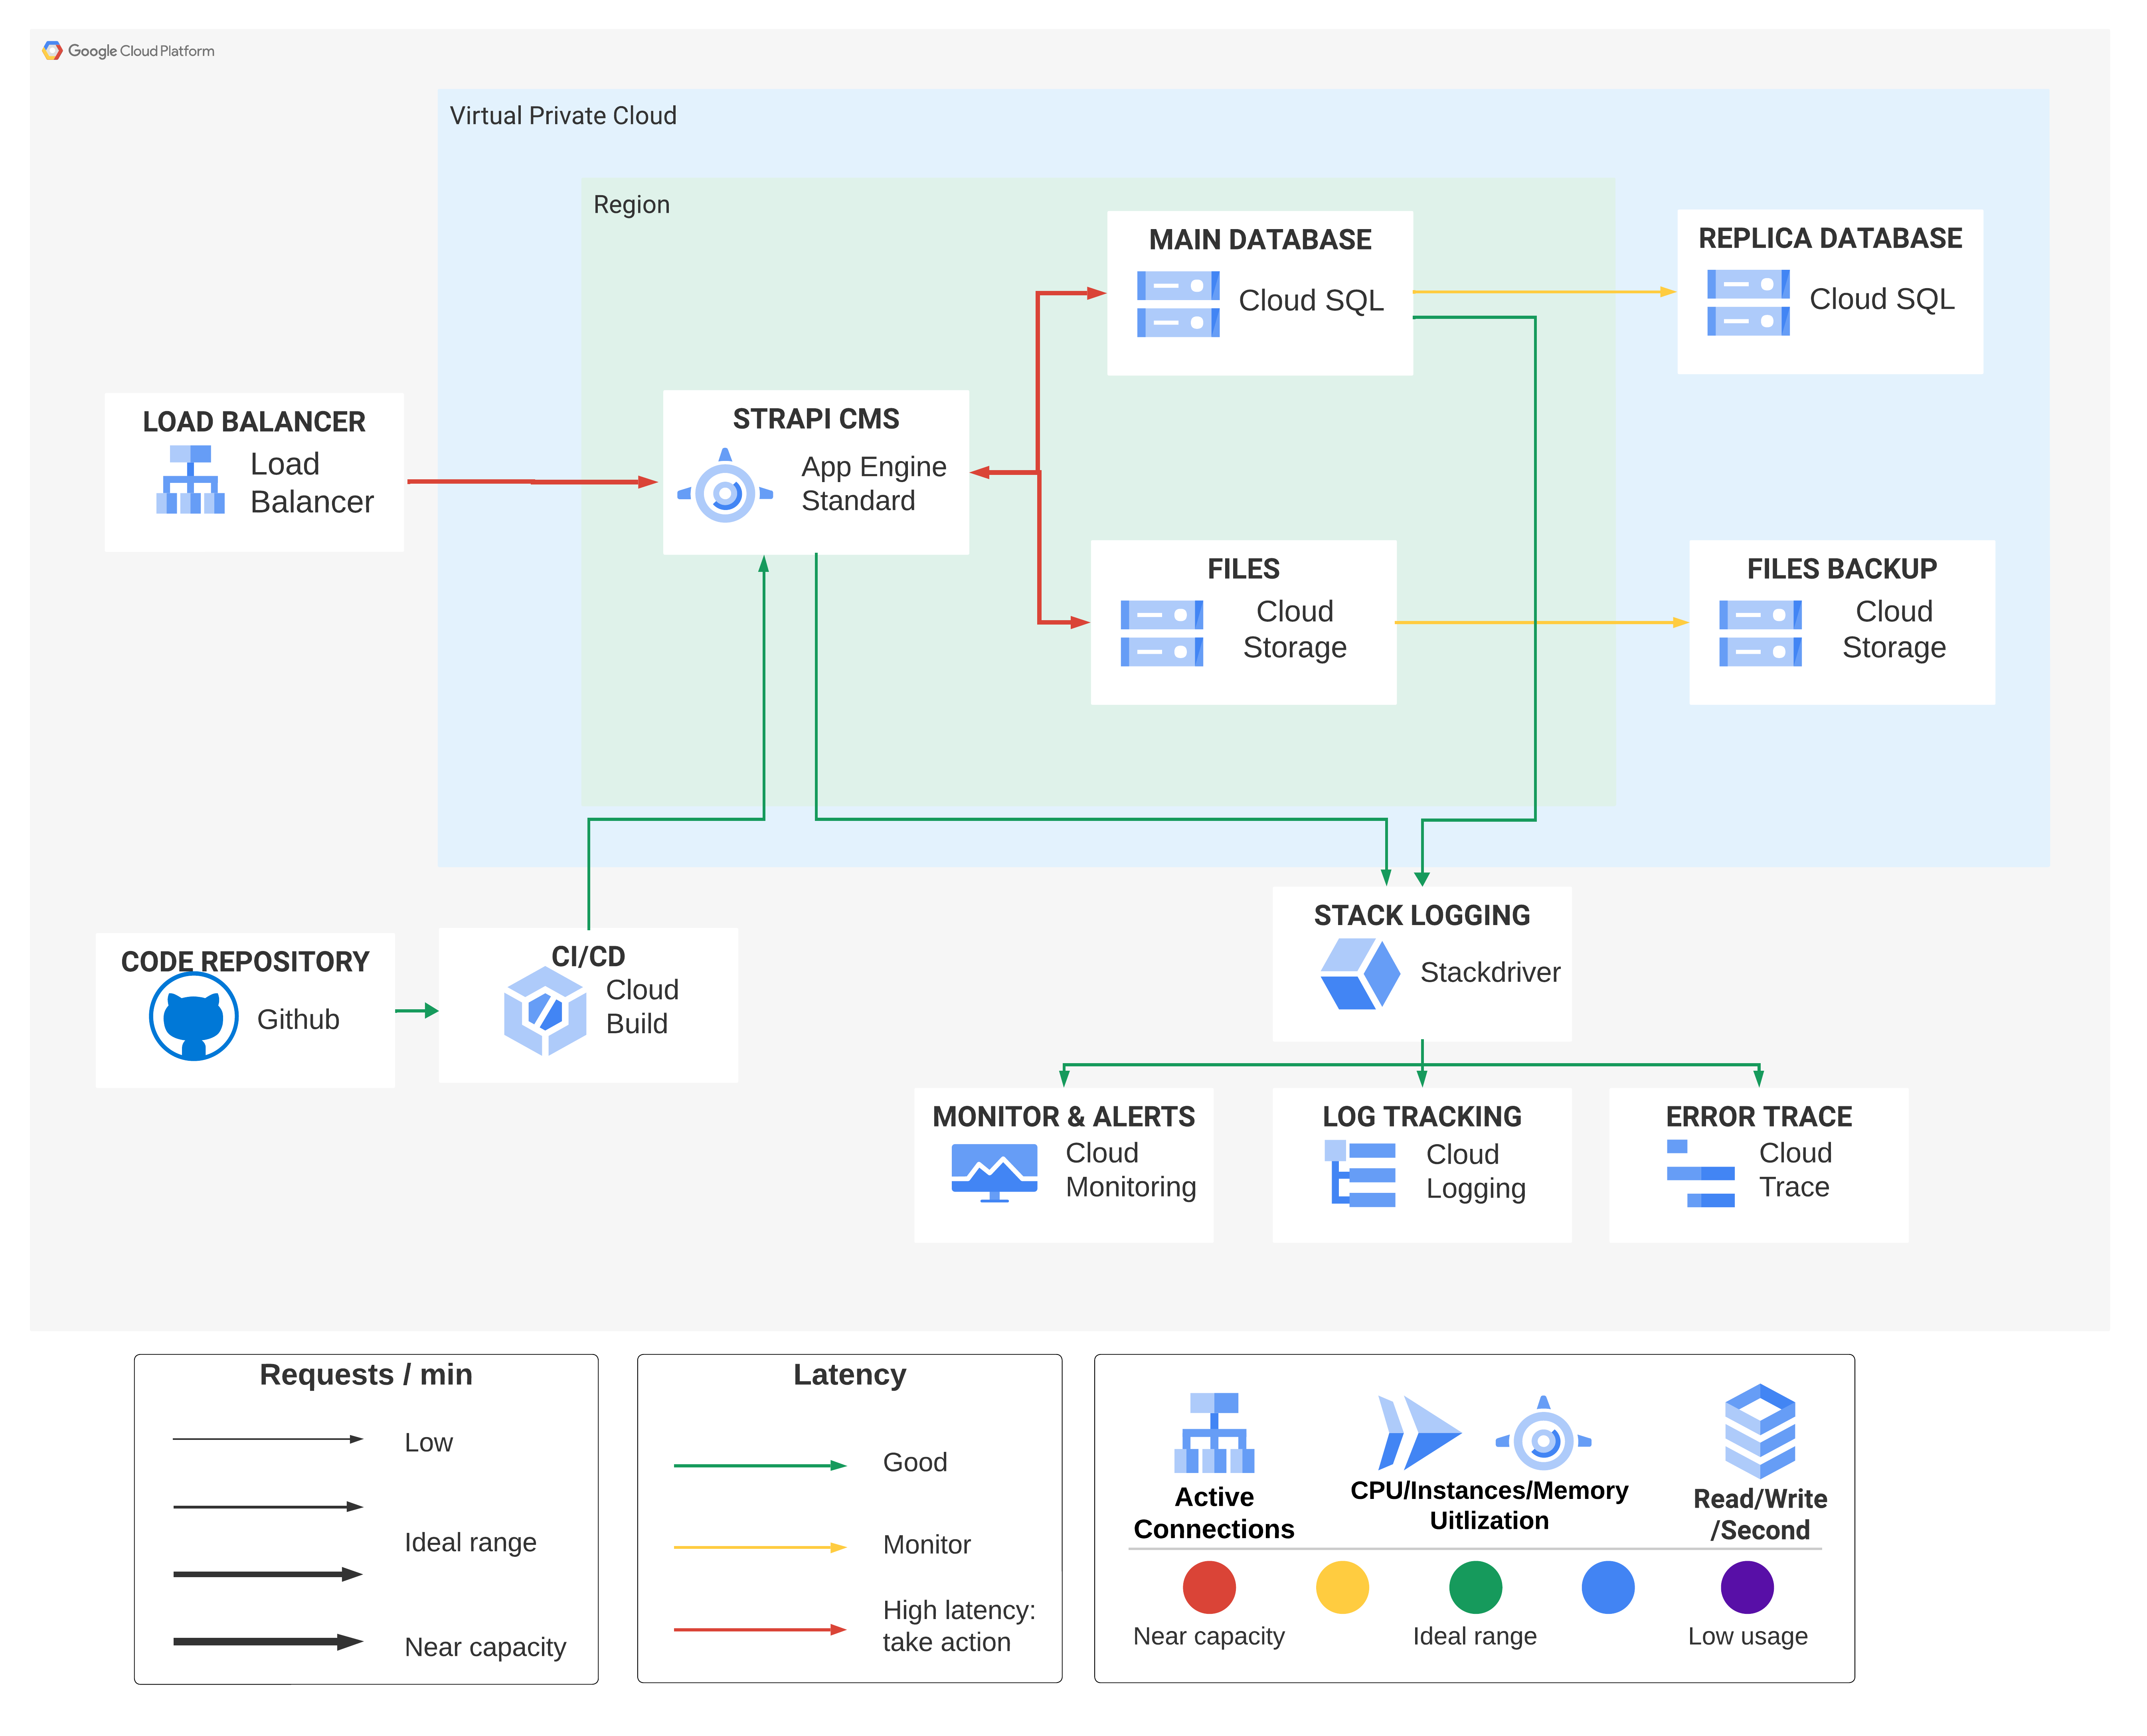
Hello everyone! Welcome to part 3 and final of 'The Definitive Guide' on running Strapi, the headless open-source content management system, on Google Cloud Platform. I'm a Google Developer Expert in Google Cloud Platform. Be sure to check out Part 1, where we set up our Google Cloud environment, Part 2, where we dived into configuring the Strapi application for Google Cloud. In this part, we will configure automated deployments and code checks as any real-world application (CI/CD) using Google Cloud Build and Github. In case you missed it, here's the diagram of what we are building:
So let's get started!
TL;DR Watch this video:
Prerequisites
Node.js v.18+ installed locally.
Have Part 1 and Part 2 completed.
The gcloud command line interface installed on your machine
Configure your Repository.
As stated before, we will use github to configure the automated deployment, so we must ensure the repository is ready to integrate into Cloud Build. The main two files are the app.yaml and the .gcloudignore and if you followed Part 2 you should be all set, but if you already have your existing Strapi project make sure to them like this:
app.yaml
runtime: nodejs18
instance_class: F2

env_variables:
  HOST: '0.0.0.0'
  NODE_ENV: 'production'
  DATABASE_NAME: 'postgres'
  DATABASE_USER: 'postgres'
  DATABASE_PASSWORD: 'CLOUD_SQL_PASSWORD'
  INSTANCE_CONNECTION_NAME: 'CLOUD_SQL_CONNECTION_NAME'
  GCS_BUCKET_NAME: 'CLOUD_STORAGE_BUCKET_NAME'
  GCS_BASE_PATH: 'cms'

beta_settings:
  cloud_sql_instances: 'CLOUD_SQL_CONNECTION_NAME'
and the .gcloudignore
.gcloudignore
.git
.gitignore
node_modules/
#!include:.gitignore
!.env
yarn.lock  # If you're using Yarn
I have a public repository you can use as a reference to compare; that's the one we will use for setting up Cloud Build.
Integrate Github Repository into Cloud Build
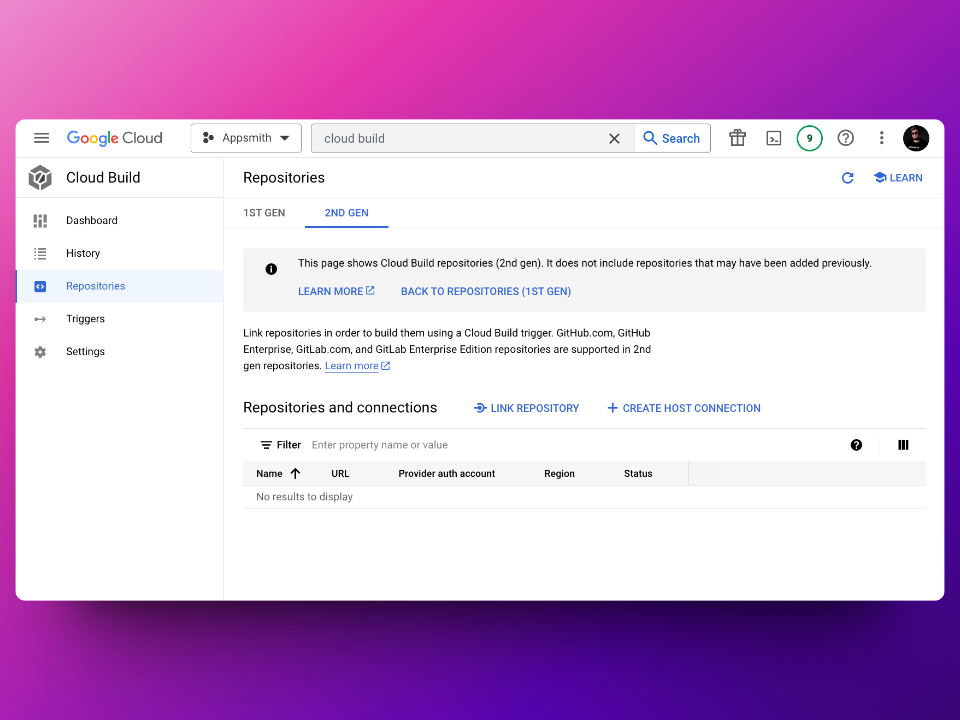
Go to Google Cloud Build https://console.cloud.google.com/cloud-build/builds, and on the left menu, select "Repositories", then make sure to be on the "2ND GEN" tab and select the "Create Host Connection" to connect our Github into Cloud Build
On the next screen, make sure to have "Github" selected on the left, then choose a Region, it is vital that this region is the same as the App Engine app (us-central1 for me), and then give your connection a name.
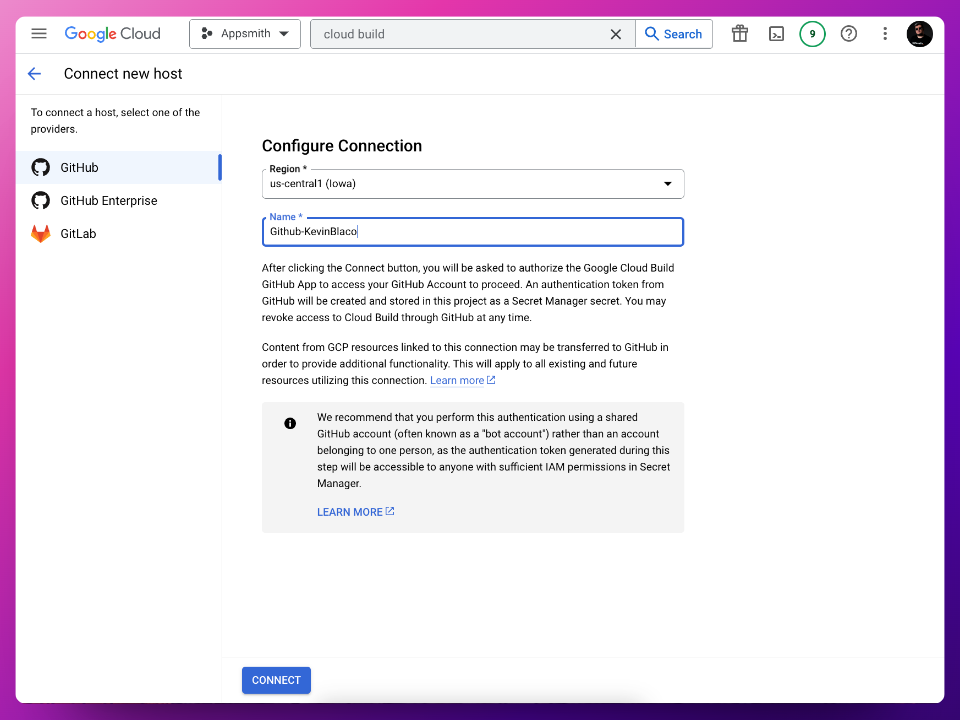
I called mine "Github-KevinBlanco" and clicked Connect; then, on the following screen, you can "Install in a New Account", in case you already have a connection in place, you might use it, but I recommend a connection per repository. On the following screen, select the account or organization you want to connect the repository, in this case, I will select my personal account
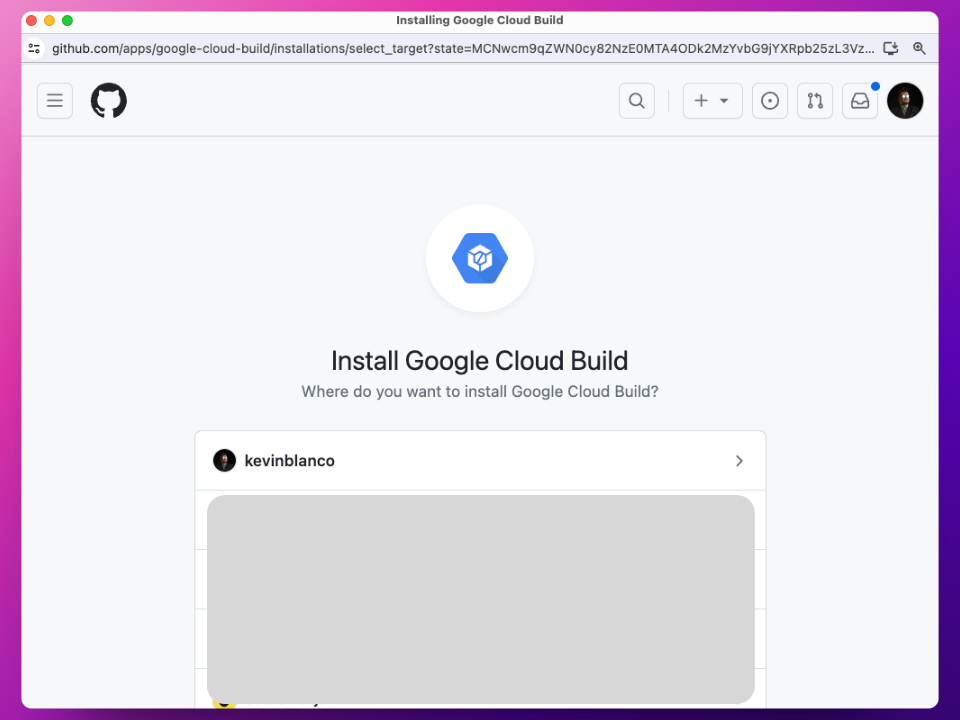
On the next screen, you will select the repository you want to integrate with App Engine, you could select all repositories but from a security standpoint is a good practice to only allow the repository you will use.
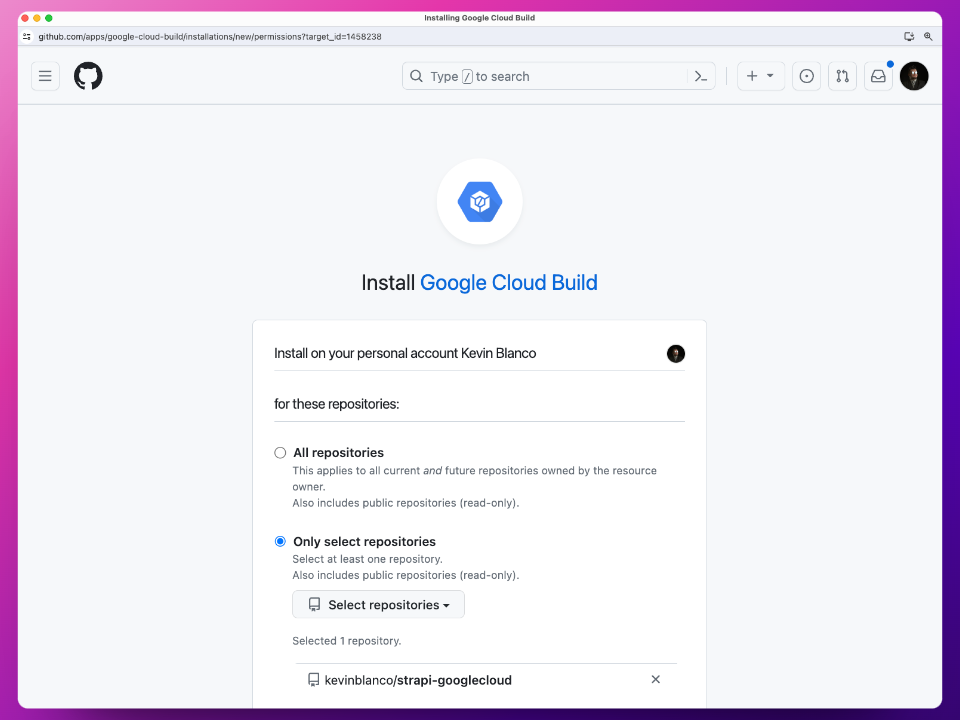
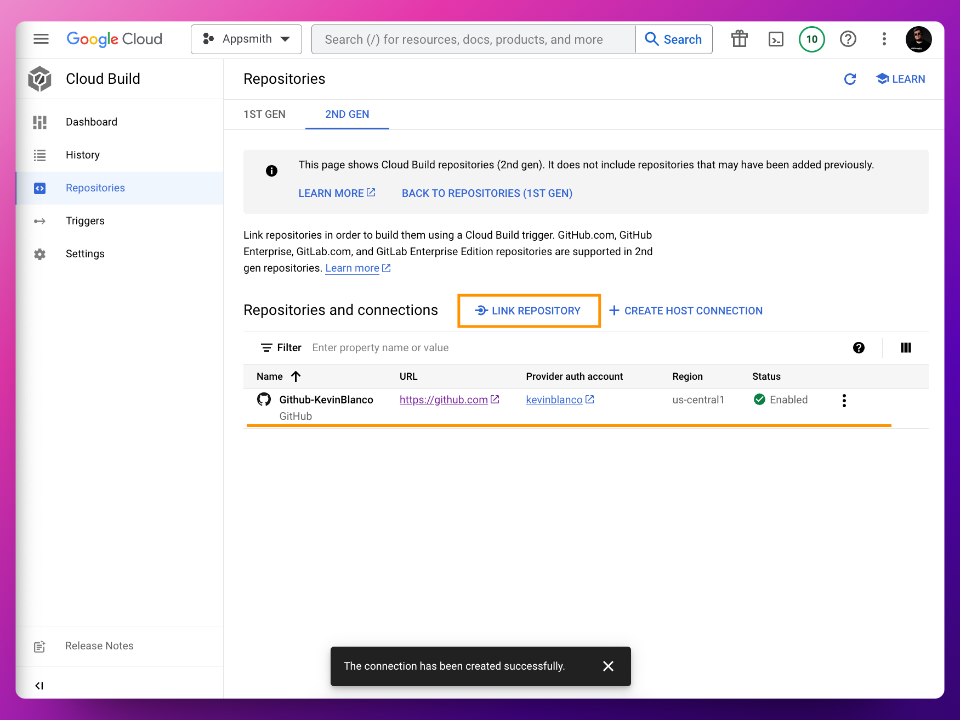
After selecting the proper repository, click on "Connect", after that, you will see the Connection listed; now, we can click on "Link Repository".
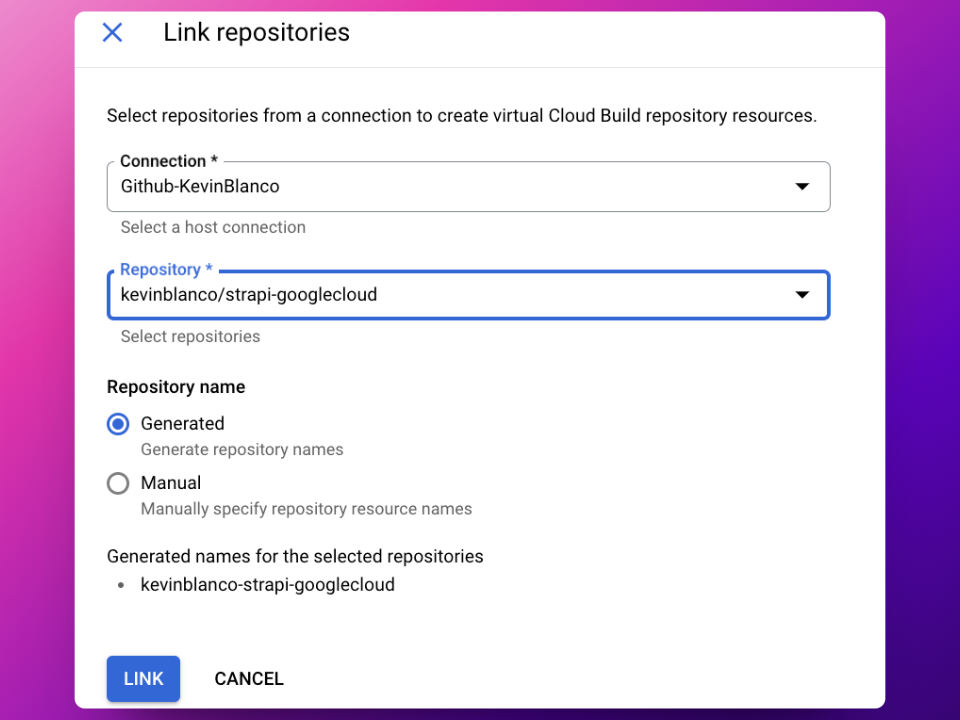
On the Link Repository creation form, select the Connection we just created and then select the repository we allowed, it will look like this:
Now, we are ready to configure our Triggers and Build Scripts!
Configure a Trigger
Go to the Triggers section in the Google Cloud Build https://console.cloud.google.com/cloud-build/triggers and create a new Trigger
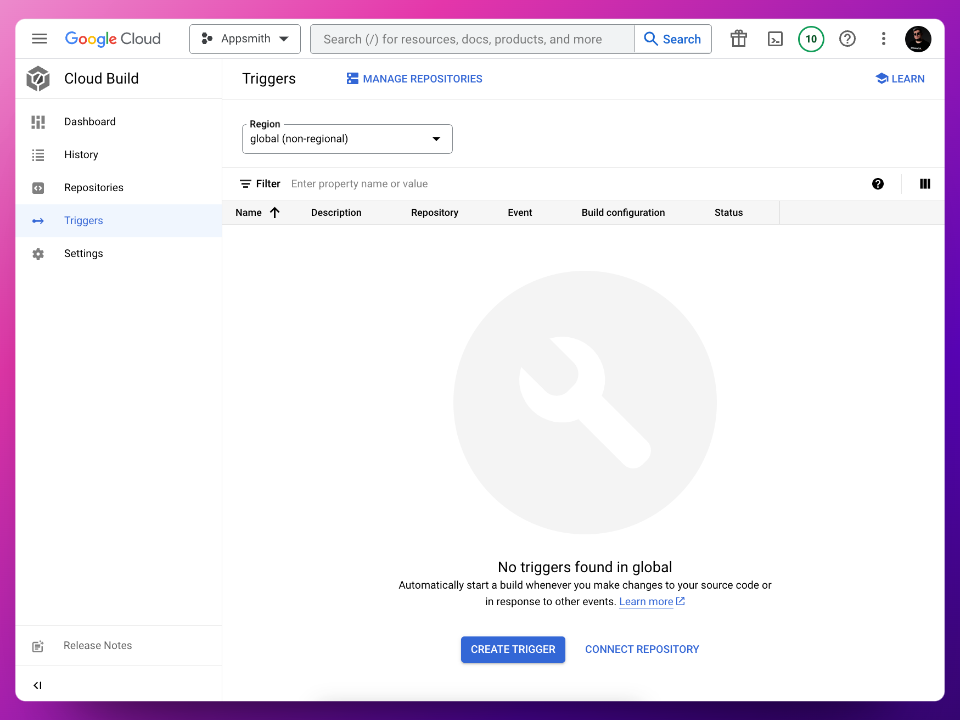
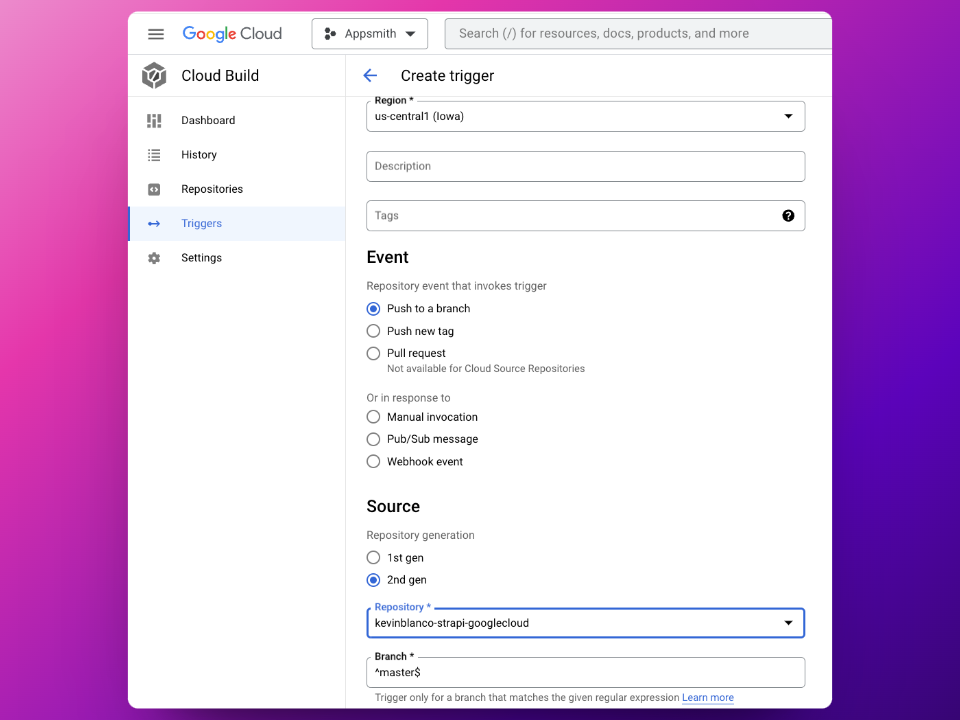
Now, let's breakdown the details we need to enter on the different fields on the Trigger creation
Name: Define your preferred name
Region: Define the Region to run this build, select the same region we've created our connection and the App Engine. Do not select Global since you won't be able to use 2nd GEN repos.
Description: Optional, a description
Tags: Optional, define tags for this trigger
Event: Define what event triggers this job, in my case is going to be "Push to a branch", but yours could be different like based on a pull request, manual invocation, webhook event, etc.
Source: Select the 2nd GEN repository we just created
Branch: Since we selected "Push to a Branch" as the event, we can define which branch will trigger this job, I'll define
^master$so that way, when there's a new commit to themasterbranch it will trigger this job.Configuration: There are multiple ways to define what's going to happen in our job, the first one is a Cloud Build configuration file (this is going to be our choice), a Dockerfile (in case you use App Engine Flexible), and a Buildpack
Location: Here, we will define where the configuration file lives if it's in the repository or inline, I will choose Inline.
Now, click on the "Open Editor" button and let's write our build script, here's where we tell Google Cloud Build what to run when the trigger executes.
steps:
  - name: gcr.io/google.com/cloudsdktool/cloud-sdk
    args:
      - '-c'
      - >-
        gcloud config set app/cloud_build_timeout 1600 && gcloud app deploy
        app.yaml --project appsmith-403817
    entrypoint: bash
timeout: 1600s
options:
  logging: CLOUD_LOGGING_ONLY
So what's happening in this Cloud Build script is that we are pulling the cloud-sdk image so we can use all the gcloud commands, and then we will execute the gcloud app deploy command that will read our app.yaml file and the build script in the package.json . As you can see, this is really simple.
Last but not least, we have to select the service account, and is really important that we choose the service account we configured in Step 1, in our case, the default App Engine service account, so with all put together it should look like this:
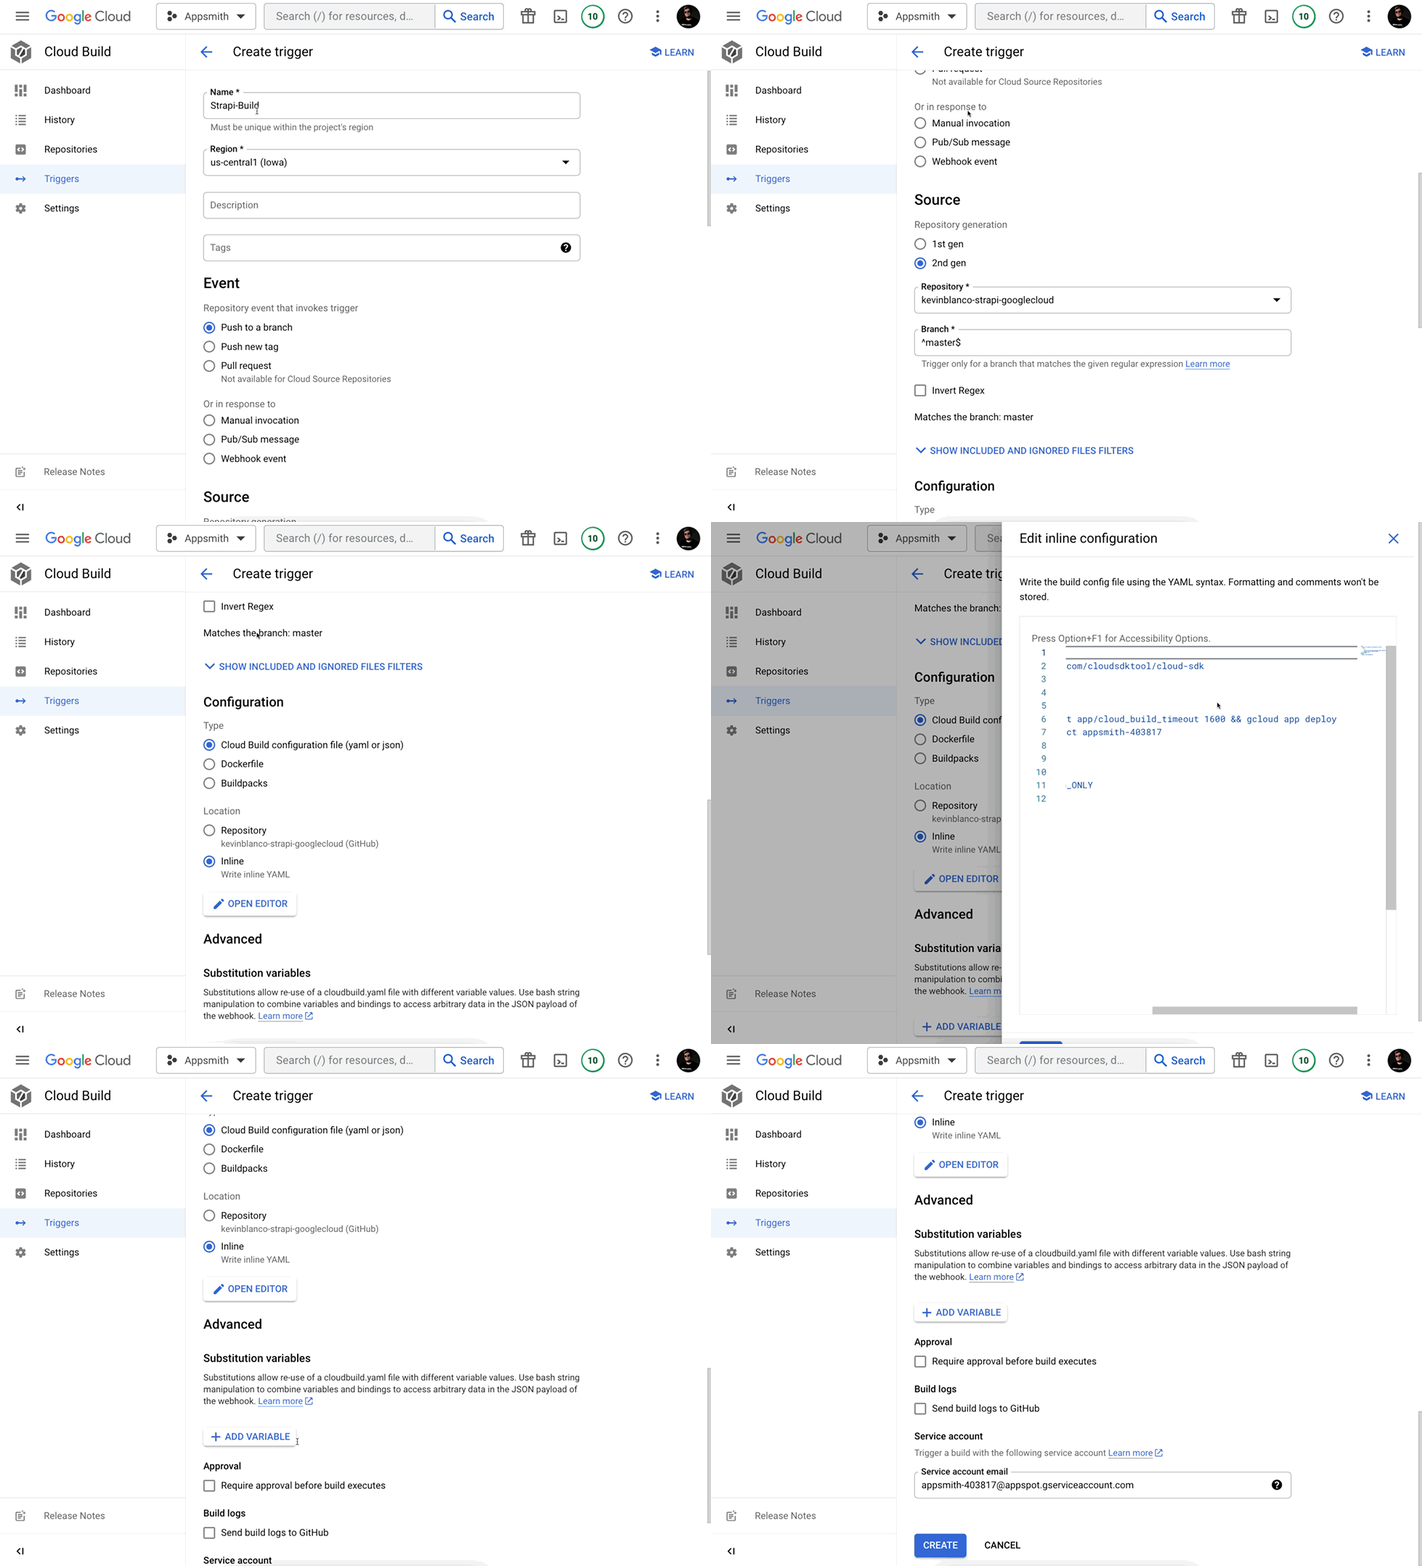
Now, save this trigger and make a commit to the branch, or, run the trigger manually. We can then go to the History section and see that the job triggered and is in progress
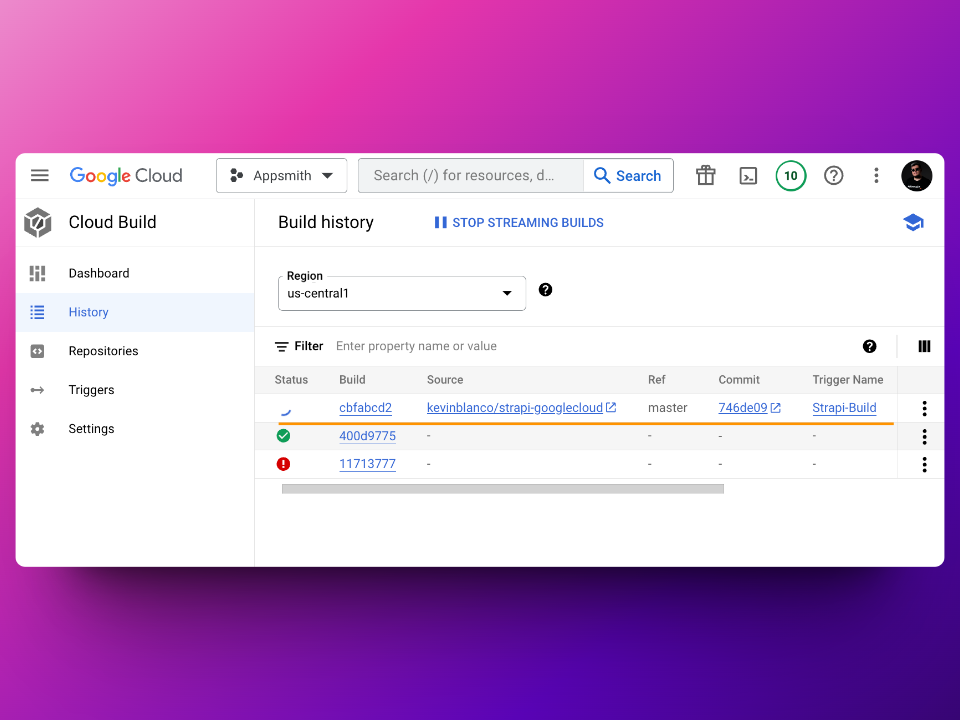
You can select the build and see the logs, once the job is done, you will notice on the logs that the App Engine deployment happened successfully!
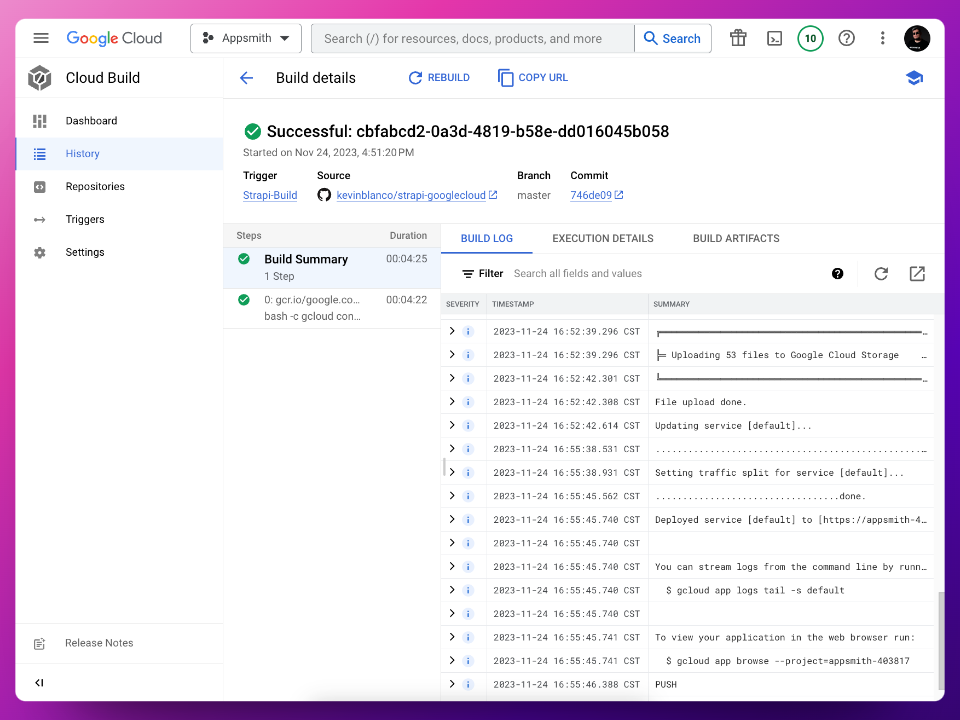
You can go to App Engine and see that the new version is live and working correctly!
Conclusion
We have come a long way but now we have a production-ready, secure application that is actually running and working correctly. Let me know in the comments in case you have questions.
Subscribe to my newsletter
Read articles from Kevin Blanco directly inside your inbox. Subscribe to the newsletter, and don't miss out.
Written by

Kevin Blanco
Kevin Blanco
Kevin Blanco is a multifaceted technologist who bridges the worlds of technology development and creative media. As a Senior DevRel Advocate, Google Developer Expert in Cloud and Workspace, and Google Champion Innovator, Kevin brings over 14 years of industry experience to the stage. His expertise spans cloud architecture, education technology, and innovative developer solutions. A certified Cloud Architect and Google Educator/Trainer, Kevin has delivered impactful sessions across North America and Latin America, establishing himself as a trusted voice in the global developer community. His unique background in cinema production and certification as a Davinci Resolve editor/colorist adds a creative edge to his technical prowess. Currently Senior DevRel at Appsmith in charge of Video Production, Kevin has spearheaded successful video initiatives that have significantly boosted community engagement and product adoption. His YouTube channel is a showcase of his ability to blend technical knowledge with compelling content creation. Kevin's passion for empowering developers, combined with his filmmaking skills, makes him an ideal speaker to inspire audiences to harness the true potential of video in DevRel and beyond.