Day 18 - Docker for DevOps Engineers - Unveiling Docker Compose 🚀
 Nilkanth Mistry
Hello DevOps Enthusiasts! Today, we're delving into the magic of Docker Compose, a tool designed to simplify the orchestration of multi-container applications. 🐳✨
📜 Understanding Docker Compose:
What is Docker Compose?
Docker Compose is a boon for defining and sharing multi-container applications effortlessly. It operates on a YAML file, acting as a blueprint to set up services, links, and configurations in one go. Think of it as your DevOps symphony conductor! 🎶

Why YAML?
YAML, or "Yet Another Markup Language," is a human-readable data serialization language frequently used for configuration files. Its simplicity and readability make it a preferred choice.

Sample Docker Compose File:
version: '3'
services:
  web:
    image: nginx:latest
    ports:
      - "8080:80"
🚀 Tasks at Hand:
Task-1: Mastering docker-compose.yml
Install Docker Compose: If you haven't installed Docker Compose, you can do it by following the instructions here.
Create a Project Directory: Create a directory for your project and navigate into it.
 mkdir my-docker-project
 cd my-docker-project
Create a docker-compose.yml file: Create a
docker-compose.ymlfile in your project directory. This will be the configuration file for Docker Compose.version: '3' services: web: image: nginx:latest ports: - "8080:80" environment: - ENV_VARIABLE=valueIn this example, we define a service named "web" using the Nginx image, expose port 8080 on the host to port 80 on the container, and set an environment variable.
Run Docker Compose: Run the following command to start the services defined in your
docker-compose.ymlfile.docker-compose up -dThe
-dflag runs the containers in the background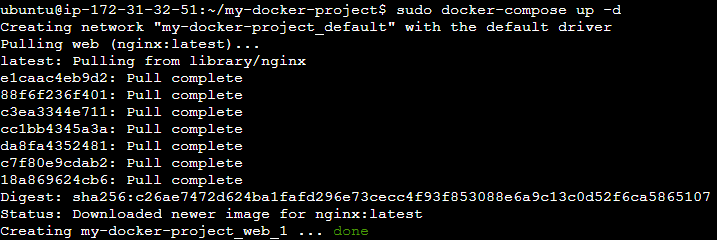
Verify the Containers: Check if the containers are running.
docker-compose ps
Stop and Remove Containers: Stop and remove the containers when done.
docker-compose down

Task-2: Handling Docker Containers Like a Pro
Pull a Pre-existing Image: Choose an image from Docker Hub and pull it.
docker pull ubuntu:latest
Run as a Non-root User: When running a container, use the
--userflag to specify a non-root user.docker run --user 1000:1000 -it ubuntu:latest /bin/bashReplace
1000:1000with the appropriate user and group IDs.Exploration with Docker Commands:
View container processes:
docker top <container_id>Examine exposed ports:
docker port <container_id>View container logs:
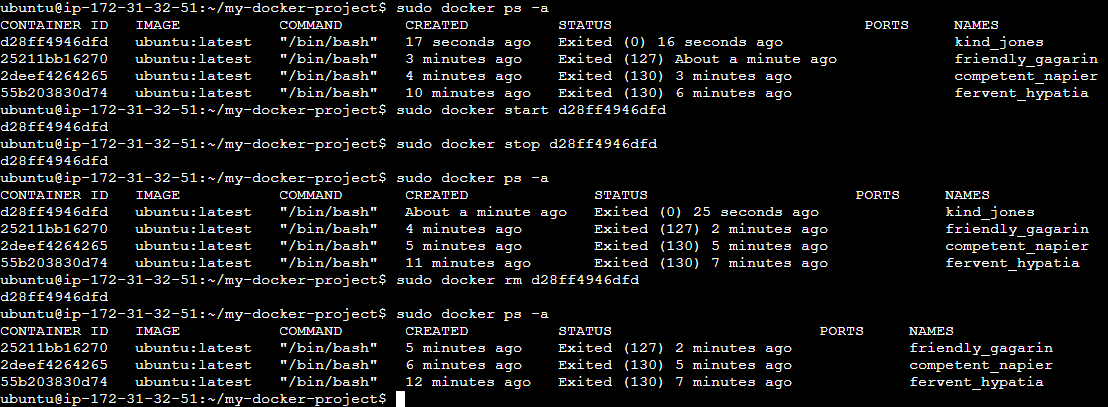
docker logs <container_id>Gracefully start, stop, and remove containers:
  docker start <container_id>
  docker stop <container_id>
  docker rm <container_id>
Now you have successfully completed both tasks! Adjust the configurations and commands based on your specific needs.
🔄 Running Docker Commands Without Sudo:
sudo usermod -a -G docker $USER
Reboot the machine.
Embark on this Docker journey with confidence! These fundamental concepts pave the way for a deeper understanding of container orchestration.
Subscribe to my newsletter
Read articles from Nilkanth Mistry directly inside your inbox. Subscribe to the newsletter, and don't miss out.
Written by
Nilkanth Mistry
Nilkanth Mistry
Embark on a 90-day DevOps journey with me as we tackle challenges, unravel complexities, and conquer the world of seamless software delivery. Join my Hashnode blog series where we'll explore hands-on DevOps scenarios, troubleshooting real-world issues, and mastering the art of efficient deployment. Let's embrace the challenges and elevate our DevOps expertise together! #DevOpsChallenges #HandsOnLearning #ContinuousImprovement