Deploying Multiple Applications on AWS EC2 with Docker
 SWATHI PUNREDDY
Welcome to our blog where we delve into the exciting world of deploying applications using Docker on AWS EC2 instances. In today's blog, we'll explore the deployment process for three different types of applications: Java, Flask (Python), and Node.js. By containerizing our applications with Docker, we ensure consistency and ease of deployment across various environments.
Let's dive in:
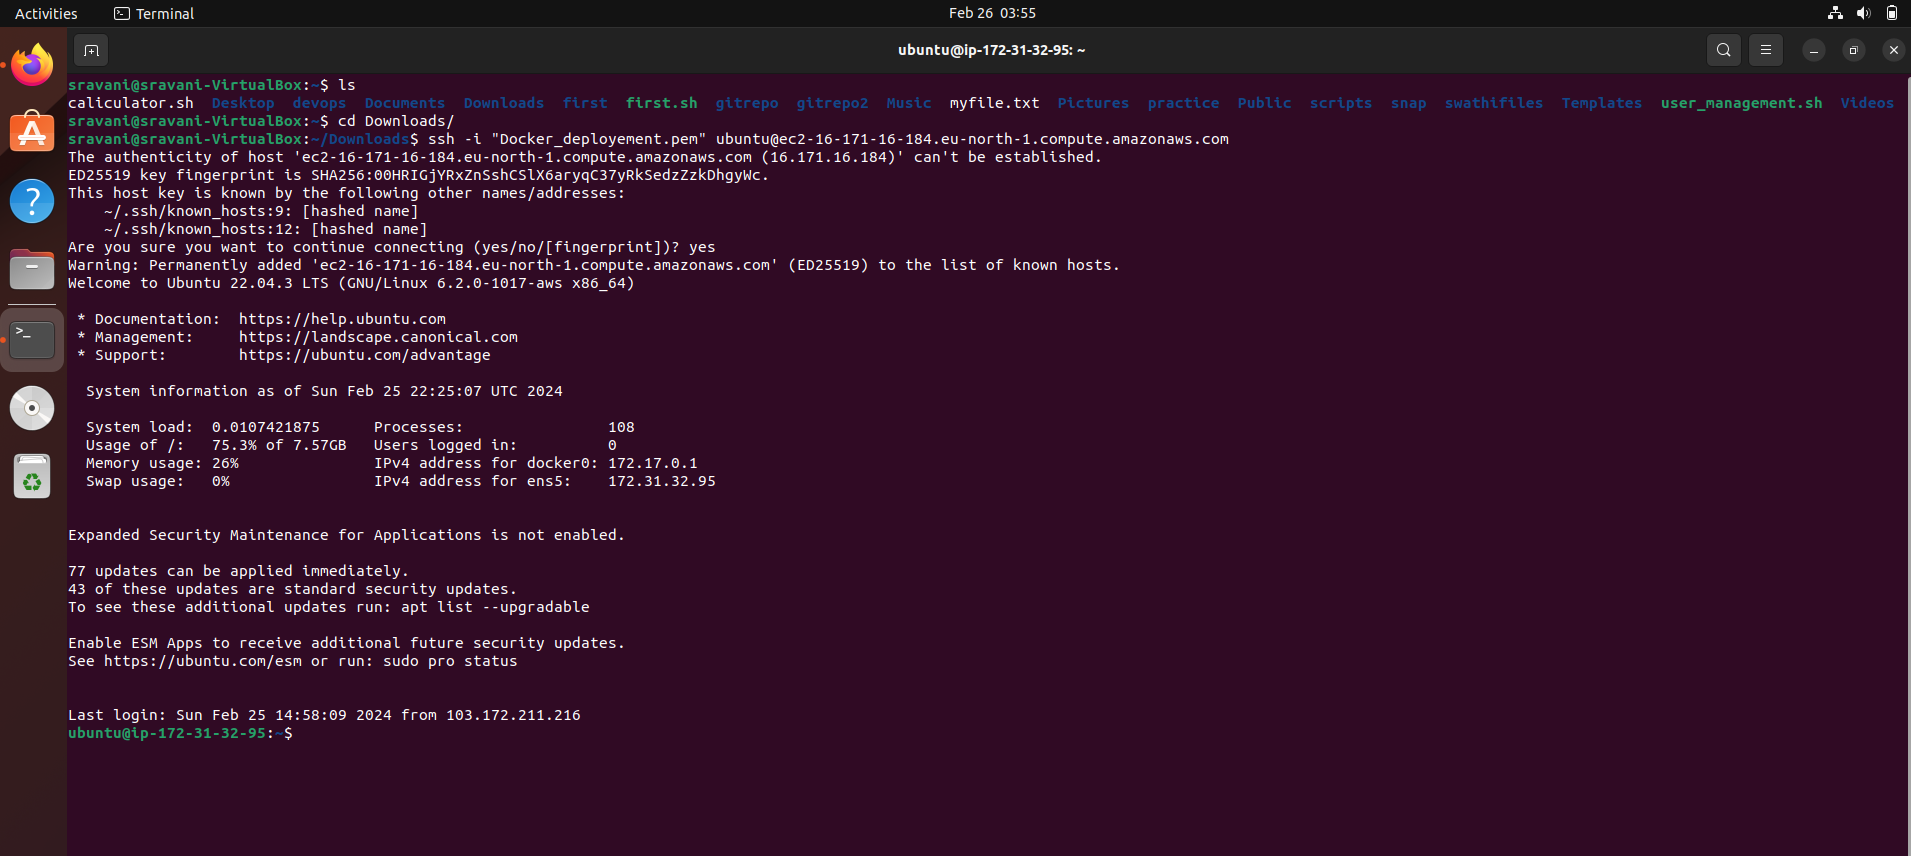
Logging in to Ubuntu EC2 Instance:
Use SSH to connect to the Ubuntu EC2 instance.
Replace /path/to/your/private-key.pem with the path to your private key file and your-instance-public-ip with the public IP address of your EC2 instance.
ssh -i /path/to/your/private-key.pem ubuntu@your-instance-public-ip
Installing Docker and Setting Up Environment:
Guide readers through the installation process of Docker on Ubuntu.
  sudo apt update
  sudo apt install docker.io
Add the current user to the Docker group to run Docker commands without sudo.
sudo usermod -aG docker $USER
Creating Directories for Deployments:
Create separate directories for each application deployment.
mkdir java-app
mkdir flask-app
mkdir nodejs-app
Java Deployment:
In this section, we'll walk through the deployment of a simple Java application using Docker.
1. Directory Structure:
ubuntu@ip-172-31-32-95:~/docker-projects$ ls
flask-app-ecs  java-app  node-app
Within the docker-projects directory, we have subdirectories for each of our applications: flask-app-ecs, java-app, and node-app.
2. Java Application Files:
ubuntu@ip-172-31-32-95:~/docker-projects/java-app$ ls
Dockerfile  Hello.java
In the java-app directory, we have two important files:
Hello.java: This file contains a simple Java program that prints a greeting message along with the current date.import java.util.Date; public class Hello { public static void main(String[] args) { System.out.println("Hello Dosto"); Date currentDate = new Date(); System.out.println("Today's date is: " + currentDate); } }
Dockerfile: This file contains instructions for building a Docker image for our Java application.# Use the official OpenJDK 11 base image FROM openjdk:11 # Set the working directory inside the container to /app WORKDIR /app # Copy the Hello.java file from the host machine into the container's /app directory COPY Hello.java . # Compile the Hello.java file inside the container using the javac compiler RUN javac Hello.java # Specify the command to run when the container starts: # Run the Java application by executing the java command followed by the name of the main class (Hello) CMD ["java", "Hello"]Explanation of each line:
FROM openjdk:11: Specifies the base image to use for the Docker image, which is the official OpenJDK 11 image from Docker Hub.WORKDIR /app: Sets the working directory inside the container to/app. This is where subsequent commands will be executed.COPYHello.java.: Copies theHello.javafile from the host machine (the directory where theDockerfileis located) into the container's/appdirectory.RUN javacHello.java: Runs thejavaccompiler inside the container to compile theHello.javafile and generate the corresponding bytecode (Hello.class).CMD ["java", "Hello"]: Specifies the default command to run when the container starts. It runs the Java application by executing thejavacommand followed by the name of the main class (Hello).
Building the Docker Image:
Once we have defined our Dockerfile, we can proceed to build the Docker image. This image will contain all the dependencies and configurations required to run our Java application.
To build the Docker image in detached mode, navigate to the directory containing the Dockerfile (java-app in this case) and run the following command:
docker build -t -d java-app:latest .
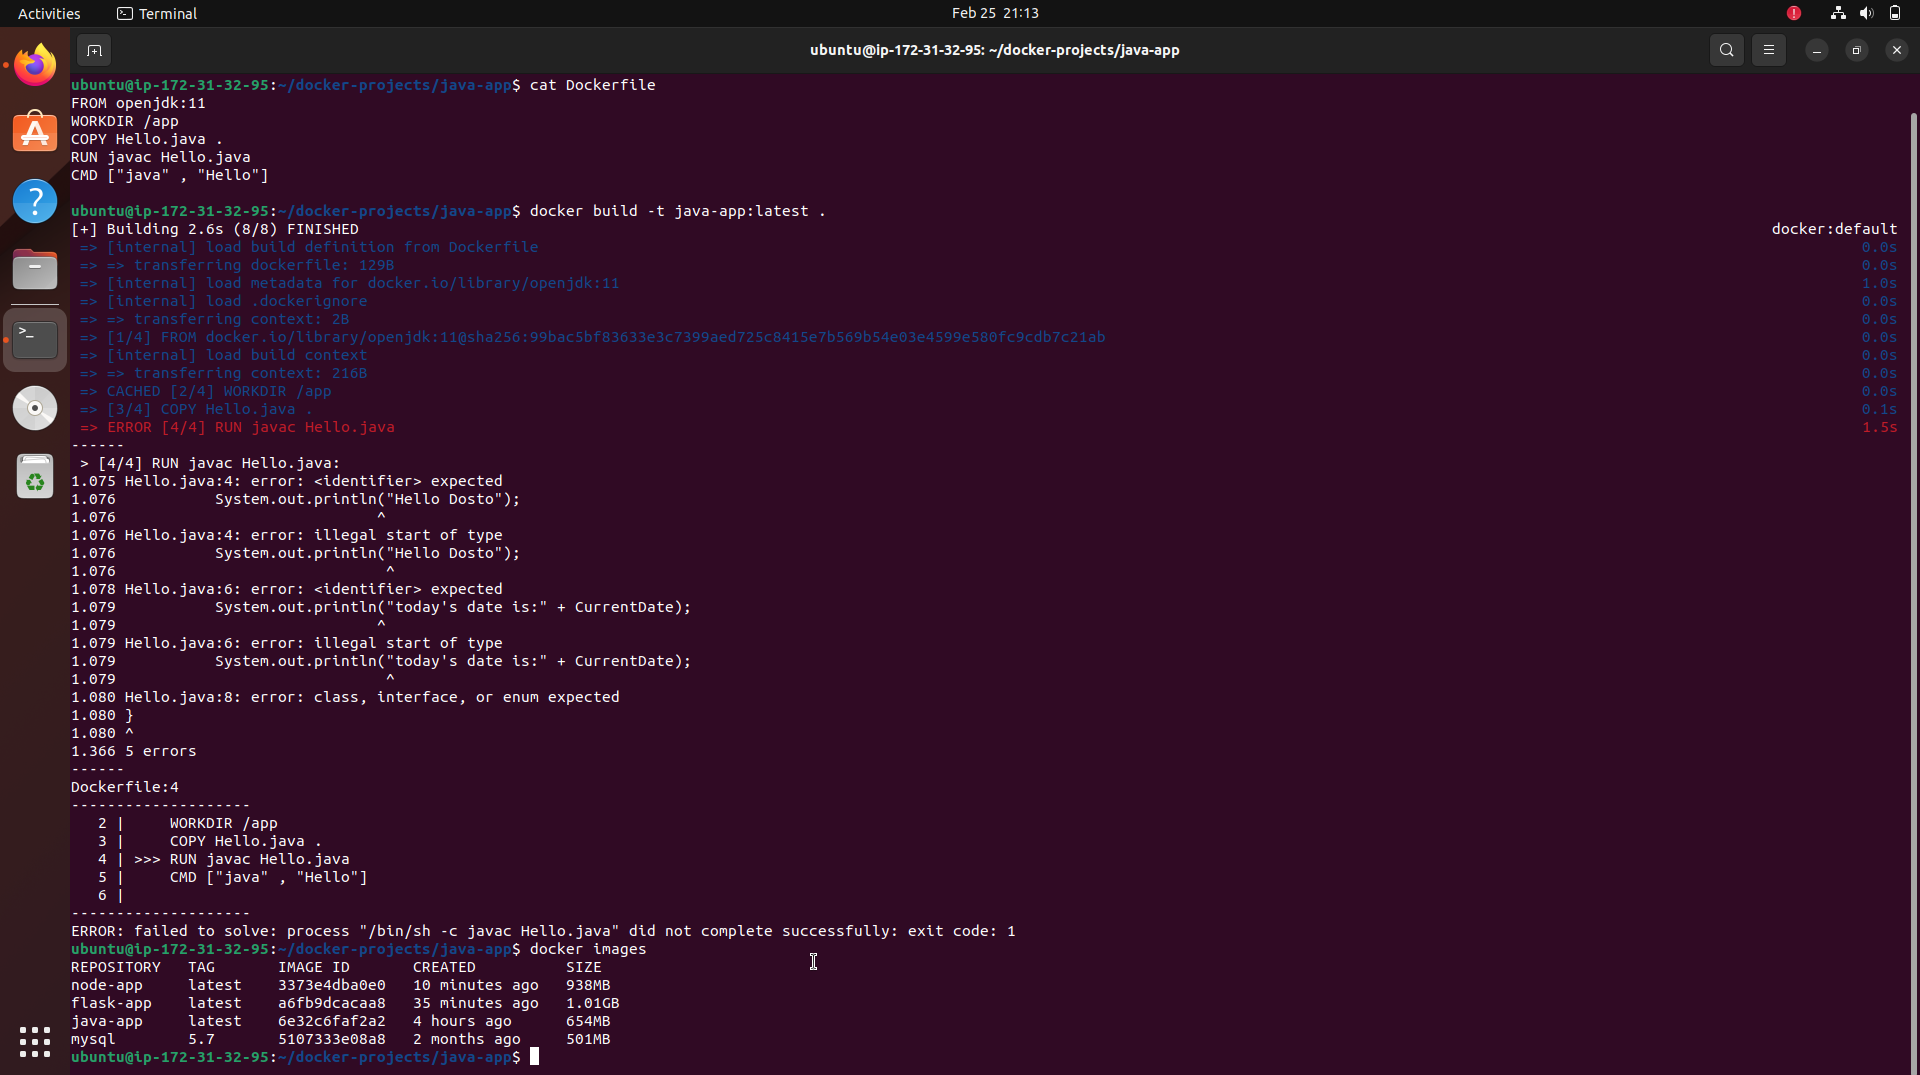
Explanation of the command:
docker build: This command builds a Docker image based on the instructions in the Dockerfile.-t java-app: This flag tags the image with a name (java-appin this case) that we can use to reference it later.-d: This flag runs the build process in detached mode, meaning it runs in the background..: This specifies the build context, i.e., the current directory containing the Dockerfile.
Once the build process is complete, you should see output indicating that the image has been successfully built.
Viewing Docker Images:
To see a list of Docker images on your system, you can use the following command:
docker images
This command will display a list of all Docker images that are currently stored on your system. You should see the java-app image listed among them.
Running Docker Containers:
After successfully building the Docker image, we can run Docker containers based on that image. Each container will be an instance of our Java application.
To run a Docker container from the java-app image, use the following command:
docker run java-app
Explanation of the command:
docker run: This command creates and starts a Docker container based on a specified image.java-app: This is the name of the Docker image we want to use for creating the container.
Upon running this command, you should see the output of our Java application printed to the console, including the greeting message and the current date.

Viewing Docker Containers:
After running Docker containers, you can use the following command to view the list of running containers:
docker ps
This command will display a list of all running Docker containers along with their details. You should see the container running our Java application listed among them.
we have successfully deployed a Java application using Docker on an AWS EC2 instance. Throughout this deployment process, we followed several steps:
Setting Up Environment: We started by setting up our AWS environment, launching an EC2 instance, and configuring security groups to allow traffic on necessary ports.
Creating Dockerfile: We created a Dockerfile specifying the instructions for building our Docker image. This Dockerfile included commands to set up the environment, copy the Java application files, compile the application, and specify the command to run the application.
Building Docker Image: We built the Docker image using the
docker buildcommand, tagging it with a name (java-app) for easy reference.Running Docker Container: We ran a Docker container based on the built image using the
docker runcommand. This container instantiated our Java application, allowing us to see the output of the application in the console.Verification: We verified the success of our deployment by listing Docker images (
docker images) to confirm that ourjava-appimage was built successfully, and listing running Docker containers (docker ps) to confirm that our Java application container was running as expected.The deployment of our Java application using Docker on AWS EC2 demonstrates the power and flexibility of containerization for application deployment. Docker allows us to package our application along with its dependencies into a lightweight, portable container, ensuring consistent behavior across different environments. This approach streamlines the deployment process, reduces dependencies, and enhances scalability and flexibility.
Deploying Flask Application on AWS EC2 with Docker
Introduction: Flask is a lightweight WSGI web application framework in Python. In this guide, we'll walk through the deployment of a Flask application on an AWS EC2 instance using Docker. Docker provides a convenient way to package applications and their dependencies into containers, making deployment and scaling easier and more efficient.
Step 1: Clone the Flask Application from GitHub:
First, let's clone the Flask application repository from GitHub to our local machine:
git clone <repository_url>
Replace <repository_url> with the URL of your Flask application repository.
Step 2: Navigate to the Flask Application Directory:
cd <repository_directory>
Navigate to the directory where your Flask application code is located.
Step 3: Create a Dockerfile: Create a Dockerfile in the root directory of your Flask application. Here's an example Dockerfile for a Flask application:
# Get base image with Python 3.9
FROM python:3.9

# Set the working directory inside the container to /app
WORKDIR /app

# Copy the source code from the host machine into the container's /app directory
COPY . .

# Install all the required dependencies listed in requirements.txt
RUN pip install -r requirements.txt

# Run the Python app using the run.py script
CMD [ "python", "run.py" ]
This Dockerfile specifies the base Python image, sets the working directory, copies the application code, installs dependencies, and runs the Flask application.
Step 4: Build the Docker Image: Build the Docker image using the Dockerfile. Run the following command in the terminal:
docker build -t flask-app .
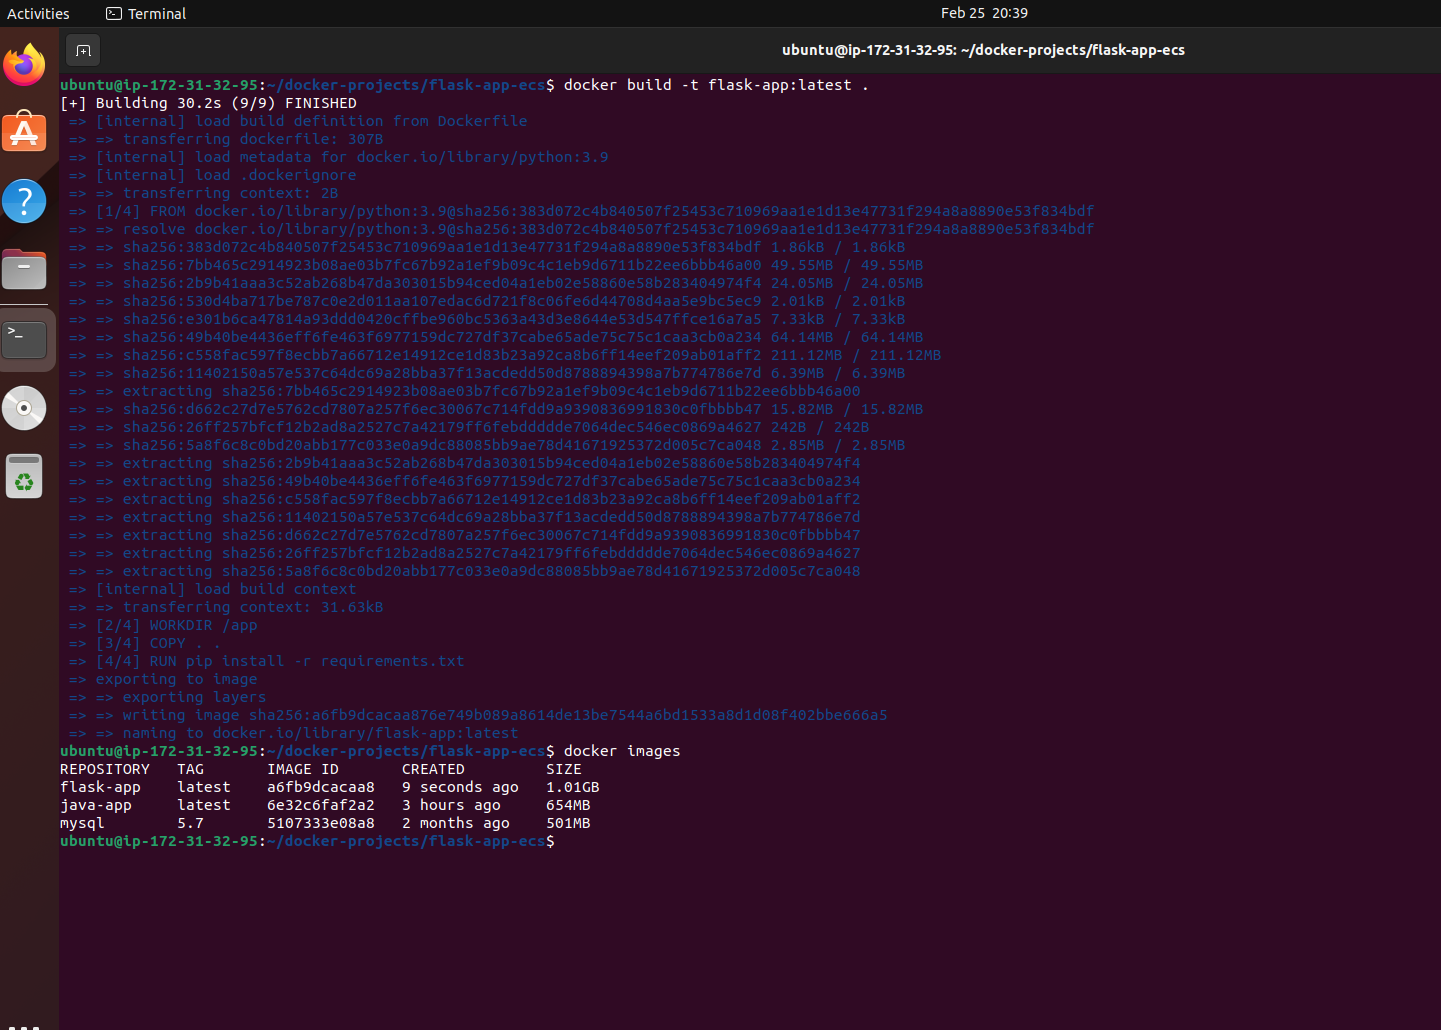
This command builds a Docker image named flask-app based on the Dockerfile in the current directory.
Step 5: Run the Docker Container: Run the Docker container based on the built image. Use the following command:
docker run -p -d 80:80 flask-app:latest
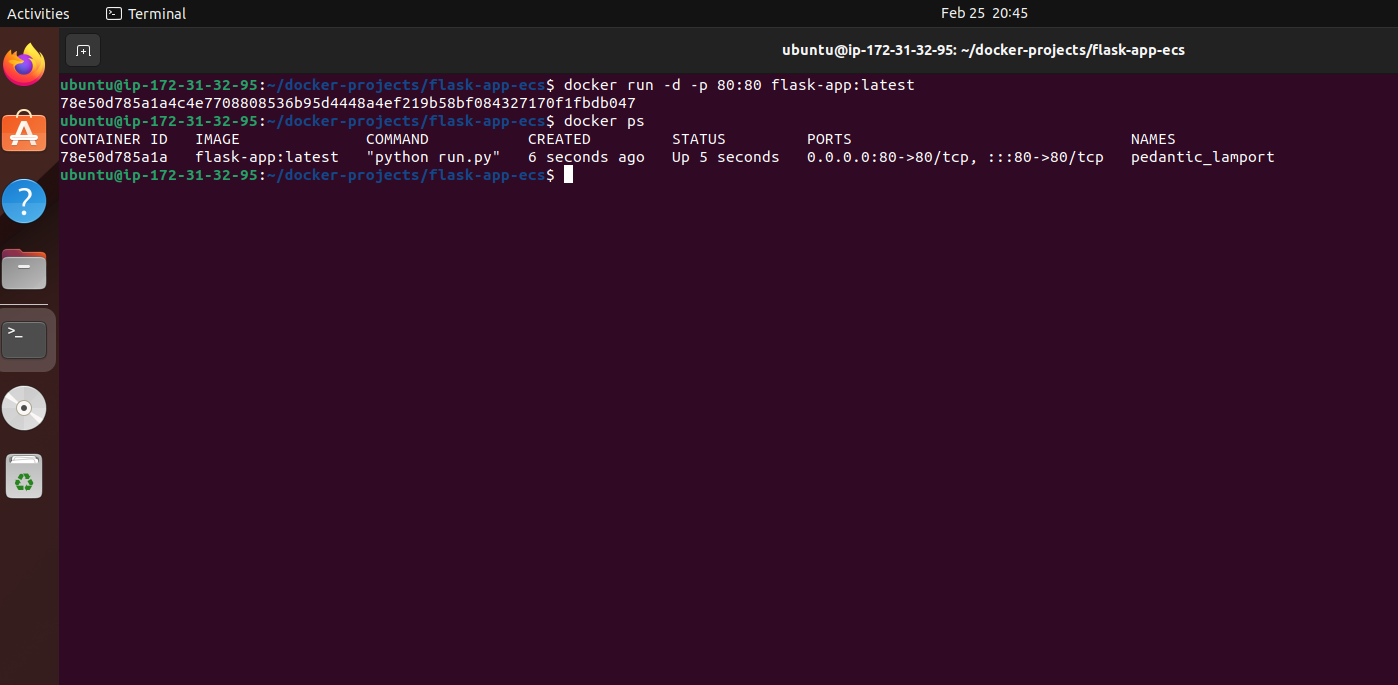
docker run: Starts a Docker container.-p 80:80: Maps port 80 of the host to port 80 of the container for network communication.-d: Runs the container in detached mode, allowing it to run in the background.flask-app:latest: Specifies the Docker image (flask-app) and its tag (latest) to use for creating the container.
This command runs a Docker container based on the flask-app image and maps port 80 of the host to port 80 of the container.
Step 6: Configure Security Group on AWS EC2: Ensure that your AWS EC2 instance's security group allows inbound traffic on port 80. Log in to the AWS Management Console, navigate to the EC2 dashboard, and update the security group associated with your instance to allow inbound traffic on port 80.
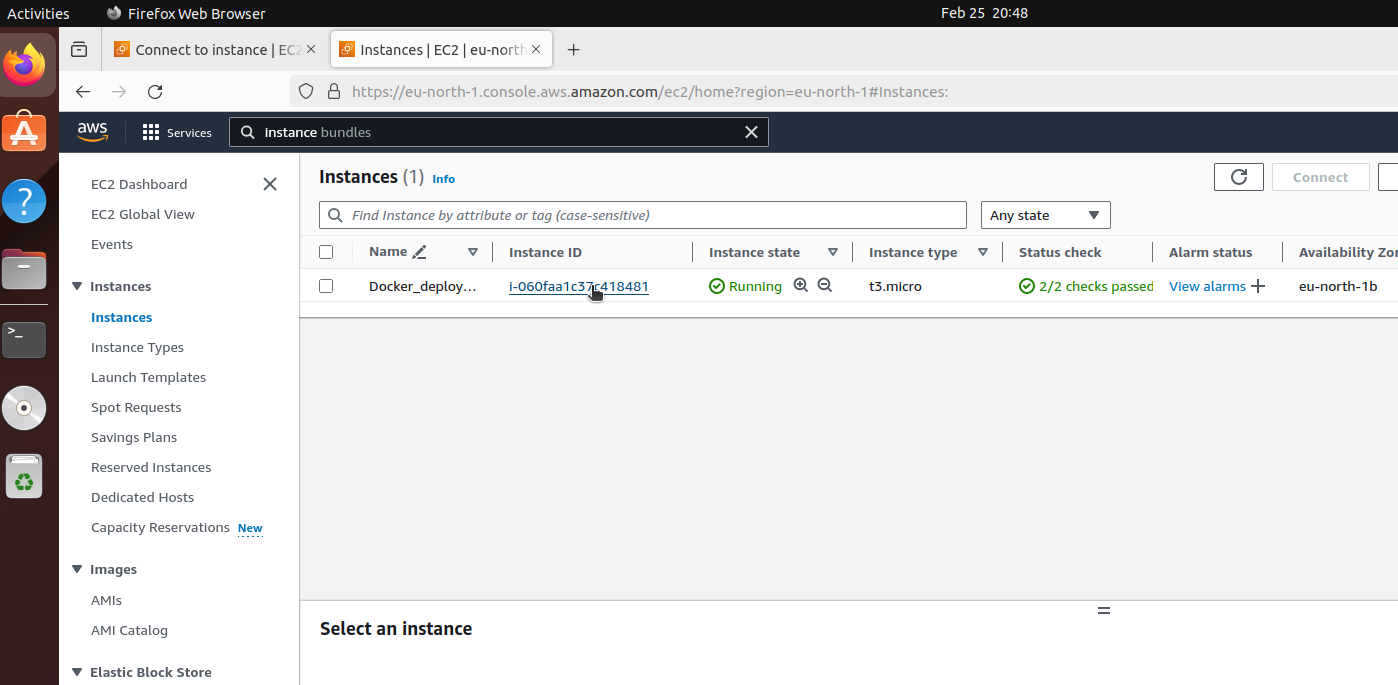
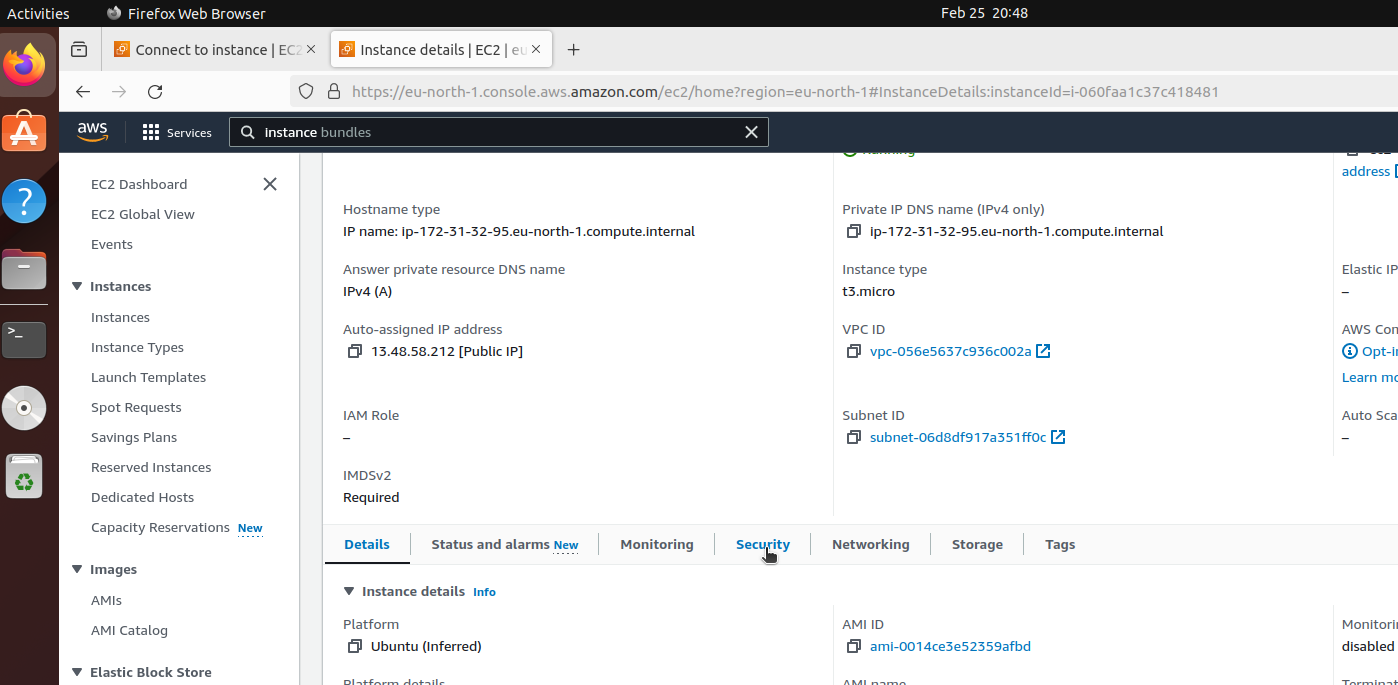
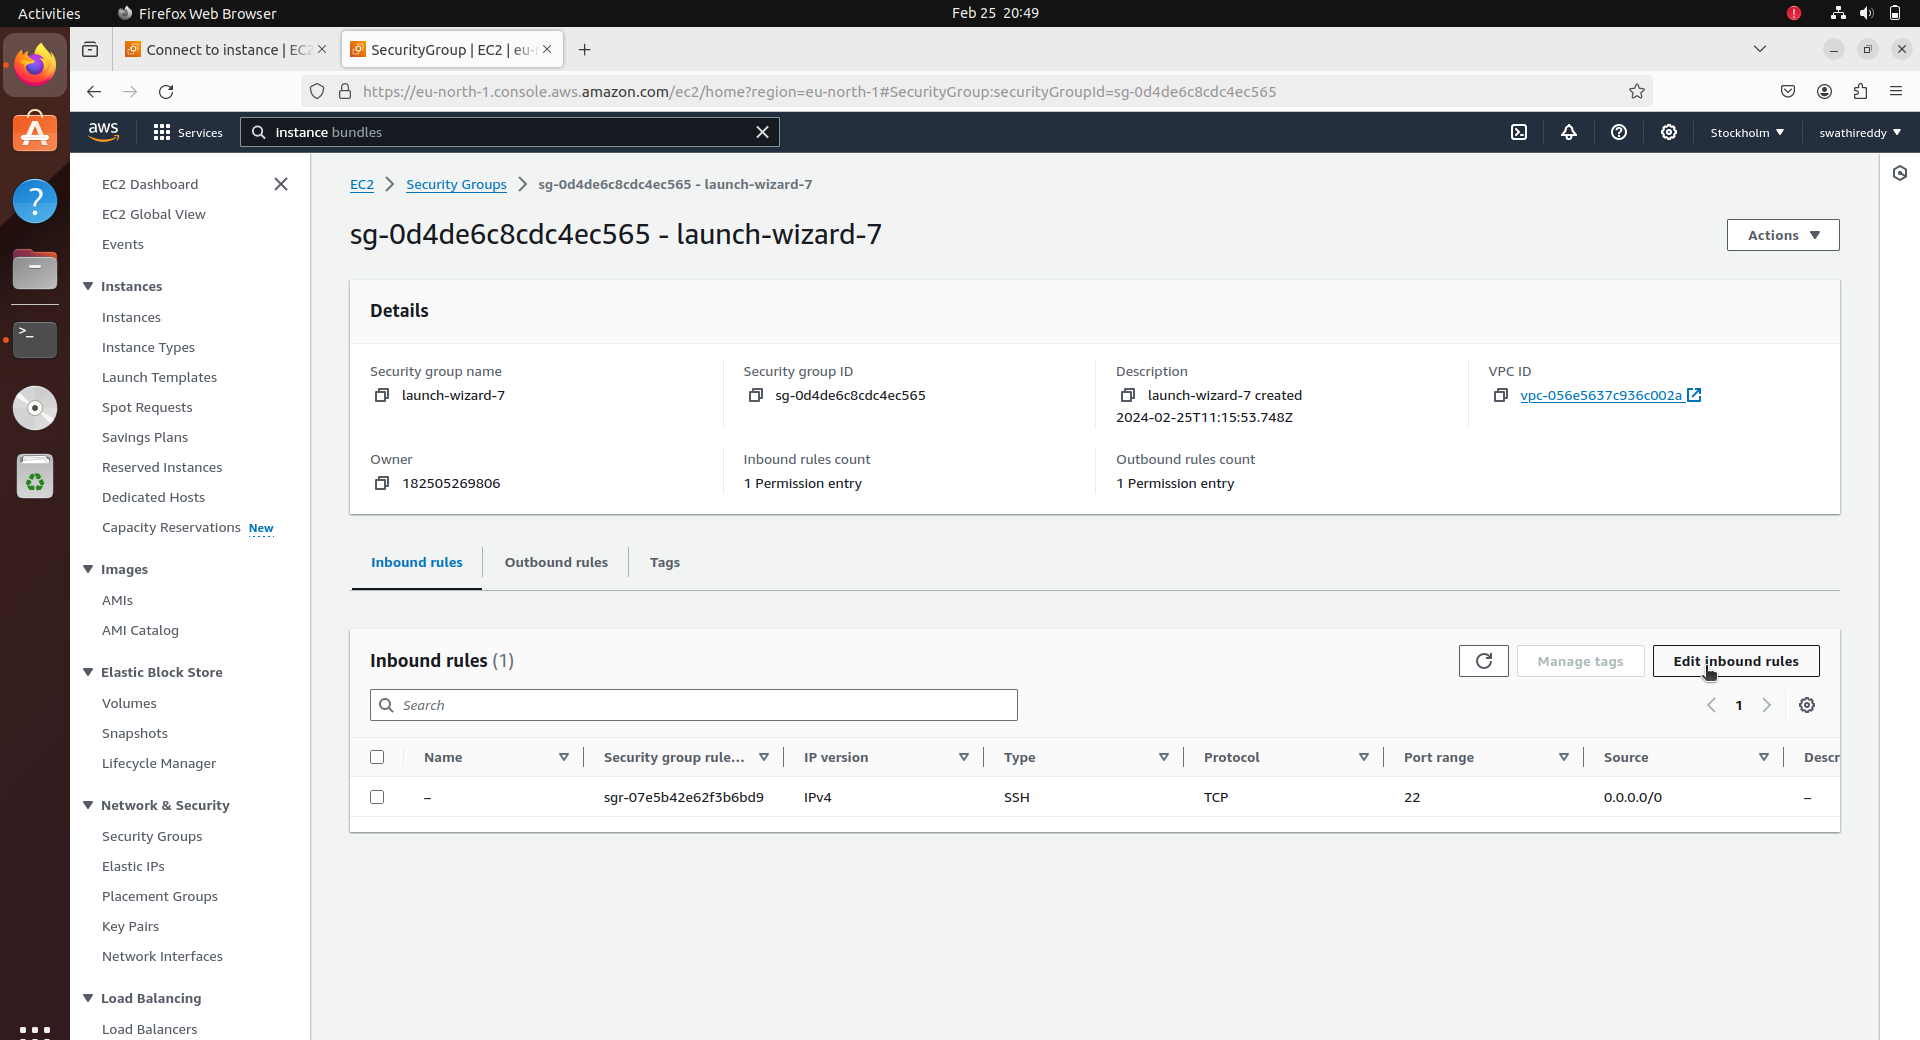
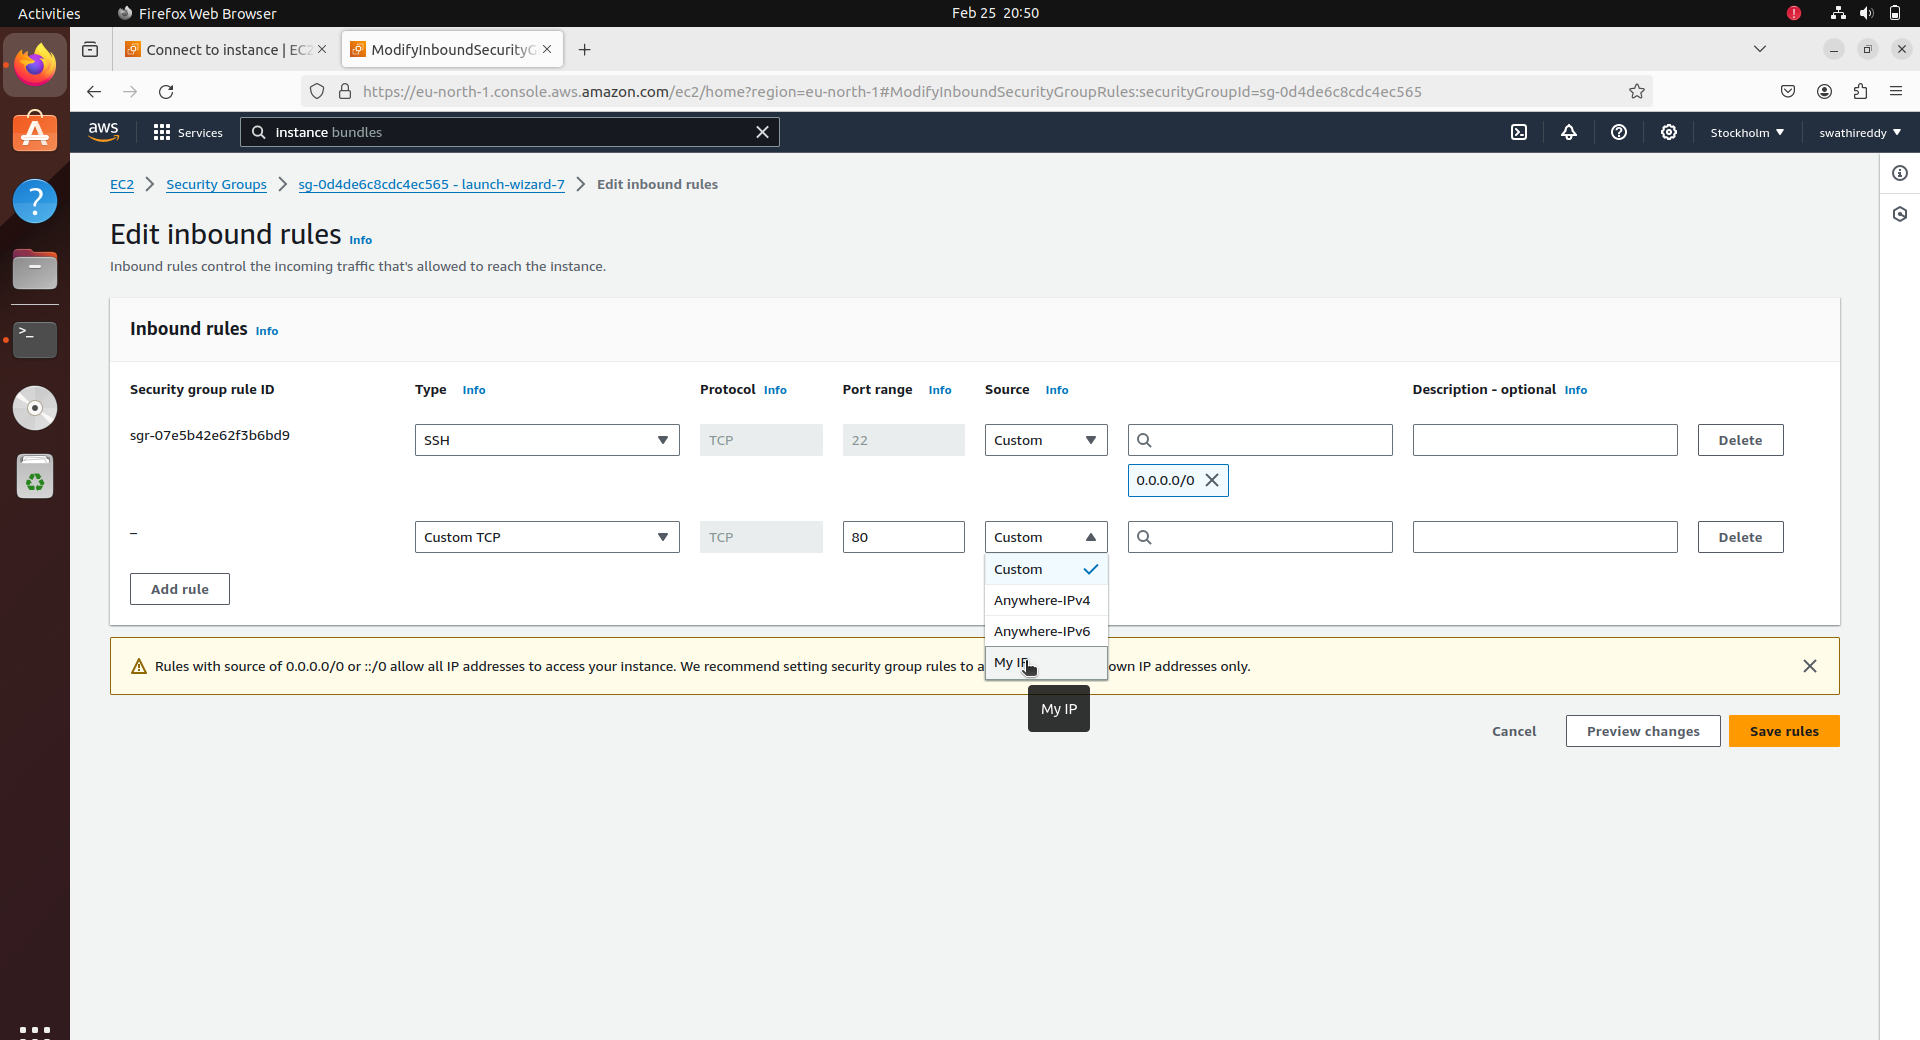
Step 7: Verify the Application: Once the Docker container is running on the EC2 instance, you can access the Flask application using the instance's public IP address followed by port 80 in a web browser.
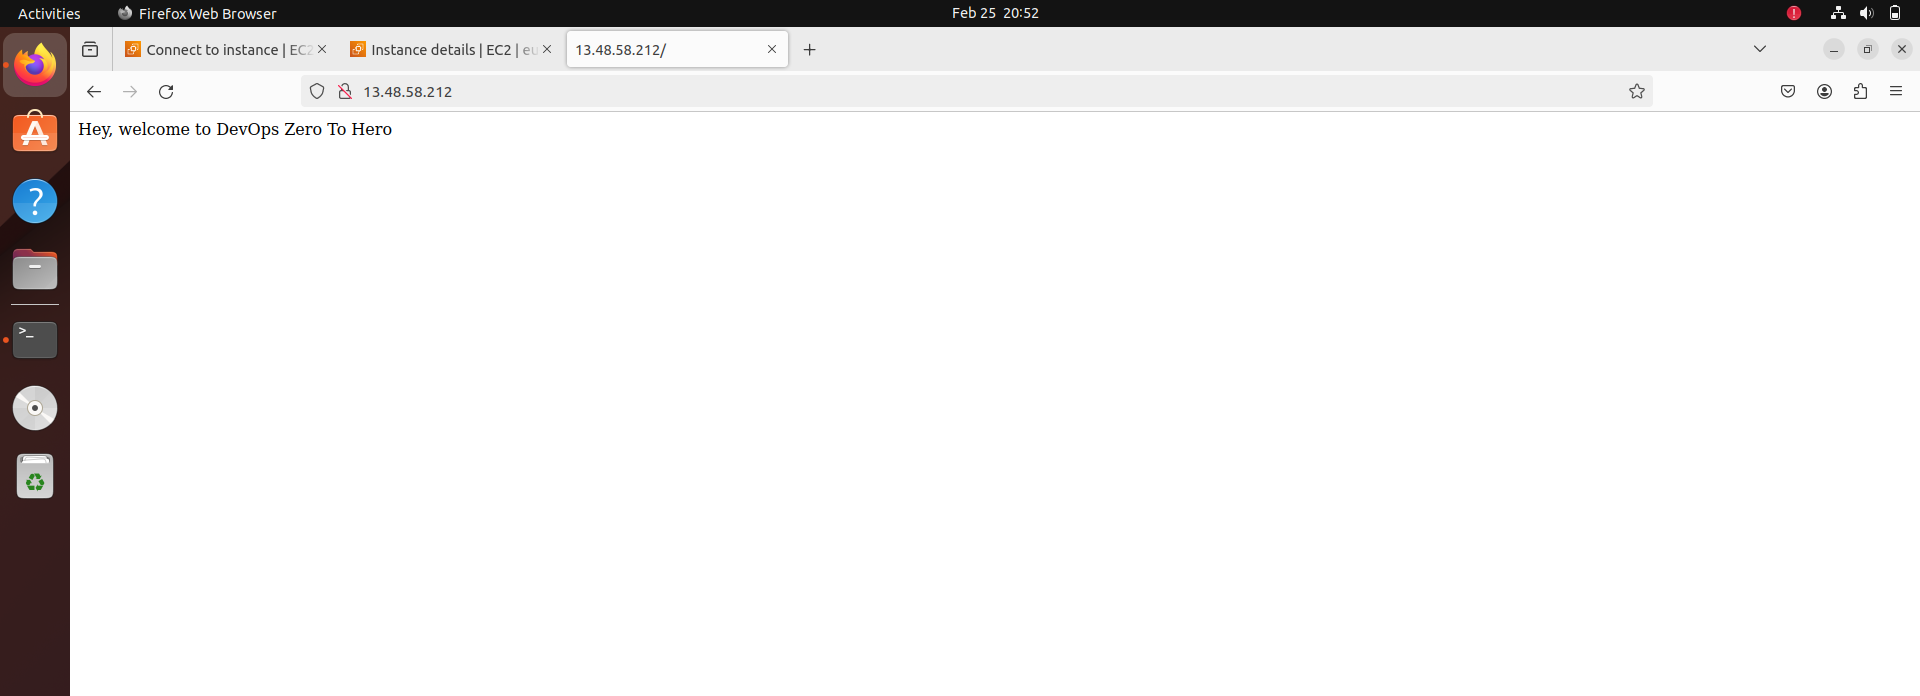
By following these steps, you have successfully deployed a Flask application on an AWS EC2 instance using Docker. This approach provides a scalable and efficient way to deploy web applications, ensuring consistency and reliability across different environments.
Deploying Node.js Application on AWS EC2 with Docker
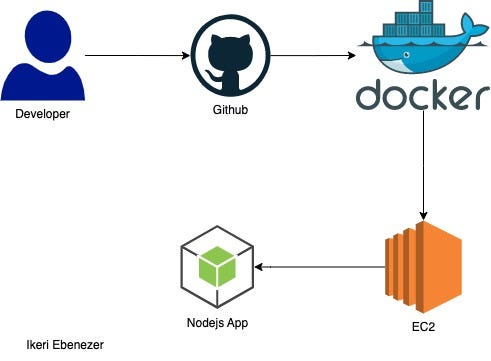
Introduction to Node.js:
Node.js is a server-side JavaScript runtime environment built on Chrome's V8 JavaScript engine. It enables developers to run JavaScript code on the server, making it ideal for building scalable, real-time web applications. With its event-driven, non-blocking I/O model, Node.js excels in handling asynchronous operations efficiently. Its extensive ecosystem of libraries and frameworks, such as Express.js, simplifies the development of web servers and APIs. Node.js is widely adopted for building various applications, including web servers, APIs, microservices, and real-time applications, due to its flexibility, scalability, and performance.
Step 1: Clone the Node.js Application from GitHub:
git clone <repository_url>
Replace <repository_url> with the URL of your Node.js application repository.
Step 2: Navigate to the Node.js Application Directory:
cd <repository_directory>
Navigate to the directory where your Node.js application code is located.
Step 3: Create a Dockerfile for Node.js: Create a Dockerfile in the root directory of your Node.js application. Here's an example Dockerfile for a Node.js application:
# Use the official Node.js 14 base image
FROM node:14

# Set the working directory inside the container to /app
WORKDIR /app

# Copy package.json and package-lock.json files to the working directory
COPY package*.json ./

# Install Node.js dependencies
RUN npm install

# Copy the rest of the application code to the working directory
COPY . .

# Expose port 8000
EXPOSE 8000

# Command to run the Node.js application
CMD ["node", "app.js"]
This Dockerfile specifies the base Node.js image, sets the working directory, installs dependencies, and runs the Node.js application.
Step 4: Build the Docker Image: Build the Docker image using the Dockerfile. Run the following command in the terminal:
docker build -t node-app:latest .
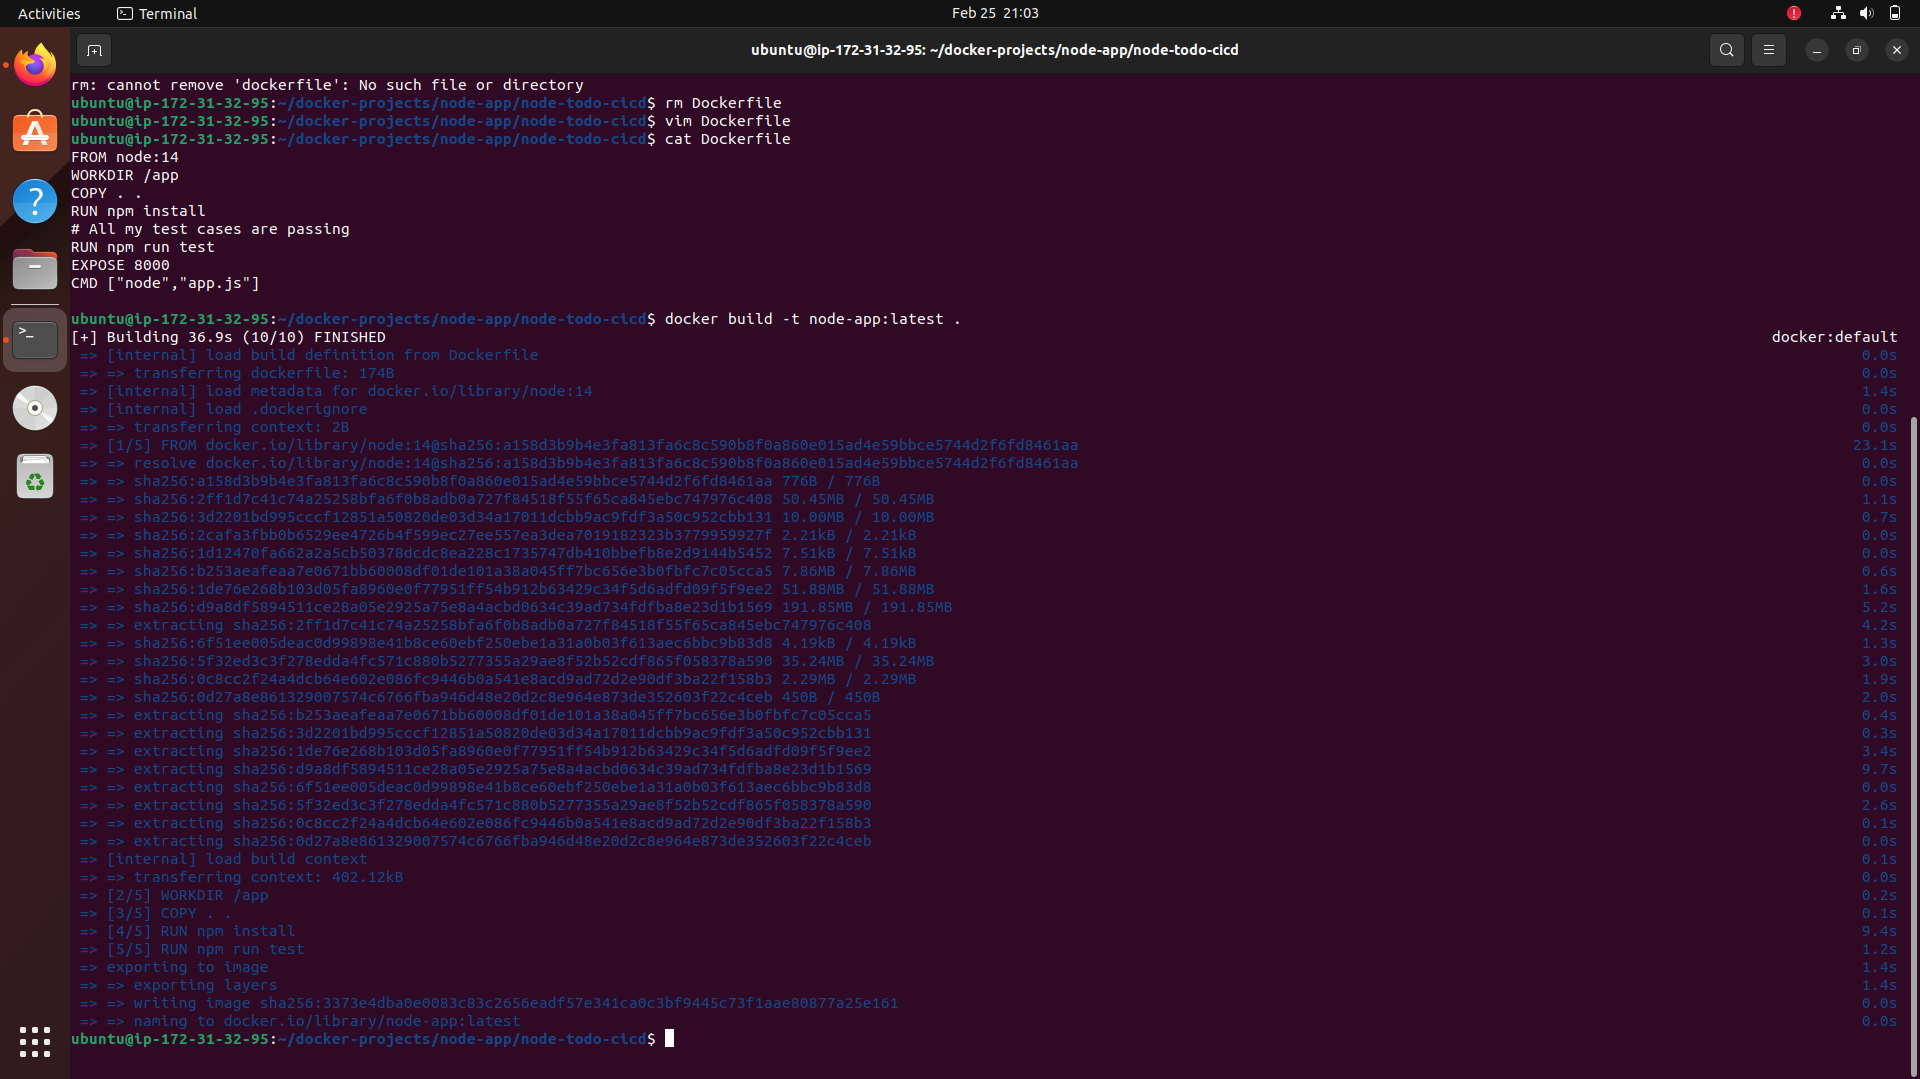
This command builds a Docker image named node-app based on the Dockerfile in the current directory.
Step 5: Run the Docker Container: Run the Docker container based on the built image. Use the following command:
docker run -d -p 8000:8000 node-app
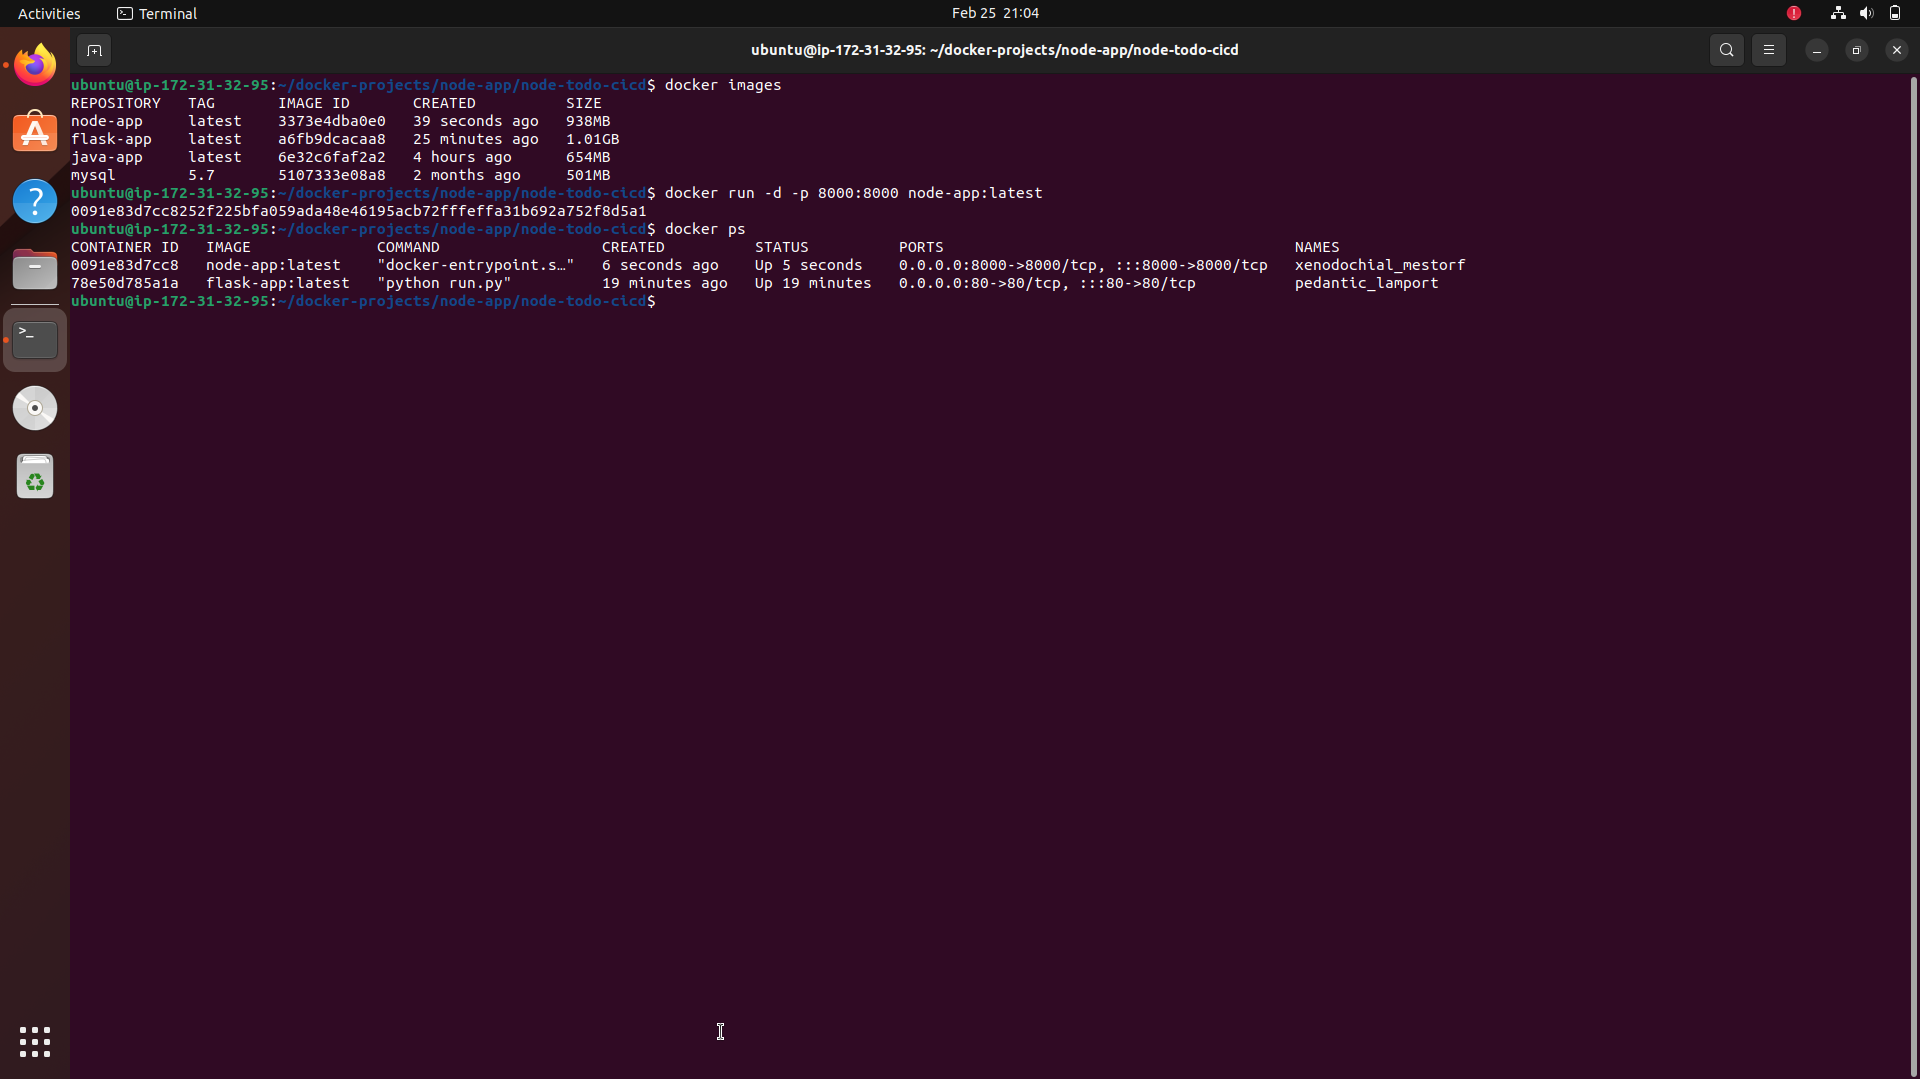
This command runs a Docker container based on the node-app image, maps port 8000 of the host to port 8000 of the container, and runs the container in detached mode.
Step 6: Configure Security Group on AWS EC2: Ensure that your AWS EC2 instance's security group allows inbound traffic on port 8000. Log in to the AWS Management Console, navigate to the EC2 dashboard, and update the security group associated with your instance to allow inbound traffic on port 8000.
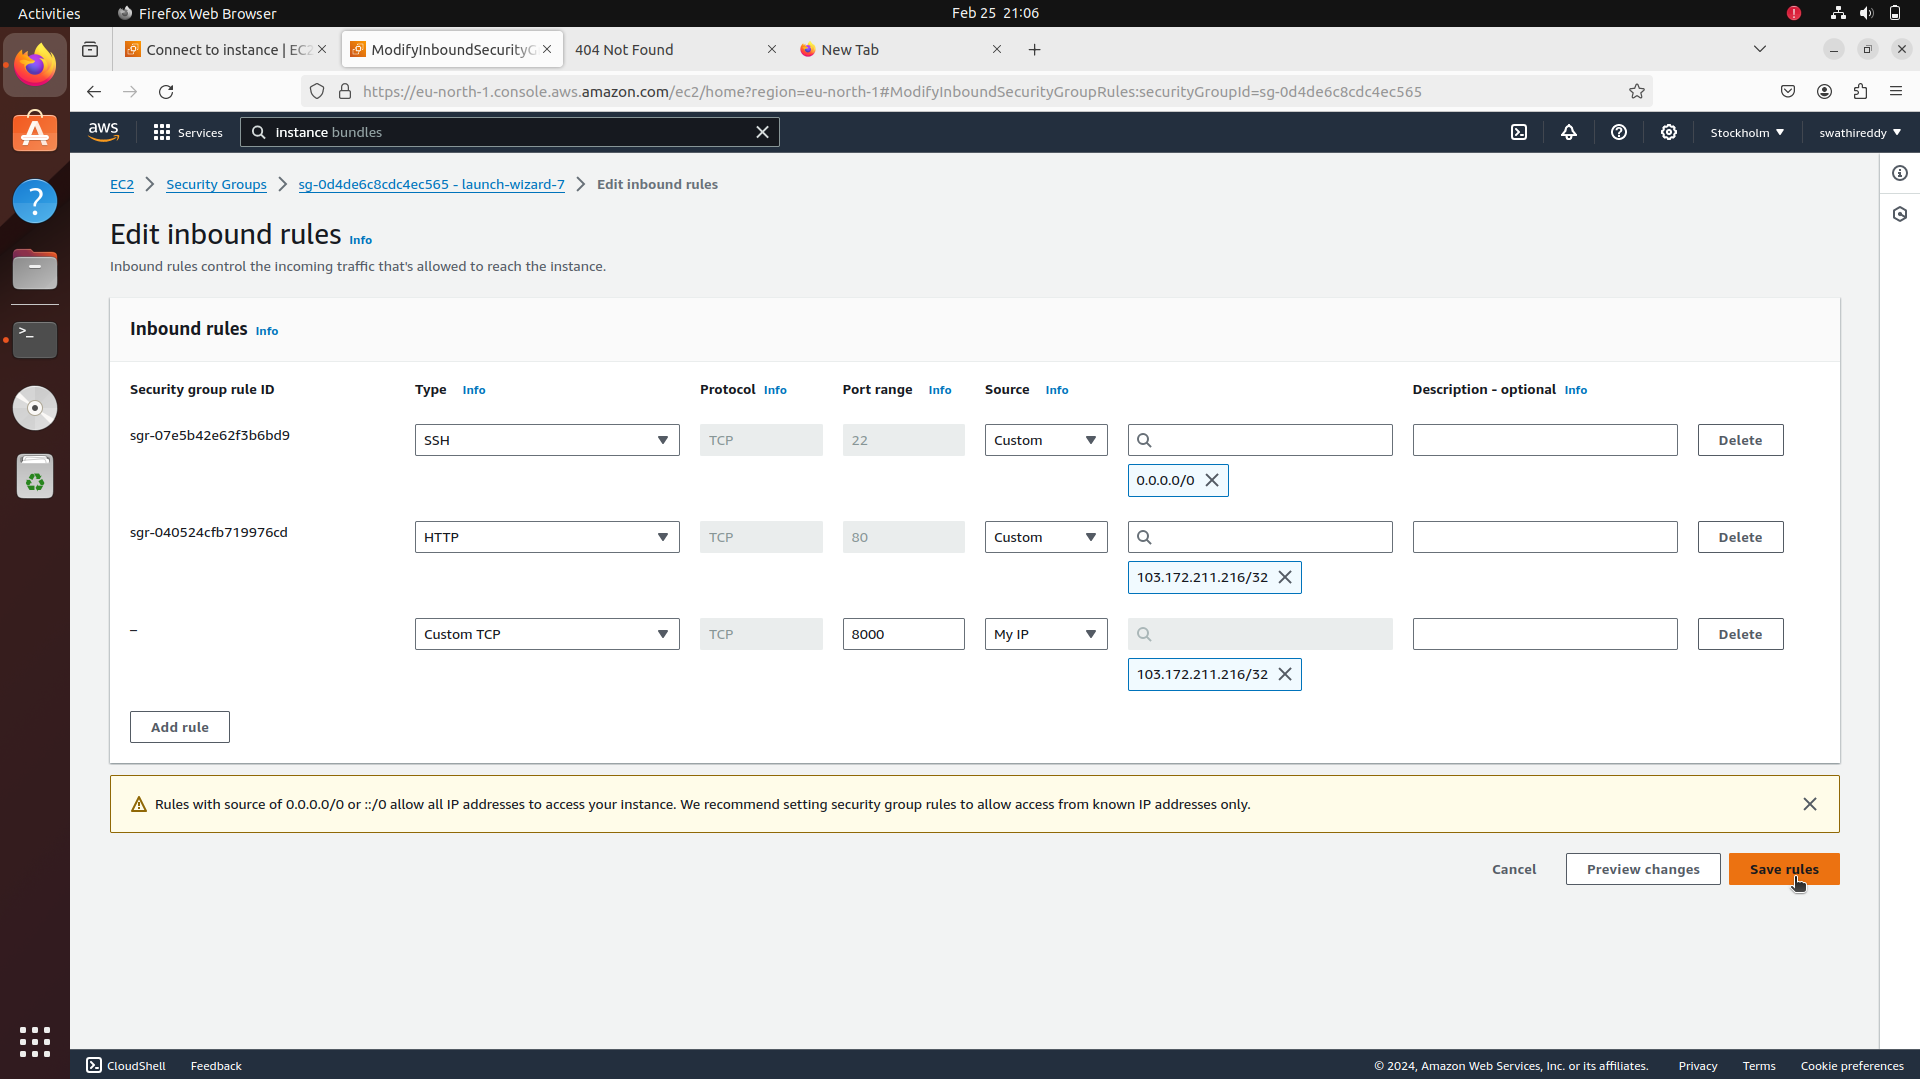
Step 7: Verify the Application: Once the Docker container is running on the EC2 instance, you can access the Node.js application using the instance's public IP address followed by port 8000 in a web browser.
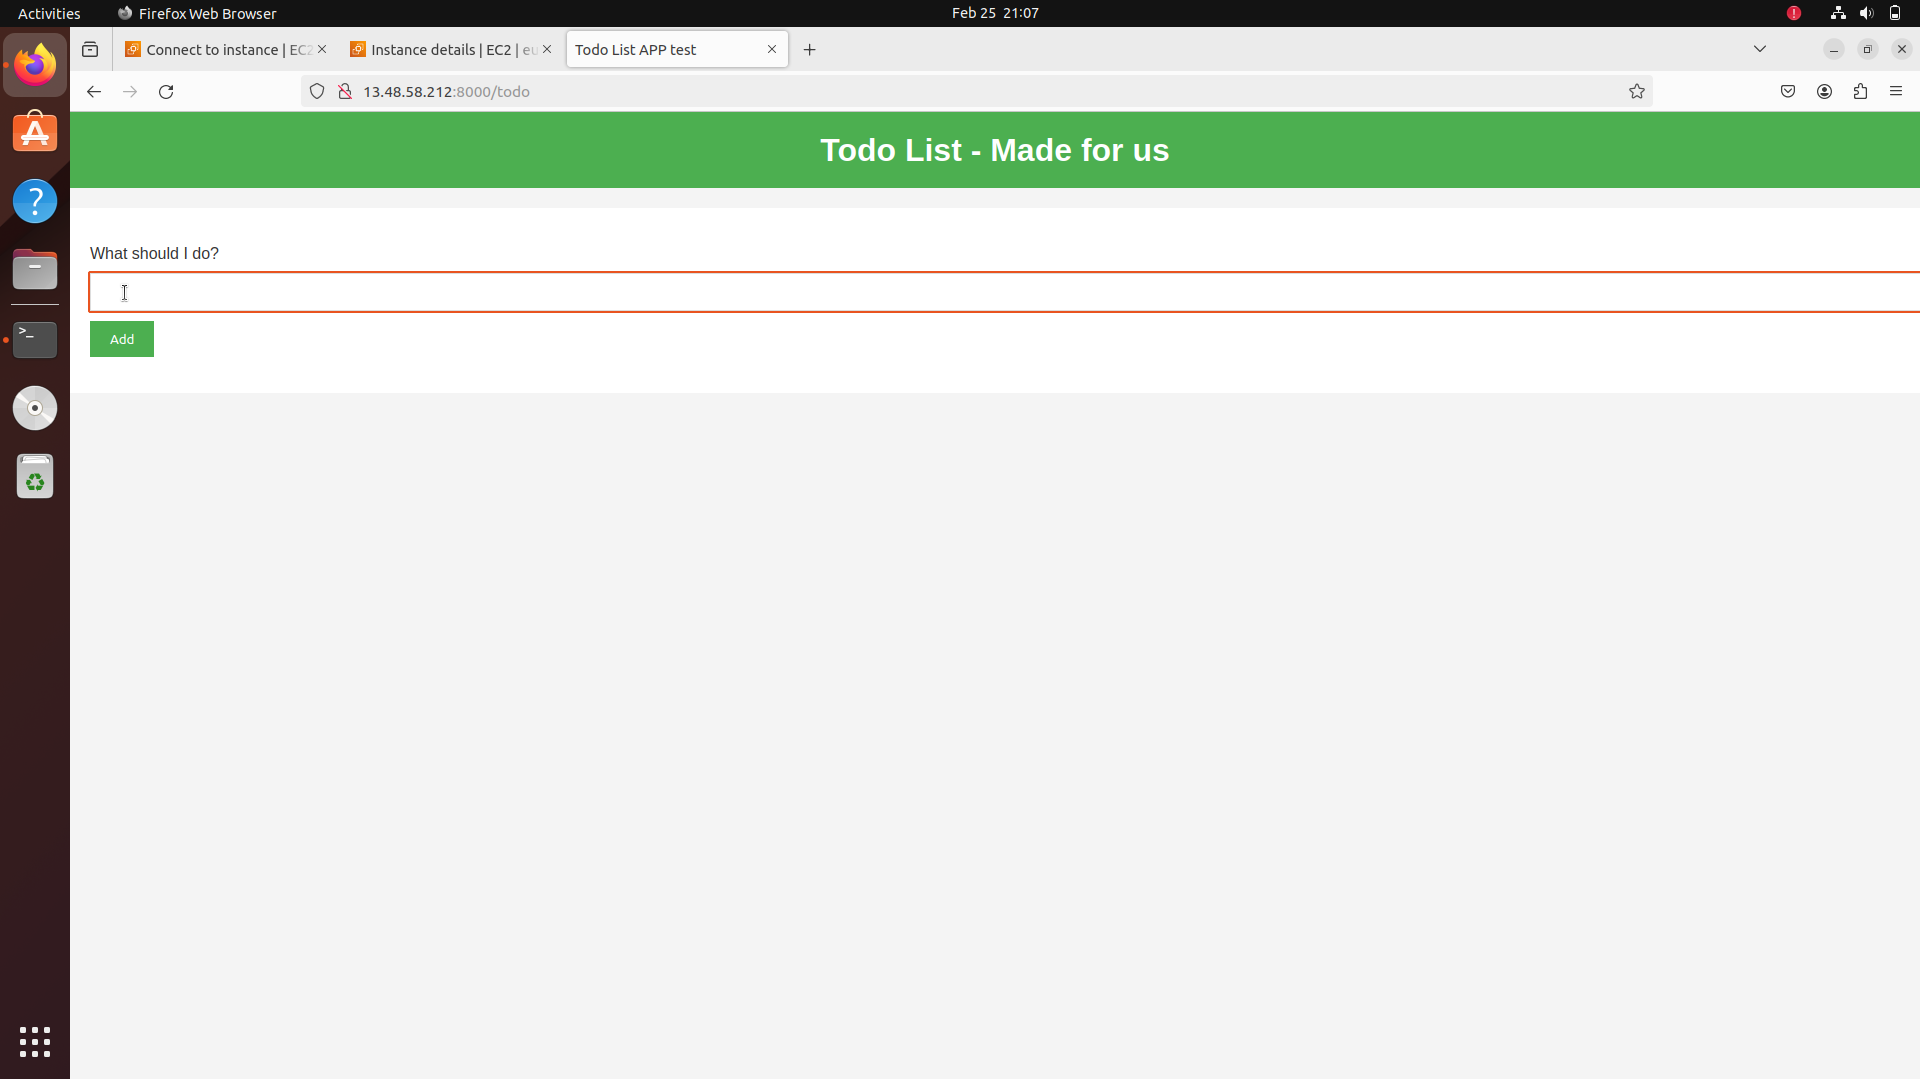
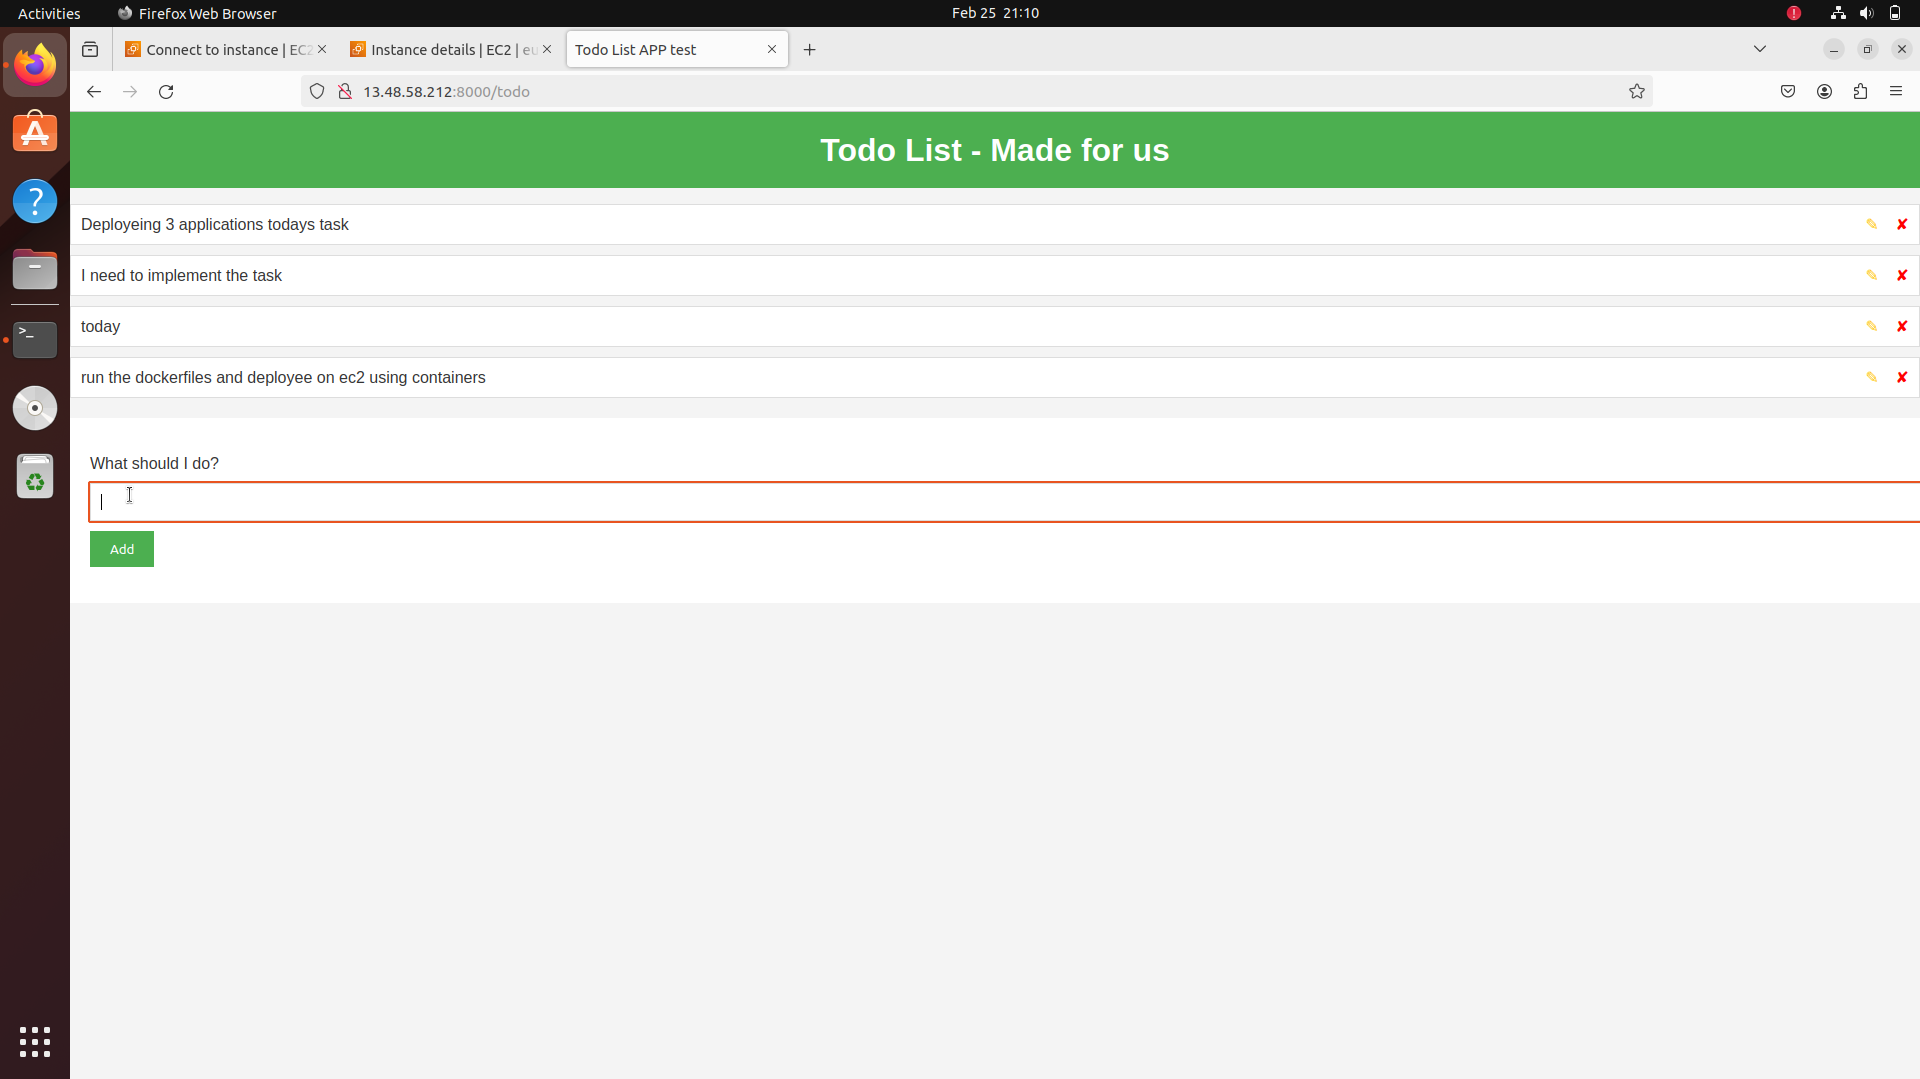
By following these steps, you have successfully deployed a Node.js application on an AWS EC2 instance using Docker, mapping port 8000 on the host to port 8000 on the container. This approach provides a scalable and efficient way to deploy web applications, ensuring consistency and reliability across different environments.
Absolutely! Writing a conclusion after covering the deployment of multiple applications can provide a cohesive summary of the deployment process and key takeaways. Here's how you might structure it:
Conclusion:
In conclusion, we have successfully deployed three distinct applications - a Java application, a Flask application, and a Node.js application - using Docker on AWS EC2 instances. Through these deployments, we have gained valuable insights into the deployment process and the role Docker plays in simplifying and standardizing deployments across different environments.
Key Takeaways:
Containerization for Portability: Docker has proven to be a powerful tool for containerizing applications, encapsulating their dependencies, and ensuring portability across different environments. By defining Dockerfiles for each application, we were able to create lightweight, self-contained containers that can be easily deployed on any platform supporting Docker.
Scalability and Resource Efficiency: Deploying applications in Docker containers allows for efficient resource utilization and scalability. Docker containers are lightweight and consume fewer resources compared to traditional virtual machines, making them suitable for deploying and scaling applications in resource-constrained environments.
Consistency and Reproducibility: Docker ensures consistency and reproducibility in deployments by providing a standardized environment for running applications. By defining dependencies, configurations, and runtime environments in Dockerfiles, we can ensure consistent behavior across different deployments, reducing the risk of configuration drift and compatibility issues.
AWS EC2 for Hosting: AWS EC2 provides a reliable and scalable infrastructure for hosting Dockerized applications. By launching EC2 instances and configuring security groups to allow inbound traffic on the necessary ports, we were able to host our applications securely on the cloud.
Future Considerations:
As we continue to explore and refine our deployment practices, there are several areas we can focus on for improvement:
Automation and Orchestration: Implementing automated deployment pipelines and container orchestration tools, such as AWS ECS or Kubernetes, can streamline the deployment process and improve scalability and reliability.
Monitoring and Logging: Integrating monitoring and logging solutions, such as AWS CloudWatch or ELK Stack, can provide insights into application performance and facilitate troubleshooting and debugging in production environments.
Security Best Practices: Implementing security best practices, such as container image scanning and vulnerability management, can help mitigate security risks and ensure the integrity of deployed applications.
In conclusion, the deployment of Java, Flask, and Node.js applications on AWS EC2 instances using Docker has provided us with valuable hands-on experience and insights into modern deployment practices. By leveraging containerization, cloud infrastructure, and automation tools, we can build and deploy robust, scalable applications that meet the demands of today's dynamic software landscape.
Subscribe to my newsletter
Read articles from SWATHI PUNREDDY directly inside your inbox. Subscribe to the newsletter, and don't miss out.
Written by
