Building a dApp using Scaffold-ETH 2 and The Graph
 Siddhant Kulkarni
gm gm gm! How's everyone doing?
Welcome to my tutorial on How To Build dApps using Scaffold-ETH 2 and The Graph! 💜
What are we building?
During the course of this tutorial, we will be building a decentralized application(dApp) using Scaffold-ETH 2, that enables the users to:
Set customized greetings.
Mint custom Tokens.
Display Data Using The Graph
All the data will be displayed on our dApp using The Graph.
Let's get started...
Scaffold-ETH 2 and The Graph are two of the most interesting combinations that you can use while building powerful dApps.
But what exactly are Scaffold-ETH 2 and The Graph?
What is Scaffold-ETH 2?
Scaffold-ETH is an open-source, up-to-date toolkit for building decentralized applications (dApps) on the Ethereum blockchain.
It's designed to make it easier for developers to create and deploy smart contracts and build user interfaces that interact with those contracts.
Contract Hot Reload: Your frontend auto-adapts to your smart contract as you edit it.
Burner Wallet & Local Faucet: Quickly test your application with a burner wallet and local faucet.
Integration with Wallet Providers: Connect to different wallet providers and interact with the Ethereum network.
Its purpose is to simplify the process for developers in crafting and deploying smart contracts, as well as in constructing user interfaces that engage with these contracts.
Find out more about Scaffold-ETH 2 in their documentation, here.
What is The Graph?
The Graph is a decentralized protocol for indexing and querying blockchain data.
The Graph simplifies querying complex blockchain data.
Read more about The Graph in the following Twitter thread:
Want to dive deeper into the documentation? Read more.
Before starting, I would like to give a shoutout to Kevin Jones, Developer Relations Engineer at Edge&Node.
He inspired me to go through this tutorial, make sure to check out his Fullstack-dApp Workshop and The Graph Builders Office Hours.
Prerequisites
Before you begin, ensure that your system meets the following prerequisites:
Scaffold-ETH 2 Setup
1. Cloning the repository
First, let us clone the subgraph-package of the scaffold-eth-2 repository:
git clone -b subgraph-package \
  https://github.com/scaffold-eth/scaffold-eth-2.git \
  scaffold-eth-2-subgraph-package
2. Importing ERC20.sol
After cloning, open the directory in your code editor and head over to packages/hardhat/contracts/YourContract.sol
We want to import ERC20.sol from OpenZeppelin into our contract so we can use its functions.
import "@openzeppelin/contracts/token/ERC20/ERC20.sol";
3. Installing dependencies
Now with your terminal pointing to the scaffold-eth-2 directory,
run the following:
yarn install
This command installs all the dependencies.
4. Starting local blockchain
Next up, we need to start our local blockchain which enables us to deploy and test our smart contracts. Run the command:
yarn chain
Your terminal should look like this:
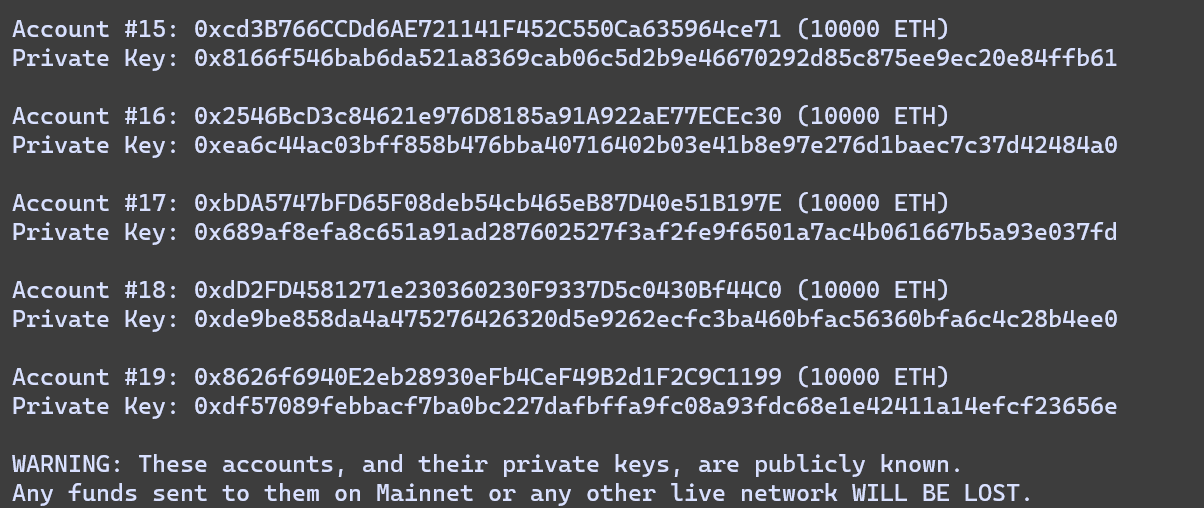
Scaffold-ETH 2 deploys our contracts to Hardhat by default, but eventually during the course of this tutorial, we'll deploy our contract to a testnet too.
5. Starting Frontend
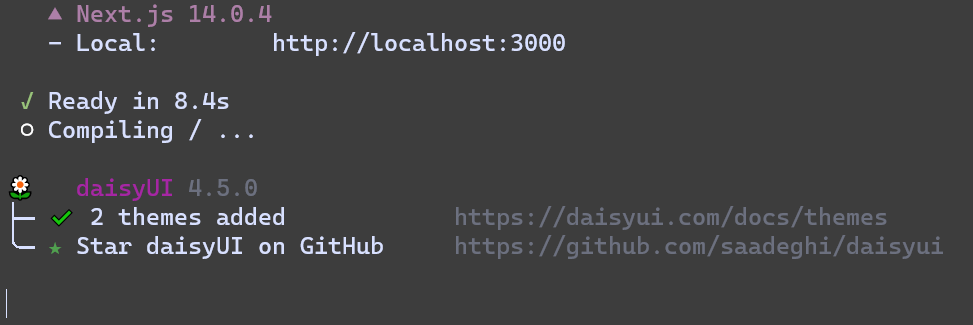
Now, we'll start our frontend application, using NextJS.
Run the following command, in a separate terminal, to start your frontend application:
yarn start
After this your terminal should look like this:
6. Deploying contracts
Moving ahead, in a third terminal, run the following command:
yarn deploy
After successful deployment, terminal should return the following:

You can see that our contract was deployed and that the terminal returns a contract address and a transaction hash along with the gas required for our deployment.
package.json file, you can take a look if you're curious.7. Interacting with the contract
Now, navigate to http://localhost:3000 our NextJS application will be visible to you.
Make sure to explore all the features that Scaffold-ETH 2 comes with (my personal favorite is the Block Explorer and the Facuet).
Scaffold-ETH 2 provides a burner wallet. How awesome is that!🔥
Head over to the Debug Contracts page, there you'll see a setGreeting function.
The default greeting that is set when we deploy our contract is "Building unstoppable Dapss!!!"
Let's change the greeting to "Scaffold-ETH 2 x The Graph"
Get some funds from the faucet and enter the parameters for the setGreeting function and hit Send💸.
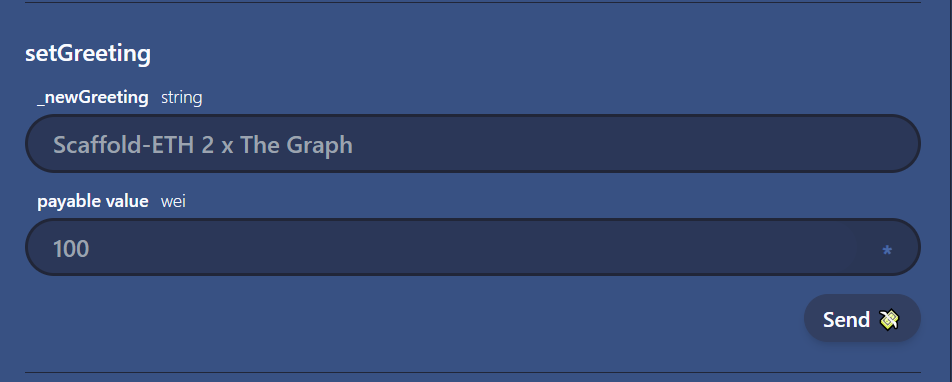
After the transaction goes through, you can see that the Greeting on the left has changed to Scaffold-ETH 2 x The Graph
Congratulations on successfully setting up Scaffol-ETH 2 on your system.🎉
Let us start with setting up The Graph!!!
The Graph Setup
We have our blockchain set up and our frontend application is running.
Now, let's us set up our subgraph.
1. Cleaning past data
Open a new terminal window, and execute the following commands.
To clean up any old data, run:
yarn clean-node
2. Running graph node
Then, to run our Graph node, run the following command:
yarn run-node
Your terminal will look something like this:
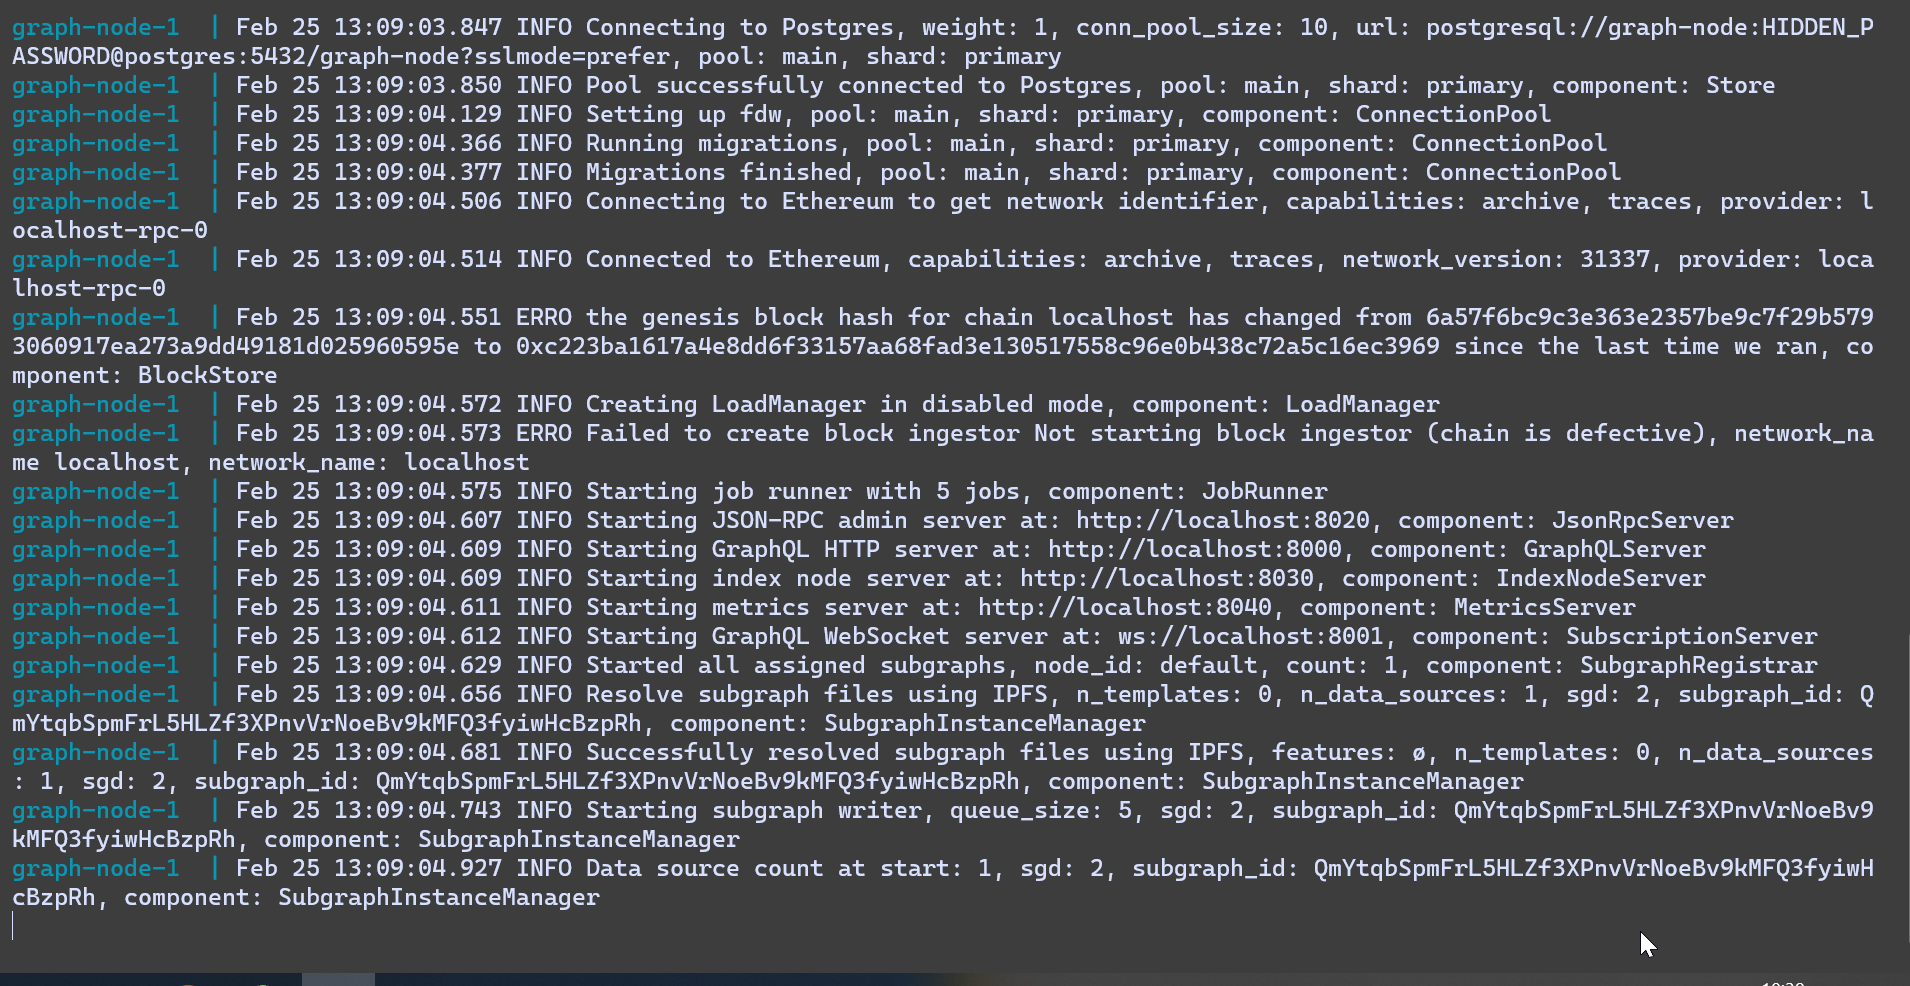
yarn run-node will run all the Docker containers for The Graph(using docker-compose)
3. Creating Subgraph
Now, open a fourth terminal window and let's create a subgraph, run:
yarn local-create
If successful, you will get this message:
Created subgraph: scaffold-eth/your-contract
4. Shipping subgraph
Next, let's ship our subgraph using:
yarn local-ship
After running this command, you will have to enter a version for your subgraph. (eg. v0.0.1)
The output will be similar to the following image:
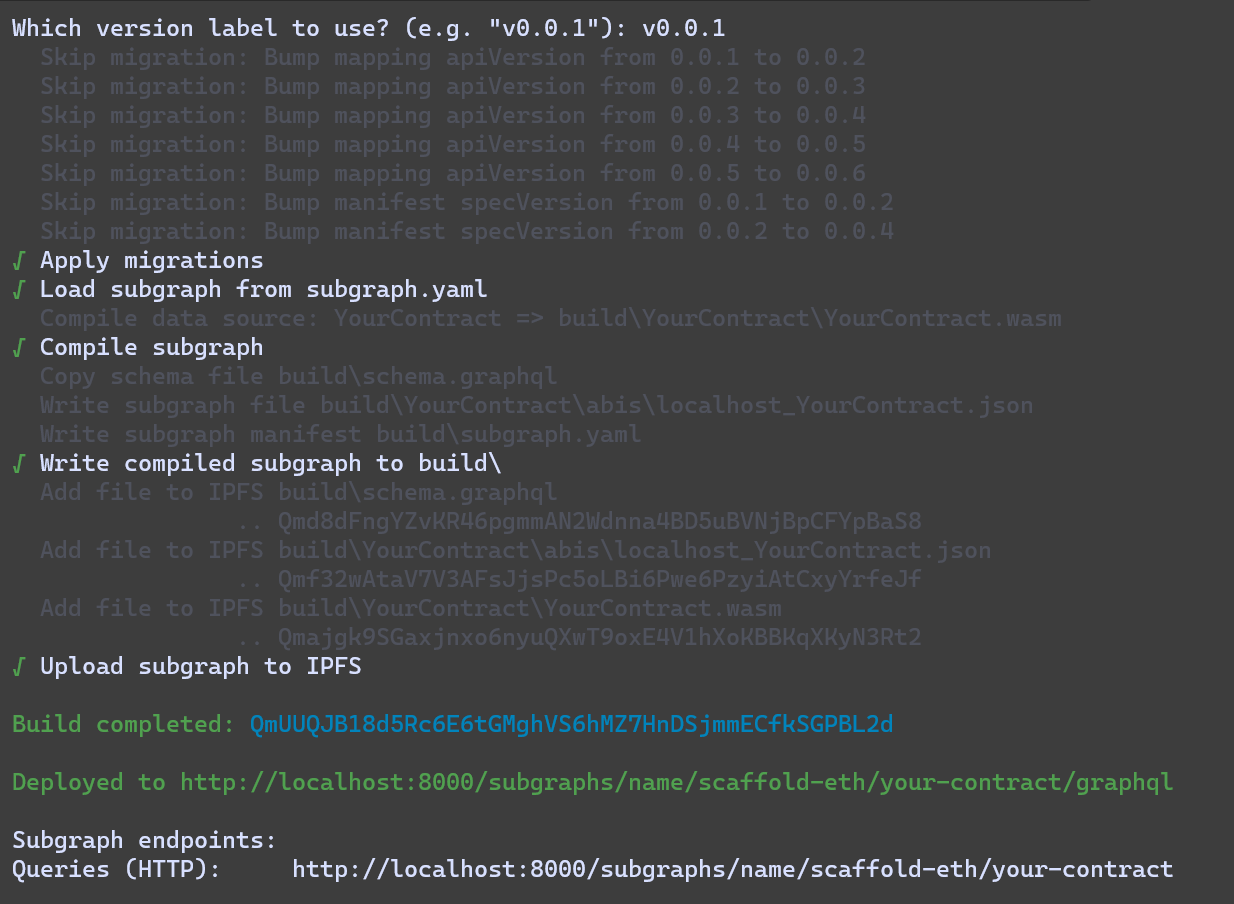
You will get an ID and endpoint for your subgraph.
By running this command:
The contract ABIs get copied from the
hardhat/deploymentsfolder to thesubgraph/abisfolder.networks.jsonfile gets generated.Subgraph SchemaandAssemblyScriptTypes are generated.Mapping functionsget checked and compiled.A subgraph gets deployed locally.
localhost:80005. Testing the subgraph
Head over to the endpoint that was created during yarn local-ship
And run the following query:
query MyQuery {
  greetings(first: 5, orderBy: createdAt, orderDirection: desc) {
    id
    sender {
      address
    }
    greeting
    premium
    value
  }
}
You will get a similar output as:
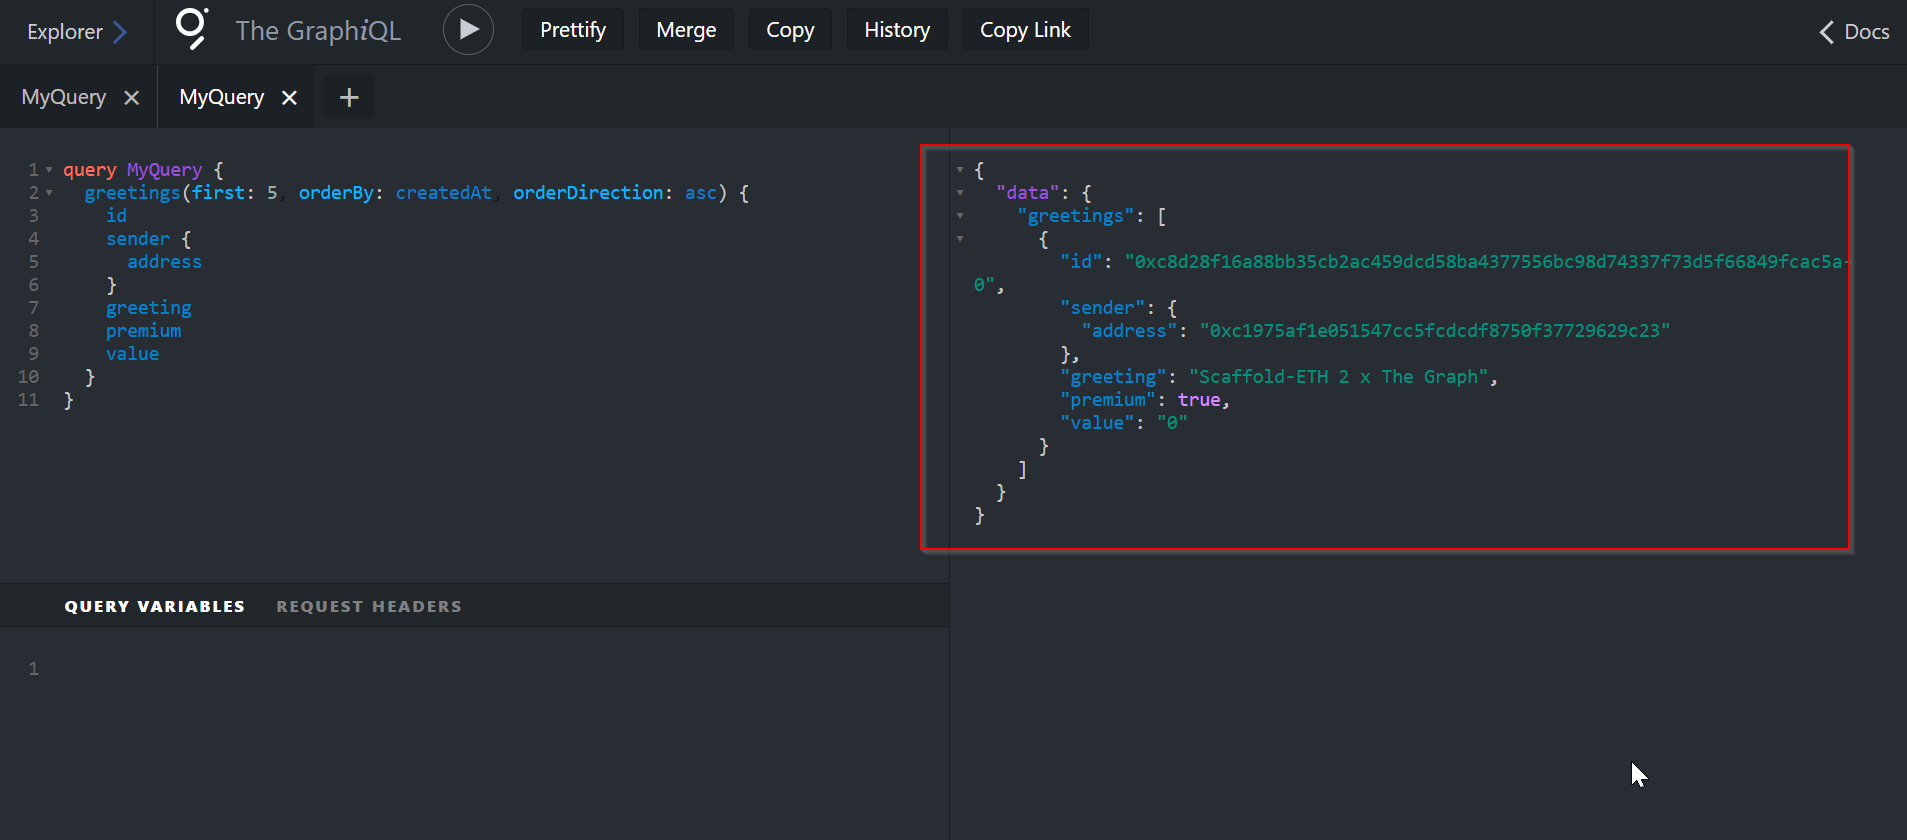
Congratulations!🎊
Your basic Scaffold-ETH 2 dApp is built.
All the changes in Greetings can also be now seen using The Graph.
Now, let's add some more functionality to our contracts!
Customising YourContract.sol
Remember how we imported ERC20.sol from OpenZeppelin?
Let's use that to enhance our dApp.
1. Adding changes to the contract
Go to packages/hardhat/contracts/YourContract.sol and make the following changes:
Our contract should inherit the ERC20.sol contract, for that:
- update our contract to:
contract YourContract is ERC20{
We also need to update our constructor:
constructor(address _owner) ERC20("Token", "TKN"){ owner = _owner; }💡Note:TokenandTKNare both parameters that represent the name of the token and the symbol, respectively. You can customize the parameters and have any name for your token.Let's add a function
mintthat can mint the tokenTKN.We will also need to define an event that emits the address of the sender and the amount of tokens minted.
Copy this code into your contract:
 // Event to emit address of minter and amount of tokens minted
     event TokenMint(address to, uint256 amount);

 // Function to mint tokens
     function mint(address to, uint256 amount) public{
         _mint(to, amount);

         emit TokenMint(to, amount);
     }
2. Deploy contract with changes
After these changes, we need to redeploy our contract to implement the changes.
In your terminal, run the command:
yarn deploy --reset
If your terminal looks like this:

then, we're good to go!
Head over to your application and mint some tokens!
3. Update schema.graphql
In order to store the newly added entities to your Graph node, you will have to include them in your schema.graphql .
To do so,
Navigate to packages/subgraph/src/schema.graphql and add the following entities:
type TokenMint @entity {
  id: Bytes!
  to: Bytes! # address
  amount: BigInt! # uint256
  blockNumber: BigInt!
  blockTimestamp: BigInt!
  transactionHash: Bytes!
}

type Transfer @entity{
  id: Bytes!
  from: Bytes! # address
  to: Bytes! # address
  value: BigInt! # uint256
  blockNumber: BigInt!
  blockTimestamp: BigInt!
  transactionHash: String!
}
4. Update subgraph manifest
Head over to packages/subgraph/subgraph.yaml and add the following entities and eventHandlers
entities:
        - Greeting
        - Sender
        - TokenMint
eventHandlers:
        - event: GreetingChange(indexed address,string,bool,uint256)
          handler: handleGreetingChange
        - event: TokenMint(address,uint256)
          handler: handleTokenMint
Now, run:
yarn abi-copy && yarn codegen
to copy the new abi and regenerate the code.
5. Update mapping.ts
Now, let's update the packages/subgraph/src/mapping.ts file too:
Add the following code to your
importfunction:import { YourContract, GreetingChange, TokenMint as TokenMintEvent, Transfer as TransferEvent, } from "../generated/YourContract/YourContract";We also need to import from our
schema.graphql:import { Greeting, Sender, TokenMint, Transfer } from "../generated/schema";Lastly, let's add the export function:
 export function handleTokenMint(event: TokenMintEvent): void {
   let entity = new TokenMint(
     event.transaction.hash.concatI32(event.logIndex.toI32())
   )
   entity.to = event.params.to
   entity.amount = event.params.amount

   entity.blockNumber = event.block.number
   entity.blockTimestamp = event.block.timestamp
   entity.transactionHash = event.transaction.hash

   entity.save()
 }
6. Shipping our updated subgraph
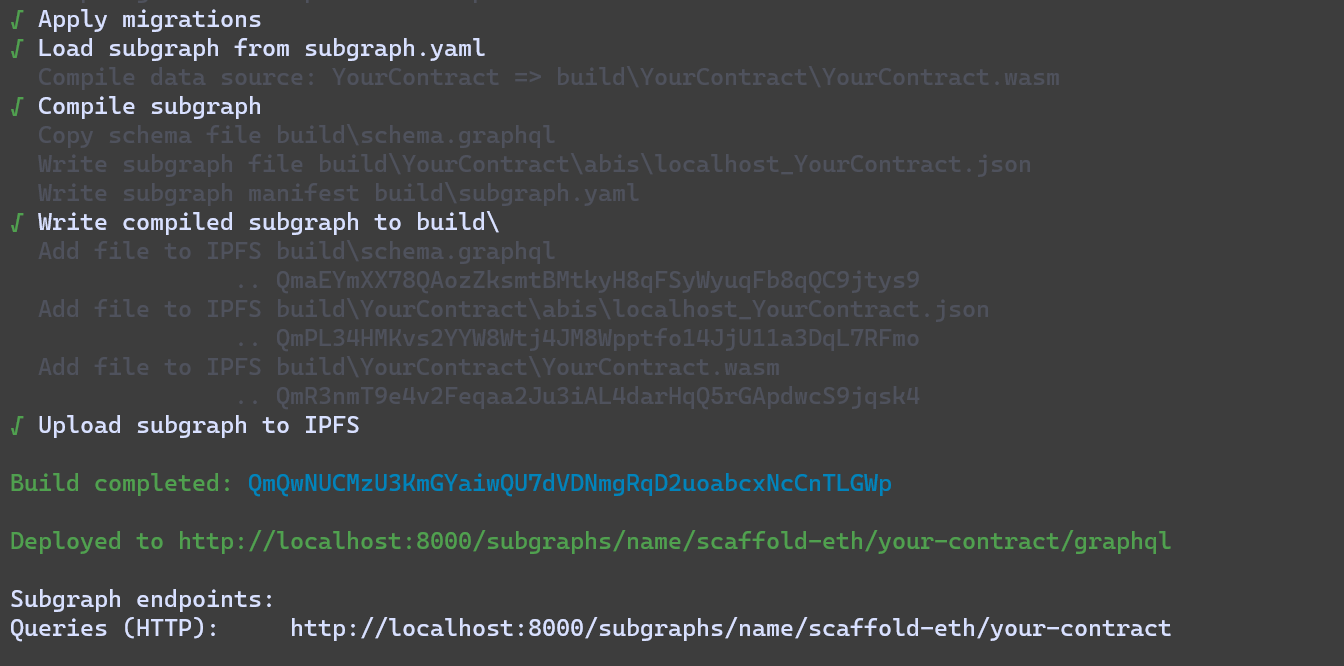
To ship our updated subgraph, run:
yarn local-ship
For the version, I suggest that you enter v0.0.2 .
If everything works out, your output should be like this,
7. Testing the query
Now, let's test our subgraph. Head over to the endpoint of your subgraph.
Run the following query:
query MyQuery {
  tokenMints(first: 10, orderBy: blockTimestamp, orderDirection: desc) {
    id
    to
    amount
  }
}
If you have been following along, then your output should be similar to this:

CONGRATULATIONS!!!!
Your dApp is ready!💜
But why stop here?
Let's get our data from the subgraph to display it on our frontend😎
Getting our data to the Frontend
Now that we are done with our backend, let's dive into the frontend.
We will have the following features on our frontend:
Connected wallet's address and balance.
Display of the current
Greeting.Contract address and contract balance.
Input fields and a button for
setGreeting().Input fields and a button for
mint().Subgraph data for
setGreeting()andmint().
1. Customizing the Home page
- Navigate to
packages/nextjs/app/page.tsxand replace all the code with the following:
"use client";

import { useState } from "react";
import { gql } from "@apollo/client";
import { useQuery } from "@apollo/client";
import type { NextPage } from "next";
import { useAccount } from "wagmi";
import { Address, AddressInput, Balance } from "~~/components/scaffold-eth";
import {
  useAccountBalance,
  useDeployedContractInfo,
  useScaffoldContractRead,
  useScaffoldContractWrite,
} from "~~/hooks/scaffold-eth";

const Home: NextPage = () => {
  return <></>;
};

export default Home;
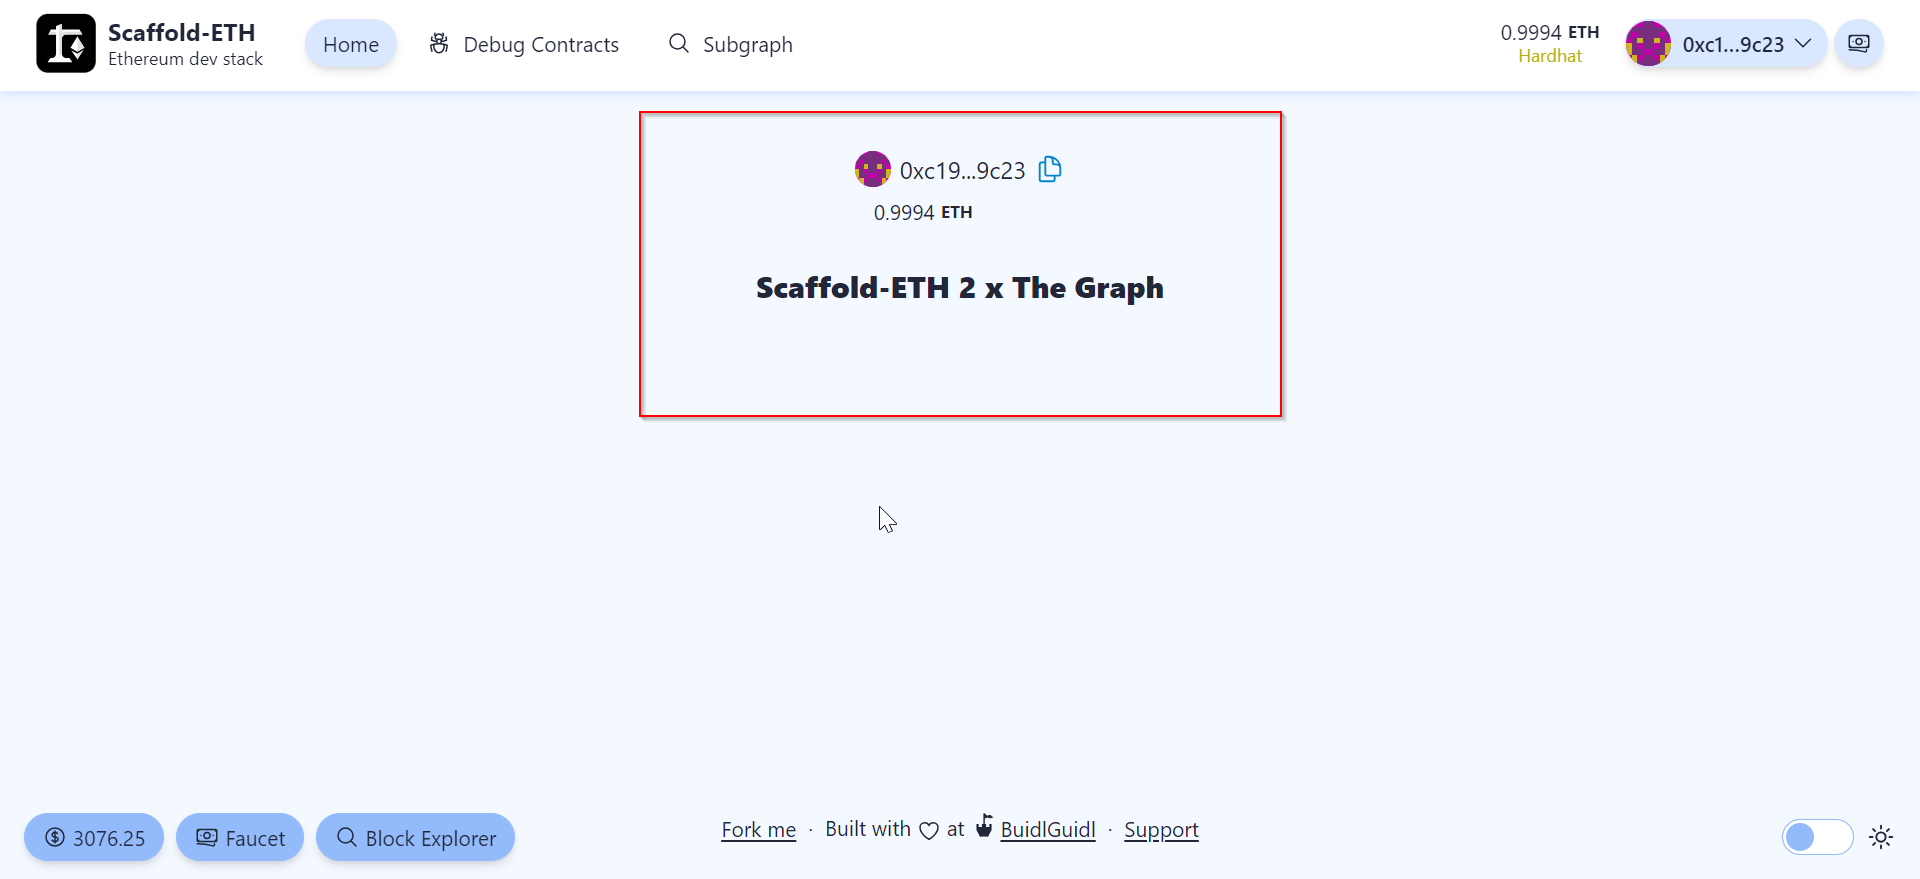
- Create a div to display Wallet Address and Balance:
<div className="flex items-center flex-col flex-grow pt-10">
<div>
    <Address address={address} />
    <Balance address={address} />
</div>
</div>
useAccount() is imported from Wagmi.
It enables us to get the balance and address of the current connected wallet.
- Declare
useAccount()outside the return function:
const { address } = useAccount();
- Create a div to display the current greeting:
<div className="p-5 font-black text-xl">{greeting}</div>
- Declare the variable to get data from Scaffold-ETH hooks:
const { data: greeting } = useScaffoldContractRead({
    contractName: "YourContract",
    functionName: "greeting",
});
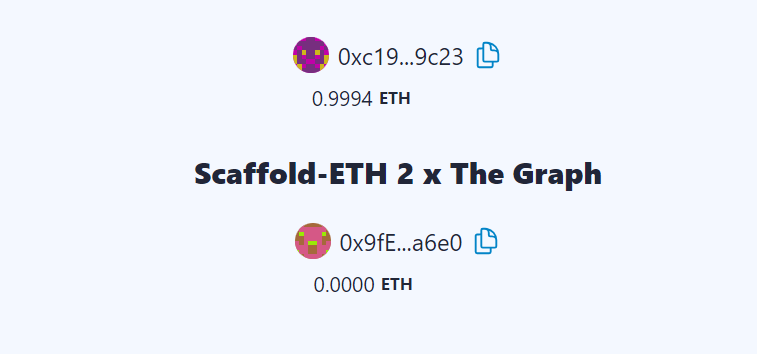
- Displaying Contract Address and Balance:
<div>
    <Address address={yourContract?.address} />
    <Balance address={yourContract?.address} />
</div>
- Declare
useDeployedContractInfo():
const { data: yourContract } = useDeployedContractInfo("YourContract");
So far, our frontend should look like this:
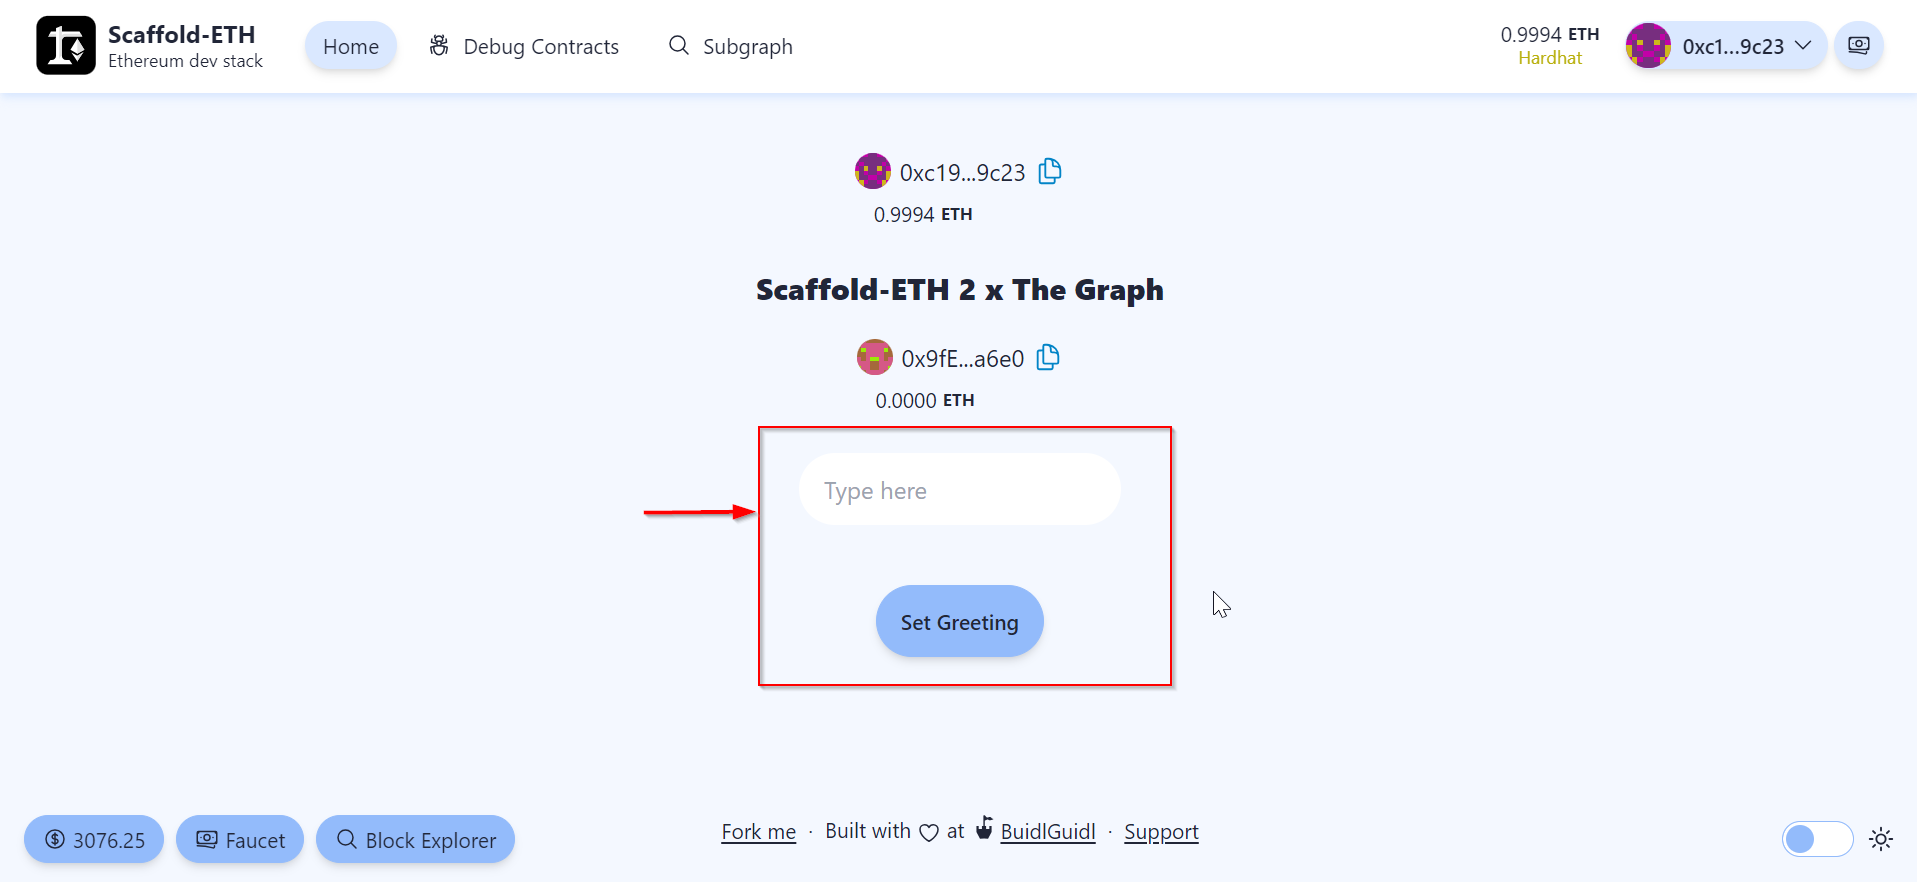
- Next, we need an input field and a button for our
setGreetingfunction.
<div className="p-5">
    <input
        value={newGreeting}
        placeholder="Type here"
        className="input"
        onChange={(e) => setNewGreeting(e.target.value)}
    />
    </div>
    <div className="p-5">
        <button className="btn btn-primary" onClick={setGreeting}>
            Set Greeting
        </button>
    </div>
- We need to declare a state variable to help us keep track of the greetings and
useScaffoldContractWrite()to call oursetGreeting().
const [newGreeting, setNewGreeting] = useState("");

const { writeAsync: setGreeting } = useScaffoldContractWrite({
    contractName: "YourContract",
    functionName: "setGreeting",
    args: [newGreeting],
});
Our setGreeting() button should look like:
- Next, we need input fields for
mint():
<div className="p-5">
    <AddressInput
        value={newMinter}
        placeholder="Minter?"
        name={address}
        onChange={setNewMinter}
    />
</div>
<div className="p-5">
    <input
        value={newAmount}
        placeholder="Amount"
        className="input"
        onChange={(e) => setNewAmount(e.target.value)}
/>
</div>
<div className="p-5">
    <button className="btn btn-primary" onClick={mint}>
        Mint TKN Tokens
    </button>
</div>
- Declare two state variables for
MinterandAmount:
const [newMinter, setNewMinter] = useState("");
const [newAmount, setNewAmount] = useState<any | null>(null);

const { writeAsync: mint } = useScaffoldContractWrite({
    contractName: "YourContract",
    functionName: "mint",
    args: [newMinter, newAmount],
});
It should look like this:
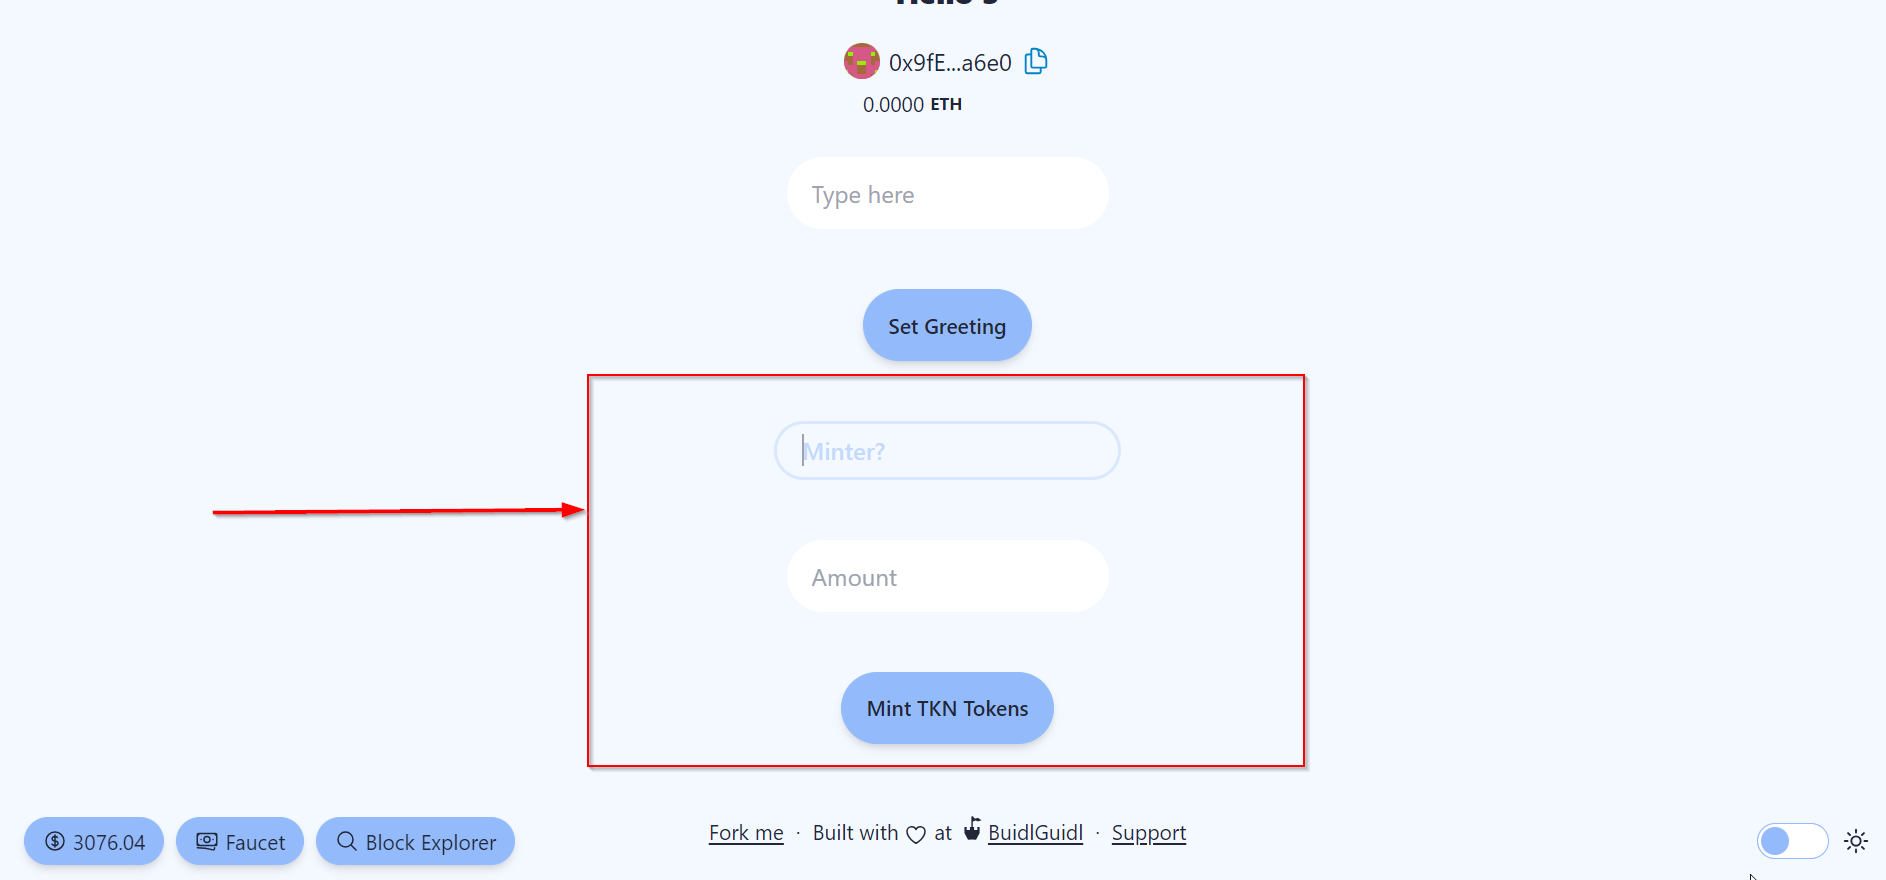
Our page.tsx should look like:
"use client";

import { useState } from "react";
import { gql } from "@apollo/client";
import { useQuery } from "@apollo/client";
import type { NextPage } from "next";
import { useAccount } from "wagmi";
import { Address, AddressInput, Balance } from "~~/components/scaffold-eth";
import {
  useAccountBalance,
  useDeployedContractInfo,
  useScaffoldContractRead,
  useScaffoldContractWrite,
} from "~~/hooks/scaffold-eth";

const Home: NextPage = () => {

  const { address } = useAccount();

  const { data: greeting } = useScaffoldContractRead({
    contractName: "YourContract",
    functionName: "greeting",
  });

  const { data: yourContract } = useDeployedContractInfo("YourContract");

  const [newGreeting, setNewGreeting] = useState("");

  const { writeAsync: setGreeting } = useScaffoldContractWrite({
      contractName: "YourContract",
      functionName: "setGreeting",
      args: [newGreeting],
  });

  const [newMinter, setNewMinter] = useState("");
  const [newAmount, setNewAmount] = useState<any | null>(null);

  const { writeAsync: mint } = useScaffoldContractWrite({
    contractName: "YourContract",
    functionName: "mint",
    args: [newMinter, newAmount],
  });

  return <>

  <div className="flex items-center flex-col flex-grow pt-10">
    <div>
      <Address address={address} />
      <Balance address={address} />
    </div>

    <div className="p-5 font-black text-xl">{greeting}</div>

  <div>
    <Address address={yourContract?.address} />
    <Balance address={yourContract?.address} />
  </div>

  <div className="p-5">
    <input
        value={newGreeting}
        placeholder="Type here"
        className="input"
        onChange={(e) => setNewGreeting(e.target.value)}
    />
    </div>
    <div className="p-5">
        <button className="btn btn-primary" onClick={setGreeting}>
            Set Greeting
        </button>
    </div>

    <div className="p-5">
    <AddressInput
        value={newMinter}
        placeholder="Minter?"
        name={address}
        onChange={setNewMinter}
    />
    </div>
    <div className="p-5">
        <input
            value={newAmount}
            placeholder="Amount"
            className="input"
            onChange={(e) => setNewAmount(e.target.value)}
    />
    </div>
    <div className="p-5">
        <button className="btn btn-primary" onClick={mint}>
            Mint TKN Tokens
        </button>
    </div>

  </div>

  </>;
};

export default Home;
2. Displaying Subgraph Data
Now, we want our subgraph data to be displayed on our frontend.
For that we will add a table in our Subgraph page.
Head over to packages/nextjs/app/subgraph/_components
And create a file named MintersTable.tsx and paste the following code into the file:
"use client";

import { gql, useQuery } from "@apollo/client";
import { Address } from "~~/components/scaffold-eth";

const MintersTable = () => {
const GET_TOKENMINTS = gql`
query MyQuery {
  tokenMints(first: 10, orderBy: blockTimestamp, orderDirection: desc) {
    id
    to
    amount
  }
}
`;

const { loading, error, data: tokenMintsData } = useQuery(GET_TOKENMINTS);

const tokenMints = tokenMintsData?.tokenMints || [];

  // Subgraph maybe not yet configured
  if (error) {
    return <></>;
  }

  return (
    <div className="flex justify-center items-center mt-10">
      <div className="overflow-x-auto shadow-2xl rounded-xl">
        <table className="table bg-base-100 table-zebra">
          <thead>
            <tr className="rounded-xl">
              <th className="bg-primary"></th>
              <th className="bg-primary">Minters</th>
              <th className="bg-primary">Amount</th>
            </tr>
          </thead>
          <tbody>
            {tokenMintsData?.tokenMints?.map((tokenMint: any, index: number) => {
              return (
                <tr key={tokenMint.id}>
                  <th>{index + 1}</th>
                  <td>
                    <Address address={tokenMint.to} />
                  </td>
                  <td>{tokenMint.amount}</td>
                </tr>
              );
            })}
          </tbody>
        </table>
      </div>
    </div>
  );
};

export default MintersTable;
If you look at the code, it is nothing other than just a basic table that displays the address of the minter and the amount minted.
And the GraphQL query is declared which enables us to fetch the subgraph data using useQuery() .
Now, let's import our MintersTable to our Subgraph page.
Inside packages/nextjs/app/subgraph/page.tsx import the following:
import MintersTable from "./_components/MintersTable";
Secondly, we'll need to declare our MintersTable.
If you scroll down, you'll will see the following line:
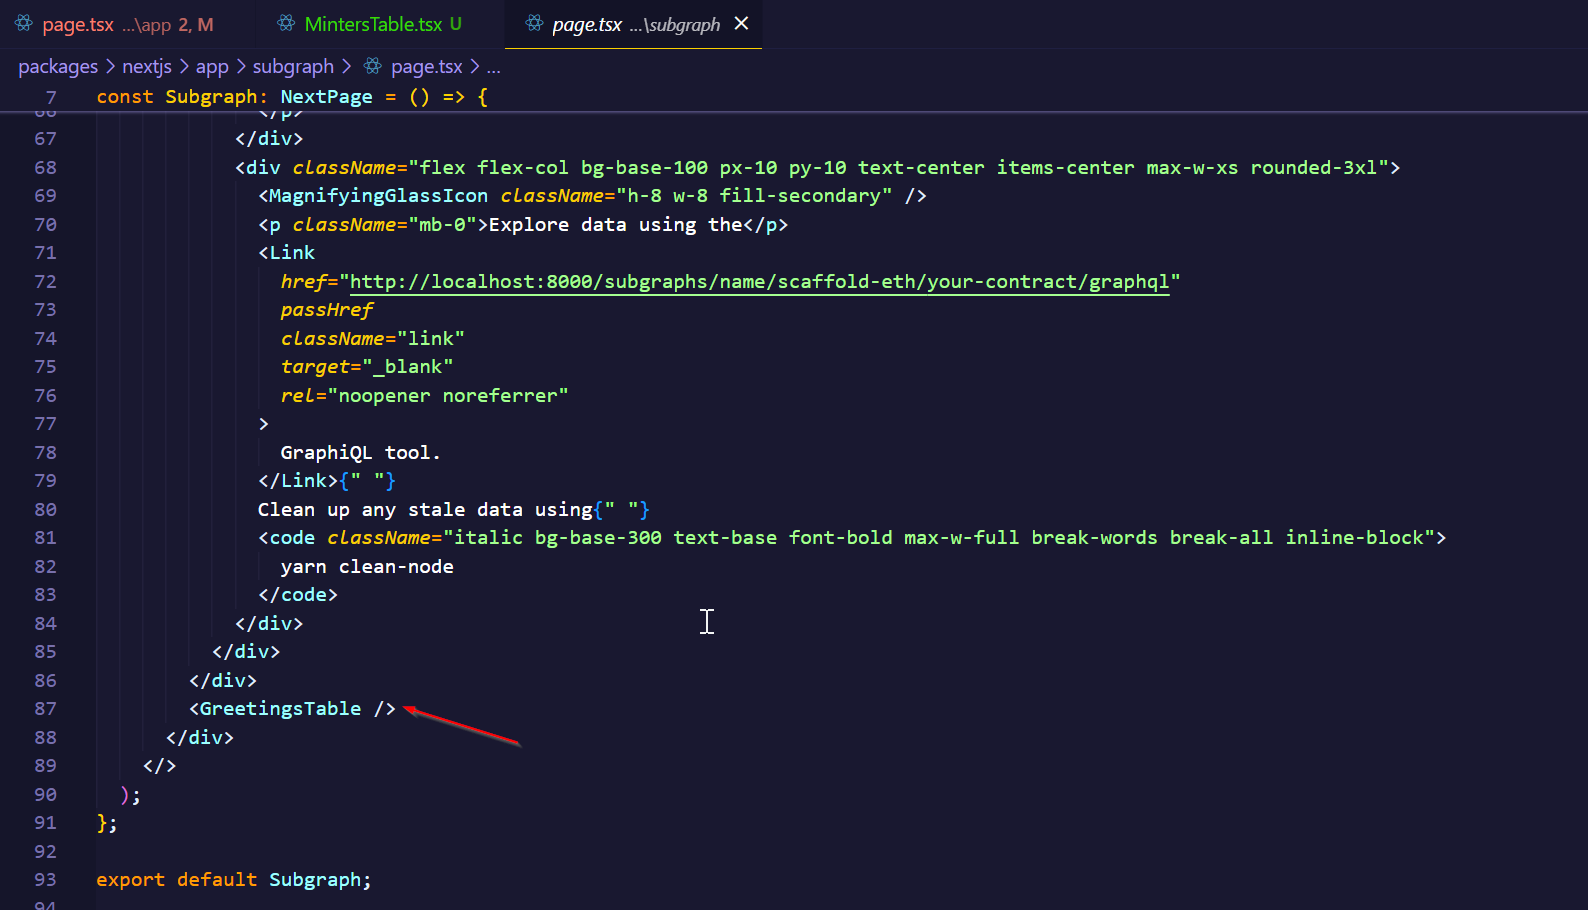
Paste the following code just below <GreetingsTable/> :
<MintersTable/>
Let's also declutter the Subgraph page so that it looks more organized.
Instead of a few more steps, let's take a shortcut.
Replace everything under packages/subgraph/app/subgraph/page.tsx with:
import React from "react";
import Link from "next/link";
import GreetingsTable from "./_components/GreetingsTable";
import MintersTable from "./_components/MintersTable";
import type { NextPage } from "next";
import { MagnifyingGlassIcon, PlusIcon, PowerIcon, RocketLaunchIcon } from "@heroicons/react/24/outline";

const Subgraph: NextPage = () => {
  return (
    <>
      <div>
        <div className="flex items-center flex-col flex-grow pt-10">
          <h1 className="text-center mb-8">
            <span className="block text-2xl mb-2">Welcome to your</span>
            <br></br><span className="block text-4xl font-bold">Subgraph</span>
          </h1>
        </div>
        <GreetingsTable />
        <MintersTable />
        <div className="flex-grow bg-base-300 w-full mt-16 px-8 py-12">
          <div className="flex justify-center items-center gap-12 flex-col sm:flex-row">
            <div className="flex flex-col bg-base-100 px-10 py-10 text-center items-center max-w-xs rounded-3xl">
              <PowerIcon className="h-8 w-8 fill-secondary" />
              <p className="text-center text-lg">
                Start your subgraph environment using{" "}
                <code className="italic bg-base-300 text-base font-bold max-w-full break-words break-all inline-block">
                  yarn run-node
                </code>
              </p>
            </div>
            <div className="flex flex-col bg-base-100 px-10 py-10 text-center items-center max-w-xs rounded-3xl">
              <PlusIcon className="h-8 w-8 fill-secondary" />
              <p className="text-center text-lg">
                Create your subgraph on graph-node with{" "}
                <code className="italic bg-base-300 text-base font-bold max-w-full break-words break-all inline-block">
                  yarn local-create
                </code>
              </p>
            </div>
            <div className="flex flex-col bg-base-100 px-10 py-10 text-center items-center max-w-xs rounded-3xl">
              <RocketLaunchIcon className="h-8 w-8 fill-secondary" />
              <p className="text-center text-lg">
                Deploy your subgraph configuration with{" "}
                <code className="italic bg-base-300 text-base font-bold max-w-full break-words break-all inline-block">
                  yarn local-ship
                </code>
              </p>
            </div>
            <div className="flex flex-col bg-base-100 px-10 py-10 text-center items-center max-w-xs rounded-3xl">
              <MagnifyingGlassIcon className="h-8 w-8 fill-secondary" />
              <p className="mb-0">Explore data using the</p>
              <Link
                href="http://localhost:8000/subgraphs/name/scaffold-eth/your-contract/graphql"
                passHref
                className="link"
                target="_blank"
                rel="noopener noreferrer"
              >
                GraphiQL tool.
              </Link>{" "}
              Clean up any stale data using{" "}
              <code className="italic bg-base-300 text-base font-bold max-w-full break-words break-all inline-block">
                yarn clean-node
              </code>
            </div>
          </div>
        </div>
      </div>
    </>
  );
};

export default Subgraph;
ALL DONE!
You're just one step away from a complete dApp!
Your final output should look like this:
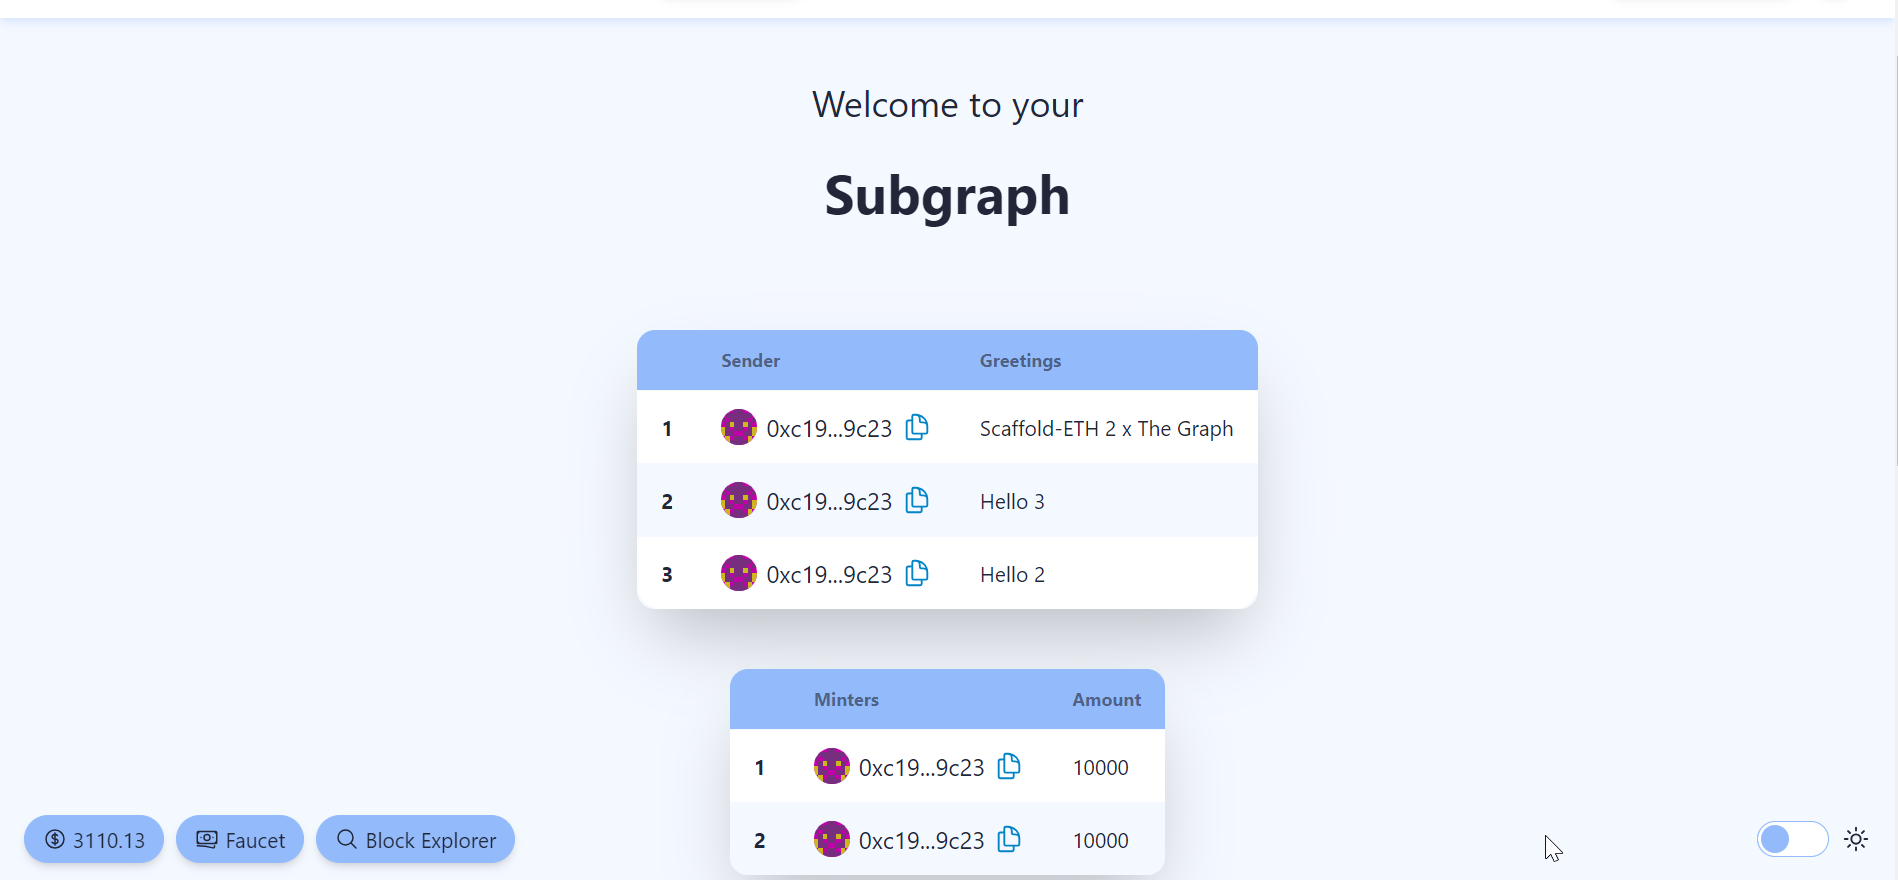
Shipping to Polygon Mumbai
Enough with Hardhat, now let's deploy our dApp on Polygon Mumbai testnet.
- Open your terminal and run the following command:
yarn generate
This generates a new wallet and stores the PRIVATE_KEY inside the .env file.
- Now to fund our account, first run:
yarn account
You'll see the following things:
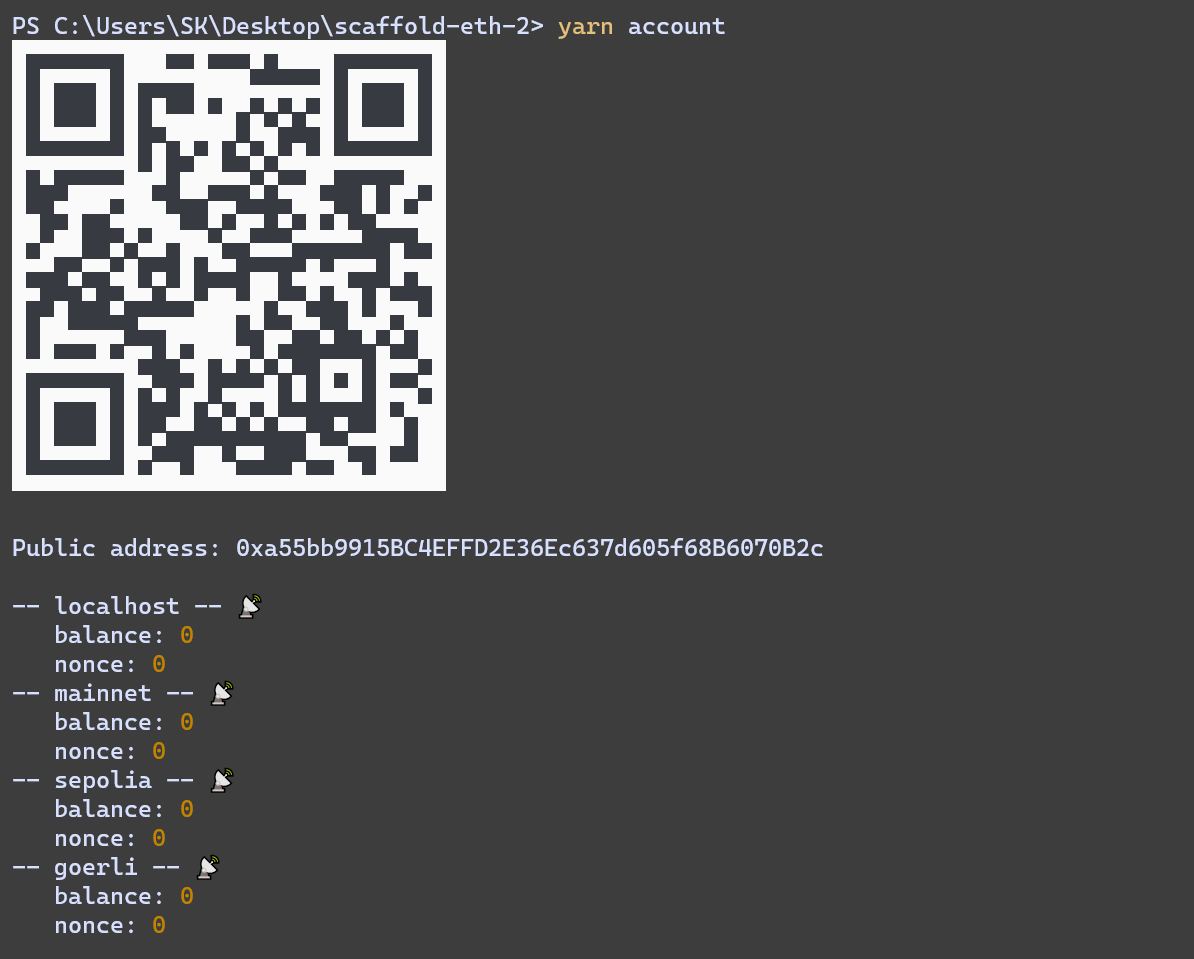
QR code for your wallet.
Wallet Address.
Wallet Balances on Mainnets and Testnets.
All networks can be found listed under packages/hardhat/hardhat.congif.ts
Send some testnet MATIC to your newly generated wallet.
If you need testnet MATIC, get it from the Polygon Mumbai faucet, here.
- Now to deploy our contracts, run:
yarn deploy --network polygonMumbai
After successful deployment, you'll get:
Nothing to compile
No need to generate any newer typings.
deploying "YourContract" (tx: 0x7d7e5a9c2590757b1932a725ec4fa38a6e2307984c03c55ab906d97941dba141)...: deployed at 0xE591bc1d54D352144B5f0443AFdC01Da1Fcd8cf7 with 1065097 gas
👋 Initial greeting: Building Unstoppable Apps!!!
📝 Updated TypeScript contract definition file on ../nextjs/contracts/deployedContracts.ts
- Now we need to verify our contract.
To do so, first we need to get the Polygon Mumbai Block Explorer API key.
Head over to PolygonScan and create an API key.
Copy the API key and head over to packages/hardhat/hardhat.congif.ts and change the ETHERSCAN_API_KEY to your API key.

Now, run:
yarn verify --network polygonMumbai
After verification, you will get:
verifying YourContract (0xE591bc1d54D352144B5f0443AFdC01Da1Fcd8cf7) ...
waiting for result...
 => contract YourContract is now verified
You can check your contract on PolygonScan, here.
Deploying Subgraph on Studio
Now with our contract deployed on Polygon Mumbai, let's deploy our Subgraph on Subgraph Studio.
Connect your wallet.
Create a subgraph.
You will now need to install the graph-cli . Open your terminal and run the following:
yarn global add @graphprotocol/graph-cli
Next, we will initialize our subgraph:
graph init --studio [SUBGRAPH_SLUG]
You can find your subgraph-slug on your Subgraph Dashboard.
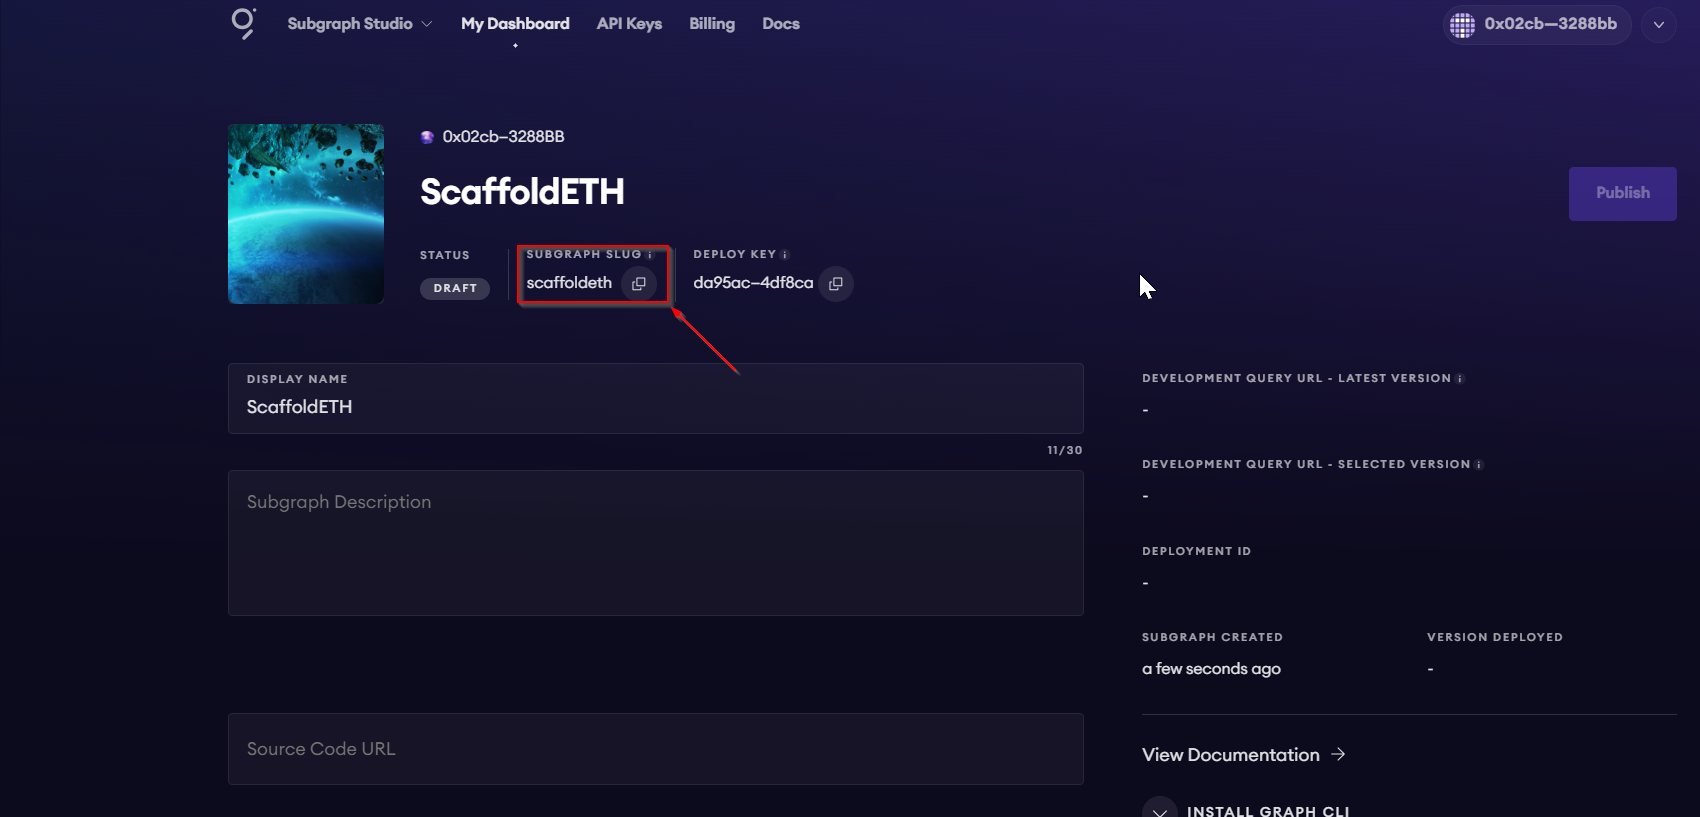
On running, you will see the following:
List of protocols: Select
ethereum.Subgraph Slug: Enter your subgraph-slug and press enter.
Directory to initialize subgraph in.
List of Ethereum networks: Select
mumbai.Contract Address: Enter contract address for your contract.
It will then fetch the ABI and Start block from PolygonScan.
Enter Contract name and select y for Index contract events as entities?
This should be your output:
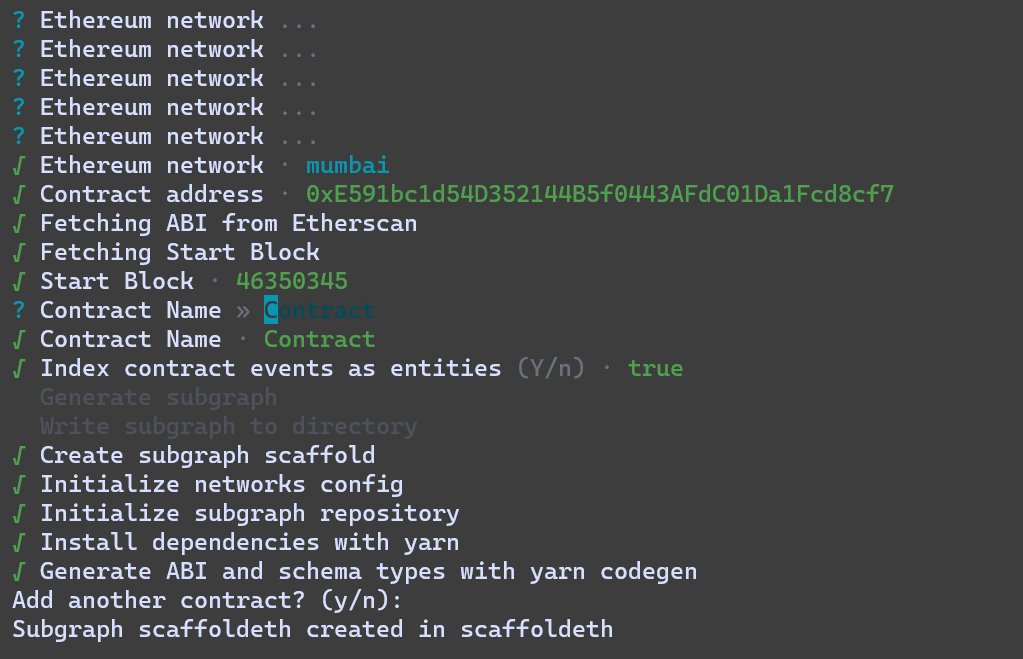
Now, let's authenticate our subgraph.
Run the command:
graph auth --studio [DEPLOY_KEY]
You can find your DEPLOY_KEY here:
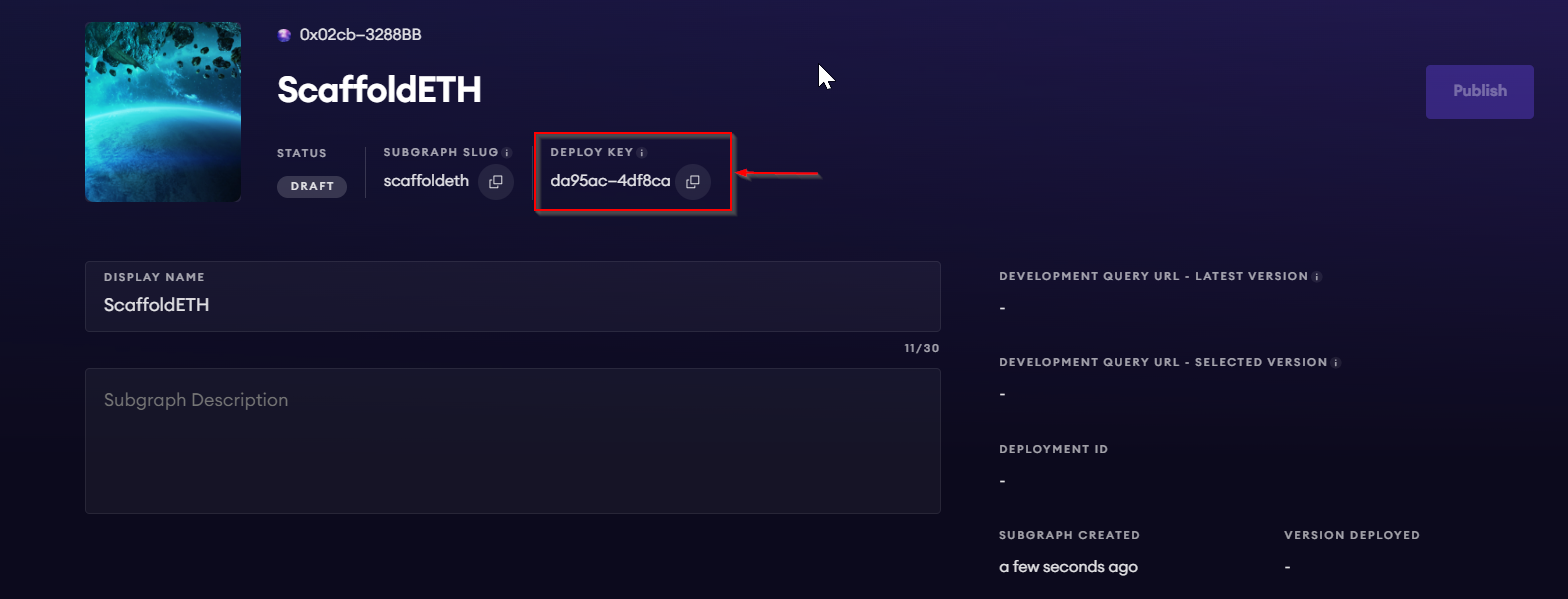
You will get the following message:
Deploy key set for https://api.studio.thegraph.com/deploy/
Moving on, choose the directory in which your subgraph is initialized and run:
graph codegen && graph build
Your terminal should look like this:
  Skip migration: Bump mapping apiVersion from 0.0.1 to 0.0.2
  Skip migration: Bump mapping apiVersion from 0.0.2 to 0.0.3
  Skip migration: Bump mapping apiVersion from 0.0.3 to 0.0.4
  Skip migration: Bump mapping apiVersion from 0.0.4 to 0.0.5
  Skip migration: Bump mapping apiVersion from 0.0.5 to 0.0.6
  Skip migration: Bump manifest specVersion from 0.0.1 to 0.0.2
  Skip migration: Bump manifest specVersion from 0.0.2 to 0.0.4
√ Apply migrations
√ Load subgraph from subgraph.yaml
  Load contract ABI from abis\Contract.json
√ Load contract ABIs
  Generate types for contract ABI: Contract (abis\Contract.json)
  Write types to generated\Contract\Contract.ts
√ Generate types for contract ABIs
√ Generate types for data source templates
√ Load data source template ABIs
√ Generate types for data source template ABIs
√ Load GraphQL schema from schema.graphql
  Write types to generated\schema.ts
√ Generate types for GraphQL schema

Types generated successfully

  Skip migration: Bump mapping apiVersion from 0.0.1 to 0.0.2
  Skip migration: Bump mapping apiVersion from 0.0.2 to 0.0.3
  Skip migration: Bump mapping apiVersion from 0.0.3 to 0.0.4
  Skip migration: Bump mapping apiVersion from 0.0.4 to 0.0.5
  Skip migration: Bump mapping apiVersion from 0.0.5 to 0.0.6
  Skip migration: Bump manifest specVersion from 0.0.1 to 0.0.2
  Skip migration: Bump manifest specVersion from 0.0.2 to 0.0.4
√ Apply migrations
√ Load subgraph from subgraph.yaml
  Compile data source: Contract => build\Contract\Contract.wasm
√ Compile subgraph
  Copy schema file build\schema.graphql
  Write subgraph file build\Contract\abis\Contract.json
  Write subgraph manifest build\subgraph.yaml
√ Write compiled subgraph to build\

Build completed: build\subgraph.yaml
Lastly, we want to deploy our subgraph to the Studio.
Run:
graph deploy --studio [SUBGRAPH_SLUG]
Enter a version for your subgraph and wait for the subgraph to be deployed.
You will get an endpoint and Deployment ID for your subgraph.
Similar to this:
Which version label to use? (e.g. "v0.0.1"): v0.0.1
  Skip migration: Bump mapping apiVersion from 0.0.1 to 0.0.2
  Skip migration: Bump mapping apiVersion from 0.0.2 to 0.0.3
  Skip migration: Bump mapping apiVersion from 0.0.3 to 0.0.4
  Skip migration: Bump mapping apiVersion from 0.0.4 to 0.0.5
  Skip migration: Bump mapping apiVersion from 0.0.5 to 0.0.6
  Skip migration: Bump manifest specVersion from 0.0.1 to 0.0.2
  Skip migration: Bump manifest specVersion from 0.0.2 to 0.0.4
√ Apply migrations
√ Load subgraph from subgraph.yaml
  Compile data source: Contract => build\Contract\Contract.wasm
√ Compile subgraph
  Copy schema file build\schema.graphql
  Write subgraph file build\Contract\abis\Contract.json
  Write subgraph manifest build\subgraph.yaml
√ Write compiled subgraph to build\
  Add file to IPFS build\schema.graphql
                .. QmYwRGFgZ29N2MvotHCGFbXcFWeXDZTqvVLAwMHVfCGGDp
  Add file to IPFS build\Contract\abis\Contract.json
                .. QmPL34HMKvs2YYW8Wtj4JM8Wpptfo14JjU11a3DqL7RFmo
  Add file to IPFS build\Contract\Contract.wasm
                .. QmfKPf2BSqhVhJs471qzzbT9F29A1gEcw3FFioeh1o2BAq
√ Upload subgraph to IPFS

Build completed: QmYGcGRcVdfr1fsRVsjUEfcK7spQoJzJRPKxwTR5FEdGQ8

Deployed to https://thegraph.com/studio/subgraph/scaffoldeth

Subgraph endpoints:
Queries (HTTP):     https://api.studio.thegraph.com/query/55877/scaffoldeth/v0.0.1
Go to your subgraph endpoint and run the following query:
query MyQuery {
  greetingChanges(first: 10, orderBy: blockTimestamp, orderDirection: desc) {
    id
    newGreeting
    greetingSetter
    premium
    value
  }
  tokenMints(first: 10, orderBy: blockTimestamp, orderDirection: desc) {
    id
    to
    amount
  }
}
If your query returns valid data, then your subgraph is deployed successfully.
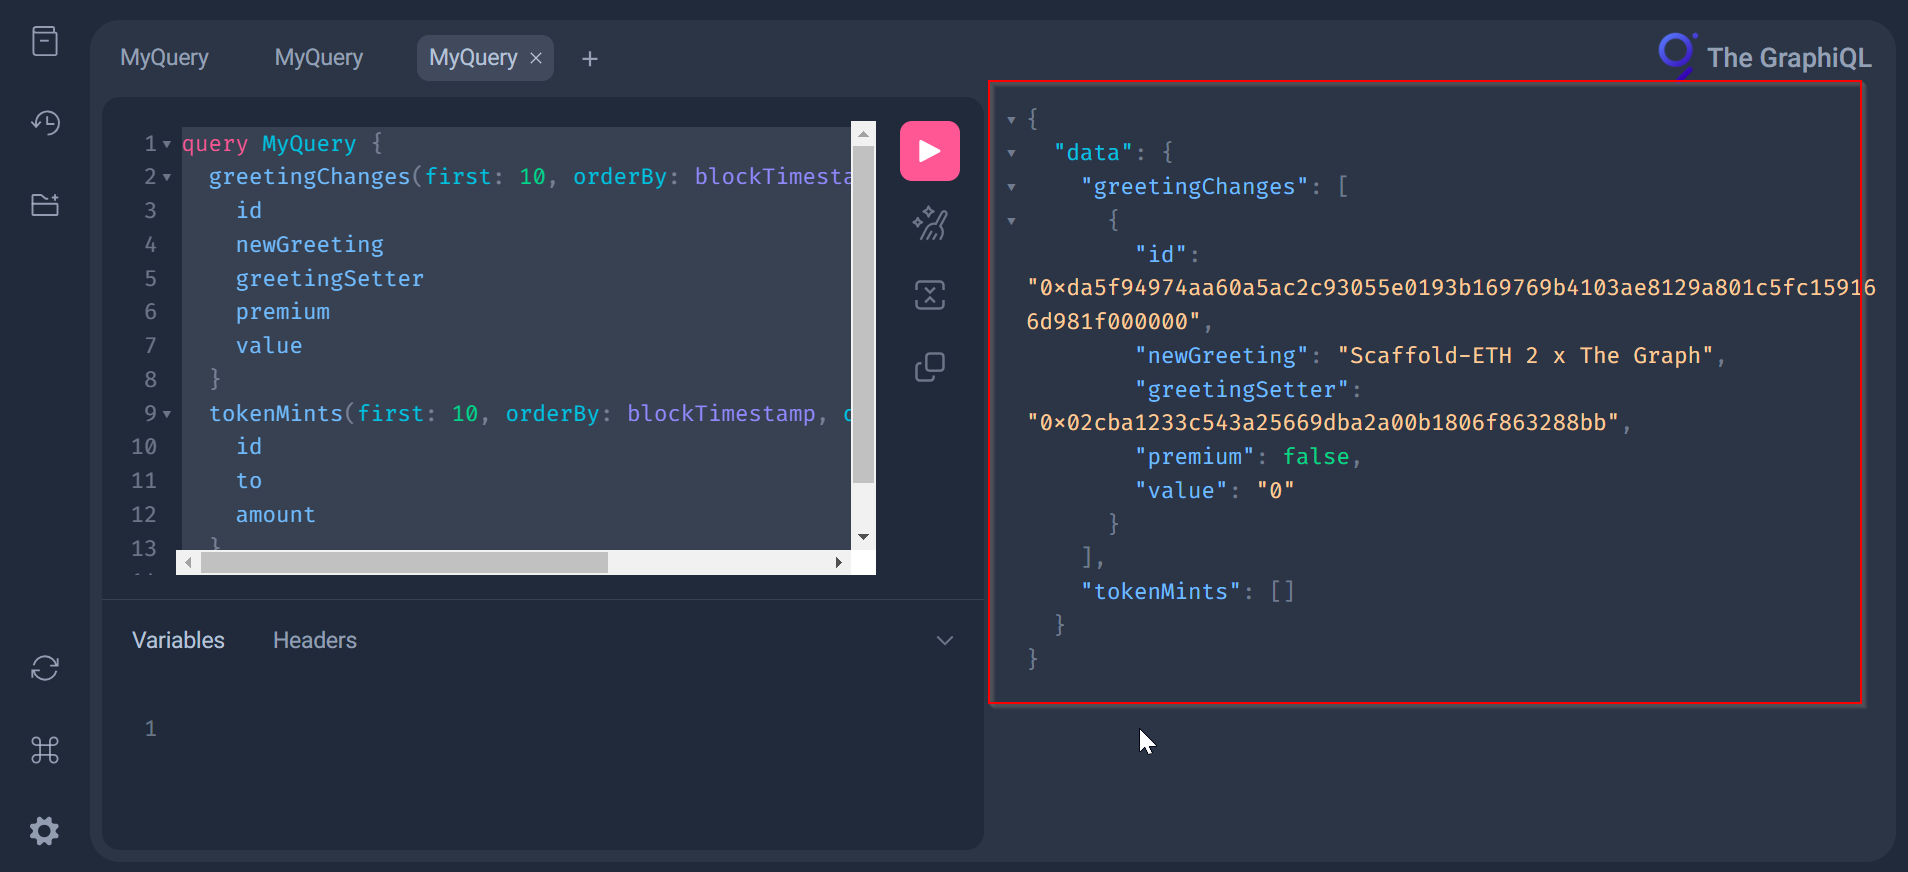
Updating Frontend
First, we want to change our targetNetwork to polygonMumbai,
Go to packages/nextjs/scaffold.config.ts and make this change:
targetNetworks: [chains.polygonMumbai]
Now, let's change our GraphQL endpoint to our Subgraph Studio development endpoint.
Go to packages/nextjs/components/ScaffoldEthAppwithProviders.ts and replace:
const subgraphUri = "http://localhost:8000/subgraphs/name/scaffold-eth/your-contract";
const apolloClient = new ApolloClient({
    uri: subgraphUri,
    cache: new InMemoryCache(),
});
with:
const subgraphUri = "[YOUR_DEVELOPMENT_ENDPOINT]";
const apolloClient = new ApolloClient({
    uri: subgraphUri,
    cache: new InMemoryCache(),
});
Since we generated new schema and subgraph config, let's update our query too.
Go to packages/nextjs/app/subgraph/_components/GreetingsTable.tsx and replace the code with the following:
"use client";

import { gql, useQuery } from "@apollo/client";
import { Address } from "~~/components/scaffold-eth";

const GreetingsTable = () => {
  const GREETINGS_GRAPHQL = `
  query MyQuery {
    greetingChanges(first: 25, orderBy: blockTimestamp, orderDirection: desc) {
      id
      newGreeting
      premium
      value
      blockNumber
      greetingSetter
    }
  }
`;

  const GREETINGS_GQL = gql(GREETINGS_GRAPHQL);
  const { data: greetingChangesData, error } = useQuery(GREETINGS_GQL, { fetchPolicy: "network-only" });

  // Subgraph maybe not yet configured
  if (error) {
    return <></>;
  }

  return (
    <div className="flex justify-center items-center mt-10">
      <div className="overflow-x-auto shadow-2xl rounded-xl">
        <table className="table bg-base-100 table-zebra">
          <thead>
            <tr className="rounded-xl">
              <th className="bg-primary"></th>
              <th className="bg-primary">Sender</th>
              <th className="bg-primary">Greetings</th>
            </tr>
          </thead>
          <tbody>
            {greetingChangesData?.greetingChanges?.map((greetingChange: any, index: number) => {
              return (
                <tr key={greetingChange.id}>
                  <th>{index + 1}</th>
                  <td>
                    <Address address={greetingChange?.greetingSetter} />
                  </td>
                  <td>{greetingChange.newGreeting}</td>
                </tr>
              );
            })}
          </tbody>
        </table>
      </div>
    </div>
  );
};

export default GreetingsTable;
Now, if you refresh your frontend, all the changes can be seen😎
Finally, you're all the way through with your dApp.
If you want to refer to the Github repository of this dApp, click here.
BIG CONGRATULATIONS to you!💜
I want to thank Kevin Jones aka Shutterblock.eth for the inspiration for this blog. He has been super helpful with everything regarding this tutorial. Make sure to check his work out!
Thank you for sticking till the end💜
You can connect with me here:
Subscribe to my newsletter
Read articles from Siddhant Kulkarni directly inside your inbox. Subscribe to the newsletter, and don't miss out.
Written by

Siddhant Kulkarni
Siddhant Kulkarni
Advocate at The Graph | Editor at Geo Browser | Aspiring Blockchain Developer