From Code to Cloud: Deploying 2048 with Docker on AWS
 Hemanth Gangula
Explore the deployment of the 2048 game, leveraging DevOps and cloud tech for rapid, scalable, and reliable deployment in today's digital landscape.
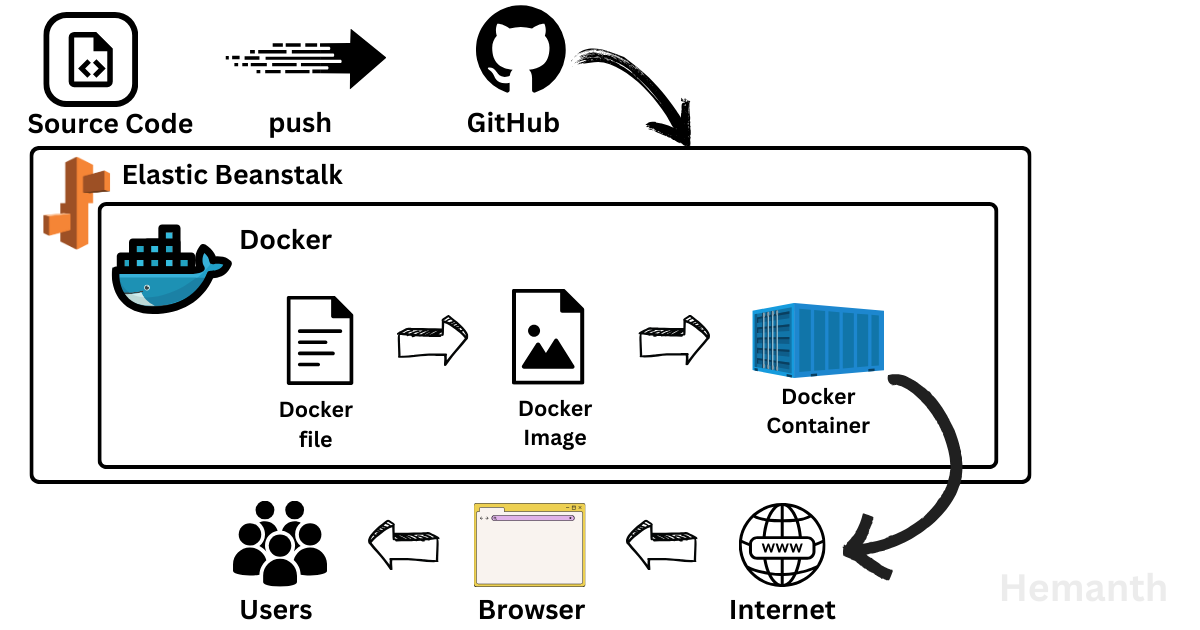
Our deployment strategy revolves around a robust technology stack, incorporating Docker containers and AWS Elastic Beanstalk. Let's delve deeper into the components of this stack and explore how they optimize the deployment process:
1. Docker Containers: Docker has revolutionized the way applications are packaged, shipped, and deployed, making it a cornerstone of modern DevOps workflows. Containers provide a lightweight, portable, and consistent environment, facilitating seamless integration and deployment across various cloud platforms.
2. AWS Elastic Beanstalk: AWS Elastic Beanstalk epitomizes the cloud-native approach to application deployment, automating infrastructure provisioning and deployment orchestration. Seamlessly integrated with Docker, Elastic Beanstalk streamlines the deployment process, enabling developers to focus on innovation rather than infrastructure management.
By harnessing the power of Docker containers and AWS Elastic Beanstalk, we aim to demonstrate the efficiency and scalability achievable through DevOps-driven cloud deployments. Join us as we navigate the intricacies of containerized application deployment, leveraging the latest DevOps best practices to deliver a seamless gaming experience on the AWS cloud.
Step 1: Testing Docker Container Locally
Creating the Dockerfile: Before building the Docker image, ensure you have a Dockerfile in your project directory. If you haven't already created one, you can use the following Dockerfile as an example for deploying the 2048 game. Feel free to customize it according to your project's specific requirements:
You can find the 2048 game source code, which I forked and used in this project, on GitHub at the following link: 2048 Game Repository
  # Use the Ubuntu 20.04 base image
  FROM ubuntu:20.04

  # Install NGINX, zip, and curl in a single RUN command
  RUN apt-get update && apt-get install -y nginx zip curl

  # Configure NGINX to run in the foreground
  RUN echo "daemon off;" >> /etc/nginx/nginx.conf

  # Download and extract the project files from GitHub
  RUN curl -o /var/www/html/master.zip -L https://github.com/HemanthGangula/2048/archive/refs/heads/master.zip \
      && cd /var/www/html/ \
      && unzip master.zip \
      && mv 2048-master/* . \
      && rm -rf 2048-master master.zip

  # Expose port 80 to allow outside access
  EXPOSE 80

  # Start NGINX server when the container starts
  CMD ["/usr/sbin/nginx", "-c", "/etc/nginx/nginx.conf"]
Build Docker Image: Create a Dockerfile in the project directory and build the Docker image using the
docker buildcommand.
Run Docker Container: Launch a Docker container from the built image using the
docker runcommand and verify that the 2048 game is running correctly on your local machine.
After successfully running the container simply go the http://localhost:80 you can see the output.
- Test Functionality: Interact with the game to ensure all features are functioning as expected within the Docker container.
Step 2: Deploying Docker Container to AWS Elastic Beanstalk
Got it. If you're using the AWS Management Console (GUI) Here's how you can proceed:
- Prepare Dockerfile for AWS EB: Update the Dockerfile to ensure compatibility with the AWS Elastic Beanstalk environment. Include any necessary configurations or dependencies.
Create Elastic Beanstalk Application: Navigate to the AWS Management Console and locate the Elastic Beanstalk service. Follow the guided process to create a new application environment for deploying Docker containers. Configure the environment settings, including VPC configurations and IAM roles, as per your project requirements.
For additional reference, you can also check the official AWS documentation for deploying single-container Docker applications on Elastic Beanstalk: AWS Elastic Beanstalk Single Container Docker Configuration
Deploy Docker Container: Once the Elastic Beanstalk environment is configured, navigate to the application version section and upload the Dockerfile. Initiate the deployment process through the GUI, and Elastic Beanstalk will handle the rest.
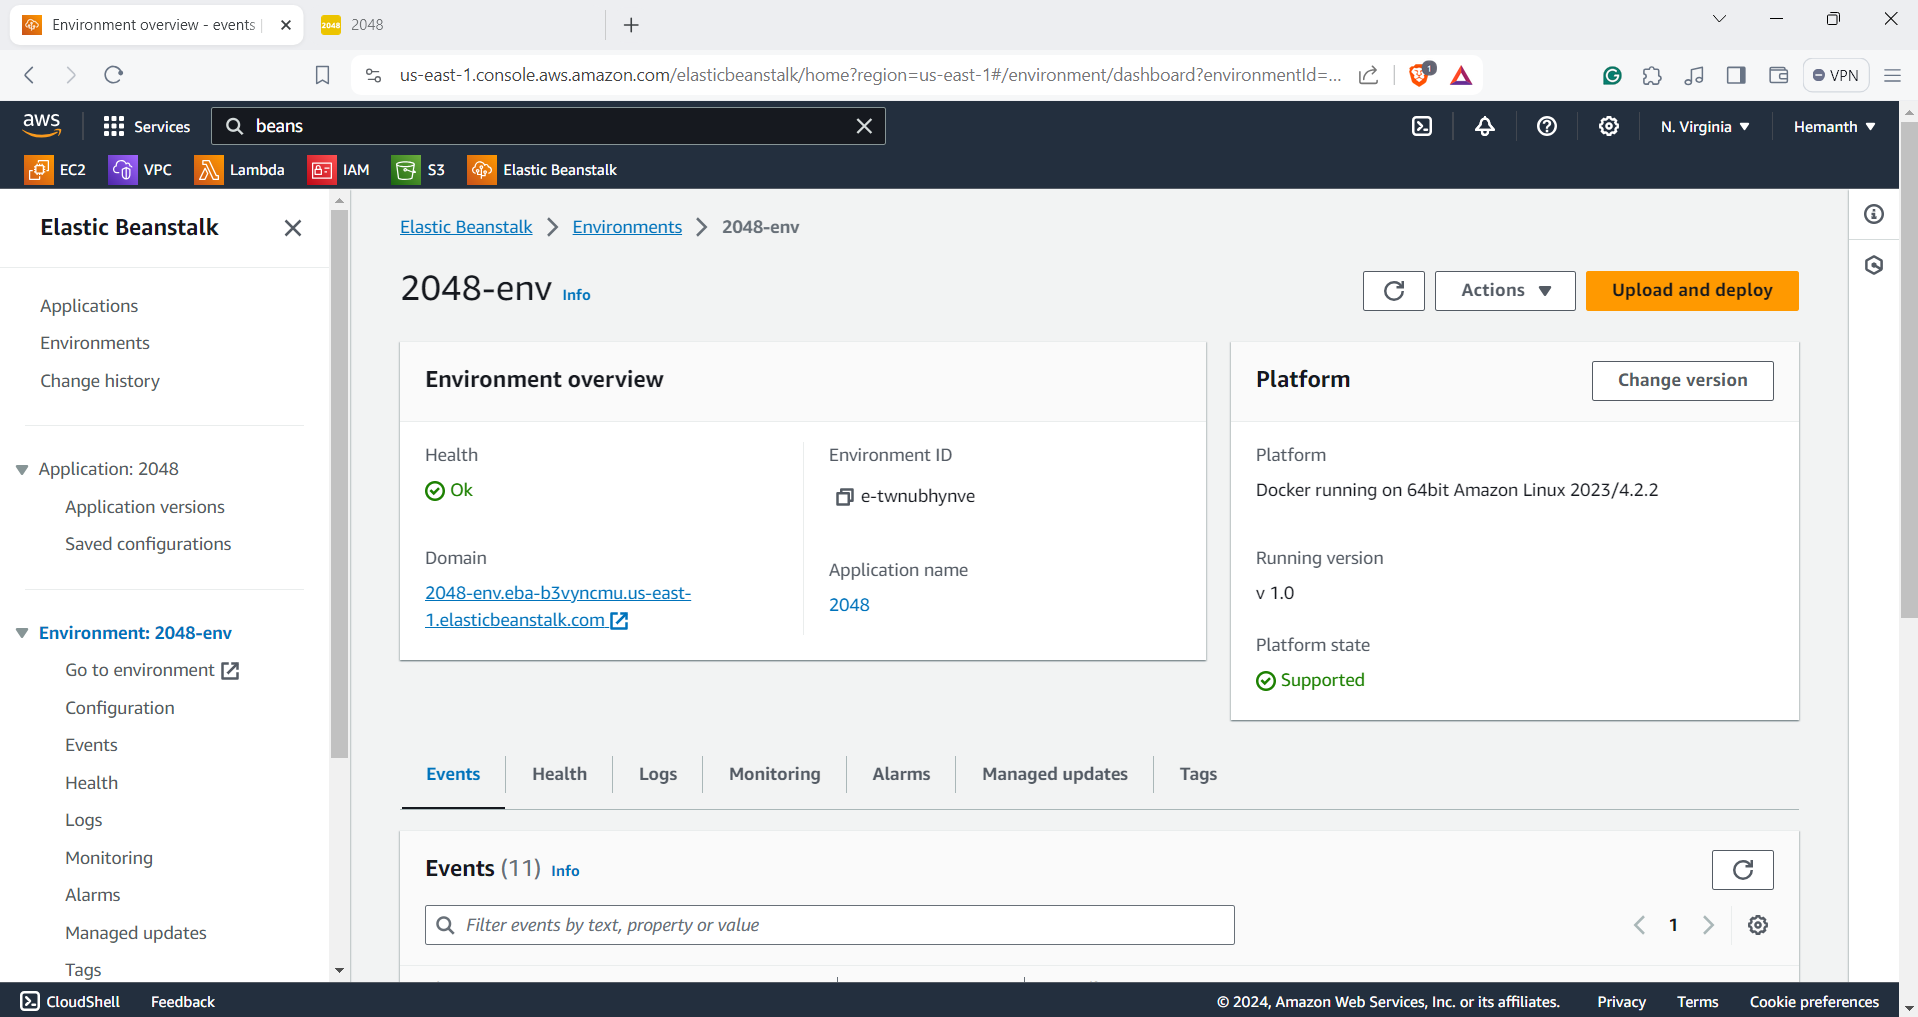
Monitor Deployment: Monitor the deployment process through the Elastic Beanstalk console to ensure successful completion. Verify that the application is running correctly and accessible. Upon successful deployment, obtain the domain configured for your Elastic Beanstalk environment as shown in the below figure.

Please copy the domain link provided and open it in a new tab to access the game.
Here's the deployment link: http://2048-env.eba-b3vyncmu.us-east-1.elasticbeanstalk.com/ (Note: If the link isn't accessible due to AWS cost constraints, we apologize as this is a project demonstration).

By following these steps using the AWS Management Console, you'll be able to deploy the Dockerized 2048 game on AWS Elastic Beanstalk with ease.
In conclusion, the successful deployment of the Containerized 2048 game on AWS Elastic Beanstalk marks a significant milestone in modern application development and deployment practices. By leveraging containerization technology, we've achieved greater flexibility, scalability, and ease of management for our game application.
Subscribe to my newsletter
Read articles from Hemanth Gangula directly inside your inbox. Subscribe to the newsletter, and don't miss out.
Written by

Hemanth Gangula
Hemanth Gangula
🚀 Passionate about cloud and DevOps, I'm a technical writer at Hasnode, dedicated to crafting insightful blogs on cutting-edge topics in cloud computing and DevOps methodologies. Actively seeking opportunities in the DevOps domain, I bring a blend of expertise in AWS, Docker, CI/CD pipelines, and Kubernetes, coupled with a knack for automation and innovation. With a strong foundation in shell scripting and GitHub collaboration, I aspire to contribute effectively to forward-thinking teams, revolutionizing development pipelines with my skills and drive for excellence. #DevOps #AWS #Docker #CI/CD #Kubernetes #CloudComputing #TechnicalWriter